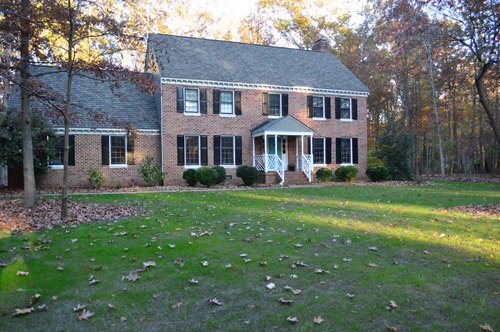
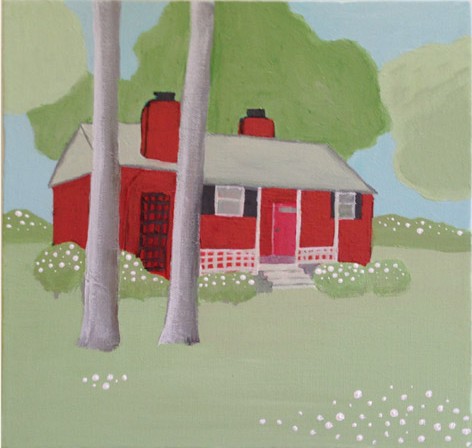
The last few weeks have been deliciously random and so productive for us! I think we should bounce around from room to room all the time like this… at least until we dive into a big renovation that demands all of our attention. So far this week we’ve painted raindrops & a pink door in Clara’s room, had some fun with Shannon’s design dilemma, finally finished our big sunroom floor project, and we’re actually starting to work on something in the kitchen for Monday (ahhh! that room needs more help than I did in Calculus class). And this week’s little crafty project didn’t bomb, which is a huge relief because there were definitely a few
Shannon’s Dilemma: Ideas Anyone?
After weeks of waiting for three dry days in a row to grout, Mother Nature is finally on our side and John’s finishing up the tile in the sunroom as I type this (while singing “grout, grout, let it all out”). He’ll give you the full tiling rundown tomorrow, and in the meantime, I’m more excited than Jessie Spano about this post (and she’s SO EXCITED). As we mentioned on Facebook this weekend, thanks to your suggestions during our Blogiversary, we thought it would be fun to share some ideas for folks out there who are stuck with decorating dilemmas. We also knew you guys would have a ton of suggestions to add to the
Painting A Closet Door Pink & Raindrops On The Wall
Let’s all join hands and sing “Raindrops & Rose Paint.” Yes, that’s a bad Sound of Music pun. Please forgive me, Julie Andrews. But just look at how festive Clara’s room is thanks to the addition of some bright raindrops that we painted on the wall and a watermelon pink closet door. Remember when it used to look like this? Well, it’s definitely looking pretty happy these days. Although the door color is actually more true to life in this Instragram sneak peek that we shared yesterday (iPhone for the win). And the pink drops are easier to see in real life (they seem to hide in these pics for some reason). How did we get
How To Make A Jellyfish Costume With Lights
Happy Friday, guys! As is the annual tradition, we thought we’d share what Clara and Burger are going to be for Halloween this year, especially since I DIYed Clara’s costume for the second year in a row (without crying or cursing!) and I love how it came out. At first when we asked her what she wanted to be for Halloween she said “a lawyer!” True story. And we laughed and pictured her walking down the street with a little briefcase. Then a few days later she said “I want to be a jellyfish!” So asked her a few questions like “what color jellyfish do you want to be?” and that’s when she came out
A Craft With Pumpkins, Paint, & Pantyhose
Oh yeah, this is a weird one guys. I thought it would be fun to get crafty with a bunch of faux pumpkins and gourds that I’ve had for years, along with a few other items that have been tucked away in my craft bin for forever and a day. So all of these quirky little seasonal updates cost me zero dollars (holla!), and it turns out I’m cool with putting legwear on decorative items, so I learned a little bit about myself. Enter three sets of pantyhose, stage left. Or should I technically call them fishnets? Either way, I’ve been thinking about how much fun they’d be to slide around a pumpkin like a
How To Stencil A Floor
We did it! We stenciled our bathroom and closet floor and it looks awesome. So worth the effort. And so much better than the carpet that was there before. Remember when the floor in our closet and vanity area looked like this? And then we ripped up the carpet to reveal the subfloor and they looked like this? Well, five hours and $24 later, it looks like this! Our actual bathroom has tile (where the shower/tub/toilet are), but this is a separate vanity area along with an adjoining closet – which both had old carpet that we couldn’t live with for one more day. So we yanked it up and decided to have some fun with
How To Make A Canopy Bed With Fairy Lights
Update: Holy cow, you guys are full of so many fun ideas today! I’m having trouble keeping up with comments since they’re rolling in so furiously, but please know I’m reading them all and loving all the suggestions! Happy Friday! We’ve been all over the place this week, painting the walls/trim/ceiling in the bathroom & closet, diving into some basket craftiness, de-wallpapering our biggest room yet (the 21′ long kitchen), and now we have a little Clara-room update along with some photoshop percolating as we plot our next move in there. But first, here’s the tiny (and twinkly) addition: Things just got a little brighter in here… Ever since we hung her canopy, we’ve thought
Are “Phase 1” Projects Just A Waste Of Money & Time?
Q: You’re putting time and energy into this “temporary” job for your bathroom (not to mention some money), so why not just go ahead and do the full gut job? I know you guys watch money really well, but isn’t this not the most cost-effective in the long-run? :) – Karen A: This is a great question, and we thought it would be fun to elaborate on the subject. Because it’s safe to say that we love saving a buck, but we also like showing an old house some love and making it feel like home, so here’s our take. First of all, I think a lot of people think like Karen does – in
Using Soap & Water To Remove Wallpaper
Let’s talk about what we’d like to accomplish before this baby comes for a second. In our first house when we were preparing for Clara’s arrival, over those nine months we tackled a few rooms that were still on our redo list (mainly the full bathroom and the nursery) since so much of the house was already done (our kitchen reno was all finished, the hardwood floors had been redone, we had opened up some walls and closed off others, etc). This time around, there’s a baby on the way but this house is much less finished than our first one was, so our goals before baby are more about getting it to a nice
How To Paint Baskets
This marks the third Tuesday in a row that I’m sharing a crafty-ish project (remember I made a little fall wreath two Tuesdays ago, and stenciled a pillow using a metal grate last Tuesday?). So I thought it would be fun to try to do something crafty each week (aiming for every Tuesday, but knowing that some weeks life throws me curve balls like a sick kiddo or a project that doesn’t work out, so it might be a little loosey goosey sometimes) and call it… wait for it… Weekly Crafty. I’ve always liked sharing small crafty ideas (there’s a whole category devoted to them on our Projects page) and I think it’s a nice
My Chat With Jonathan Adler
Anyone who knows me knows that I love Nate Berkus and Jonathan Adler more than anyone else in the design world (although I have sizable girl-crushes on Sarah Richardson and Candice Olsen) so when I got an email asking if I wanted to hop on a phone interview with J-Ad (as I like to call him in my head since we’re besties) well, I momentarily lost my mind. I debated saying no (I’ll definitely get awkward and squeal-y and make him think I’m nuts) but after chatting about it with John, he convinced me that a 15 minute call with Jonathan Adler might end up on my highlights reel of this whole blogging “career” when
How To Make A Sweet Hand Print Birdhouse
I wasn’t planning to post about this little craft that Clara and I whipped up together, but then we got a photo of John’s Granny grinning and holding our creation and I couldn’t help but put together a little post about it over here – just so we’ll always remember it. Here’s what we made: a sweet little birdhouse, complete with Clara’s hand-prints on the roof. It was originally painted dark red all over (from HomeGoods, where it was $4.99) but Granny is just such a sunny lady that we thought it would be a fun activity to paint it some happier colors and mark it up with some Clara-hands before sending it off to
- « Previous Page
- 1
- …
- 21
- 22
- 23
- 24
- 25
- …
- 123
- Next Page »