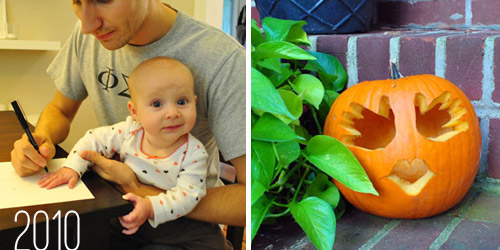
Since Clara’s still a few years off from knife-wielding age, we still scratch our heads each year for a toddler-friendly way for her to be involved in the pumpkin decorating process. When she was 5 months old we borrowed the outline of her hand to inspire a lady-like Jack-o-Lantern (a Jill-o-Lantern perhaps?)
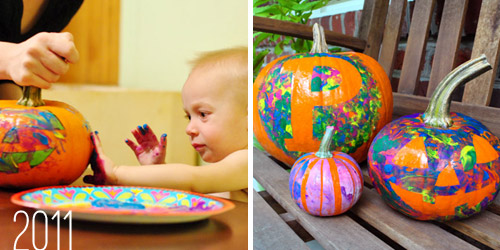
Last year we took advantage of her new-found dexterity and let her finger paint some pumpkins that we had strategically taped off ahead of time to later reveal some designs.
And since she had so much fun last year (and we loved how they turned out) we did a slight twist on that idea by making tissue paper “sticker” pumpkins this year.
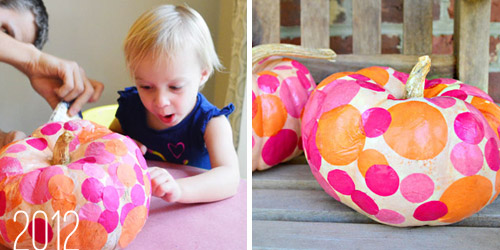
Anyone who follows us on instagram knows that Clara is obsessed with stickers. And although a pumpkin covered in her usual fare of Snoopys and Barneys would have been fun, we thought it might be even more exciting to try our hand at something we could customize. So we decided to make our own “stickers” with the help of some colorful tissue paper and good ol’ Mod Podge that we already had on hand.
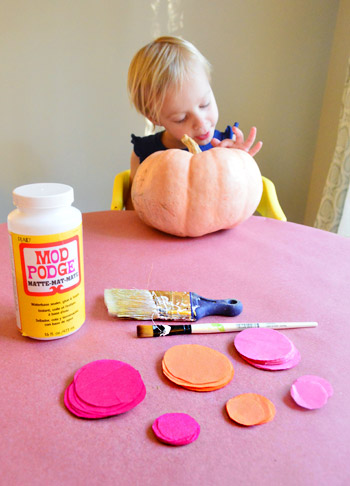
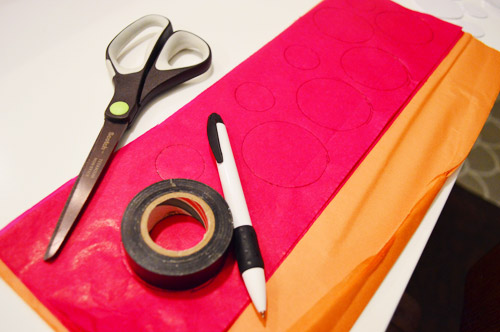
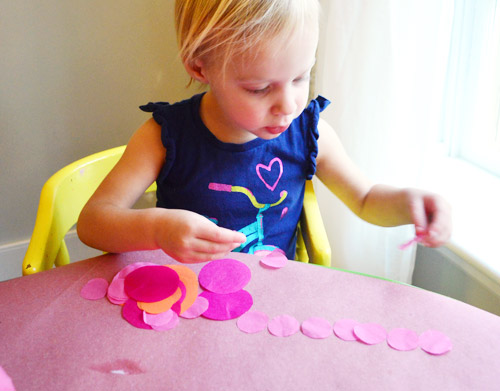
Sherry used some leftover tissue paper from Clara’s pink-and-orange birthday party and cut a bunch of large and small circles using, of all things, a roll of electrical tape as her guide (tracing the outside made the big ones, and tracing the inside made the small ones). Use what you got, right?
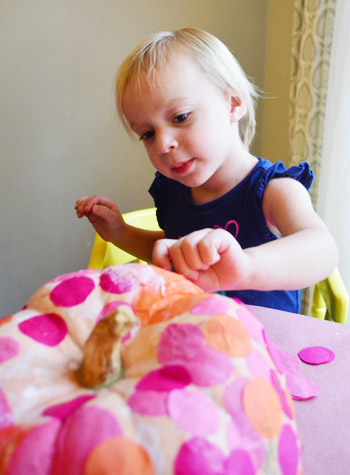
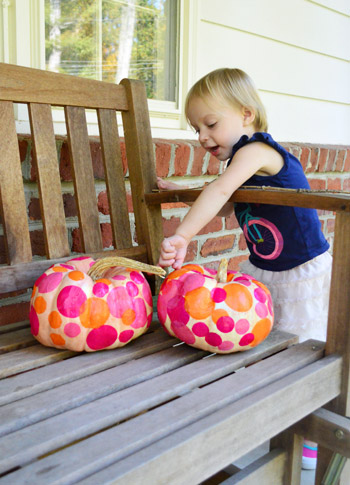
Then I basically just used a big paintbrush to coat the pumpkin with a thin layer of Mod Podge as Clara placed the tissue dots wherever she pleased. It was really that simple.
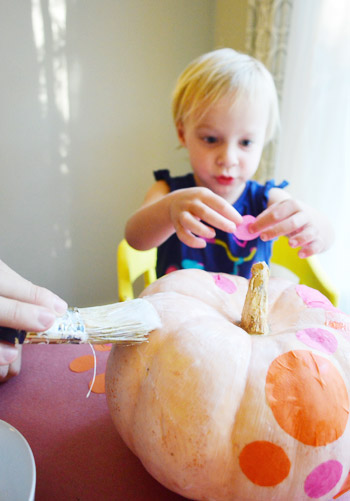
We spotted (pun!) these pumpkins at Kroger, and knew they would be awesome (we thought a lighter colored pumpkin would help all of the colors show up since sheer orange and pink dots on an orange pumpkin might be harder to see). Although they might look like typical white pumpkins, they actually have a hint of orangey-pink to them, so it’s a fun twist. Plus a portion of proceeds went to breast cancer research, so that was pretty great too.
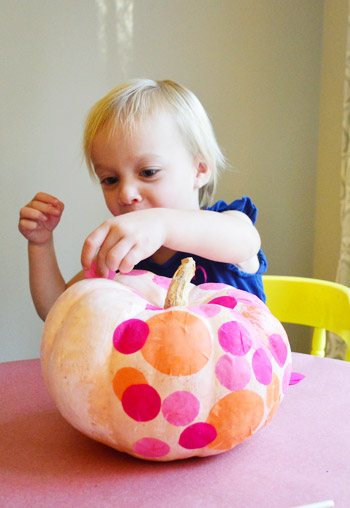
You can see that the tissue did crinkle a bit as it went down. Bumpy pumpkin surface + toddler fingers = nothing perfectly smooth. But we didn’t mind, we were just happy she was having fun. I did occasionally dab some extra Mod Podge over top to help them stay down, which seemed to help.
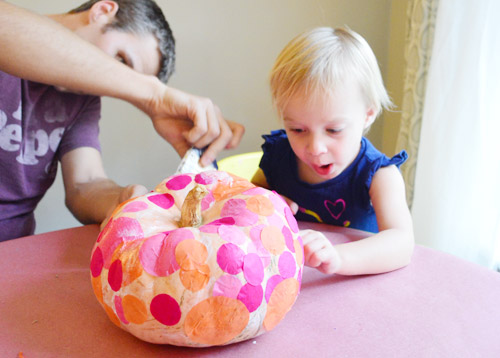
The best part was that Clara was IN LOVE with the project. I realize she doesn’t look particularly gleeful in these photos, but it’s because she was so focused on it. She asked several times that night if we could do it again. Plus, we appreciated that it wasn’t nearly as messy as we had anticipated (note the table covered in craft paper). I probably ended up with more Mod Podge on me than she did (I did accidentally stick my forearm in it once) but since it’s basically Elmer’s Glue, it washed off easily with plain water.
We did two pumpkins in total, but the fun didn’t stop there. There were so many extra tissue dots that Clara kept on playing (sorting them, lining them up, singing to them, putting them on her head…).
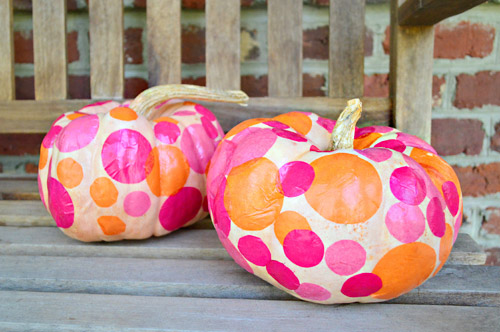
After she went to bed that night Sherry did a full coat of Mod Podge over the pumpkins just to ensure that all of the edges got adhered. The bonus was that it also gave the whole thing a nice smooth and glossy feel.
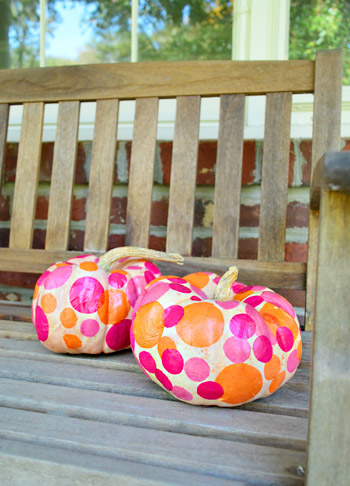
We think they’re really fun- especially since we just used what we had around the house and came up with something sticker-ish for our sticker-obsessed girl. So if you have any toddlers who are into stickers, this could be a fun weekend project (and tissue paper is only around 99 cents, so it’s pretty cheap too).
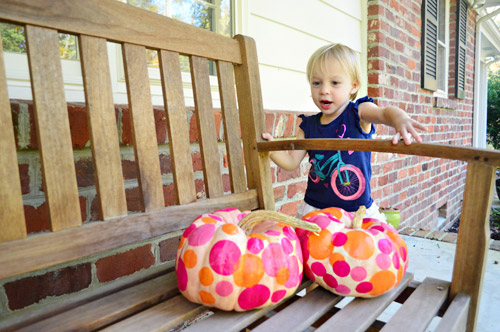
I attempted to get a cute picture of Clara sitting next to her pumpkin creations, but there was little interest in being still. And yes, she’s wearing the same shirt from the day before. We had dressed her in it as the “it’s ok to get messy” shirt for the project, but since it survived so well it became the next day’s outfit when paired with the skirt of her choosing.
The most interaction I could get out of Clara was her singing “Rock-A-Bye, Baby” to them while swinging the glider-bench back and forth.
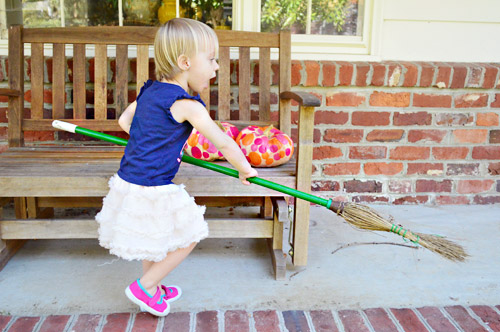
Then she discovered a broom nearby and it was like the pumpkins never existed. When a girl’s gotta sweep, a girl’s gotta sweep!
And if you’re looking for some easy pumpkin paper crafts, our friends at Childhood Magic have a free pumpkin printable that you could use in a variety of ways and give kids of all skill levels an easy way to help you decorate for fall.
Psst – Sherry wants me to mention that for the first time ever she’s attempting to DIY certain aspects of Clara & Burger’s costumes this year, so we’ll keep you posted and share some pics as soon as they’re done (most likely right on Halloween if I know my wife…).

Sam M. | Atkinson Drive says
These are SO cute! What a great idea for toddlers – maybe I’ll steal this idea to use with my little man… :-)
Savannah says
Looks like you got a cheese pumpkin( or is that just a Long Island thing??)I baked a pumpkin pie from scratch for the first time a couple weeks ago, and at the farmers market they told me to use cheese pumpkins for baked goods.
Love the colorful dots! It turned out really cute!
Julie says
I love this idea! Only wish my children were smaller, so not into stickers anymore :(
On another note, you are always pulling up past photos on your blog. Just wondering how do you organize all the photos and videos you take? I can’t seem to get control of mine!
YoungHouseLove says
We just use the search feature on our site to find old ones and link/add them (ex: I looked for “Pumpkin project” to see what came up). So blogging is actually a great way to keep a diary that’s easy to reference with photos and all that! Haha.
xo
s
Molly says
I don’t have a kid but I love all things spotted and just might do this myself (but once I whip out the modge podge no surface is safe…i’ve ended up with wooden chairs covered in magazine ads and photos before…)
Karen says
I DIYed part of my 6 month olds costume and used my sewing machine for the first time! I’m excited to send you a photo since it’s an idea I saw on Pinterest!
YoungHouseLove says
Sounds awesome! Can’t wait to see the pic!
xo
s
Jane says
Clara is so cute! What a great idea for decorating pumpkins!
PS- I just pre-ordered your book! I can’t wait to receive it :)
YoungHouseLove says
Aw thanks Jane!
xo
s
Melissa says
What a fun project! I did a fun ModgePodge project with my girls and STILL have dried ModgePodge stuck to my wood table and soapstone countertops. Do you have any idea how to get it off?? Please help!!
YoungHouseLove says
Hmm, it’s water-based (it’s basically exactly the same formula as Elmer’s glue) so I’d just try scrubbing it with water and sponge. Maybe some dish detergent? Hope it helps!
xo
s
RCMom says
3 Great ideas! I posted them to my blog fb page! Thanks!
Emily says
LOVE the pink and orange pumpkins! I write a blog about things that are pink and orange called Pink+Orange and would like to link to your adorable project next week. So cute and clever!
YoungHouseLove says
SO cute! What a fun site.
xo
s
Michelle says
Great pumpkin idea for a girl that loves stickers like my daughter . I had extra tissue paper that I circle punched with the ez punch . I’ll be trying the project tomorrow great idea !!!
Naomi says
Aw! All of these ideas are cool and unique :)
Naomi {Starry Eyes + Coffee Cups}
AnnMarie says
I’m thinking no power in a few days = No YHL posts? We are all totally screwed :-P Stay safe Petersiks!
YoungHouseLove says
Aw thanks! You too! We’re scared about losing power since we have tour stops in NY, CT, and NJ at the end of this week (so we only have a few days to get a ton of stuff done for posts while we’re gone). Eeks! Here’s hoping it’s not so bad so we can still get posts up and write the ones for the end of the week to share while we’re traveling. And that NY, CT, and NJ are ok too!
xo,
s
Erin says
We just finger painted our own pumpkin! It was so fun. Thanks for the idea!
YoungHouseLove says
So glad!
xo
s
Homa says
Thought I’d share how this project went with my four year old granddaughter. She was much more interested in wielding the paint brush with the mod podge than putting on the circles. So we traded jobs.
YoungHouseLove says
That’s so cute! I love it!
xo
s
Georgia says
Aww i love this project its awesome!
The video was so cute :)
x
Linda says
Sherry and John, I’m pretty sure I can speak for most of your readers in saying we just hope you and your extended families are safe throughout the storm – the only updates that would be great to get are just to know you’re ok. All else can wait.
YoungHouseLove says
Thanks so much Linda! We hope everyone else stays safe too!
xo
s
Becky says
Hey Phi Sigma Pi alum! I am a Beta Iota alum and on the Foundation Board… AND a long time reader who just realized you are a Brother. So cool!
YoungHouseLove says
No way! Alpha Omicron here. :)
-John
Charlotte says
What a fantastically unique idea! Can’t wait to start fun traditions with our little one.
Charlotte
LARY @ Inspiration Nook says
Too funny when she says “Home depot” ;) #DIYbabygirl
Alisa says
Ack! I die! That is just too cute of a project. I was wanting to do the whole pumpkin patch/pumpkin decorating thing with our baby girl this year, but we just never got around to it and won’t be able to before Wednesday. I DID however, remember at 6:30 this morning that we had yet to put together a costume for her! After I got the plan ok’d by the hubs (we couldn’t decide what we wanted her to be even though we had starting planning months ago!), I went digging through scraps of fabric and trims left over from a couple wedding dresses I’ve made in the past year and put together a tooth fairy costume for her. Only took about 30 minutes and was freeeeee so I’m pleased. I figure next year when she can walk we can do some more elaborate costuming…but since we will be holding her the whole time, I didn’t want to deal with anything too wacky! Stay safe during this storm!
YoungHouseLove says
You too Alisa!
xo
s
Carol in Bama says
Hope you guys stay safe with the coming storm. Thinking and praying for all the folks on the east coast in the path.
YoungHouseLove says
Thanks Carol! So far so good.
-John
Erin says
Cute pumpkins! Hope the frankenstorm doesn’t ruin your Halloween! Stay safe and warm!
Stephanie says
Love your pumpkins! I did a no-carve pumpkin this year too. I spray painted gold and then sharpied “Boo!” in black sharpie. Also all things I had around the house- it’s so nice when that happens!
Looking forward to seeing you guys in Austin!
Diana says
I hope Sandy is not going to hit you or your dear ones. Stay safe, “see” you as soon as possible!!
YoungHouseLove says
Thanks Diana! We’re getting lots of rain and winds now, but they say the worst part is yet to come (Mon evening/Tuesday). Hope everyone else is staying safe!
xo
s
Erica says
I love how bright and colorful the end result is! Such a fun way to customize decorations, especially if you’re using non-traditional holiday colors. I could totally picture mini-versions of these for place settings or as a part of a centerpiece.
joanne moy mcintyre says
love the modge podge pumpkins!!
off topic, but this reminded me of your love for bees…
http://www.designsponge.com/2012/10/animal-love-bee.html
YoungHouseLove says
LOVE IT ALL!
xo,
s
Carmel says
Clara vídeos are the best! I love the Home Depot mention! Too funny!
Whitney Dupuis says
Super cute! I love this idea! We are going to decorate a pumpkin for my son on Halloween and I love the idea of doing something other than carving it. We may have to set up ideas like this!
By the way, Clara is such a little doll. She seems so much older than her age. What a great vocabulary and coversationalist! (Yep, I may have made that up)
Alison says
I love it!!! And I love that Clara has a Granny and Grammy. My mom is Grammy and my mother in law is Granny. Hopefully our little 9 month old boy can keep them separate.
Melissa says
She’s incredibly cute! I know it’s hard to tell from pictures but she looks a lot like both of you. Fantastic ideas, too.
Judith says
I love it! It’s really great that Clara can have her own Halloween pumpkin even if she’s too young for carving.
We don’t have kids yet, but I will keep your great ideas in mind for later. ;)
Here’s the link to the pumpkins my boyfriend I carved last week: http://kleinesgelbeshaus.blogspot.de/2012/10/halloweenkurbis-mal-anders.html
Aubri says
Thanks for the reminder about Clara’s hand-eye pumpkin! We were struggling to figure out what to do for our Bugaboo’s first pumpkin… 7 month old’s pumpkins are harrrrrd. It turned out great though, we just had her put her hand right on the pumpkin to trace it. She *loved* the cool, smooth, pumpkin texture and giggled up a storm. It was really fun!
Koliti says
What delightful fun Clara pumpkin projects! This year’s pumpkin is fun & festive.
Love in the video how Clara is the polka-dot-sticker-on-er and John is the polka-dot-patter-down-er!
And how they’re both just killing time til they can go to Home Depot again!
Sonja says
I used to LOVE Mod Podge when I was younger! Great idea to use it on pumpkins for decorating… we always used to just decorate rocks :)
Hannah @OneDogLife says
“And then we’re going to drive to … to … to Home Depot.”
I love how she just says it so matter-of-fact, like, where else would we go? I think I watched it three times :)
Frances Jerman says
Love your blog! I’m constantly finding inspiration from your designs. My husband and I braved the knife wielding with our pumpkins this year though, and all of our friends and family loved our flirty pumpkin with our little toddler’s hands –such a great idea! (http://fransprairielife.blogspot.com/2012/10/peek-boo.html)
Next year, when our tot is a little bit more hands on we’ll definitely try your super cute sticker pumpkin idea! LOVE
YoungHouseLove says
LOVE it!
xo,
s
Christy Niebaum says
I used some leftover purple Behr paint from a project to paint a pumpkin for my daughter, Natalie. I used painter’s tape to tape off an “N” and then painted purple all over the pumpkin. Unfortunately, when I went to take off the paint to reveal the “N”, some of the paint started peeling up. It still looked ok, but not 100% how I had hoped. I’m guessing maybe I should have used acrylic paint instead of regular wall paint.
Sad panda.
YoungHouseLove says
Aw man it still sounds sweet!
xo,
s
Kara J says
Thanks for the inspiration! I used the Mod Podge/tissue paper idea on “my son’s” pumpkin this year!!
Rachel Elizabeth says
First off, I just have to say I love your blog! I love DIY projects and have recently got even more into them because my boyfriend and I needed some inexpensive ways to class up furniture for our apartment, and you do so much great DIY stuff, you’ve really been an inspiration to me because I really didn’t think I could DIY as much as I do, and you are a house thats all amazing DIY.
I am a nanny for a beautiful one year old girl, and at the beginning of October I was trying to find fun Halloween projects to do with her. Your painted pumpkin blog was one of the first to pop up, and I decided thats what we would do. I bought two craft pumpkins, one small and one large, and on the smaller one taped out a face and on the larger taped out three ghosts and “Happy Halloween” in a speech bubble. Saoirse and I had a great time finger painting her pumpkins, and they came out beautifully. I sprayed them with some sealer just so her beautiful art didn’t come off between this Halloween and next Halloween, and now that I see this, I will have to keep it in mind for next year.
Thanks for having such a great blog, and keep up the awesome work! I really think your family is amazing, and I’m incredibly glad I found your blog :)
YoungHouseLove says
Aw thanks Rachel, you’re so sweet!
xo
s
Cari says
So maybe I’ve missed this question, but what do you do with your pumpkins after the fall? I usually bake mine into something but I didn’t know if you had any other ideas/suggestions.
YoungHouseLove says
We toss them in the wild part of our backyard and see if they grow next year! One year we actually got a perfectly round and beautiful pumpkin that grew all by itself!
xo
s