Again? Already?!? If you had told me 10 months ago that I’d be doing deck construction again less than a year later, I would’ve punched you in the face.

Okay, not literally. I’m not the punching type. But I would’ve thrown you a look that said “I would be punching you in the face right now if I were the punching type.”
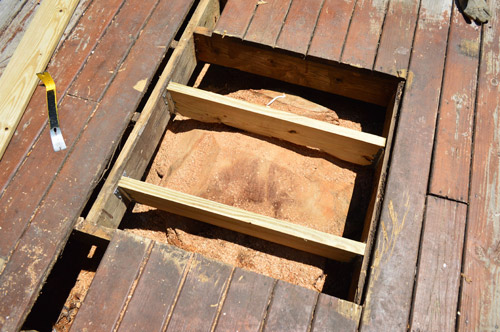
It’s not that I didn’t enjoy the process of building a deck in the heat of summer… I just wasn’t really looking forward to doing it again so soon. But at least it wasn’t an entire deck this time. It was more of a patch job. Remember this puppy?
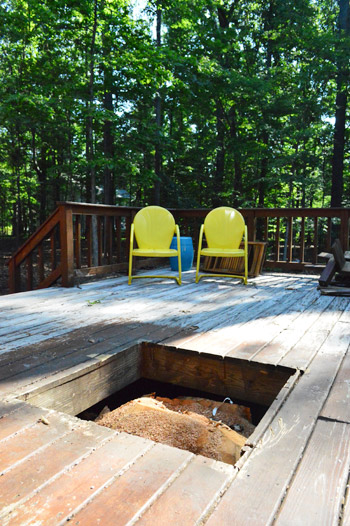
That’s the hole leftover from the big tree that we had to remove. The tree guys were nice enough to disassemble the bench that surrounded it (okay, technically they had to demolish it to remove the tree). Only downside is that it left us with this pretty pile of bench scrap.
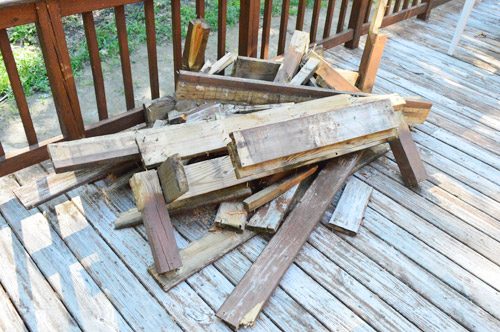
Rather than rebuild the bench, we decided it would make the deck more functional to just cover the hole so we could place a table on a centered spot out there (if the hole stayed it would squish the outdoor dining area over in a not-as-centered-and-more-cramped way. My biggest worry was trying to find deck boards that were the same width as the existing who-knows-how-old decking. I even attempted to salvage some full boards from the scrap pile, but I came up three short.
So I headed off to Lowe’s to get my supplies and (with an old scrap piece of board in hand) quickly discovered they were a standard width that I could buy right off the shelf. Score! So into my car I packed:
- Seven 8 foot long deck boards – $42
- One 8 foot long 2 x 8″ board that was cut in half (those pieces would act as my joists) – $9
- Four metal hangers to hold the joists in place – $4.50
- TOTAL: $55.50
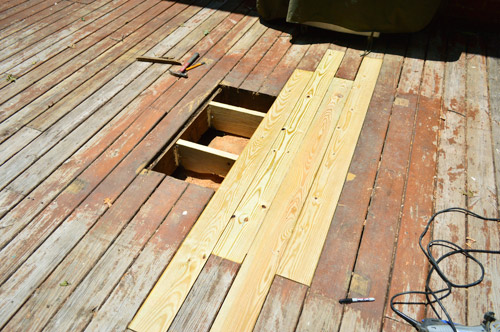
First up, I cut my 2 x 8s to the width of the hole and secured them with the hangers, using some decking nails that we had leftover from last summer.
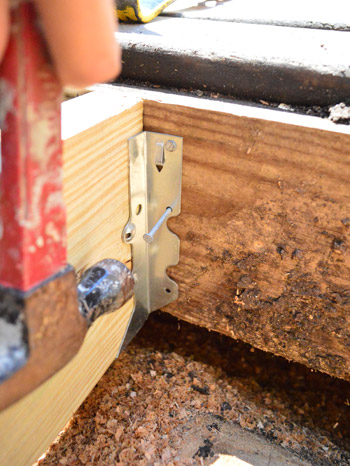
I probably only needed to do one joist (the space was just a little over three feet wide) but the tree guys had cut the stump down at a weird angle so I couldn’t put a joist right across the middle – so this ended up being my weird spacing. As long as it keeps the deck boards from falling, it’s cool by me.
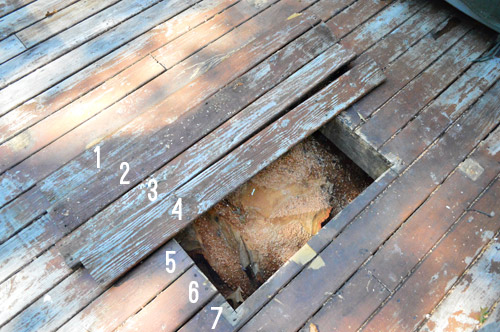
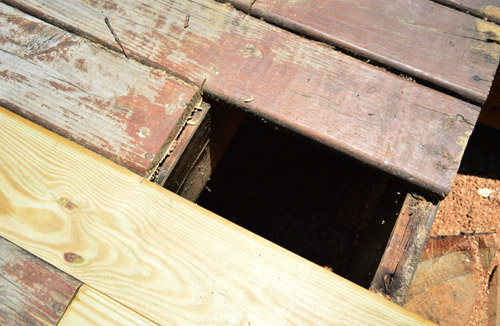
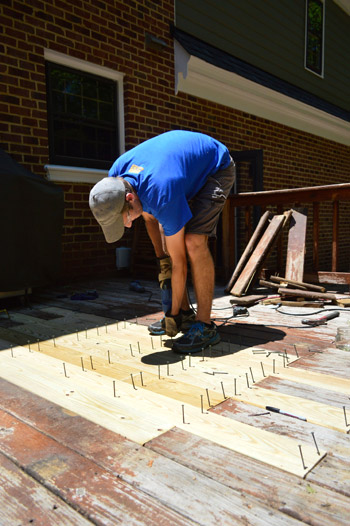
For stability and appearance reasons, I knew I wanted my new boards to extend beyond the hole. That way my patch-job would looked a smidge more natural and the new boards could rest on an existing joist at either end for even more stability. So that decision involved cutting back some of the other planks to lay in my fresh new boards and camouflage the hole.
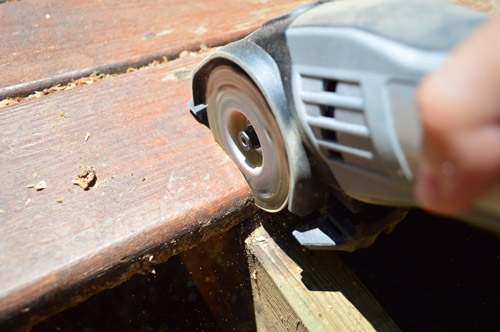
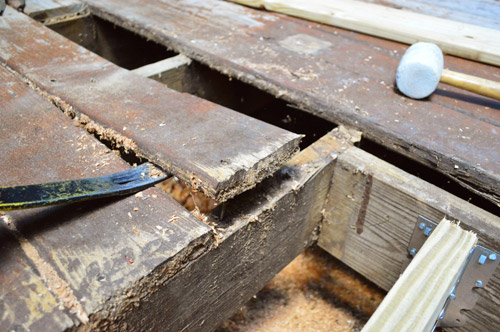
To do this, I broke out my Dremel Sawmax and cut a deep slice. It wasn’t deep enough to go all the way through, but it was enough to make the board snap right where I wanted it (hence the slightly rough edge you see above).
This process saved me from having to pry up the entire length of each board. Instead, I just had to pry the sections that I wanted to remove.
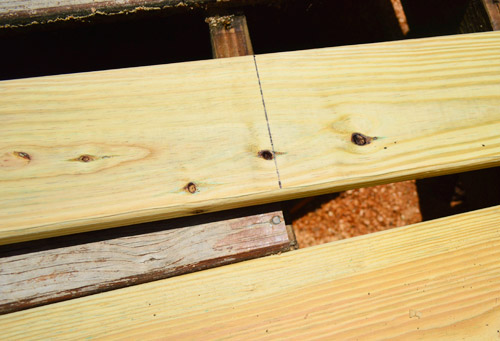
When it came time to fit the new board, I just laid it across the space and marked it with a pen. No measuring tape needed.
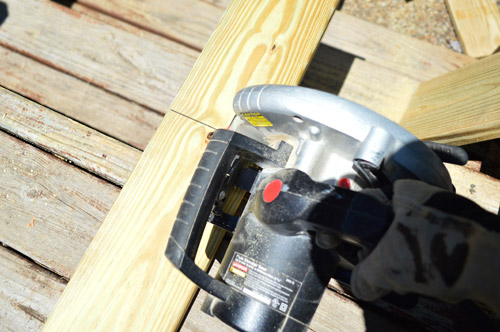
Then using the stairs as a makeshift sawhorse, I cut each board down with my circular saw.
Then it was just a matter of putting my puzzle pieces together as I went.
Well, that and screwing them down. I was thankful that I had kept all of my leftover screws from last summer (maybe the universe knew I’d be doing deck-work sooner than I thought?). It saved me a few bucks and most of all it saved me from doing one of those annoying extra trips to the store because I forgot to grab something.
So here she be. Certainly not the prettiest home improvement “after” but the mismatched boards are at least an improvement over a gaping hole. Oh, and don’t mind that weird long board on the bottom left. One of the old boards cracked while I was prying it up so I had to patch a little more than originally planned.
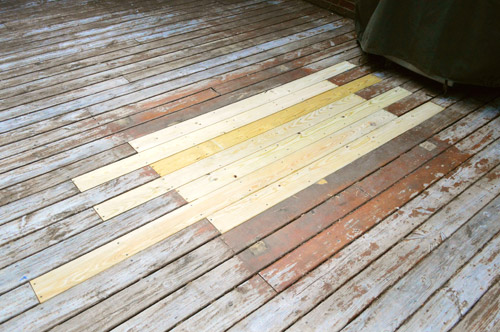
We’re hoping that once the whole deck gets a good cleaning / stripping / restaining the new boards will blend right in with the old ones. Or maybe I should say that hopefully the old boards will look newer and they’ll all fit right in.

But for now, we’re just enjoying being able to have people over without worrying that someone’s about to fall through the deck. Check out Sherry’s chair bravely sitting right where the old hole used to be (she took this photo, which is why she’s missing).
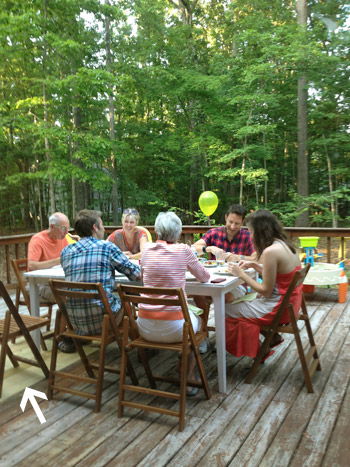
So next on the deck to-do list is to give the whole thing a deep cleaning/stripping and then stain & seal it to hopefully bring back some like-new glory. And eventually we’d love to open up the back of the deck by adding extra wide stairs that lead down to the backyard. Sort of like this. Maybe from the thick post that’s in front of Sherry’s left elbow to the thick post that’s in front of the pot of herbs in the photo below? But that’ll probably be a “Phase Two” thing for us down the line.
We also later added two gates to the deck to keep the dog from running away!

Is anyone else tackling a project they didn’t foresee in their future? Something that was a pleasant (or maybe not so pleasant) surprise? As much as I didn’t enjoy having a deck to-do on my list again, I definitely appreciated the fact that this one only took me one afternoon to complete.

Erin says
I think it’s great that you now have this out of the way and can enjoy your deck this summer without worrying about an accident. (Even if it is a little mismatched!)
Suzy B says
So excited for you guys to tackle the deck project. We have a large deck that needs restaining. Tried a Behr product last yr and just did not do the trick. We have West sun that hits our deck in afternoon so we need help.
There are so many blogs and info on deck staining products. Just want to find the right product for lasting results.
Sunshine and Paint Pots says
“If you had told me 10 months ago that I’d be doing deck construction again less than a year later, I would’ve punched you in the face”.
That had me in absolute stitches !!
Keep up the good work John :o)
Michelle says
When I saw Clara with her bucket on her head, I couldn’t resist: http://www.youtube.com/watch?v=mUdoaJLiSX4
YoungHouseLove says
Hahahahha!
xo
s
Jess Hogue says
SUMMER 2012: Blue hat, gray shirt
SUMMER 2013: Gray hat, blue shirt
If there were a “Team Deck Build”, I know what color its uniforms would be!!! ;-)
YoungHouseLove says
Haha, he likes to keep a tight palette…
xo
s
Rishia O'Neill says
John, noticing much about the tree stumps. One under deck…kill it now as although no light, it will live on a while and roots too. Sooo to KILL ROOTS must kill whole thing, pronto, before that list gets tooooo long. Honest, been through this too many times. If ever one cuts tree down, even if grind the stump…roots need to be killed too as they have a life of their own 4 quite a while. Don’t know about epsom salts.. they are a mineral actually good for garden..magnesium sulfate is all epsom salts are. Sorry to be a bearer of bad news….KILL ALL OF THE TREE…EVERY IOTA…CAN U IMAGINE HOW FAR THOSE ROOTS EXTEND? Truly scary regarding foundation and such. Remember, I am your eldest groupie, so no be mad or sad(:
YoungHouseLove says
Thanks Rishia! You’re the best. I could never be mad at you. (winks, in a non smarmy way)
-John
Kristin D says
For what it’s worth, figured I’d just throw our deck story in here. We bought the house with an original (15-yr old?) deck that had seen better days. We thought a good powerwash and staining would fix it, but turns out the powerwashing made it worse with splintering.
We bit the bullet and took up the surface boards on the railing and the deck flooring and replaced those, but left the railing. We then waited a good 9 months for the wood to dry out before staining (due to laziness), but it was a good thing because the pressure-treated wood shrank considerably, leaving gaps between the boards. When we were ready to stain & seal, we used Sikkens semi-transparent (more like opaque unfortunately) stain. I ended up using a small 2″ brush to get in between the boards.
All said and done, I’m glad we took this approach with leaving the railing and pulling up the boards. No worrying about splinters and mismatched decking. Here’s our project from start to finish: http://www.flickr.com/photos/andrewskristin/sets/72157632097151367/
YoungHouseLove says
Woah, that sounds like a ton of work, but it looks awesome Kristin! Love all the photos!
xo
s
Shar says
This is awesome. I was wondering how to fix boards on a deck because I have couple of boards that are sticking up and squeaking on my deck. Thanks. Lol at the punch you in the face comment. I laughed so hard because I wasnt expecting it.
Barbara says
Okay, I have an idea.
We need John to start training men how to be men. Man Class. You know, the dad that can build stuff, be romantic to his wife and doesn’t pay top dollar for anything? Because there are only a few out there.
I think John’s Man Class should be a required course in elementary, junior and high schools, a required semester in college and possible a program for grad students.
I have made it to 52 without finding such man, and doing it myself (and if I can do most of it…). So, I have to ask – 1. John, will you teach Man Classes and 2.; (because I’m so much older than you guys) Do you have a single uncle or something??
YoungHouseLove says
Haha, I think the secret is that John has three sisters. So between them and his mom he grew up in a house with 4 girls, which definitely helped to make him… tolerant… of girls and how they tick. Haha! So my advice is to find a guy with a bunch of sisters and see where it goes. As for single uncles, John’s are all taken, but I bet there’s a man out there hiding. Maybe in the lumber aisle at Home Depot? Haha!
xo
s
kristi says
We have to treat our deck and we are looking into the deck Restore paint that they sell at Lowes/HD. Have you looked into that at all? It’s actually a sand type paint that coats the deck and helps make the boards stronger and it lasts longer than stain. We used it on our concrete front porch and it’s held up so nice. Can’t wait to try the deck… not that I’m looking forward to the process…
YoungHouseLove says
Oh yes, we keep hearing about that stuff, so it’s definitely in the running! So glad to hear you have loved how it worked on your porch.
xo
s
danielle says
sanding down some uneven/cracked spots in a wall turned into removing an old wasp’s nest, finding a completely rotted support beam, and having to reinforce the framing of the house before re-insulating the wall and putting up new drywall…
YoungHouseLove says
Oh man, if you give a mouse a cookie…
xo
s
Liz Brueseke says
We are getting ready to put our house on the market, and noticed our two huge elm trees were looking scraggly so we thought about trimming them. Then my bug inclined hubby looked closer and found emerald ash borers, on our ASH trees, not elm trees. Sigh…. now we have to have them removed which leaves the front of our house hot, and unprotected, plus it’s an expense we didn’t think we’d have in this whole process.
YoungHouseLove says
Oh man, so sorry about that Liz!
xo
s
Katie @ Dateswithdrywall says
We’re spontaneously doing a guest bedroom makeover this week! Nothing like out of town guests coming to visit to get you in gear, right?? Seems like everyone is tackling unexpected projects right now…
Jennifer says
“I would’ve punched you in the face” = I almost spit my drink across the room. Ha Ha. Loved it!!!
Shannon [Our Home Notebook] says
So glad you are enjoying the deck! So much better without the hole. I can’t wait to see it all freshened up. At our old rental we spruced up our worn deck with some dark solid stain after pressure washing it and it did wonders.
Erin Sanderson says
Just found out that a definitely not-so-pleasant project awaits me at home :( We’re on vacation and got a call from our sweet neighbor that the ceiling in our hallway has collapsed! Apparently the water line leading to our evaporative cooler had a leak… YUK! I guess we get to experience sheet-rocking in all it’s glory over the 4th of July weekend :)
PS LOVE the bucket headed little girl!
YoungHouseLove says
OH NO! So sorry Erin! Hope it’s all ok asap.
xo
s
Jeanne says
A few years ago we had to take down our deck due to rotting boards and railings. This left us with a 3 foot high cement slab (the deck was built by the previous owners on the foundation of what used to be a sunroom) and because we have 3 small children, we couldn’t let them out the back door for fear of them falling off the slab! It took a very long time to get plans drawn and permits issued but our new deck was built last year. It’s now more than 2x the size it had been (now its about 40 feet long and about 12 feet deep). It is my absolute pride and joy! I wish you the same happiness on your deck and with all of the wonderful projects you are working on!
YoungHouseLove says
Aw thanks Jeanne! That sounds like quite the adventure!
xo
s
Jen F says
Looks great! Hey, by the way, you aren’t kidding about tetanus – I’m sure you get your shots and here is my public service announcement to remind everyone else to as well. My 85 year old neighbor lady told me that she knew 3 people who died of it when she was young! It really did happen back then!
YoungHouseLove says
Oh my gosh!
xo
s
Rishia O'Neill says
Oh John you make me blush! I’ll take swarmy, Sherry can’t be jealous. Sherry is the get even kinda gal (:, probably make a real interesting true to life plaster paris/concrete? sculpture of any serious sniffers of her JohnMan!
Back to the curse of big trees and their undying remains.
After I posted I took a good gander at the stumps left in my yard. As big as yours. One 100+ yr oak, the other a nasty piece of work called by folks here a ‘castor bean tree’, but it’s not. It MUST be Genus relative of KUDZU. The tree roots will remain as they are..just won’t grow…eventually rot (1,000 years), AFTER I KILL THE STUMP. Those huge things I can see partially. AT LEAST 3′ IN DIAMETER.
Oak no problem for me, far away from house, was more a threat to neighbor and although it killed me to do it, down it went.
It now looks like a lovely, odd green thing. Stuff growing out of it, or all over it. Arthritic hands stopped my investigation of that one. But I bet from what I could tell routing around the mess, they are shoots from stump. Tree cut down 5 years ago
Now what I have seen, and see in my front berm, the one holding my 100+ yr house from falling into street, is a tree stump alive and well. Happy as a clam. Bursting forth with new shoots out of the stump. So blase’ about it too. IT WAS CUT DOWN THIS SPRING.
As soon as this weather (rain) quits I am going to buy what it takes to kill that b___h!
You might be able to treat (KILL KILL KILL) it by BORING PLUG HOLES. Nice to try a new piece of rental equipment…you could bore into the sides, then use both of your great imaginations and FUNNEL/pour the probable/inevitable poison to humans and animals stuff into the plugs.
IF A POISON IS NECESSARY, USE MASKS AND GLOVES.I am a great grand mother, whatcha expect? me not mention the obvious you already know? Be real…just wait till the bean is 30!
I am very green…would never propose this poison route to you, but that thing could ruin the deck you hope to hold onto for awhile, before you want to deal with it bigtime again. I try not to think about the foundation to house.
Remember… when they say ahhhh no problem, just leave it!
BEWARE …investigate with Lowes or others re: what to use IF IT WAS THEIR HOUSE! ta ta (:
YoungHouseLove says
Thanks again Rashia! I promise I’m not going to let that stump mess with my deck (more deck building is NOT an option, ha!).
-John
Jade says
I think it’s so great the amount of DIY projects you guys get done – and with a young child too!! Seriously, good job! I’m STILL trying to get the rest of my painting done around my 2 year old…. Oh and I can’t wait to see what the deck looks like once complete – already it look fab x
YoungHouseLove says
Thanks Jade!
xo
s
JudyR says
The “punch in the face” remark just cracked me up. In my 61 years, it seems like there are several chores that we keep doing over and over, especially as landlords! Every time, I think, “I’m never going to do this again, as God is my witness!” One is that we always end up stripping wallpaper somewhere! Since we are dog-nuts, it seems like we’re always building a fence somewhere. Like deck building, these are tedious jobs that just seem to reappear everywhere, lol! But like deck building, they are great investments for your home. I admire your tenacity!
YoungHouseLove says
I admire yours Judy! You sound like a busy lady!
xo
s
Tracy says
Nice job feathering in those boards. We had to do that to our interior wood floors because there was a lot of water and pet damage. Once we sanded and stained it, you couldn’t even tell where the boards were replaced.
YoungHouseLove says
So good to hear!
xo
s
Corinne says
We’re currently dealing with a few collapsed drain tiles around our house so that’s…fun. (not!) We spent the last two days digging 6 feet down and now that we found the tile, we’re hoping that it’s something we can spot fix (replace the broken tile) and then check again to see if we can go all the way through the pipe. Otherwise, it’s looking like it will be something we’ll need to call in the big guns (machinery) for. I can manage digging a few ridiculously deep holes, but all the way around the house? No…don’t think so!
YoungHouseLove says
Oh man, good luck with everything Corinne!
xo
s
Sassafras says
Deck Demo? Sort of…earlier in the week we had the dump truck, box blade, back hoe, etc. guys in to finally clear out the slash pile of trees, roots & rocks that was made I guess four years ago when they built our house. It was a tick, snake, fox, cat, skunk, weed, etc. hole. My new to me back yard looks fantastico now! Done so that we can now move on to tearing out the back deck (wobbles and creaks) and pour concrete patio back there instead and we’ll have to get concrete stairs down made also. All this done so that we can then move on and pour the slab for a new garage to be built at the side, and then to the front to get a sidewalk and concrete steps done out front. Got to get the back yard work done first while they can still get back there. What the heck…it’s only money, right??? …she moans and white knuckles her handbag.
Your repair looks great John and I’m sure your back is thanking you that it was only a patch-up deal this time instead of a full on build!
YoungHouseLove says
Wahoo! Go Sassafras, go! Good luck with everything. Sounds like fun to me!
xo
s
Tara says
I love the bucket on Clara’s head. Toddlers will ALWAYS put a bucket on their head!
Tracie says
Wouldn’t that stump attract termites? I guess not if the deck is clear since that’d probably be their first stop.. but I’d still be crawling under that deck to check the stump for termite damage at least once a year so I could catch them before they moved on to the house.
-Tracie, who bought a house w/ termite damage and shall be paranoid forevermore
YoungHouseLove says
Oh man, so sorry about your termite woes Tracie! We get an annual termite inspection and he goes in the crawl space and under the deck, so we’ll keep an eye out as well as our termite guy, but we think there’s a lot of other wood around so who knows where the termites could go. Thankfully this house had no signs of them at inspection and when we moved in (we got another check just to be sure). Here’s hoping it stays that way…
xo
s
Emily says
I love the wide step idea!!! I think it is a great look for the steps.
Emily
eageremily.blogspot.com
Holly says
It looks AWESOME.
You might want to treat the stump. It’s a magnate for termites, ants and other creepy crawlies.
YoungHouseLove says
Thanks for the tip Holly!
xo
s
Cassidy says
Your awesome deck makes me jealous! We live in a townhouse with a TINY back yard.
The last 2 photos on this blog post have always been my dream for someday…when I saw your deck pictures it reminded me of it. It looks similar to your deck and yard, especially if you decide to add a wide staircase down to the yard:
http://kellymoorebag.com/blog/?p=9562
Isn’t it an awesome outdoor space?
YoungHouseLove says
So beautiful!
xo
s
KNatGU says
On other outside news, I was curious did you guys leave Clara’s rock box at the old house?
YoungHouseLove says
Yes, that was dug into the ground, so it was “installed” so it stayed with the house.
xo
s
jolene says
Oh man, are we ever doing something we hadn’t planned on! We too just moved into a new-to-us house. We found out the day we moved in that the basement carpet was non-restorable due to cat pee. Ewwwww! So, 700 sq ft of carpet to rip up and replace, including stairs. And we had to rip out the built-ins. Big bummer.
Katie Kimsey says
Yeah, one year in to our first house and we have mold growing through the sheet rock in the basement. So it looks like I’ll be learning how to drywall sooner rather than later after we’ve fixed this mess. We’ll probably also do a french drain around the house. But DIY sounds way better than the $12,000 quote we were given by local mold remediation people. :)
YoungHouseLove says
Oh no! Good luck Katie!
xo
s
Susan @ Sweet Little Nest says
Womp womp. I’ve been in the hospital for a week with meningitis(!) so I’m behind on my blog reading, but I wanted to make a comment about the stairs. When we built our patio last year, we’d envisioned our wide staircase up to the tiered backyard in the middle of the patio. My cousin, who is landscape architect, redirected us. Since we originally had a double window looking onto the space that was to become a double door, she told us that was where the staircase should go – in line with the egress. Gives you the best views of your yard from inside and outside the house. I think you are planning something similar with a new egress from the kitchen or eat in space so I urge you to line your stairs up with that. Even if they won’t be done at the same time. We’re so glad moved our stairs. Best. Decision. Ever.
YoungHouseLove says
Love that tip! And I hope you’re feeling better Susan!
xo
s
Jenny says
I haven’t read the other 250 comments so I don’t know if someone else already mentioned it, but when you get around to staining the deck, I had great success with Flood. I used it on our deck at our first house and the color was nice and rich. While it was technically a solid stain, it went on more like paint and it held up really well over time. The front porch on our new house really needs a coat of something, but I think it will have to wait until next spring when I’m no longer pregnant to be tackled. I have no hesitation going back to my local Benjamin Moore store and buying Flood again it was so great!
YoungHouseLove says
Thanks for the tip!
xo,
s
kate C. says
I know this is old, but I’ve been reading your blog for almost three years. Slowly, I’ve been absorbing the info and learning. Today I removed a rotten board from our deck, and bought the new board, screws, wood filler, etc. All because of the confidence I gained from reading your blog. Now, just have to learn to use a table saw to trim a bit off the width and I’ll be ready to fill this gap! Just wanted to say thank you!http://instagram.com/p/q4xrRLOQzB/
YoungHouseLove says
Totally made our day. Congrats!
xo
s
kate C. says
And it’s done! yay! :) now to re-stain the whole deck… the projects don’t ever end, do they? :)
YoungHouseLove says
Haha, never!
xo
s