Again? Already?!? If you had told me 10 months ago that I’d be doing deck construction again less than a year later, I would’ve punched you in the face.

Okay, not literally. I’m not the punching type. But I would’ve thrown you a look that said “I would be punching you in the face right now if I were the punching type.”
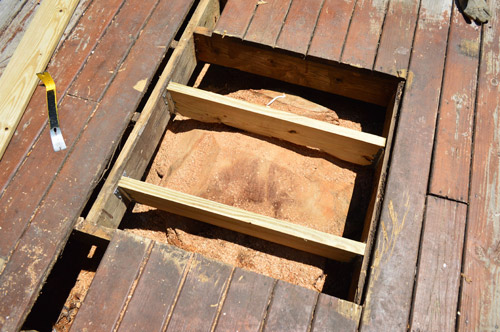
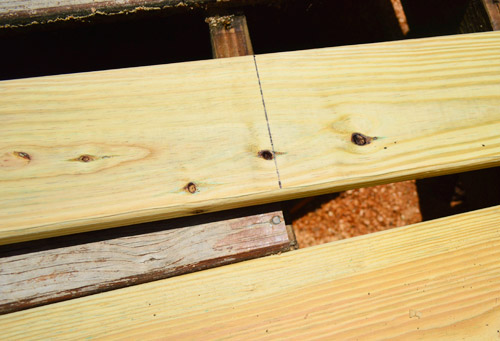
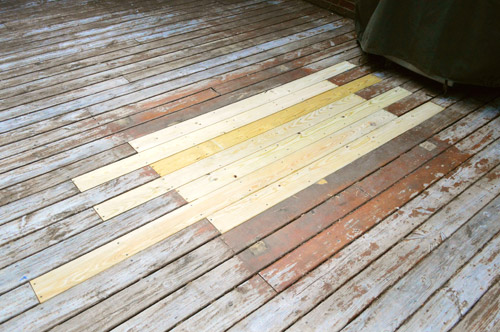
It’s not that I didn’t enjoy the process of building a deck in the heat of summer… I just wasn’t really looking forward to doing it again so soon. But at least it wasn’t an entire deck this time. It was more of a patch job. Remember this puppy?
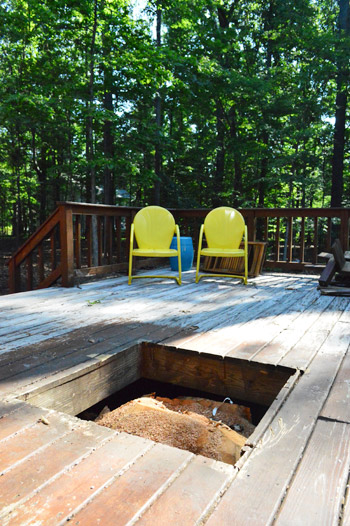
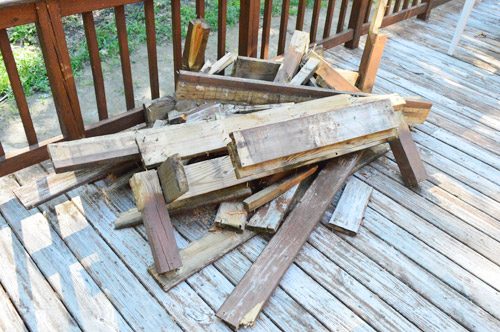
That’s the hole leftover from the big tree that we had to remove. The tree guys were nice enough to disassemble the bench that surrounded it (okay, technically they had to demolish it to remove the tree). Only downside is that it left us with this pretty pile of bench scrap.
Rather than rebuild the bench, we decided it would make the deck more functional to just cover the hole so we could place a table on a centered spot out there (if the hole stayed it would squish the outdoor dining area over in a not-as-centered-and-more-cramped way. My biggest worry was trying to find deck boards that were the same width as the existing who-knows-how-old decking. I even attempted to salvage some full boards from the scrap pile, but I came up three short.
So I headed off to Lowe’s to get my supplies and (with an old scrap piece of board in hand) quickly discovered they were a standard width that I could buy right off the shelf. Score! So into my car I packed:
- Seven 8 foot long deck boards – $42
- One 8 foot long 2 x 8″ board that was cut in half (those pieces would act as my joists) – $9
- Four metal hangers to hold the joists in place – $4.50
- TOTAL: $55.50
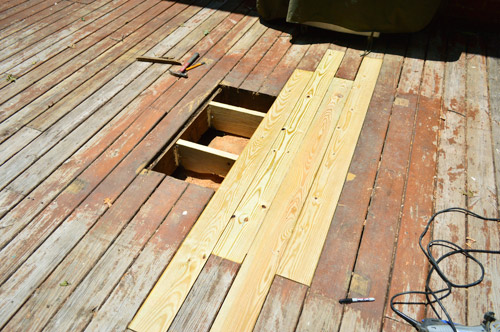
First up, I cut my 2 x 8s to the width of the hole and secured them with the hangers, using some decking nails that we had leftover from last summer.
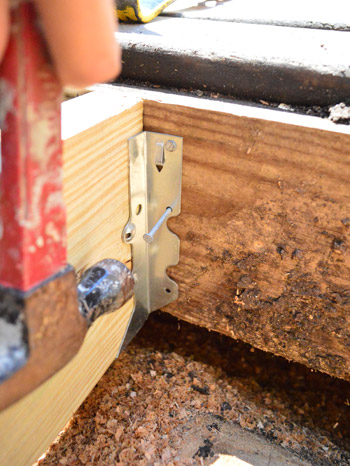
I probably only needed to do one joist (the space was just a little over three feet wide) but the tree guys had cut the stump down at a weird angle so I couldn’t put a joist right across the middle – so this ended up being my weird spacing. As long as it keeps the deck boards from falling, it’s cool by me.
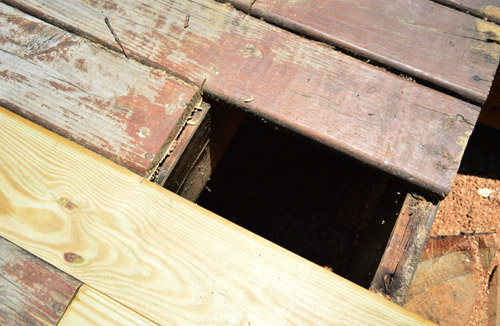
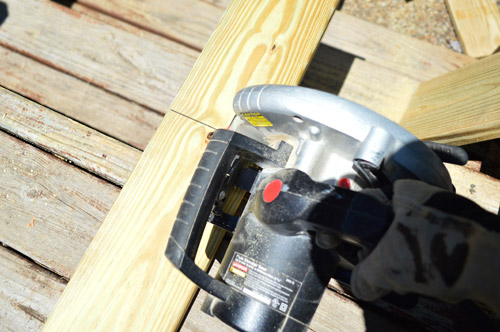
For stability and appearance reasons, I knew I wanted my new boards to extend beyond the hole. That way my patch-job would looked a smidge more natural and the new boards could rest on an existing joist at either end for even more stability. So that decision involved cutting back some of the other planks to lay in my fresh new boards and camouflage the hole.
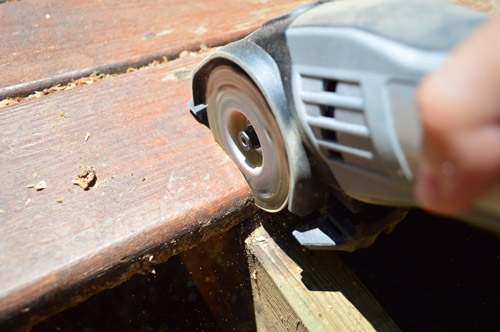
To do this, I broke out my Dremel Sawmax and cut a deep slice. It wasn’t deep enough to go all the way through, but it was enough to make the board snap right where I wanted it (hence the slightly rough edge you see above).
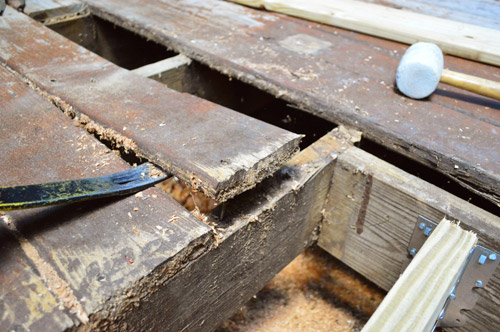
This process saved me from having to pry up the entire length of each board. Instead, I just had to pry the sections that I wanted to remove.
When it came time to fit the new board, I just laid it across the space and marked it with a pen. No measuring tape needed.
Then using the stairs as a makeshift sawhorse, I cut each board down with my circular saw.
Then it was just a matter of putting my puzzle pieces together as I went.
Well, that and screwing them down. I was thankful that I had kept all of my leftover screws from last summer (maybe the universe knew I’d be doing deck-work sooner than I thought?). It saved me a few bucks and most of all it saved me from doing one of those annoying extra trips to the store because I forgot to grab something.
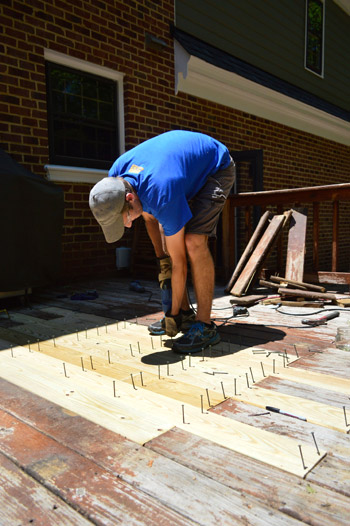
So here she be. Certainly not the prettiest home improvement “after” but the mismatched boards are at least an improvement over a gaping hole. Oh, and don’t mind that weird long board on the bottom left. One of the old boards cracked while I was prying it up so I had to patch a little more than originally planned.
We’re hoping that once the whole deck gets a good cleaning / stripping / restaining the new boards will blend right in with the old ones. Or maybe I should say that hopefully the old boards will look newer and they’ll all fit right in.

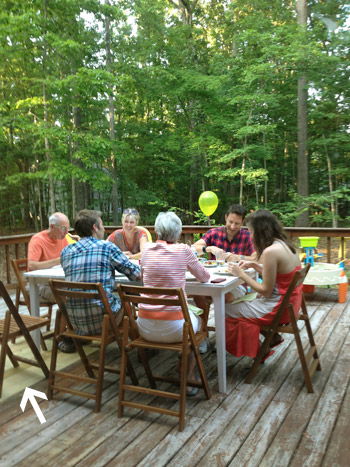
But for now, we’re just enjoying being able to have people over without worrying that someone’s about to fall through the deck. Check out Sherry’s chair bravely sitting right where the old hole used to be (she took this photo, which is why she’s missing).
So next on the deck to-do list is to give the whole thing a deep cleaning/stripping and then stain & seal it to hopefully bring back some like-new glory. And eventually we’d love to open up the back of the deck by adding extra wide stairs that lead down to the backyard. Sort of like this. Maybe from the thick post that’s in front of Sherry’s left elbow to the thick post that’s in front of the pot of herbs in the photo below? But that’ll probably be a “Phase Two” thing for us down the line.
We also later added two gates to the deck to keep the dog from running away!

Is anyone else tackling a project they didn’t foresee in their future? Something that was a pleasant (or maybe not so pleasant) surprise? As much as I didn’t enjoy having a deck to-do on my list again, I definitely appreciated the fact that this one only took me one afternoon to complete.

Bethany says
I read your blog every day, but don’t comment. Great job writing, photographing, publishing… great job. Thanks for the inspiration and the giggles.
YoungHouseLove says
Thanks Bethany!
-John
Taylor says
I love Clara’s hat…hahaha. The mismatched wood looks better than a hole. You could always use an outdoor rug to hide them until you’re ready to refinish. Nice work.
dlichten says
The wide steps totally changed how my porch is used, from being a barrier to the garden to being part of the garden. And they immediately became extra seating. Bonus!
Betsy says
Two years ago with yet another deck cleaning looming, I discovered a company that used a regular hardwood floor belt sander on the deck floor and hand sanded pickets, rails, etc. After the sanding they stained/sealed it. Their sign in our yard prompted neighbors to stop by to see our “new” deck. It took a lot of talking to convince them, “Nope, same deck, just a face lift.” It really did look amazing and still does with a simple cleaning and additional sealer.(Caution: sanding treated lumber is hazardous because of the chemicals from the “treating” process. Wearing a mask is a must!)
Happy new home — thanks for inviting us along on your journey!
Kitty says
Awesome repair job, John! I live in NOVA and would love to husband swap for a while. Any chance Sherry needs an unhandy mathematician? No? (Sorry if that was too weird, ha ha!)
YoungHouseLove says
Haha! My dad’s a mathematician, so I do have a soft spot for them…
xo
s
Jennifer I. says
We need to sand, strip and stain our deck (the boards have that pretty reddish/mildew look like yours), so I’m anxiously awaiting you post to see how to do it!!
Paula says
I have been reading as much as I can about the Behr product but my biggest concern is, how does it perform 5 years out? Since it looks like it has only been on the market for a year or less, we have to depend upon Behr’s word on its durability. And when it does start to fail or lose its staying power, is it worse than what we start with? Also what is ‘prepped properly’? I am sure there are instructions but also could be as many ways for the manufacturer to decide one DIDN’T ‘prep properly’ if it fails prematurely. *Sigh*. I have an interest because I have a deck that has seen far better days, that I prepped and restained about 8 years ago, that really started losing its freshness within a year. I am so tempted to try the Behr product but wish I knew more!!!
YoungHouseLove says
We worried about how it would perform down the line but in talking with the paint guy he said since it’s the same base as solid deck stain (which has been around for a nice long time) the difference is that it just goes on 4 times thicker. So it’s not oil based while something else is water based or full of a new chemical or something – it just is more protective since it can be applied more thickly. It can even be painted over with solid stain down the line because their formulas are compatible (we worried we’d have to scrape it all down or do something terrible in a decade if it started to peel or something, but he assured us that cleaning it and removing any flakes and then just going over it with DeckOver again or even a solid stain would work). That made us feel better that it’s not some new-wave formula that isn’t compatible with anything in the future. As for properly prep, there’s a flier full of info on display at our HD so maybe they have one at yours too?
xo,
s
Kayla says
I love that John has the same color palette going on in the first side by side photos. Blue hat and grey shirt vs. grey hat and blue shirt. Check.
YoungHouseLove says
Haha, it’s true. He’s a man of a few colors.
xo
s
Jeff says
You did an awesome job John. I loved your “punch in the face” angst because I’ve felt this exact way many o times!! Gotta get one of those small saws, that little dude rocks the house (or in this case deck).
Can’t wait to see what type of stain you choose. I’ve heard great things about Penofin but haven’t tried it.
Katherine says
Just wondering why you didn’t use the 4 old boards you had and just buy 3 new instead of all 7?
YoungHouseLove says
They were a bit more degraded than we’d like since they were under the tree (so they caught a lot of moisture/piles of leaves sat on them) and we thought it would be better to just do all new ones.
xo
s
Lena says
If you plan on adding another bean to the family you might want to wait with adding stairs. We have wide stairs on our deck and just had to add a makeshift railing so our toddler won’t tumble down the four steps in the one second we’re looking the other way.
YoungHouseLove says
Good tip!
xo
s
Meghan says
All I could think was, well at least you didn’t have to get a permit for this deck. I bet you are happy about that. Deck looks great!
YoungHouseLove says
Haha, so true!
xo
s
Andy says
No decking plans, but I did just build a picket fence. Do you have an impact drill/driver? Let me tell you, it is a game changer for driving decking screws!
YoungHouseLove says
I don’t, but now you’re making me want one!
-John
Carina says
My husband has just finished decking out our little courtyard (we live in the city in the UK so outdoor space rare) but it looks amazing & so much bigger now! We had crazy wild overgrown weeds & dodgy paving slabs before – which hadn’t been touched since the 70s! He even made some benches out of the left over planks. Now it’s all ready to host my birthday BBQ in a couple of weeks :-) …unlike the weather over here though!
erin says
yeah, patching up our bedroom wall was completely unforseen! husband wanted to have a tv mount (I did not, and i still don’t). he ended up accidentally clipping a wire, so in comes the electrician. who leaves a big honking hole. We ended up having someone mount our tv. so now we gotta paint that wall. UGH.and having the tv up there, feels like a big black hole. I was totally fine with it on a dresser!
YoungHouseLove says
Oh no! And to think yesterday I was feeling very confident about hiding some wiring for a mounted TV…
-John
erin says
Based on my research, it looks relatively simple but we also have our cable plug on the side wall adjoining, so there’s no way we can have it rerouted, we had 3 different people come in for quotes. Unless we wanted to basically destroy the whole 2 walls. (NOT what i want). but i think if it’s an up/down thing, You should be good.
Ann says
We recently revamped our deck and are loving how it turned out (so far). Check it out!
http://talesoncanterburylane.blogspot.com/2013/05/facelift.html
YoungHouseLove says
That looks awesome!
xo
s
Heather says
That looks so good! I have a question not related to decks though, have you ever tried to use a shower curtain as curtains?
YoungHouseLove says
I haven’t tried that yet but I hear it’s awesome as long as they’re fabric (so they drape like a curtain). I would search shower curtain on pinterest and see what comes up!
xo
s
Heather says
Thanks!
Tania says
Omigosh working outside in the summer heat definitely makes me want to give someone the “I would punch you in the face if I could” look too- especially here in Texas!! We just finished building a swinging outdoor bed – worth it since its my favorite spot in the house but it was sooooooo darn hot! Literal blood, sweat & tears! http://www.runtoradiance.com/2013/06/27/welcome-to-the-secret-garden/
YoungHouseLove says
Looks awesome out there!
xo
s
Ian Anderson says
I think you’re ready for a nail/screw pouch John! Then you can keep the drill driver in action and use the left hand to ‘feed’ the drill. I always seem to fall over them when I tried pre-inserting them!
Good job on the patch, expertly done I must say.
YoungHouseLove says
Sounds pretty sweet, Ian. Thanks!
-John
Manda Wolf says
Patch job looks really good. Glad to know I’m not the only one that sets all my screws with a hammer then go down the line!
Sammy says
Wow, if I had covered that hole, I couldn’t have been as brave as Sherry as to sit right on top of it. I’d me checking my chair every 4 seconds hahaha
Good job, John!
Ian says
Incidentally, I learned something about decking screws this week whilst doing 20sqm in my own garden, and that was to leave the screws flush with the surface.
I had always buried them a little, but apparently the thinking is that burying a screw allows water to sit on the top of the screw in the little ‘well’ that’s created when you overdrive them in. This eventually (admittedly it takes a LONG time) rusts the screw and rots the vulnerable torn timber surrounding the screw.
Best practice is to leave the screws flush and don’t forget to pilot drill the screws at the ends of the boards to prevent splits.
I study this stuff as I am in a ‘keeper’ and don’t want to have to do all this work again in 25 years when I’ll be too old lol!
YoungHouseLove says
Such a great tip Ian!
xo
s
Alex says
Seriously! I never would have thought about that but it makes so much sense!
Eilene says
My deck looks to be in simalar condition. Except that the previous owner used railroad ties for the beams (holding the roof up?). They are now painted white and the majority of holes (hornet homes) are filled in.
I decided that I’m going to wait to see what you guys do before I tackle it!
Terresa says
Looking great!!! Can’t wait to see what it looks like after a stripping/staining. Although I don’t envy you with a big task like that looming. But I read another comment by a reader about the deck paint stuff and I just think that weird textured/gritty appearance is so unattractive compared to just pretty stained wood. Can’t wait to see your finished deck though
YoungHouseLove says
We have seen them in person (demo at HD) and Rustoleum is gritty but the Behr DeckOff looks just like solid stain to us (but fills cracks/splinters a bit better) – so we’re attracted to the smooth finish of that option. Will keep you posted!
xo
s
Laura & the Shell says
Looks very nice, John! You’re a deck pro now, that’s why you could do this project in a single afternoon. This house is so great – I can see why you guys are so enamored. The view off the back porch is so peaceful and lovely! Can’t wait to see the porch all cleaned and re-stained/sealed/etc.
Celia says
I love the idea of the extra wide steps…
thinking of doing that to replace the narrow stairway to our deck — to open it up, provide space for plants and even some seating.
Krissy says
Our unpleasant new project: extend the roof on our porch. We finally stained everything this weekend and it looks beautiful – so it was a perfect time for Nathan’s grandfather (who we rent from) to decide we need to rip off a chunk of the roof and extend it. Oof.
Megan @ Rappsody in Rooms says
I love the info that comes from comments! I have been thinking about getting that Rustoleum paint for decks that make it almost like that rubber-ish boards that you can get if you’re willing to pay. So it’s great to hear some of the reviews in the comments. Can’t wait to hear what you do!
Jenny says
HAHAHAHA! BEST opening line EVER :D!!
Meghan says
The back door of our new door was hung ALL KINDS OF WRONG by the previous owners. So wrong that there is a good inch gap on the bottom and a half inch gap on the right side, allowing cold air (we live next to San Francisco, so you know, FOG) and local wildlife to come and go pretty freely. Our new door is just about done being made, so looks like we’ll be hanging a door and the doorframe this weekend.
Hannah says
I hardly ever comment, but with the picture of Clara and the bucket on her head, I knew I had to show you this – it’s a birthday card that my parents gave me a few years ago, and in the midst of stressing over grad school, they still tell me to ‘Relax. Wear a bucket on your head.’ :)
http://www.sunrisegreetings.com/products/albums/cards/popUp.php?sku=0279WDC5002&skuCount=474
Thanks for always sharing the tutorials and the little bits of life!
YoungHouseLove says
SO CUTE!
xo
s
Theresa says
I am surprised that you did not chose to grind the stump; are you worried there will be some regrowth?
YoungHouseLove says
Here’s a thread with more info on that for ya (in short: it gets no light so it shouldn’t regrow, we can access it from below the deck to spray it with something or treat if we have any issues, and our friend did the same thing four years ago with her deck and it hasn’t grown back or caused any problems). There are a lot of stumps in the woods behind our house of trees that have been cut down over the years and even though those get light they don’t appear to regrow, they just slowly degrade over time.
xo
s
Kay says
Clara is so avant garde. I bet a bucket on the head will be the new in thing..lol.
YoungHouseLove says
Haha!
xo
s
Kathy says
It really is an improvement! And that’s hard to imagine with such a lovely tree there before. Nice.
I painted a wood deck around the pool with a SW deck paint with some of the non-slip stuff they advise. It did an awesome job! The stuff you mention sounds similar. Maybe I’m just old-school haha.
PS in your prep to sell at the old house did you stain the deck?
YoungHouseLove says
Oh yes, here’s that post for ya. It turned out great! https://www.younghouselove.com/2013/05/finishing-the-deck/
xo
s
Kim says
Funny how things come back around to “haunt” you! I told my husband about your deck project last summer as a source of inspiration for when we move (fingers crossed that it’ll happen this summer… fyi, your blog makes our house hunting process inspirational), but I think I just overwhelmed him with that one. Haha! Can’t wait to see the deck progress as you clean & stain it.
Krista says
10 months after we moved into our house (this is our first), the brick front porch steps crumbled to pieces – the day before Halloween! I spent the whole evening dashing out to meet trick-or-treaters waving my arms like a crazy woman to stop little kids from trying to come onto the porch. Classy.
We’ve had a sawhorse with a caution sign in our front walk for 8 months now while we figure out how to fix it. Got any tips for relaying brick steps?
YoungHouseLove says
Oh no! That sucks! Anyone have tips for brick steps? We haven’t tackled that yet.
xo
s
Cassie @ LittleRedWindow says
Which is higher priority for you guys, the french doors onto the deck from the kitchen? Or the wide stairs from the deck down to the yard? I’m assuming the doors but maybe not since you’ll probably hire that out? I’m just curious :)
YoungHouseLove says
The doors for sure! I dream of them every day. But since we feel like we’re bleeding money right now, I think we’ll focus on smaller upgrades than either of those two things first (painting blue trim, removing wallpaper, painting a few rooms, hanging art and curtains, etc). You know, just so we can build up our savings again and think about more long-term choices a bit more (the placement of the doors and the stairs both might shift depending on our future plans for the kitchen/deck).
xo
s
Rishia O'Neill says
Well John you DID IT AGAIN…meaning you did a fab job. Perfecto. I knew you would find the boards at local Lowes. I mean, as in holding my breath as I kept reading of the potential problems you faced. But you two? Breaks comes and go and you were due one after the tree nightmare. Been THERE.
So congrats, pics and dialogue as usual very informative and accurate… younglove trademark…that and sarcastic wit. Not sure, as your Elderly Groupie, which I enjoy the most…because you so artfully tie them together.
God Bless All of You
YoungHouseLove says
Thanks Rishia!
-John
Gwen says
i hear ya! it’s moments like these that make being a grown up not all that fabulous, right? the unexpected projects are often the ones we don’t want to spend the time or money on! thanks for sharing your steps though!
ashley @ sunnysideshlee.com says
hahaha! I love that first sentence!
Kate says
Dear Clara,
I really like your hat! I am a lifeguard and think that should be the new lifeguard uniform at our pool.
Your friend,
Lifeguard Kate
YoungHouseLove says
Haha! I’m reading her your comment when she wakes up from her nap!
xo
s
Natalie says
Not to be super picky but you weren’t ripping the boards John, you were crosscutting. A rip cut involves cutting with the grain (like if you were ripping them down to make narrower boards on your table saw) and a crosscut is when you cut across the grain which are the cuts you would frequently make with a chop saw.
Source: former Carpenter’s Apprentice
YoungHouseLove says
Oh yes, you’re totally right! We updated that this morning when someone else mentioned it. Maybe you’re reading in a reader and it’s not caught up yet? I think if you refresh it’s all fixed :)
xo,
s
LaurenJD says
I hope this mean there is another “Ode to a Power Washer” post coming from John in the near future! The last one was so funny.
Lori says
My husband made the scary discovery that the brass-and-beveled glass light fixture in our entry hall (you know the ones – kind of a hexagonal cylinder with a mini-chandelier inside?) was coming apart – four of the six panes of glass on the middle layer were coming un-soldered from the top layer. I unexpectedly found myself in my entry way standing on a ladder on my dining room table cutting the whole thing down while my afraid-of-heights husband leaned over the banister to catch it. Whew! Averted that shards-of-glass disaster, and forced us to actually upgrade the fixture instead of just complaining about it for eight years. (Not that we’ve gotten one yet; we can’t agree on a new style!)
YoungHouseLove says
So scary!
xo
s
Jennifer @ Creative Scatter says
The beginning of this post cracked me up! “I would’ve punched you in the face.” You both are such witty writers and I love it!!!
The deck looks great!! I really need to put on my brave face, buy a saw and start doing some wood projects.
Jeanine says
The patch job looks great. I totally loved the first line of this post. I literally laughed out loud! :)
Teresa says
I really like that you’ve jumped right in to entertaining…a lot of people feel like their house has to be “finished” (is that even possible for DIY enthusiasts?) before they’ll let anyone in the door!
YoungHouseLove says
Oh yeah, we learned that after our first house (which we rushed around trying to “finish” for the first few months and then realized it took us years to get there). Now we never put off having people over. They come to see us, and a little project dust doesn’t seem to deter them :)
xo
s
Teri says
The porch looks great and is so nice and big for entertaining. The picture of Sherry and Clair is so cute with the swimming pool! You two make everything look so easy. You are truly an inspiration to us DIYers. Keep posting and I will keep reading!
robyns says
I had to do a double take….shirt and hat colors switched from one deck to the other!
Debi says
We cut down a tree in our front yard, two years ago and it decided it didn’t want to die and turned into a bush!
We keep weed whacking it and the shoots keep popping out of it!
Aren’t you afraid the one under your porch will do that too and mess up your new boards?
YoungHouseLove says
No way! I’ve never heard of a stump coming back to life! We have stumps in the woods from lots of trees that have been cut down over the years and they never grow back (just seem to slowly decompose). Even the tree guy said since it’s going to be under the deck (essentially getting zero sunlight) it shouldn’t regrow at all. But if it does we can access it from under the deck and spray it with something or treat it so it stops. Is yours in the sun? I wonder if that’s why it keeps trying to regrow! So funny!
xo
s
Pamela says
Locusts are notorious for this bad behavior, as we learned to our dismay after having one cut down AND having the stump ground. I’ve not seen that behavior with oaks (nor pines or maples).