This is a heartwarming story featuring Ethan Hawke and Gwyneth Paltrow about getting crafty with a pillowcase, some fabric paint, and a metal grate, hence that pun-tastic title.
I don’t know about you, but I always seem to have one or two extra pillowcases around. We only have one set of sheets per bed, but I think since I buy two extra pillows for every bed (and therefore need extra pillowcases) I must see them on sale and grab them without making sure I really need them (hence the over-abundance). Really, it’s sort of a mystery to me since I’m the girl who won’t buy tomato sauce or toothpaste unless I’m sure I’m out, but maybe in another life I was short a pillowcase and it ruined my day so now I hoard them. Truly, it’s weird.
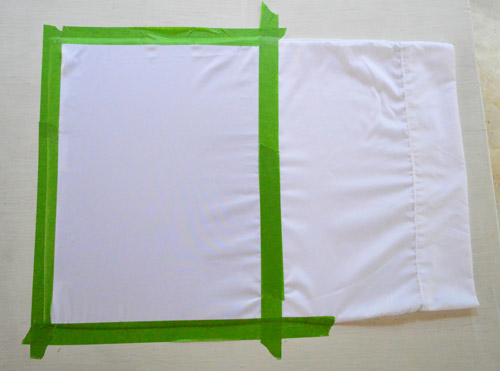
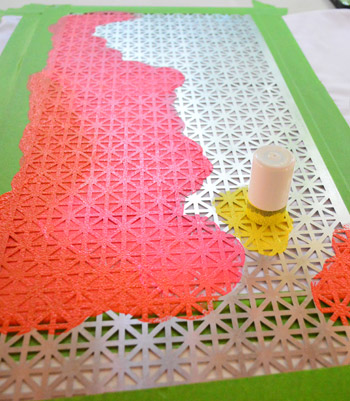
But anyway, I had this extra pillowcase so I thought it would be fun to use it as spare fabric and get a little crafty. And thus this project was born. First I taped it off in a rectangular shape using painter’s tape to hold the fabric taut. Oh and I slipped a piece of cardboard inside the pillowcase to keep it from bleeding or sticking together before taping it down.
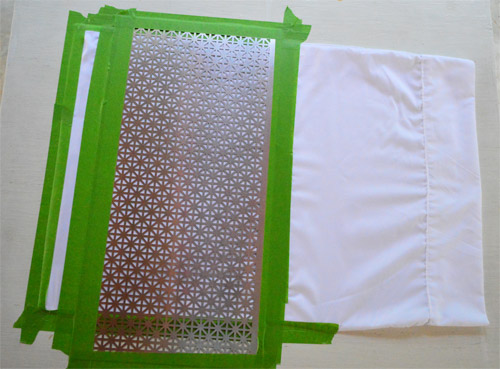
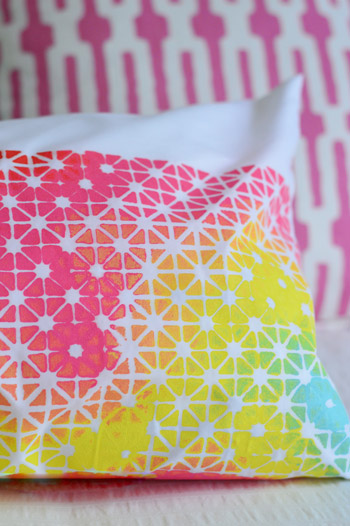
Then I taped this cute metal grate over it that I picked up at Home Depot for $9, which I immediately looked at and my brain said “um – STENCIL!” At first I debated doing this on paper to make some frame-able art, so you can go that route too, but then I thought using fabric paint on a pillowcase and stitching that up to make an easy little bolster could be fun, so I veered that way at the fork in the road that is Craft Street.
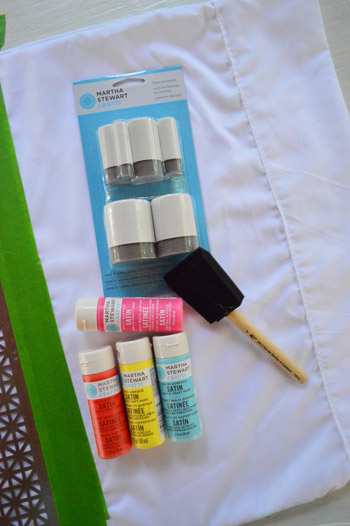
I raided my supply drawer for some Martha Stewart craft paints (they say right on the label that they work on fabric – and they’re only a few bucks a pop so I grab them in colors that I like whenever I see them on sale). I also had these stencil brushes (the ones in the blue package) in my craft basket after using a coupon to get them almost free a little while back from Michaels, so I was happy to finally put them to good use. All told, the only thing I bought for this project was the $9 grate, but if you had to pick up the paint and the brushes and the grate it would probably be around $20 as long as you have some fabric on hand. The good thing is that the grate is reusable, so you could make a few pillows or even a table runner and matching napkins and then make some art/stationery/gift tags with it. Oh man, now I’m thinking about the holiday-gift potential…
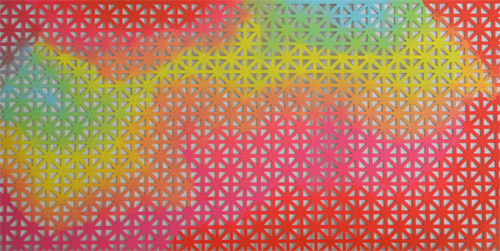
Next it was stamping time. I tried not to load my brush up too much (I worried from the start that things could bleed under the grate – and thick paint applications can make fabric crunchy) so I dabbed it on a paper towel a few times to get rid of excess paint before tap-tap-tapping my way around the grate. I tried to do sections of colors in sort of an irregular wave shape, just so nothing looked like obvious stripes and dots, but had more of a sand-art feeling. Oh yeah, who remembers sand art?
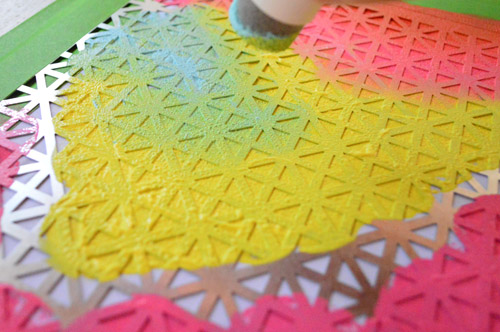
Occasionally I blended stuff using a bunch of extra dabs. This is what the blue did on top of the yellow after some extra pats in that area (see how it mixed to create sort of a yellow to green to blue gradient there?).
In other places I went with less of a blended edge and more of a defined color-meets-another-color border. It was fun and loosey-goosey and the whole thing probably took me around twenty minutes.
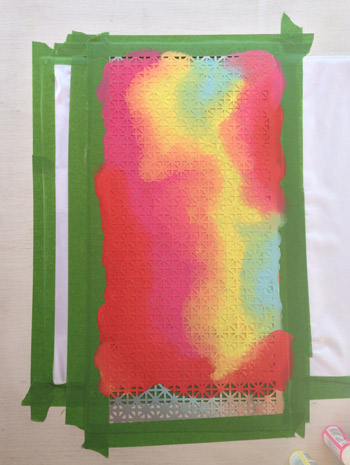
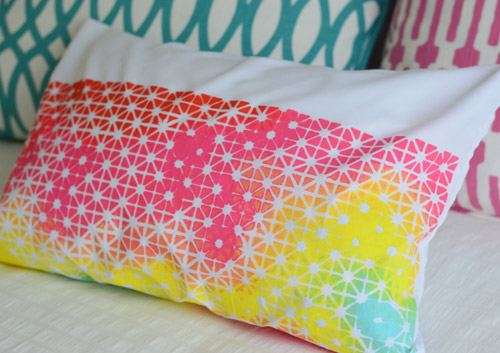
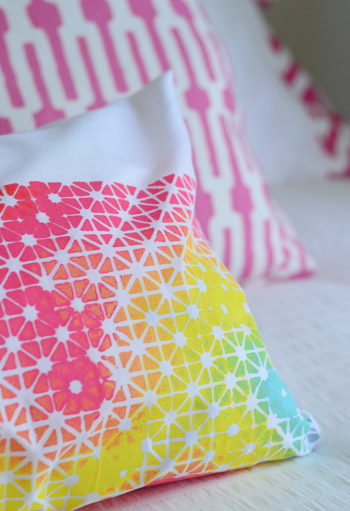
I waited a little while to remove the grate (maybe an hour?) just because I worried I’d shift it slightly while ripping off the tape and smear the whole thing. When it dried and I finally removed it… welp, there was some bleeding in a few areas. At first I was sad, but the more I looked at it, the more I liked the varied/imperfect pattern. It almost reminded me of constellations.
I think if you were going for a perfectly clean-lined look at home, using some stencil adhesive to stick the grate to the paper/fabric might result in a crisper edge, and using even less paint on your brush (and just dabbing it suuuper lightly) would probably cut down on the bleeding issue as well.
But in the end, I’m calling those imperfections a happy accident. Sort of like how you pay the big bucks for those hand stamped block printed fabrics that are cool and irregular… but that’s the charm. At least that’s what I’m telling myself.
Update: For those asking if this is washable, someone commented to say they had luck washing fabric that they painted with the same Martha Stewart product by following the directions on the container, so it looks like it can work! I’d just read the label first to find out what you’re dealing with if you plan to wash the item often (like cloth napkins for example) because other fabric paints might have simpler instructions.
Heck, I also think the grate is pretty great art itself. So you could always just paint the grate and not worry about any bleeding under it and then use a metal snip to cut it to fit a frame.
And now that I’ve mentioned the potential for reusing the grate, I’m kind of excited at the idea of a homemade runner or a matching set of napkins. Anyone else planning to try their hand at some grate creations? Will Ethan Hawke be invited? Will Gwyneth Paltrow bring the crudités?
Psst- Wanna know where we got something in our house or what paint color we used? Just click on this button:


Manda Wolf says
Very pretty! I really like how the colors flow together.
Kim Hall says
That is so nifty!
Melanie says
Absolutely love this! More posts like this!!
YoungHouseLove says
Thanks Melanie! My new goal is a small/crafty project like this each week (last Tuesday was wreath day) so here’s hoping I can stick to it!
xo
s
Andrea says
Ooh yes please! It looks so pretty <3
Estrella says
Yay! I’m excited with the small projects weekly prospect :D
Anele @ Success Along the Weigh says
I did something similar with a different patterned grate with a table runner but my colors weren’t as bright and cheery as yours. Yours is super cute and I love the bleed sections. It makes it unique!
jill says
beautiful! you’re going to have about 100k people doing the same thing now! or some variation. You are so creative!
Abbey says
You forgot to show us the full shot of the new pillowcase on the bed!
YoungHouseLove says
I took a few wide shots but the guest room has those white-on-cream stripes on the wall above the bed from spraying the doors so it desperately needs a paint job. Soon I hope!
xo
s
Kim says
I actually had been thinking of making a runner as I am desperately trying to add a bit of comfort/color/something to my dining room – I had been thinking of a linen runner with an apple print for fall but I like this grate idea.
What fabric where you thinking of for the runner?
YoungHouseLove says
Ooh linen or burlap would be really fun and textured – although I wonder if some sort of smooth cotton would work more with a stencil and then use the nubby burlap or linen just for something simple (maybe with a raw fring-y edge?).
xo
s
Sandra T says
Hey, I love this! And I think it’s pretty where it bleeds a little (ok, that sounds weird!). And I love the runner idea! Yay for simple art!
Jill says
Love this! Perfectly imperfect!
Rene @thedomesticlady says
That is so cute! I have been wanting to paint monograms on some pillows.
http://thedomesticlady.com/2013/10/04/getting-the-most-use-out-of-your-outdoor-decorations-and-happy-fall/
YoungHouseLove says
That sounds fun!
xo
s
Crystal @ 29 Rue House says
That would be a neat idea with the grate too! Tape out a letter and use the grate to fill it in!
YoungHouseLove says
I love that!
xo
s
Holly says
I love this, and I think the bleed through actually adds to the charm of the project and makes the pattern more interesting and more organic.
YoungHouseLove says
Aw thanks Holly!
xo
s
Lisa E says
I totally agree. In fact, until I read the post, after a quick look at the photo, wondered how you achieved that look! Happy accident indeed.
Lexie says
Haha me too, I was worrying how tricky it would be to get the unevenness as it’s so pretty!
Crystal @ 29 Rue House says
So cute! I love it and the imperfections of it make it cooler!!
Keep ’em coming!!
Nadine says
Super cute!!
kate C. says
When I first saw this my immediate reaction was, “that’s really cool how she made it look less rigid and perfect! Wonder how she did that?” So yeah, definitely happy accident – looks awesome! :)
YoungHouseLove says
Wahoo! Thanks Kate, that makes me irrationally happy.
xo
s
Cori says
I had that exact same thought at first! It does look kind of constellation-y, which I think is awesomesauce. Really, really super cute.
jess hogue says
am agreeing with the majority of commenters here. the ‘bleed through’ takes the pillow from fab to FAB.U.LOUS! very cool indeed.
Allison says
Pretty pretty!
Angie @ Bug Meets World says
I love the colors and when I first saw it I totally thought the bleeding was done on purpose. Grate idea! (See what I did there.)
YoungHouseLove says
Haha, I see what you did there, and I like it.
xo
s
Mara says
I think the painted grate kinda looks like a heat map index.
YoungHouseLove says
Oh my gosh it does!
xo
s
Leigh Anne says
Cool and crafty – I love it! I definitely hope to have time for smaller-scale projects like this soon! When I first saw it, I thought the yellow paint looked a little like an elongated version of the state of Virginia. A happy accident indeed! Am I the only one? Anyone?? Bueller?
YoungHouseLove says
Haha! Hidden state pride!
xo
s
Erin says
Wow! Happy accident is right. I LOVE how the bleed parts look with the whole design. So cool, Sherry!
Henna @ HENNA BLOSSOM says
Wow, that’s so fun! I love your creative eye. Home Depot is YHL craft, eh. ;)
It’s so funny that you mention having extra pillow cases. I was organizing our linen closet this weekend and a little befuddled as to why we have so many extra pillow cases! :) Still a mystery! But now I have a project, ha. :) Thanks guys!
xo
YoungHouseLove says
Seriously, DO THEY MULTIPLY?! Are pillowcases the new rabbit?
xo
s
Tracy says
We’re moving, so I just realized how many we have. I reasoned it out though – when I get new sheets for one of the beds, the old ones go to stuff like protecting the truck bed when hauling some furniture, or covering my peppers for a surprise frost, etc. The pillowcases aren’t as worn generally…and just stay in the closet!
Sadly, I rarely get white pillowcases, they’re always some kind of pattern, but it does get me thinking of what else I could do with them.
YoungHouseLove says
It’s so funny how they hide in there, quietly planning to take over the world…
xo
s
Dayna says
Make pillowcase dresses! They are very easy to make, just do a search on pinterest. and if you don’t have a little girl or know one, you can donate them to orphanages!
YoungHouseLove says
So sweet! I love that!
xo
s
Ann says
This is a great idea… when I first saw the picture I thought it was going to be a professional line of fabrics lol. It looks good!
But….after seeing that instagram picture of all the wallpaper on the kitchen floor, I can’t wait to see that post!!
YoungHouseLove says
Oh man, I only did half of the room so I’m trying to get the energy to finish it so I can post about the whole shebang being done!
xo
s
Sasha says
Just about ran out of the house to pick up supplies to do this, but remembered I haven’t got the money this month. Definitely on my to do list for next month :) can’t wait, absolutely gorgeous :)
YoungHouseLove says
Aw thanks Sasha!
xo
s
Hilary says
Did you trim the original pillow case before you inserted a cushion? Or Sew around the cushion? The seams aren’t visible so I wondered how you went about trimming the original pillow case.
YoungHouseLove says
I just stuffed the cushion in and only sewed the bottom up by hand (so the top seam and side seams are the original hidden pillowcase seams). So easy!
xo
s
Emily says
I make all the pillows for my house, and swear by envelope style pillow covers. No hand sewing, easy to change out when you get bored with them, and I often use the overlapping portions as a decorative accent (with a contrasting border or something).
http://www.marthastewart.com/270503/three-ways-to-make-a-pillow-cover
YoungHouseLove says
Love that!
xo
s
Bethany says
Thanks for the link Emily! I always make envelope pillow cases too but I’ve never done it with just one piece of fabric, I always use 3 (1 for the front, 2 for the envelope part on the back). This way seems a million times easier!
betty (the sweaty betty) says
not sure how far this is from you, but the AC Moore on Hull St (near Home Depot and Walmart) is having a liquidating sale right now, everything is 40% or more off! I got tons of Halloween stuff and saved over 60%!
YoungHouseLove says
Thanks for the tip Betty!
xo
s
betty (the sweaty betty) says
I forgot to mention THAT I LOVE THIS! I used to LOVE sand art, I think I still have some in my room at my parents house. I love those metal grates, I might have to get in on this and do something for my guest bedroom!
Riva says
Where in Home Depot did you find the grate? I’ve been looking for ones that are flat and all I can ever find is in the venting/ducting section … and the grates are always attached to those boxy things to be set into the floor as part of the all the ductwork.
YoungHouseLove says
Ours were in that center aisle sort of in the back of the store right near the edge. Kind of close to the mailboxes and mailbox letters and for sale signs?
xo
s
Janelle @ Two Cups of Happy says
Even though I’m a perfectionist, I like the bleedthrough. I agree – more crafty posts! I miss crafting :)
YoungHouseLove says
Thanks Janelle!
xo
s
Bethany says
Sand art!! Oh, how I miss you. Remember how there would be Sand Art booths at craft fairs? With like a million different colors of sand and super awesome looking glass jars. The coolest jars were always something insane like $50, so I never got to make one of those. Maybe one day.
YoungHouseLove says
Yes, those were the best!! And you’re right, they were crazy expensive!
xo
s
Ana says
AMAZING! Im loving the craft projects too, keep ’em coming!
Lesley L says
Fall finally arrived on the Gulf Coast, so I painted my front door yesterday. ( White) and ORB’ed our doorknobs! My husband was hesitant at first, but loved the final outcome! Thanks for all you do!
YoungHouseLove says
Sounds so pretty Lesley!
xo
s
Emily says
Love this!! You have such a great eye for appealing shapes and colors. I love the imperfections and totally saw the constellations too! So purdy :)
Kelly says
Oh, I like the irregularities! I think it turned out perfect!
Liz says
Sherry, this was a grate (ha!) post. I actually think the imperfections are what makes it look really cool!
Sarah W. says
So cool! I see in the comments that it’s for the guest room, but it would probably go great in Clara’s room too. Good versatility!
Amanda T. says
It looks like a delicious rainbow sno cone! I totally want to frame the grate. It’s fabulous!
Sarah O. says
I LOVE THIS. Also, I think it’s Gwyneth, not Gweneth?
YoungHouseLove says
Thanks Sarah! You’re right!
xo
s
Lindsey S says
I LOVE the imperfections. I was with you, my first thought was it looked like constellations!
Regina says
Sherry, you are genius! This is super pretty.
YoungHouseLove says
Aw thanks Regina!
xo
s
Wendy @ New Moms Talk says
Awesomely simple!
I have some high hopes for edible garland that I’m looking to test out making this week. (Here’s to crossing the fingers and doing a little pumpkin dance that all goes well.)
YoungHouseLove says
Mmm, sounds awesome!
xo
s
Shellie L. says
I love this! I do have a question though, I’ve used that type of paint before but would the pillowcase be washable? Now I’m thinking I need to make some pillow cases and curtains (stencil the bottoms) for my little girls room.
YoungHouseLove says
I’m actually not sure that it’s washable, but you could grab fabric paint that clearly says washable on the label if you want to make something like cloth napkins. In our house pillowcases that are sewn around cushions don’t really get popped into the wash anyway, so I just went with the all-purpose/fabric paint I had. Anyone know if the Martha stuff is washable?
xo
s
Stephanie B. says
There’s this cool stuff called Textile Medium that you can add to acrylic paints to make them washable. I had never heard of it until I read in this post (http://www.ourfifthhouse.com/2011/03/stenciled-drapes.html) from Our Fifth House! You just add a little (2 to 1, I think, but the post says more) to your acrylic craft paint and it makes it washable! I got a small bottle (a few ounces maybe?) for $3 at Hobby Lobby! I haven’t tried it yet, so I don’t know for sure, but she raves about it in the post!
YoungHouseLove says
Oh yes, we used that to make striped curtains in our book! We really liked it! It makes the paint softer too and is really cheap!
xo
s
Koliti says
Did it say in teeny tiny print on the bottle? Like if you need to heat set it? Or just let it set for a certain amount of time? Or wash it just in cold? Maybe they have more info on Ms Martha’s website.
YoungHouseLove says
Someone said the bottle had info, so that’s awesome news! She actually said she followed the directions and it was washable and she had great success, so that was great to hear!
xo
s
mpsoderb says
This.is.amazing.
How do you even think of these things?!?
YoungHouseLove says
I think I just stare at things and see stencils a lot, so I was like “just do it Petersik!” – haha!
xo
s
Gabriella @ OLinA says
So cute! I don’t know why but I find this so intimidating. I think I’ll take the leap and try it because it is way to cute not to.
Elaina says
I just bought this exact same grate with plans to make an earring holder out of it. I have some extra molding around my basement and I am going to make a frame and hang all my earrings in the holes!
Now you have me thinking I want to paint it first… Thanks! haha
YoungHouseLove says
Such a fun idea!
xo
s
Alison says
Where the heck do you come up with this stuff??!!! I currently have to decorate all the rooms of my house and have no idea where to start. You should make your way down Dallas and help me figure this all out.
YoungHouseLove says
Haha! Be right over!
xo
s
Ginny @ Goofy Monkeys says
I LOVE THIS!
I’m seriously inspired now to paint curtains for my daughter’s bedroom!!!
Ana Silva says
Wow! When I first saw it I just knew you bought it or it was some sort of fabric you found and loved. I am in love and want to copy you now and make one exactly the same; which I know it’s impossible. Great art project! Pinning now.
Stacey says
I think my washing machine transforms socks into pillowcases!
Love the pretty colours, love the bleed, love this post! Nice one, Sherry!
YoungHouseLove says
Haha, it’s true! Where are my socks and why do I have ten extra pillowcases?
xo
s
Brenda says
I’m usually such a perfectionist, but I actually LOVE the way the colors bled together in parts. It’s such a nice, soft feeling. I have no idea why, but I think the “imperfections” make it look fancier.
Jessica says
Did you have any issues with the paint drying stiff? or “hardening” the fabric at all? I looked at these paints in the store, but wasn’t sure how the end result would be on fabric.
YoungHouseLove says
The key is thin application I think! Anything globbed on will be really crunchy, but I try to just dab it on lightly and it seems to be ok. It sort of has a linen/slightly nubby feel (not smooth like the original pillowcase anymore, but nothing you’d scratch yourself on like jute). Hope it helps!
xo
s
Katie says
Sorry if this is a silly question, but I read through the post and didn’t see whether you sewed the pillow into the painted pillowcase case or just pinned the rest of the pillowcase down on the other side? Just wondering how it got from painted pillowcase to what it looks like with the pillow in it. Looks really nice — fun and unique!
YoungHouseLove says
I just stuffed a bolster cushion in the pillowcase and only cut/sewed the bottom up by hand (so the top seam and side seams are the original hidden pillowcase seams). So easy!
xo
s
Beth says
missed posts like this! i am inspired to try something holiday related too — thanks to you! perhaps a navy, neutral or red tea towel stenciled with gold and silver, and wrapped around a wine bottle for a hostess gift? thanks sherry! xo
YoungHouseLove says
OH MY GOSH I LOVE THAT!
xo
s
Laughing Abi says
I love the pillow you made but also NEED to know about the amazing patterned pillows in the background. Where are they from?
YoungHouseLove says
Aw thanks! HomeGoods! I have a geometric pillow problem…
xo
s