We did it. Completely out of order. Yup, we finally decided what color to paint the office and went for it. Which would have been a lot easier if we had pinned down our color pick before we built our wall-to-wall two person desk. Oh well, such is DIY life. We didn’t want to rush into choosing a wall color and then hate it after we built the desk (which would have meant having to repaint everything again after the desk was built anyway). So we waited. And waited. And discussed. And rediscussed. And waffled.
And it’s a good thing that we actually did wait. Because before the desk was completed we were considering some dark muddy colors (which you might have seen on the wall here). And after the desk was built we were both 100% sure that we wanted the dark wood desktop to really pop (a dark color on the walls would just make it all blendy and muddy in there), so back to something light and airy we waffled again…
Here’s a brief synopsis of our thought pattern:
- let’s go dark and enveloping!
- wait, that + a dark wood desktop = a dark muddled space… we don’t want the dark wood to blend into the walls
- plus we’ll lose light when we convert the carport to a garage so dark walls aren’t smart
- ooh, but some bright color might be fun!
- but the attached kitchen & laundry room are bright cheerful grellow and we don’t want the office to compete since it’s right next-door
- plus we want to add bright colors and bold patterns with upholstery/accessories/art/window treatments/desk chair paint
- so bright walls would be way too much with a bunch of bright fabrics/art/accessories, especially in a room where we have to concentrate/work
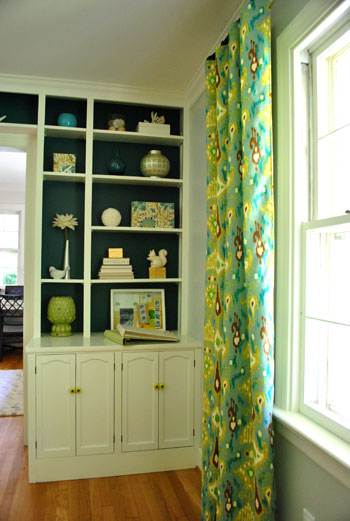
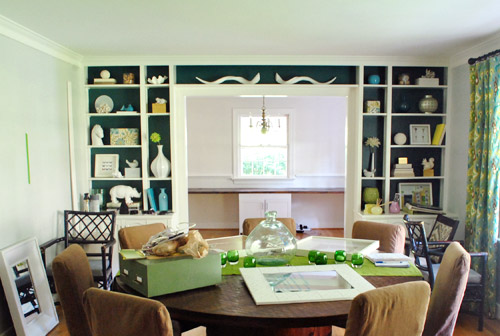
- plus bright walls would be seen from the adjoined dining room which has deep teal built-ins and brightly patterned curtains, and we don’t want those to fight for attention
- hmm, this is harder than we thought
- all we know is that we want the chair-rail and molding to pop, but not too much since that might be too chaotic/in-yo-face
- and we don’t want something too dark or too bright…
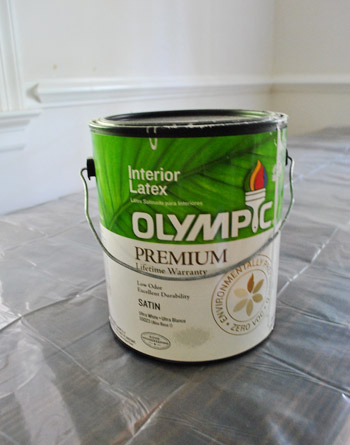
So we actually ended up exactly where we initially were six months ago: Benjamin Moore’s Moonshine (color matched to Olympic No-VOC paint in a satin finish). That’s the same soft gray that we have (and LOVE) in the living room, dining room, and hallway. Allow me to expand upon those weird stream of consciousness bullets above. We thought about going just a shade darker than Moonshine in here, but realized that we like light and bright workspaces (plus once we convert the carport into a garage – even though we plan to add windows to the exterior walls and door – we might lose a little light).
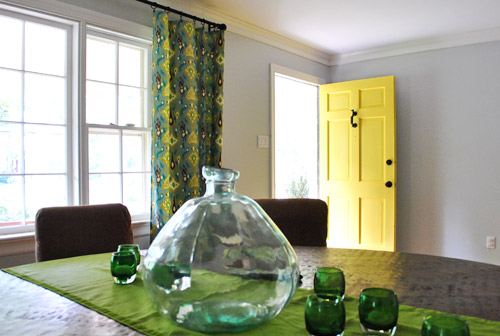
Some of you might be yawning because you were imagining something like sunny yellow (to tie in the front door)…
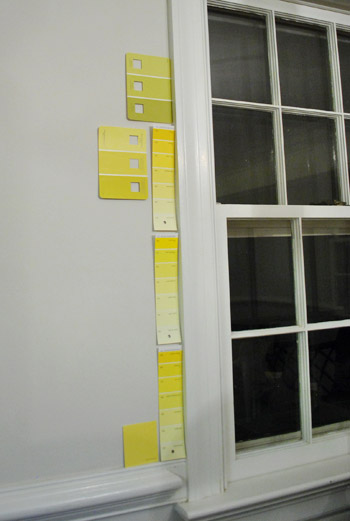
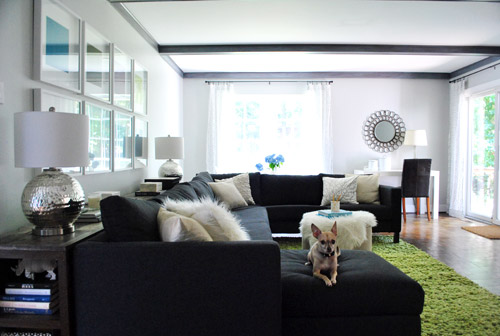
… or green (to tie in some of the tones in the living room curtains) or blue (again, to pick up on the dining room built-ins and curtains)…
… but after thoughtfully considering belaboring all of those options, we finally decided that going soft gray with the walls will really give us the freedom to bring in some seriously fun brightly colored & boldly patterned fabric (for the two desk chairs and the window treatments) along with some punchy art, bright lamp shades, and even in fresh paint for our desk chairs. We definitely like the idea of some fun cheerful pops of color in the accessories as opposed to all over the walls since we don’t want the room to feel too chaotic/hard to concentrate.
Besides, since we already have such a bright greeny-yellow tone in the middle of the house (the kitchen and laundry nook)…
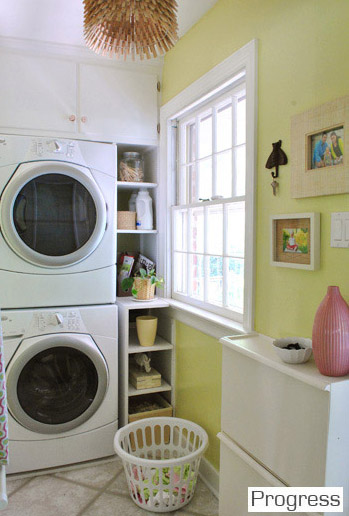
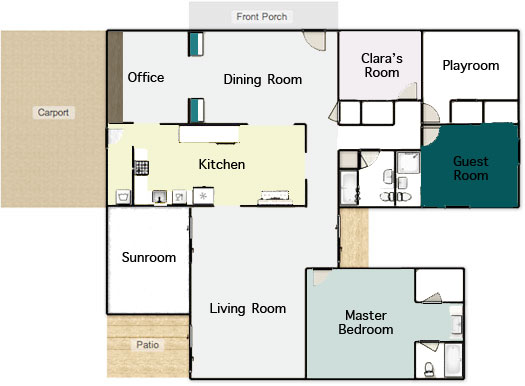
… we kind of love the idea that all of the soft gray rooms lead to the cheerful kitchen in the heart of the house. So we decided that we didn’t want some other bright color competing with it since they’re next-door neighbors. There’s something kind of nice about a burst of happy color in the center of our home with three soft platinum gray rooms around the perimeter (with pops of color in the accessories like the art/rug in the living room and the curtains/built-ins in the dining room):
The funniest thing to us is that we only have a few unpainted rooms remaining (the playroom, sunroom, hall bathroom, master bathroom, and guest bathroom). And since those spaces aren’t ones that we spend the majority of our time in (meanwhile we practically live in the office), it’s kind of ironic that it was one of the last few that we got to. I wholeheartedly admit that the whole house color scheme above might not make much sense to you now, but hopefully once we paint those last few spaces and add touches like wainscoting in the hallway and other major furnishings/accessories that are still woefully missing (window treatments, lighting, rugs, furniture in the playroom instead of junk, etc) it’ll make a lot more sense. One step at a time.
Speaking of which, our office painting method was slow & steady. First we cleared the room.
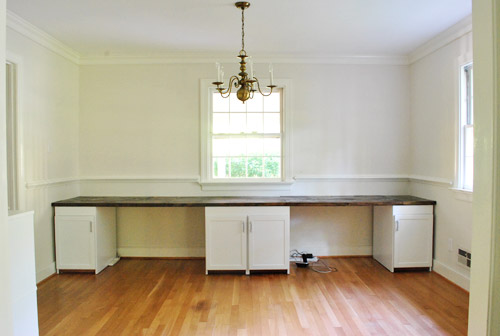
Which of course meant the dining room got full of offset office stuff:
Oh and while the office was cleared we snapped some pics of the desktop since so many of you wondered where the seams fell. We had to highlight them with a white line in photoshop to help you out (they’re actually really subtle in real life, so they were impossible to see from this distance without some white-line help):
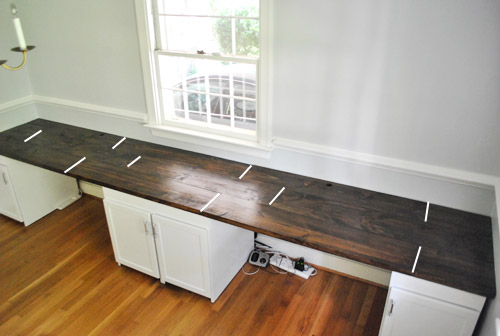
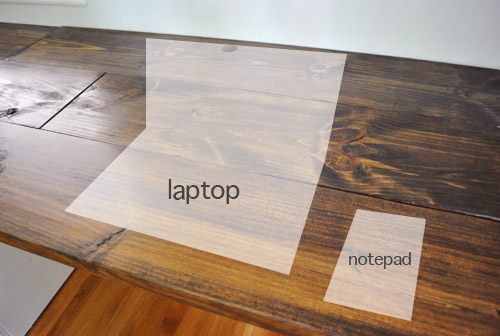
As you might notice, to the right of both of our laptops (when they’re actually on the desk) there aren’t any seams, so we don’t have any lumpy-bumpy seam-related writing issues (we write on pads and notebooks anyway, so I don’t think it would matter).
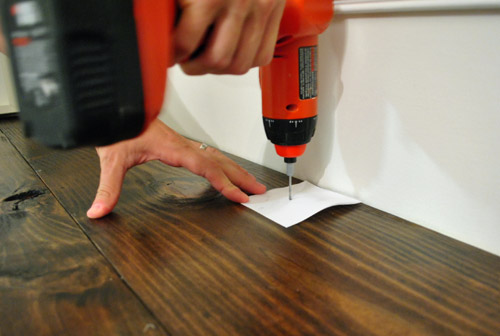
Oh and didja notice the holes in the back of the desktop behind both of our computer areas? Let’s have a little side chat about those, shall we? First we made a pilot hole where we wanted them to be (John used a paper template so they were both spaced the same distance from the wall):
Then John used a 1 1/2″ bit…

… to drill a nice ol’ hole for all of our cords (for desk lamps, computers, the home phone, etc):
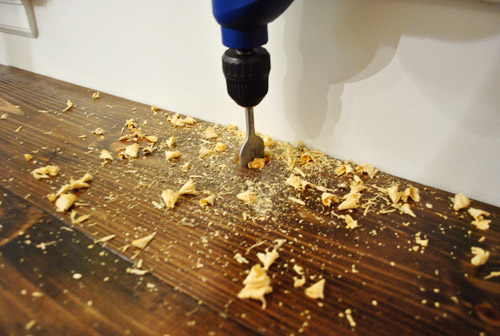
And John was a smartie pants and taped a cup under the hole to catch shavings, which was a huge time saver when it came to clean-up:
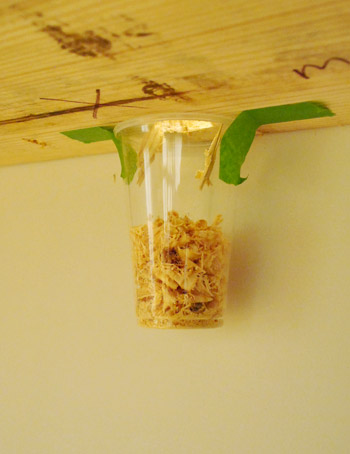
But of course the wood was unstained, so I used a little craft brush to get in there with some dark walnut Minwax to blend the hole in a bit better (we sanded things first, just to keep them nice and smooth so we don’t get splinters while retrieving cords):

So that’s how those handy holes came to be. As for how we painted the wall behind the built-in desk, the entire thing actually slides away from the back wall, so we slowly slid it out towards the middle of the room…
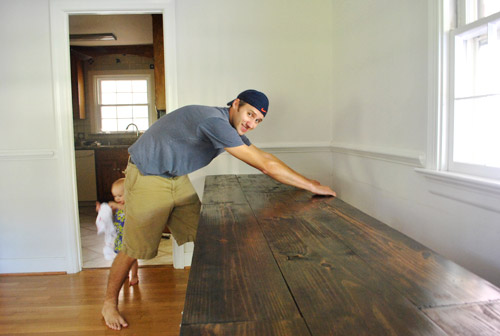
… and covered it with a giant drop cloth to protect our beloved dark wood desktop. That way we could roll/cut in behind it and then later push it back into place and paint the two sides of the wall that it blocked while it was pulled forward.

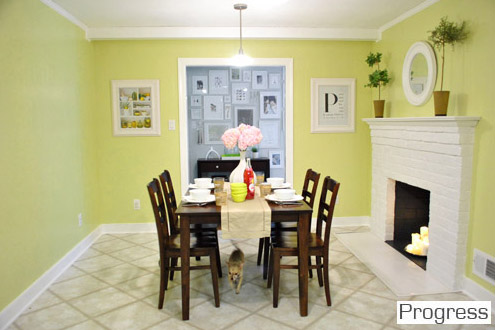
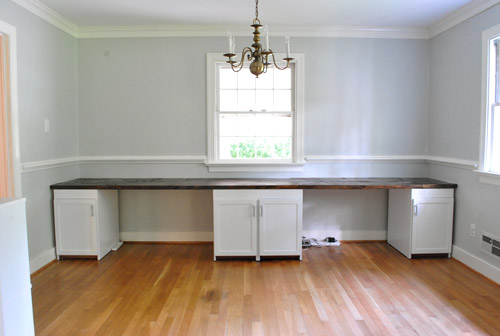
As is our tradition, John got his roll on while I did tons of cutting in (thanks to that chair rail, two doorways, and two windows). About two coats and four hours later she was looking like a soft fluffy cloud. Ugh, but ignore the light fixture. That thing’s having surgery as we speak- er, write. More on that soon.
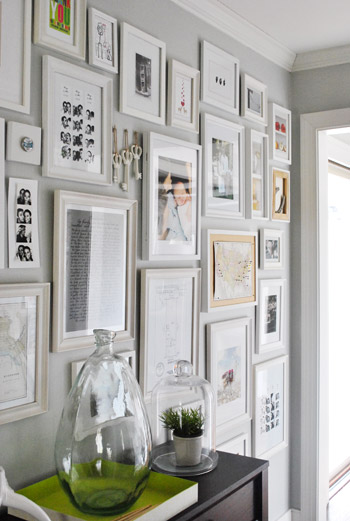
Then we just pushed the desk back against the wall and loaded everything back in there. The walls look a smidge blue-gray in these pics, but in real life they’re a true gray color (not icy blue or anything close to purple at all). Oh yeah but remember that everything on the desk is just sort of tossed there, so the leaning frames won’t stay (we need height, so we’ll probably hang some over-sized art on the walls) and everything else will likely evolve as we settle in a bit more.
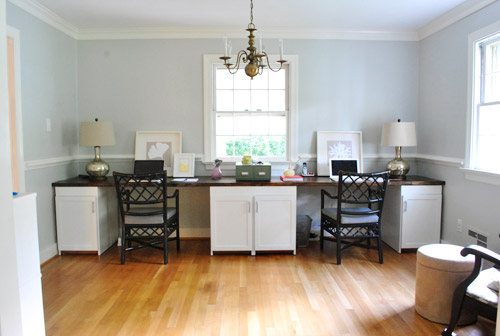
The lamps are from HomeGoods but we’re not sold so they might go back. We’re thinking we may use new lamp bases or shades as a place to add color along with art, paint on those desk chairs, patterned window treatments, etc. But thankfully we’re still as enamored with the wall color as we were when we chose it for the hallway frame gallery (the color reads more true to life in this pic)…
… and we definitely still love it in the dining room…
… and the living room too…
We especially appreciate how it makes the super thick crown molding and the nice chunky chair rail pop without being too high-contrast (which would also compete with our big beautiful desktop). Of course the chair rail will make a lot more sense when we hang proper art instead of leaning too-small stuff it in front of it.
And we love that this phase of the office upgrade was $0 since we still had a bunch of paint leftover from painting the dining room (we bought three cans back in January when we initially planned to paint the living room, hallway, dining room, and office all that color – and finally completed that initial plan this weekend). Only seven months later. Haha. Oh and we owe you a wide shot from the dining room of the fresh paint job, but since we’re making those aforementioned light fixture tweaks, we can’t shoot one quite yet. Soon!
But wait, there’s more than just a paint plan in here. We actually love the idea of adding a subtle tone on tone stencil around the entire room above the chair rail (hooray, no more desk shimmying necessary). We don’t want anything with too much contrast since it’ll compete with the dark teal built-ins and the fun curtains in the nearby dining room, but we’re seriously considering something like this with just a softer gray color for the feather part over our Moonshine walls (although I love the pop of yellow, so we might try it and bag it if we step back and it’s too much):
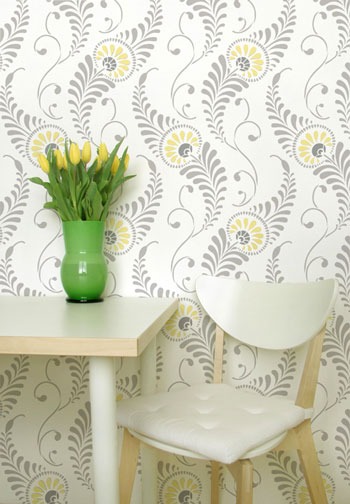
At 54 honking dollars it’s hardly a drop in the bucket (the stencil is over two feet tall and almost two feet wide to hopefully make the project go faster/smoother), but we figure that we did snag six cabinets for $6 and we built a 13 foot counter for $27… so maybe we should just bite the bullet and spend $54 for something we love. Any type of wallpaper (even the cheap stuff at Lowe’s and Home Depot) would be way more than $54 for the entire room above the chair rail, so I guess that’s another way that we’re rationalizing our possible purchase. Haha. We shall see. You know we’ll let you know when we make a final decision. We’ve never done a giant repeating stencil like this on a wall (we did stencil the floor of our first house’s sunroom) so that should be interesting too. And who knows, maybe I’ll find it as soothing as my little potato stamp project in Clara’s closet (I enjoyed that repetitive motion more than a person probably should).
Did anyone else paint their walls or drill holes into something this weekend? Or move a giant 13 foot desk? Or figure that we might be painting or drilling holes? Or dream that we had a secret son that we never told anyone about (two different commenters had that dream last week – crazy!). Oh and we painted this room four hours before my mom came to town for the weekend from NY. Nothing like a little en-route visitor to light a fire under ya.
Psst- You can see some mom-visit pics over on Young House Life today. Clara does not have a healthy fear of alligators. At all.

jodanders says
I love how you two think! Our entire main areas (living, dining, kitchen and hallways) are all the same light gray so that we can add bright punches of chartruse, orange, yellow in the little decorations that we can change out. It’s a little Candice Olsen;)
liz @ bon temps beignet says
I gotta tell ya, I used Royal Design Studio’s large fabric damask stencil just last week… AWESOME!!! I used a metallic Ralph Lauren paint, so it’s super subtle. I love (love love love) how it came out.
Here are some pictures:
http://bontempsbeignet.blogspot.com/2011/09/stenciled-damask-wall-royal-design_06.html
YoungHouseLove says
Woah- that looks awesommmmmmmme!
xo,
s
Sharon says
I love the soft gray. Gray really is the new beige these days. I was wondering how much space is in between each work area on the desk? I’ve been planning a double work desk for my kids in our living room and want to make sure they’re not cramped. Hobby Lobby now has wall stencils for about $17.00 (and about 8 bucks with a coupon). Not a great variety but for a small area, worth checking out.
BTW – love, love, love the green in your house. Every time I see it I always think it’s such a happy color :)
YoungHouseLove says
That double cabinet is about 28″ wide, and then we have about a foot of wiggle room on either side of our chairs. Hope it helps! As for the Hobby Lobby tip, we’ll have to check it out!
xo,
s
Sarah says
I’m a big fan of the gray and I absolutely LOVE the custom desk. After studying your console table and desktop projects, you inspired us to build our own dining room table AND buy a kreg jig (which my husband is IN LOVE with). The table is still a work in progress but we stenciled a wall a few months ago and it was definitely worth the time. It was pretty simple (but tedious). I used a stencil from Stencil 101 Decor. Here is the end product:
http://dconawhim.blogspot.com/2011/05/living-room-reveal.html
YoungHouseLove says
Looks awesome!
xo,
s
Jessica Woodard says
I am picturing the light fixture in a sunny yellow :) Can’t wait to see what your guys end up doing!
Meredith says
I would have loved to see the room in yellow – but I think the stenciling will be great too!
jeannette says
very, very psyched ABOUT THE STENCIL. i remember one Color Splash where bromstad used a huge one and stenciled varathane (clear shiny-ish, not too) over a gorgeous soft grey or blue. it was yummo. please do keep us posted, in considering it for my bedroom.
linda says
seeing the drawing of your house layout… i think the soft gray is perfect in the rooms you have it in! looks lovely!!!!
Ami says
I think the color was a great choice and that stencil would be STUNNING. I really want to stencil walls in our living room but I so skeeered. No pressure, but I’d feel a lot better if you guys did it first! YHL is like my little DIY you-can-do-it pep talk! And I also read a tutorial on stenciling and painting stripes that another commenter commented (commenter commented????) on that said the same thing about painting your base color on first and it pretty much eliminates all bleeding through.
p.s. The knobs on your cabinets are almost identical to these Martha Stewart at Home Depot. One knob is almost as much as you paid for all 6 cabinets!
http://www.homedepot.com/Kitchen-Cabinets-Cabinet-Hardware/Martha-Stewart-Living/h_d1/N-5yc1vZas87Z4tg/R-202241370/h_d2/ProductDisplay?langId=-1&storeId=10051&catalogId=10053
YoungHouseLove says
Isn’t that so funny?! We still can’t believe how lucky we got.
xo,
s
tracy says
The office looks great and I’m loving the stencil idea.
I have a question about painting…usually my husband cuts in while I do the rollers, and he read somewhere that you have to cut in while the main part of the wall is still wet, otherwise you’ll see the edges. Do you pay attention to that “rule”? He’s away for training this week and I’d like to paint the living room to surprise him, but think if I did it by myself the wall would dry way before I could cut in on all of it. Advice?
YoungHouseLove says
Hmm, I bet we accidentally adhere to that a lot but also disregard it a lot (also accidentally too). We just randomly work around the room (usually I start cutting in a bit earlier and then John comes in and rolls and catches up with me). We always need to do two coats (plaster walls) so maybe that helps keep things uniform? We definitely don’t have weird cutting-in marks or anything. Hope it helps!
xo,
s
Abby says
I had read that online and thought that you had to do it that way in order for it to look good and not show lines. However, my uncle (who is a professional painter) said that it doesn’t matter. My boyfriend and I painted our bedroom this weekend and we didn’t pay attention to that rule….once it dried, it looked great and there were no lines or anything! I think you’l be okay but I would suggest cutting in one wall and then rolling then cutting in another wall and rolling. Good Luck!
Erin says
Looks great, you guys! Love the office.
I’ve thought of doing painted stripes or stencils somewhere in the house, but then we had a professional painter do a couple of rooms (Angie’s List deal that was too good to refuse) who said that you have to skim-coat the whole wall after doing anything like that because the tiny ridges from taping show up if you just re-paint. Bummer! Has anyone had any experience with that? I would probably never change the room again if I knew I had to skim-coat the whole thing, but maybe I’m just not committed enough! ;)
Again, great job with the desk and lovely paint job!
YoungHouseLove says
Hmm, good question! Anyone? We painted stripes in our half-bathroom and just left them for the next owners, but they didn’t feel like they had any sort of ridge that couldn’t be buffed out with gentle sanding. Hope it helps!
xo,
s
Robin @ Our Semi Organic Life says
My dad has painted lots of geometric patterns in my parents house not only with different colors but different textures! Yep that textured paint that’s like sandpaper n such! Hate to see what happens to new owners if they ever sell that place.
Andrea says
Ok, ready for crazy (embarrassing) dream? I dreamed I babysat for you guys (and I’m 28 yrs old, so my babysitting days are way in the past). You had an awesome backyard, Clara had a whole swingset/playground complete with a slide. but the best part was John had built a tree-house with some kind of giant rope swing or zip-line that was up in the air. And it was so much fun, Clara stayed on her playset and I swung off the tree-house swing up in the air until you came home. Then I realized that while I was having all that fun, I had completely ignored Clara. I didnt give her a snack or check her diaper or anything, she just played by herself. And I felt really bad, but you didn’t seem to mind at all.
in other news, I found roman shades on craigslist for $15 each. that was exciting since i was nervous about trying to make some myself.
YoungHouseLove says
Haha, that backyard would be awesome. If you can dream it maybe we can do it someday. Haha. So glad you found cheap craigslist shades too! Niiice.
xo,
s
Sharon says
Well now you’ve done it. My husband is going to ban me from your site if I do another one of your projects. I have been looking for a stencil similar to this one and now you’ve found it. I’ve made curtains, all because of you. I’ve repainted 2 dressers, you guessed it all because of you and now this. Oh boy, I just might have to fib when I tell him my idea for doing this stencil all the way up my stairs and in the 2nd floor hallway. I have a similar shade of soft gray on that level in the main rooms. I am also planning on doing a photo gallery at the top of the stairs and have started collecting my frames; I’ve never been one for too many photos in the main living areas but this is perfect because it is private and for our eyes only.
Now let me think what my story is going to be….Hmmmm
YoungHouseLove says
Haha, tell your hubby we’re sorry (shh, we’re not, we’re really just beaming for ya!).
xo,
s
Bethany says
I haven’t read through all the comments- but there’s a really great idea on pinterest of doing this type of tone-on-tone stenciling, but instead of doing it in a different color, you get the same color in a gloss finish (or matte depending on which you used first). I think it might look really awesome in this room!
http://pinterest.com/pin/189499473/
Just a thought. Love what you guys have done with the room though.
YoungHouseLove says
Love that effect too! Not sure if something super glossy in a room with chair rail will still read too formal/dining room-ish so we’ll have to see where we end up!
xo,
s
Whitney says
Just popped over from Pinterest….have you seen the flat-base, glossy-paint pin?! Of course you have. :) For those that haven’t, they painted a wall in a flat base and added a design in a glossy finish. Even I can do a stencil on the floor or wall…so, no pressure.
YoungHouseLove says
Yes, that’s really cool too!
xo,
s
buen says
love it! kind of like the color i used to paint my bedroom… very nice and soothing! On a different note, i have noticed john does most of your diy projects barefoot…i know it´s a personal preference, but i can´t help but think of the time my brother broke his foot while moving furniture, he happened to be barefoot as well, and he´s quite strong but somehow the wardrobe he was helping lift up the stairs with my dad
slipped from his hands and landed right on his left foot. Sometimes freaky accidents happen and you can never be too careful. it sucks when you get hurt, specially if it happens when you´re doing something that´s apparently not dangerous.
YoungHouseLove says
We completely agree! We need to stop what we’re doing and put shoes on a lot more often. Sometimes we remember after we take our pics (but before we actually do things we’re posing to do), but we still need to be more diligent about that and put them on every time!
xo,
s
Leslie says
My hubby actually did something similar for my sewing machines…he created a table top then bought these rubber grommets for the cord openings…they keep the cords for scraping on the desktop opening. I saw them at Lowes (in Austin, TX) about two weeks ago and they were around $5.
YoungHouseLove says
So smart! Thanks for the tip!
xo,
s
Jean says
I’ve been trying to pick a gray with a hint of blue to paint my kitchen. On my computer your rooms look like they have a hint of blue but on my BM swatch – Moonshine looks all gray. Wondering what you think when you see it in person.
YoungHouseLove says
In person it’s all gray for us (just looks icy blue in the pics for some reason). But in different lit homes it changes (my BFF said it looked super green in her house, and the swatch she went with looked green in our house!).
xo,
s
Heather says
No room painting or hole drilling or desk sliding this weekend, but I did build a 19″ diameter drum pendant from scratch. That was a bit of an accomplishment.
Love the gray, by the way. I painted my master bedroom gray and love it! :)
Christina P. says
So this has absolutely NOTHING to do with your post but a friend of mine who sells insurance posted this on Facebook and I immediately thought of Sherry and her love of fake animals painted white!
Is it weird that random things make me think of a blogger whom I’ve never met?
Oh well.
Enjoy!
https://www.facebook.com/photo.php?fbid=939553390654&set=a.939553280874.2389732.34316039&type=1&ref=nf
YoungHouseLove says
Oh man I’m dying to see it but the link won’t work. Maybe it’s a privacy setting?
xo,
s
Christina P. says
*Oops. Try this instead. I promise you’ll want one! haha
https://fbcdn-sphotos-a.akamaihd.net/hphotos-ak-snc7/s720x720/305848_939553390654_34316039_42828484_2145860463_n.jpg
YoungHouseLove says
Oh my gosh- hilarious!
xo,
s
Dominique says
Ha. Funny.
Up until a few months ago, I’d take one look at that brass chandelier of yours and think anything in the range of ‘cheap’, ‘dingy’, ‘cheesy’, ‘dated’, or just ‘ew’.
However, now I in the antiques department of a luxury lighting company. I see and restore brass chandeliers similar to yours everyday. They sell for in the thousands.
While they aren’t my favorites among the fixtures that I work with, my perception of them has shifted somewhat, and they no longer inspire that instant “yuck!” gut reaction.
I look upwards and pay a lot more attention to light fixtures these days. Can’t wait to see what tweaks you make to yours!
(Also, the office is starting off great! Love the wood top of the desk.)
Kerry says
Please please please do the stencil! I have been contemplating them all over my house but have refrained because I might go stencil crazy once I start.
Also wondering about ur lamps. They’re great but everything looks the same height. Maybe taller ones? As always we’re all excited to see what you choose.
YoungHouseLove says
Oh yeah, we mentioned we might bring those back since we’re not loving them (although hanging proper art instead of leaning that just-tossed-there stuff will definitely help).
xo,
s
Jessica says
That stencil is too awesome! I am looking forward to seeing it if you decide to use it or not. I feel that soft grey walls were the correct choice, a darker colour would have just washed out that beautiful dark wood table top that John made.
I actually sawed into a door frame on the weekend, and removed this old over-hang piece on the door (you know like one of those old-school sliding doors) because it was just dark and bulky and really 70s-ish ;) I plan to paint the wall and re-stain the wood frame either today or tomorrow – woohoo for jobs!
buen says
yes, we don´t want silly injuries that could potentially set back your upcoming projects! I forgot to ask you before… what are you planning to do with your old office desk?
YoungHouseLove says
We’re not sure! It’s sitting in our dining room right now (sort of like a console table near the front door) but it’s most likely not staying for long. We’ll keep you posted!
xo
s
Jeremy says
You must do that stencil! It’s better than wallpaper -ya just paint right over it! I fell in love with grey + yellow after I saw a bunch of weddings w/ that color palate. You and John are so clever w/ your taping a cup to catch shavings & using an art brush to stain small spaces. I love how the office is coming along!
eileen marie says
Hahaha -my husband was still signed on from leaving a comment for the contest (the ONLY time he comments, even if I show him a REALLY good post), so the above is ME!
LibraDesignEye says
Love that stencil! gloss or not, yellow accent or not, it’s so YOU!!! Paint is so rewarding so fast!! Great progress!
Jessalyn says
Looks great!! And the desk is coming together awesomely.
We just painted our kitchen (olympic Aqua Sparkle) and adjoining dining space (valspar Cool Vista) and are now painting kitchen cabinets white – thanks to your tutorial!
Becky says
I really like the gray color for the office. I find it interesting how often you can second guess a decision and then after exploring a bunch of different options end up going with the original decision I spent Friday night and Saturday painting my dining room, kitchen and living room (we have an open floor plan). We used Martha’s Plummage color as an accent wall in the dining room and a darker gray in the kitchen and the surrounding walls. It looks amazing! However, I keep getting flashing on the walls. I’m not sure what I’m doing wrong. Even though I’m using light even strokes, I still get lines where the roller was. Any suggestions?
YoungHouseLove says
Hmm, my best guess would be that you aren’t giving it enough time between coats or are re-going over spots that are semi-dry so it’s leaving strokes/roller marks. Ideally you’ll go from one side of the wall to another and not touch anything up or go on to coat two until it’s completely dry. It could also be your roller (maybe try something like a flat surface one from Purdy, they’re what we like). Hope it helps!
xo,
s
Robin @ Our Semi Organic Life says
Are you going to just keep the chair rail in the one room? What about installing some in the dining room or elsewhere? Our old rental house on the southside has it in the living room, hallways and even bathroom!
YoungHouseLove says
That could definitely be fun! We definitely have plans to bring some wainscoting into the hallway so the dining room could be pretty with some added architecture too – although I’m not sure if it would compete with the built-ins. Something to think about…
xo,
s
Rosemary says
I can’t wait to see your stencil project! I found Royal Designs Studio when y’all hosted a giveaway (I lost) and ended up buying a stencil from them. I’m in LOOOOOOVE with my dining room now. It was tough, but worth it.
You can see it here:
http://rosemaryonthetv.com/2011/07/05/stencil-stencil-on-the-wall/
YoungHouseLove says
Wow- that looks so good!
xo,
s
jennie says
can’t wait to see this room take shape. the desk is to die for!
Lyndsey says
This is my first comment:) well besides the give aways…anyways all I can say is Hurry up and get to stenciling…I can’t wait to see the finsihed project!!!!!
and I love the grellow my kitchen is painted the exact same color, you and your house is such an inspiration to me and my home decor!
Abby says
My boyfriend and I painted our bedroom this weekend. It was dark baby blue (if that makes sense). We liked the idea of having a blue but wanted it to be more “light and airy.” We decided to go with Benjamin Moore’s glass slipper (color matched to Sherwin Williams Satin). We absolutely LOVE the color! We just have to paint the trim/woodwork this week and then I can finally put the bedding (Bella Paisley Duvet Cover & shams) that I got about 3 months back from the Pottery Barn Outlet in Lancaster, PA. I think it is so ironic that this was your comment today because while we were painting, my boyfriend was talking about the decor that he wanted to use in the room and I made a comment that was something like, “John and Sherry would not approve of that!” We both had a good laugh. I’ve been following your blog for the past couple months and it has inspired us to take chances and dig in to some DIY projects! We’re really enjoying our new home and I always look forward to seeing what you guys are up to! Thanks!
Megan says
The gray looks great, and a stencil would look awesome! We did a gray tone-on-tone stencil in our dining room and L-O-V-E it. It was worth every minute (hour) of painting. There is a pic. at the bottom of this post: http://theboutons.blogspot.com/2011/01/kitchen-christmas-b-wall.html
YoungHouseLove says
So pretty!
xo,
s
Meghan says
That stencil is beautiful! So worth the $54, and besides the cost, so much less HASSLE than wallpaper if you ever want to do something else in there!
I have a little bit of PTSD from intricate stencils. I bought this one: http://www.istencils.com/ProductDetails.asp?ProductCode=93-00025
intending to stencil the back of a chair with it. Fortunately I tried it on a cheap-o 16×20 canvas first. Those little intricate pieces made it so hard to be precise. With too much paint it bled and was really obvious. With too little paint, it looked cheap. Eventually I did many light coats, which was tedious. If the paint dried at all before I could wash it, it got gunked up and blocked the pattern. Once the paint stuck, it was difficult to get off. Then one of the little pieces of plastic bent up…. oh man.
So. It looks like that one is big enough that it shouldn’t be a problem. And I am not a stencilling expert so there are probably better methods than what I used. But if I were going to commit to doing a whole room, I would read up on all those experts and practice a LOT first!
YoungHouseLove says
Thanks for the tips! I hope it’s not the project from h-e-double-hockey-sticks. Yikes.
xo
s
katie damon says
I thought of you guys when I saw this!!
http://blogs.babble.com/family-style/2011/09/09/8-best-paint-chip-projects/
such fun ideas :) I can’t decide which is my fav!!
YoungHouseLove says
Love it! So many fun ideas.
xo,
s
Aimee says
Yep! I finished painting my craft room closet VERY dark purple (leftover sample from Sherwin-Williams), and the shelving’s going in this week. :)
The grey looks amazing in all your rooms!
Danielle says
HI Sherry
This is a very random and nothing to do with the post above, but I thought I’d share :-)…Last night I dreamt that me and my husband and you, John and Clara all went to play putt putt golf together and then we watched a baseball game. Oh and you were 6 months pregnant…I must have read your blog right before bed or something, so weird right?!
YoungHouseLove says
Woah- that’s funny. I do love putt putt! But I’m definitely not prego!
xo,
s
Beth says
I love the pale gray. I am considering a stencil for my pink bathroom renovation, but what I want to do is recreate the twinkle pattern I discovered on the wallpaper left behind the bathroom mirror. Have you or has anyone tried to make your own stencil? This is totally new territory for me, and after removing all of the wallpaper in the house, I’m traumatized.
YoungHouseLove says
Ooh someone commented about DIYing one today (so maybe just scroll back for that info and do some googling if you want more deets?). Hope it helps!
xo,
s
sara says
Love the color and stencil idea! We looked into it, and decided it was going to take too long for my patience. Instead, we bought some lovely frog tape and made a diamond pattern. Not sure if you will be able to see this or not, but we’ll try http://www.facebook.com/photo.php?fbid=10150297443179645&set=a.10150098808474645.283127.513984644&type=1&theater
YoungHouseLove says
Aw man, can’t see it. But would love to!
xo,
s
Christine says
I love it! It looks great! I just found this blog and she has a desk that is very similar to yours so I thought you might want to check it out! Her counter looks just like yours, just a different stain. She is from Nashville, like myself and was featured on Style Blueprint (a Nashville based blog for design, entertainment, etc.) Her name is AnnaMaria and she designs her own fabric. Don’t know how I’ve missed her blog. I also loved her other built ins in this space. Haven’t found a picture of the room with furniture in it, but this is just the blank slate. http://annamariahorner.blogspot.com/2011/04/bare-canvas.html Also, I love your new blog design. :-)
YoungHouseLove says
Wow! The architecture in that room is stunning!
xo,
s
Alison says
I think I missed something. What happened to the mini pictures you put in the frames in the living room?
YoungHouseLove says
Good eye, Alison. They’re still there – we just borrowed an older photo that was snapped before they were added.
-John
Vicki says
First, the taped cup trick? That man is a keeper!
The office is looking so fantastic, I can’t wait to see what you do with the light!!
Maya says
Heh, I actually did have a dream about you guys this weekend… bear in mind that I’m 7 1/2 months pregnant, so a lot of this is probably me projecting. :) I came upon Sherry randomly (in what looked like a dentist chair… I THINK it was in a hospital) in the middle of giving birth, trying for VBAC, and she was looking a lot freaked out. So I called my doula and asked her if she could help, and she couldn’t come (that whole we-live-in-Israel thing) but she spoke to Sherry over the phone and said that Sherry came through like a champ and had a very successful birth. Haha. I also went over to your “house” while Sherry was in labor, and it was actually just like this cottage that I lived in for a short time on my family’s farm, and there were all kinds of details about it that you don’t show on your blog… like, the ceilings were this cracked, peeling teal and yellow, and they looked really gross and oppressive. I remember thinking “wow, this photographs really well.” ;)
YoungHouseLove says
Haha, that’s pretty funny.
xo,
s
caroline says
Hi guys – loving the office set-up – I have been thinking about your desk lamps though – and whilst I know it all depends on what you end up doing with the overhead light I personally feel you need more of a desk style lamp – its just that having the bases as bedside tables and the chairs as non-standard office chairs I think you’re missing a chance to celebrate some of the things which are cool about office decorating.
Like this for example:
http://www.ikea.com/us/en/catalog/products/70089584
Now of course price is always a factor etc etc – but maybe you guys could get some old office lamps and funk them up a bit with your magical spray cans.
I just think those lamps are too sofa/bedside table-esque.
Lots of love from Down Under
Caroline
YoungHouseLove says
We love the idea of desk-type lamps and own one similar to the one you linked to, but when we put it on our giant 13 foot long desk it just disappeared! It kind of looked thin and unbalanced and way too piddly. So that’s why we’re thinking we just might need something chunkier in the name of balance. Who knows where we’ll end up though!
xo,
s
Meg says
I haven’t read through all the other comments, so I don’t know if I’m repeating anyone else in saying this…
Concerning the stencil color, you could always go with the same color of your walls, but in a different finish. You went with a satin for the background, so you could go with either flat or glossy in the same color for the stencil and get a cool effect. It might be just the subtlety you’re looking for! I have to give credit to Pinterest for this idea; I love that website!
YoungHouseLove says
Oh yes, we love that option too!
xo,
s
Alexis says
The Hubs and I got our paint on yesterday while the kid was in school. Don’t feel bad about how long it took you guys to paint. Our dining room had only been waiting oh, 14 months (!) for a color. When we moved last summer the dining room wallpaper came down right away as did some texture to camouflage the imperfect walls, but deciding a paint choice just never happened. We finally couldn’t take any more and got to painting. And in a little coincidence we painted it grey albeit a darker shade than yours. As always love, love, LOVE your blog.
BTW: I daydream of visiting Richmond (we’re in Virginia Beach), you guys make it sound lovely. But I’m afraid if I ran into you I’d freak you poor people out with my love for YHL.
YoungHouseLove says
Haha, you should come on down to Ricmond! It really is lots of fun. And I guarantee I’d be more awkward than you if we bumped into each other. Guarantee.
xo,
s
Megan says
I think the oversized wall art above your desk will look really good. The first thing that popped into my head when you said that was the canvas with the horses on it. Although, you might want something more “inspiring” not that horses are not inspiring. :) Oh, and I love the desk ecspecially the wood top.