We were determined to refinish the old, stained clawfoot tub in our beach house bathroom. Having it professionally reglazed or refinished seemed daunting (it’s heavy!) so we were determined to make this a DIY project. Luckily, it was surprisingly easy to do ourselves and only cost us about $50 and a fair amount of free elbow grease. So let’s just dive right into what worked (and what didn’t) and how we nursed this baby back to life.
Finding An Old Tub
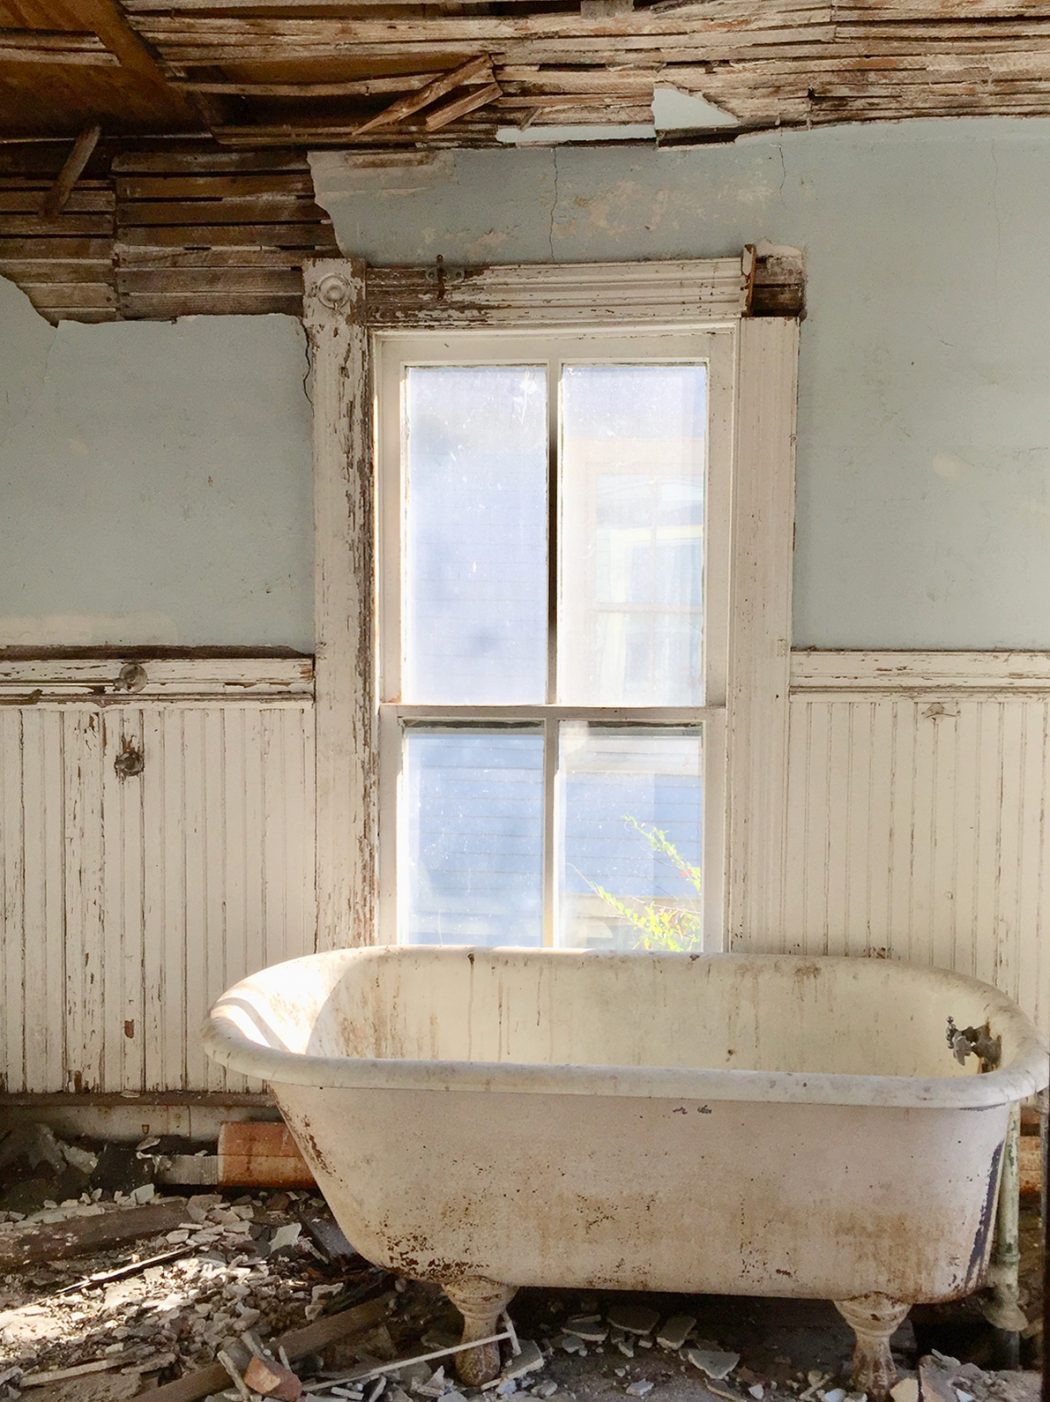
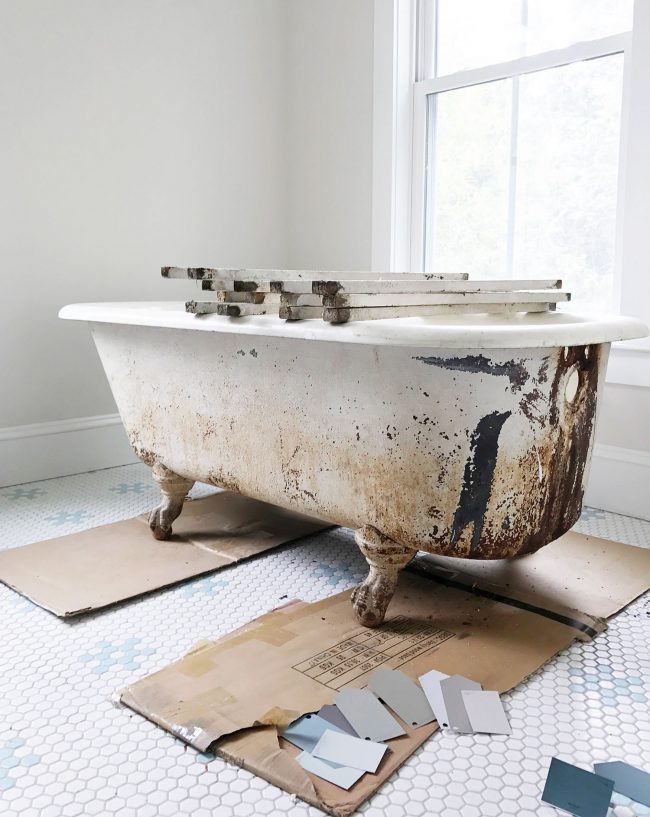
We were fortunate that this tub came with the beach house when we bought it, although its condition clearly left something to be desired. The room was literally falling apart around it and we ultimately had to have that whole side of the house rebuilt to make it structurally sound.
If you are looking to buy one, you can often find sad, neglected clawfoot tubs for sale at architectural salvage stores or on sites like Etsy. It will obviously cost you to purchase and to move it, but ultimately could save you from buying a new bathtub. And, just look what we were able to do with ours with just a little bit of hard work:
We didn’t get to tackle refinishing our tub for several months while the rest of the home was under construction, but it waited patiently for us until the bathroom was nearly done and ready to be put back together. Here’s what we did:
Materials For Refinishing Your Clawfoot Tub
While each situation may be different, most tubs will need attention to both the outside AND inside surfaces of the tub. The inside is largely a CLEANING process and the outside is largely a PAINTING process.
The inside needs to be clean and free of holes, flaking, cracks, deep scratches, or other damage to the glaze that could require professional repair or compromise its ability to retain water over time. You’ll need:
- Soft sponge
- Scouring pads
- Spray bottle
- Bar Keeper’s Friend or other soft surface cleanser
- Heavy Duty Magic Erasers
- Steel wool, fine grade (#0)
- Bath tub and tile refinishing kit (optional)
- Painter’s multi-tool (optional)
- Gloves (optional)
The outside is more forgiving. While it should also be free of holes, damage can be more easily fixed or covered up with paint. Here’s what we used on the outside of tub:
- Fine-, Medium-, and Coarse-grit sanding blocks (optional)
- Rust-removing drill attachment
- Power drill
- Lead paint test
- Dust mask
- A quart of Clean Metal Primer
- A quart of Anti-Rust Paint (in color of your choice)
- Small foam paint rollers
- Chip paintbrushes
- Paintbrush for oil paint
- Drop cloth or cardboard to protect your floor
Step 1: Assess The Damage
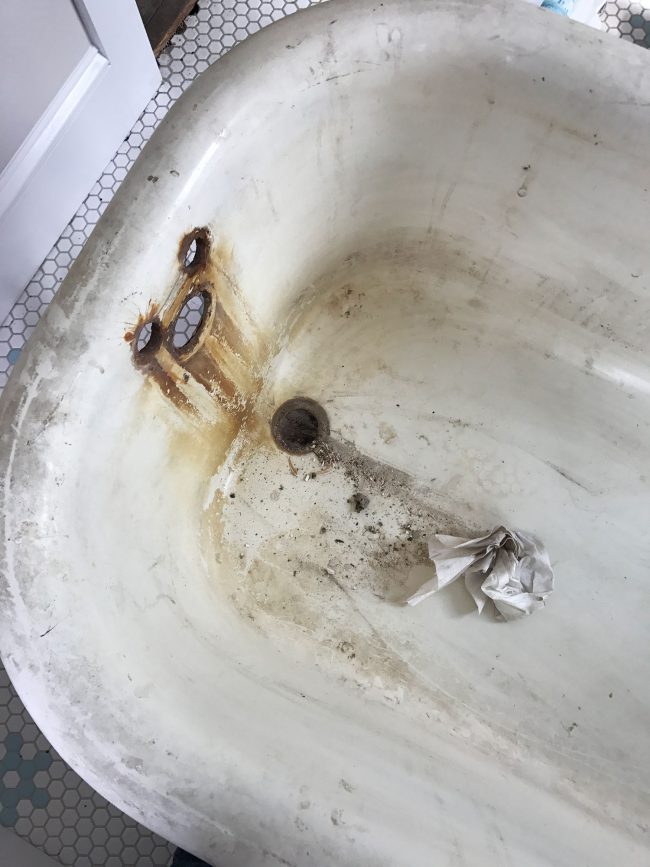
Using a sponge and water, we first wiped down the inside and outside of the tub to assess what was superficial dirt or soap scum, and what might be a deeper stain. We were most worried about rust spots because those can eat away at the finishes and leave pits or holes in the glaze or ceramic.
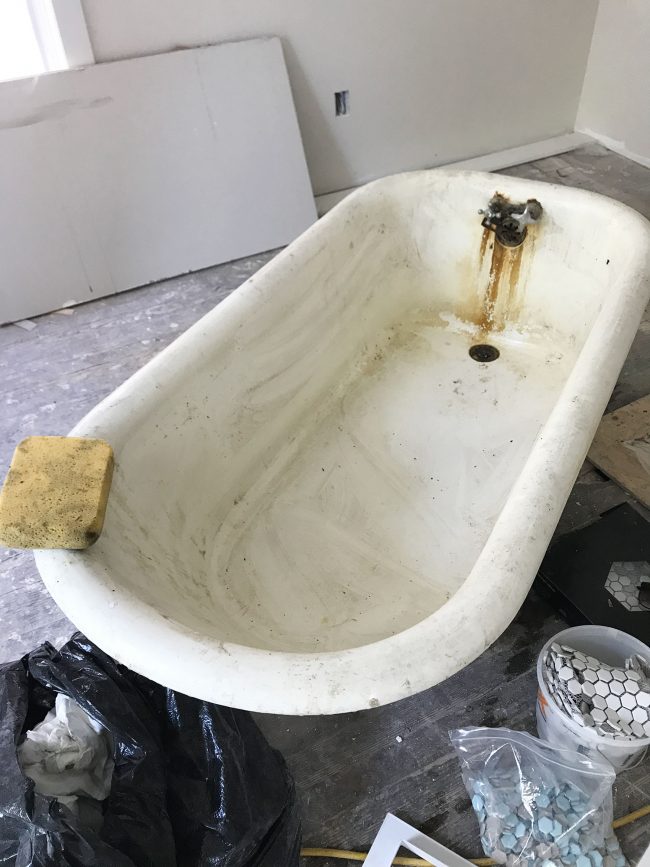
Lucky for us, a remarkable amount of grime came off. This fueled our hope that we could avoid hiring someone to do professional bathtub reglazing on the inside. That was a BIG relief, since it’s important that the inside surface has a durable glaze coating that will stand up to cracking or flaking over the years.
Note: We later learned that home improvement stores sell tub and tile refinishing kits that are DIY epoxy applications you can do at home. We haven’t tried one ourselves, but reviews are largely positive online. Some people report bubbling or a persistent smell, but this might be a great option to try if you only need to repair a small part of your tub and don’t want to pay to refinish the whole surface.
There were still plenty of really really caked on hard water stains that would take more elbow grease, but we were happy to be moving the tub into the bathroom, not out to some professional tub reglazer.
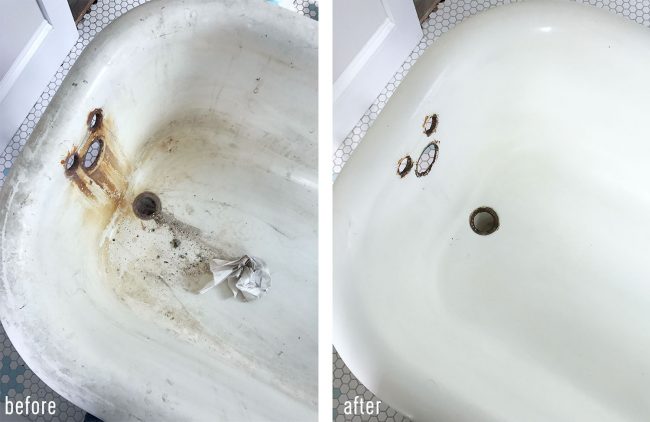
Step 2: Clean The Inside With Vinegar
To remove some of the lighter stains, we mixed a solution of 1-part white vinegar and 1-part water in a spray bottle and coated the inside of the tub. We then used a little elbow grease and a green scouring pad to get all of the easy stuff off.
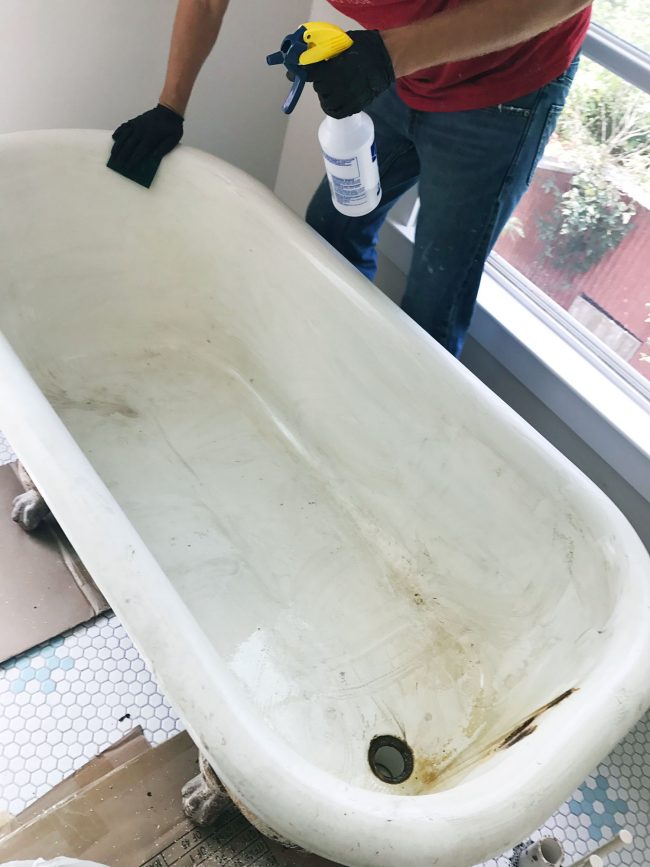
It made a HUGE difference, although not enough that I would be willing to actually take a bath in there yet.
Step 3: Give The Inside A Heavy-Duty Scrub
A few readers had recommended Bar Keeper’s Friend Soft Cleanser but the initial results weren’t great. We followed the instructions of applying it to a damp surface, letting it sit for a few minutes, and then scrubbing it off with an ordinary sponge. Our stains didn’t budge.
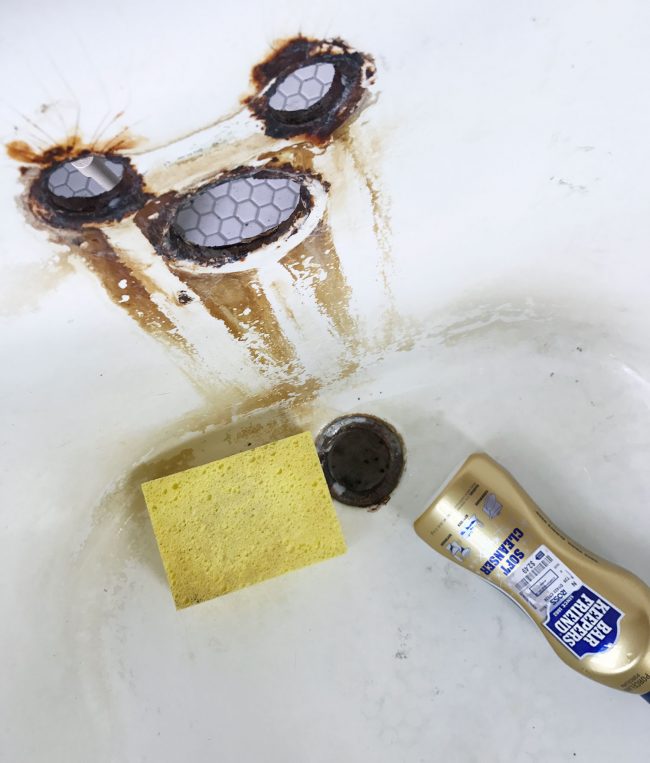
We decided to give it another chance, this time letting it sit for longer (about 15-20 minutes) and then scrubbing with a Heavy Duty Magic Eraser instead. This worked a lot better but was a bit slow-going and we burned through a few Magic Erasers very easily.
With the second coating of soft cleanser still soaking, we swapped out the Magic Erase for fine-grade steel wool. I’m not sure if it was the cleanser or the steel wool, but we finally started to see some noticeable progress. It still required A LOT of elbow grease, but it was insanely satisfying to see those rust streaks dissipating.
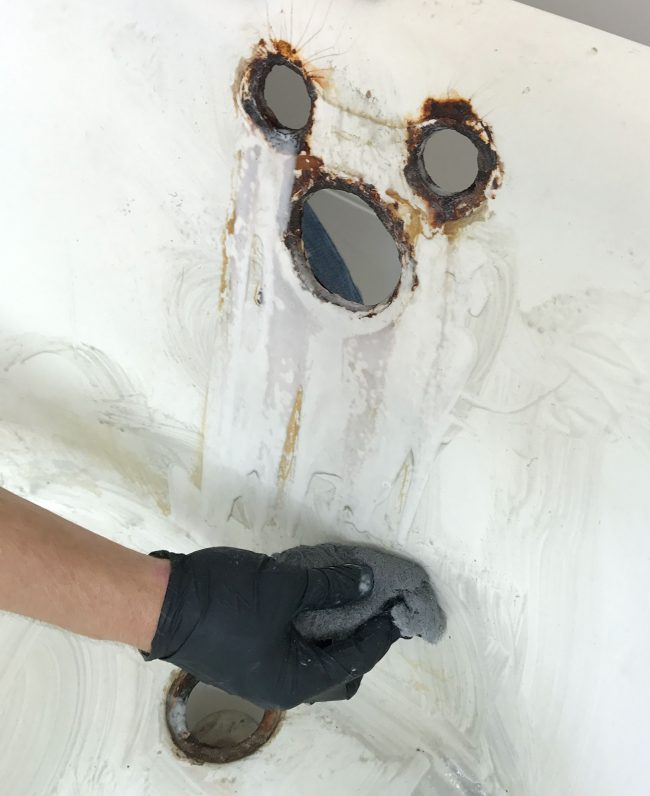
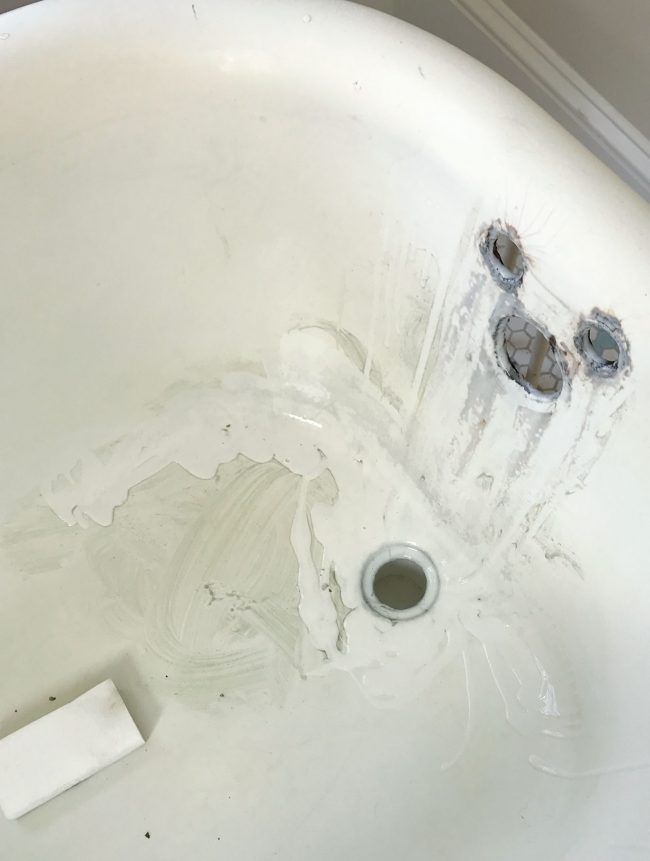
NOTE: We also very gently scraped it in some parts with the dulled tip of our multi-tool, but you could also use a razor blade or putty knife. I didn’t take a picture because I didn’t want to necessarily recommend it since it can etch/scratch your tub which is NOT GOOD, but we checked frequently to make sure we weren’t scratching ours, and it was helpful in chipping off some large chunks of rust-covered hard water stains. This would also be helpful in removing old silicone caulk.
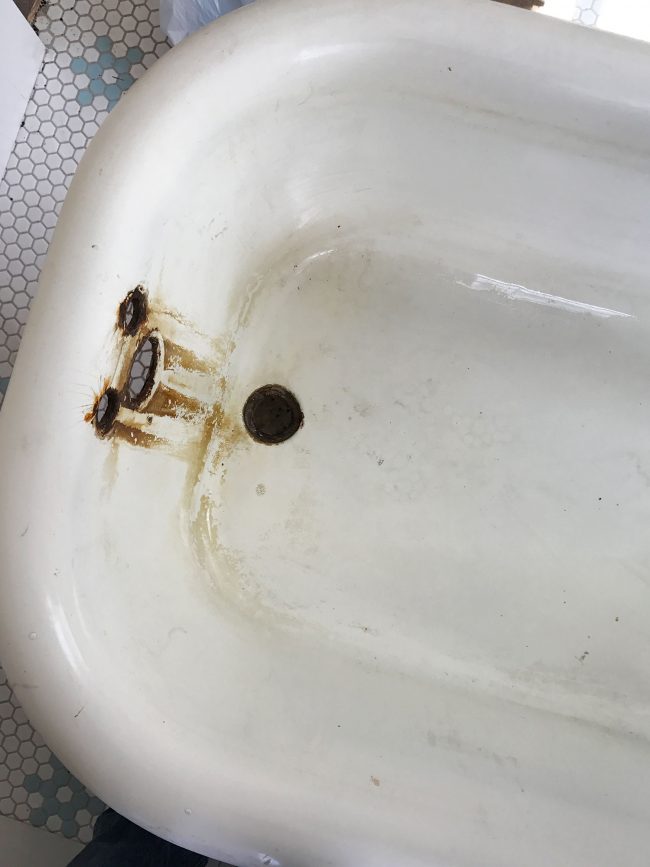
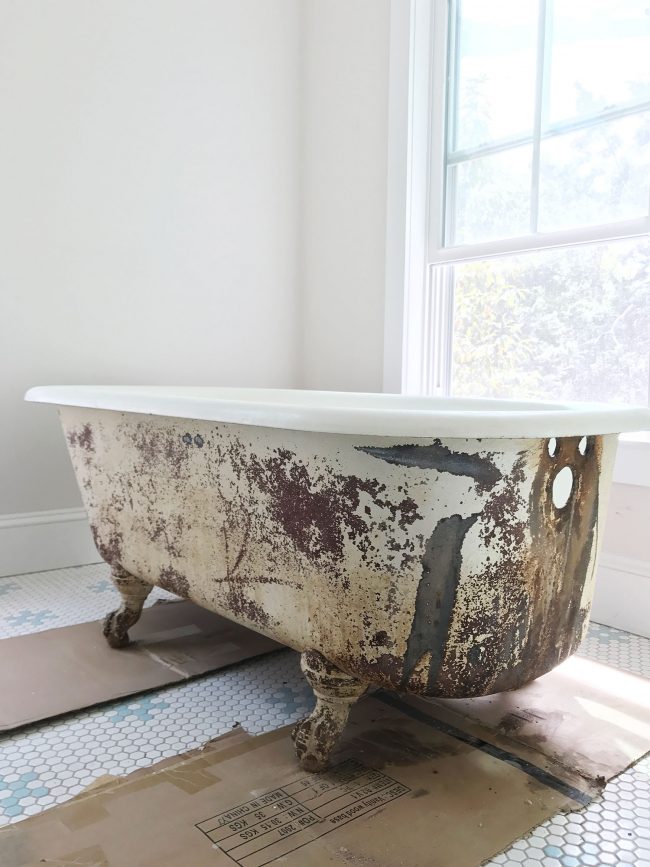
The final results are not flawless, but we are more than satisfied with how it looks and I’m more than willing to plop my bod down in there for a good soak. Plus, all the rusty-looking rings you see below will be covered by a new drain, faucet, and spigot once they’re installed.
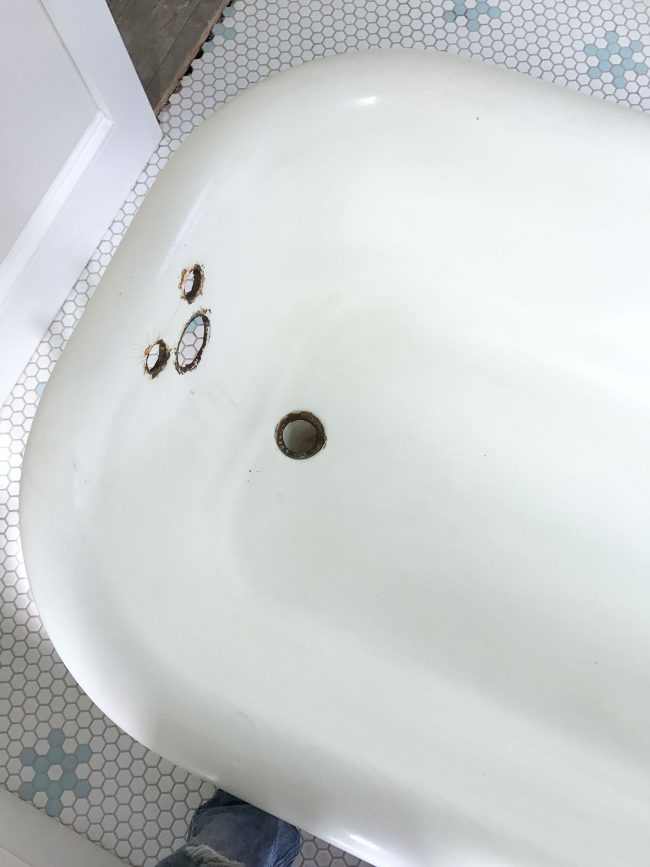
Here is a side-by-side of what we achieved with JUST CLEANING – no actual refinishing or reglazing. Since we were able to uncover the original finish in such good condition, it gives us lots of confidence for how it will hold up moving forward.
Now let’s talk about restoring the outside, because what good is a tidy interior if the exterior looks ready for a horror movie?
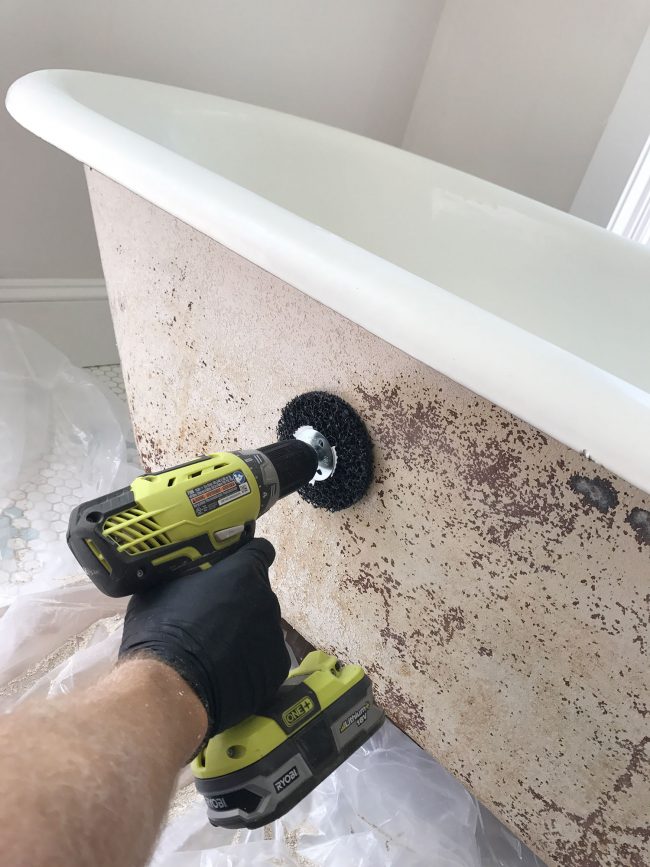
Step 4: Sand The Outside
Unlike the inside, the outside of our tub had a lot more flaking rust and paint. Our first step was to sand the outside get rid of the already flaking paint so we could have a relatively smooth surface to paint.
NOTE: Always test old tubs for lead paint! Many have it, which is extremely dangerous, especially if kids will be bathing in them. We were thrilled to find out ours was clean.
We first sanded by hand using some coarse grit sand paper and sanding blocks, but later found a more effective method was using this rust-removing drill attachment instead. It knocked off even more of the loosest parts of the old finish than the sanding block did, and in much less time.
NOTE: We were both wearing heavy-duty lead paint removal masks during all this sanding just to be safe because tons of dust flies and even though it checked out to be lead-free.
Next, we went over by hand with medium- and then fine-grit sanding blocks to smooth it out a bit more. It would’ve taken us hours to get everything down to the original finish, but in about 20 minutes we got it down to a smooth-to-the-touch finish with no more flaking, and that’s good enough for the next step.
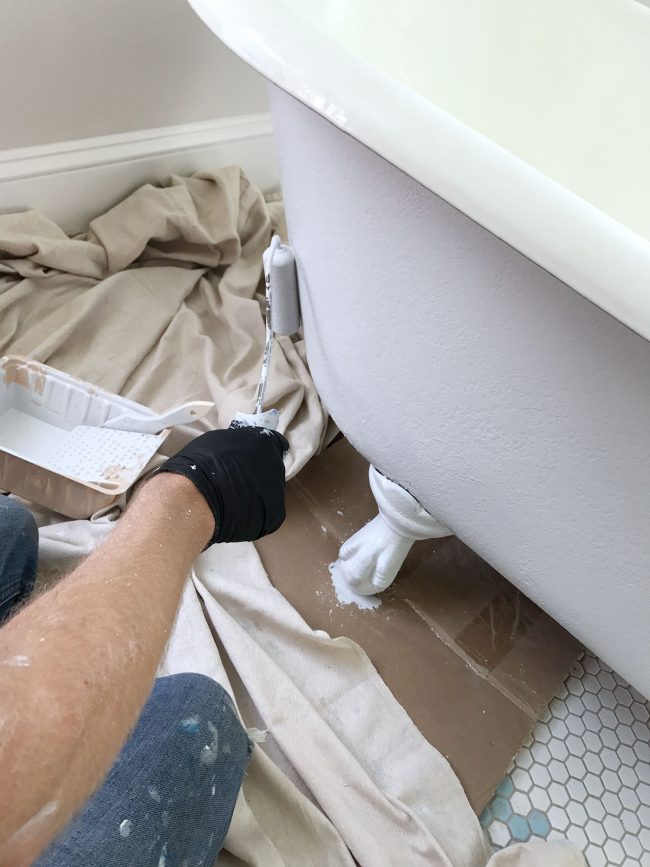
Step 5: Paint With Clean Metal Primer
After a wipe down with a clean towel, we were ready to prime. Based on a long conversation with the pro at our local paint desk, we chose this oil-based Rust-Oleum Clean Metal Primer to do the job. This product is a triple-threat when it comes to refinishing the outside of your clawfoot tub:
- It covers existing rust
- It prevents future rust
- And it readies the surface for paint

We applied with small foam rollers for a smooth finish on the large surfaces and then cheap chip brushes to get under the lip and around the actual clawfeet. Be warned that it’s pretty dripping (so protect your floors!) and stinky (so open your windows! and/or turn on a fan).
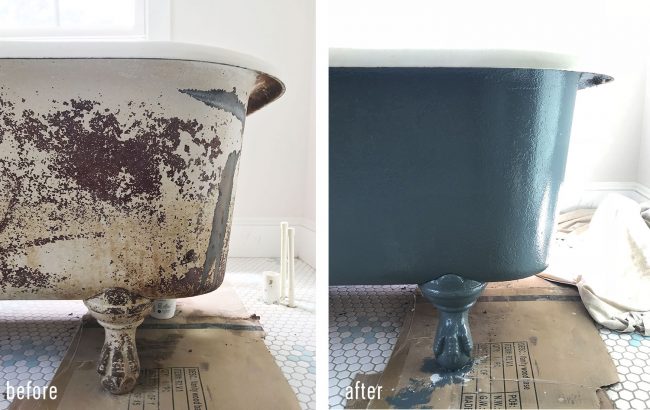
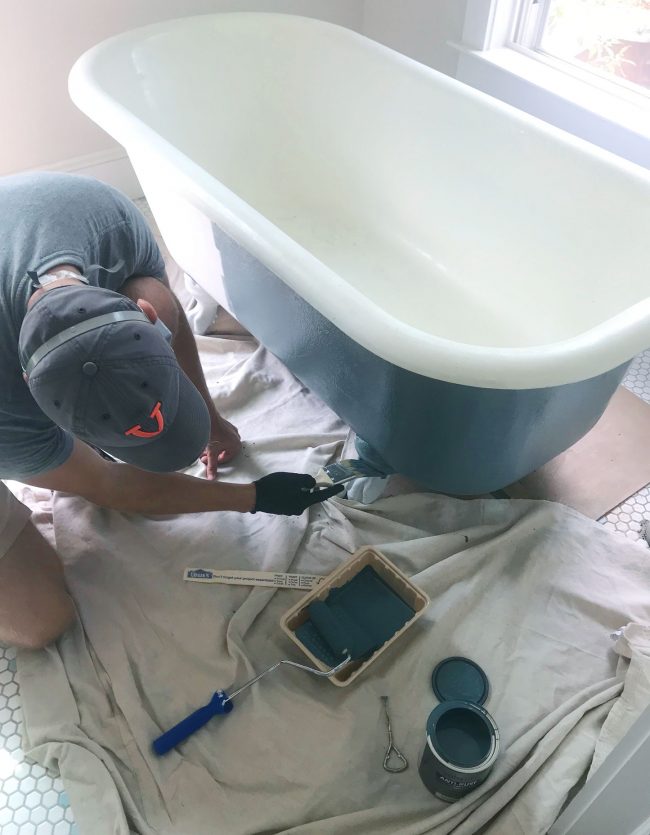
Step 6: Paint The Outside
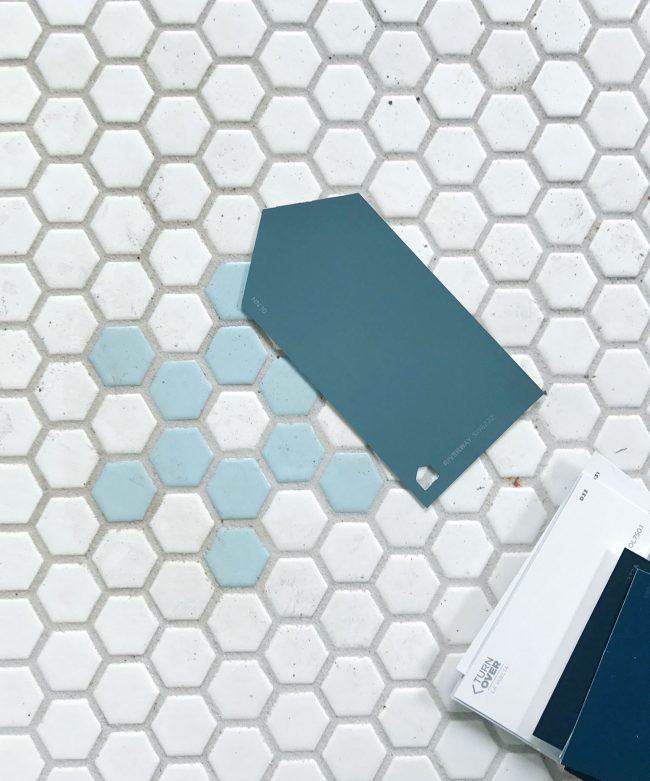
Once the primer is fully dry, you can paint the outside in the color of your choice. We considered a whole range of colors for the outside of the tub, but we landed on Riverway by Sherwin-Williams. All of the straight taupes or grays felt a little too boring for a room with such a playful floor pattern, and we wanted to go noticeably darker than the little accent tiles in the floor so it didn’t look like we were trying to match it.
We had the color mixed at Lowe’s in this Valspar Anti-Rust Armor paint, which was recommended by the paint pro we chatted with. It’s moisture and stain resistant and has some additional rust prevention built into it. The literal description online says it’s great for “appliances, playground equipment, mailboxes, and tanks.” I know they probably mean things like propane tanks, but I got a good laugh imagining someone painting a giant military tank by hand with this stuff.

Once again we used small foam rollers for most of it, and then we used a paintbrush meant specifically for oil-based paints to get between the toes. This paint was also pretty stinky (hence the masks we donned again for this step) but it went on much thicker than the primer.
You could choose to paint the feet an accent color (like black, silver, or gold) but all of our inspiration photos of clawfoot tubs had this two-tone look with a white interior and colorful exterior, not a three-tone effect. That’s definitely something you can go for if you like that extra foot-bling though!
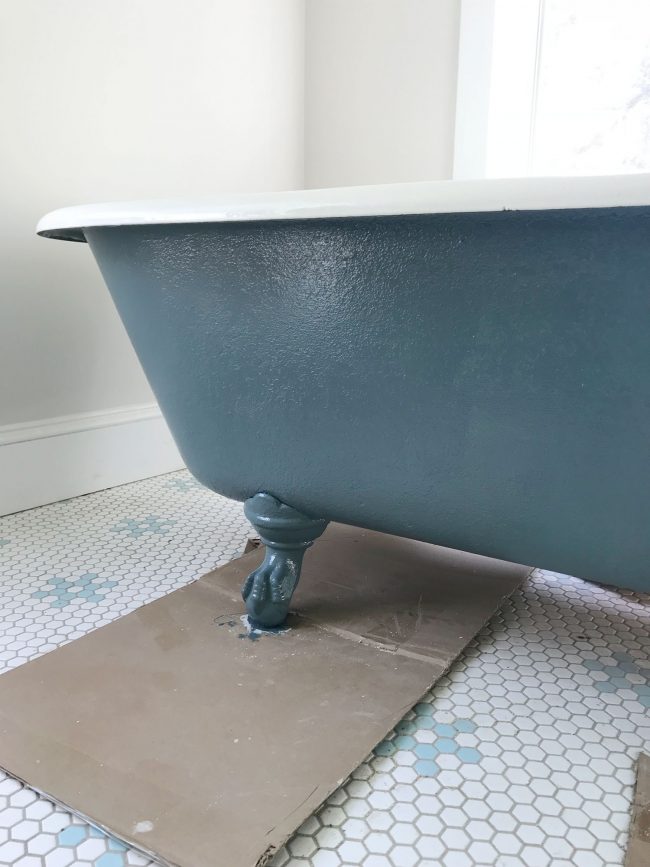
You can see that the outside isn’t perfectly smooth – you can still see the subtle topography of the old finishes beneath the fresh coat of blue. We’re actually like it gives the tuba sense of age and history, like it’s been in this house for decades instead of some new replica that we brought in.
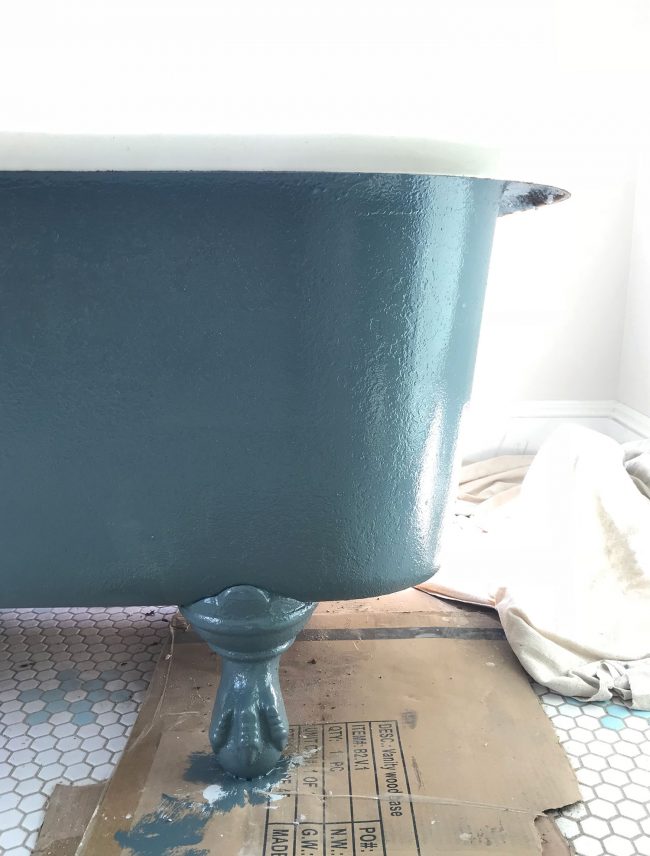
Dappled dots or not, it’s certainly a huge improvement! It took us around $50 and a fair amount of sweat, but we got something that looks pretty darn close to this Rejuvenation clawfoot tub that retails for $3,300!
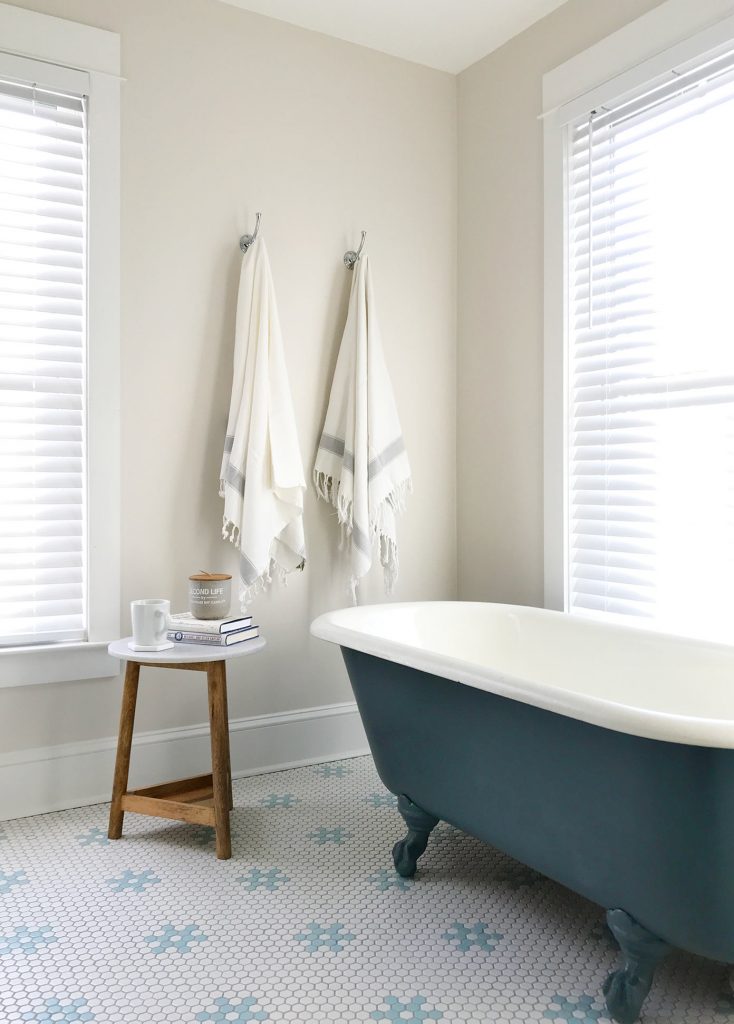
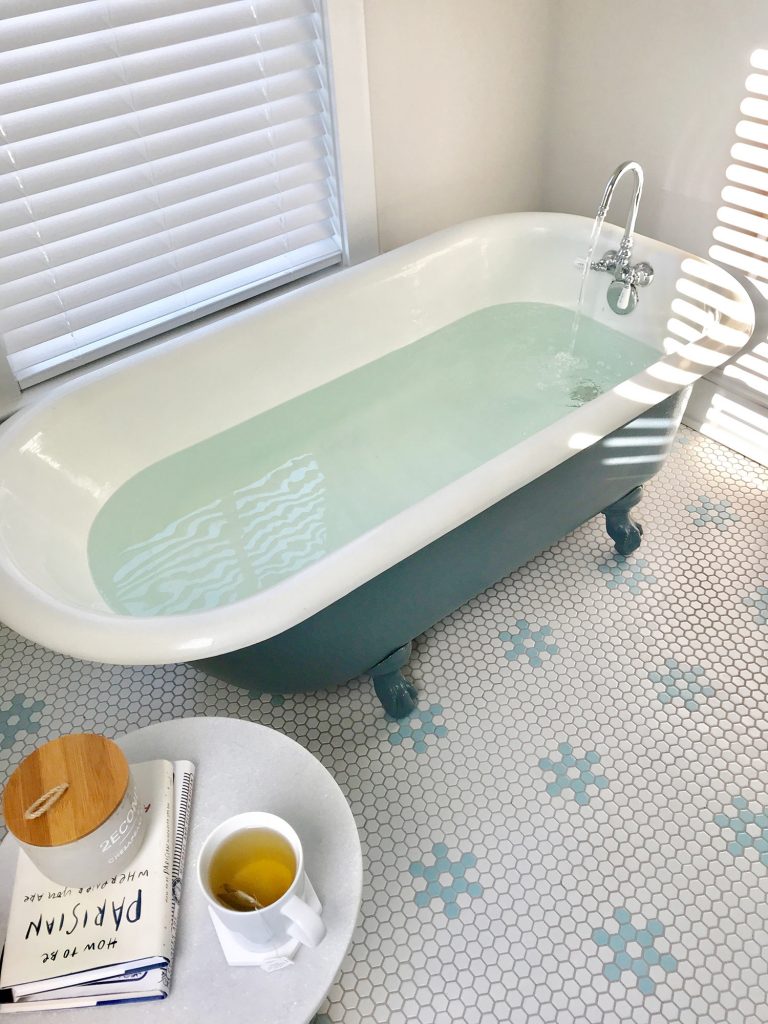
Now fast-forward a few more weeks once we got this room more fully put together – and our plumber installed the new bath fixtures – and this is what we’ve got:
And even better, yet, look how beautiful she looks with water in her!
So we hope this inspires you to give any old, nasty clawfoot tub you come across a second chance.
Psst – Wanna read more about this beach house rehab project of ours? Click here to see everything we’ve done for the past year to get it to this point!
*This post contains affiliate links*
