Today we’re going to show you how we constructed an easy DIY deck gate to help keep our dog Burger from escaping. He loves laying in the sun out there, but we wanted an affordable and attractive way to stop him from running off after a squirrel or something. We also have a newborn and a toddler, so the gate will help with them too. And the whole thing only took a couple of hours and cost us less than $30!
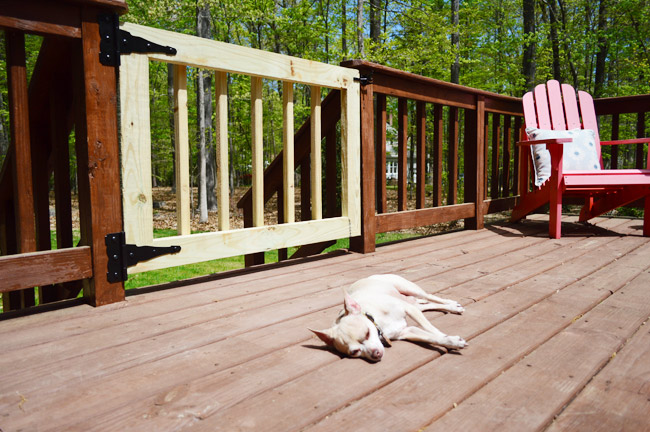
We don’t have a fence on our property, and he has gotten more brazen lately and may even wander into the neighbor’s yard. So far our solution has been this very classy plywood boards we’ve been leaning against the opening. It works surprisingly well, but it’s flimsy and ugly.
And while we could’ve bought a premade, freestanding gate. We wanted something that was integrated into the deck itself.
Material & Supply List
I read a couple of tutorials online that were particularly helpful (this one), then I took some measurements, sketched out a game plan (I modified the plan), and hit up Home Depot. Here’s what I came home with:
- 2×4″ pressure-treated boards
- 2×2″ pressure-treated balusters
- Gate hinge and latch set
- Miter saw
- Screwdriver
- 2″ deck screws
- Measuring tape
- Clamps
- Pocket hole jig (optional)
- Carpenter square (optional)
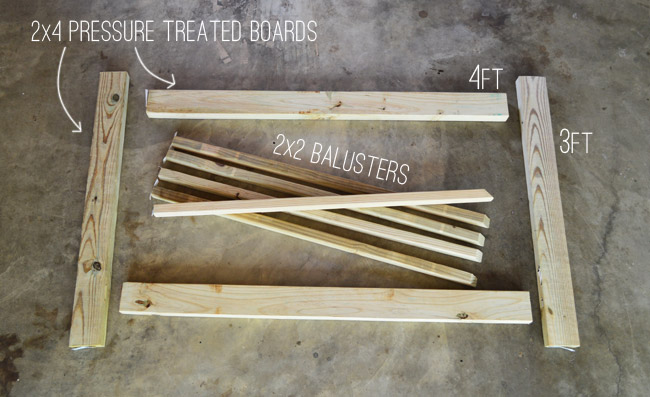
You can see the basic arrangement of the deck gate build above. I was able to save money by purchasing some longer 10′ boards that they cut down in store to fit in my car (that’s what you see above). I was building too gates, so my materials were double what you see in that photo.
Step 1: Measure & Cut Your Wood
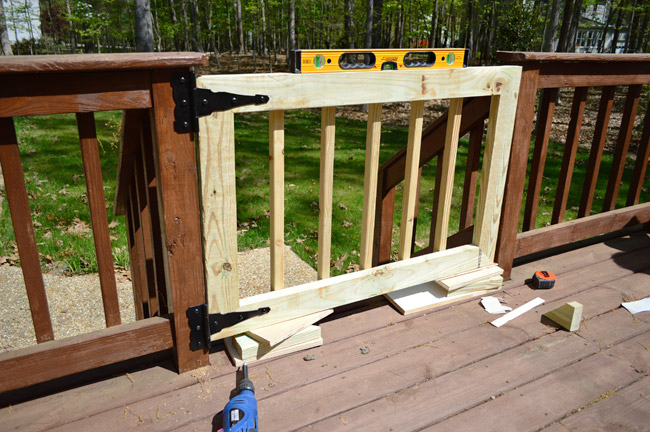
The width of each gate should be 1″ shorter than the width of the opening. This leaves room for it to swing easily once finished. The height should match your existing deck railing. This particular gate was 44″ wide and 29″ tall. We also chose to miter the corners of our gate for a cleaner look, but that’s up to you.
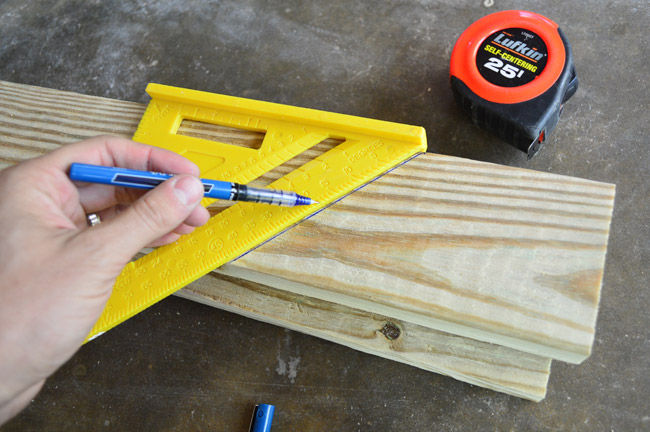
Using a carpenter’s square to mark your 45° cuts is recommended to get the most precise cut. We also suggest cutting your boards in pairs: the top & bottom boards together, and the two sides together. This ensures that the pairs were identical lengths and will help keep your gate square in the end.
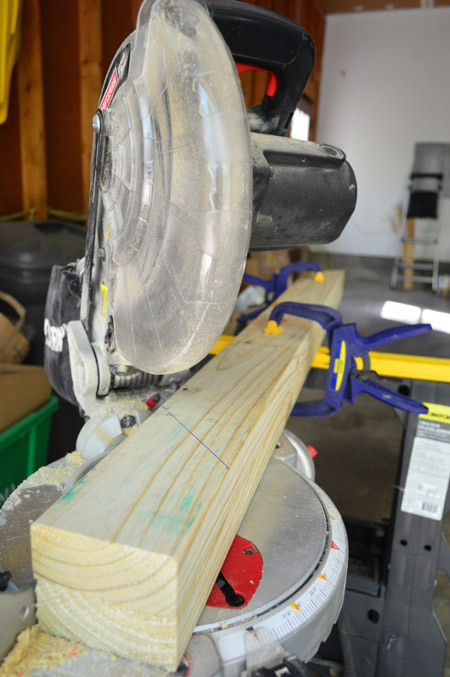
You can see we clamped the board together as we cut to keep them lined up as we cut them on the miter saw.
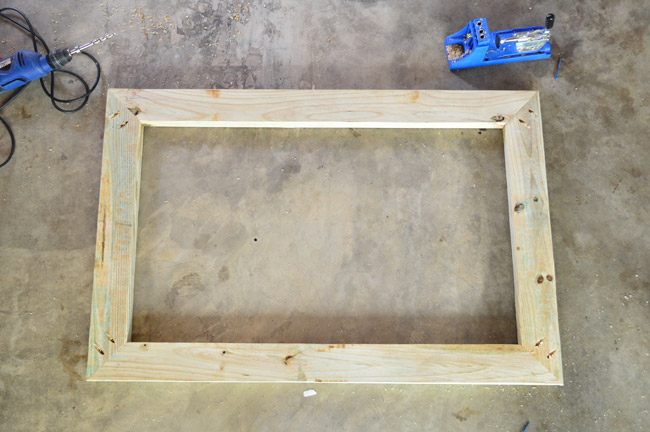
Step 2: Screw Your Gate Frame Together
To join my deck gate together, I used my Kreg Jig to create two pocket holes on cut end of the 2 vertical boards (you could do the horizontal boards instead, but there’s no need to do all 4). These are holes I’ll later fill with wood putty.
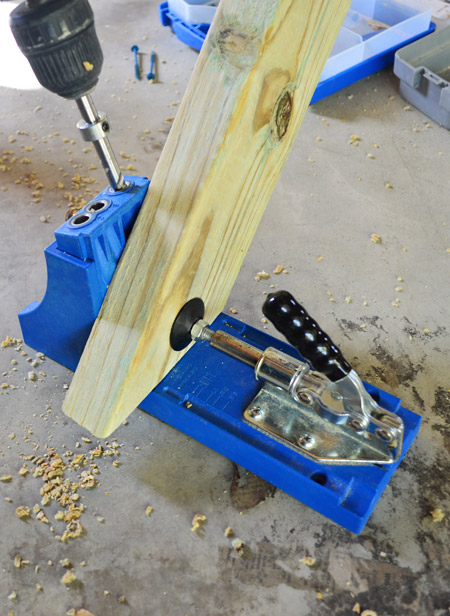
If you don’t own a pocket hole jib, you could also just use long screws right through the sides of the boards. We just find the pocket hole system is a tighter, more precise system. Here’s my frame after everything was screwed together using 2″ deck screws.
Step 3: Add Balusters To Your Gate
Next we attached 2×2″vertical balusters to mimic the look of the rest of the deck’s railing. We measured the spacing between the existing balusters and determined I’d have space for five of them on my gate. So after cutting them to length, I attached the first one at the center point of my gate on both the top and the bottom using two 2″ decking screws.
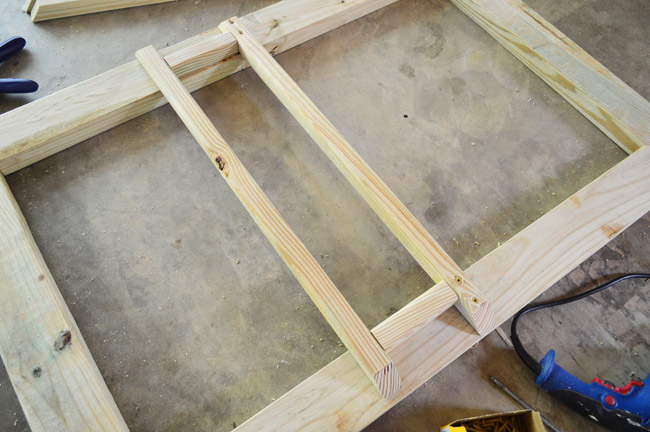
To make this task easier, we recommend creating a spacer out of scrap wood to make sure your balusters are evenly spaced. You can see ours in the photo above.
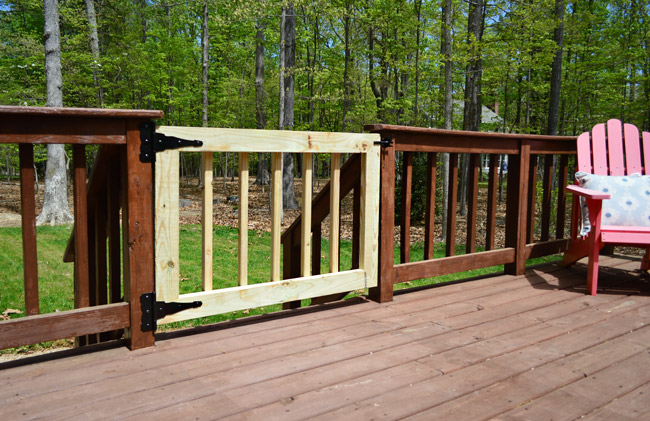
Step 4: Hang Using A Gate Hardware Kit
With the gate constructed, we just needed to attach it. Home Depot sold a $15 kit that included two T-hinges and a latch. Your hinge should stretch about 1/5th the length of your gate, so these 8″ hinges were just about perfect for our project.

To hang the gate, I used some scrap wood to prop it in place and (with Sherry’s help) determined the best spots to attach all of the hardware with the provided screws. We couldn’t center the top hinge (it ran into the existing deck railing) so it rides a little low. But once the light wood is stained to match the rest of the deck we hope it won’t be too noticeable.
Then we just attached the latching mechanism to the other side, and we were in business.
Some people also choose to install an anti-sag kit on their gates to keep them square over time. We opted not to at this point because we preferrred the cleaner look. It’s always something we could add later, but luckily our gates aren’t very big or heavy.
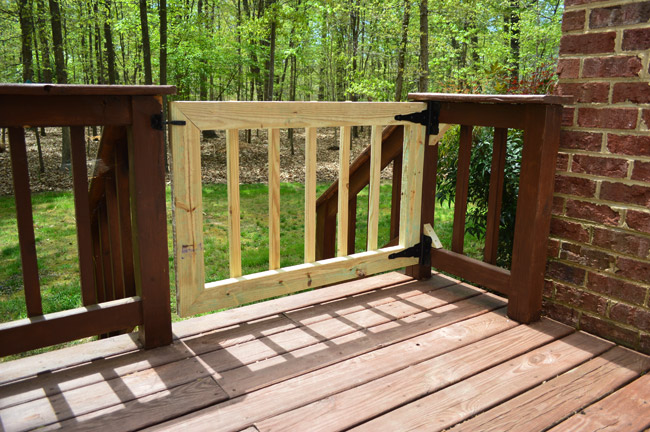
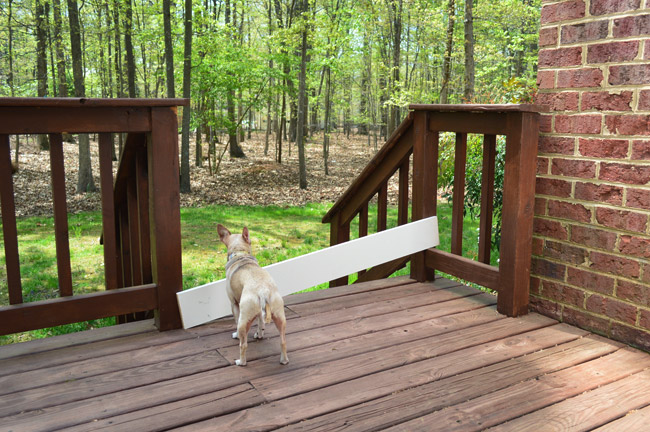
The gate above was a bit challenging because it was attached at a corner of the deck. Since we couldn’t screw into the post, we had to use the horizontal rails instead. The hinge was too tall to fit entirely on each rail so we screwd in some blocks (the initial mitered corners that I had sawed off) to give the hinge a place to attach.
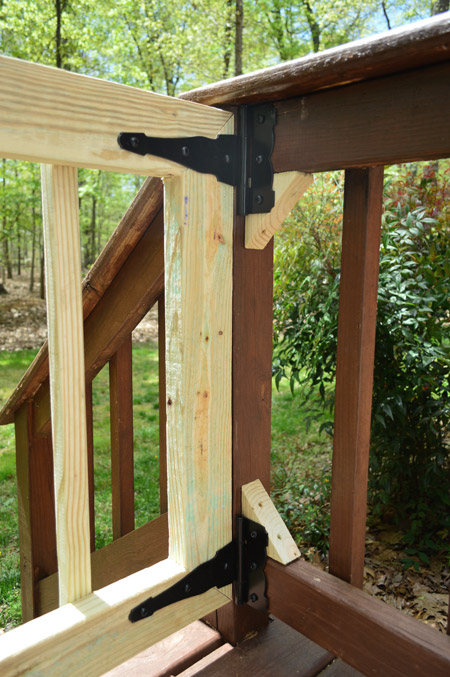
Once everything is stained, the blocks should blend right in with everything else.
Step 5: Stain And/Or Seal Your Gate
Depending on the look you want, you’ll likely want to seal or stain your new deck gate. Just be sure to wait about 2-3 weeks to let your pressure-treated wood dry out first. If you seal it too quickly, some of the pressure treatment chemicals can cause bubblnig or peeling. We used the same stain we’d used months prior to stain and seal our whole deck. You can see one of the finished gates in the background of this photo.
It took just about three hours to make both deck gates and my total cost was $53 ($23 for the wood and $30 for the hardware). And it’s been HUGE help in keeping Burger on the deck. Sure, he could squeeze his little chihuahua body through the gate if he really wanted, but he’s just not that adventurous. Remember: this is the same dog that was stopped by a small plywood sheet before.
And even though our kids don’t play out here unsupervised at this point, we know thes gates on the deck will be extremely helpful in preventing falls down the stairs. Especially once our newborn reaches the learning-to-walk age.
Want More Deck DIY Projects?
We’ve tackled a lot of builds and home improvements to our various decks over the years, so be sure to check out these posts too.

Teresa @ wherelovemeetslife says
Good idea… and that seemed pretty straight-forward. We have no decks, but have a min pin that absolutely basks in the spring and summer weather. We opted for an underground fence and have been pretty happy with the purchase. We have had it about 5 years now and the only time we have issues is if she wears her battery down and we do not realize it. On the other hand we also have a boxer and she NEVER tests her collar .. lol she has no desire to wander.
I hope Burger enjoys!!
Lisa says
Just some thoughts, for anyone considering invisible fencing — When functioning properly, underground fences keep the dog in, but they don’t prevent other dogs or animals from entering the yard and fighting (or breeding!) with your pet, or spreading parasites or disease, or people from entering the yard and stealing your pet (dog theft is a serious issue in some areas, mostly for “bait dogs” for dog-fighting rings). Even with an invisible fence, I would be afraid to leave my dog outside unsupervised.
Mary Beth says
I cannot get over my admiration and total jealousy of how when you need to do something you guys just DO it. LOL.
That gate looks amazing and I wish that either my husband or myself were so handy… I’ve been wanting to add something like that to our front porch for years so that the kids can play safely… hasn’t happened though.
http://hystericallyeverafter.com/2014/04/16/wish-list-wednesday-pondering-porches/
Hope you’re all enjoying these precious days with Clara & Teddy!
xo MB
Mary | Lemon Grove Blog says
Having trouble accessing the site this morning :( Looks like I’m able to (maybe?) get to the comments page, but can’t see the post. Hope you guys are adjusting well to life with TWO littles!! :)
YoungHouseLove says
So sorry Mary! Anyone else having an issue? Maybe try another browser or clear your cache/data/cookies and try again?
xo
s
jessica says
Same issue. I’m on mobile. The page was a little off yesterday, all the borders and stuff were missing. Today it just shows me comments only.
YoungHouseLove says
Can you guys tell us what browser you’re using (ex: Internet Explorer 6, Firefox 3, etc)
xo
s
maria says
i am having the same issue! you guys broke the internet :)
YoungHouseLove says
Ugh, this sounds regional. Hmm. Or maybe it’s just on certain mobile devices? We are on our iphones (and laptops) and seeing it fine, and our load time/internal stuff says everything is running well too. Are you all in a certain region? Are you all on mobile phones? Would love to get things fixed for you guys!
xo
s
Alisa says
I couldn’t get to this post from your site. Every refresh didn’t show a new post. But I could get on the post, which loaded fine, coming over from facebook. I’m on Firefox.
YoungHouseLove says
Thanks Alisa!
xo
s
Paula says
Same for me. I’m in GA, on a laptop, using internet explorer…
YoungHouseLove says
To anyone having an issue, can you try refreshing a few times and if that doesn’t work, just clear your cache/cookies/data. That should solve it we think!
xo
s
Melissa says
Had problems via chrome this morning, but firefox loaded it okay. I’m in NC. I uploaded a pic of what I was seeing to your fb page in the reply/comments where everyone was posting about the problem. Hope it helps!
YoungHouseLove says
Thanks Melissa!
xo
s
Pam the Goatherd says
I tried to get in from your facebook link post and got the “page unavailable’ message several times before it finally loaded.
I’m in South Central Michigan on IE. It’s raining like crazy here today and this system covers the entire Midwest and Great Plains regions. Don’t know if that might be what is causing the problems. Rain always seems to slow things down internet-wise out here in the boonies.
YoungHouseLove says
Oh man, thanks Pam! Maybe that’s what’s going on. So strange!
xo
s
peggy schomaker says
Same here–comments only for Deckgate from FB, or I get April 24 page when I go from my favorites bar.
YoungHouseLove says
Can you try refreshing a bunch of times Peggy? It seems to have cleared up for a lot of other people with just that.
xo
s
Nancy says
Chrome 34 is major messed up as far as showing YHL. I usually use Firefox, which has worked (and is working) fine. I’m in south Tennessee. (since you say it may be regional?)
HTH
Alissa says
No problems accessing the site in Colorado (if that helps diagnose anything). Good luck!
YoungHouseLove says
Thanks Alissa! At this point we believe the glitch is over. Anyone still having issues anywhere? We haven’t heard of any for the last half of the day so we’re hoping it’s resolved :)
xo
s
Maureen says
Yay! We were just looking to buy baby gates for our deck to keep our dog in, but this is way better. Our deck is on the front of the house, so we need something that looks nice, but can also be latched back when we want to keep them open. This is a pretty easy looking project (said the girl who always thinks things look easy until she actually TRIES them.)
Barbara says
Ha ha Maureen – I have the same problem (thinking things are easy) and hubby ends up coming to sort out my mess!
Rachel says
Same here. It looks easy, I get it going, and then I convince hubby to help me with X part after I screw it up enough. Do I get a A for effort? :)
Ashley H. says
It looks great! Burger doesn’t try to squeeze through the balusters? We have a small dog and he is able to maneuver his way through them.
YoungHouseLove says
Burger has a very unique dog-personality. If you put a curtain up he believes he can’t go through it. The guy is either extremely timid or lazy or both. Since he’d have to jump into the air, clear the bottom frame and the balusters perfectly, and then land on the stairs below, I think he just doesn’t have it in him. But a more brazen pup might be able to squeeze through if they’re small – and determined – enough, in which case we’d recommend closer spacing or adding some sort of a cross board.
xo,
s
braelin says
I was wondering the same thing– it looks like he could shimmy between them (glad to know he can’t and/or his personality simply won’t lend itself to that…). The image of him having to leap the gate and nail a landing on steps on the other side is funny…. you are lucky that he won’t attempt that… my pup would totally try (and probably break a leg in the act…)!
Jamie says
As both of my dogs think they are ninjas, I had the same thought/concern. I have a husky/shepherd mix who would likely try to squeeze through those balusters, and somehow she’d probably succeed.
Tiffany says
I have a 7 lb “mix” and she totally jumps baby gates! She can clear a 4 ft. baby gate without touching it. We think she has Italian greyhound in her? Anyway she’s like a show dog lol.
YoungHouseLove says
HOLY COW! Get that dog an agent.
xo
s
Kim S says
Sherry, you said Burger is maybe timid, lazy, or both. I would throw “extremely obedient” into the mix…give the guy some credit, ha! Maybe he just figures that if you bother to block it off, you must want him to stay out, so he will. :o)
YoungHouseLove says
Haha! I wouldn’t go that far – he’s amaaaazing at stealthily stealing Clara’s snacks… as long as it just involves running up to the ottoman and grabbing them (no heavy acrobatics, haha).
xo
s
Rachel Snodgrassgr says
Burger is so cute, behaving so well! We use a 1 ft tall shoe rack to keep our big boxer dog out of the kitchen, its so funny to see him longingly stare at food from behind what amounts to an imaginary blockade. Your woodworking skills are getting so impressive, any chance you will ever build the kids an outdoor playhouse? I love you guys!:)
YoungHouseLove says
We have chatted about a playhouse but we think some sort of swingset/playset would get the most, so we’re debating building one of those or retrofitting an old one (maybe from craigslist) or something. We also want to make a little shed someday so that could be similar to a playhouse build…
xo
s
Manda Wolf says
You need to build a tree house! I have awesome memories of the tree house (split level with a crow’s nest, slide, monkey bars, fireman’s pole, and a swing made out of this huge thick rope) that my Papaw made for me when I was 7/8ish. I would love going there every summer to see my tree house. I even used the crow’s nest to do homework in when I was in high school and we moved back to Illinois next to my grandparents. What I’m trying to say is there are memories that a can only be made with a tree house for kids.
Bren says
Oh, totally do the retrofit off of Craigslist! You could incorporate a little play house/pirate fort space ship and save tons of dough! I even see them for free if you disassemble it yourself, all the time. Love the gate. My husband made one last summer after 12 years without one and we were like, “Duh, why didn’t we do this before we raised 3 kids and 2 pups?” xoxo
YoungHouseLove says
Love that!
xo
s
Jill says
That photo of him sunning his belly is awesome. He looks small enough to fit through the slats of the deck surround and gate – but I guess he knows his boundaries!
Anele @ Success Along the Weigh says
Aww, Burger gate! I love that piece of plywood kept him in. What a good pup. Our Toy Fox Terrier dug her way THROUGH a box to break out of a generous area in the basement we provided her and just thought stacking a box or two to keep her from wandering the whole space would suffice. Um, no. Your little man is much more polite. Gate well earned!
Barbara says
Oooh – another great idea. My yard is fenced, but my dog ignores the steps and flies off the deck – despite her joint issues. I may create one to force her to stop in the hopes that she will actually use the steps!
Crystal says
I really loved this post and hope you guys have more like this coming now that the showhouse is almost over (not that I don’t enjoy that too but this is why I relate to you guys and enjoy reading your blog so much).
We’re upgrading the chicken brooder and built a bigger one for our chicks (2 by 4 feet – until they move out to the coop) and had to deal with hinges and hook and eye latches this weekend too.
Allison says
I was looking through some old photo albums from when I was little, and my parents totally just used plywood to keep me on the deck!
Kelly says
It looks really good!
Did you think about cross bracing it, though, like this? http://www.casadecrepit.com/archives/001611.html
I’ve always been told that you need to either have a tension cable or a diagonal piece of wood across a gate to counteract the force of gravity. (I know my kids would speed the sagging along by stepping on the gate and swinging on it!)
Anyway, I just love your yard. It looks so peaceful and the covered area on your deck looks so inviting. Good job, guys!
YoungHouseLove says
Thanks for the link Kelly! We wanted the gate to match the same look as the rest of the deck, and have seen other tutorials where it seemed to work and hold up well (especially since it’s not a super wide gate) but the option to add something like that is good to know if we ever feel like we want to stabilize it more. It’s pretty solid with the 2 x 4″ frame though.
-John
Mara says
While I understand you maintained the spacing to keep things symmetrical, it seems like he would still be able to easily slip right through. Is it perspective or could he actually go through?
YoungHouseLove says
Thankfully, just like Burger can’t slip through the rest of the deck’s perimeter, he can’t get through the new gates. He’d have to leap into the air, clear the bottom frame and the balusters perfectly, and then land on the stairs below, and he’s just not that daring (he’s much happier to be lazy and bake in the sun). But a more brazen pup might be able to squeeze through if they’re small – and determined – enough, in which case we’d recommend closer spacing or adding some sort of a cross board.
xo,
s
Darcey says
The gate looks great! I’d love to adapt this to fit our problem spot with our dogs- but we just have a metal fence to connect to. :/ maybe we’ll get creative this summer- thanks for the inspiration!
Heidi says
That’s incredible! Now you just need one of these patio tables with built in ice coolers to make it the most amazing. dect. ever!!
http://www.krusesworkshop.blogspot.com/2014/04/step-by-step-patio-table-plans-with.html
Molly says
If you are going to leave that one gate open most of the time, you might consider putting a latch on the house somewhere to hold it up in position while it’s propped open. We have a gate like that and since we don’t latch it 100% of the time, it has started to sag on the latch side. Good luck – it looks great so far!
YoungHouseLove says
Oh yes, John mentioned that in the bottom of the post. It’s on the to-do list!
xo
s
Courtney says
We have dachshunds and have used these before until we could fashion a more permanent solution.
http://m.homedepot.com/p/Hampton-Bay-18-in-Wood-Picket-Garden-Fence-RC-74W/100039106/
They’re cheap, easy to put in and take out, & step over. Might be good until you get some fencing. Short dogs for the win!
Kirsten says
Beautiful gates. As a side note, I want Burger’s life!
Faith says
Hey, I’m in TN looking at the site on Google Chrome, and all I can access is comments on this post. If I go to the home page, it’s all wonky.
YoungHouseLove says
What if you go to our Facebook page and click the link to the post from there? Someone else said that worked for them. Only seeing the comments is so odd. Many other commenters seem to see it just fine, but a handful of people are clearly having an issue, so that’s what makes us wonder if it’s regional. Hope we can fix it for you soon!
xo
s
Michelle | Birds of Berwick says
Great idea! My naked-belly dog loves to bask in the sun as well! Luckily our yard came fenced in, but she burns the grass so we built her a little “pee yard” off a back area we don’t really use. Oh the things we do for love!
http://www.birdsofberwick.com/2013/05/14/thepuppyandthepee/
Kelley Storms says
I had troubles when I tried the link through facebook but it opens fine if you just go to the regular site.
Also, congrats on the new arrival to your family of 5 :) I have been reading daily for over 2 years now and I applaud your decision to scale back. HOwever, I will still check everyday ;) No lost site traffic from me!!
YoungHouseLove says
So strange! Someone else said the opposite (it worked from the site but not from Facebook).
xo
s
Rebecca says
The website is loading slower than normal for me as well…not terrible though. I’m in Tennessee, using Safari on my iPad. :) everything loads eventually though for me. Loving the gates!
YoungHouseLove says
So sorry Rebecca! Thanks for the info! We’re trying to get to the bottom of it. If you refresh, does it come right up for you? Or is it slow every time?
xo
s
Rebecca says
Seems like it’s back to normal speed for me when I just checked on another tab. It loaded the comments like normal too. Weird!
YoungHouseLove says
So glad it’s working now! To anyone having an issue, can you try refreshing and clearing your cache/cookies/data? That should solve it we think!
xo
s
Elizabeth says
What a great post! I’ve been meaning to make a gate for the deck at my parents’ house so my daughter can’t escape Burger-style :) This might be just what I needed to get on it!
JebberJay says
Perfect! I have the same gate set up for my dog, with latch and all). She loves lying out there in the sun. Last year, I added a doggy door flap to the screen so that she can go in and out at will. I bought an easy peasy kit that transforms a standard screen door into one with a doggy door. It’s the one at the bottom of this page, with the golden coming through. :o) http://www.theglassguruofroseville.com/in-glass-in-screen-pet-doors.php
Ashli @ Skunk + Clover says
Thanks for this DIY guys, it’s exactly what I’ve been looking for! We have the same problem with our little chi, except he’s slightly more brazen than Burger, preferring to jump straight over any barrier I’ve propped up!
Anna says
I’m having similar issues with the site using Chrome. Couldn’t see the post, and borders are missing, but saw the link to comments. Looks fine in Firefox.
YoungHouseLove says
Weird! To anyone having an issue, can you try refreshing and clearing your cache/cookies/data? That should solve it we think!
xo
s
Bailey says
I can open in Internet Explorer (which I will only use for you guys :) ) but not in Chrome even after refreshing and clearing cache/cookies/data. In Texas.
YoungHouseLove says
Argh, so sorry Bailey! We have no idea how to solve this since we didn’t change anything and internally (through our host/site dashboard/etc) everything looks fine. Maybe it’ll resolve itself in an hour or so?
xo
s
Laurie says
The gates look awesome. You did a beautiful job making them match the existing railing.
Do you ever look at what you can whip out now in 3 hours and sort of marvel how far you’ve come from when you first started DIYing?
YoungHouseLove says
Yes! I was gushing to Clara and Teddy about how lucky we are to have such a handy dad around!
xo
s
Rebecca says
So sweet!
Aimee says
John better start working out – it looks as though there’s more deck cleaning, staining, and sealing in his near future! I didn’t think that could fade so fast in just one winter’s time.
Lauren says
It’s funny that Burger is the star of today’s post, because last night I stumbled upon http://www.hamburgershouse.com. That site was active before I discovered YHL, so it was a huge and hilarious surprise!!! You guys are too much!!
Anna says
Well of course it looks fine AFTER I submit my comment. :)
YoungHouseLove says
So glad it’s working now! To anyone having an issue, can you try refreshing and clearing your cache/cookies/data? That should solve it we think!
xo
s
Diana says
I love fairly easy fixes that make life easier!
Meghan says
YES! When we had our deck built 4 years ago, I told our contractor to build 2 gates with locks so I could have our deck act like a giant playpen for our then 3 year-old, 1 year-old, newborn, and our little schnauzer! It has allowed me to be able to work in the kitchen and keep an eye on everyone without worrying about someone toddling down to the lake behind the house! Lots of our friends have added gates to their decks now since seeing ours! You will not regret it! In the winter months, I just prop one of the gates open with a heavy stone planter to allow our dog to go in and out without me having to walk through a foot of snow to open the gate for him!
YoungHouseLove says
So glad to hear that!
xo
s
Lo says
The gates look nice and well put together! Why not just put Burger on a long leash attached to the deck or something, so he can run around in the grass, but won’t get away too far?
YoungHouseLove says
With deer roaming through and the possibility of small dogs hanging themselves on leashes (if they run up the steps and get tangled and try to go back down) we just thought these worked better for us – plus they’ll keep Teddy corralled down the line.
xo
s
Lauren says
I thought deck rails couldn’t be any wider than a tennis ball? We have a home in VA and this is what a contractor told us when we replaced our deck rails.
Laura says
This is so great! My little guy is almost fully mobile (he just turned one – why do kids have to grow so fast?!) so I’ve been looking for something like this to gate off the deck.
Carolyn says
Gates schmates we want more Teddy/Clara!
But I mean those are really nice gates too.
:-)
Shar says
Does anyone know what the spacing between deck rails needs to be in order to be “kid safe”? Need to replace our older deck rails, and I am thinking that the ’80’s spacing is not up to code. Friends have told us rails need to be really close together, but no one seems to know actual dimensions…
YoungHouseLove says
When we built our old deck, the county code said there needed to be no more than 4″ between the rails. So I actually used a scrap piece of 4×4″ post to space mine evenly. The ones on this deck are about 5″ apart – and since we first saw this house shortly after I completed the other deck, it was one of the first things I noticed! Guess the code wasn’t as strict when this one was built a few decades ago.
-John
Steph says
I built a huge swingset last year and did a lot of research on deck and swingset safety regulations. The recommendation is no spacing between 3.5″ and 9″. The reasoning being that kids are too big to get stuck in a space smaller than 3.5″ and their entire bodies can pass through a 9″ space. Google CPSC Public Playground safety handbook. They also have much less specific recommendations for home playgrounds, but I was extra cautious when building
YoungHouseLove says
Thanks Steph!
xo
s
Kara says
Oh this is great. I am even more envious of your deck now. I’ve been letting my 3yo venture outside alone some around our house (and taking deep, calming breaths while I do), so this would be amazing. Unfortunately I’d need a 15-foot-high mesh perimeter to keep the cat in the yard though. So if you ever feel like blazing that trail for me…
Laura B. says
Hi, Kara.
I know a lady who has put normal chain link fence around her house and then put a hot wire fence attached to it on the yard side about a foot off the ground. Her cats never leave the yard. We are country folks so we use these to keep coons out of our chickens.
Kara says
Oh how interesting! I didn’t really think it was possible to contain cats!
Emily says
So funny Laura because my parent’s have two little dogs, a dog door to a 4 foot chain link fenced yard. The tiniest dog figured out how to scale the fence and get out and go with all the neighbors that were out for walks during the day. My parents lived on a farm so they put the hot wire fence on it for a few weeks until the dog learned to stay in. Never hurt her, but it did deter her jumping habit. My dad said that it was a lot more humane than her getting hit by a car.
Jen says
We actually use a standard invisible fence for our indoor/outdoor cat (along with our dog) and it works great! He’s been dying to go outdoors since we got him as a kitten seven years ago, but we’d kept him as an indoors-only cat. When he used to escape, he would take off running and we were always scared he would get lost or hit by a car. When we moved to our new house last summer, we DIY’d an underground fence, bought the collar from our local dealer, and he learned the boundaries very quickly. We live on 2 acres so he has lots of room to room and play but doesn’t get himself into trouble. He is so much happier now that he can go outside, and it is so wonderful not to have to worry about him darting out when we open doors anymore.
Everyone is amazed when we tell them that we keep our cat contained with an invisible fence – but it really does work!
Kara says
Jen, that’s amazing! We kept our cat inside for years while we moved around, but after we’d been in our house a year I let him out. He is so much happier now. He’s a very high-energy cat (ginger male!), and he was always restless inside. Once he got stuck in our neighbor’s garage overnight and I thought he was gone, but even then I couldn’t regret letting him outside because his quality of life is so much better. He’s much nicer to be around when he’s inside now.
But lately I’ve become more aware of him possibly being a nuisance to the neighbors as well as hunting birds, mice and lizards. Apparently domestic outdoor cats are a big threat to birds. So it would be more responsible to limit his range.
Joanna says
Gosh, you make it look so simple. And it turned out great! We don’t own any dogs, but I have a feeling this tutorial will come in handy when we have another toddler (and our own house, for that matter) some day :).
Ellie says
Our chihuahua lays in the sun the exact same way! She even gets a little tan on her tummy sometimes! I swear her and Burger are long lost relatives or lovers. They look a lot alike! I will have to send a pic one day!
Sarah says
Thanks for the motivation to get our deck gate done! The wood has been sitting in the garage for 2 weeks now. We need a gate to keep our 2 year old from wondering the yard. Our hinge will attach like your second gate, so it was good to see how you did that. Thanks again!
Grace says
Love the gate! My father-in-law actually built us the same type of gate for our indoor stairs when our son was a toddler. The adjustable baby gate never seemed to fit right on the stairs and I was always a basket case when he was near them (that is why they call me Captain Safety, after all:)) The fixed swing gate was a perfect solution. I thought we would have to take it down when we moved, but the new owners also had a little one and loved the idea.
Meggan says
I still maintain that you should end each post with a gratuitous Teddy/Clara shot, at least for awhile ;)
YoungHouseLove says
Ha! There are a ton of those in Instagram/Facebook for ya :)
xo
s
Ashley says
You will LOVE this down the line come toddling toddler! It’s been a godsend in our alwayswanttobeoutside home.
YoungHouseLove says
So glad to hear that!
xo
s
Amanda says
If Burger ever does get out, you can DIY him a special outside collar. Just lace 3 whiffle balls through a collar and he won’t be able to get more than his head through the slats! :)
Carolyn says
Site isn’t working for me, either. This post isn’t showing except through Feedly and I can’ only see comments. If I got to the main page there’s no background.
So…the slats on that gate look quite wide, like wide enough for a mobile infant or toddler to get their head stuck so I’m wondering if they’re up to code.
YoungHouseLove says
When we built our old deck, the county code said there needed to be no more than 4″ between the rails. So I actually used a scrap piece of 4×4″ post to space mine evenly. The ones on this deck are about 5″ apart – and since we first saw this house shortly after I completed the other deck, it was one of the first things I noticed! Guess the code wasn’t as strict when this one was built a few decades ago. Thankfully it’s just an inch wider (and a mobile infant’s head is most likely a lot larger – Teddy’s is about 4.5″ already).
-John
jessica says
Thank you thank you!!! We have been wanting to build a gate on our deck because we have stairs and I don’t trust my 16 month old to not go down them! We have been blocking it with the BBQ pit but he has been crawling around it!!
Erin D says
This may be a dumb question, but what happens if it rains on the gates before the 2-3 weeks time is done?
YoungHouseLove says
It’s just fine since they’re pressure treated. We had our deck unstained/sealed for about a season before we got to it at our last house and it worked great.
xo
s
Hilary says
Hi Erin, I think the 2 to 3 week drying time is for the chemicals in the wood to dry or cure. So rain doesn’t make a difference to that. But if you are painting something outside and it gets rained on, you would normally give it a couple of days to dry before painting.
Lisa says
I love it! Thanks so much for the details. I need to do this for our deck so the canine member of our clan can bask in the sun without being able to chase the two- and four-legged creatures that walk around our neighborhood.
Our former home had a second-story veranda and it was just about his favorite place in our home. He loved to spend hours out there. With a couple of gates, he should be in business again. Thanks!
Loren says
The gate looks great!
The plywood solution is adorable, we do something similar with our dog & a baby gate, it doesn’t properly fit the deck railings, but we just prop it in place and to keep the dog from wandering.
Stephanie says
We did the exact same thing on our second story deck the first week we moved in! It’s been the best $45 we spent on the house for our dog and cat! We cheated slightly and bought this handrail, cut it to size, stained it, and then added hardware. First time homeowners, we didn’t even have a saw so my husband used his hacksaw for the project and it still turned out great!
http://www.homedepot.com/p/Unbranded-Pressure-Treated-6-ft-Handrail-132380/202674738?N=5yc1vZc5i7