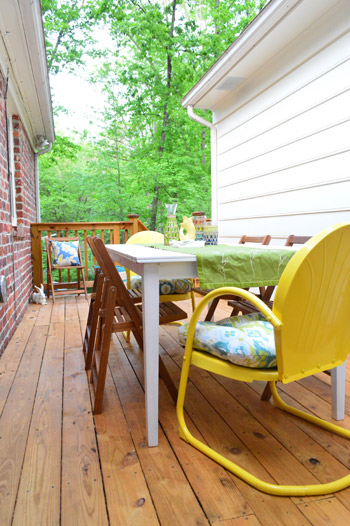
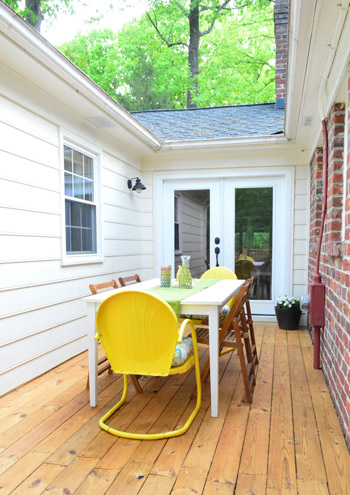
With our power washing done we could finally stain and seal our deck, which we completed and re-furnished on Tuesday (literally hours before our first showing!).
But let’s rewind to where we left off yesterday. We mentioned that after finishing it in late August we were told to give the pressure treated wood 2-3 months to dry out before sealing any of the moisture from the treatment in (apparently sealing or staining PT wood too soon can lead to terrible results). So by the time staining was advised, it was too cold out to apply the stain. But even after spring rolled around and we power washed, it still wasn’t quite ready.
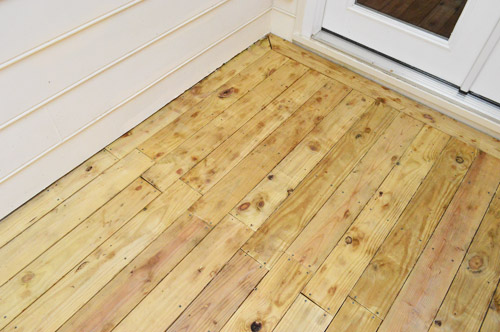
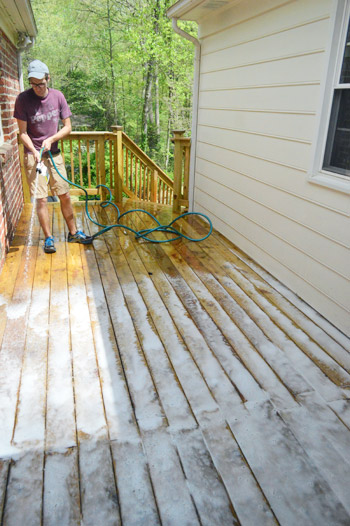
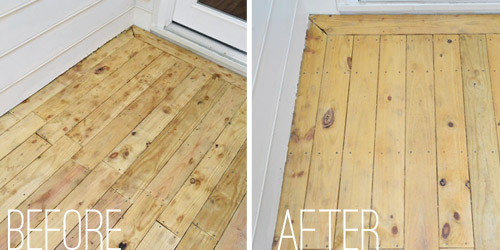
What was standing in our way? Some lingering grime that the pressure washer didn’t remove in this corner. Sherry didn’t think it was that noticeable, but I was determined to get things cleaner before staining (I feared that we’d seal them in and potentially darken those spots even more if we didn’t get them off first). Yes, you can call me Nerdy McWorrypants.
Since we hadn’t used a cleaner during the pressure washing process, I decided to try one after the fact. Lots of deck staining tutorials (like this one and this one) recommend applying some sort of cleaner first, so I didn’t want to skip that step. We grabbed this $7 “Deck Wash” because we liked that it could just be sprayed by attaching it to a garden hose.
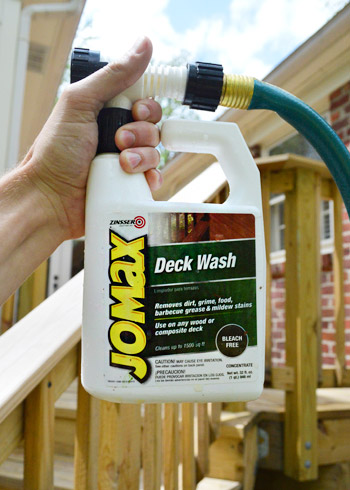
I followed the instructions, which was basically spray it, let it sit for about 5 minutes and then rinse it off. Could cleaning a deck really be that simple?
Apparently not. I didn’t even bother taking an “after” photo because it looked exactly like the before.
After two attempts (pressure washer, then cleaner) I was about to admit defeat. But I decided to give cleaning one more try, this time in the form of an $8 Olympic brand cleaner. I had bypassed it originally because it required buying this $11 sprayer.

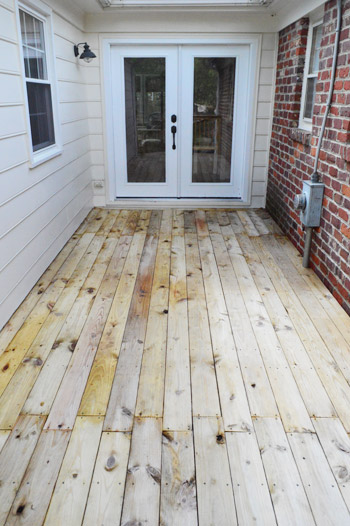
Well, this cleaner most definitely made a difference. The same spray process commenced, I let it sit for a few minutes, and then rinsed it off, but this time it seemed to essentially bleach the whole deck clean. I was a smidge panicked with the result at first (although I had read that a bleach mixture is a commonly recommended deck cleaner) but in the end it was the exact blank slate that we needed to apply a nice even coat of stain. So to anyone wondering if the $8 product with the $11 sprayer can be that much better than the $7 one that works with a hose… in our experience the first one did nothing and the second one worked overtime.
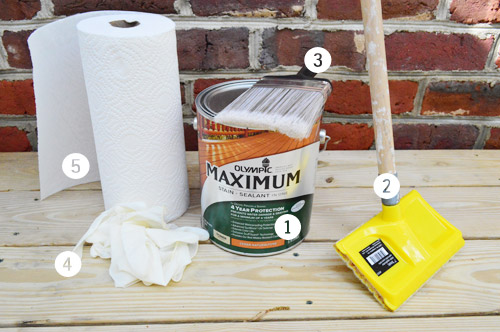
Next up was applying the stain/sealer, which Sherry and I were both eagerly anticipating (literally the minute Clara was tucked in for her nap we sprinted out to get started in the hopes that we could finish everything before she woke up). Here were our supplies:
- Olympic Maximum Toner in Cedar Naturaltone color (it’s a stain/sealant all in one, and was $37 from Lowe’s)
- Deck Stain Applicator ($7 from Lowe’s)
- Large brush ($6 from Lowe’s)
- Rubber gloves (already owned) – and yes, I now realize they kinda look like a certain other rubber item…
- Paper towels (rags would also work)
As for choosing the type of stain + sealer to go with, we heard a lot of great things about it from a friend of ours who recently used it (and a few readers mentioned the same one as well). We chose a toner over a semi-transparent finish because the color would be subtler and more of the wood would show through. We’d grown so used to the “natural” look of the wood that we didn’t want to go too dark (especially with the dark brick wall on one side) and our only other hope was that it wouldn’t look too red-orange either. Of course if you look at the photo below, straight out of the can it was pretty darn orange, but thankfully it dried to look a lot more subtle.
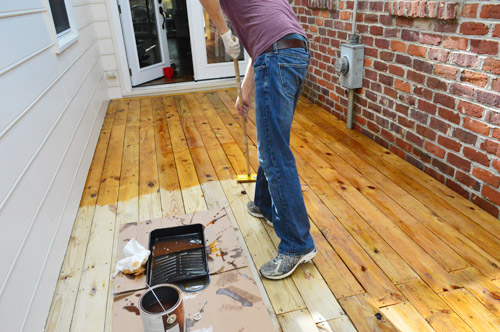
Before taking the train to Staining Town, we had read up on several options for applying it – spraying, rolling, brushing, etc. – and we opted to use a sponge-y “deck stain applicator” because we had seen my dad use one before at my Granny’s house. Both in watching my dad, and in our case, it was pretty easy to use and seemed to make things go really quickly. The only catch is that you need to “backbrush” afterwards, which keeps the stain from pooling in any place and also apparently helps work the stain into the wood. So as usual, I did the rolling-ish step (in this case, it was the sponge applicator) and Sherry was the brush girl (she followed quickly behind me, brushing over everything I stained to work the stain into the cracks and keep it from pooling anywhere).
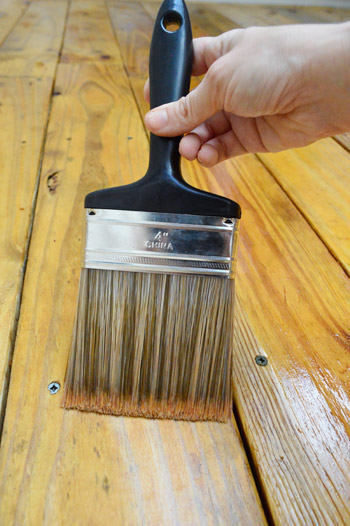
The top portion of the deck probably took us 15-20 minutes (this stain + sealer only calls for one coat). So that part was waaaay faster than we expected. It was the stairs and railings that ground us to a halt. That part had to be done with the brush making sure that we got all sides of each post while watching out for drips and puddles. So it took us more time and focus than we expected. Maybe two hours in total for that part? We kind of lost track, but Clara woke up before we were finished so I went in to watch her and Sherry “The Paintbrush” Petersik stayed back and got ‘er done.
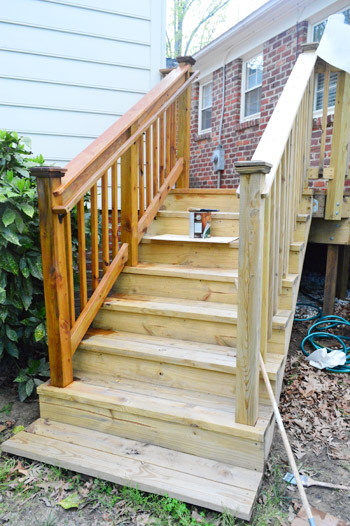
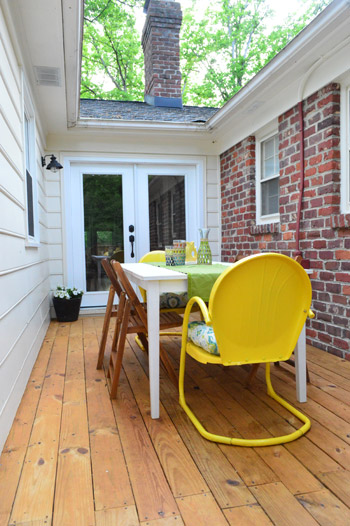
When the stain was still wet we worried that the color was redder than we had wanted, but when it dried it did exactly what we wanted – it just “toned” the wood, so it still looks similar to the other exterior wood around the house (like the fence around the patio, etc). Oh and you might notice that Sherry took a moment to paint the utility box to blend a little more with the brick, just like she did at our first house. It only took a test pot of paint (around $2.50), so although it’s hardly invisible, it’s a lot less “Look at me!” in person. And I think you can tell in the photos when you compare it to the picture a few photos up.
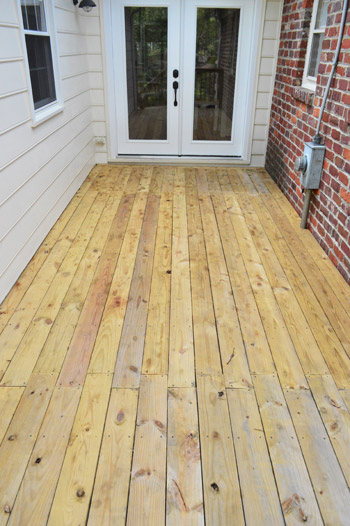
Best of all, I was totally redeemed from my failed-ish attempts at cleaning. Here’s that corner that was especially dirty looking.
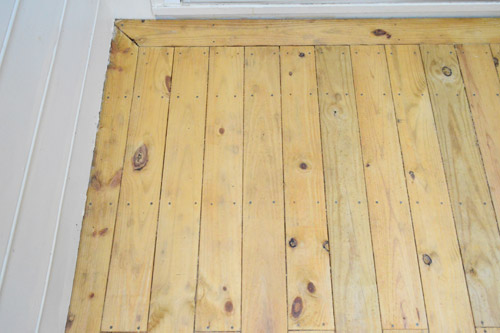
It’s not flawless, but it’s much improved over where we were post-pressure washing.
So now, eight long months after construction on the deck wrapped up (and 10 since it started!) it’s officially stained and sealed. And I’m still just as proud of her. Thankfully we got to enjoy the deck all through late fall and early spring (even before she was cleaned and stained) but it’s nice to know that she’s 100% complete and future acorns and leaves can’t do as much damage if they decide to hang out too long.
We also finally calculated the long awaited deck budget breakdown for you guys (we wanted to get her stained/sealed before breaking down the benjamins) so here it is:
Permit – $114
First lumber & hardware order – $1007
First auger rental – $60
Second lumber & hardware order – $251
Second auger rental – $60
Flashing – $40
Misc hardware & supplies – $95
Powerwash – $80
Cleaner & Stain – $76
Total: $1783
I definitely think if you didn’t have to build such a large staircase (ours has 8 steps with long railings on either side) you could save a good chunk of money. And if you don’t fail your first inspection and have to rent the auger again, you’d save 60 more bucks. Oh and you can save seven more if you buy the good cleaner the first time. Ha!
I think this project was one of my biggest (it’s right up there with our first house’s bathroom gut-job) and it certainly saved us money to DIY it (it probably would have been around 6-8K to get this hired out) but most of all it gave me confidence. Dude, I built a deck. And the permit guy said it would hold a bunch of elephants. I’m a proud poppa.
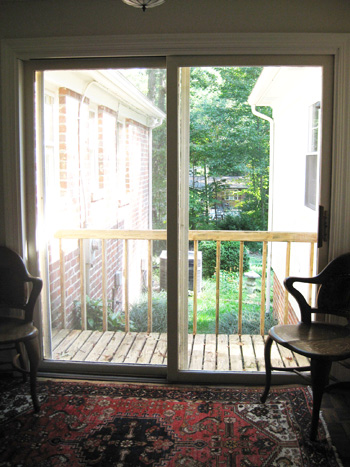
That odd little alley of ours has definitely come a long way. Here’s a picture we took during our first walk through back in 2010.
Anyone else staining a deck? Did the stain look crazy bright right after it went on? Have you tried one of those deck stain applicators on a stick? I really think in combination with the brush it was a fast yet thorough method.

Ainhoa@ALittleBite says
Thanks for the cleaning tips – out patio is always pretty dirty and we can never get it clean just by using the pressure washer. Will have to try this step as well!
m @ random musings says
I believe the active ingredient in the Olympic deck cleaner is bleach, that’s whyyou have to soak nearby plants with water and protect from runoff. What an awesome transformation!. Love the new color
YoungHouseLove says
Oh yeah, that makes sense!
xo
s
Anne @ Planting Sequoias says
Wow! This really makes a difference…especially from the way before picture! It’s like that spot was made for that deck. Nice work, John!
Lu says
Looks great! I can’t wait to see what you do with the deck at the new house!
Stephanie says
What a pretty, pretty deck.
Whenever you have a showing and someone comments on how nice that of a deck that is, is John like “Me! I built that!”? Because I would totally do that…
YoungHouseLove says
Haha! It has mostly been us leaving the house and a buyer’s agent bringing someone through (even when you sell by owner many folks come with an agent to buy it, which happened in our first house too). It’s actually nice since we don’t have to stand there awkwardly. Haha!
xo
s
Abbey says
We’re doing the same thing right now, although it seems to be taking two weekends! Luckily we’ve had sunny, dry weather in between. Yours turned out great!
Maureen says
Looks great! We are getting our deck boards and railings/stairs replaced very soon and I am beyond excited! I am really excited to pick out a color/stain. Do you think you will be able to salvage your new house’s deck or will you need to replace it?
YoungHouseLove says
Salvage! Thank goodness. I think it would take us a year to have built one that big…
xo
s
Erin says
I totally agree on the application method – worked great for us. But we used the same brand & type (but the 3 yr one) and it had faded out in less than two months. I was not impressed and am going to try a Benjamin Moore product this time.
YoungHouseLove says
Oh no, that stinks! Was yours the toner? We heard that specifically that finish is really durable since it’s so more opaque (as opposed to thicker things like semi-transparent, which can fade and scuff).
xo
s
Kelly says
Keeping this one (and all your other deck posts) bookmarked since we need to build a deck, and I was shocked at the estimates we got. Just need to find some time (and some funds!) so we can make it happen. Thanks for the final budget breakdown. It’s really helpful to know what we may be getting ourselves into.
Amy J. says
Such great timing! We are putting in a deck next week (hiring, I wish we were as cool as y’all… and you’re right, they can be $$$ if you try to get fancy), and I am in charge of the staining in a few months. It is hard to tell since just John is in the picture. When backbrushing,I understand the followng, but did you just do a few boards at a time to avoid stepping on or painting yourselves into a corner?
YoungHouseLove says
Great question! We worked together, starting in the top left corner and doing about a 2 x 2′ square of boards (that way we could both stand without being in the stain but lean over to get it (either with the applicator or the brush), then we’d work over and do a block in the middle, and then the corner, etc. It was sort of like building 2 x 2′ boxes all over the deck, spanning from one corner to the other and then down the right side of the house, and then down the middle and then along the left side until we “
paintedstained ourselves off of the deck and down the stairs” :)xo
s
Thomas says
It looks great! I love how you guys have little outside areas of your home where you can relax like the deck, the back porch area, and even sunroom-ish. Great job!
Stephanie says
I love it love it love it love it!!!!!!!
I don’t know why, but this is my favorite project from this house! I love that it so much was put into it with such an amazing outcome! it makes me want to (make my husband) build a deck and we already have one! haha!
YoungHouseLove says
Thanks Stephanie!
-John
Emily says
Hang on to that sprayer because it will be your best tool in wallpaper removal! I swear on my life it kept me sane in removing the wallpaper in every single room of my house. Wash it out REALLY good. Use 1:2 ratio of liquid fabric softener and warm water. You could prob get away with 1:3 ratio if the smell is too strong (but it smells like fresh laundry!).
Use the sprayer to mist your walls…then mist again…and let it sit 10-15 mintues after it’s saturated. The wallpaper should peel off in SHEETS. I kind of want to write a book on it because it was that amazing for me after ruining the walls in my kitchen trying to use a steamer to remove wallpaper.
Okay, enough of unasked for advice :-)
YoungHouseLove says
Great tip! LOVE IT!
xo
s
Kathryn says
Emily, thank you so much in advance from a future fixer-upper owner! Houses (of a certain age) here in Dublin are NOTORIOUS for insane wallpapers, like put-Vegas-casino-carpets-to-shame bad. This tip now has pride of place in my future-house file.
lindsey says
You’ve probably already received a ton of tips for wallpaper removal (and probably already have started). I’ve found the blue gel zinsser dif to work the best (http://www.worldpaintsupply.com/zinsser-02481-dif-wallpaper-stripper-gel-1-gallon/).
YoungHouseLove says
We haven’t touched it yet! Thanks for the tip!
xo,
s
lindsey says
wanted to add: the dif is non-toxic and no odor.
I haven’t tried Emily’s method.
I think you guys should do a wallpaper removal post running through all the different methods/products you’ve heard and rate them all. Pretty please?
YoungHouseLove says
Sounds fun! We do have lots of wallpaper..
xo,
s
Ashley says
I can second Emily’s wallpaper removal tip. Worked like a charm for our home. And the fabric softener mixture smells SIGNIFICANTLY better than vinegar (which is another option but not worth it because of the smell).
YoungHouseLove says
That sounds awesome! Thanks!
xo
s
Stacey says
Ditto on the fabric softner! it works SO much better than anything store bought and makes the whole house smell like fresh laundry!
Annie says
Looks great! I’d love to hear if there are any tricks for KEEPING the deck clean or things you’re supposed to do to keep it nice, like yearly maintenance stuff. Moving to a house with a deck and want to keep it looking sharp!
YoungHouseLove says
I have come to love blowing the deck with the leaf blower! As long as things are dry, it even picks up those stringy pollen things and I can even blow off the table and chairs in 5 minutes.
xo
s
Heather P. says
Wow – congrats on getting the deck done! It looks beautiful, and I’m sure whoever ends up buying your house will enjoy it for years to come!
Sarah says
How perfectly timely!! As soon as it stops snowing in Minnesota (yes, really – snowing on May 3!), I will be embarking upon a restaining of our deck area. I’m already excited to get out our pressure washer. SO fun!!
YoungHouseLove says
It’s so crazy that you guys are still getting snow!
xo
s
Laurie Jones says
I always loved this idea you came up with to build this little deck, it looks so comfy and inviting! I hope you can enjoy a meal or two out there before you sell the house!
YoungHouseLove says
Oh yes, we’ve been soaking it up out there since the first sunny day! Haha! Burger even stands by that door now to let us know he wants to be let out so he can bask in the sun.
xo
s
Kathryn says
I know we’ll never be the wiser one way or the other, but in my head the owners-to-be totally put in the french doors from the master bedroom. How lush is that notion? “Cup of breakfast tea on our veranda, darling?” “But of course. I’ll bring the crumpets.”
YoungHouseLove says
Oh my gosh I would love that! They’d find me hiding in the bushes with a camera. #creepy
xo,
s
kristi@SimplePrettyThings says
Ughhh we have to clean and stain our huge deck as soon as we have the proper weather and time. That’s a hard combo to come by for us. Thanks for the post. This gives me confidence…
Angie says
Yes! Thanks SOOOOO much for this post! We’re just gearing up to do the same thing with our deck and now we know to get the “good cleaner”. Loving your deck all stained/sealed up…she’s certainly a looker!
rachael says
We built a deck two years ago and we stained last year with Ben Moore’s arbor coat in a solid stain, and it looked great until we had a ton of rain and the it dipped below freezing again. Some boards where there was a small split in them cracked the stain so the guy at the store suggested we lightly sand just those spots and apply fresh stain over it. So here’s hoping it works!
YoungHouseLove says
Good luck Rachael!
xo
s
SunshineGal85 says
The toner really makes it look finished and it looks great. I can’t believe I’ve never heard of that applicator. When you roll it on, you get so many little pools that it’s just more trouble than it’s worth. Quick question — and I’m sorry if you’ve already addressed this, but I’m still new-ish — regarding that “strange little alley” of yours. What windows would you have lost in the original part of the house if the addition had been built directly against the original? Is that why there is an alley? So it didn’t close in bedroom windows?
YoungHouseLove says
Yes, when they added the addition in the 70s they made that alley because they would have lost the only window in the hall bath, and guest bath along with a window in the guest room and the master. I think it was definitely worth it to keep all that light (two bathrooms without windows would have been less pretty I think) but that little balcony to nowhere was certainly a funny finishing touch! Haha!
xo,
s
carollynn says
Thank you so much for this tutorial. We are in a similar situation just a bit north of you in DC (deck built last summer, waited for lumber to dry out, then too cold to stain)- so we were wondering what and how to do it. The cleaning part is probably the aspect I was most concerned about, but the stain application tips are going to make a HUGE difference. Can’t wait to see what you do with the new house.
Amy says
John,
I don’t comment very often, but I have to say – I really admire your can-do attitude! Building a deck is something that I would never have attempted, and I’ve built lots of smaller stuff (framing walls, simple furniture). And not only that, but you are fast! My projects take forever to think through – they usually take weeks to plan, and you seem to get it done in a few days. Or does it just seem that way? You and Sherry are either really good multitaskers or don’t need sleep! I’m looking forward to see what you do with the new house, I’m cheering you on!
YoungHouseLove says
Thanks Amy! Don’t feel bad at all about how long projects take to plan! Sometimes we plan projects for months or even years. It’s why we never tackle a kitchen remodel until we live somewhere for at least a year because we’re constantly thinking and rethinking layouts and options. So when we mention a project here, it’s usually after months of mulling things over (and we usually try to fill that in for you guys by saying things like “at first we were thinking about this but then we decided we wanted that” or something). So the method is definitely something like: think, do a different project, think more, do something else, think more, paint a room, go back to thinking and maybe post a post about initial thoughts, think more, and then finally do something and share the details!
-John
Reenie says
THANK YOU…. so much for this post….. I need to do mine.
Looks great =)
Crystal @ 29 Rue House says
I love John’s determination to get those boards clean! LOL And thanks for saving me $7 bucks if I ever do have a deck to clean!
Did you guys/are you going to do anything with your fence? We put ours up last summer but never stained/sealed it.
YoungHouseLove says
Since it’s pressure treated and a vertical surface (so leaves and acorns won’t sit on it) ours still looks good two years later! So maybe we’d clean and clear seal it in a few years if it looked more bedraggled, but ours is doing really well!
xo
s
carli says
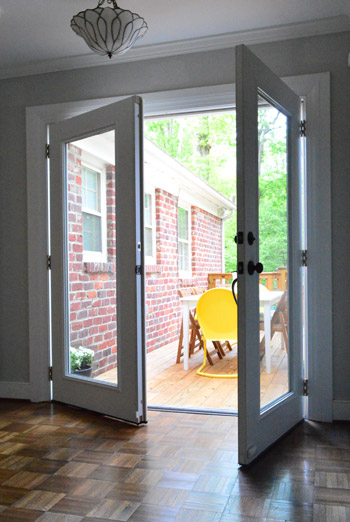
Wow! I literally can’t believe the transformation on this project! From those old, grimy sliding doors to the gorgeous glass double doors opening out onto an outdoor dining area?! love.
christina @ homemade ocean says
WAY TO GO JOHN!
It looks amazing :)
maureen says
I used Oxi Clean to get our deck cleaned ready for sealer. A little more labor involved, but worked well.
YoungHouseLove says
No way!
xo
s
maureen says
Way! worked like a charm :)
Susan K says
I use OxiClean too. Actually applied it with the same deck applicator John used for the stain. Just dipped in the bucket and brushed it on, then rinsed with the hose. It glows every spring!
YoungHouseLove says
So interesting! I never knew you could do that!
xo
s
Tara says
Wow, that made such a difference! You should have that house sold in no time.
Kathryn says
It looks so fresh now! I also just want to say Kudos to you for doing all these projects even though you know you’re not going to be around to enjoy them for long!(I don’t know if I would have been as diligent!) You are going to make some new owners pretty happy.
YoungHouseLove says
Aw thanks Kathryn! It feels awesome to finish things and cross them off the list. And we have never stained a deck so we were nerdily excited :)
xo,
s
Johnny @ Our Freaking Budget says
Hugely awesome. “I built a deck” would totally sit at the top of my resume. And seeing the progression photos from this and the cleaning post was oddly therapeutic for me. So thanks for filling my DIY and therapy counseling needs.
YoungHouseLove says
You’re very welcome Johnny.
-John
Lisa Gentry says
Thanks for this post- we need to stain and seal our deck this summer. What do you do if your deck already has a stain? Ours has a semi transparent-like gray stain on it. I’m not sure where we should go from here! Also, for how many years does your stain provide protection?
YoungHouseLove says
I believe pressure washing and using that second cleaner we mentioned would hopefully help with the stain. As for our stain and sealer, since its a toner it said something really long (3 or 5 years?) but I forget. Maybe check their website?
xo,
s
cristy says
Hey guys, great job, the deck looks amazing! Those last pictures reminded me of your french door switch out, and I went to look for that post and can’t find it. Can you direct me?
YoungHouseLove says
Here’s the first post and I think if you scroll to the next post (or the one after that) there’s the other one :)
https://www.younghouselove.com/2012/10/when-to-diy-vs-when-to-hire-it-out/
xo,
s
Sara says
We let our deck sit too long without being cleaned and stained again. I’m sure we will need some cleaner after power washing. Thanks for the tips! And that sponge brush looks like it would be so quick. We did everything with paint brushes when we stained our deck and front stoop a couple years ago. It took forever.
Amanda says
You guys need to put before and after photos around the house when you have showings. Just a subtle way of showing off all the work you’ve done. ;)
Heather says
I love the stain color you picked. It looks great against the brick!
KarinK says
I’m curious – how long did you let the wood dry out (after power washing and then cleaning) before you applied the stain? Does it matter? It looks great and to comment on the original power washing post, YES! It is an oddly soothing job to power wash. We bought a cheap-o electric model from Big Lots – definitely takes longer if you have a lot of square footage, but for $70, I can deal with it.
YoungHouseLove says
Every stain can has different drying times so we made sure to follow their recommendation. I think we waited 48 hrs from the last rain (it rained between power washing and staining).
xo,
s
Elaine in Ark says
Your deck looks great! I have a deck with an addition that needed to be replaced last fall, so now I have a two-tone deck with a roof over 1/3 of it (the original section). The builder told me to wait until spring to seal it, so I’m going to do that when the snow melts off (yes, I am in Arkansas, and I used to think it was in the South, but we have snow and it’s May 3).
My question is: did you have to power wash the railings and posts, or just the deck floor and steps?
Thanks!
YoungHouseLove says
We just did the deck floor on ours, but the posts and railings around the patio (which are older) got power washed :)
xo,
s
Kim says
FYI when you stain your next deck try this: http://www.readyseal.com/ It really is “goof proof” as in, it can puddle or drip and you don’t need to worry about catching it all because it spreads itself(I actually tried this and watch it happen, it’s sorta amazing). It may require more coats, but it was so much easier than when we used the other stuff on our deck furniture (which looks a hot mess right now because we didn’t catch all the drips, and it didn’t survive the elements well…and we even covered it during the winter!). Meanwhile, our deck still looks fabulous. We plan to use it again on our fence and I am so excited I don’t have to catch every random drip because we have a lot of fence!!
YoungHouseLove says
Sounds cool!
xo,
s
Karen F says
John, you should be VERY proud of the deck – awesome job!
Amanda T. says
LOVE this! I’m considering staining my back patio, but it’s concrete so I’m a little scared. Haha. I have stained a deck before (in my pajamas! haha!) and it wasn’t too bad. :)
LMN says
Great deck. And SOOOO EXCITED Y’ALL ARE MOVING TO YOUR DREAM HOUSE/NEIGHBORHOOD!!! Sorry, didn’t mean to be loud. :-)
YoungHouseLove says
Haha!
xo,
s
Nicole @ Liberty Belles says
I am SO impressed by this deck. I’m nowhere near confident enough to building something like this (plus, I rent an apartment, so…) but I hope one day I will be. You guys are really inspirations.
Diane says
We let our kids put their handprints and names in the wet stain on our deck. Same with the concrete in our new driveway. Should have down the same with our pets. Shucks.
YoungHouseLove says
Cute!!
xo,
s
Kim says
Looks great! And I bet it’ll be a bonus selling feature for the house now :) I have to admit, I’m a little sad we’ll never get to see it in all it’s glory with string lights in the evening… maybe at the new house?
YoungHouseLove says
I’d love that!
xo,
s
Kate says
Looks fabulous! You guys did great work. I sure whoever buys the house will love it.
Angel says
The bunch of elephants sentence made me laugh. The image of a small herd of confused elephants standing around on your deck popped in my head. :)
YoungHouseLove says
Haha, I keep telling John that we need to test that theory out…
xo,
s
Alex says
It could happen! Michelle Tanner got to have an elephant at her birthday party; I bet a certain tiny, blond Petersik with a birthday coming up would LOVE to have an elephant (or two or three!) at her party, too!
YoungHouseLove says
Hahah!
xo
s
Brit says
Great job, looks fantastic!
Is it weird that other thing I noticed most from the last two posts is how many different pairs of sneakers John appears to have? LOL. Some cool looking ones too! (are the ones in this post gray with blue laces? Nice…)
YoungHouseLove says
Oh my gosh the man is a sneaker connoisseur!
xo,
s
Melissa@TheHappierHomemaker says
It looks great! I hope the showings are going well for you guys!
Ashley@AttemptsAtDomestication says
It looks awesome! I’ve got major deck envy going on!