This year we have a bevy of wallet-friendly DIY holiday gift ideas to share, but this $10 project is earmarked as urgent since it takes a few weeks to get going. But fear not, there’s a super speedy set up and then it just sits there for a few weeks getting gorgeous on its own. So after the initial minute or so of tossing things together, your work is officially done.
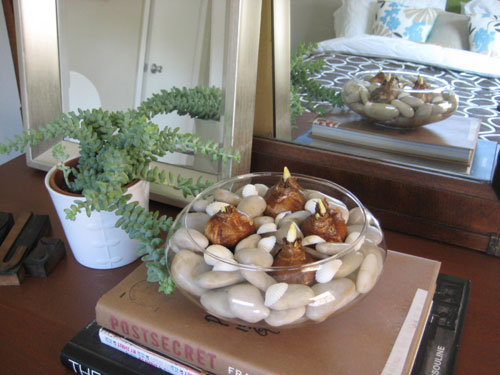
What is it you ask? Why a chic little vase full of beautiful and fragrant paperwhites in full bloom. Potted in a simple glass vase along with a few river rocks and about an inch of water, they practically guarantee gorgeous holiday scenery. So whether you’d like to throw together a little paperwhite show for your mom, your neighbor, your best friend, or yourself- here’s a short and sweet tutorial.
Step 1: Get it together. Purchase 3-5 paperwhite bulbs- also called Narcissus (we snagged a box of four at Walmart for $5), some river rocks (we got ours for $2 at Michael’s), and a clear glass vase at least three inches deep and five inches wide (we got ours at Target for $3). Total project cost: $10. Flowers in December: priceless.
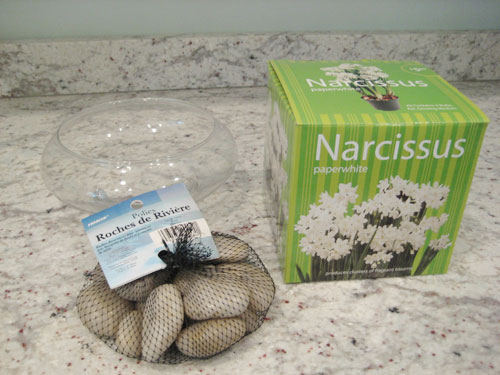
Step 2: Lay the foundation. Use about half of your river rocks to line the bottom of the vase to create a nice little bed for the bulbs to rest on. The idea is that the rocks will elevate the bulbs about an inch or two so their roots have room to grow.
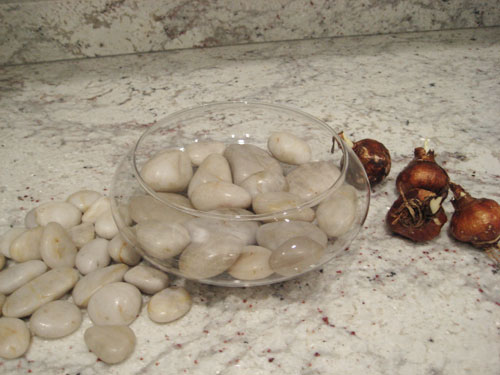
Step 3: Get your plant on. Add the bulbs to your little rock garden and wiggle them in a bit so they remain standing (if they topple over, reposition the rocks beneath them to support them). It’s important that your bulbs still remain elevated, so make sure they’re not pushed against the bottom of the vase, which doesn’t give their roots any room. Then just add the rest of your rocks around them so they feel even more snug in their chic new home.
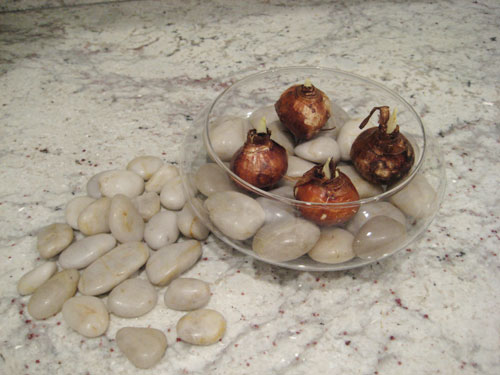
Step 4: Just add water. Once your bulbs are snugly surrounded by the rest of your rocks (note that they shouldn’t be buried completely- the top part of the bulb should still be exposed) add just a smidge of water so that the very base of the bulbs (where the tiny roots live) are submerged. The idea here is that the water line just kisses the very tip of the bulb, while the rest of it sits well above the water line on the rocks.
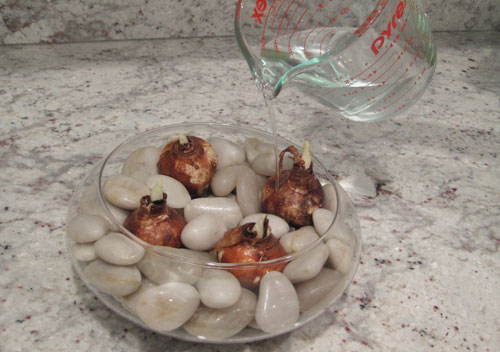
Step 5: Go about your business. Maintain the water line and place your vase in a sunny spot and wait patiently (or not so patiently) for three to four weeks. By then the stalks should be shooting up towards the sky and you’ll end up with beautiful fragrant white flowers (see the box in step 1 for a visual)- perfect for those bleak and cold winter days. And have no fear if your paperwhites aren’t completely in bloom come gift giving time, just explain to the recipient that they’re primed and ready so they just have to sit back and enjoy the show.
Oh- and if you want to take this ten dollar project to a whole new level you can use etching cream to monogram the glass bowl to create a truly personalized gift (and elicit all sorts of “you’re so crafty” comments). So if you wanna add a little extra oomph to your paperwhite prezzie, just use a stencil to etch the first initial of the giftee’s last name and rejoice in your thrifty yet terrifically chic little potted paperwhites.
And even if you don’t etch your way to something personalized, you’ll still end up with a smashingly cheap and thoughtful gift for minimum time and money. Just tie some red ribbon around ’em and you’re set. We can’t wait to see ours do their thing. Three weeks and counting…
For more info about growing paperwhites, click here. And to see how ours turned out, click here.
Update: You can check out all of our favorite holiday decor finds here – many of which are under $15!

jen says
I used to give paperwhites for Holiday gifts more than 10 years ago. They do look beautiful but….have you smelled them in bloom before? They are quite pungent…some of my friends with sensitive noses couldn’t stand it!!
mmc says
Do you have to put the bulbs in the cold for a certain amount of time?
Kirsten says
I potted mine a month ago and now they are in full bloom. FYI: As the bulbs root they’ll move all around in the pot, so you’re neat arrangement is gonna do whatever it wants to. I tried to tame them to no avail… As well, the blooms ended up toppling over after a few days. But, in my opinion, they smell glorious.
LJK says
I love the idea of etching on a monogram or initial.
elizabeth says
You guys are on the main page of Apartment Therapy today!!
http://www.apartmenttherapy.com/sf/living-room/before-and-after-christines-living-room-by-young-house-love-070544
Kristin says
We use marbles instead of river rocks for a pretty festive color-scheme! You can also tie the stems with ribbon or twine to keep the up-right a little longer. Happy gifting :).
Anne-Marie says
I learned that if want to stunt the growth of paperwhites (these suckers grow really tall, and topple over) you can add s bit of alcohol (such as gin, vodka, whiskey, rum or tequila) when you reach a good height. The blooms stay vibrant, but the stalks stop growing.
Laurel says
I agree with jen, I used to do these. In fact, I would cover a new quart size paintcan with cute wrapping paper and it would make an adorable vase when they grew. I stopped because I can’t stand the smell. I hear they are supposed to smell nice, but after 4 years of trying – my nose can’t take it anymore!
Sandra J says
I love, love, LOVE this idea! You have just helped me solve some Christmas present dilemmas. The best part is I already have the polished river rocks and bowls! I bought them from a friend who used them in her wedding thinking I would used them in mine…but never did. It’s a sign because just last week I was wondering what I was going to do with them and now I have my answer! Thanks for another fabulous idea!
paula says
i am doing this for gifts this year, but mine are in tiny terracotta pots. i hope the recipients enjoy the smell though.
DCKate says
I love paperwhites. My mom planted them every year at Christmas when I was growing up, so I associate their smell just as strongly with Christmas as I do pinetrees or gingerbread.
Rachel says
I love paperwhites and I received some as a gift this year for Christmas. Mine are toppling over right now and have stopped blooming. Do they re-bloom? Advice? How much water do they need? Maybe I’ve over watering…
YoungHouseLove says
Hey Rachel,
Paperwhites usually only have one blooming season (they’re annuals in most climates) although if you live somewhere in the south or west coast you may be able to plant them and mulch them to keep them warm enough to live on and bloom again and again each year. As for water, they only need enough for their roots to drink, so if you’re submerging the bulbs they might be a bit too wet. Oh and when paperwhites topple over, wrapping a nice piece of ribbon around the middle of their stems to keep them upright can do wonders. Hope it helps!
xo,
Sherry
Aussie Deb says
Thanks for the great site! I’m inspired for a few projects this weekend. I’d suggest that eco friendly folk stick to recycled marbles instead as river rocks are mostly extracted from mainly Asian countries with no environmental laws to protect the rivers from over stripping, since everyone visitng your site seems to be happy to make little postive changes I thought you might like to know.
With our opposite climate I cant do it for Christmas but I love the idea and it’s just in time here for some friends with winter birthdays.
Olga says
I’m not sure how yours aren’t tumbling over, even after you tied them with a ribbon. Mine grew very tall, so they are heavy, but the stem isn’t the strongest.. so tying the ribbon around them only makes them tubmle over together one way..
YoungHouseLove says
Hey Olga,
Hmm, all ours needed was a little ribbon around them to support them- perhaps pour bulbs were planted further apart at the base so they were more stable? We’ve also heard tips like adding pennies to the water or even a little vodka can somehow make the stems more sturdy and help them stand. Let us know if any of those odd little pointers work!
xo,
s
Caitlin @That House On The Corner says
Hey Youngsters!
I was curious if you know if this will work with any bulbs to force-grow them? I have MANY (think in the hundreds!) un-planted tulips, daffodils, and a few hyacinths that I would absolutely ADORE indoors, but I wasn’t sure if it would work because they are spring bloomers…
Any ideas?
Thanks!
YoungHouseLove says
Hmm, good question! We’re not really sure but maybe you can call a local nursery and ask someone there? Hope it helps!
xo,
s
Judy says
Most bulbs need to spend a few weeks in the cold in order to be forced. You can force other bulbs but have to leave them outside or in an unheated garage for several weeks or they won’t grow. If you google “forcing bulbs” you’ll find info on this. It’s never worked for me, so I stick with paperwhites, but maybe you’ll have better luck.
Caitlin @ That House on The Corner says
Thanks for the reply! I thought I’d drop in to let you know I went ahead and tried forcing the bulbs that were leftover in my garage that I hadn’t planted (which coincidentally, were chilled just as Judy recommended!) and I am very excited to say that after 4 days they are already showing some serious roots and starting to sprout! Yay! I’m already planning on making even more so I have some “just because” gifts to pass around since I have about 200 more unplanted bulbs just begging to be forced at my parent’s house ;-)
Great idea, great blog!
YoungHouseLove says
That’s amazing! Good luck and thanks so much for keeping us posted!
xo,
s