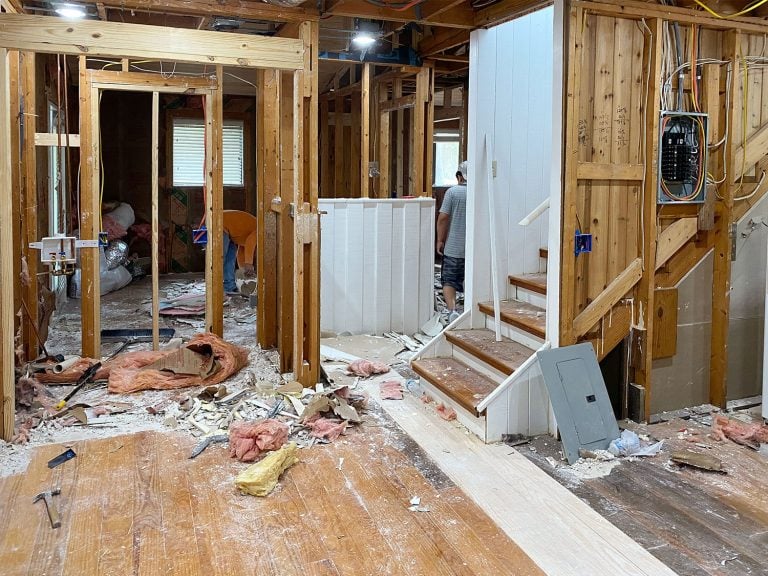
Tackled Together: Closet Clutter – Part 1
For those of you who joined us in tackling our collective closet clutter this weekend, how’d it go? We’re proud to say that our weekend wrapped up with less unnecessary stuff crammed behind closed doors and more room to fill with impending baby goods (or things that later get offset by baby goods and need a new home). We’ve got a lot to recap, so we’re starting with what happened in the master bedroom and will follow up with details about the other two closets that we tackled later this afternoon. Can you handle the excitement? Hold on to your (pared down) hats.
As I revealed on Friday, my closet had been looking quite sloppy due mostly to a growing collection of t-shirts (thank you 10K races) and general folding laziness.

So I literally took everything out to evaluate what I still needed and what had been long forgotten. I guess that’s step one: clear things out so you can really see what you’re dealing with. Here’s a look at my empty drawers… well, except for the one that literally contains my drawers. I figured you didn’t need (or want) to see that step.

That glimpse of t-shirt piles in the corner of the photo above is just the beginning. Check out exactly how many shirts I found hiding in there. I can’t tell whether it felt more like a clown car or the male version of Sherry’s shoe collection. (In her defense she claims she’s now “in recovery” for that addiction and only has two pairs of jeans to offset the shoe to clothing ratio. It’s true she really is a minimalist in all non-shoe areas).

Anyway, once everything was out, I basically categorized it into four piles:
- General-wear t-shirts (since button-down work shirts remained hung up throughout the process- although I whittled those down too)
- Shirts for working out/running
- Shirts for doing house projects (like those above, just with more paint splatters)
- Shirts to donate
We learned a while back that you don’t need that many “home improvement/painting” clothes, just one outfit for warm weather and one outfit for cold weather (and a belt, see more about that here). So just because you have ten old ratty shirts with paint on them doesn’t mean it takes ten ratty paint stained shirts to work on your house- you probably only need one or two. Anyway, with all the categorization done, and each stack pared down it was time to neatly fold the keeper shirts (as well as my far slimmer collection of shorts & pants) and put them back in their proper places.

Which not only left me with a pared down and better sorted drawer situation, but also freed up an entire shelf above the drawers that was now barely being used. Three cheers for already achieving some bonus storage space for the potential bambino stuff that will supposedly overtake every available nook an cranny! Plus I got a pretty decent donation pile out of the deal.
Sidenote: Surprise! There was a dog hiding back there this whole time.

We actually sorted all of our reject clothing/stuff by dividing it into these categories:
- Donate
- Trash (for things that were just too grody or useless to donate)
- Return to friends & family (we actually found a lot of borrowed books and things that we were happy to pass back to their rightful owners)
- Pay it forward (we also found a few things that we knew one of our friends or family members would love, so instead of donating those items we actually resolved to giving them a second life through someone we know)
I also managed to tidy up the top shelf of my closet which contained an out-of-sight, out-of-mind collection of junk… including more shirts (hey, at least I’m consistent):

Now it’s virtually empty, with the exception of some mess-wrangling shoeboxes (c’mon, a guy’s gotta keep old cassette tapes from his high school band concerts somewhere, right? Just kidding… sort of). And if I wanted to be swanky, I could actually pick up a bunch of matching bins or baskets from Ikea to corral my stuff instead (and a few to leave empty in anticipation of other items to store someday). That would look pretty nice actually. Maybe I’ll upgrade the next time we find ourselves in our favorite Swedish superstore.

So to recap: my closet went from this…

…to this:

Sherry’s closet was far from disastrous at the start of all of this, so there’s not much of a before/after story there. But she did purge a bunch of clothes/jewelry/shoes that she hadn’t touched in a while (not just because of the baby bump, but even before that). In fact here’s our final spread of donation items just from our closets (along with some “return to their rightful owner” and “pay it forward” piles – which always feel just as good to shed). We did, however, decide to hang on to the sleeping chihuahua.

But since I know ladies have a thing for looking in other ladies’ closets, I’ll give you some obligatory “after” shots of Sherry’s side of the bed anyways (you can snoop around and see way more on this old closet crashing post of yore):


Oh, and before we leave the bedroom, I should point out that Sherry also cleared out a bunch of stuff from our “bonus” closet – i.e. the only original, single closet in our room – which is now home to a few of my suits and dress pants along with Sherry’s non maternity clothes (while her bedside wardrobe has the stuff she wears on a day to day basis). Notice those two 100% empty top shelves? Like a breath of fresh air I tell ya.

In the end, we felt very accomplished. Not only did our closets get tidier, but we freed up about four shelves for storing whatever new stuff comes our way. And we were able to haul off a pretty stuffed bag of clothes and accessories to a local donation drop box (along with returning stuff to our friends and family and even dropping off some books at a neighborhood book store) to complete the bedroom closet purge.
And even though we’ve got a lot more closet cleaning coming atcha later today, we can’t wait any longer to hear how your weekends of de-cluttering went. Were you able to pare down your wardrobe? Or re-discover some pieces you already owned (which you’ll now be wearing instead of storing under piles of other stuff)? Any advice to pass along to those who weren’t able to tackle this spring cleaning task yet? Let’s talk about your favorite tips and tricks when it comes to clearing out those closets (or junk drawers, or kitchen cabinets). Oh and if you’ve got photos to share from your own closet cleaning adventures, jump over to our Facebook page to post them for the rest of us to oooh and aaaah over. Fun, fun, fun.
Psst- Want a closet look at closet organization here at Casa Petersik? Check out this post on the subject. And to learn how we brainstormed and installed those two built-in wardrobes on either side of the bed, click here for the full story.
Reader Redesign: One Brilliant Board
You may remember Carla from back when we helped her transform her kitchen with some paint and a few simple switcheroos. So when she sent over her great little DIY chalkboard calendar project we had to share it. Here’s her letter:
I had to pass along our latest update – we made a chalkboard wall calendar in our kitchen! We were inspired by none other than Master Crafter Martha Stewart and thought that her chalkboard wall calendar idea would look great in our home. To my surprise, it was fairly simple to do – all you need is black chalkboard paint, a few foam brushes, white paint (which we had plenty of from our kitchen cabinet painting project), unsanded tile grout, lots of blue tape (Frog Tape was out of stock and I was very apprehensive about using the blue stuff, but it actually worked!) and a shoebox lid for mixing (resourceful, right?!). Her directions on How to Make Custom Color Chalkboard Paint were fairly simple to follow and we even conquered the different shaded blocks too! Woot! Woot! It was so funny to see one of your previous posts about Lyzz and her chalkboard painted door because we were in the beginning stages of figuring out the whole thing ourselves, so it was a help and I had to share. We hope you enjoy the pictures! Thanks again for having such a wonderful blog and CONGRATS again on your baby girl news!! -Carla
Here’s how things looked once Carla had applied some black chalkboard paint as a base:

Here’s an in-progress shot with a few of Carla’s squares taped off and ready for some custom chalk board paint:

And here’s the gorgeous after thanks to her fabulous handiwork:


Didn’t Carla do a great job? We love the different custom chalk board colors that she whipped up and the fun and functional grid that she created with simple supplies like painter’s tape and a shoebox lid. Thanks so much for sending the photos our way Carla! Is there anyone else out there who’s thinking of tackling this task now that Carla has demonstrated how great it can look?
Window Shopping: Charlotte Or Bust
We recently mentioned our trip to Charlotte, North Carolina when we explained how we DIYed a few faux sheepskin throws for our house. And now we’re back to share more of our road-tripping details. We dropped in on a slew of fun fabric and decor stores (and snapped photos of a ton of inspiring ideas as we went) so here’s a little virtual play by play of what we liked along the way.
We already mentioned that we swung through Mary Jo’s Cloth Store, which is basically the biggest and most insane fabric store that we’ve ever seen. It’s actually a gigantic 32,000 square foot warehouse full of about a million bolts of fabric (we’re talking about a football-stadium-sized holy grail of textiles) and it’s located right outside of Charlotte (just off of 1-85 at exit 21). All I can say is that if they don’t have it there, nobody does. Plus their prices are fantastic. We saw designer prints marked down to $10 a yard that go for $19 a yard here at fabric stores in Richmond. Yes please. Here I am among the rows and rows (and rows) of stacked fabric bolts with my cute friend Kristin who showed us around town (remember when we crashed her house for you a while back?).

Seriously, you think I’m kidding when I say that there are literally like a million bolts of fabric just stacked on top of each other- some nearly as tall as me. I felt like Alice in Wonderland- and it was my kind of rabbit hole.

And while we already shared that we picked up a yard of faux fur for our fake-o sheepskin project, what we didn’t reveal was that we also got a yard and a half of fabric for the nursery. See, there’s actually about a foot of space between the crib mattress and the drawer beneath it, so we thought a nice band of removable fabric would be a great way to bridge that gap (and keep people from being able to peek down into the contents of the drawer). It was as easy as taking a leftover swatch of our trusty curtain fabric with us (see it below on the left) and holding it up to a lot of potential textile choices until we settled on the delicately patterned nubby fabric that you see there in the middle of this picture:

We knew it wouldn’t ever be right up against our curtain fabric, but wanted to be sure that we didn’t get something too busy that would compete. But it would be up against our crib sheet, so we hunted down a bolt of solid turquoise fabric to approximate that color- just to see how they’d look together (see it to the right of the patterned fabric we picked for the skirt in the picture above?). We really loved how the slightly more saturated and solid turquoise tone (which is extremely close to our crib sheet at home) worked with the subtly patterned lighter teal fabric that we’ll be using to make a crib skirt. So that’s how we settled on a taking home a yard and a half of that pretty nubby fabric (for just $14) along with a yard of our faux fur sheepskin stuff (stay tuned for our crib skirt making tutorial coming soon, or check out this alternate method to tide you over).
Next we headed to a place that we’ve only been once before: a Pottery Barn Outlet (cue the sound of angels singing). This one was just south of the North Carolina border in Gaffney. And the funny thing is that we had actually been to this exact same store during our big Texas road trip last year (check out those hijinks right here). Here we are with all of our loot out front, but first let’s go inside and have a little look see…

You may have noticed that we were holding a rather large (5 x 8 to be exact) rug in the photo above. Well, when we saw this amazing tan on cream link-patterned wool rug (marked down from $429 to $129.99) we just had to take it with us. We actually have another big room makeover on the agenda after the nursery (surprise!) so you’ll have to stay tuned to see where it goes and what else we’ll be bringing in to go with it…

We also fell in love with a ton of amazing lighting options. Too bad we didn’t have a place for either of these fixtures, but the rough woven texture of the light on the left and the soft ceramic patterned pendant on the right really had us at hello.

We were also extremely inspired by their framing options (especially with all those red sale stickers on them). So much so, that we grabbed the two large woven frames on the left (for just $16 and $12). You can’t really tell how big they are but they’re nice and meaty- and the grasscloth texture just slays us. We also saw the cute frames-within-a-frame on the right and thought it was a great DIY idea. Grabbing twelve small frames at a craft store like Michael’s and hanging them within a larger burlap-backed frame is such a fun way to layer textures and create a great grid-like accent. And you can frame anything from small scribbles made by your kiddos or collected matchbooks or skeleton keys to black and white photos of friends and family. We just loved how unique and do-able the idea was.

Then we headed back to Charlotte where we stopped at the Sleepy Poet Antique Mall. This place is another gigantic warehouse, but instead of being filled with fabric like Mary Jo’s, it’s packed with antiques and collectibles as far as the eye can see.

Here are just a few of the things that caught my eye along the way. This mustard ceramic artichoke would make a pretty cool bookend- and that large woven basket would be a great spot to wrangle toys in a nursery or blankets next to a sofa.

We also loved these nesting tables (just $60 for all three!) and the booth on the right was full of chic lamps, chairs and accessories that felt oh so Domino to us.

Next we stopped at one of the most amazing and inspiring decor places I’ve ever stepped foot in. And it just happened to be geared towards kids rooms and nurseries. But there was nothing cheesy or unsophisticated about it. Lucy & Co was founded by a woman named Beth who adopted her daughter (named Lucy) and was so inspired by children’s spaces that she decided to start her own little design boutique.
And let me tell you, the woman is a genius. We actually got to hang out with her (and swoon over some photos of her daughter Lucy) and we just couldn’t believe how creative she is. See the window treatment on the right in the photo on the left behind that amazing butterfly mobile? It’s actually a simple wooden cornice box that Beth completely covered with rows and rows of white pom-pom trim (you know, the kind you can put on lamps or pillows?). And she did it all by hand with a regular old glue gun. Amazing, right? And let’s turn our attention back to that yellow mobile with what look like swarms of yellow butterflies fluttering around. We were so inspired by that concept that we’re actually going to adapt it for our nursery (using thin floral wire and small blooms) so stay tuned for that.

Meanwhile on the right in the photo above you’ll see the awesome twiggy chandelier that she made with branches and white spray paint wired around a more traditional ceiling fixture. Pretty fabulous, eh? It actually reminded us of the chandelier that our friend Katie Bower had in her little boy’s mood board so we snapped this photo just for her.
We also couldn’t deny that Beth’s bold fabric pairings and murals were pretty darn fantastic. Check out this painted wall that she created after being inspired by some fabric that she found for that long pillow that rests on the foot of the bed.

And speaking of that long pillow, Beth confessed that she didn’t want to spend a ton of money on that fabric to create a real duvet that she could fold at the foot of the bed so she just made a long plush pillow to act as sort of a faux-duvet. We actually love this “accident” because we can picture many a child loving that giant pillow (for sitting on the floor and reading, pillow flights, snuggling in bed, etc). She’s amazing I tell ya. Head over to her site to check out more stunning spaces.
We also hit up a slew of other stores (namely a few baby ones like Nesting and Shower Me With Love) where John got to do what he does best. Pose with ironic items. On the left you can see him trying on “My Brest Friend” (it’s sort of like a Boppy) and on the right he’s in Home Goods holding the weirdest ceramic animal we’ve seen yet. Yes that is a cat with binoculars.

On our way back home we headed over to one last shop, the Mitchell Gold + Bob William’s Factory Outlet, right outside the Hickory Furniture Mart. We didn’t exactly need any of the amazing on-sale sofas, armchairs or sectionals that they have in every square inch of their spacious shop (nor did we have a vehicle that would accommodate any of ‘em, which is part of the deal- you buy things right from the floor and cart them home yourself). But we did have a ton of fun trolling each of the many furniture-stuffed rooms to see what they had and how much of a markdown they were offering (many sofas were under $900 and some arm chairs and dressers/coffee tables were as little as a few hundred bucks).

This is one of our favorite sectionals they had on display. Can’t you just imagine this in Brad and Angelina’s house with a million kids on it? So cozy for a spacious den or basement media room in a house with a giant family.

And here’s a gorgeous solid wood 9-drawer dresser for $325 on clearance. We thought that was definitely a great price for such a well made and timeless piece that could work in a dining room as a buffet or in a bedroom for clothing storage.

So there you have our long-weekend-whirlwind-road-trip through Charlotte from a few weeks back. We hope you enjoyed the virtual ride. And who knows, you might just find yourself visiting that area someday and now you have a little list of places to hit up. Have any of you been to these stores? Anyone from the area with other shop recommendations for us the next time we’re in town? Anyone longing for that cat sculpture with binoculars for their garden? Do tell.
Psst- Looking for our closet organizing update from this weekend’s “Let’s Tackle It Together” challenge? We’re still in the process of uploading pics and writing the post- so stay tuned for those details tomorrow afternoon.
Fab Freebie: This Giveaway Sucks
***This giveaway is no longer accepting entries***
Literally- it does. Hear me out for a minute. A couple of weeks ago we posted about our new Bissell vacuum, which virtually swept us off our feet (and actually sucked stuff off our floors). Well, thanks to the magic of the Interweb, that post actually caught the eye of the kind folks over at Bissell and after a few emails back and forth… tah dah! We managed to sweet talk them into a YHL giveaway. So now one lucky reader gets the chance to win their very own Bissell Cleanview Helix Bagless Vacuum Cleaner to help them spruce up every nook and cranny of their casa. Nice, right?
We’re psyched that Bissell’s helping us share this HEPA-filterin’, 12-amp powerin’, multi-surface settin’, pet hair suckin’ and lightweight cleanin’ love with one of you. And if your house is home to a canine or a feline with a bit more fur than our bald-bellied Burger, this little bonus prize might come in handy too: they’re throwing in a Bissell’s Pet Hair Broom for our big winner as well.

Even if you don’t find yourself sweeping up much pet hair, the broom’s rubber bristles (which attract fur like a magnet) are retractable for your normal sweep jobs. So here’s how you can get your paws on this prize set which- thanks to the broom- technically doesn’t completely suck.
- PRIZE: A Bissell 82H1 Cleanview Helix Bagless Upright Vacuum Cleaner and Pet Hair Broom
- TO ENTER: Comment on this post with the words “CLEAN ME” and…
- BONUS QUESTION: … tell us about any of your spring cleaning rituals that are already underway in your house (or any that you might be diving into soon). Getting the garden ready? Washing all the windows? Taking us up on our closet cleaning party? Spill it.
- GIVEAWAY CLOSES: Wednesday, March 10th at 8pm EST
- NUMBER OF WINNERS: One
- PRIZE SHIPS: Home to the world’s best and second-best hockey teams (that’s Canada and the US, fyi)
- USUAL STUFF: One entry per e-mail address is permitted. The winner will be selected using random.org and announced on Thursday. Good luck!
Find more freebie info on our Giveaway FAQs page. Pics courtesy of Bissell.
Lee’s Design Dilemma: Solved
When Lee sent over her Design Dilemma after pictures we couldn’t wait to share them. We know that many of you are chomping at the bit to see how our mood boards turn out (believe me, we are too) so we’re always thrilled to see how those spaces transform after some pretty major room makeover-ing. You may remember that we whipped up this custom mood board for Lee a while back when she came to us for help turning her hodge-podge of a room into a space to sort mail, do homework, and store a few things in a more appealing way. Since the room’s visible from a plethora of other adjoined spaces, it serves as a pass-through but also needs to bring a lot more function and style to the table. Here’s the before picture to refresh your memory:

And here’s the mood board that we created to inject order, balance and tons of eye-pleasing function to a formerly undefined and unfinished looking room (see more mood board details here).

And now for Lee’s big after pic. Here’s her newly spiffed homework and mail zone right off of the front room and the kitchen:

Isn’t it endlessly more inviting and useful? We love everything from the big round pendant to the woven baskets that mimic the texture in the round jute rug under that great desk that stems from that fantastically functional wall of bookcases from Ikea. And here’s what Lee had to say about her big room makeover:
This overhaul was so exciting! We got nearly everything you suggested and as soon as we built all of the Ikea stuff it immediately started to look great in there. Your ideas really did make for a big change. We love it. The bowl on the desk is always changing (sometimes it’s full of fruit but I also love your crayon idea – we’ve got boatloads of those!). Brilliant work! Thanks so much! -Lee
No thank YOU Lee, for sending us your room update. You don’t even know how excited we get when they turn up in our inbox. Didn’t Lee do a fantastic job? We love that she added as many boxes and bins as she needed to meet her storage goals and that she’s having fun switching out the desktop bowl depending on her mood. This is one of those great transformations that shows how just a few quick and easy changes (like Ikea bookcases that mimic the look of built-ins, and a simple pendant light along with a textured jute rug and some affordable Ikea art) can really pull a formerly mismatched room together and add lots of form and function in a snap.
Plus Lee’s big presto change-o proves that you don’t have to break the bank for a big room makeover either. The entire bookcase and desk system was just $317 while the pendant light was only $49 and the rug was a mere $84 (so all those major pieces only set her back a total of $450). Not bad for starting over practically from scratch, right? So let’s all shower Lee with praise for being so wonderful and sending us her eye-pleasing pictures. And here’s hoping more Design Dilemma after photos will be landing in our inbox very soon…


