It’s Wednesday the 2nd… so it’s time to share this season’s (completely unofficial) Pinterest Challenge (not sponsored by Pinterest or anyone else, just dreamed up by Katie to make us stop pinning and start doing).
I actually tackled ornaments (since the winter edition of our little Pinterest Challenge won’t be until January), which I mentioned last Wednesday when Katie, Ana, Erin and I issued our little get-off-our-bums-and-make-something challenge.
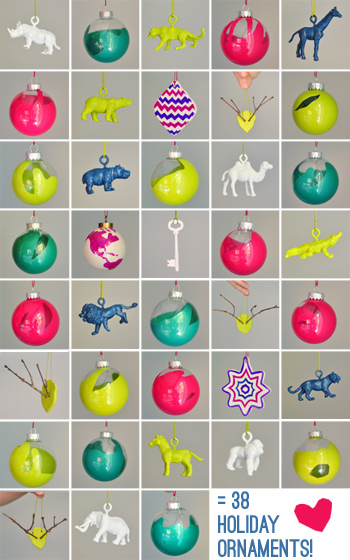
I know, I know – it’s not even Thanksgiving yet. I’m one of those one-holiday-at-a-time peeps too. But it was actually oddly satisfying to feel so “prepared” for the upcoming holiday season. And I’m kind of in love with all the happy little ornaments I squeezed out. I actually ended up making 38 DIY ornaments! Here are just a few of the things that inspired them (all found thanks to Pinterest, but originally from here, here, here, here, here, here, here, here, here, and here):

As are the rules, I took inspiration (or Pintspiration, har-har) from the above projects and then I did my own spin. Which added up to those 38 aforementioned ornaments that I whipped up. My method? Good ol’ trial and error. I just played around and made stuff up as I went along. Here’s what I ended up with:
- 12 faux ceramic animal ornaments (inspired by the A stuff above)
- 18 colorful swirl glass bulb ornaments (inspired by the B stuff above)
- 3 patterned ceramic ornaments (inspired by the C stuff above)
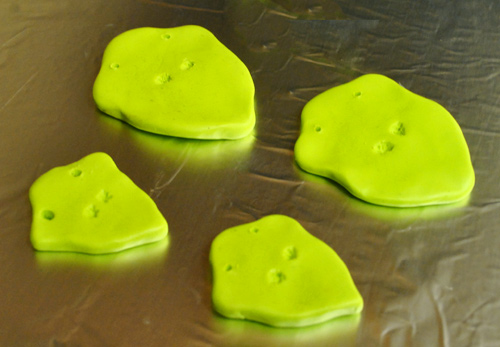
- 4 faux antler ornaments (inspired by the D stuff above)
- 1 skeleton key ornament (inspired by the E stuff above)
Here they are now:
And here’s how I made each type:
Faux Ceramic Animal Ornaments
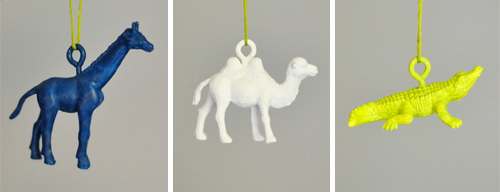
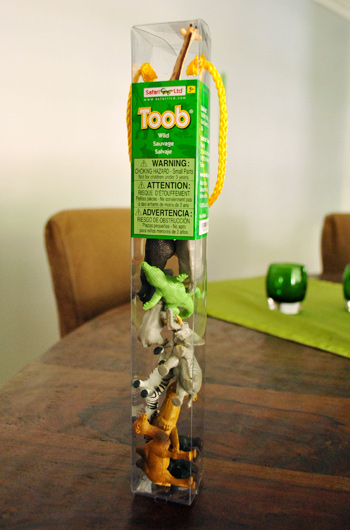
- Purchased a pack of small plastic zoo animals from Michael’s for $4 (with coupon)
- Primed them all with white spray primer
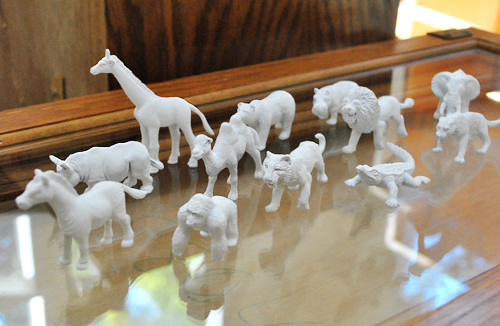
- Use small drill bit to start a hole to screw small ring hooks into the top of each one so they could be hung
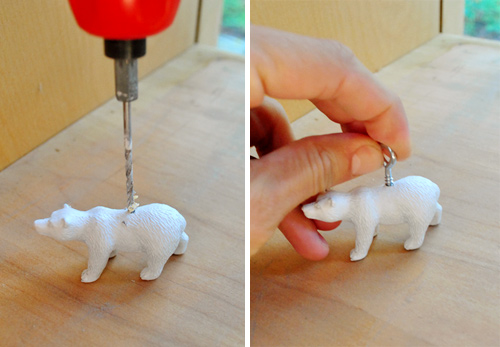
- Painted 4 of them white, 4 of them lime green, and 4 of them navy (w/ acrylic craft paint from Michael’s)
- Added colorful string (the kind used for friendship bracelets from Michael’s) for hanging
Colorful Swirl Glass Bulb Ornaments
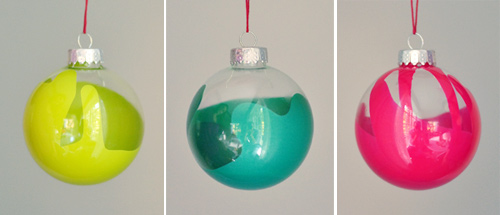
- Purchased three six packs of glass ornaments (in small and large sizes) from Michael’s for $9 total (with coupons)
- Removed the ornament cap and poured a decent amount of 99 cent craft paint in one of three colors into the ornament (exact colors I used: “Limeade” by Apple Barrel, “Metallic Emerald Green” by Folk Art, and “Magenta” by Folk Art Shiny)
- Slowly swirled the ornament around to spread the paint and create a nice “spun” effect (I aimed to cover 50% of the glass with paint for a not-too-much-and-not-too-little effect). Here’s a video to show you just how easy these babies really are:
- Allowed each ornament to dry overnight
- Reattached the ornament caps in the morning after the craft paint dried
- Added colorful string (the same kind used for friendship bracelets from Michael’s) for hanging
Patterned Ceramic Ornaments
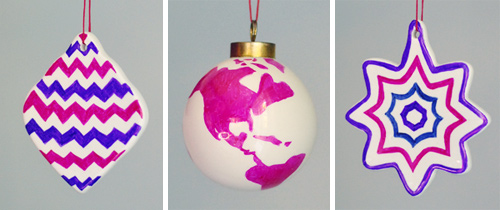
- Purchased three ceramic ornaments from Michael’s (for $5 total with coupons) along with three Sharpie markers in navy, magenta, and plum (also from Michael’s for another $5 with coupons)

- Drew magenta and plum chevrons on one ornament, hot pink continents on another (for a modern globe effect), and nested starbursts on the third ornament (in navy, plum, and magenta)
- Switched out the stock red ribbon for colorful string (yup, the friendship bracelet stuff from Michael’s)
- Oh and I’m planning to paint the gold cap of the globe ornament someday (white or orange or navy or pink… not sure yet)
Faux Antler Ornaments
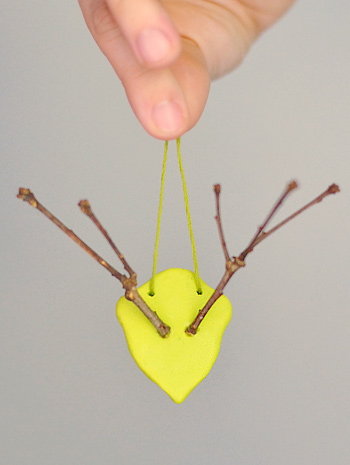
- Purchased one square of Premo Sculpey clay in lime green from Michael’s for $2
- Sculpted two small shield shapes and two larger ones
- Used a needle to create two holes for hanging and a stick to create two indents where each stick antler would be glued
- Baked according to the Sculpey directions to permanently harden them
- Used crazy glue and sticks from the front yard to create faux antler trophy
- Added colorful string for hanging (more of that friendship bracelet stuff from Michael’s)
Skeleton Key Ornament

- Grabbed rusty old skeleton key (a sweet gift from a friend)
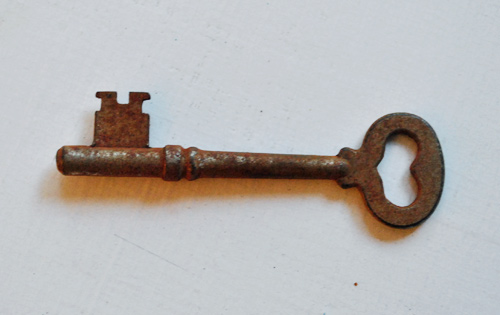
- Used spray primer and white craft paint leftover from faux ceramic animals to paint it white
- Added the friendship bracelet string for hanging
As for where I’ll display the not-so-Clara-friendly ornaments (well, they’re all super friendly for looking, especially all the zoo animals – just not so friendly for touching when it comes to the glass and ceramic ones), I’ve always loved the idea of a half-height tree on a round pedestal table like this – so we might get a real tree for that (and plant it in the backyard when the holidays are over). But on to the money stuff – here’s the budget breakdown:
- $4 for plastic zoo animals (from Michael’s)
- $2 for ring hooks for animals (from Lowe’s)
- $3 for spray primer for animals (from Lowe’s)
- $3 for acrylic paint in navy, white, and lime (from Michael’s)
- $2 for friendship bracelet string for hanging (from Michael’s)
- $9 for 18 clear glass ornaments (from Michael’s)
- $2 for magenta & teal acrylic paint (reused lime paint from animals)
- $2 for Primo Sculpey clay for faux antlers (from Michael’s)
- Total: $27 (so each of the 38 ornaments was 71 cents on average)
Oh and don’t forget to check in on Katie, Ana, and Erin to see what amaaaaazing projects they whipped up (they’ll be sharing theirs sometime today as well)!

And now here’s the part where we invite you to share all of the fun Pinterest Challenge projects that you guys have tackled in the last week (right along with us, well at least virtually with us). If you’ve already blogged about it, just:
- click on the blue “Add Your Link” button with the odd cartoon head at the bottom of this post (you might have to do some scrolling, depending how many projects are added)
- add a link to your specific blog post about your project in the url field (not your home page)
- where it says “name” write a descriptive name for your project (ex: “38 DIY Ornaments”) as opposed to your actual name
- we’d also love if you could quickly link back over to our project posts within your own (here’s Katie’s, Ana’s, Erin’s, and ours) – it’s also nice to link to your inspiration project on Pinterest as well as to directly link to the original project/site, just so they get some love too.
And if you’d rather just link over to your project in the comment section, feel free to do that – or even add a link to a free photo sharing site like Flickr with your pics if you don’t have a blog (remember to set the gallery to public so we can all see it). We can’t wait to see what you’ve been up to! Geeked out doesn’t even begin to describe it.
Update: You can check out all of our favorite holiday decor finds here – many of which are under $15!

Leave a Reply