When we decided we wanted to do a wood planked ceiling in our sunroom, I think I kind of just envision walking into Home Depot, strolling down the beadboard ceiling aisle, and loading up our cart. Piece of cake. Easy as pie. Insert third dessert related idiom here.
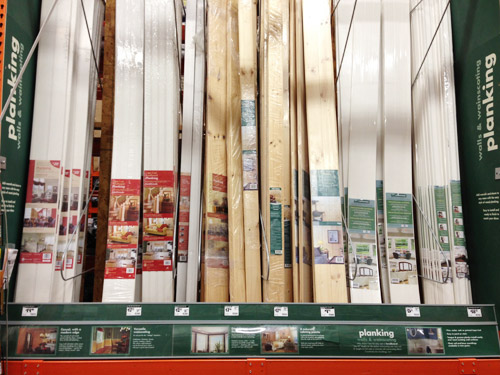
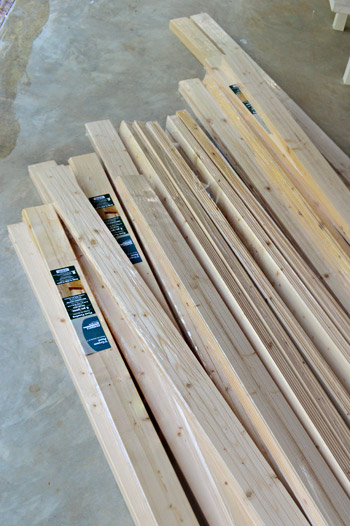
Well, turns out there are lots of options for achieving the beadboard look. Historically, beadboard was made up of individual tongue-and-groove planks – kinda like a hardwood floor. Except between each board is a little ridge or indentation, aka the “bead.” Just look at this assortment of choices…
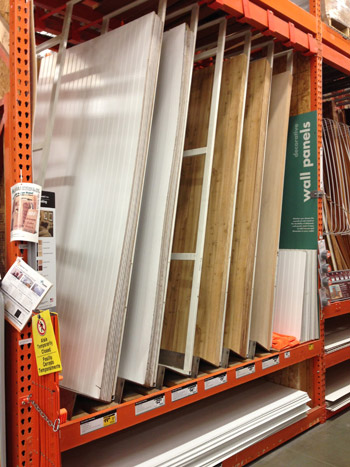
There are also lots of panel options. You know, those full 4ft x 8ft sheets of the beadboard pattern? We considered this option first because it seemed to be the most affordable (often less than $1 per square foot), but ultimately decided against it. Partly because installing these huge panels on our high ceiling seemed somewhat daunting (although Rhoda’s tutorial with the rented drywall lift made it seem less so, but we’d need to rent a truck to get them home and also had to factor in the cost of renting a drywall lift, which might counteract the savings). Mainly we skipped them because using panels meant there would be seams where one sheet meets another one – and, although you can cover those up with trim, we decided that on our sloped ceiling it just wasn’t the look we were going for.
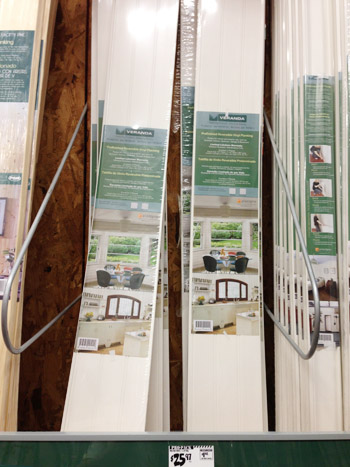
The next option we considered most seriously were these vinyl planks. Vinyl is a tempting option in an outdoor space because it won’t rot or warp from exposure to moisture. I read some message boards where people complained that these looked “too plastic-y” but the deal killer for us was actually the price. These were about $1.79 per square foot, so they were nearly twice as expensive as the panels (which would essentially double our project cost right off the bat).
Knowing we wanted a more authentic plank look (versus a panel) and that we didn’t think the cost & look of vinyl were ideal for us, we eventually narrowed all of our choices to these: individual tongue-and-groove wood planks. Both Lowe’s and Home Depot sold similar options (neither of which are online unfortunately). The Lowe’s option came in under that $1 per square foot mark, so the price was right. And we were also excited to be getting a more traditional look – both without any fake seams and with some real wood grain in the mix. The final cost for 20 six-packs of 6″ tongue-and-groove planks worked out to be $297 (at $0.94 per square foot). Admittedly it was a bit more than we pictured ourselves spending on this part of the project (we originally guessed that we could come in under $250) but we ultimately just want a result that we’re happy with for the long haul.
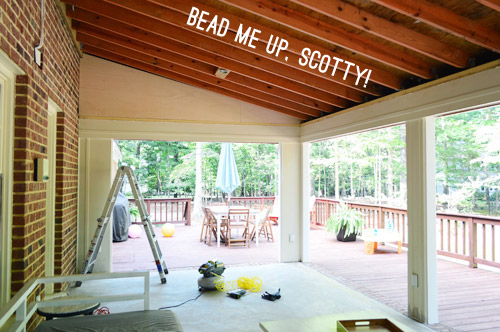
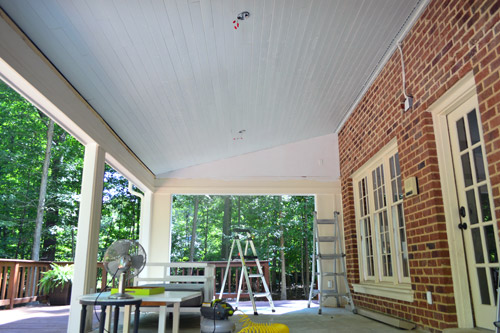
Unlike the large beadboard panels, we could fit these in our car and install them without buying any additional equipment like a scaffold or a drywall lift – but just like the other options, this choice also had its downsides. For one, installation would be more tedious since each board is only 6″ wide, meaning all 40 rows would need to be installed piece-by-piece. And wood is also susceptible to moisture issues (warping, rotting) if it’s not properly protected and maintained. Thankfully our entire sunroom’s exterior is wood, which has held up well for decades – so we had confidence that our new sunroom ceiling would stand the test of time if we prepped it properly. Which meant that before any planks could be installed, we needed to prime and paint both sides of them… one by one. Even though the backs won’t show we primed and painted them anyways so the whole board would be protected and sealed in.
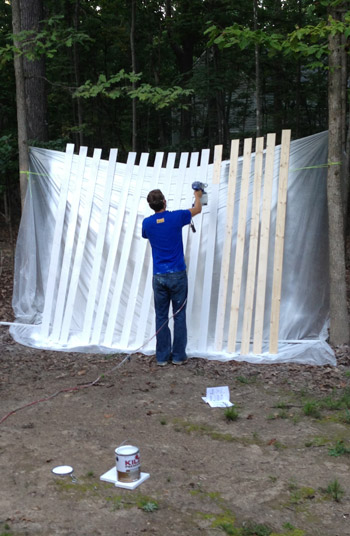
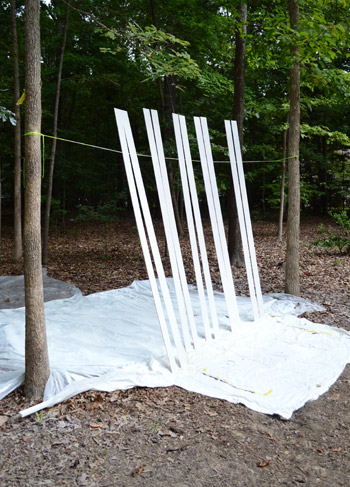
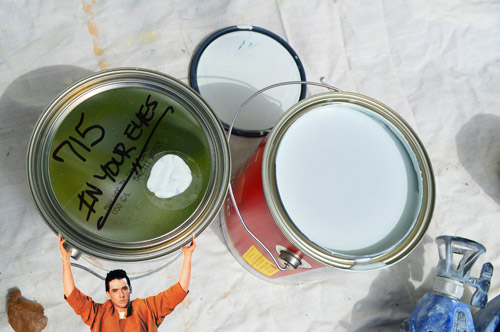
Pictured above was my first painting station, which didn’t work out so hot because the plastic drop cloth kept sticking to the backside of the boards. So eventually I figured out a method that worked: drop cloths on the ground and some nylon rope tied between two trees. I could get 10-12 planks done at a time (getting two done with one swipe of the paint sprayer – spraying their backside and then flipping them right over to do the front). Update: Here’s an affiliate link to a paint sprayer that’s similar to ours on Amazon since ours isn’t available anymore).
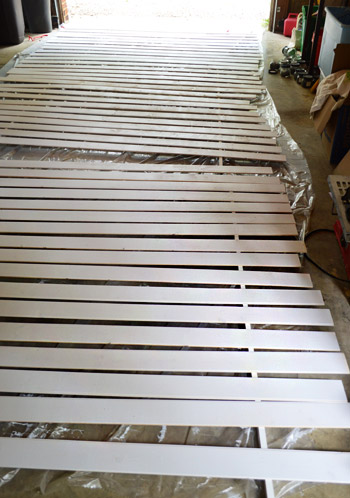
This process alone took about four days worth of two hour sessions, since we had 120 boards to do – front and back, primer and paint. We only had room for about 45 of them in our makeshift drying station in the garage (that way they didn’t get rain / dirt / leaves on them while curing) so I primed and painted one group, then installed them, then primed and painted the next, and installed those. Factor all the various paint sprayer cleanings into that, and let’s just say it wasn’t my favorite project in the world. But I knew once we got them up on the ceiling it would all be worth it. At least that’s what I kept telling myself.
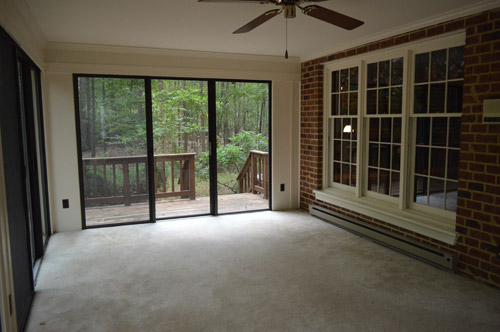
The primer we used was good ol’ Kilz Premium and the paint was Benjamin Moore’s Regal Select Exterior in the low lustre finish (we just told the guys at the paint desk what we were doing and they said that would work well). The color was called “In Your Eyes.” It’s a nice, pure light blue. We didn’t want the color to be too bold (we worried it would reflect into the living room window and make the whole room blue if it was too dark) and we also didn’t want it to clash next the the brick exterior of our house. We also wanted to make sure it read as blue, and not gray or green in some lighting situations. If you’re looking for a blue porch ceiling, we’ve also rounded up the best haint blue paint colors!
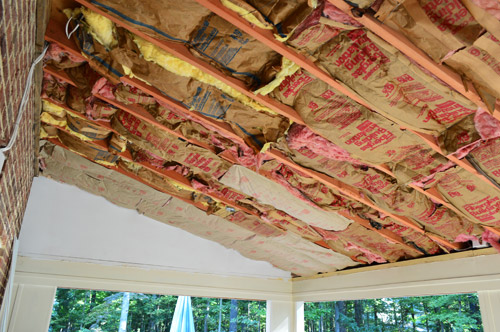
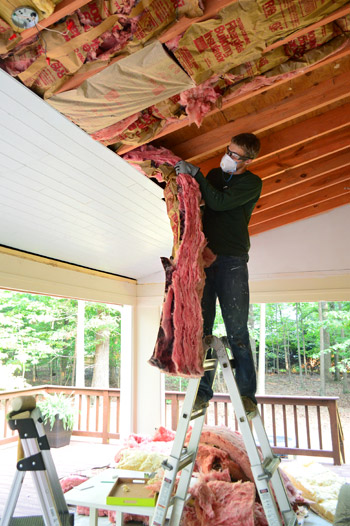
Now, before I get into the installation part of this project – a note about insulation. After a few commenters confirmed our instincts to re-insulate the ceiling to help keep some of the summer heat from getting through, we decided to go for it. The sun beats down on this roof all day, so even though the doorways have been opened up for some nice cross-breezes, apparently insulation can keep open rooms cooler by absorbing that constant sunlight shining down from above. So we mostly used the leftover insulation that was in the ceiling before (remember we removed it here?) despite how ugly it was. It was still relatively new and would do the job just fine – although we did have to buy one new roll to fill some gaps.
And then we learned we should NOT have insulated the roof in this case. Oops. We were able to remove it later (more on that in a moment) so please ignore the presence of insulation in these next few shots…
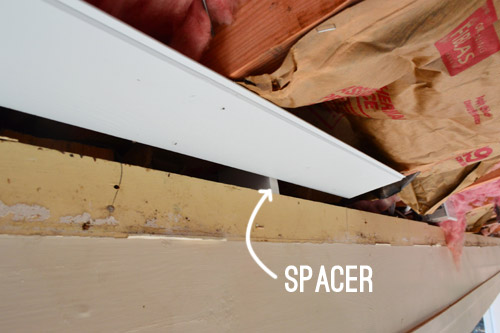
Installing the planks was giving me hardwood floor deja vu. From that process, I know that setting your first board straight against your wall is a crucial step to ensure your whole project isn’t crooked. So I cut a few spacers out of scrap wood to place along the front wall to keep my first row even.
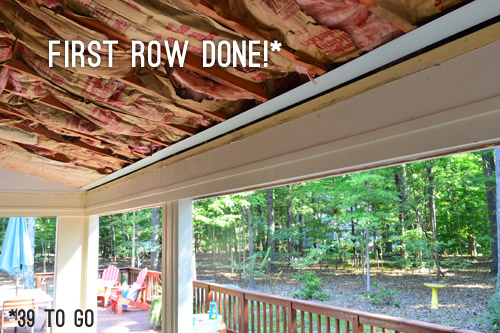
We hung our planks in this direction (running parallel with the long wall) so that we could attach them directly to the joists (every 16 inches). That way they’ll be nice and sturdy (nailing them in at such close increments will hopefully keep them from sagging or warping down the line). That wall is about 20 feet long, so it took about 2.5 boards to complete each row.
Also borrowing from our hardwood flooring experience, we wanted to stagger the breaks between boards from one row to the next. This makes things more secure since there’s not one area of weakness for each row that lines up, and also looks nice since the boards don’t all break at the same place. So if we started one row with a full board, we started the next row with a partial scrap so they weren’t ending on the same joist.
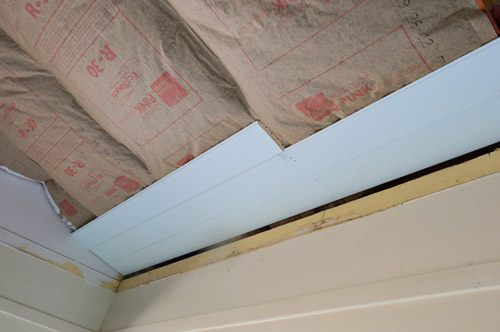
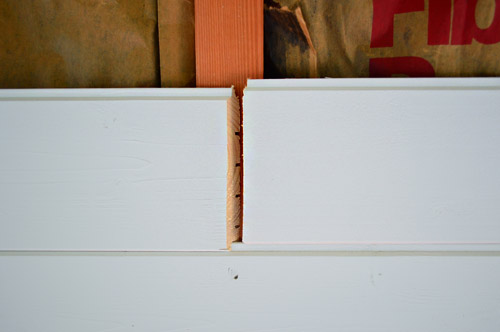
Sherry helped me by doing a lot of the cutting while I did the nailing – and the other thing we did to make the seams less visible is to cut everything using a scarf joint. By cutting every end on matching 45° angles, the boards will overlap each other a bit and will be more likely to stay together and look more seamless in the long run.

You can see it a bit closer here, as we’re installing one board next to another. You’ll notice we also cut everything so that all of our seams coincided with a ceiling joist. This meant we could nail both ends of a seam into the joist, further discouraging the ends from bowing away from the ceiling.
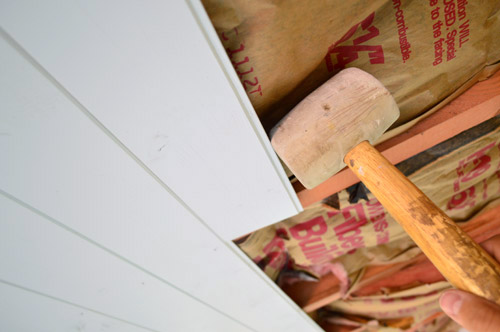
All of that cutting was definitely a bit of a time suck, so it was nice to have an extra set of hands for some help with that. And luckily the rest of the install went pretty much like clock work. The tongues and grooves helped each board slide on the ceiling pretty nicely, though it sometimes took some light encouragement with a rubber mallet.
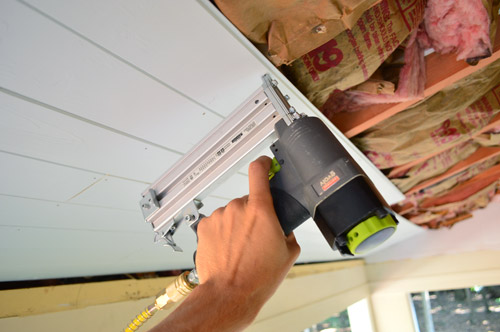
Follow that with a shot from the nail gun into each of the joists (with some wood glue along the joists before installing the plank) and we were in business. Update: Here’s an affiliate link to the nail gun we bought on Amazon.
It took us a good 5 hours to get our first set of 45 boards hung (over the course of a few days), so it definitely was a slow-going project. And I’ll admit the idea of hoisting a few 4ft x 8ft panels up there was starting to sound pretty appealing. But at least the breakneckback speed meant that we were able to catch our little insulation error before it was too late (instead of having to remove the entire ceiling, we could pull everything out since the beadboard hadn’t progressed too far to block anything from our reach).
The issue we learned (first from a commenter, and then later confirmed by the framing expert who helped us remove the drop ceiling) is that insulation traps heat (duh) and needs airflow in order to sweat that heat out. Since our insulation would’ve been installed smack dab between the roof and the beadboard ceiling, there’d be no air flow. Not only could that mean built-up moisture that could threaten our beadboard, but the hot insulation could actually result in a roof that doesn’t even meet its expected lifetime due to all that trapped heat burning it up prematurely. So we’re very grateful to have learned the error of our ways so that we could correct it before it meant tearing out our new ceiling. And we figure with the cross breezes we get paired with the two fans that we’ll be installing, this little shady retreat from the deck will be nice and cool by comparison – even without the insulation.
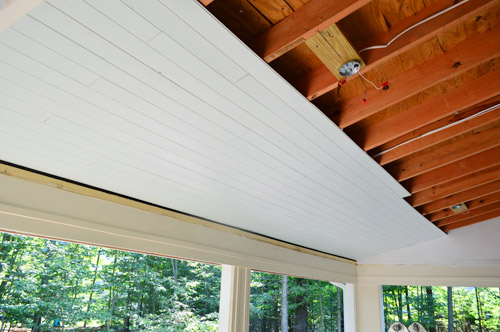
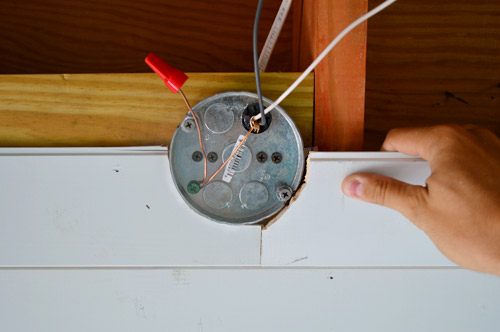
After another round of priming and painting, we could get to work installing our second set of planks. At this point I pretty much had my rhythm down and I think it only took me four hours (big difference, I know – but this was without Sherry manning the saw so I was a lone ranger for this part). I probably could’ve chugged along a bit faster if I didn’t have curveballs like jigsawing around the two fan fixture boxes, but those weren’t too bad in the end.
When I had that batch up, it actually started to look like a ceiling.
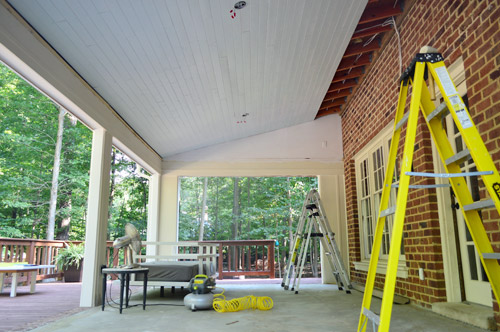
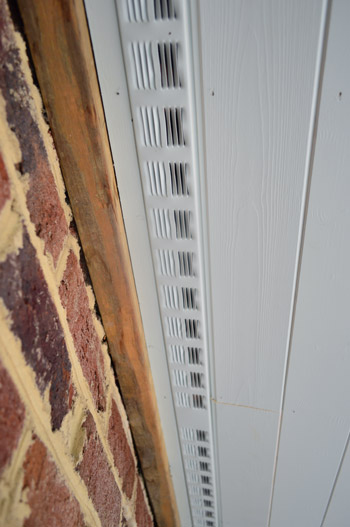
My final day of ceiling installation went pretty quickly since I only had a small sliver of space to finish. The height was becoming a bit challenging and my neck and shoulders were basically numb from working above my head for so many days in a row, but I was somewhat excited for a new challenge: adding a row of vents across the top to help introduce a bit of air flow up there – which was also recommended by our framing guy during our remove-the-insulation conversation.
At last, all of the ceiling boards were in. I guess technically it’s not a “beadboard” ceiling since our planks don’t have the bead design engraved into them – they just lock together to create that look. We’re glad we went with a simpler 6″ plank because, given its size, we think a smaller bead detail might have looked a bit too busy up there.

Sadly our ceiling work is not quite done – but we’re in the home stretch. We just have to add trim around the edges, which will need to be caulked and painted. Plus, I want to go back and try to fill the many, many nail holes in the boards themselves before painting over the whole thing one last time for that protected-against-the-elements result (we figure one more coat over all the planks, now that they’re pieced together, will help keep moisture out of the seams).
Progress feels good. It’s almost like having the feeling in my arms again.
Here’s what our to do list is looking like now:
Rip up the old carpeting(more on that here)
Remove the sliding doors and tracks to open things up(more on that here)
Convert outlets to outdoor-safe rain-proof ones with covers(more on that here)Add fresh casing to the openings and caulk like crazy to waterproof everything(more on that here)
Demo the old ceiling in hopes of possibly lofting it (get a pro in here for advice)(more on that here)
Remove old beams, reinforce ceiling stability, and re-route electrical for two fans instead of one(more on that here)Prime, paint, and install our beadboard ceiling- Add trim around the ceiling, caulk and paint that, and hang two ceiling fans
- Repaint the columns & interior of the sunroom with white exterior paint (it’s currently cream)
- Tile the floors (we bought something that’s outdoor safe and less slick than the glue-stained concrete here)
- Get a rug, furniture, and maybe even add some outdoor curtains and lanterns/sconces?
- Build an outdoor fireplace like this down the line
I think this puts us at more than halfway done, but we still have floor-tiling to check off before we’re really coasting towards the finish line. Did anyone else spend the last week priming and painting a whole lot of stuff? We also tackled Clara’s walls, ceiling, and closet, so it was quite possibly the most painting we’ve ever done in a week’s time. Plus Sherry conquered another area of blue trim, so we’ll be back with those details in a day or two.
Psst- Wanna know where we got something in our house? Just click on this button:


Lauren @ The Highlands Life says
It looks sooooo good!! I love what ya’ll are doing with this porch!
Jeff says
Wow it looks AWESOME!
Anele @ Success Along the Weigh says
Your patience is to be commended. I could never get through something like that without creative a few new swear words!
Christine S says
Looks amazing!!! So glad you were able to catch the little “mishap” with the insulation before it potentially caused a moisture issue!!! It’s a lot more work involved than most people realize at a first glance. Great job!
Theresa M. says
Haha!! Love John Cusack holding up the paint can! (I wondered if you guys would get Peter Gabriel, he’s a bit before your time.)
Julie says
OMG John Cusack, that was priceless!!!!
Missy says
I love that you snuck Lloyd Dobbler in there and didn’t even mention it. Best movie scene ever!
Chelsey says
I actually did laugh out loud for real. The ceiling looks great!
Sue says
I know! i just about died laughing at that pic of John Cusack. Bahaha
Amy Dunn says
Silent laughter = tears at my work desk! Incredible Say Anything reference. Sure, the beadboarding takes the cake but you two just crack me up. Great work, and funny as all get-out, P-Siks!
Larissa says
That might just be my favorite YHL funny of all time. John, you’re good.
Lisa says
OMG!!!! John Cusack… that was classic and so awesome! Love the subtle humor for a Monday morning. Thank you!
Kari says
My favorite part of the whole post!
Nadine says
OMG, Lloyd!! My teenage dream!
Sandra T says
Amen, haha!Love love love “Say Anything”, “In Your Eyes”, and your punny! My 17 yo daughter loves that movie, too! I made sure of it! ;)
Lilly says
Totally agree with the sneaking-in of Lloyd Dobbler!
Janey says
I actually stopped reading the (really interesting and fun) post to come here and thank you for the awesome In Your Eyes paint can with John Cusack. Made me so happy on what has been up to now kind of a grey day. :-) Now back to reading the rest…
Maja says
That was so funny! I actually checked whether the link was for the song, but it was for the actual paint. It was only then that I saw John Cusack holding up the paint can… awesome. :)
J.Mill says
JOOOOHN!
It took me a second to notice that, but when I did… haha!
jmlo says
One for for the Cusack Fan Club!!!
seriously made my day (and it just turned midnight, so it made my tomorrow, too!)
Kathleen says
Ha! Cracks me up even more that you snuck him in there without saying anything about it. Now that song’s stuck in my head.
Heidi says
The ceiling looks incredible! Painting that much wood gets old pretty fast.
I had to paint our entire garden workshop 3 times BY HAND! No Rollers. My arms and back are still burning.
http://www.krusesworkshop.blogspot.com/
YoungHouseLove says
Holy cow, that’s some serious dedication! Hope you regain the use of your arms again soon!
xo
s
Amy says
LOVE the little John Cusack! HA!
P.S. Oh, and the project too.
Alyson L says
This might be my favorite YHL post ever, just because of the tiny Cusack holding up the “In Your Eyes” paint!
Manda Wolf says
Looks really good guys. I really didn’t’ think I would like the sun room opened up, but now it really looks good and I can see how it will be a better use of the space.
We used bead board paneling twice in our house once for a wainscoting in the living areas (http://ourwolfden.wordpress.com/2013/07/12/small-change-huge-impact/) and then in our downstairs bathroom (http://ourwolfden.wordpress.com/2013/08/22/bead-board-walls-in-the-downstairs-bathroom/).
YoungHouseLove says
Both of those look awesome! I especially love the large panels you used in the bathroom. Such a great look for the whole wall!
xo
s
Ash says
I LOVE it, what an amazing transformation! Can’t wait to see it when all the trim is installed and painted!
Chelsea @ Riding Escalators says
Ooooo! I <3 it! Good call on the actual boards versus the panels. This coming from a gal who bought what felt like a whole house full of paneling – it doesn't look real folks. Never has – never will. :)
Shari says
Cusack! I am dying of laughter here :D
Danielle says
Wow, it looks incredible so far! Congrats!!
I think your next book should be a home improvement theme – kitchen updates, installing a beadboard ceiling…the list of how-to’s you’ve already accomplished is pretty impressive!
Liz H says
Love this! It looks so awesome. I’ve gotta say, I’m totally jealous of this space. I’ve been dreaming of adding bead board to the ceilings in my kids rooms. Is there a reason you had to paint both sides of the panels if only one side is going to show?
YoungHouseLove says
Since they’re in an outside space we just wanted to seal the whole thing so we didn’t worry as much about warping/swelling with the weather changes – but if you’re using it inside I’m sure just painting the side that shows would do the trick.
xo
s
Michele from IL says
Ceiling looks great! Also, love the cameo of Lloyd Dobler! :)
Sharon Sprague says
WOW! This is spectacular. And I can’t imagine how sore you must be! I love all the details you provide and the photos are great. When do you think a fireplace might make an appearance? I love the one you provided in a link a few posts ago. Super cool! What a great hang out spot!
YoungHouseLove says
We’re not sure when we’ll get to that but we think it’ll be down the line since we will have to save up for it and most likely will need permits and all that good stuff (we’ll definitely have to consult a pro, perhaps a mason, to help us with the framing and ensure everything is safe/to code). Should be really fun when we get to it though! Maybe in a year or so?
xo
s
HeatherB says
Sherri~
Did you see the one in HGTV magazine this month? Actually, I guess it is the October 2013 edition… Anyway, they feature a screened porch with an awesome outdoor fireplace, too. They had a note about prefab rather than custom, and turned the hearth into bench seats. Looked really cool, and I thought of you :)
YoungHouseLove says
That sounds really cool!
xo
s
Sara V says
WOW It’s crazy how much more open and airy the whole room looks now! I’m loving it.
Daniella says
amazing but time oh time..how much time do you think it took you in total?
YoungHouseLove says
Probably around 12-15 hours if you include all the prep work (priming & painting), spread across a week’s time.
xo
s
Jen. says
Ooo! I just used Fantasy Blue — one darker than In Your Eyes, I think — in my front hall. I LOVE it. It only looks grey in incandescent light, which I suspect you won’t be using much on your outdoor room. Good luck! The ceiling looks so nice!
YoungHouseLove says
That sounds really pretty, Jen!
xo
s
Tina P says
I don’t know if you knew this already, but I was taught that light blue is traditional for outdoor wood ceilings because wasps are repelled by that color so they don’t build nests.
YoungHouseLove says
Love that!
xo
s
hollie says
Lloyd Dobler totally made my morning :)
Alison says
The John Cusack joke was perfect. Well-played, Petersiks.
Dizee says
Having feeling in your arms is over-rated!
Good job on the ceiling!
I had a sense of accomplishment when I cleaned the playroom recently – it was so bad I was almost too embarrassed to post the before pictures….
janice says
oh my gosh I can not imagine your aching neck, arms, back – hands, head…all of you…? !! Looks great though!
Paige @ Little Nostalgia says
I loooove the blue. It’s going to be so pretty once all of the trim is white. Well, it’s already pretty, but you know what I mean.
We got our paint on this weekend, too. Did the front of our house!
http://littlenostalgia.blogspot.com/2013/09/a-painted-house.html
YoungHouseLove says
Gorgeous! I LOVE the color you picked.
xo
s
Jordan@the2seasons says
Wow this is so impressive. It looks amazing, and I have to say so clever for your painting setup.
Cathy says
Lloyd Dobler — hahahaha! Thanks for starting off Monday right!
Your vision for this room is nothing short of amazing. Love how it’s coming together.
KarenH. says
Oh, very nice!! I didn’t do any construction work this weekend–at least, not of the home variety–I’ve been enjoying the use of my sewing room since spending most of the summer putting it together, but that DID include installing beadboard panels as a ceiling. Believe me, you chose correctly. Even so, that was a VERY big job and you did a very nice job of it :)
Meagan Briggs says
So so awesome! Love bead board!
Fenny says
Hi guys. Looks great! Curious why you decided to go horizontal instead of vertical with your boards. I think it would have made the ceiling look even higher if you had gone vertical. A little more work since you would have to add pieces between the rafters to nail the boards to but I really think it would have been worth it.
Fenny
YoungHouseLove says
Thanks Fenny! We had to attach the boards to the joists (every 16″) to keep them strong and secure, so since the joists ran that direction, we had to do the boards that way to catch those cross beams and nail them all in.
-John
Katy @ The Non-Consumer Advocate says
Wow, what a huge amount of work! Of course, it will all be worth it when you’re done though.
But it’s too bad you couldn’t get John Cusack to be a bit more helpful. It’s nice and all that he’s holding up the paint can, but it wouldn’t have killed him to work the saw as well.
Some people . . .
Katy
YoungHouseLove says
Seriously. Dude was just messing around holding up the paint cans and looking all vulnerable.
xo
s
LisaDR says
Coming out GREAT!!!! We used beadboard in our breezeway which is now part of the kitchen and it’s such a clean and cozy look! I’m surprised about the insulation…and have a question…would polstyrene boards versus fiber insulation help to keep the porch cool and not effect the wood panels? We have an insulated roof that is 3″ of foam board and it is at least 10 degrees cooler under the porch. We don’t have wood, however, but I’m just wondering about the heat factor.
YoungHouseLove says
Great question! I’m not sure. Anyone have an answer for Lisa?
-John
Paige @ Little Nostalgia says
When we bought our house last summer, there was polystyrene insulation in our crawl space and the home inspector told us we had to get it removed because it’s a fire hazard! I’m not sure if there are different varieties, but ours had to go. :-/
YoungHouseLove says
Oh no!
xo
s
JMK says
For anyone living in a cold climate, separating your insulation from the roof sheathing is a standard building code item. If you have a normal attic with a triangular space like your porch before lofting the ceiling, you only need to add the styrofoam channels at the point where the attic begins to go our over the exterior wall into the eaves. If you have an entirely vaulted ceiling, which we do in 4 rooms in our home, you have to staple multiple sections of the styrofoam channel from the eaves all the way up to the highest point. This ensures you keep an air channel open between the underside of the roof sheathing and the insulation. In winter here it’s easily -30 outside and 70 inside so you defintely want a barrier between hot and cold spaces to avoid the temperature transfer. I’m surprised you weren’t advised to add venting to the eaves at the bottom of the porch roof. Hot air rises, so in summer air will eventually be forced out the vents at the top, but I’d think adding them at the bottom to let in fresh air would speed up the process.
YoungHouseLove says
Great info JMK! Thanks for sharing!
xo
s
Heidi S. says
Looks great! I’m going to throw in my nerdy architectural opinion about insulation. I would agree with JMK about adding venting at the eaves to allow the air to circulate, now that you have vents at the top. I think it is good that you took out the fiberglass insulation, because if nothing else it had a paper vapor barrier which shouldn’t be used in this type of condition (and could allow moisture to develop). I have mixed feelings about the Styrofoam channels though. It is true that a lot of codes still technically require this in vaulted ceilings, but this is not always as helpful as one would think. The concept is that the channels allow air to flow between the insulation and the roof to keep the shingles cooler (some shingle manufacturers will actually void your roofing warranty if you install insulation directly to the underside). However studies have shown that the narrow venting does not actually increase the shingle temperatures by very much. And the added benefit of a really tight installation job (either with rigid or spray foam) is more beneficial than venting and possibly allowing gaps for air to escape. In our old house (1888) we have actually sprayfoamed the underside of our roof (between the joists and the plaster ceilings) with no venting.
Also Paige the reason that your inspector probably said to remove the rigid polystyrene is that it is exposed. To meet code (and avoid flame spread) it is to be fully sealed in a wall cavity and not left out. We have this in our basement walls (but fully sealed) and I recommend this type of insulation in lower level conditions. It makes a noticeable difference. Another option for damp conditions is mineral wool, which isn’t affect by moisture and is actually also used in fire walls. You don’t want to use fiberglass insulation in areas that are prone to be damp.
YoungHouseLove says
Thanks for the info Heidi! We’re thinking we could add some vents to the outside eaves of the sunroom so it vents to the same area without interfering with the planked ceiling.
xo
s
bridget b. says
very cool! i would have never thought to do something like this. i love the ideas you guys tackle in your house.
Megan @ Rappsody in Rooms says
HA! I love that you snuck a little John Cusack/Say Anything in there. I almost didn’t catch it. I think that, along with your amazing projects, is why I read your blog. btw, the ceiling is fantastic!!
Wendy says
Looks amazing! Really impressive and will totally be worth all of the hours you spent on it. I know how those marathon, never-seem-to-end type of projects feel (I spent about 16 hours this weekend refinishing vintage furniture and probably still have another 4-6 hours left of work).
schmei says
That’s a fine looking ceiling, but it’s the John Cusack photoshop job that made this the perfect Monday morning read for me. Well played.
Meredith says
I was expecting the “in your eyes” link to go to the clip from say anything, and was kind of disappointed that it didn’t until I noticed the photoshop job of john cusack – so glad that you all are able to find time to add some joy and humor into your work :)
Meredith says
Did you take a nap after this? Please tell me you got a nap. I think I want to take a nap after just READING about that.
YoungHouseLove says
I daydreamed about taking a nap while hanging those last boards – does that count?
-John
JMK says
I’m confused about why you put the nails through the face of each board? We installed individual 1/2″ bead boards on our veranda ceiling and nailed each one in the tongue of the board that was then hidden by the next board – the same way you install hardwood floors. Was this type of board not suitable for hidden nailing? It just seems like a huge job to face nail it and then have to go over the entire ceiling again to fill and repaint. Just wondering.
FYI – the leftover scraps of beadboard are being used for the ceiling of the powder room and the back walls of builtin book cases. If there is are any really small pieces left after that we’ll be making planter boxes for out on the veranda (something like this: http://www.lowes.ca/planters/all-things-cedar-pl20-20-planter-box_g865057.html?isku=7143549&linkloc=cataLogProductItemsImage )
YoungHouseLove says
Yes, it just wasn’t meant to be installed that way, so we couldn’t do hidden nails (although I agree that would definitely save me some caulking time. As for the leftover pieces tip, that’s really smart! Thanks for sharing that link, JMK.
-John
JMK says
To clarify, the boards were 1/2″ thick, but 4″ wide. Very much like installing a hardwood floor over your head.
Melissa D says
This looks awesome! I have a son on the autism spectrum who is obsessed with fans….so much so that he has a scrapbook of fans from home improvement store ads. He loves reading through your book and is so excited about your new house and everything you are doing with it. I just showed him your post and he said he can’t wait to see what fans you guys are sticking out there. :)
YoungHouseLove says
Aw, that’s so sweet Melissa! Tell him we (and Clara) send our love. We can’t wait to get those fans up and running!
xo
s
Sommer says
Looks great – I think the individual planks look better than the large panels. We have panel beadboard in our kitchen and the seams definitely stand out and look bad (part of that is probably the not great paint job) and I can’t wait to tear it down.
Gwen, The Makerista says
That looks really amazing! What a difference!
Lisa E says
Apparently I’m not totally awake yet, because I totally missed John Cusack until I read the comments. Classic! I just love your whit! :D Anyway, it’s looking really pretty. I absolutely hate working on projects above the head. My neck kills just thinking about it. Way to hang in there!
Tiffany says
It looks wonderful! I am so excited to see if Sherry painted the dinning room trim or the trim in the office. I hope that it is the dinning room, I have been dying to see how you two were going to transform those corner built-ins. Also can you please post a picture of the family room, it will be interesting to see it with new curtains, rug and art on the mantle. I love everything you two are doing in your new house.
YoungHouseLove says
Oh yeah, we’re hoping to take a bunch of updated room shots for you guys this week since things seem to always be in flux.
xo
s
Betsy says
Looks wonderful! We just put similar paneling on a ceiling at a cottage at the shore that was damaged by Hurricane Sandy. We used it to fix a ceiling that wasn’t level (it’s an old house — nothing is square or level!).
http://www.the567project.blogspot.com/2013/08/a-shore-thing.html
YoungHouseLove says
That’s a really smart solution! I bet it looks great!
xo
s
Kristen says
This space is really coming together nicely! I’m glad you chose a blue for the ceiling!
Laurea says
This looks great. I love that you guys went with the real tongue-and-groove planks instead of the long boards. Its amazing how much of a difference it makes.
Brit [House Updated] says
I totally pictured actual beadboard going vertical, but I like the horizontal planks even better! You guys must be getting to be pros at that paint sprayer, is it worth it for projects like this?
YoungHouseLove says
SO WORTH IT!
xo
s
Isabel says
18 shutters and three doors later I wholeheartedly concur. Next up, kitchen cabinets!
Michelle @ A Healthy Mrs says
Looking good! Love the John Cusack “Say Anything..” photoshop :)
Emma says
This looks so good! Wow! I love the guy you Photoshopped into the paint picture :)
Ashley says
Oh goodness, I almost peed my pants when I spotted the tiny John Cusack! And I’m so glad you added him in, because that’s where my mind went as soon as I read the paint name!
Renee says
Looks awesome – so jealous!