Before we get to our weekly deck update, we just have to say HOLY COW you guys have awesome homes! So many folks submitted house crashing photos for our upcoming trip to Atlanta for the Haven conference – and we wish we had time to see every last one of you! We’ve worked out a plan to crash as many as we can fit in and are crying a little inside that we can’t get to all of you – but we might be back out that way for book tour stuff in the fall so there’s always next time! So this is just a huge thanks to everyone for offering to allow a toddler, a chihuahua, and two curious bloggers to snoop around.
Ok, back to business. I’m quite proud of this post title as it includes not one, but two deck puns about our latest accomplishments: leveling more stuff and digging holes. Continuing with the theme of Deck Day #1, Day #2 wasn’t quite as productive as we had envisioned. Day #2 actually happened the day after #1, but since that progress wasn’t really post-worthy we wanted to squeeze in a bit more ’til writing another update. But we finally accomplished both a fully completed ledger board and made all of our post holes thanks to Deck Day #3, so here’s the rundown on those last two days of deck work.
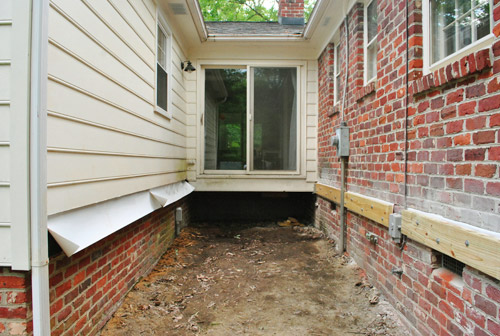
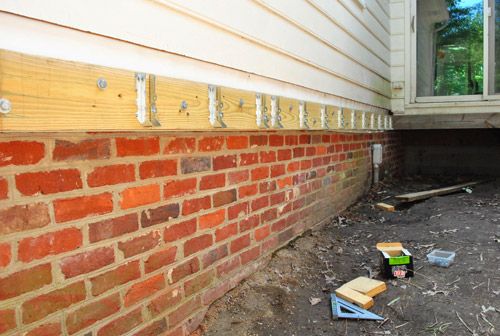
You may recall that we left off with hanging one ledger board on the brick side of the alley and had readied the siding side for ledger board-ing as well.
Obviously the first task for Day #2 was to get the other ledger board hung against the house (for more explanation of what these guys do and how they’re installed, check out this post). So the first thing we did was mark where all of our hangers would go (the metal piece that a joist sits in) so that we didn’t put any bolts in those spots. Since the hangers would have to line up with the hangers we had already marked on the brick side of the house, I created a little diagram with all of my measurements so we could mark them accurately. Clara is responsible for the crayon scribble.

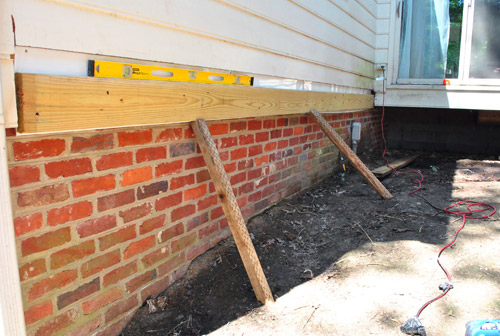
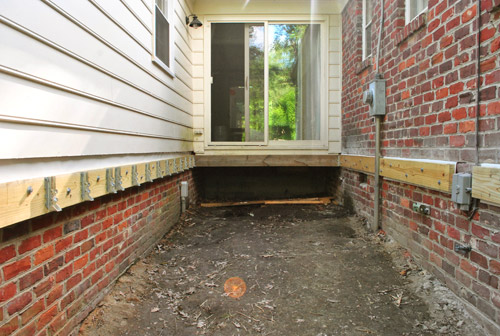
The ledger was a bit of a bear to maneuver because it was one 17-foot-long 2×8′ board. But my dad and I managed to get it into place – and between our two sets of hands and some scrap board for propping, were able to level and screw it in without too much trouble. The actual bolting process was faster since (a) we only had to use 6″ lag screws this time and (b) we were going through wood, not brick.
Since the ledger board attachment phase went faster than expected, we decided to insert another task to our to-do list: attaching all of the joist hangers. Our ultimate goal was to dig post holes by the end of the day, but since it was barely 11am we thought we could knock out the hangers pretty fast. So off we went with our level and scrap joist, hammering in the hangers right down the line. Although we actually did every third hanger first (to take advantage of the full length of our level) and then went back and filled in the ones between.
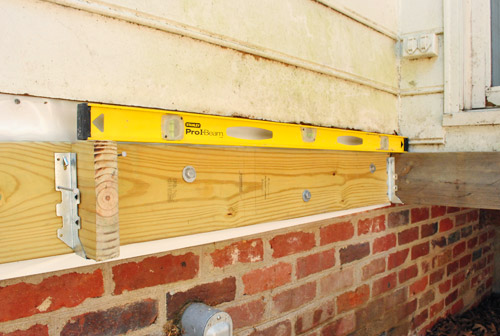
It was a relatively straight-forward process, though a bit more time consuming than we had bargained for.

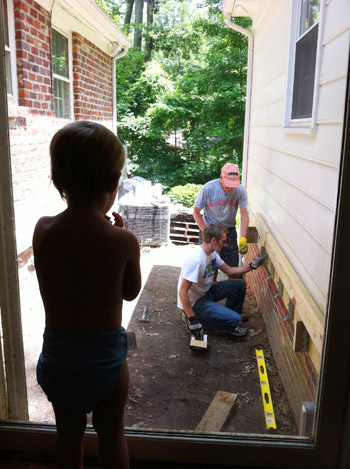
And just like the day before, we had our cheering section observing from the door. Unlike the day before, the cheering section was no longer wearing clothes for some reason (except, thankfully, for a blue cloth diaper). This doesn’t include my wife (she was diaperless, yet clothed – and thankfully very helpful for photo taking and conferring throughout the day while she Clara-wrangled).
By about 1pm, my dad and I had finished all of the hangers on one side of the house. And we were growing a bit less confident about our schedule and more than a little hungry.
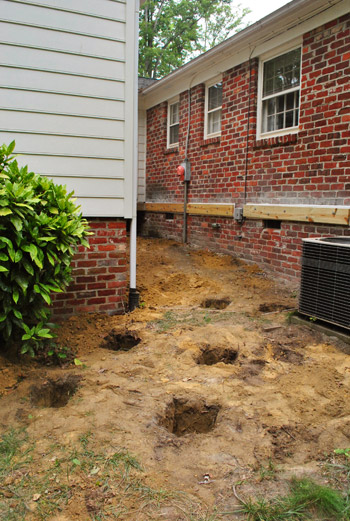
So instead of tackling the hangers on the brick side of the house, we decided to get some food in our bellies and then turn our attention to digging post holes since our first inspection was only about footings, not ledgers or hangers or any of that other jazz. But can’t you just see it- our future deck. Try to squint and imagine beams going across these ledgers and boards running on top of those. Bam: instant imaginary deck. If only making that a reality were that easy. We can only devote one or two days a week to it since it calls for such big chunks of our time (we’re also working around my dad’s schedule, which we’re happy to do in return for his help) so our goal is to complete it before the end of July. So expect weekly updates for the next month or so and then hopefully we’ll have a nice purty after picture for ya. Haha.
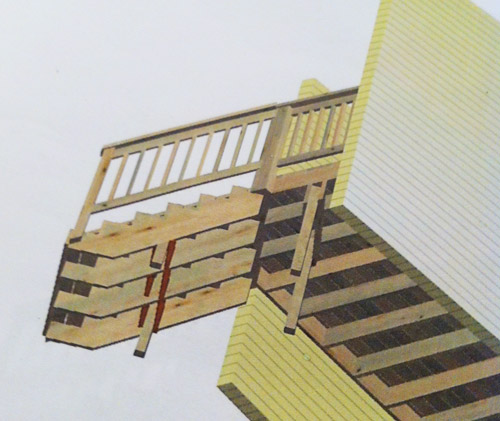
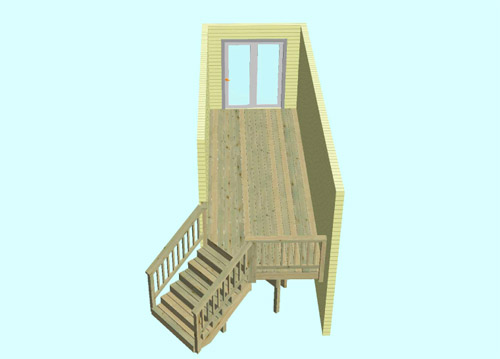
After our late lunch we got right to planning where our post holes needed to go. On paper, it looked fairly straightforward. As you can sort of tell from this 3D rendering that 84 Lumber provided with my plans (this is a few from underneath – almost as if you were beneath our AC unit) – we’d need two posts at the end of the deck, two in the middle of the stairs, and (although not shown clearly) two at the very bottom of the steps.
Actually figuring out where those holes went on the ground was a bit more involved. For the two at the end of the deck, we first had to figure out exactly where the end of our deck was and what angle the stairs would come off at (we made it easy on ourselves and went for 45 degrees). We marked our lines with some string tethered between two bolts hammered into the dirt.
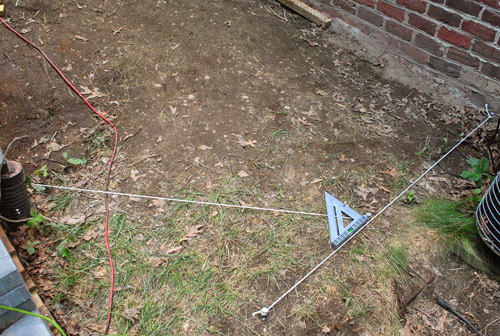
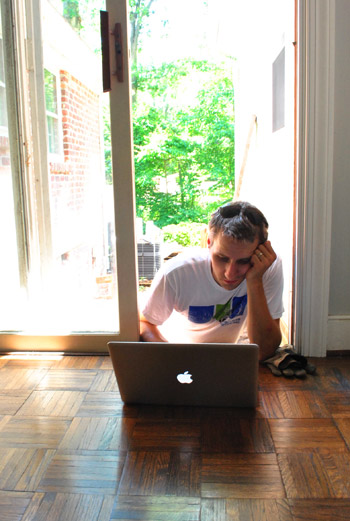
Figuring out the stair posts meant actually figuring out how long our stairs would be. My geometry is a bit rusty, so thank goodness for this EZ Stair Calculator I found online. And thank goodness for my fancy schmancy temporary desk:
Even with the calculator, we spent more time staking out our stairs because Sherry, my dad, and I got into this big debate about what the stairs should look like (and what we felt capable enough to build). We had at one point envisioned stairs that flared out at the end. But there were seven stairs instead of three, so that would have gotten too wide for the space.
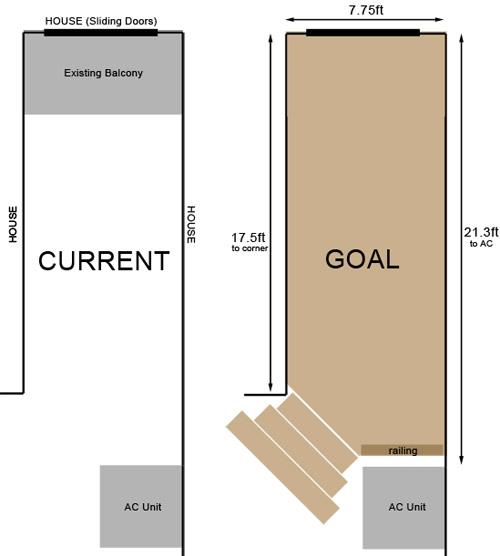
We even talked about three stairs with a large platform halfway down and then three more stairs. But ultimately we opted to keep things simple and just go with basic straight stairs for now (we didn’t want them to go on forever – which they would do with a platform in the middle – and with the air conditioner to the right of the stairs and the house to the left of them, it sort of limited our creativity). Oh but see the railing on the deck to the right of the stairs in the picture below? We think that’s going to be a big built-in planter box instead. Will keep you posted as we go!
At least our decision to go with “classic stairs” was easy to mark with our string (we later shifted them over five inches away from the house – oh and we’ll plant something to the right of them so there’s a buffer between the steps and the air conditioner – not too close though, so it won’t inhibit the air conditioner’s function).

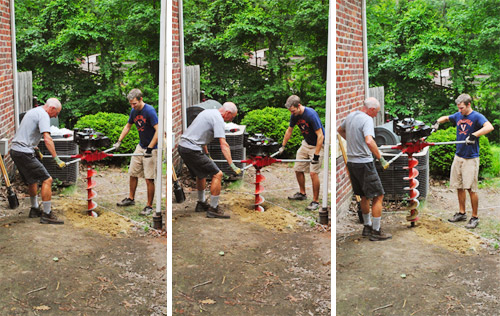
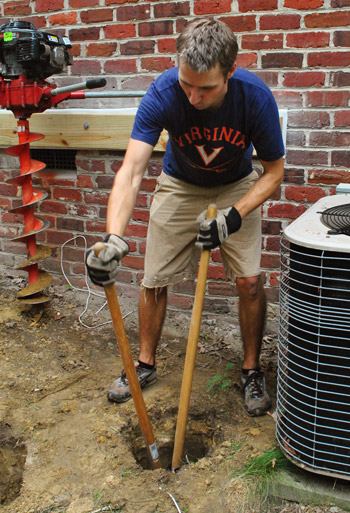
But by that point it was about 5pm on Deck Day #2, and two straight days of work were catching up with us, so we made the call to leave hole digging for another day. So let’s skip ahead to just a few days ago when my dad arrived with this in his trunk. Enter Deck Day #3, stage right.

That’s a two-man auger from the Home Depot Tool Rental Center. After having not the most fun manually digging holes for our fence last year, I figured we’d got the power tool route this time. It was $60 to rent for 4 hours (and it would have been $85 if we wanted it for a full 24).

To get us started I dug a shallow mark in the ground where we needed our hole to go, which also helped the auger bit sit in the right place before we powered it up.
The thing started up like a lawn mower (you pull the cord and it starts to rev) and, although a bit unwieldy it wasn’t all that challenging to use. It took both of us holding tight while I controlled the speed of the bit with one hand. We’d let the motion and weight of the machine do most of the work – we just had to keep it from falling over. And occasionally we pulled it out to help the dirt actually get out of the hole. NOTE: Always call your local Miss Utility first to ensure you’re not digging through any wires or pipes that could be damaging to yourself or your property. We did this as one of our first deck planning steps way back in May (more on that here).
If you asked me today, I’d say the auger wasn’t that hard to use. But looking back at these pictures, boy does my face tell a different story.
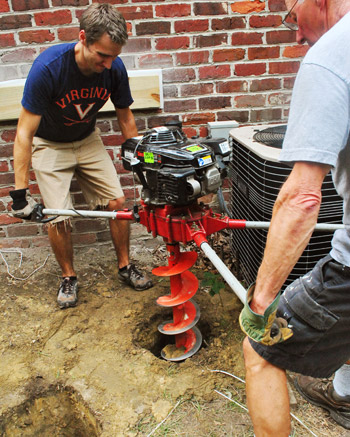
And I guess it wasn’t only my face trying to prove just how hard we were working. Sherry thought it was funny that the veins in my arms were bulging… even several minutes after putting the auger down to rest.

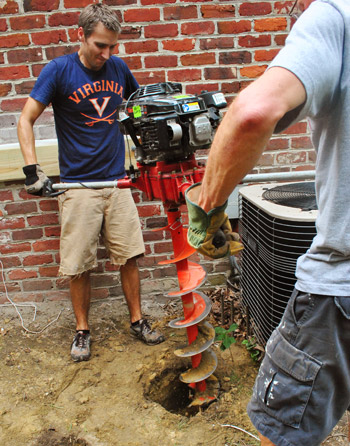
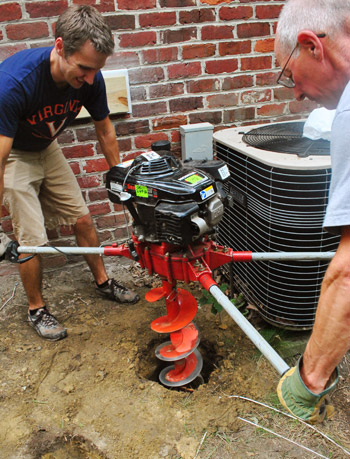
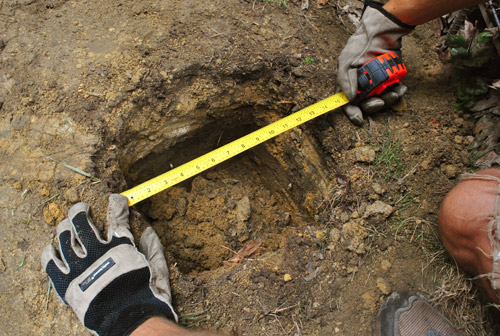
Also contributing to the vein-bulginess was the fact that following each spin with the auger, we had to go back manually with a shovel and a post hole digger to “tidy up” the hole and get it to the required dimensions.
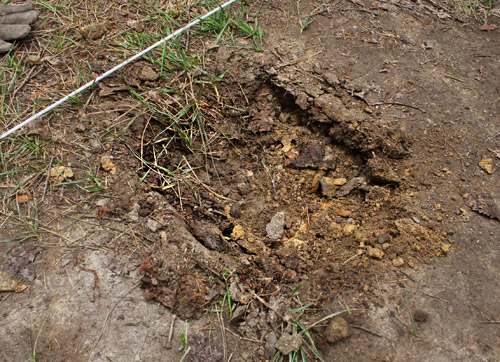
Part of the reason we did this was just to get some of the loose dirt out that the auger had churned up, but not successfully carried out of the hole. The other reason was that (due to a miscommunication with my dad on my part) he rented an 8″ auger bit and we needed 12″ holes to pass inspection. So you can see from the picture below how a “just augered” hole wasn’t quite as wide as we needed.

But once everything was cleared out, we checked all of our dimensions to make sure they would pass inspection. The holes had to be 12 inches wide. Check!
And at least 18″ deep (which is the local requirement given our frost line). We tried to get at least 21″ though, because I plan to put a few inches of gravel in the bottom to help for drainage before I put in the required concrete.

Digging the six required holes only took us about two hours. Pretty speedy compared to all of the other work that had gone into this deck so far. Of course, the day we worked felt like the muggiest and most humid day of the summer so far, so my dad and I were both pretty well spent (not to mention drenched in sweat). I’ll spare you that picture. Instead, I’ll leave you to admire our holes. Wait, that sounds inappropriate…
With our footer holes done we’re now able to proceed with scheduling our first inspection. While I’m super confident about our holes, something about the inspection just makes me nervous. So please keep your fingers crossed for us! Perhaps I’ll have to put on a fancy inspection-getting outfit much like my dapper permit-getting one. Or should I just send Burger and Clara out there to charm the guy?
What did you guys tackle this weekend? Any other auger users out there? Or do you dig the old fashioned way like I did for the patio’s fence installation? I gotta say it took a lot less time, so the $60 rental fee was money well spent!
Psst- Want to follow along as we inch towards a finished deck from the beginning? Here’s a post about planning it, clearing the area, getting a permit, demoing the old deck, and day one of deck building.

Casey @ wafflingdesign says
woo! looking good!
Melanie@MJ says
That picture of John on the laptop is definitely what my boyfriend would be doing. He’s had the weirdest temporary desks while working on projects. He wouldn’t be able to do half of the stuff he does without a little Google + Forum help.
The deck progress is seriously coming along! Can’t wait to see it finished, but probably not as much as you guys.
James Malone says
The one really cool thing about visiting the West Coast, I can finally enjoy your posts over coffee and breakfast.
YoungHouseLove says
Aw, thanks James!
xo,
s
Misty says
Wow! I can’t wait to see the finished product!! My boyfriend and I tackled the flooring in our new home! He and a friend took about three hours ripping out the tiny area in the kitchen where there was glued down linoleum. Afterwards we put down a beautiful high gloss laminate. It was very durable and easy to install (minus some awkward corners).
YoungHouseLove says
That sounds awesome!
xo,
s
Jane says
oh man! You guys are such pros!! Am in awe of what projects you take on!!
YoungHouseLove says
You’re so sweet Jane! We’re definitely not pros, so we’re just as nervous as anyone else trying something for the first time! We just try to do as much research as we can and hope for the best!
xo,
s
gina says
sexy john <3
Robin @ our semi organic life says
I’m sure you’ll be proud when all that hard work pays off!
tae says
Ooh, so the inspection happens before you actually put posts in? How are you keeping the holes from getting re-filled with rain, dew-ey dirt, etc. until the inspection happens?
YoungHouseLove says
They’re definitely getting rained on, but it’s draining and if anything it cleaned them out more- haha. They still measure wider and deeper than we need them, so we’re psyched!
xo,
s
Emily says
Are you guys not using sono tubes? Are you just pouring the footings level with the ground?
YoungHouseLove says
We’re just doing traditional wood footings on gravel with concrete at the bottom (following code to the letter for our county). Hope it helps!
xo,
s
Jess @ Little House. Big Heart. says
Holey moley! (Like what I did there?)
Question: Are there any concerns about the proximity to your AC unit (for service/repair, etc.)? Having had to recently replace our unit, it’s something I’m paying more attention to now.
YoungHouseLove says
Thankfully we have a few feet around it (in some photos it looks more cramped than it is) so it’s all to code and should easily be able to be worked on from all sides – or replaced). It’s pretty new (was replaced before we bought the house) so we hope it last a while but you never know…
xo,
s
Shayla says
Speaking of your book tour, do you have dates and locations set already? Any plans to stop by Texas?! :)
YoungHouseLove says
Nothing is set yet! It won’t be until November (when the book comes out) so maybe things will be set by August/September? We’ll definitely keep you posted!
xo,
s
angel p says
I’m hoping for a Texas stop too!! Houston area. :)
Lindsay B says
I can’t wait to see more deck progress! Especially excited to see how you guys decorate it. I’m crossing my fingers for some sort of ceramic animal ;)
Wendy says
Nice job! We did a lot of root removal earlier this year, and know what back breaking work shoveling, digging, etc. can be. Keep up the great work!
Barb says
Amazing work. It is crazy all the prep, math, and blood, sweat and tears go into a decking project.
My question is this…Will the deck remain open or will John put some sort of lattice on the bottom to keep skunks, squirrels, and other animals from living underneath?
B.
YoungHouseLove says
There’s probably going to be something to keep animals out (there will be stairs on one side and either the base of a planter box or some lattice on the other side). Will keep you posted for sure!
xo,
s
steph says
My husband rented a skid steer thing a ma jig to dig our holes
http://www.thislittlenest.com/what-weve-been-up-to-contd/
YoungHouseLove says
Holy cow, now THAT is MAJOR!!!
xo,
s
Becky says
OMG! This post made me LOLOLOL First the diaper (that pic is so darn cute with Clara’s little head watching Daddy), making faces, the bulging viens, “admire our holes”! Hilarious! Great job on the progress and thanks for the laughs! (I needed something to keep me awake at work – thunder boomers + one storm-hatin’ dog made for a sleepless night last night.)
Krystle @ Color Transformed Family says
I think it’s great that Home Depot has big tools like that that ou can rent. I am sure it makes the job much more enjoyable.
YoungHouseLove says
So grateful we didn’t have to buy one! And it definitely made me infinitely less scared for John’s health than when he dug those fence holes (I thought he was going to pass out at the end of that)!
xo,
s
Ashley says
We recently borrowed a two man auger from a family member to work on the deck we are building. It was MUCH easier than only using post-hole diggers. We just put the hangers up for half the deck last week and the other half are being done today. Hopefully we can get actual decking boards on by early next week. It’s been kind of fun (and a strange coincidence) to be building a deck while you all are building one.
I work full-time and go to school at night so our progress is slow as well, but we are hoping to have ours completed by the 4th!
YoungHouseLove says
That’s so exciting Ashley! Congrats on your progress!!
xo,
s
John@Our Home From Scratch says
Looks great guys!! When I built my shed, I used PVC footings… they’re designed to save you construction time by eliminating the need to wait for the concrete to cure. They would have saved me time, but I used a regular post hole digger and it took me nearly two days since the ground was so hard… so, I shot myself in the foot on that one. I’ll always rent a hole digger from now one.
Are you planning on putting a weed barrier or rocks underneath the deck before you add the floor boards? just wondering.
YoungHouseLove says
Oh man, that sounds exhausting! But smart tip about the PVC footers! We will definitely be putting down weed blocking fabric and gravel once we pass our hole inspection (can’t lay that stuff down yet since they want to see the ground, etc).
xo,
s
Christina says
I wish digging our post holes for our deck only took 2 hours. We built our deck last summer, and we learned our yard was full of rocks past a certain point. We got the auger stuck a few times. Between, my dad, husband, grandfather, mother and I, it took all day.
But your deck plans look great, I can’t wait to see the finish product.
YoungHouseLove says
Wow- that sounds so hard! So glad you got ‘er done in the end!
xo,
s
KATHY says
nice holes! I’m glad to hear from someone who rented an auger… we are going to be DIY-ing a fence this summer and my husband thinks he’s going to dig all the post holes himself (it’s a very long yard). I think we’ll spend the extra $15 dollars and get the 24 hour rental! Time is money.
Erin @ One Project at a Time says
Thanks heavens for the interwebs- right? I feel like most of our projects are done with YouTube tutorials no less than 10 feet away. Don’t worry too much about the inspection, in my experience those things are much more nerve racking than they actually ever are in reality. (Or maybe we’ve just had really nice inspectors.) Anyway- you’re doing great so far!
YoungHouseLove says
I don’t know, we hear that our county is notorious for failing more people than they pass- at least once! Ultimately everyone ends up with a deck though, sometimes you just have to make some changes as you go. Eeeks, we’re nervous but hopeful!
xo,
s
anne says
I’m worried about the holes as a safety hazard. You got ’em covered by sawhorses or something? (I’m a worrier.)
YoungHouseLove says
There’s no access to this side of the house by anyone (no delivery people, kiddos, pets) – especially since that door to nowhere (which will eventually lead to the deck) is always locked! We do have some old boards over them, just in case.
xo,
s
Megan says
I love updates on this project! I’m partial to flaring stairs because, otherwise, looking out from inside the house, you’ll only see decking, not yard. It will nice regardless, though.
YoungHouseLove says
Yes, just couldn’t make the flaring stairs make sense since there are 7 of them instead of 3 in that pic – so they just looked too cramped to the house and AC when we mapped them out with that flare. Either way looking out you wouldn’t see yard since the deck is so elevated (you’ll just see the deck and the trees/greenery behind it near our property line). Hope that makes sense! Hard to explain. Haha.
xo,
s
Crystal @ 29 Rue House says
Just send Clara and Burger out there :). We actually manually dug two more holes to finish our fence at the back of our yard this weekend. We started the project a couple months ago with a rented one-person auger and it was a total, complete failure. It could have been rocks/roots that we had right there or maybe HD’s tools needed to be sharpened?? At least they gave back half our money.
YoungHouseLove says
Wow- that stinks!
xo,
s
Katy says
Wow! You guys always make me want to start renovating everything I see. Now I want to build a deck. I just got back from a fun filled week in New Orleans, and only scared my eyes a few times on Bourbon Street. http://thefirstapartment.blogspot.com/2012/06/i-in-new-orleans.html
Just as hot as your adventure, but Im thinking more alcohol was invovled with mine, hopefully!
YoungHouseLove says
Scary alligator pic!!! Wow, glad you survived!
xo,
s
Alison says
Im getting anxious to see more progress!! I love these posts! Since moving to Texas, we have noticed that a lot of backyards have decks. Probably to avoid the fire ants but this will be useful info when we buy our house.
Heidi P. says
Awesome work! Sherry diaperless yet clothed – PHEW! Haha! Otherwise, that would have been really disconcerting!
YoungHouseLove says
Haha, no kidding!
xo,
s
NancyO says
Thats awesome!
I actually removed an old fence … Attempted to save a baby dying tree (oops, forgot to water it) … Weeded around the dying tree … My boyfriend built a boot while I painted the bedroom Moonshine!! I checked out other colors (like the grey’s that Candice Olsen picked out) but Moonshine was the winner by far! On my dimly lite room it looks more blue-grey but that’s okay. It still looks great. Thanks for posting about you’re colors!
YoungHouseLove says
You were so busy! Congrats!
xo,
s
Gaidig says
Good job with the footings! I’m excited to see your progress. I know you’re waiting for your dad, but it seems like some of the things are possibilities for single-person or Clara-nap work to get a leg up on your timeline, such as attaching the other joist hangers and pre-cutting your joists.
YoungHouseLove says
We definitely sneak out there and do little stuff whenever we can, but it’s nothing major enough to be post worthy. We have 8 posts a week to share, so there have to be other projects that we tackle in the mix too – like the bathroom tile we updated last week as well. So we can’t spend the whole week working a few hours at a time on the deck for just one update post – so one deck update a week works for us (and allows us to tackle/share other stuff as we go). Hope that makes sense!
xo,
s
Christine says
Wow– that is hard work. You should be very proud of yourselves! The end result will be so worth it.
Jillian {Her Split Ends} says
Deck progress is looking good! you guys are going to get a TON of use out of that space…love it.
second of all…ATLANTA…how did i miss that…I can’t go to Haven {boo…stuck at my day job} BUT i would love to meet you guys…maybe a quick coffee before you hit the road? I know you are CRAZY busy but if you have a second…let me know!
Cheers
~ Jillian
http://www.hersplitends.com
YoungHouseLove says
Aw thanks Jillian! We’ll definitely let you know if we have a spare second! We’ve got some house crashing and some Katie Bower time to get in there along with the talk, so it’s going to be tight!
xo,
s
The Mrs @ Success Along the Weigh says
That’s quite a bit o’ progress. A dork would call it augerific! I think I just did.
YoungHouseLove says
Haha, sounds like a John-ism. He loves adding rific or tacular to everything. Haha.
xo,
s
Stacy Weiland says
We have looked things up online for almost every project we’ve done around here. Your deck is going to be awesome! :)
LauraC says
A post on hole-digging made me wonder if you have ever read the book, Holes, by Louis Sachar? It’s young adult, and a good quick read!
YoungHouseLove says
Never read it, will have to add it to the list!
xo,
s
Bethany says
I’ve never read the book, but the movie is cute! :)
K Tomson says
Got our porch pressure washed and ready for stain/sealer next weekend!
Your deck project is much more ambitious than I would ever attempt, but it is going to look great!
jennT says
Wow– its really getting there! You’ll have a new deck so soon. It’s so awesome that John’s dad is around to help. :)
Lynn @ Our Useful Hands says
I tried getting Michael to agree to drop everything, be extremely unreasonable and drive up to Georgia from FL on a whim just to catch you guys speaking at the Haven Conference. Would you know he wouldn’t go for it? Haha! It’s okay because I’m sure you will tell us all about it and I can’t wait for all those House Crashes. The deck is really taking shape isn’t it? Keep up the good work guys.
My best, Lynn
YoungHouseLove says
Haha- we’ll tell you all about it! I promise! Even the embarrassing things that we’ll surely do.
xo,
s
Ashley@AttemptsAtDomestication says
Awesome! I am SO excited for this project for some reason! It makes me want to get started on our new patio! (Too bad that’s on next year’s agenda haha)
tammylee says
just a thought about the built in planter box.although it would look really pretty, do you think it might block what little air flow you are gonna get on the deck?
love all your projects btw so inspiring !
YoungHouseLove says
It actually gets a nice breeze between the house so we think we’ll be good! If we start to frame it out and it feels stuffy we’ll switch things up for sure though!
xo,
s
how2home says
Things are looking really good John & Sherry! The 3d rendering is looking awesome. Are you guys going to stain the wood, when the deck is done? How was your fathers day? Did you guys do any decorating particularly for fathers day?
YoungHouseLove says
Yes, we’ll seal it after it’s all “acclimated” for sure! As for Father’s Day we had some family time, went to dinner, had a nice walk and I got some cute stuff for John, so we’ll share that soon!
xo,
s
how2home says
Any stain color in mind yet though? Oh, we’re excited to see what you got for John for father’s day! We did a little diy tutorial over the weekend with mason jars(www.how2home.wordpress.com/2012/06/17/diy-mason-jars-part-2/) let me know what you think!
YoungHouseLove says
No stain color ideas yet, but we’ll keep you posted! Off to check out your mason jar tutorial…
xo,
s
Shannon says
We went through the same inspection fears when we built our deck! The “rules” are so long and complicated, but the inspections went smoothly.
Up in Wisconsin and Illinois, those post holes have to be 4 feet deep! I took great pictures while my husband and friends used a gigantic auger.
Can’t wait to see the finished deck!
Amber says
Nothing as challenging as what you folks are pulling off but I bought a bed from Ikea and put it together all by myself even though the instructions say it takes two…take that Ikea!
Did I screw it up? Yep! Put dowels into the holes where screws were supposed to go and when I tried to pull them back out with pliers, they disintegrated. Yay…so I had to pound the remnants flat with a hammer and then drill the holes clear of the dead dowels.
It too me much longer than I should have but I now have a proper bed to house my mother when she comes to visit me in Charlotte.
Brynn says
Wow, thank you for showing just how much time and hard work goes into everything you do. It looks fantastic so far, and as for the imaginary deck I imagined, its gorgeous!
This weekend I tackled a how-to you posted a while back- hair cutting! I cut my husband’s hair for the first time, and I have to say I was rather impressed with the results, and so was he! Thanks for all the tips & tricks. I didn’t snip his ears or anything but I did manage to nip myself twice though! (I am just that big a spaz!)
YoungHouseLove says
Wahoo! So glad it came out so well! I always cut myself at least once so you’re not bad at all!
xo,
s
melissa says
Wow, you guys are lucky! Up here in Wisconsin, we have to dig post holes 48″. You can imagine it’s one of my husband’s least favorite jobs. He’s building us a small deck off our back door but luckily can get away with just placing the posts on top of concrete blocks this time. Hope things go smoothly for the rest of your deck progress!
YoungHouseLove says
Wow- that’s deep!
xo,
s
Pam says
Just got an email from Amazon re: “New Interior Design Books”, and guess what book was RIGHT THERE on the list? “Young House Love: 243 Ways to Paint, Craft, Update, Organize, and Show Your Home Some Love”, of course! Congratulations, you two (or four, I should say)… and what a great looking book cover, too! I’ve pre-ordered my copy and can’t wait until it comes out!
YoungHouseLove says
Ahhhhh! That’s so exciting! Thanks so much!
xo,
s
Angie@Echoes of Laughter Blog says
I know it’s a bit late in the game,but have you thought of laying your decking boards on a diagonal to the house? It would be a neat architectural look, make the space look wider and line up nicely with the stairs? Just a thought! Have a great week and can’t wait to see more of your progress. Angie
YoungHouseLove says
We have thought about that but don’t think we’ll like that as much as a modern clean look (we’re planning to do a frame around the whole outside and then maybe even work in a detail with the boards making a zipper-ish pattern, which we linked to in the planning post). Hope it helps!
xo,
s
Me, Ed and Pea says
So much work! Great job so far :)
heather says
Nice! It looks really good! About 2/3 of the way down on this post are some stair/tread recommendations from my husband (about cutting the treads).
As far as this weekend we did dig holes, and more, and yet somehow it was actually a really relaxing weekend. We got our livingroom about 50% demo’d (most of the boards down), Andy put the ledger boards up outside (which will be inside) to help frame in our new livingroom, pulled some siding off the house, and also got the holes for the porch frame dug and the sonotubes filled with concrete. Besides that planted some more squash, broccoli and cauliflower to the garden and I got some reading about permaculture in. Busy busy! If you have any interest you can see some of the livingroom demo here (there’s a video).
http://www.likeacupoftea.com/after-all-these-years/
YoungHouseLove says
Thanks for the stair tread link Heather! And so exciting about the living room demo! Good luck with everything!
xo,
s
Megan says
It is going to be GREAT when you get done!!! I can picture it and I know you two can too.
BTW, my 3 year old LOVES to go around with pants and has been completely naked (besides diaper) many, many times. You’re probably just getting the beginning stages… plus, it’s summer time when it’s hot and really, what 2 year old needs clothes?! Take that diaper off and you may get her potty trained! :)
YoungHouseLove says
Oh yes, she tears off her clothes every chance she gets! When we go into her room in the morning to get her, half the time she’s topless or bottomless, or both. Haha.
xo,
s
Chelsea @ Chelsea Eats Treats says
You guys will do fine for the inspection!! However, I will keep my fingers crossed anyway :)I can’t wait to see the after photos and to see how you guys decorate the finished product!! I hope I can wait that long haha