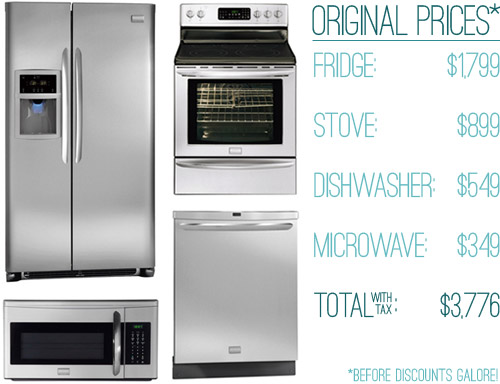
Archive for October, 2011
Reader Redesign: Bathroom Gone Gray
This latest before & after comes from one of our neighbors to the north, Kahley from Ontario, Canada. She and her husband Steve revamped their home’s only bathroom. And in the process proved that going dark and sophisticated can still be bright and airy. Here’s her letter:
We are a young family of four – me, my husband, and our kids Noah (4) and Lexie (2). The only bathroom in our house dated back the 1950’s, so it was HIGH TIME to reno!
Since it was our only bathroom, we wanted it to be insanely multi-purpose. We needed a tub AND shower, some closet space, a dirty laundry area, lots of concealed storage, etc etc etc!

I had the color (BJ Moore “Gray”) picked from the beginning. These built-ins were created according to plans that I developed. Above you can see the shower curtain that I made myself from some discount fabric in the women’s “suiting” area at Fabricland. The fun striped roman blinds were made by Tonic Living in Toronto. The accent color that I chose in the end was a golden mustard yellow. The towels are from Sears!
Here’s the bttom view of our vanity. I fell in LOVE with an oh so unaffordable vanity at Pottery Barn (they used to have a larger double version that was amazing) – so I had it built for THOUSANDS less.
Here’s what I like to call sexy tile!! I believe it’s a Centura tile (it’s an enlarged subway tile – 4″x12″ – in a high gloss gray finish). It feels oh so chic. Now if only I could have done a walk in shower (oh the joys of only having one bathroom, and children to bathe!). Anyway, thanks for checking out our bathroom makeover. I hope you love it! – xo, Kahl
We’re not sure what we like more – all of the function they added (a set of built-ins on either side of the shower) or the brave color choices (dark gray tile and a gray ceiling). So we’ll just choose to love them both equally. How about you? What’s your favorite part? Oh and you can read more about the project over on Kahley’s blog.
Psst – Got your own awesome before & after project? Send your story, pics, and related links to submission@younghouselove.com to be considered for a possible Reader Redesign feature. You know we love a makeover.
Bush Fence, Begone!
We did it! Over the course of two nice long Clara naps (and with a little help from a friend) we managed to open up our front yard in what we like to call “Phase Two Of Ten Million” when it comes to slowly transforming our front yard. Why so many phases? Well it started out looking like this:

Much like our first house’s yard, we figure it’ll take a few years of tweaks to get it where we want it, so this phase was just about clearing things out for a you-can-actually-see-the-house-now effect (Phase One was limbing up the magnolia). In short: we dug up/transplanted/removed a ton of bushes (with the help of a friend of ours who took home some boxwoods in exchange for helping us get a bunch of them up). This post is full of photos, so I’ll let them do the talking. Without further ado, here are the before and afters (we tried to take photos from the same angle for comparison). First there’s the AFTER to the before above (don’t mind the black feather wreath out there on the door for Halloween):

Here’s another BEFORE for ya from the driveway:

And another AFTER from the same angle (a little further away):

Another BEFORE:

And the AFTER:

Here’s a side-angle BEFORE:

And an AFTER from the same POV:

Another BEFORE facing more towards the street:

And the accompanying AFTER:

Here’s a BEFORE from the other side (the bushes used to completely stop the eye so our yard felt way smaller):

And here’s the AFTER from the same angle:

Yet another BEFORE:

And another AFTER:

Here’s how it looked from the front porch BEFORE:

And AFTER:

The only drawback? I got me a blister. So in that aspect it was exactly like Phase One (seen here). Totally worth it though. No pain, no gain.

As for where we put the bushes that we transplanted, we just dug them up…

… and planted them in the naturalized parts of our side and back yard (and our friend who helped us dig made off with the rest of the healthy ones). Sadly some of the bushes were dead…


… so those just got removed with a sawzall (aka this reciprocating saw by Skill). Which was probably more fun to use than it should have been (it was actually our first time sawzalling, so we took turns and grinned like fools the whole time). And you know we loved the fact that this big curb appeal makeover was f-r-e-e (well, I guess it cost us a few boxwoods in return for some helpful friend labor, but it was foliage well spent).
As for our future lawn plans, we’re definitely just getting started out there – so there are a lot more phases on the over-the-next-few-years agenda. We’ve got plans to:
- dig out some ivy/monkey grass
- lay down some grass seed in certain areas
- layer in some low maintenance native (and less fence-like) plantings to soften things up around certain areas of the perimeter
- landscape around the front of the house (there are hardly any plants on either side of the porch – so it’s just sort of a mud pit in those areas)
- do a million other things that are slipping my mind at the moment (one big one: convert the carport to a garage)
So this step was just about clearing things out to make way for some less house-obscuring choices and opening things up to let the eye travel a bit further in certain places. Feels nice to let the house breathe a little. And the neighbors have all been saying such sweet things about the change. Whew! Has anyone else been up to a few exterior tweaks? Do you do them during baby naps with the monitor outside on full blast so you can run in at a moment’s notice? Do you hold your breath until the neighbors approve? We totally do.
Psst- We’re over on BabyCenter talking about a Halloween surprise that we discovered on Sunday night. Let’s just say Clara’s in love. Here’s the story.
Fab Freebie: Cameo Appearance
***This giveaway is no longer accepting entries – see who won below!***
Random.org cut its way through over 6,000 entries and picked our winner as… Stephanie (who would love to have a few hundred laughs with Zach Galifianakis). Congrats!
I believe it was the renowned Dave Coulier who once immortalized the words “cut it out” on Full House… but I don’t quite think Uncle Joey had a clue what potential those words could hold when it came to the Silhouette CAMEO digital cutter. You guys may have seen Silhouette cutters mentioned around the blogosphere before (our friends Jessica at How About Orange and Nicole at Making It Lovely did some cool projects with theirs). Now Silhouette has released a larger and quieter model called the CAMEO. Basically any design that you can create on your computer can be printed and intricately cut out on all sorts of papers. We haven’t tried it out ourselves, but there are tons of idea starters on the Silhouette Pinterest boards.
- PRIZE: A Silhouette CAMEO digital cutter (worth $299) and a $40 starter kit
- TO ENTER: Comment on this post with the words “CAMEO ME” and tell us…
- BONUS QUESTION: …what famous person you’d pick to make a cameo in your life? Would you love to meet Matt Damon standing in the checkout line behind you? Or have Kate Middleton compliment your outfit when she passes you on the street? Or does your dream encounter involve a surprise serenade by NKOTB?
- GIVEAWAY CLOSES: Wednesday, October 26 at 8pm EST (or at 10,000 entries)
- NUMBER OF WINNERS: One
- PRIZE SHIPS: The 50 United States
- DISCOUNT: Use the code YOUNGHOUSE here when purchasing your own CAMEO and get the starter kit for free (a $40 value)
- USUAL STUFF: One entry per e-mail address is permitted. The winner will be selected using random.org and announced on Thursday as an update to this post. That’s right, come right back here on Thursday for the announcement of our winner. Good luck…
Note: We weren’t paid or perked for hosting this giveaway, we just do ‘em to thank you awesome folks for stopping in. See our Giveaway FAQ page for more info. Pics courtesy of Silhouette America, How About Orange and Making It Lovely.


