Coming off of the heels of our own adventures in stencil land, we just had to share this note from Ginny who stenciled her dining nook earlier this year. Methinks she had a clawed hand of her own going on after she finished (just like my lady wife). Here’s what Ginny had to say about her dining area makeover:
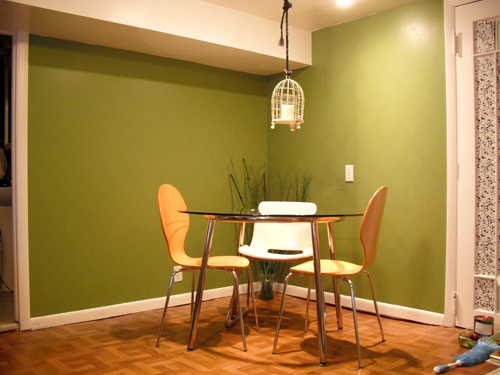
I wanted to create a dining corner in my living room. Well, although I bought my table, finally got the chairs I wanted, and tried to dress it up, it still didn’t feel like a dining room to me. It was just this table in the corner of the room. Then it hit me like a ton of bricks. I was missing COLOR. I wanted the color to match my living room so I brought in some green to match the carpet.
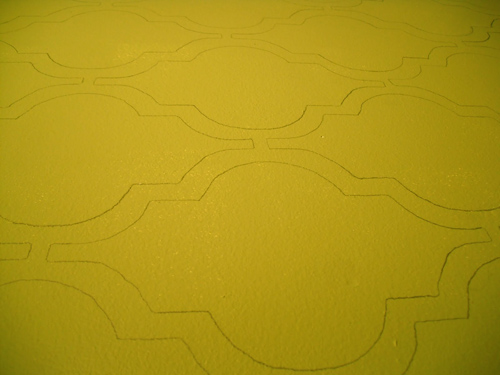
Then I saw this post that inspired me. So I went to her website to see what she did in full detail and she actually got the idea from this website. This is why I love bloggers – ideas go from page to page to page! So I cut out the template, traced it on the wall… which took 4.5 hours. Yes, my hands were hurting the next day. But then I also had to paint the lines, which took even longer :(
Now I’m absolutely positively head over heels in love with my dining room! -Ginny
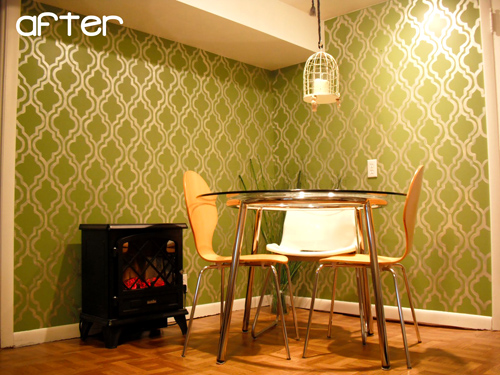
Thanks so much for sharing Ginny! We really love how the bold color and pattern made a statement out of an otherwise ordinary corner. You can read more details about her project here. Anyone else out there inspired to use a similar stencil or color palette in their dining space (or beyond)? And hopefully Ginny’s hand recovered eventually! Sherry’s are finally back to normal. But I’m not about to ask for a back rub just yet. Don’t wanna push my luck…
Got your own awesome before & after project? Send your story, pics, and related links to submission@younghouselove.com to be considered for a possible Reader Redesign feature. You know we love any and all design eye candy!

Meghan, UK says
Wow, what a fantastic transformation! Well done that woman, and thanks for sharing – it’s great to get introduced to other bloggers (for someone who’s too lazy to search!)
Jess @ Little House. Big Heart. says
What a transformation! It’s beautiful!
I was thinking of wallpapering the back of our bookcase, maybe I’ll just try this!
Kelly says
That’s really pretty! Bravo, Ginny! :)
Sarah says
Gorgeous. What color is the paint in the design, exactly? The light hits it a little funny.
YoungHouseLove says
Here’s hoping Ginny can stop by with that info for ya!
xo,
s
ali says
That’s incredible – so inspiring, and with the willingness to “go full claw hand” (reference to funny, non-pc joke in Tropical Thunder), so doable! Will be looking for options in the house tonight!
Anna says
So beautiful. The walls are perfect.
Vanessa says
This looks so great! Love that stencil and love how its shimmery! Thanks for this passing Ginny’s submission along.
Karen F says
wow, that looks amazing!
Whitney Dupuis says
That is beautiful! Way to go, Ginny!
Jos says
hopefully she can stop by and say where she found that cute birdcage type light fixture. such a great room.
YoungHouseLove says
Isn’t that so cute? Here’s hoping she can drop in soon!
xo,
s
Amy says
Click the link to read Ginny’s post, she talks about the birdcage as well as the stenciling!
keri says
Jos – I was just reading her blog and she has a whole post on it! http://ginnyart.blogspot.com/2011/04/dining-room-reveal.html – it’s from Michael’s.
Elisa @ The Self Life says
The link to her blog post is in the post above! She got it from Michaels and transformed it into a light fixture!
Jennifer says
Now that would be something I’d have a hard time actually finishing! Amazing job!!!
Carrie says
Awsome!
Vanna says
Any ideas for a knock-out wall treatment for super textured walls? I live in a 60 year old house with plaster walls, they fit the Mediterranean architecture so the texture needs to stay but I need some solution besides just paint. I am thinking that stencilling won’t work because I won’t be able to get crisp lines. true? any ideas?
YoungHouseLove says
Hmm, I think if the texture is too much it might be hard, but I’ve heard of people skim coating their walls to smooth them out (it’s probably something you can find videos or tutorials online for). Hope it helps!
xo,
s
Sarah says
I tried stenciling on lumpy plaster–it wasn’t as crisp as it is on drywall but it’s doable.
YoungHouseLove says
Thanks for the info Sarah!
xo,
s
Cathy says
Pardon my language, but this exact thought went through my head when I saw the reveal, “Holy sh!t! That’s amazing!!” I love it!
Julia @ Chris loves Julia says
This is so sweet! A fellow YHLer commented on my post today and told me to send it over to you guys. It’s not a room re-do but it is quite the transformation.
http://chrislovesjulia.blogspot.com/2011/10/oh-my-lampa.html
YoungHouseLove says
Wow- those look amazing!!! I love how you figured out how to redo the shades. So smart!
xo,
s
Carley @ On One Hand says
I think I saw that pattern online somewhere too and thought about stenciling my bathroom. Alas, we’re still renting and a clawed hand just wouldn’t be worth it to only look at it for a little while. Someday! Glad to see it on another wall though, I love what she did with it…and I LOVE the green!
Stephanie says
WOW! Amazing! We need paint colors, Ginny!
Megan @ Are We Wed Yet says
LOVING THIS! We painted our “bar wall” (the look through wall from the kitchen to the living room) in our apartment black a few months ago, and it looks great but it needs a little something extra. This would be perfect! Can’t wait! Thanks for sharing!! <3
Carla says
I’m such a perfectionist that I would find it very difficult and frustrating painting all of those lines. Do you have any tips you can share on how you did that (assuming you’re reading the comments)? You made a stencil, but did you paint with a dabbing technique like Sherry did, or paint everything by hand? Thanks!
Ginny Art says
Hi Carla,
There are no shortcuts to this process. It was all done with a steady (but sore) hand. Although it did take forever, I kept telling myself it would be worth it at the end.
Christin says
Beautiful!!!!
Tanya @ Lovely Greens says
Now on to re-decorating those doors! ;)
Lauren says
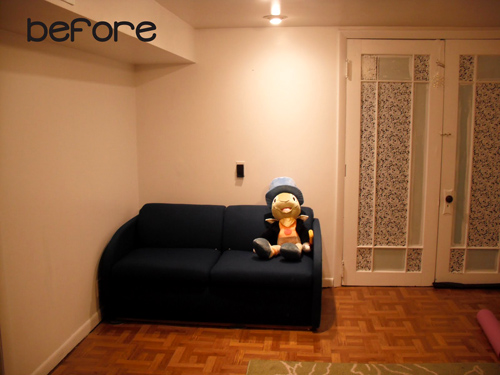
Hahaha I love that the giant Jiminy Cricket wasn’t removed for the “before” photo. He definitely adds to the space.
Kristen says
Wow! She did a fabulous job! What a gorgeous space!
Tanya says
Everything looks fab! Hmmm. now you all have me thinking about stenciling a wall in my half bath. What’s the word on a small space? Large scale stencil or small? I worry that a small might make it look too busy?
YoungHouseLove says
I’ve seen both in a small powder room and they looked awesome- so I don’t think you can really go wrong! I’d just choose your favorite stencil and go for it!
xo,
s
Tanya says
Thank you! It will likely be a winter project, I’ll send a pic if it turns out OK. Of course, this is after i “fun up” my linen closets with new paint and fancy shelf paper from chicshelfpaper.com Thanks for the link to them, they have AWESOME products.
Jenn L says
awww yay! the green reminds me of my blog! I’m pretty obsessed with that color and the stencil that goes with it! That is seriously the perfect place for something bold too. Corners were made for WOW factors!
xoXOxo
Jenn @ Peas and Crayons
Kristen @ Popcorn on the Stove says
That’s the same tutorial I used for the stencil wall at our old apartment! I filled in the lines instead of having two (oops) but I do love how it turned out! It’s so fun seeing what others do with the same inspiration!
YoungHouseLove says
So gorgeous! Totally looks like wallpaper!
xo,
s
banclothing says
This must have been SOOOO much work!!!! I love the after and it is totally worth the time. Did you use a metallic paint? I love the shine!
Susie says
It looks wonderful! I used the same tutorial and put this stencil on one side of our stairway to add more interest, and one of my favorite things is that everyone has their own take on the colors and pattern. It’s time consuming but turns out so great.
http://agirlandfourguys.wordpress.com/2011/08/17/finished-yet/
It was fun to see this reader’s nook re-done!
YoungHouseLove says
So pretty!
xo,
s
Amanda - aka Sherry's dream bff says
Woo to the hoo for the return of Reader Redesigns! I know you’ve been talking about that for a few weeks now, but I never got the chance to voice my own elation about it. So there it is. Ha. Thanks J & $herdog! :)
Now…I’m crazy about that stencil!
I can’t wait until the renting-an-apartment phase of my life is over so that I can actually attempt half of the things I see here and on Pinterest haha
Ginny Art says
OH MY FREAKING GOD! I love you guys and want to thank you both for featuring my dining room!!! I literally screamed and called my mom to tell her (she LOVES Burger!)
I’ll have to come back and post the paint color, but the birdcage is from Michael’s Crafts.
:D
YoungHouseLove says
Thanks for the info Ginny!
xo,
s
Reenie says
WOW….Ginny (and all the other bloggers that were shown)….that’s a lot of patience…time and beer!!! HA!
They all look great.
Elisa @ The Self Life says
That is delicious! Love the colors she chose.
Reenie says
Pssst….. check out Kristen’s blog….she does hand painting and stenciling ~ makes her own stencils. She does beautiful work. =)
http://kfddesigns.blogspot.com/
YoungHouseLove says
We love Kristen! She’s such a genius!
xo,
s
Connie says
WoW! Claw hand indeed! This is amazing.
Melanie @ Mailbox Journey says
That’s amazing!
Thanks for sharing.
lauren says
it looks like it would be theraputic to do all that…either that or send you to therapy!!
amazing transformation
YoungHouseLove says
Haha- hilarious! And probably true.
xo,
s
emily says
WOW. I am poor as a church mouse, but I’d spring from some wall covering at that point. Hats off to the dedication, it looks GREAT!
seriouslysassymama says
I love that stencil. I printed it out from a blog and hope to use it in my entryway!
OMG Ponies! says
Thanks so much for sharing the link to the Better After blog. I’m newish to blog following and the one you link to is full of so many amazing completed projects which link back to other great design blogs.
:)
Brianne Franklin says
YES YES YES! LOVE the reader design posts! Most welcome addition!
Keri says
Very nice! Thanks for sharing your re-do, Ginny!
GreenInOC says
Wow, that’s beautiful!
The closest “I’ve” come to something like that is I have tone on tone harlequins on two of my walls – one on the super high stairway and the other on the wall my headboard is against in my bedroom – but alas, “I” didn’t technically do it, I paid someone else to!
GreenInOC says
Here’s an older picture of the wall going up the stairs:
http://thefosterpaws.files.wordpress.com/2011/10/photo.jpg
jess says
Love it!
Kristin says
Wow, that looks amazing — I love the bold color!
I found the same idea from Jones Design Company and loved it but knew I would not have the patience to do an entire wall, so I tried it out on a much smaller scale (just 2 large canvases):
http://kiki-mysewcalledlife.blogspot.com/p/home-sweet-home.html
It’s been great because I get the same pattern without full on claw hands and since I’m in an apartment, I won’t have to paint over all my hard work :)
Kudos to anyone who can stencil an entire wall or room!
YoungHouseLove says
THAT LOOKS GORGEOUS! Such a great idea for someone who rents or has textured walls or is just short on time!
xoxo,
s
Nancy says
That looks fabulous! I used a similar stencil design that I got from Royal Designs on my bathroom ceiling earlier this year. In fact, the colors are very similar to your office. The bathroom walls are gray and I repainted the white ceiling “grellow”, as you call it. Then I stenciled over the grellow ceiling with white. I love it. It’s like always having a sunny sky overhead.
Suzy says
Genius – I am so adding this to my endless list of decor to do’s!!!
Karena says
I love this. Absolutely stunning.
Might have to steal the idea for our bedroom nook. Well, first we need to knock out the existing, barely-a-closet closet to create the nook. We’re taking an adjoining mini-room and splitting it in half. One half will open to our master and create a new walk-in closet that is more suited to my needs. The other half will open to a hallway as a dual purpose office and linen closet/storage.
Anyways, this is just the pop that the nook will need without overpowering the whole room.
Ali says
It looks fantastic!!
Meg A. says
Green & gold… bling bling! I would never have the patience for that. Way to go, Ginny!
Kathy says
love it! I want to do that in our hallway but I think I will just buy a stencil like John & Sherry – I couldn’t handle claw hands haha it would never be complete!