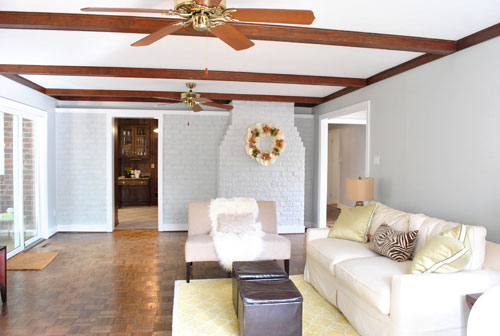
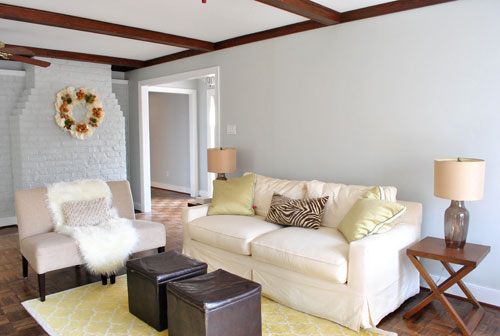
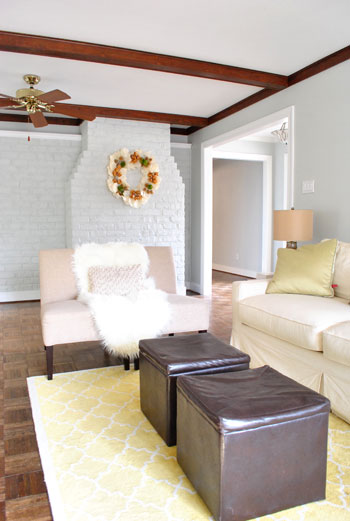
Glad that’s out of the way. Painting the trim was as long and tedious of a process as we expected. Maybe more-so actually, but it’s done! Wahoooo! And it feels pretty darn good. Seriously, there was more than one happy dance (one on Friday night when we finished, and another one in the morning when we saw the room in the light). What is it about certain annoying home improvement jobs that make you want to ugly-cry while doing them but happy-cry when you’re done? Talk about roller-coaster emotions. In the end, we never regret them, and we’re happy we got ‘er done. We’re just not ready to “do them all over again” the next day or anything. Haha. Anyway, it’s looking pretty good. Here’s the view in the living room now (ignore the beams, we’ll get to that later):
As far as the process went, experts recommend using oil-based primer to block potential bleed-through when it comes to painting wood trim (followed by latex paint). We threw caution into the wind and went straight to white semi-gloss latex no-VOC paint (Olympic Premium from Lowe’s). I had gotten some gray wall paint on the trim a few days back when we tackled that project, and it seemed to cover well without any signs of bleed through. So I went for it. Could have been a terrible plan. Could have resulted in having to go back and repaint all the trim with primer if I did see some bleed-through. And possibly pulling 60-80% of my hair out as a result. But it didn’t! Oh happy day.
So we saved the nastiness of working with oil-based primer and all the VOCs that come with it. Call it a baby-and-eco-friendly risk that happened to pay off. If it hadn’t we would have sought out the lowest VOC stainblocking primer that we could find, but it was pretty sweet that it didn’t come to that. That’s about where the words “pretty sweet” stop with regards to this project. We vowed to keep it real with you guys, so although we’re eternal optimists who generally love nearly every project that we tackle (even the ones that don’t work), we promised to tell you if something sucked. And painting the trim totally did.
It wasn’t that it was very hard (I used this brush, which I swear by for “staying in the lines” and going a lot faster that I used to move with a traditional long-handed brush). It was just that it took for.ever. I started at around 10am on Friday and went it alone until about 3pm (while Clara took her morning nap and then John watched her and tended the blog), then around 3, out of sheer desperation, I asked John to help while Clara was taking her afternoon nap (he traditionally rebuffs detail work since he’s the “big picture” guy who rolls while I cut in, so he claims he has less control when it comes to fine motor skills with a brush). At that point I was on coat #2 though, so I just asked him to go down the middle of the trim and baseboards with the second coat while I followed him and added a second coat to the top and bottom of the baseboards and trim (which requires a bit more control since that’s where the brush can meet the floor or the wall).
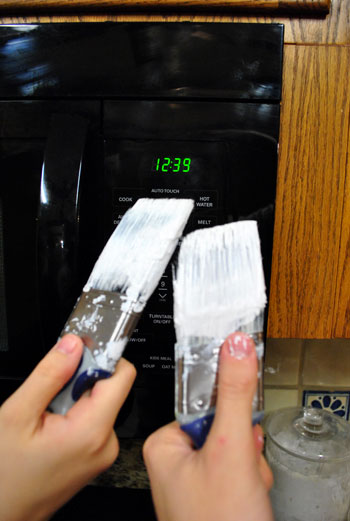
By coat number three it was around 7pm (thanks to a lot of blog, Clara, and food breaks among other things) and that’s when we realized that it wasn’t going to be a three-coat process like we thought. It was going to take four full coats to cover that dark dark trim. Boo to the hoo. There may have been a temper tantrum (not by Clara) but no actual tears were shed (which I consider to be a semi-mature response to such devastating news). But we pressed on. And it was actually past midnight when we finally finished (and snapped this victory shot of our paintbrushes “toasting” in front of the microwave clock). Klassy, right?
If we had used oil-based primer it definitely would have only been a 1-2 coat process (after the coat of primer was applied, which would add up to 2-3 total applications) so it may have taken us until 5 to 7pm instead of 12:30 in the morning. But those 1-2 extra coats were worth it to us in exchange for a completely zero VOC result. Even if it meant dragging a little bit the next day. So for those who are looking for the expert recommendation for tackling this project, use oil-based primer applied with a brush followed by 1-2 coats of latex gloss or semi-gloss paint also applied with a brush (and tape things off if you like to work that way). But if you wanna know how we did it, I used my trusty short handled brush and we applied 4 coats of semi-gloss latex paint (without taping off, since over time I’ve gotten nice and steady without tape). We actually painted all of the wood trim in our first house (including the stuff in the bathroom and kitchen) using this method (no sanding or primer) and we luckily didn’t have any chipping or bleed-through issues after 4+ years there. Fingers crossed for the same luck here!
As for the paint choice, we used the off-the-shelf white stuff that comes without any tint from Olympic Premium called “Base 2” (since “Base 1” is also known as “Ultra White,” and we wanted something crisp and white but not crazy white with a glowing blue tint to it). We love the color, and plan to use it for the rest of the trim in the house. When we finally work up the energy to tackle a project like that again in a few years. Har har.
Oh and the beams. We promised more details about those. We left them au naturale to be 100% sure that we don’t prefer them that way (we don’t). But now that the trim is all painted, we’ve decided that we definitely want to stain or paint them a deeper gray color for some richness and dimension. And of course those fans have to go. So for a vague idea of what that might look like, picture this…
… looking something like this:
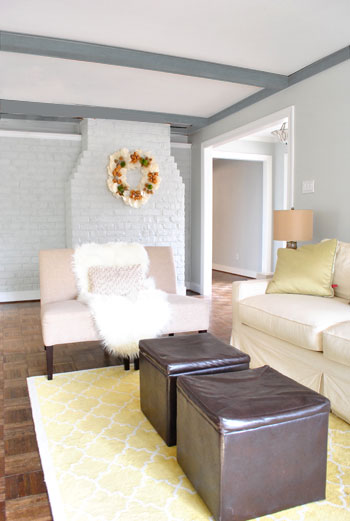
They definitely would have looked gorgeous in white just like the trim, but we want to take a risk and do something a little unexpected. We love that it’ll hopefully be just the right amount of drama without looking too heavy (we have standard 8-foot tall ceilings so we didn’t want them to feel like they’re closing in on you). But we think it’ll have a nice not-too-top-heavy look in the end, especially since we’ll be bringing in a large charcoal sectional to ground the room and add balance. Then we can start layering in some bold colors in the curtains, art, rug, accessories, etc. Should be interesting.
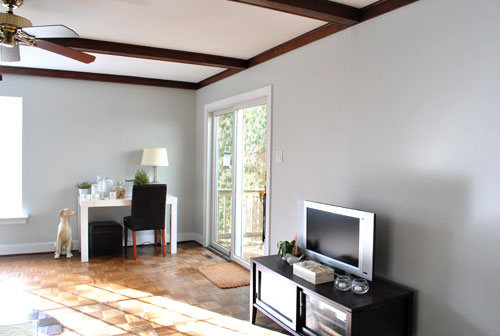
And why not end with a nice little flash-back to what the space looked like a little over a month ago when we moved in?
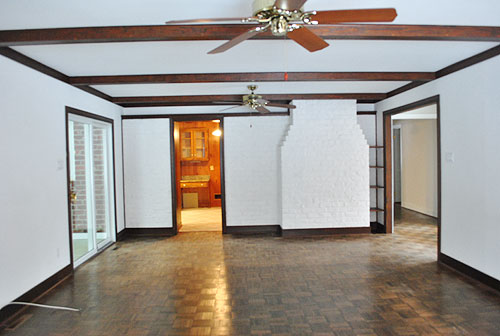
Oh the memories. Change is good.

Kasey at Thrifty Little Blog says
I feel your pain on painting trim. Over the past two weeks I’ve spent at least 25 hours repainting the trim in my house. The fresh look of the space is totally worth it!
Melissa @ HOUSEography says
Wow! That is a great change. The room now looks HUGE! I think the dark trim broke up the room too much but the white makes the gray really stand out – looks wonderful. I’m pretty sure I would have sought out the low VOC primer which I wish I had done after priming our new basement built-ins for 4 hours last night – so I was feeling your pain!
Shaina says
Looks great, I am also in the process of priming and painting an entire 1987 house worth of oak orange trim. We’ve taken a break though b/c of the oil based primer and all the fumes.
Just a note, the previous owners painted a couple things w/o priming and we’re seeing peeling from it (which of course makes more work for us now). Hopefully that doesn’t happen to you guys though!
YoungHouseLove says
Hey Shaina,
Thanks for the heads up! We actually painted all of the wood trim in our last house with this method (no primer) and we luckily didn’t have any chipping or bleed-through issues after 4+ years there. Fingers crossed for the same luck here!
xo,
s
Celestte says
LOVE the white trim and love the gray walls. I like your idea with the beams, but curious about the ceiling. Will you keep it white?
YoungHouseLove says
Hey Celestte,
We’re not sure if we’ll go with a softer gray (50% more white than the one on the walls) or even the same soft gray color as the walls. Who knows where we’ll end up! But we’ll post about it when we make a final decision for sure!
xo,
s
Theresa says
As always you two have hit another homerun! I absolutely love it. What a difference those gray beams are going to make too. I am in shock that you were able to tackle that project in one days time. I have been working on repaining my trim and in comparsion to you two I
Marie says
For baseboards with carpet–a combo of newspaper, dropcloth or other covering, taped to the carpet, plus one of those big metal edgers to push the carpet down as far as possible, worked for me. It’s a real pain.
So worth it though–that white trim really makes your gray pop!
Sarah says
Love this! What a nice change! Have you discussed your furniture anywhere? I love the light color but wonder how you clean it. We have a son who’s a few months older than Clara, and a Lab, so I’m starting to realize the importance of kid- and dog-friendly furniture.
YoungHouseLove says
Hey Sarah,
The sofa is slipcovered which is a lifesaver! We do plan to get a dark gray sectional in there (for a lot more seating) but we’ll never not get slipcovers again- they’re just perfect for the not-so-perfect way we live!
xo,
s
Sarah says
I started painting all of our wood trim a few months ago (the day job and kids are making it a loooong drawn-out process). I actually did sand first and used the same exact paint you all used-even 3-4 coats. It looks great, but I’m seeing some chipping on baseboards and around doors. I spoke with a professional painter and he said we should have used an adhesive primer first. Oh well. I hope you all don’t have the chipping issues I have.
YoungHouseLove says
Hey Sarah,
Thanks for the heads up! We actually painted all of the wood trim in our last house with this method (no primer) and we luckily didn’t have any chipping or bleed-through issues after 4+ years there. Fingers crossed for the same luck here!
xo,
s
Erika says
Looks amazing and nice and cozy welcoming feel!
Erin @ WriteTasty says
The gray walls look so much better and “obvious” (wrong word but you get it) with the white trim– love it! I can’t wait to see the room once the ceiling has been done, as well.
Micha says
Wow, 4 coats! You guys are unstoppable! Nothing is as instantely gratefying as freshly painted trim – it looks so bright and fresh!
elizabeth says
I would not paint the beams a color, they are too wee and the ceilings low. Paint them white and maybe the ceilings a color…
Patti says
I sooo feel your pain when it comes to those tedious jobs, I curse the heavens while doing it but dance a jig when it’s finished. And the last pic is why I keep coming back, you guys always nail it. Love the plans for the wood beams.
ronda says
Did you have to sand since you didn’t prime first? I have to finish my upstairs but have been putting it off…Your project looks great and I am anxious to see what you decide with the beams.
YoungHouseLove says
Hey Ronda,
Nope, just like in our last house, the trim was very chalky feeling (as opposed to glossy) so we knew it would grab the paint really well. We actually painted all of the wood trim in our last house with this method (no sanding or primer) and we luckily didn’t have any chipping or bleed-through issues after 4+ years there. Fingers crossed for the same luck here!
xo,
s
Kristen says
I love the idea of the gray beams, which surprises me. I normally love exposed wood, but there’s a dreamy quality to the room with the beams being gray. I can’t wait to see what else you do with it! Also, thank you for showing me that with LOTS of hard work, you don’t have to be scared off by wood trim. We have been looking at houses in our area and the majority of them have wood trim, which my husband and I don’t like … now I know that they’re not the end of the world!
Melissa @ A Place to Nest says
You can really see the gray pop now! Looks great! I wanted to thank you. I have gotten pretty good at daring choices of color and not needing “help”- aka sample paint. But seeing your samples of gray made me rethink a color I was just about to buy. SOOOO glad I did. On the wall I HATED it. Just to be safe my runner up is going to get a sample purchased as well to test it out.
As for crying about a long project- we just finished our backsplash and you can read about it on our blog. But I would say the worst was our master bedroom. It is HUGE. And we also did our master bath too. Oh and 2 of the walls were a deep accent color. Oh, and I was 3 months preggo so feeling awful. Mask on, tired, nausea…. there were exausting tears shed on that one.
Kris @ the expat diaries says
The room looks incredible! I can’t believe what a difference the white trim makes to the feel of the room.
Also, every time I see a sneak peek through to the kitchen, I get all giddy thinking about what you might have in mind for those dark cupboards…
For now, put those brushes down and take a well-deserved break from the paint cans!
Rachel says
Nice work! It would be neat to see what those beams would look like white, with the ceiling maybe the same gray as your wall color.
Harinee says
Threaded comments seem to be working this time! Looks good!
I love the grey beams too but I was picturing the beams much darker when you said charcoal.. The wall colour looks beautiful now!
YoungHouseLove says
Hey Harinee,
Wahoo! We definitely spent more hours trying to get that to work than painting trim, so we’re hoping that the site doesn’t crash or anything…
xo,
s
mary W. says
How does your trim not get brush strokes using the glossy paint? We are considering painting our entire house trim to the bright white from the current off white (or what we refer to as vanilla almond latte color) but terrified! We are afraid the doors and trim will have brush strokes, on top of the time, hand cramps, and frustrations. Job well done for sure and cannot wait to see your contemporary transformation of the wood beams over head, should be divine!
YoungHouseLove says
Hey Mary,
Thin and even coats of paint is the key. Too thick = brush strokes. You also want to allow each coat to fully dry. And don’t judge the first or even the second coat (it will have brush strokes) but once you get to the third (and fourth in our case, ouch!) when the coverage is more consistent it’ll look perfect!
xo,
s
Sarah @ The Strength of Faith says
Um, WOW! Did you take those photos in the same light that you took the post-painted-walls but pre-painted-trim photos? The trim really makes the new wall color pop!
I hope you had a well-deserved break this weekend. You two (four including Burger and Clara) are doing amazing things around that casa.
YoungHouseLove says
Hey Sarah,
Yup, same morning light! Isn’t it funny how much of a difference paint can make?!
xo,
s
anna says
I love your website and the painting looks great. I think it will look even better if you split that 2 chairs that you combine to look like a loveseat.
YoungHouseLove says
Hey Anna,
The seating area will definitely be changing! As we mentioned we have our eye on a gray sectional. More details on that soon!
xo,
s
Karen J says
Looks great! Good call on repainting the ledge; I think it will look better too. I totally agree with Sarah that the crown molding would look better white with the grey beams. Well, at least in my mind it would. Did you already try it in photoshop that way before deciding? I’d love to see it if you did.
YoungHouseLove says
Hey Karen J,
Nope, we didn’t photoshop that since in person when we’re staring up at it we’re 100% sure it’s not the way to go for us. In rooms with big thick beams (much bigger than the trim) they seem set apart enough for that two-toned choice to make sense, but visually we think it’ll just look all odd and stripey since they’re the same thickness and visual weight – so in person when we stare up at them we’re sure we’ll think “why did we paint some things one color and other things another color?”. Hope it helps!
xo,
s
gemma@thesweetestdigs says
Love it. Crisp, white trim makes all the difference!
When we renovated our basement I painted all of the trim in the 3+ rooms (in addition to the ceilings, walls and doors).. and I can definitely empathize with your end of day tantrum. I’ve been there, too!
Erin says
This makes me feel extra lazy for not tackling such projects all in one day and my rooms are much smaller than this one. My bedroom trim was equally as dark and tall for the baseboards, and I primed and have finished three coats of white semi-gloss paint, but when I walk in sometimes I still feel like it needs a fourth coat (fifth if you include the primer) and it has completely halted my kitchen renovation with lots of dark wood to be painted. I’ll admit, I’m incredibly intimidated by what I have to accomplish and completely in awe of your trim painting perseverance.
Funnelcloud Rachel says
This looks fantastic – I can’t believe how well it made the gray walls show up (in your other post, I could hardly tell they were gray!). And I’m impressed at how quickly you got this done – I hate painting trim. We did it on the first room in our house that we painted, and every room since then we’ve skipped the trim (it was already white – but still, could use a fresh coat!) I’m going to look for that magical short-handled brush, though!
Also, I was amazed at how good painting the trim white made the wood beams look – I actually really like them now that they’re the only wood accent in the room (as opposed to everything being trimmed in wood). Of course, the ceiling fan has to go, but I think the wood beams really warm up the space and add architectural interest!
Dina says
Just a tip for Mindy and others who’ve asked about painting with wall to wall carpeting. I painted my husband’s home office a few months ago and used frog tape to protect the carpet. This is kind of hard to describe, but I basically put the tape along the carpet with about 1/8 to 1/4 inch of excess tape hanging up the wall. I then pushed the excess tape down into that tiny space between the wall and the carpet. It was a little painstaking but it protected the carpet perfectly while letting me make sure I got my trim painted all the way down to the floor.
And now for a question of my own – do you have any advice on how to paint a kitchen? Would you remove the cabinets, refrigerator, etc.? Or would you just paint around them? I am dreading trying to move my fridge, but on the other hand I feel like it will look really weird one day if we (or future owners) replace the fridge and there’s a big rectangular swatch of some other color! Thanks in advance!
YoungHouseLove says
Hey Dina,
From experience we have learned that moving a fridge can damage floors (our brand new hardwoods in the last house were scratched when the fridge installer pulled it in and out and dragged the wheels against ’em). So sad! So we leave the appliances in place whenever possible! Just leave your extra paint cans with the new owners so they can always paint back there if they want!
xo,
s
Jen @ The Decor Scene says
I love the white trim, BUT I love your Photoshopped grey beams even more. That is really going to make the room and finish it off the right way. This room is going to be gorgeous once it’s finished. Can’t wait.
And I love your new “Comment” area. I love that you can tell who you are answering because it’s right below that person. Nice touch.
Veronica says
Looks great! I commend you!! I also have to do all of the trim because there is NO WAY my husband could keep it straight and clean. Maybe you have already mentioned this..but are you planning to keep the parquet floor? We have that in our house (real hardwood parquet) and I was thinking about getting it refinished but wasn’t sure if that is possible? It’s about 30 years old and we also have regular hardwoods in the rest of the first floor.
YoungHouseLove says
Hey Veronica,
Yes, we’re hoping to refinish it to get rid of some splinters and some faded spots. We’ll blog all about it when we get there!
xo,
s
Jen says
Wow, that paint color really looks beautiful with the white trim! Love how the room is shaping up.
For those who do want to use primer on their trim, here are my 2 cents. I’ve tried practically every primer on the market on my glossy oak trim, and while oil based primer is best, Gripper (by Glidden I think?) from Home Depot is a close second to the oil. I can do one coat with Gripper (with no sanding) plus 2 coats of paint and be good to go, whereas with some other latex primers, I’d do multiple coats of primer and multiple coats of paint. It’s not that the stain was bleeding through, it was just not getting enough coverage. The guy at Home Depot told me any primer would work better with even just a quick sanding of the trim, but I chose not to do that and the Gripper still worked. Hope this helps someone!
Melissa says
Thank you so much for sharing this! I have some glossy oak trim and doors to paint white ASAP, and I really want to do it right the first time.
sarah (sarah learns) says
wow, you guys are definitely troopers! i think i would have shed some tears if i had to stay up past midnight painting trim for the 4th time. blah! but the end result looks great! the beams are going to look pretty baller painted a dark charcoal. i’m glad you’re planning to do something a little dramatic with them instead of going with white!
Julia M says
Love it! La-hove it! I am anxious to see how the beams look, although your sneak peak (via photoshop?) has me fulfilled for the time being. Off topic: the new comment threads are nice and there seems to be a mini smiley face at the very bottom of your site to the right of disclaimers. …. ….. also sweet. :)
Kali says
Looks fan-tastic!! We got all new windows back in April and I have yet to paint a single piece of trim because I know the process is going to suuuck.
Question: Are you opposed to using a water-based primer or would that be no better then going without a primer at all? I am thrilled you’ve found success w/o using oil-based primer so it gives me hope.
Also… I LOVE the idea of the charcoal beams! LOVE.
YoungHouseLove says
Hey Kali,
All primer (even the water based stuff) can help with coverage and adhesion, so it almost always helps if you want to toss it into the equation!
xo,
s
Sarah says
LOVE IT!
Heather @ REOlisticRenovation says
Looks really good. I love the way the white accents the walls now. I kinda like the beams as is only I am sure you guys will make it look fab! I don’t like painting at all especially all the prep that goes into it. You guys did a great job!
heather s. says
It looks great and I’m so happy you’re painting the beams gray! The stain just makes the ceiling look low and heavy.
I also agree with an earlier commenter – I’d paint the piece of trim above the brick the same color as the wall since it breaks up that wall.
YoungHouseLove says
Hey Heather S,
Yup, that’s definitely on the ol’ to-do list!
xo,
s
Alyssa says
In the words of Outkast, it looks “so freash and so clean”!! Lol!!! Looks great guys, that’s a lot of patience you have over there!! So happy you had the whole weekend to enjoy your handy-work:)
AmyC83 says
I didn’t read all the comments so I’m not sure if someone already suggested this, but…
Would you consider painting just the border around the ceiling white and leaving only the beams a dark wood (maybe staining the beams even darker)? I think that wood beams always look better than painted ones, but I agree that something is off about this room and I’m thinking it might be the border or trim at the top of the ceiling. It might be worth it to give it a try before you paint all the beams…
YoungHouseLove says
Hey Amy,
Yup, we considered that but decided it wasn’t for us. Scroll back through the comments for more on that subject. Hope it helps!
xo,
s
Donita says
Great job guys!!! That is beautiful. Love how the gray walls pop out now, with the white trim. Great choice. LOVE LOVE LOVE the beams the gray. When I started reading/looking at the pictures, was thinking that gray would look great on the beams. I can’t wait to see the finished project. We are looking at maybe relocating *possible new job* and buying a house. I can’t wait to do some painting on my own home!!! You two are so inspiring!!! You have so much energy though. LOL Oh to be young again. :-D
Jenn L @ Peas and Crayons says
Looking good!
julia says
Are you planning to keep the yellow rug in there? I like how the yellow looks with the gray.
YoungHouseLove says
Hey Julia,
We wish we could, but we’re thinking that when we get our big gray sectional, a 5 x 8 rug will definitely be too small. But we might still use yellow as an accent color- not sure!
xo,
s
Anna says
I LOVE the exposed wood beams! I would totally leave them alone if it were my house. Kinda bummed that you plan to paint over them.
Karen P. says
I have to go to the paint store today to get paint for my office and bathroom trim. I am painting my office Autumn Bloom and my bathroom moonshine. What color BM paint should I get for the trim – Super White or Decorator’s White? I posted on the facebook page but didn’t get much response. Hoping you have time to stop in and make a suggestion before I leave for the store.
YoungHouseLove says
Hey Karen P,
Decorators White is our fave! But you probably can’t go wrong with either!
xo,
s
Lilly says
Hi it looks much better with white trim I too am a fan of white trim throughtthe house. But I have a question about ur lamps. I know they have an open bottom because u have put things in the for xmas. So my question is how will u baby proof them so Clara doesn’t get hurt if she acidentally pushes it and it breaks (babies r really curious). I know my daughter wants to touch everything she’s experimenting. I recently had to give my beautiful round, glass side tables away :( because she kept on banging things on top uf it like her bottle and toys. I was afraid she could break them and get hurt. But now I want to buy some lamps like urs for the master but I’m torn and don’t know what to do. Sorry for the super long msg that is not about painting trim. Do u have any suggestions?
YoungHouseLove says
Hey Lilly,
We actually plan to put those lamps in our bedroom (once we get side tables) so they won’t be in a zone where Clara frequently plays or is left unsupervised (of course if she’s getting into trouble near them the lamps will go into storage before we’ll let her hurt herself for the sake of decor, though!). Maybe hold off on getting the lamps for now if you’re worried about them? Or place them up high on a dresser or console or something so they’re out of the way? Good luck!
xo,
s
Caryn says
Nicely done! I totally understand how painful the process is. Our entire house had beige everything when we moved in… beige trim, beige walls, beige carpet, beige doors. It took forever to get all the trim white but it was totally worth it. I did however discover something worse than painting trim… painting door frames and doors. They are my nemesis.
Can’t wait to see the beams done. They are going to look awesome!
Kathryn says
Love it!!! I love the look of the dark gray beams as well. Unexpected but beautiful. I think it looks much better (and more unique) than the white.
heyruthie says
sweet god of mercy. i have the same wood trim to paint in my entire house, and i was hoping for a *much* cheerier post from y’all on this topic. i have 4 young children (ages 1-8) and “baby duty” doesn’t even describe what someone is on, when another parent is painting.
i think this project may have to be back-burnered or hired out. any thoughts? would you have tackled this project on a 2000 suare foot house (19+ windows and doors) with 4 young children?
YoungHouseLove says
Hey Heyruthie,
Hmm, I think if you can send the kiddos off to a relatives house for a fun little day trip (or sleepover) and if you recruited some friends/helpers it might not be so bad. I think it’s like a movie, where if someone tells you it’s awesome and you have high expectations it doesn’t exactly meet them. But if someone tells you it sucks (like we did) you might do it and say “that wasn’t so bad!”
Here’s hoping!
xo,
s
Gary says
I’m loving the white trim. Great job!
I’m starting to paint all the trim in my house white and was hoping to see the “painted trim” blog post today. I would love to avoid the oil-based primer, but after doing a lot of research, I think I’m going to go ahead and use it. My trim is really glossy and slick so it needs some bite. I just HATE the fumes.
Since your trim was chalky and took the paint well, you should be fine. I’m guessing 4 coats will prevent the bleed through as well. It’s definitely worth the shot to avoid the oil-based primer.
How much paint did it take to do the 4 coats? I need to make a paint run later today. Thanks! :-)
YoungHouseLove says
Hey Gary,
It took about half a gallon of paint (which I couldn’t believe! that doesn’t even include crown or beams!) so definitely get a gallon if you’re dealing with a large room. Except maybe since you’ll use primer you might need significantly less. Hope it helps!
xo,
s
Jamie says
Amazing! It’s astounding how a small amount of white paint can really open a room up! Great work.
melanie says
It’s beautiful! And I LOVE how it’s going to look with the darker gray beams!!!