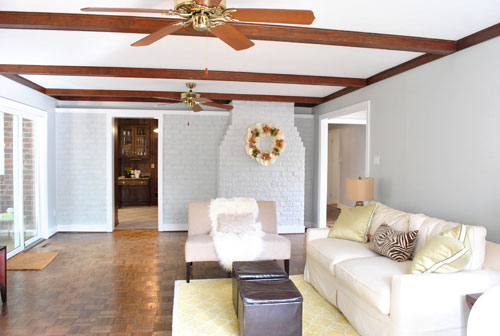
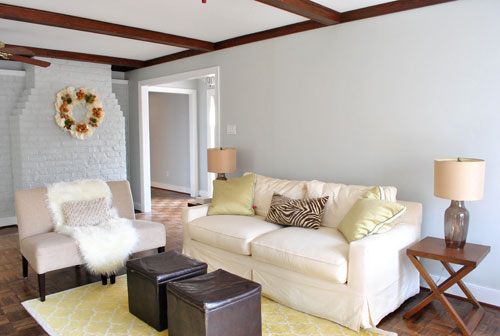
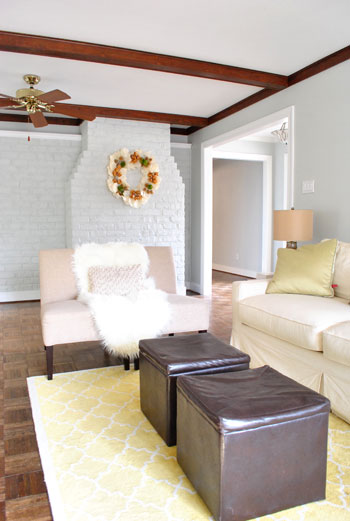
Glad that’s out of the way. Painting the trim was as long and tedious of a process as we expected. Maybe more-so actually, but it’s done! Wahoooo! And it feels pretty darn good. Seriously, there was more than one happy dance (one on Friday night when we finished, and another one in the morning when we saw the room in the light). What is it about certain annoying home improvement jobs that make you want to ugly-cry while doing them but happy-cry when you’re done? Talk about roller-coaster emotions. In the end, we never regret them, and we’re happy we got ‘er done. We’re just not ready to “do them all over again” the next day or anything. Haha. Anyway, it’s looking pretty good. Here’s the view in the living room now (ignore the beams, we’ll get to that later):
As far as the process went, experts recommend using oil-based primer to block potential bleed-through when it comes to painting wood trim (followed by latex paint). We threw caution into the wind and went straight to white semi-gloss latex no-VOC paint (Olympic Premium from Lowe’s). I had gotten some gray wall paint on the trim a few days back when we tackled that project, and it seemed to cover well without any signs of bleed through. So I went for it. Could have been a terrible plan. Could have resulted in having to go back and repaint all the trim with primer if I did see some bleed-through. And possibly pulling 60-80% of my hair out as a result. But it didn’t! Oh happy day.
So we saved the nastiness of working with oil-based primer and all the VOCs that come with it. Call it a baby-and-eco-friendly risk that happened to pay off. If it hadn’t we would have sought out the lowest VOC stainblocking primer that we could find, but it was pretty sweet that it didn’t come to that. That’s about where the words “pretty sweet” stop with regards to this project. We vowed to keep it real with you guys, so although we’re eternal optimists who generally love nearly every project that we tackle (even the ones that don’t work), we promised to tell you if something sucked. And painting the trim totally did.
It wasn’t that it was very hard (I used this brush, which I swear by for “staying in the lines” and going a lot faster that I used to move with a traditional long-handed brush). It was just that it took for.ever. I started at around 10am on Friday and went it alone until about 3pm (while Clara took her morning nap and then John watched her and tended the blog), then around 3, out of sheer desperation, I asked John to help while Clara was taking her afternoon nap (he traditionally rebuffs detail work since he’s the “big picture” guy who rolls while I cut in, so he claims he has less control when it comes to fine motor skills with a brush). At that point I was on coat #2 though, so I just asked him to go down the middle of the trim and baseboards with the second coat while I followed him and added a second coat to the top and bottom of the baseboards and trim (which requires a bit more control since that’s where the brush can meet the floor or the wall).
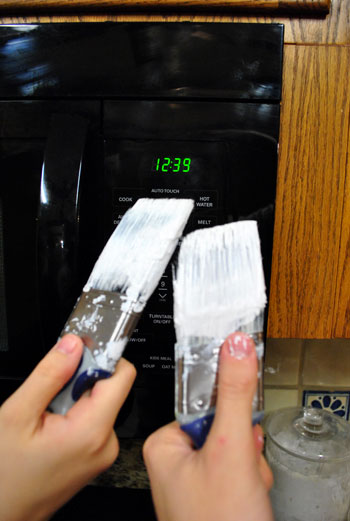
By coat number three it was around 7pm (thanks to a lot of blog, Clara, and food breaks among other things) and that’s when we realized that it wasn’t going to be a three-coat process like we thought. It was going to take four full coats to cover that dark dark trim. Boo to the hoo. There may have been a temper tantrum (not by Clara) but no actual tears were shed (which I consider to be a semi-mature response to such devastating news). But we pressed on. And it was actually past midnight when we finally finished (and snapped this victory shot of our paintbrushes “toasting” in front of the microwave clock). Klassy, right?
If we had used oil-based primer it definitely would have only been a 1-2 coat process (after the coat of primer was applied, which would add up to 2-3 total applications) so it may have taken us until 5 to 7pm instead of 12:30 in the morning. But those 1-2 extra coats were worth it to us in exchange for a completely zero VOC result. Even if it meant dragging a little bit the next day. So for those who are looking for the expert recommendation for tackling this project, use oil-based primer applied with a brush followed by 1-2 coats of latex gloss or semi-gloss paint also applied with a brush (and tape things off if you like to work that way). But if you wanna know how we did it, I used my trusty short handled brush and we applied 4 coats of semi-gloss latex paint (without taping off, since over time I’ve gotten nice and steady without tape). We actually painted all of the wood trim in our first house (including the stuff in the bathroom and kitchen) using this method (no sanding or primer) and we luckily didn’t have any chipping or bleed-through issues after 4+ years there. Fingers crossed for the same luck here!
As for the paint choice, we used the off-the-shelf white stuff that comes without any tint from Olympic Premium called “Base 2” (since “Base 1” is also known as “Ultra White,” and we wanted something crisp and white but not crazy white with a glowing blue tint to it). We love the color, and plan to use it for the rest of the trim in the house. When we finally work up the energy to tackle a project like that again in a few years. Har har.
Oh and the beams. We promised more details about those. We left them au naturale to be 100% sure that we don’t prefer them that way (we don’t). But now that the trim is all painted, we’ve decided that we definitely want to stain or paint them a deeper gray color for some richness and dimension. And of course those fans have to go. So for a vague idea of what that might look like, picture this…
… looking something like this:
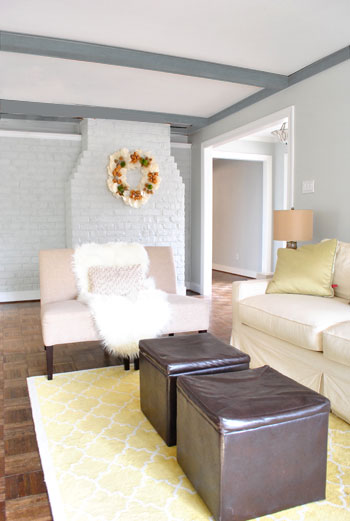
They definitely would have looked gorgeous in white just like the trim, but we want to take a risk and do something a little unexpected. We love that it’ll hopefully be just the right amount of drama without looking too heavy (we have standard 8-foot tall ceilings so we didn’t want them to feel like they’re closing in on you). But we think it’ll have a nice not-too-top-heavy look in the end, especially since we’ll be bringing in a large charcoal sectional to ground the room and add balance. Then we can start layering in some bold colors in the curtains, art, rug, accessories, etc. Should be interesting.
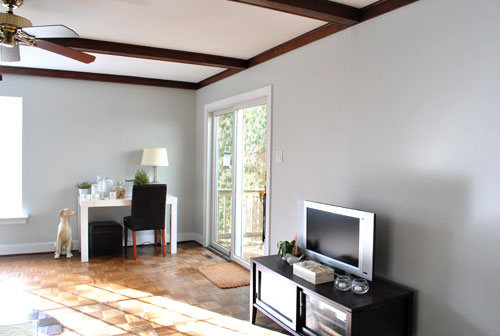
And why not end with a nice little flash-back to what the space looked like a little over a month ago when we moved in?
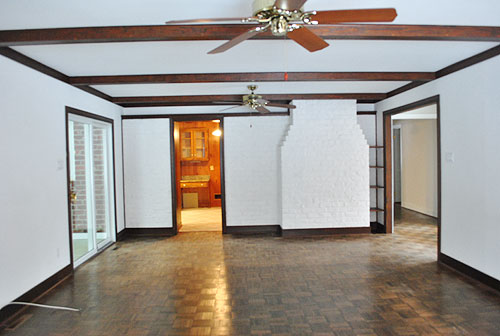
Oh the memories. Change is good.

Jessica Dixon says
Beautiful work! I know it was a pain, but you both did great. I really like the beams in the grey. I think they will look great when you are done. Congrats on finishing the trim!
Jessica says
wow! What a difference!! You can really see the gray color now. And the whole room looks way more pulled together. I kinda like the wood beams how they are but I also like the dark gray. Great job guys!! I can’t imagine the dedication!!
KB says
Did you guys sand the the trim before you painted it?
YoungHouseLove says
Hey KB,
Nope, we just followed the steps that we outlined in this post. Hope it helps!
xo,
s
Bree says
Hi guys – the room looks great! I’m trying to convince my husband to help me, scratch that “allow” me (let’s be honest), to paint our wood trim white. To be fair, we have a lot of wood trim, so I can understand his hesitancy. But, after painting the wood cabinets in our kitchen, I feel I’m up for the challenge. My problem (one of many!) is that I have had a dozen descriptions on how I am supposed to paint them. Some people tell me I have to sand them, other’s say I need to use a special chemical that gets rid of the wood stain, some say I just need to apply a lot of coats??? Did your wood trim have a stain on it? If so, you didn’t have any problem with the paint adhearing to the trim? How would you suggest I tackle this project? Thanks so much!
YoungHouseLove says
Our wood trim seemed to be unsealed and unstained, so it worked to just paint it. If you have a stain on it you’ll need to use a stainblocking primer, and if yours are glossy and sealed, a gentle sanding followed by primer and paint would work best!
xo,
s
Amy G says
Loving the grey beam idea!
Emily says
This is exactly why I haven’t painted the trim in my house! Its such a long and tedious process.
Looks great though – and I think they grey wood beams will look really nice!
emily says
love the new look. i’ve always been a fan of gray walls. these look so sharp with the white trim.
Ashley says
Love the gray walls and the white trim is nice but I’m loving the wood beams. Please dont’ paint them. I’d kill to have that wood in my house.
Laura says
Looks fantastic. I am definitely digging the Moonshine. Love the thought of a darker gray on the beams. Bravo, kids!!!
marilyn says
Great job! It looks great and so will the beams when done.
Lindsay says
Looks amazing! I’m now motivated to continue on with painting the trim at our house!!
Jessica says
I feel your pain! Me and hubby painted cabinets from Thursday until last night! (We both work full time and have two little ones under 2 yrs old) so we were up every night until 1-2 a.m.! We used your painting cabinets tutorial BTW, and let me just say – b/c I think I read somewhere where you guys are planning to paint yours (inside and out), that it is one LONG process! I told hubby I don’t think I could EVER do it again. LOL We had dark cabinets that had never been painted before and it took about 3-4 coats of paint when it was all said and done. We are perfectionists I guess but it turned out wonderfully. We went from dark wood to white.
On another note you mentioned that you are going with a charcoal sectional. Where did you find one? I loved the Kivik one that you initially mentioned but they don’t seem to be in stock anywhere! Bummer too, because I thought it was perfect for our home.
YoungHouseLove says
Hey Jessica,
Stay tuned for a sectional post soon! We owe you guys deets on that for sure!
xo,
s
Elisa @ What the Vita says
I had hoped you wouldn’t paint the beams white because (selfish reason) my dream house would have beams. But you’re right, the wooden look didn’t look right, so I really love your gray beams idea!
And you pressed on and finished everything in one day! WHOA. This would have taken me a few days and lots of whining to finish… you guys are the definition of perseverance.
beth says
We have lots of painting trim work coming in the near future. Dreading it, but we know it will be worth it in the end. Your trim looks great.
We really have a doozy on our hands as we’ll most likely be painting our knotty pine clad vaulted ceiling. Ahem. Which means shellacking knots and then primer and paint from what I can tell. And scaffolding. And we have three kids. EEEEK.
KarenC says
Love it! It was kind of hard to see the new gray paint before… but the white woodwork really makes it pop now. The gray beams are going to be gorgeous.
Can’t wait to see the room with the sectional, a rug and some window treatments.
Emily says
Looks really nice – amazing what fresh paint and trim can do for a room… if only every homeowner knew a transformation and refresh was “that easy”! And trim is a beast, but I liked reading about your hatred and pain and suffering. Well expressed.
Ann says
I know you want to paint/stain the beams, but IMO (as an architect) they look beautiful as is! To me, it accented nicely with your wood end tables. I know that the wood may look different in person, but based on your pictures that’s how it comes across to me. Just a thought.
Relevant Notes says
The beams look so awesome in the gray!!!
Ananda says
Any reason why you painted the trim white but left the quarter round brown? Looks great, btw. As a person who has also tackled painting trim throughout our whole house, I do agree that it sucks!
YoungHouseLove says
Hey Ananda,
In the adjoining hallway the trim was painted but the quarter round wasn’t- so in the interest of keeping things consistent we followed that method.
xo,
s
Peggy says
Looks good! I definitly like the darker gray better on the beams, just not too dark. Would you consider painting that horizontal piece of trim at the top of the brick wall in the wall color instead of the trim color? IMHO, it breaks up the wall. Carry on!
YoungHouseLove says
Hey Peggy,
Yes! We actually were staring at that and planning to take that project on in a bit. You know, after we fully recover from all the trim painting on Friday. Haha. But we agree that the ledge would look better if it blended in instead of sticking out!
xo,
s
Deb Ramsthaler says
Hi Guys,
I know I will be in the minority here but I actually like the natural stain on the beams. I think it really works with the floor. Then again only you know the “big picture”. Once the curtains go up and your new art work is hung I bet it will look amazing. Isn’t it interesting how the white makes the Moonshine POP!
I know its a painful job but it’s done now and you wont have to do it again for years.
Best,
Deb
kyla says
Oh youngsters!! I was knee deep in trim painting this weekend as well….a temper tantrum may or may have not happened at my house as well. But, yes the end makes me SO happy after the process makes me feel like a 4 year old stomping my feet in the middle of the toy store isle and holding my breath. The result is motivation to keep going on my kitchen and living room…almost!
Cara says
Great work, guys! Now go get a couple’s massage! You’ve certainly earned it :)
Catherine says
I initially thought it might be nice to leave the trim dark but I now see the error of my ways – love the look and with charcoal beams it will be even more fabulous! Well done you!
debbie says
Looks awesome….loving the gray idea on the beams…..room looks great…love the color. Funny those grays were my three choices as well!! Love your blog and look forward each day to see what you guys are up to… but can I make a tiny suggestion…not digging that wreath on your brick…..you need something a little “snazzier”….
YoungHouseLove says
Hey Debbie,
Oh yeah that’s just a “for now” thing still hanging since Christmas! We haven’t hung anything else on any walls (except for the stuff in Clara’s room) so it’s just a placeholder…
xo,
s
Sarah says
I love how you made those two slipper chairs look like a settee by pushing them together and throwing the sheepskin on top! You two are so clever!!
Angela says
The white trim looks great!
Unfortunately, and hopefully not, you may still regret not using primer first. We painted the beams in our living room white without using primer and over time the stain has bled through. It has kind of given it a white wash look that we don’t mind but it definitely wasn’t our intention.
YoungHouseLove says
Hey Angela,
Thanks for the heads up! We actually painted all of the wood trim in our last house with this method (no primer) and we luckily didn’t have any chipping or bleed-through issues after 4+ years there. Fingers crossed for the same luck here!
xo,
s
Barb says
Sherry:
I feel your pain as I have painted dark trim to white in every room in our house which is a CAPE! It was a horrendous task and I must admit….it took me a year to complete. Yes, upon finishing one room or hallway, I would hate to have to begin anew…but on to the next room I went a few weeks later. All told, it was so great to have it be so light and bright upon completion. I even had to do all the doors also. Dear God…I thought it would never end, but the result is fabulous!! So I want to say this:
BRAVO to you for working so hard on a task that is horrid!! But it is done, and it is so room-changing!! Love the crisp brightness it brings. YOU DID A GOOD THING, my friend!!
So, rest up, and begin anew with the rest of the house. The sooner you begin…the sooner it will be transformed into beautiful-ness!! YOU GO, GIRL!!!
You deserve a break today…go shopping!
Barb
Kristin F says
Looks fabulous! I adore white, shiny trim but dread doing it. Totally agree that it is so depressing to finish the walls only to then remember you have to paint all the trim…well, you do if you want the room to look finished! Agree about the beams, dark wood beams are dragging the look down and white would just blend into the ceiling. Can’t wait to see how it looks when all is done. Oh, do you plan on priming those beams though?
YoungHouseLove says
Hey Kristin F,
Not sure yet. We were careful not to get any paint on them so we’ll have to see how it covers. Might do a trial run or test a few methods on the back of a beam that’s not seen very often or something.
xo,
s
Peggy says
BTW, thanks for the research you showed on gray paints- I plan to paint my kitchen cabinets gray, so you might have done some of my color-choosing work for me!
Alisa D. says
I’m voting for white beams but I’m betting you’ll prove me wrong and whatever you choose will look fantastic. Everything’s looking good! It’s been so much fun watching your house come together!
Katie says
Love it! Can’t wait to see what the beams will look like :)
Stephanie says
You are not making me optimistic for the entire floor of dark gray trim waiting to be painted white at my house, but I’ll keep looking at your “after” pictures to keep me motivated, because it looks amazing! And I adore your future plan for the beams, can’t wait to see it brought to life!
Paula says
Great job!! I think I would prefer the beams white, but will hold out complete judgment until after the project is finished and you add all your final touches. I have not been disappointed in the past, it always comes together looking great!!
Emily says
Oh – and I thought I had picked a grey for my bathroom (I’m stealing your guest bath paint idea – grey on grey stripes). Of course once I saw how the moonshine looked in pictures you completely upended my selection! I went back to the paint store – picked up a million more greys (moonshine included).
Susan says
Beautiful work! I love that you guys take pride in painting your trim the “right way” and don’t just slap-dash some paint up there.
Have y’all given any thought to perhaps whitewashing your beams instead of doing an opaque color? I think they will look great when they are lighter than the current wood, but whitewashing (or grey-washing?) could perserve some of that wood grain character. Just a thought!
YoungHouseLove says
Hey Susan,
Yup, we’ve thought about that too! We’re thinking something darker might give us the drama we’re looking for, but who knows where we’ll end up!
xo,
s
Cara says
How did you decide to paint the walls before the trim rather than vice versa? My gut tells me it would be easier and faster to paint trim first since you wouldn’t have to worry about being so careful to stay “in the lines.” But what do I know? I’ve never done it!
YoungHouseLove says
Hey Cara,
Your gut is probably right! Lots of people prefer it the other way, but since I’ve gotten pretty good at trim, I like doing it at the end. It’s like the icing on the room, er, cake.
xo,
s
D says
I was one of the reader who couldn’t see much of a difference when you painted the walls gray, but now I can totally see it! The color looks great!
jenny G. says
It looks fantastic! One thing though – are you sure that “Base 2” is actually a different white? At Home Depot they told me that the bases are all the same color, but the medium/dark bases just have less paint in them (to allow for more of the mix color)! The paint dept. guy advised me, if I wanted off the shelf white, to always go for the lightest or 1st base, because you get the most paint for your dollar.
YoungHouseLove says
Hey Jenny G,
Yup, we chatted up three different employees who said ultra white was very very stark (almost blue) while B2 was a softer white base, so I guess in some instances the base paint is slightly different!
xo,
s
Tanya says
Wow! That looks so great. That room is looking so sharp! Making a mental note in case I ever have a home with trim I’d like to highlight & not hide :)
~Tanya
dans-le-townhouse.blogspot.com
Barb says
OOPS…forgot to add this…
Painted the kitchen cabinets white also. Man, that was a process and I have since then done it again. Lots of sanding and I used the CABINET COAT paint from Benjamin Moore and it paints like BUTTER!! You just have to try it. I LOVED IT!!
Remember…CABINET COAT PAINT in white and they can tint it for you if need be.
Barb
Jessica F. says
Great work yet again youngsters! We’re all very proud of you and your meticulous brush work…booyah old trim!
kim says
My two cents….. I like the dark gray but I would be tempted to go even darker then what you have in the pic. I would also think about painting the ceiling a dark grey and the beam white.
Nikki says
Looks great! We just changed dark trim in our house too and it really makes things feel fresh and bright!
Quick question: Have you guys decided on your first “big” project (I guess I mean bringing in outside help)? If so what is it and what’s the time frame :) Can’t wait to hear! You guys are such an inspiration!
YoungHouseLove says
Hey Nikki,
We’re taking things one day at a time but I’d guess the kitchen- maybe in a month or two. We believe in taking our time to live in a house before ripping down walls and redoing floor plans (just to make sure it’s the smartest change so we’re not kicking ourselves later). We exchange ideas and brainstorm every day though- so it’s definitely something we can’t wait to tackle!
xo,
s
Lauren says
So, I had been looking for a good grey for my kitchen for months, and after your post on Thursday, I just went and bought Moonshine (in the same paint at Lowes). Then when my husband went to visit his family on Saturday, I spent from 9am-7pm painting the whole thing, with my head at a right angle to reach the walls over the cabinets near the ceiling- you know how it goes. And when it was all over, Moonshine looked baby blue, not silvery grey. And later that night (after a few margaritas) I definitely cried. So you are a trooper for ONLY throwing a tantrum ;)
PS- in the morning the color was much better, and then it was even better after we put up a new light fixture, and after my oak cabinets get painted white (I am saving up my energy to tackle that next) I think it will look even better. SO I’m not repainting just yet, ha ha!
Heather says
the trim looks awesome!
Melissa says
Wow, what a difference. Painting the trim added inches to your room. The room looks taller and draped in light.
Phoebe says
Wow!!!! I’m so glad the trim was already painted in my house when I moved in. I don’t think I’d have your stamina to finish all in one day! And I’m loving the idea of dark grey beams – such a dramatic departure.
Just thought I’d also mention, there is a low-to-no voc primer on the market that is water-based and will block tannin bleed (the most common bleed from wood). Its by Zinsser: Bullseye Zero. I work in a paint department of a midwestern home improvement store and although I’m by no means an “expert” that’s what I’d recommend to my guests coming in shopping if they were concerned about oil-based primers and vocs. :)
Ashley @ sunnysideshlee.com says
It’s getting very JohnandSherryesque! Love it! And I think the beams will look great as a dark gray! :) Can’t wait!
karen @ our slo house says
First off: congrats, good job, pat on the back, job well done. : )
The photoshopped pic of your beams being dark grey is gorgeous — not a color I could have imagined.
I had a crazy dream about you guys last night: I dreamed that we were selling something on Craigslist and you guys came all the way to California to buy it. Of course, you had Clara with you, and my kids were in love with her. I think they were feeding her applesauce!?? Anyhow, then you (Sherry) and I were comparing our hands. We were saying how our skin was dry and our nails were all short because of all the DIY projects… That was pretty much it. What do you think it means? Any trips planned for CA? LOL
YoungHouseLove says
Hey Karen,
Haha, that’s hysterical! We do love CA trips so you never know…
xo,
s
Cait @ Hernando House says
I’m definitely not a fan of the grey beam idea, but the white trim looks good! I say go for it with the beam if you’re lovin’ the idea!