One of the major questions facing us when figuring out how to add some office-y function to our guest bedroom was: where does the desk go? Correction: since there are two of us, were do the desks go? Bear in mind that this isn’t the easiest question when you’re working with such a modestly sized room (it’s just 10′ x 10.5′) that also needs to accommodate our new sofa (which folds out into a full bed for our occasional house guests). So we decided that a little pre-planning would help us answer that very question. Allow me to introduce my simple (not-to-scale) floor plan to demonstrate the desk placement options that we weighed:
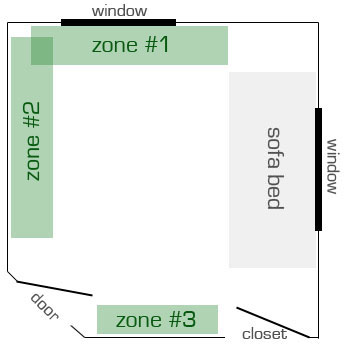
- Zone #1 sounded great because it meant one of us would get to peer out the window and enjoy a nice view of the backyard. But with the couch so close, it meant the other person might be a bit cramped. Plus, we had big plans for a bookcase on that wall (to balance out the height of the uncentered window) so it was on to the next two options.
- Zone #2 felt like a better choice since it was the longest uninterrupted wall, but it would require a very custom sized desk because of how long that wall is and how far the sofabed would need to fold out when it’s in use.
- Zone #3 only offered up space for one desk, although putting one of us there (and the other person in zone #1 or #2) would take pressure off of finding one long two-person desk. But it also meant that we’d have our backs to one another, which isn’t always helpful when we’re working on something together (seeing each other’s screens would be more convenient).
So what did we decide? Zone #2 for the win! It made the most sense since it was the longest space. Plus we loved having a blank wall in front of us to hang art, pinboards or whatever other productivity-inducing wall decor we decide that we need when it comes time to tackle the art-factor in the room.
With that decided, our next challenge was finding a desk to fit that wall. We had about 7ft between the window and the door (when it was fully open) to work with, but only 21″ of depth before we’d start bumping into the folded-out sofa bed. So after lots of hunting (and even some thrift store trolling) we came up with two decent options – the IKEA Besta Burs and something like the Crate & Barrel Sloane Leaning Bookcase Desk (with two work areas instead of one).
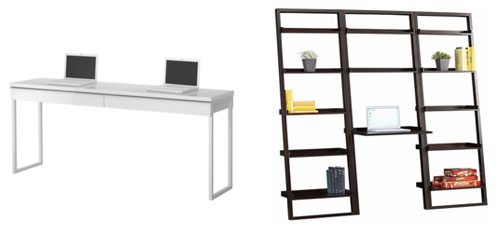
Sadly after checking out both solutions in person, we weren’t won over by either one. The IKEA option was close, but at 5’10” long and only 15″ deep, it didn’t fill the space as much as it could have (and we’ll take all the desktop that we can get!). Plus the $249 price tag was a bit steep for two cheap-os like ourselves. And the Crate & Barrel option wasn’t only more expensive ($379), but it didn’t accommodate two desk areas (so we would probably have to build something similar that would) and it also meant there would be an abundance of bookcases in the room (remember, we’re already planning to place one next to the uncentered window to balance out that wall and add tons of functional storage space. It was beginning to look like we were all out of desk luck…
But then, infused by some of the confidence leftover from my self-building experience, I decided that I should build a custom desk for us. I’d been eager to try out the Kreg Jig on something bigger, so this seemed like just the project. Plus – how hard could it be? Just gotta screw some legs onto a big slab of wood, right? But when it comes to getting “big slabs” of anything home, we always have to think a bit harder since our only vehicle is a Nissan Altima (which isn’t really something that a 7 foot piece of wood just slides into).

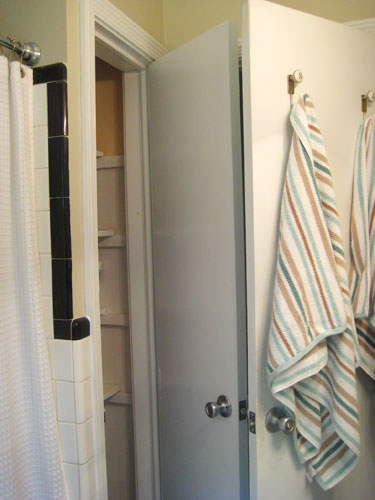
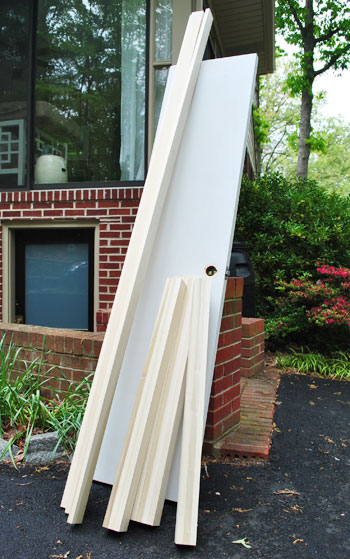
So we put on our thinking caps and our figuring-things-out pants and – in a moment of inspiration – Sherry remembered that we still had the hollow-core door that once lived on our bathroom linen closet residing right in our garage. Check it out in the photo below on the left. It was always in the way so it had to go (and you know we have a thing for open storage anyway), but now it was poised for a comeback.
Sherry had seen a few other folks around the blogosphere repurposing doors to create tabletops and desktops so she convinced me that we should join the ranks. And lucky for us, the door was nearly a perfect fit for our floor plan without much altering (it was just under 7ft long, and about 18 inches wide). Plus not only was it free, but it required absolutely zero hauling. Picture us with some serious jazz hands thanks to this fortuitous development.
As for the rest of my supplies, I didn’t turn to woodworking plans like a normal person might (I wasn’t planning on doing any fancy drawers on my first attempt at furniture building, so perhaps I was feeling a bit adventurous). Instead, I poked my head under our dining room table since it had the same basic legs and rail design that we decided we wanted for our simple DIY desk. Of course it was a different measurement than our desk would be, but the basic construction was perfect to mimic for my pending project.
With a few quick measurements, we headed off to Home Depot to pick up enough wood for four legs and a rail on all four sides. We came home with a nice little wood collection that looked a little something like this (oh and we added the existing bathroom door to the mix before snapping the photo):
Our bounty included a few planks of 1 x 3″ (poplar) for the rails and four chunky 3 x 3″ lengths (also poplar) that we’d be cutting down to create legs. In total, it cost us about $70 – which would end up being our only out-of-pocket expense for this project. Not bad considering the smaller skinnier Ikea desk was a whopping $249.
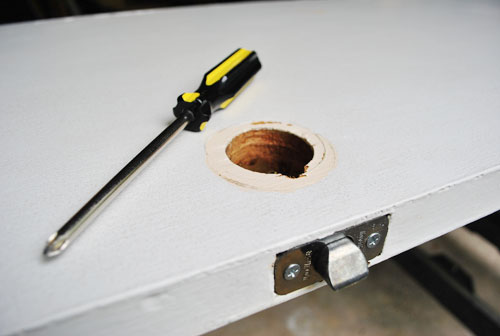
Before I could get to the fun screw-everything-together part, there was quite a bit of prep work to be done. Let’s start with the door hardware. Obviously we didn’t need hinges or a handle mechanism on our desk. So first I removed the hinges and used some wood putty to fill the indentation they left behind (since that side would become the front of the desk). This is because we decided to leave the hole where the handle had been in place so it could conveniently become the spot at the back of the desk that we fed all of our wires and power cords through. And you know this cord-wrangling feature appealed to that type-A wife of mine.
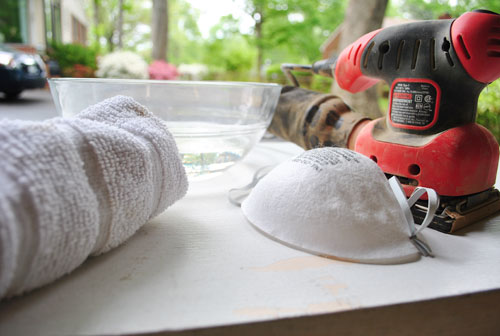
The other prep project that I had to do was whip the door back into shape. Living in the garage for two years meant it had some peeling paint and a bit of scum on it. But it was nothing that a good scrubfest with some vinegar-infused water (for the scum) and a light sanding (for the peeling paint) wouldn’t fix. Well it wouldn’t completely fix it, but it would get it ready for some priming and painting- which would.
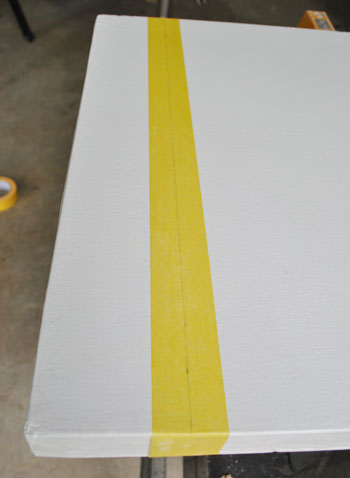
I also had a bit of sawing to do. Even though the door was already slightly shorter than the 7 foot space between the open office door and the opposite wall, we wanted to shorten it by a few more inches just to leave some breathing room on either side of our future desk (so it didn’t look crammed into the space too tightly). I measured and marked where we wanted to cut it, and then – to help prevent the wood from splintering – I taped it off using some painter’s tape (then I just traced my cut line over the tape again so I could see it).
Then out came the circular saw. Hello old friend.

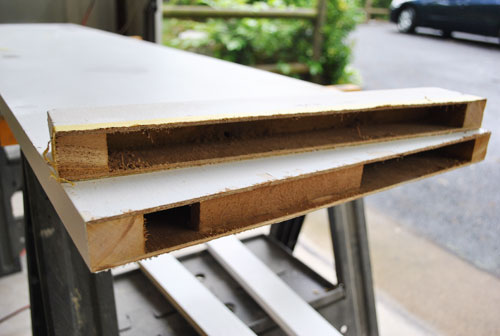
Now if anyone has ever wondered what the inside of a hollow-core door looks like, here ya go. Obviously this needed a bit of sanding to smooth things out, but since this is the end that would face the wall, I didn’t go through the extra effort to seal it over with a new piece of wood. Call it a short cut, if you must. Or a place to hide stuff that you don’t want anyone to find. Oops, I just told the internet about it so that’s out.
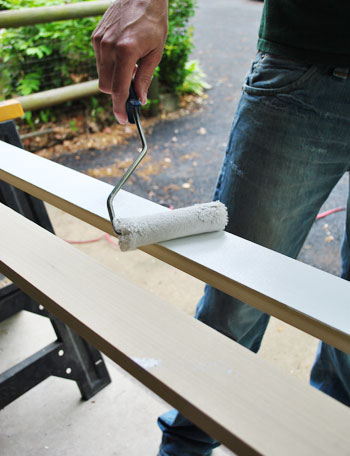
In the above photo, you can already see my other prep project sitting on the bottom of my sawhorse: priming. I decided to prime all of the wood before constructing the piece, but saved painting until after it was all put together. Knowing it would get a little roughed up during construction, I didn’t want to feel bad every time I got a mark on the wood.
Now for the fun part. With everything primed and dried, I could start construction. I began with the legs, using the Kreg Jig to drill one pilot hole on the two inside faces of each leg. Check out this post to learn more about how the Kreg Jig works.

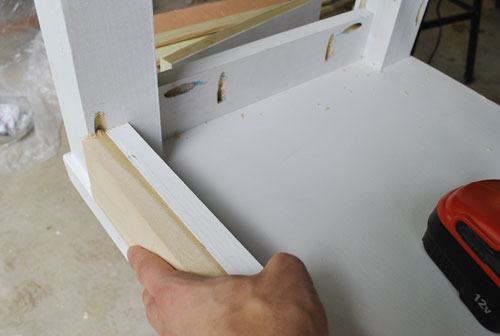
With my pilot holes drilled, it was a simple next step to screw them into the door (which was finally on the verge of become a desktop!). Since I wanted the legs to be set in from the edge (instead of flush) I used some furring strips leftover from our bathroom project as impromptu guides to ensure that I was setting each leg at the same distance from the edge.
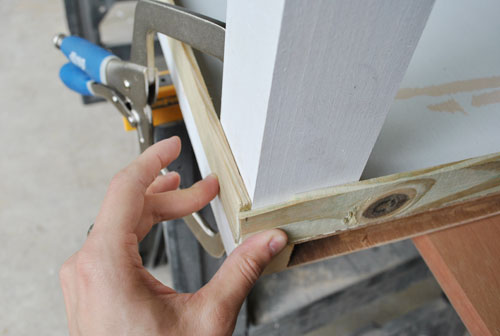
And with the help of my trusty clamp, I screwed the leg into place no problem. Whew. Note that the door is still looking a bit rough in this picture – those are some of the scrapes that occurred as I pieced things together. I had a few more than I anticipated because I realized too late that I should’ve used oil (not water-based) primer. Oops, my bad. But a good once over with the oil-based stuff before painting solved the problem.
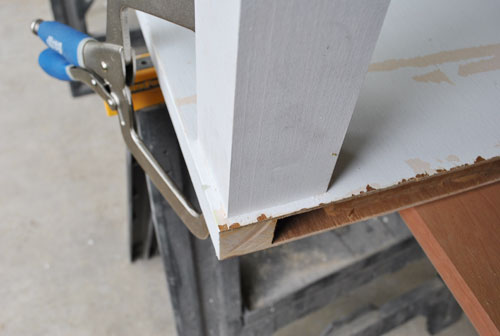
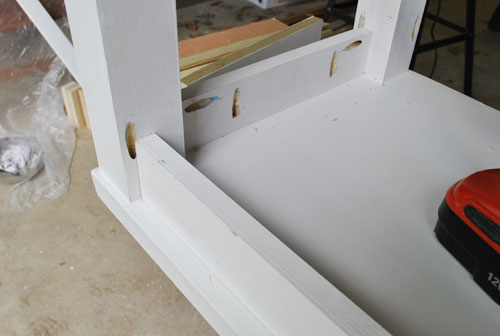
Once all four legs were in place, it came time to attach my rails. I carefully measured and cut those four pieces using my miter saw and then drilled pilot holes using my Kreg Jig again. As you can see below, on each rail I prepped pilot holes to go both into the legs and into the door itself (roughly 8″ apart). And since I wanted the rails to be set back even further than the legs, I used another impromptu guide (this time a leftover 1 x 3″) to make sure I was setting all four at the same depth.
Now, since this is a hollow-core door I feared that I wouldn’t be going into solid wood with these screws. But fortunately, with the exception of the end where I sliced off a few inches, all of my screws were angled enough that they went into the solid frame on all sides of the door. Here’s what it looked like with two of the rails in place.
Now this is the part where “through the magic of the Internet” I put my ingredients in the oven and they come out fully baked (mainly because I won’t bore you with some wood puttying, repriming with the oil-based stuff, painting, and poly-ing – but we used the same method that we used to paint the top of this dresser). And voila! Here’s our brandspankingnew desk:
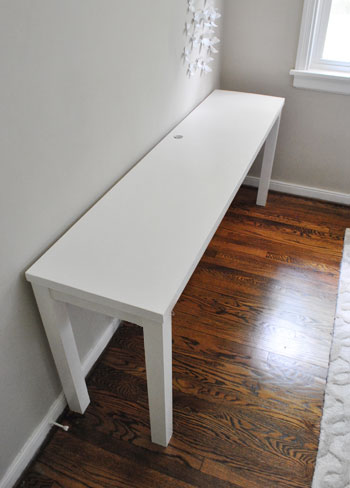
I realize it’s a bit hard to get excited about a plain white table – but we were pretty pumped back when I finished this project (yes, this is something I actually tackled right before Clara’s arrival – she just distracted me from writing the post about it once she came along so it’s just hitting the blog now). Anyway, it fits the space perfectly (since we made it, gotta love custom measurements) and it provides plenty of room for the two of us. Plus it’s out of the way enough for the sofa bed to be fully folded out. We realize it looks crazy skinny in the shot above, but it’s actually 18″ deep, which easily accommodates our two laptops (which are only 9″ deep) along with everything else we’ll need to have on hand. It was also the right price (just $70- since we already owned the door, all of the screws, wood filler, primer, and paint). And we have the satisfaction of having done it ourselves. Score.
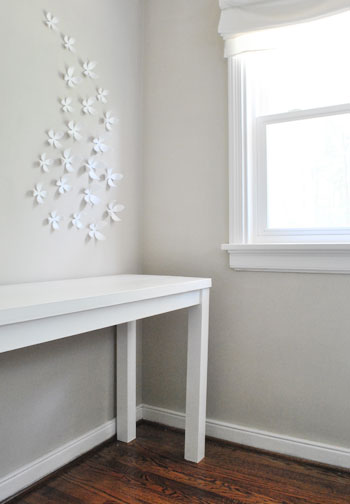
Oh and now we’re getting to the best part – turning it into a actual functioning workspace for both of us. That means chairs, storage, more storage, electronics, wall decor and anything else that we find ourselves pining after in order to be productive parents / bloggers. We’re gradually piecing everything together, and although we’re taking a slow-and-steady approach to this project (kinda out of necessity, given that we have a newborn daughter and all) we can share that we’ve already clocked a few days of work at our new door-turned-desk and so far it’s working out fantastically well. In fact I’m writing this very post on said desk right now. Of course the walls are still bare and we have a ways to go, but I can also divulge that we’ve taken on two more office projects (since Clara’s arrival no less- we’re so proud!) so stay tuned for the play by play on those two exciting undertakings soon…
But enough about us. Have you guys seen any other unique desk solutions recently? Or have you creatively solved any of your own where-do-I-put-my-workspace dilemmas? Feel free to throw in any other fun and/or functional office ideas that might come in handy for others who are planning their home offices as we tackle ours. Share and share alike.
Psst- Wanna follow the entire office/guest bedroom/playroom makeover? Click here for the intro post and here to read about the big sleeper sofa hunt.

sarah says
whoa! first comment! I love it when people turn closets into cute, functional office spaces. the only problem is who the heck has enough closet space to spare?
Meghan says
Looks great!!! Can’t wait to see the rest of the office. I have to ask how you guys are handling baby+blogging?! I want to know your secrets!! Even getting out of your pj’s with a newborn is tricky business! And how is the cloth-diapering going? Hope all is well over at tu casa. :)
YoungHouseLove says
Hey Meghan,
Our secret is to have an awesome baby! We’re so lucky that Clara is a great eater and a fabulous sleeper (she sleeps for 5 hour stretches at night, so we just have to get up once in the night to feed her!) so we’re a lot more productive than we ever thought possible. Of course we trade off entertaining her during the day, and I’m feeding her every few hours as well, but it really is doable! And nobody tells you how funny babies are. We’re laughing non stop at the adorable things she does (and Burger cracks us up as well) so the house just feels happy and she’s a joy to be around. As for cloth diapering, we can’t wait to see how it goes. She has to be a bit bigger to fit into her cloth dipes but we’re thinking she’ll get there in a few more weeks. And of course we’ll share the details when we make that adjustment. Stay tuned…
xo,
s
Maya says
Wow, that looks great! What a perfect repurposing of an old door… I love the way you don’t sweat the open end and the knob hole, instead finding the functionality in the “flaw.” I can’t wait to see more!
P.S. I’m kind of entertained… the first thing my husband and I did when we realized we’d be sharing an office was build bookshelves through the middle so we WOULDN’T see each other while working. Clearly you guys are a little more collaborative than we are. :)
Melanie says
Great job on the desk John. It looks amazing!! I’m on the edge of my seat waiting to see more of this transformation.
julie says
Oh my gosh, that desk rocks!!! I love that it provides just enough space and is long enough for two people to share (can’t wait to see the storage solutions). As always with your decor it looks light and airy. This post makes me sorry that I already splurged on my Office Depot l-shaped desk. I may have to do a little re-purposing myself. Thanks for the fantastic post and hope all is well with new family!
amelia says
wow – very impressive. The desk looks beautiful and functional. Great thinking leaving the door knob hole for the office wires! Lovin’ how this room is coming together and very excited to see how everything gets organized (as i have an office space of my own that i’de like to make more functional and fancy). Even more amazing is that you both continue to write posts while having a newborn – crazy impressive!
caligurl says
OHMIGOSH! how creative! i LOVE it! can’t wait to see how you decorate the area!!!!
Nick says
Turned out quite nice…
Just FYI, typo in 5th paragraph:
“…I decided that I should built a custom desk for us”
It happens to the best of us.
YoungHouseLove says
Thanks Nick – for both things! Consider “built” now “build.” I was so close, but no cigar on that one…
-John
liz @ bon temps beignet says
This makes me want to paint everything in my house white! Everytime I walk around IKEA I constantly think to myself, ‘s o m e o n e (not me cuz I have no carpentry tools or skills) could make that for waaay cheaper’. And you did! Awesome job.
Rebekah says
You guys are TOO clever! This is great!!
Stephanie says
Looks great! Can’t wait to see more!
Katy says
Great job guys! What a smart idea to use a door. Before I was married, I lived with two other girls and we turned an old door into a beer pong/flip cup table. A bit different than turning it into a desk, but a great way to re purpose an old closet door! :)
Lesley H says
Nice work! I’m loving the desk and the way the white pops against the wood floor. I’m with Sherry – excellent use of the door’s hole for cords! Enjoy your new work space as much as we’ll all enjoy what you accomplish there.
Kate says
Great job John!
Amy says
When I was younger my dad made a desk for me out of a solid wood door. The “legs” on one end consisted of a 2-drawer standard wood file cabinet; on the other end, clever dad built a custom bookshelf to match the height of the file cabinet. I’m sans-desk in my current apartment, so I miss that huge workspace!
Kristin says
Great idea! I like your custom desk.
When I was a kid, my parents made our dining table out of a leftover door from when they removed a wall (they tiled the table/door).
Fot other readers who want to repurpose a door or other piece of wood, Ikea also has lots of nice table-legs you can buy separately so you do not have to be as a skilled craftsman as John is ;-)
Our desk is also self-made, but with legs from Ikea. In the future, we would like to add this one on one side:http://www.ikea.com/us/en/catalog/products/00146762
AbraCat says
I’m exhausted just reading about this project! You must have boundless energy– I’m always impressed by your accomplishments.
Amanda says
Great ideas!! Love the flowers on the wall, too :)
When hubby and I learned that our home office that got occasional use was turning into my all-the-time office while I worked from home, and it needed a play area since working from home was because of the baby arriving, we had to make lots of changes. We got a piece of glass cut so that our desk for one became a desk for two, and moved things around to have a play zone free of wires. We also wanted the ability to see what each other was doing, so monitors got mounted to the walls on swing arms :)
Here is a pic: http://www.facebook.com/photo.php?pid=68128508&id=2014600
Ashley @ The Design Thief says
I have to admit that I first saw the post I skimmed to the bottom and saw the finished product. My thought was “Wow, I didn’t know that West Elm made a double desk”. Then i went back and actually read the post to find out that YOU guys did it! Great work! It’s very professional looking!
JenWoodhouse.com says
Awesome job! You guys are so resourceful. I love it!
Barb says
I noticed you have the Mary Kate & Ashley Lamp in your “digging” list… I’ve seen something very very similar at TJMaxx. The lampshade is more cream colored and the base is more green-blue. I think it was about 30 dollars. Maybe you can find it at your local TJMaxx too. I swear every TJMaxx I have gone into (2 in Des Moines and 1 in Chicago) in the last month had 2 or 3 of them.
YoungHouseLove says
Thanks for the tip, Barb – aren’t places like TJMaxx and HomeGoods so great for lamps?
xo,
s
Laura B. says
This is wonderful! I bet the hole from the doorknob will come in handy for hiding away wires :).
Jessica @ How Sweet says
I just love that wall decor! So cute and fresh.
Audrey says
I have to say, I’m surprised at how well the final product looks! Great job, John!
Katrina says
I had a friend who turned an old door into a desk back in college, but his was propped up on cinder blocks and had framing in the door wood, so it wasn’t exactly a smooth surface to work on. I did always like the idea though, so it’s nice to see it done right.
My fiance and I tackled a similar ‘where does the desk go?’ problem when we were discussing how to arrange a hobby room in our new house. The room had to accomodate all his music gear (two keyboards and guitar speakers/amps, and four guitars) as well as a table surface for me to work at and an old card catalog containing my scrapbooking supplies. The closet in this bedroom was extra deep with built in drawers and two sets of shelves (that originally had bifold doors on them), but the closet had huge heavey doors that weren’t tracked at the bottom and we knew would be hard to work around if we actually stored stuff in the closet. So we decided first thing to take the doors off. Once they were off, we realized an old rectangular table I had fit perfectly into the corner of the closet, under one set of shelves. And voila! An out of the way desk that can even be hidden with curtains (when we get around to pikcing them out and hanging them…) We haven’t added anything to the walls yet, but we’re glad to have the floor plan figured out and things gravitating towards their eventual resting places.
Agent Scully says
Great job! I’ve been searching for the perfect desk for over 3 years now and, hand to god, no one makes simple desks anymore: one drawer, one cubby for internet gear with plain legs and no fancy edging. Is that too much to ask? I guess so because I haven’t found it yet. This project is seriously pushing me towards a DIY desk.
Blair R says
Love it!
SSB says
I’m so impressed!
Brittany says
Love the office design! I’m laying out my home office the exact same way since we need that room for a guest bedroom as well. I have two half windows in your “Zone 1” that I’m removing for a french door to our backyard. I’ll get to it eventually once we’re done redoing the upstairs that we had to gut down to the studs for re-wiring and insulating. I’ll have to look into what we have left for doors when we’re done. I’m already planning on taking the crystal doorknobs and making them into wall mounted curtain tie-backs for the french door curtains.
Holly West says
I love how this project turned out and I so love that you recycled that door. So John, does this mean you’re officially done with your other job or do you have to go back for awhile after your papa-leave is over? Either way I’m so glad you both get to be work-from-home parents.
YoungHouseLove says
Hey Holly West,
I’m officially a full time daddy/blogger. Here’s that post for ya: https://www.younghouselove.com/when-we-grow-up/
Woohooo!
-John
Jacquelyn says
Wow! That desk is so impressive! You two are always inspiring me to take a creative fling at working on the aesthetic quality of my house!
Lauren says
This is so funny that you mention you had an extra door sitting in your garage, bc we bought our new home back in January that had an old door left in it too. I totally want to try this out as I always wanted to create a space for both our desktop computer, but for my sewing machine and crafting station as well. So I need the long and skinny type workspace too. And with the leftover wood cut off of the door, I think I might be able to incorporate the corner desk I have wanted or maybe a matching shelf! An idea we had thought of for the legs are those really heavy duty spindles that are used for banisters. We’re in the process of re-doing our kitchen and one side of our new granite, eat-in buffet will have one of those spindle legs bc I can’t get enough of that ‘Pottery Barn look’. Thanks for the door tip, I can’t wait to get started on ours! Keep the ideas coming!
Jill Stigs says
EXCELLENT work John…….you are definately getting some mad carpentry skills! Gotta love how a custom made piece works so well for you.
I used a piece of plywood (stained to match my pub table), 4 pretty brackets and a piece of molding to finish off the front to make a custom desk for my kitchen nook. It’s the area that is under my upstairs neighbor’s stairs. This pic is quite dark, but you get the idea.
http://www.flickr.com/photos/29996837@N08/4020440816/
CarMaj says
Wow! I am so impressed!! Love that the door knob hole can be used to run wires too – awesome job!!
Totally unrelated question here, but where did you find those adorable weekly onesies that Clara is sporting?! They are too cute!!
Lauren says
Great job! The desk looks so professionally built!
But I’m confused…will y’all keep the desk area in the den? Or combine that workspace into the new guestroom/office?
YoungHouseLove says
Lauren- We actually are planning to keep that desk area in the den. It’s a great spot to write letters and even to sit down with the laptop on the weekend to look up a movie or read a few favorite blogs (that area will come in handy for more casual computer use as opposed to the real hours that we’ll put in slaving away in the office across the house during the week). We also think that down the line it’ll be a great drawing desk for Clara (and eventually a handy homework spot as well). And since it’s right in the common area where we hang out it’ll be nice to have her so close to the kitchen, dining area, den, and sunroom (instead of tucked back into the more private area of the house away from us as we prepare dinner or decompress on the sofa).
Kate- We love Ana’s blog! We’ve actually featured her over here on YHL (she did a little guest post about building shelves). So much fun!
CarMaj- It’s actually just photoshop! We just invested in a white onesie (which we’ll keep her in for each photo) and then we add the week after we snap the picture on the ol’ computer.
xo,
s
Kate H. says
Your “doortable” is great looking. We have used doors for outdoor tables quite a bit. . you can buy leg packages that collapse for storage. Thought you may enjoy this blog. . . she’s a DIYer and makes it look easy! http://www.knock-offwood.com Thanks for all the wonderful ideas you share!
Heather says
That’s an amazing idea! I’m looking for an odd shaped desk also and am now considering making my own.
Thanks for the inspiration.
Cristina says
You know what I love about you making a desk out of a door? The fact that you can use the hole for the door knob as a place for all the cords to go. It’s genius! LOL!
Carrie says
Love it! So clever. I’m a fairly new reader and maybe you’ve covered this, but the flowers on the wall…where, what, how? :)
YoungHouseLove says
Hey Carrie,
Here’s that link for ya: https://www.younghouselove.com/push-it-push-it-real-goo/
Love them!
xo,
s
Christa says
John I’m so thrilled to watch you morph into a burgeoning woodsman! I can’t wait to watch you knock out some walls and tackle some built ins, etc.
heather s. says
Great job! I have an old hollow door that I bring out every time I entertain since it provides enough seating for 8 people (vs. my four person round dining table). Just plop it on top of a smaller table and you’re good to go!
Danielle says
Just a quick question: I wonder about the weight restrictions on a hollow-core door. I have a spare in our house, and want to use it as a sewing table, but fear the weight of the sewing machine will be too much for it. Do you have any information on how much weight the hollow-core doors can handle?
Carolann says
The desk looks great! John, is there anything supporting the middle of the desk, and if not, is the center fairly sturdy/solid? I know you and Sherry are using it primarily for writing, but could it handle being more of a project desk without a center support/leg? I’m exploring my options at the moment and don’t like the look of a middle leg, but I’ve noticed them often being used on long desks. Thanks for your help!
YoungHouseLove says
Carolann: The desk is totally strong enough through the middle for projects. The door itself was pretty sturdy, but the addition of the rails around the perimeter really made the whole desk very solid. It might’ve needed a middle leg had we not added those but (since we didn’t like the look of a middle leg either) we’re thrilled that the support rails did the trick.
Danielle: I don’t have any specific info on weight limits, but we were pleasantly surprised at how solid the hollow-core door was – especially around the edges where it has its own support frame inside. If your door is much wider than ours you might need some extra support in the middle of the door, but as long as you place the sewing machine on either end of the desktop our guess is that you’ll be just fine.
Hope that helps!
-John
DemMom says
I have been looking for a simple, big, useful desk for months. Maybe something like this is the solution! Now, just have to get someone over here who knows how to wield a power tool!
Heather says
Ohhh… what is that delicious paint color?!
YoungHouseLove says
It’s Glidden’s Sand White. The perfect neutral! We keep staring at the blank wall while we’re at our desk and admiring it. Hehe.
xo,
s
Erin says
Not sure if this is the right place for the comment – but I have a suggestion for your sleeper sofa.
We have a small 2nd BR (9 x 11) that serves as our office and guest room. We purchased an armless sleeper sofa – it is armless because it is supposed to be part of a sectional (which helped us get a good deal on it because people often don’t purchase the abandoned middles of sectionals!). Armless also saves space!
But then we donated the crappy mattress that comes with all sleeper sofas and purchased this: http://www.airdream.net/
This was 5 years ago, and we LOVE it! We average 1 guest per month and they love it too. It is a couple inches of mattress and then a couple inches of air. It is the only way to sleep comfortably on a fold-out sofa in our opinion and it was worth every penny (though it really isn’t that expensive).
Can’t wait to see your finished office/guest room!
YoungHouseLove says
Hey Erin,
Thanks for the suggestion! We actually already snagged a sleeper sofa that we love! Here’s that post for ya: https://www.younghouselove.com/office-progress-sleeping-with-space-to-spare/
xo,
s
Kate says
The door desk is fantastic. I love finding new uses for stuff and John, your carpentry skills have taken off!
I didn’t want to put my writing work space in the same area I was doing my furniture refinishing but someday I hope to have a small office area in our third floor loft…someday.
Sarah @ The Ugly Duckling House says
I too like the flowers on the wall. My tiny guest bath has no window, and adding something delicate like that will make it feel more light and airy. Thanks for the inspiration!
Jennifer says
My dad used an old door as the computer table in the basement when I was growing up. The door came from an office building that was closing, so it was pretty nice, and BIG. He also pulled the cords through the doorknob hole. He didn’t refinish it or add legs though – he just rested it on some filing cabinets. Yours look a LOT nicer!!
Vonda says
It’s coming together nicely (shocker) and I’m looking forward to more posts on the space!! BTW, I got excited for a minute that you might be getting rid of your West Elm workspace on C’list, but alas, I see that you’re keeping it in the den!
YoungHouseLove says
Yup, we love that little corner in the den for writing letters and leisurely laptop use on the weekend. Plus we can just picture Clara drawing and doing homework there in a few years so we couldn’t bear to part with that desk!
xo,
s