When Jennifer sent us her almost unrecognizable kitchen before and after pictures we had to share the goods. Here’s her letter:
I‘m so excited about my kitchen transformation that I had to send it your way since so much of it was inspired by YHL! Two of my favorite features in my new space (under cabinet spice shelf and sliding barn door) were inspired by this transformation that you guys featured on your blog a few months back. You can see my entire transformation with before/after pics here and the day by day process here. I’m so glad we were able to take the room from a neon green mess (yes, I painted it that color… it looked so much better in my head) to a serene and welcoming space that’s truly functional and easy on the eyes. My favorite things are the garden window in the kitchen where all of my herbs are flourishing instead of dying in the Illinois winter, and the spice shelf which was inspired by the kitchen you posted a few months ago! Anyway, thanks so much for helping me realize my dream kitchen, I don’t think I’d have 1/2 of the fun little features if it wasn’t for your blog and the amazing makeovers you share! – Jennifer
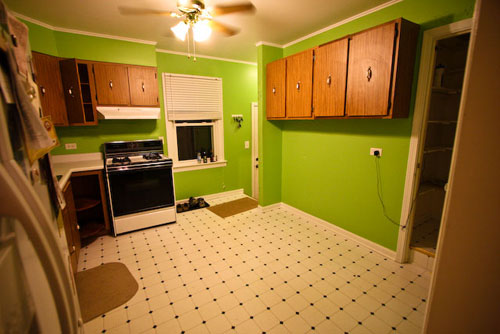
Here’s Jennifer’s bold green kitchen before:
And here’s her fresh and inviting space after the big makeover:
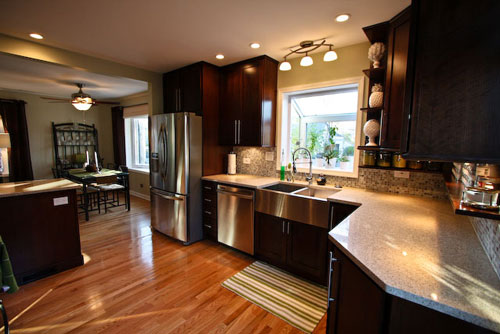
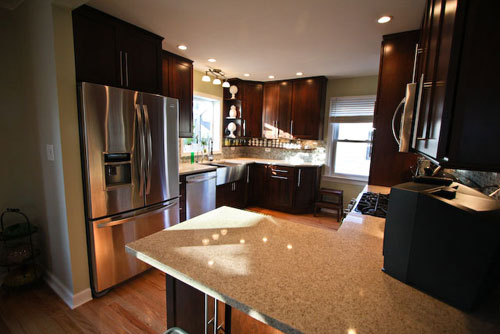
Pretty dramatic, huh? Here’s Jennifer’s list of sources:
- Cabinets: Bertch Cherry Wood, Brindle Stain
- Countertops: Quartz in Ivory Coast
- Appliances: Sears Kenmore Elite
- Hardwood Floors: Bruce Hardwood Floors
- Sink: Farmhouse Stainless Steel Undermount Kitchen Sink
- Faucet: Vigo Modern Pull-out Spiral Kitchen Mixer
- Instant Hot Water Faucet: Quick & Hot Water Tank and Chrome Faucet Combo
- Rug: Dash & Albert in Lighthouse Sprout/White Indoor/Outdoor
- Light Fixture: Bellamy Antique Pewter Semi-Flush Ceiling Light
Can you believe it’s the same room? We love that Jennifer wasn’t deterred by her initial lime green wall choice and still headed into the renovation with confidence and enthusiasm. So many people just get frozen with decision-making fear. And the fact that she took inspiration from other kitchens that she loved shows how easy it is to pinpoint your style and personalize your space to get “un-stuck” if that ever happens to you. Just flip through design mags or books at Barnes & Noble and google around for the perfect starting point! We also love that she trolled the web to find steals and deals on fixtures like the faucet that she snagged on Overstock. So thanks so much for sending the gorgeous photos our way Jennifer. We love everything from the ceiling-height cabinets and the mosaic backsplash to that built-in spice shelf and those gleaming silestone counters. Yum. What about you guys? Got any favorite parts?

E @ Oh! Apostrophe says
Wow! Awesome job! I love the floors! I’m heading to your blog to see how you did it all :)
Jessica @ How Sweet says
OHmigosh I LOVE it. That is like my dream kitchen!!
Monica says
Favorite parts?? The WHOLE thing!!! Great job and thanks for sharing.
Diane says
I love it all! Are you SURE that’s the same room? :) The farmhouse sink is especially cool!
Natalie says
That is an amazing transformation! Does she have a blog? I’d love to see more pics!
YoungHouseLove says
Natalie- Yup, we actually linked over to her blog in the post (we always link to the blogs of our amazing Reader Redesign submitters). Hope it helps!
Linda- Here’s hoping Jennifer stops in with that info for you soon! Stay tuned…
xo,
s
Linda says
Beautiful! Your kitchen is my new dream kitchen! Would you mind sharing info about the backsplash? :)
Amanda says
Can’t believe it’s the same space! It looks completely different. What a fantastic reno- I absolutely love it.
Elise says
I absolutely love that built in spice rack. I love to cook and have always wanted a neat way to display my spices but (sadly) I’m a renter and don’t want to build a rack into my cabinets. Sherry, do you have any other neat suggestions for displaying spices that are feasible for renters? Thanks so much!
YoungHouseLove says
Hey Elise,
Hmm, Ikea sells great little magnetic strips for cute spice containers that can be hung against your backsplash (or even magnetically secured to your fridge) so your spices are all out in the open and in reach without any major construction. Otherwise there are always those countertop spice racks or this funny little spice storage solution that we whipped up: https://www.younghouselove.com/hot-box/
Hope it helps!
xo,
s
Becky @ TheCodyHouse says
I LOVE this kitchen! It is hard to believe it is the same room! Gorgeous!!
Kathy says
This is great and I’m so glad you posted it. Our kitchen is currently gutted nearly to the studs but we are struggling with the motivation to make some final decisions and MOVE ON! Hopefully this post will help us and give us a little kick to keep going!! I can’t wait to be able to send you our own before and after shots. :)
Heather @ VintageSoulsPhotography says
This is amazing!!!!! What a beautiful kitchen! I am in LOVE!
Heather says
I really like the backsplash and ooooooh that fridge!! Do you know what color she used on the walls?
YoungHouseLove says
Hey Heather,
Here’s hoping Jennifer stops in with that info soon. Stay tuned…
xo,
s
Eric says
Wow – What a great transformation – quite inspirational!
Kate says
Wow! What a great transformation! The whole thing look great, it doesn’t even look like the same space!
susan says
that is so far beyond amazing that i am practically speechless. wow! who wouldn’t want a kitchen like that?!?
Gord says
Jennifer, our kitchen reno was featured on here so I know ho much fun it is to check in and see what people are saying. FANTASTIC JOB! Absolutely stunning. I’m sure you’ll love this space. Isn’t a new kitchen great?
Sarah says
Beautiful! I go back and forth on dark cabinets with light counters and light cabinets with dark counters. If we go with dark cabinets and light counters, I WANT THIS! Just perfect.
Sarah says
Oh, and is that a white pineapple I see on the shelf by the sink??? I have been looking everywhere for one to put on our entry way table. Where did you find it?!
YoungHouseLove says
Hey Sarah,
Here’s hoping Jennifer stops in with that info soon. In the meantime we’ve seen them at places like TJ Maxx and Marshall’s and Home Goods quite often. Hope it helps!
xo,
s
Amanda says
I’m usually not a fan of those garden windows but it looks GREAT in her kitchen! Great job!
Briel K. says
Whoa. Great job! Looks gorgeous! I love the openness and the farmhouse sink.
Jen Caputo says
Linda – the backsplash was a BARGAIN! We got the tiles at Home Depot for $5 sq/ft. To do the whole room probably only cost about $200.
Natalie – Sherry linked my blog above but here it is again:
http://jencaputo.typepad.com
Heather – I CANNOT remember the color and the contractor kept my paint swatch… it was Benjamin Moore though, that’s all I remember…. Sorry :( I’ll see if I can find the formulas on the cans.
Sarah – Sherry is correct, i found the pineapples at Homegoods. Last time I was there they still had a few!
Anna S. says
My favorite is the spice rack in the open and the change in lighting. Great job on your remodel! It inspires me to begin our major kitchen remodel that will be happening sometime this year… after I collect enough ideas and know more what I want. :o) wink wink.
Ann says
Can you post the “how-to” on Jennifer’s spice rack? I love it.
YoungHouseLove says
Hey Ann,
Unfortunately Jennifer can stop in with info but we have no way of posting a how-to on her project! Perhaps you can just buy some floating shelves from a place like Ikea (they have nice chunky white ones) and install them for a similar look? Hope it helps!
xo,
s
Amanda V says
Wow Thanks so much Jennifer for sending this in!! What a great transformation!
I have been trying to figure out what I wanted to do with our dark wood cabinets in our kitchen with cream laminate countertops…paint them white…then I’d have to paint the trim of all my windows and chair rail…too much! But this color scheme is brilliant and looks incredible! I am now leaning towards sanding the cabinets down a little and giving them a fresh coat of this dark stain! Will probably keep the countertops for now until I figure out what to replace them with.
Great post J&S!!
Linda says
Jen: Thanks for the response! Do the Home Depot tiles have a name? I’ve been looking for ones exactly like yours for our kitchen!
Jen Caputo says
Linda – they were some very generic thing, they were just in a box in the tile section (I actually saw them at 3 different Home Depots so you might just try looking) I don’t even think there was a brand name on them, they were just wrapped in plastic in a box….
Ann – this post has some info on the spice rack with pictures of how he put it up that might help:
http://jencaputo.typepad.com/jen_caputo/2009/10/kitchen-renovation-day-17-18.html
YoungHouseLove says
Thanks for all the info Jen! We’re so glad everyone’s loving your kitchen as much as we are.
xo,
s
Tamara says
Favourite part: removing the wall to open the whole space up, it works incredibly well and makes it so inviting.
Side note: Her craft room from her blog post is spectacular.
Kelly says
the after is beautiful, but i have to admit, i’d kinda miss the lime =) *hides*
Ashley says
That is absolutely amazing! I just copied and pasted your picture into my own inspiration file! ;)
Suz says
i’m in love with this renovation. I can’t wait for the day for a kitchen reno in my home.
Laura@JourneyChic says
What a gorgeous transformation! That green “before” is definitely shocking – but bold! The new space looks so sophisticated and comfortable. Great job!
Shelley @ Green Eggs & Hamlet says
Holy moley – that’s a dream kitchen! I love the color palette and how open it is. Great job, Jen!
cassie says
Beautiful transformation! I love that you went for things 100%…it makes the kitchen so bold and jaw-dropping.
Thanks for posting! I’m in the middle of a kitchen remodel, so it’s inspiring to see what can come out of it!
mary says
The hardware on the cabinets is so weird — handles in the middle of the doors??
Christin says
OH MY GOSH!!! That is GORGEOUS! I absolutely LOVE the spice rack shelving and the small shelves along the side of the cabinets by the window. I’m a fan of garden windows too. The colors are amazing; so rich yet inviting. Unbelieveable! Inspirational! When I get a chance to redo my kitchen, this will be one of the pics I use to draw inspiration and ideas from! Thanks and great job!
Cindy says
Hang on, I have to pick my jaw off the floor! AMAZING! TOTALLY in love with all of it! Then I got on her blog and learned all about the transformation. She loves green and that is my fav color too. She papercrafts and so do I. Kindred spirits of design world. Thanks for sharing!
Stephie says
Oh my, it’s wonderful! I work at THD and one of my designers’ customers is doing her kitchen sooo similar to that! It looks absolutely amazing, fantastic job Jen!
Irene R says
WOW!
Amy says
WOW! My dream kitchen!
Meg says
Wow, that does not even look like the same room!!!
anna see says
Beautiful! I am dazzled by this transformation. Way to have the vision to make this happen. The gleaming counters are my fave.
Leigh says
This is definitely going in the inspiration folder! I love this kitchen and that craft room! Oh my goodness, love it!!!
Dan says
Dramatic transformation. Very cool. If I may pry, what did this transformation cost with everything included (appliances, etc…)? I can’t imagine it was on the cheap except your tile find.
Katrina says
GORG!! Wow I can’t belieave its the same kitchen, it turned out fantastic
Jen Caputo says
Dan,
you are right, it wasn’t cheap although it could have cost a lot more. We did a ton of negotiating with our contractor and bought everything ourselves (as purchasing through him would have been twice the cost).
We didn’t skimp on anything from the new bay and garden windows (plus all of the other windows in the living room were switched out), the removal of the popcorn ceilings, a new closet for my craft room, hardwood floors, cherry cabinets, quartz countertops, kenmore elite appliances, etc. We basically got 3 rooms remodeled over 30 days for under $40K out the door.
It’s a lot of money but I think we got a great deal considering all of the extras we got thrown in and that the room was literally stripped down to the studs (we even got a new subfloor).
Jennifer S. says
Nice job! I like that you tore down the wall. I also like all your new windows. Nice blog, Jen, btw.
julie says
jaw-dropping gorgeous!!!!!!!
Roeshel says
Wow. Awesome! I love seeing beautiful kitchen transformations – it’s inspiring and gives me hope that our ugly one will look fabulous one day!
Great job Jennifer!
Laurie Blaswich says
You and your husband are so cute1 OMG your kitchen is
stunning, stunning, stunning!! I am new to blogging, it’s so much fun. Stop and visit me sometime.
Dan says
Thanks Jen for the reply! Money well spent. Must make you smile every time you enter upon the rooms. Visually stunning.