We’re back with our weekly basement update (here’s where we left off) and this week we painted the dingy built-in cabinet, added some art, obscured the semi-sheer doors to our armoires and brought in a bevy of bins to organize everything we have on hand (and everything we’re sure we’ll acquire down the line- now there’s lots of room to grow). Here’s just a taste of the latest updates:
But before we get to all the dirty details we owe a huuuuuge thank you to the wonderful peeps at True Value who made a lot of this week’s undertakings possible thanks to their generous gift card (which we’ve been using left and right these days). True Value was the source of the paint for the built-in and a slew of storage bins that we picked up to maximize both armoires and the space under the little Ikea table that we already owned near the door. Our basement never looked so good. Seriously the spiders who used to live down there wouldn’t even recognize the place. Thanks True Value!

But back to this week’s latest projects. First we grabbed some crisp white semi-gloss paint to clean up the built-in wall cabinet that we inherited with the house (we have big plans for what we’ll store there so stay tuned). Here’s what we started with, just to refresh your memory:
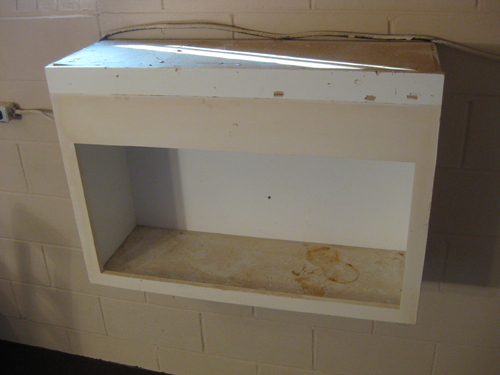
And here’s how it looks with a few coats of white paint. It honestly looks as new as our recently purchased Ikea desk to the left of it. Yay paint!
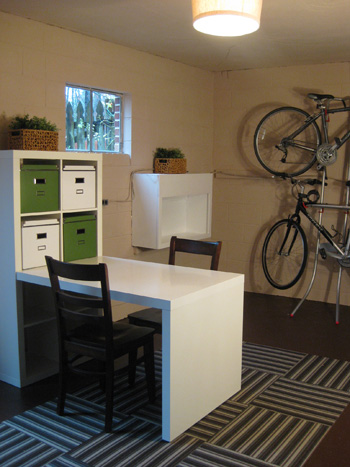
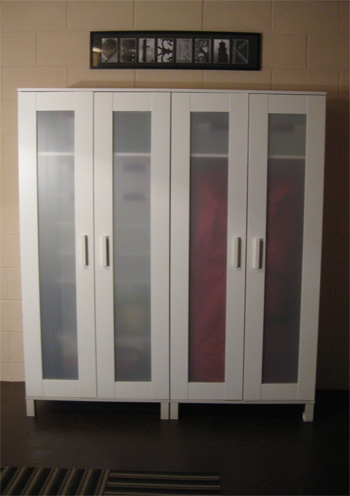
You also may have noticed that we dealt with the semi-sheer panels on the two wardrobes we recently picked up. See, after we filled one with our giant Christmas tree bag and added a few bins up top…

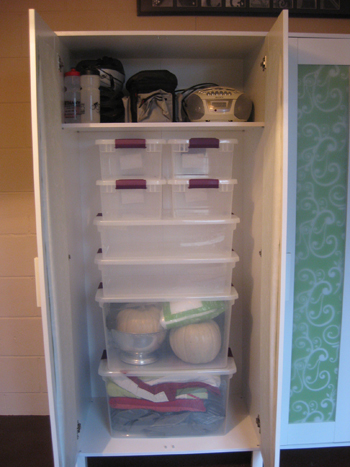
… and used the other armoire to house eight variously sized bins (only two of which we’ve filled- so we still have a lot of available real estate)…
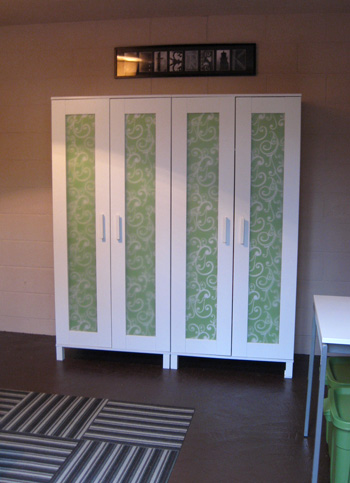
… we were left with colors coming through the fronts of the doors, which looked a bit chaotic and unbalanced thanks mostly to the big red tree bag on the right.
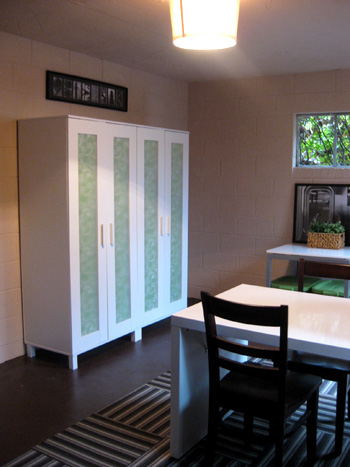
So we snagged two rolls of green and white wrapping paper from Target and cut them each down the middle of the roll to create four nearly perfectly sized panels of paper that we trimmed down a bit more and double-stick-taped to the inside of each door.
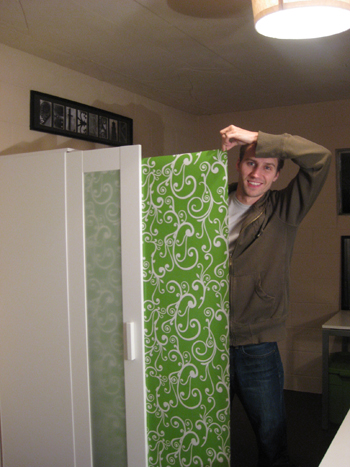
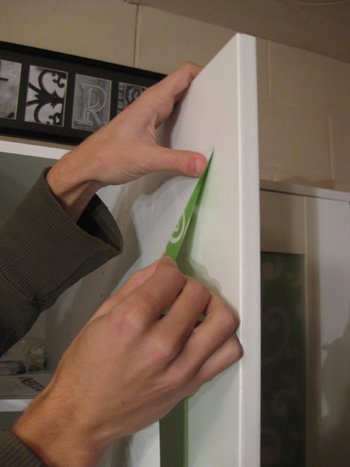
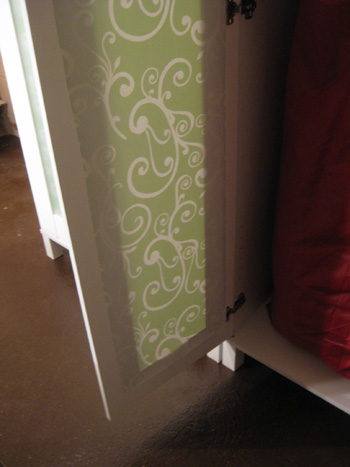
Presto, fun color and pattern that comes right through the semi-sheer door panes and adds some textured interest to the entire room. And the total project cost was just $6 (with some paper left over to wrap a few presents). Can’t beat that with a stick.
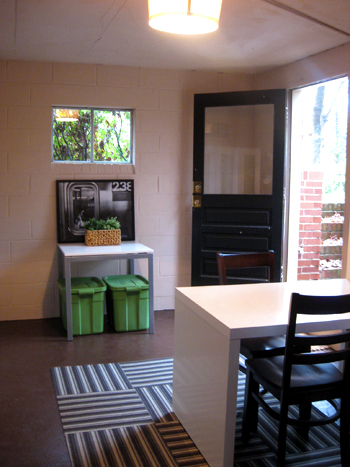
And you might notice the art hanging above the armoire (along with the large black and white framed print leaning above the table near the window). Well, the print near the window was one that we already had laying around – and it was as if it was meant for the basement (the black frame and moody art looks great with the black stripes in our rug). And the long framed piece above the armoire was actually a recent groomsman gift for John (it’s our last name spelled out in photographs of objects that resemble letters) and it also worked perfectly with the newly spruced basement color scheme.
But how did we hang the print above the armoire when our cinder block walls are so famously difficult to screw into (everything we’ve attempted to secure into the wall pulls out seconds later with a puff of dust)? Well, we grabbed some Command Picture Hanging Strips… and they did the trick! They’re super strong sticky strips that act sort of like extra-strength velcro to hold things in place.
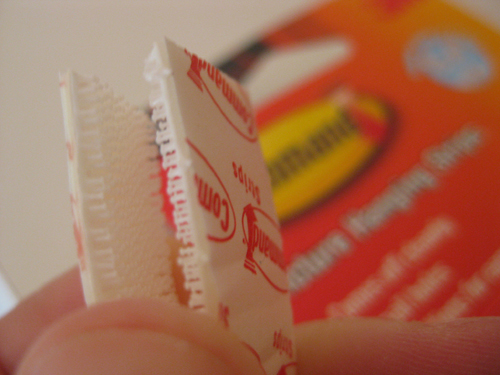
You just remove the protective backing and stick one side to the back of the frame…
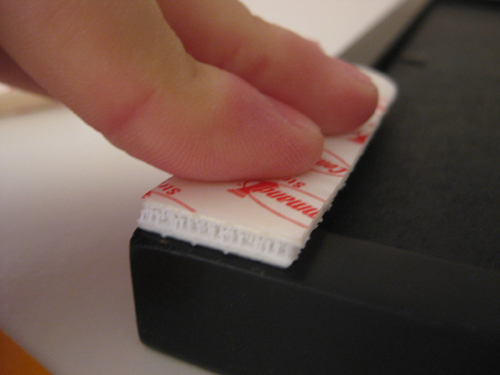
… and remove the other side’s protective backing and stick that side of the strip to the wall. Then you apply some decent pressure to the frame against the wall to get things to stick well for about a minute and then separate the pseudo-velcro strips so the pieces on the wall can “cure” for an hour or two without the weight of the frame pulling down on them. Then it’s time to reattach the velcro-ish pieces on the back of the frame to the two pieces that are then completely secure on the wall. Voila: your art is officially hung in a totally screw-free manner. It was so much less frustrating than fighting with our temperamental cinder block!
And because we visually revealed what we were using the bins in both armoires to store (some Halloween decor, an air mattress, some family quilts, etc) we might as well share what those two green bins under the table by the window are currently housing:
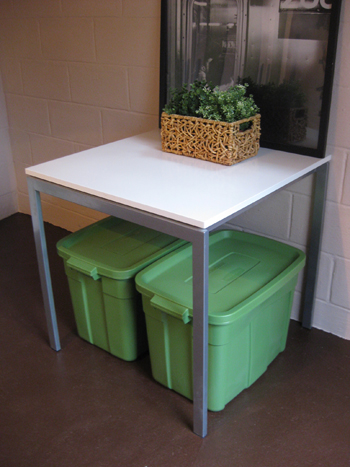
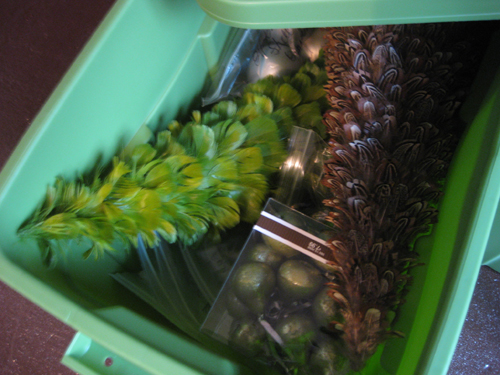
They’re storing all of our Christmas decor, which is super amazing since it used to be strewn about the house in various kitchen cabinets, bins under the bed, and boxes in my closet.
It’s so nice to have everything reunited in those cheerful oversized green bins. This stuff shouldn’t excite us that much but for some strange reason it just rocks our world.
So that’s where we are as of this week. Of course we’re still not finished (we have to add some privacy to those windows, create a screen to hide the ugly water heater and share our fun little storage project for the newly painted built-in cabinet) so stay tuned. And speaking of not being finished, do you guys have any projects that are half done? We’d love to know what you’ve started but have yet to finish. Because we of all people can totally relate to how that feels…
Psst- Want to look back on our big basement makeover from start to almost-finished? Here’s the first post, the second post, the third post, the forth post, and the fifth post. Ah memories.

Chelsea says
Love what you guys have done with the basement! The armoire doors look so good! It must be so nice to enter a storage area and have room to walk plus know where everything is! Yeah for you!!!
kg says
This is really inspiring me to de-ugly a couple of concrete-ridden rooms in my own basement. Everything looks amazing so far (as usual) … keep up the great work!
Rebekah says
Wow, guys! It looks 1000% better… a whole extra room!
Katy says
I found a tv armoire on the side of the road (that someone was throwing out) a few weeks ago, and have been working on it ever since! I have the hardware, the baskets to go in it, but I had to spray it down with bleach to kill potential mildew, wait a few days to make sure it had killed what I thought was mildew, prime it, and in spite of priming am still in need of one more coat after 3-4 coats of Heirloom white! Much longer than I expected, but I’m already in love with it! I am extremely excited that it is almost done and will hopefully be able to share a final product early next week! I love what you’ve done with the storage space – it looks great:)
Karrie says
First, I just have to say that your basement looks Ahhhmazing! I love how you even tied in the color of your storage bins to the rest of the room.
Secondly, I’m so glad that ya’ll tried the Command picture hanging stips. I have toyed with the idea after leaving serious holes in our plaster and cringing simultaneously at both the thought of patching and painting said holes and feeling like the art is then permanently placed (since I don’t want to patch the holes). Also, I believe our fireplace is brick with plaster over it and I’ve been nervous about hanging anything there so the mirror is leaning against it and offers a lovely reflection of our ceiling and top half of a wall.
And thirdly…unfinished projects….SIGH! We (my husband) started demo to our front porch (that was rotted) in August. It’s *almost* ready for paint so maybe the project will be wrapped up in the next month. And that’s just one of the many projects…so many more. SIGH!
Stefani says
Looks amazing! I love seeing the progress down there – you’ve really turned an ugly dirty basement into a room where it feels welcoming and calm and organized. And the wrapping paper idea was great – it looks so pretty!
Cecelia says
GREAT choice of paper for the armoires!
While everyone can see that the green is beautiful, lots of folks would have been afraid to put the curlicue design of the paper with the striped rug.
However, that design adds so much life and dimension to the room, and draws out the varying sizes, colors, and directions of the stripes in the carpet tiles.
I love it!
Cindy says
It’s looking so great down there! Totally love the wrapping paper in the doors. We’re gearing up to completely re-do our basement next year, so I’m tucking and filing all of these ideas away.
Eric says
What a great idea to line the glass doors with. Would this paper be easy to change if you decided to go with a different style?
YoungHouseLove says
Hey Eric,
Yup, so easy. For around $6 anyone could snatch up two more rolls of paper and easily remove the current panels (we hung them with double stick tape). Then it’s time to rehang the new stuff, which only takes about 15 minutes or so. Hope it helps!
xo,
s
Jen Z. says
wow, gotta love what a little wrapping paper can do. Love it. Love how the basement has come together.
We have many half finished projects. Our laundry room, our backyard, the shed, our enclosed 2nd floor deck (I have lots of great ideas for the room, just have to find the money,lol). So many projects so little time and money. ;-)
Lauren M. says
The basement looks awesome. I really can’t believe what you’ve been able to do.
As for unfinished projects, we had to take down 4 layers of wallpaper from our dining room (we just moved in our first house too!), then spackle all the areas that needed it and instead of spackling the whole wall, we’ve decided that the guy who charges $8/sheet to hang it will take over for us.
LauraC says
I LOVE the wrapping paper – designs and color!!! The opaque doors mute the green to a lovely shade. And I have a thing for curly-qs. So pretty. I’m glad you got to “reunite” all your Christmas stuff. It would drive me bonkers not to have it all together, but that’s just one of my quirks. :=) Great, great job down there guys!
Vicki says
I think the basement looks GREAT and wish the one from the house we just sold could have looked so great! Here’s what I’m wondering – where’s all your STUFF? I’m thinking about what we have stored and am really feeling like a pack rat. We’ve got old records and 8-tracks that my hubby won’t part with and random “art” (mostly posters) and books from my graduate study and CD’s and other books and boxes of random “stuff” in addition to those things you mentioned storing. I guess we also have a bunch of “baby” items and clothes that our 18 mo old has outgrown. Maybe someday we can part with some of it…
YoungHouseLove says
Hey Vicki,
We’re pretty much minimalists by nature (here’s an old post all about that) but we also have a ton of storage secrets in our house (namely a ton of ottomans in every room that house everything from CDs to bills and more). Here’s that post. Hope it helps!
xo,
s
misty says
Totally amazing Basement Redo! Love it!
We are slowly working on painting the kitchen cabinets. It’s a long process since we have alot going on right now. But one wall of cabinets is finished! Also, we painted the stairs to the second floor, but it needs some touch up and a second coat before december! We are on our towns Open House Holiday Tour, so we gotta decorate before then too!
Ana says
Those picture hanging strips are amazing. And I didn’t even follow the directions — I was so excited I put the strips on the wall and on the back of the pictures and then reunited them. Nothing fell. I used them liberally in my old house and will use them in my current one as soon I rip down all the hideous ’70s paneling. The reason that project isn’t farther along is that I’m waiting for the city’s bulk item collection so I don’t have to fill my tiny garage with the stuff. I considered painting it, like you did in your den, but the paneling itself has some damage and cut-outs for things that had no purpose and were removed (like the controls to the old floor furnace).
Emily says
I absolutely love what you are doing with the basement! We need to do something with our “scary” basement, so maybe we will tackle that next year. I have been eyeing those armoires from Ikea ever since you first showed them to us. I was wondering if they could be painted? Well actually stained if that is possible? I would like to make it a storage unit in our dining room but the white will defintely not work. Thanks!
YoungHouseLove says
Hey Emily,
Good question! I actually don’t think those armoires can be sanded down to a wood tone (they’re made of that white particle board stuff so it’s not like it’s solid painted wood that you can strip). But the good news is that Ikea has tons of wood-toned armoires that are still quite a steal compared to the $1000 ones you see in most other places. Hope it helps!
xo,
s
Carly Tanis says
Hi John and Sherry! Everything looks GREAT! We aren’t ready to tackle our basement yet, but im filling up my inspiration binder with your pics :)
I have a question about the adhesive you used. We have a woodburning stove that sits on a brick base attached to a brick wall behind it. Any suggestions on something similar that would work with floating shelves and resist heat? We dont have a mantle and I’m looking for a quick fix before the holidays. (our stockings need SOMEWHERE to hang!)
Last question… any idea where the last name photograph came from? Its such a unique idea!
THANKS!!
Carly
YoungHouseLove says
Hey Carly,
This isn’t an adhesive solution (since most of those aren’t heat resistant) but hardware stores sell these metal clips that go between bricks (recessed a bit into the grout if you will) and can hold an amazing amount of weight so hanging mirrors and heavy picture frames are a breeze. If you can’t find them in the hardware aisle just ask someone who works there if they have those metal clips that can be sandwiched between bricks (sort of pressed into the recessed grout area) to hold things up. Hope it helps!
And as for where the art above the armoire came from, since it was a gift we’re actually not sure, but there are tons on online companies who look like they do something extremely similar (like this one for example: http://www.nameframes.net/?gclid=CKa87_n-o54CFQiA5Qodw1SQrw). Happy hunting!
xo,
s
Jacci says
Lookin’ good, youngsters!
“Oh, so very…
John and Sherry”
XO,
Jacci
travis says
The basement is looking grand, guys!
I have one project in particular that is half done that is just killing me! When we moved into our 1920’s home in June there was carpet on the first floor and boy did it stink! It was not that hit you in the face, horror story, pet fecies smell. It was kind of hidden, however the carpet was ugly and had stains and we wanted to see what the condition of the wood floors underneath were. The stank came up with the carpet! I finished this project by sanding down the beautiful wood floors, giving it a nice stain and finishing it off with three coats of poly.
Unfortunately, however, there is a small room in the back of the house that we think the previous owners used as a smoke room. This room is an addition to the original house and is really intended to be a mud room. The carpet in this area was also nasty and really held onto that cigarette smoke smell. I joked with my wife that this year we were going to smoke our turkey by just leaving it in the smoke room overnight! So I removed the carpet, which was glued down to the pad. The bad didn’t move as it was glued down to the subfloor. By glued, I mean super glue. That thick pasty yellow stuff that never really dries, even after 20 or so years! It took me two hours two litteraly pull up a two foot by four foot swatch. I got so fed up with it that it’s still not done!
I saw the new Dremmel Multi-Max tool that uses oscillating action. They have a demonstration on their website that specifically shows the removal of this type of carpet application, so I’m hoping that I get one for Christmas this year! Any other suggestions on how to remove this type of glued down carpet pad? I would greatly appreciate any hints!
Thanks guys(sorry for the long story)!
YoungHouseLove says
Hey Travis,
Actually we’ve seen that Dremmel tool and it’s totally what we would recommend. Of course you could try manual things like metal scrapers and other products of that nature but since the glue is still so tacky and difficult it might actually be a short cut to go straight for the Dremmel instead of trying a bunch of other approaches that might backfire first. Hope it helps!
xo,
s
Danielle@ Newlywed Paradise says
Looking good! I like that you didn’t do a total redo in the basement and used what you had! I am actually doing something similar as well on a very tight budget! Can’t wait to see it all complete!
Kelly says
Love it!! The green is so fun :)
Kathy says
The basement is looking fantastic and some of the pieces have been such an inspiration to some spaces in my house!
Speaking of half-finished projects…that describes our whole house! We’ve been doing a complete remodel for about 18 months now and at the moment we are left with an empty kitchen (think studs and cruddy drywall only) and an equally empty master bath. But the rest of the house is really progressing and we’re doing decorating here and there to make our kitchen-less house more comfortable in the mean time. :) Can’t wait to share some of the final product with you sometime early in 2010!
Christin says
Love, love, love what you’re doing! I especially love the paper you used and how you put it up in those Ikea closets. Really nice. I can’t get over how organized and out together your basement is! It’s nice to know there are other people out there in the world who love organizing stuff and having things put together as much as I do! :)
Briel K. says
Lookin’ good!
My parents have the same art above their front door that spells out Krystek. :)
Mandy says
Awesome job, as usual! I really love the green and browns down there.
Carly, if John and Sherry don’t know where the alphabet art came from you can check out my friend that does similar work and has an online shop: http://www.alpha26photography.com/
We have a monogram she gave us as a wedding gift, they are really fun! : )
YoungHouseLove says
Hey Mandy,
Thanks so much for sharing that link with Carly!
xo,
s
This Thrifted Life says
Amazing job! It’s really hard to believe that is the same basement you guys showed us a few weeks ago.
Jaimie says
Love the wrapping paper idea!
becca says
i love following this renovation of your basement. i’m such a sucker for organization that i’m kind of drooling over it. and i love the ikea work desk area. definitely eying it for when we finally move and i get a craft area!
Kim says
My office is like this…. we painted and hung the shelves from ikea. the boxes (orange like your green) are put together but empty. and our stuff is sitting in the middle of the room just waiting for organization!!! ahhh!
I LOVE YOUR basement, it is looking great!
Tanna says
Great job on the basement! Love the wrapping paper idea! I have some cabinets in my sons room I want to do that to.
Jacquelin Hicks says
Love your basement! It is so functional… I’m loving the green boxes from Ikea but I fear putting them together after reading your prior blog :) Keep doing what you do. I look forward to your blog everyday!
Erin @ Domestic Adventure says
I am amazed at how you make even the most average oversize green storage containers look fashionable!
Sorry if you’ve already answered this, but what do you envision that you’ll be using the basement workstation for most? Projects? Or would you use it as an office area?
Love the whole transformation!
YoungHouseLove says
Erin- We actually wanted the desk/workstation for added function because we envision ourselves rooting through bins to retrieve things and didn’t want to be crouched on the floor to do it. We also think that waaaaay down the line it would be a cute little place for messy finger painting projects with the kids since virtually everything in the room can be wiped down. Hope it helps!
Julia- We actually asked a number of Ikea employees and there are no extra shelves (or other shelves for other systems) that perfectly fit the Aneboda wardrobes but it would be pretty easy to get wood planks cut to size at the woodcutting area of your local home improvement store to create extra shelves. We opted to stack storage bins for a more flexible arrangement. Hope it helps!
CarMaj- Nope, not bad at all! It sounds perfectly cohesive and open. Good luck girl!
Patti- The super short pile of the basement carpet tiles from Flor make them totally durable. In fact just last week the furnace guy walked right over the rug with wet muddy boots and the carpet still looks perfect! It’s basically as firm and wiry as a broom so dirt just bounces right off of it instead of soaking in. Hope it helps!
2HorseyGirls- It’s like you’re reading our mind! We already picked up frosted window film and plan to apply it asap. You’re right about it letting light in while providing privacy. It was totally the way to go. We actually applied it to our old bathroom window (before we realized no one could see into it from outside and replaced all of our windows) so here’s hoping it goes on as smoothly as last time. Stay tuned…
Jessica- Nope we really never considered drywalling to hide the cinder block walls since we know how transformative a nice coat of paint can be. Plus the room isn’t supposed to be a finished living space, it’s just a souped up storage room so we thought doing things cheaply but still chic-ly was the way to go (and drywalling can be a big expensive project). We actually aren’t really big on covering flaws with drywall and would just rather paint them (like we did for the half-paneled and half-brick walls in our den). We love that we transformed that dark room with about $60 worth of paint and never had big drywalling projects to take on. The effect is still warm and cohesive and surprisingly seamless, even though two walls are painted brick and two walls are painted paneling. Hooray for paint! Hope it helps.
xo,
s
julia says
Looks great – especially the paper in the wardrobe doors!
Question for anyone – is there any way to somehow add more shelves to those armoires? they’d be perfect if they had shelves. I don’t think bins would work for me bc I’d go crazy having to restack them every time I want to grab something out of one of the bottom bins…
Sarah says
I LOVE it! And, I also love that you are showing it in stages. My husband and I recently tackled turning our finished attic (that only housed a washer/dryer and a 1/2 bath decorated from the 80’s)into an office/spare bedroom/laundry center/updated bath. And I wish I had taken pictures along the way instead of just doing a before and {hopefully} after, if we ever get it finished. The space is A LOT bigger than we had thought when it comes to actually furnishing and decorating. But your blog is providing lots of ideas!!! Thank you!
CarMaj says
The basement looks really great! Everything is super organized – what could be better then that!?
Our huge-ish project right now is painting the living room… which also includes the foyer, stairway, hallway, and the den/office (it’s somewhat of an open space so we can’t change up the colors for each area, so yes, everything is going to be the same color throughout – is that bad??)… we’re taking it one wall at a time though, but I know we’re going to love it once it’s complete… cross your fingers that we finish before next Thanksgiving (and that we will never have to do this again!)!!
Patti says
Love the wrapping paper idea … I have the same semi-sheer door panels on a kitchen cabinet and was racking my brain to figure out a cost-friendly way of hiding my ugly stuff in there … and you solved it for me, thanks! Your basement looks so nice but I was wondering, do you think the area rug will hold up ok? If your basement is anything like mine, it gets awfully dirt-y. :)
2horseygirls says
A suggestion for privacy for the windows without losing the light would be window film from Artscape http://www.artscape-inc.com/index.php.
It can be found at Home Depot and is applied just like window tint to car windows.
We took all the heavy sliding doors out of our Depression-era home’s master bedroom and replaced them with French doors. I thought curtains would be too heavy, so we went with this window tint http://www.lighteffects.com/styles.php?id=5 on each individual pane – 40 in all (yes, my sweetie is a saint!).
It provides quite a bit of privacy but still loads of light.
When you go to Artscape, make sure to look under the Retail Locations for more styles, althought the Etched Lace would pick up the pattern in the wrapping paper you used on the armoire :)
LOVE the blog and all the ideas! Keep them coming.
And congrats on your future addition as well :)
Laurie says
Great idea with the wrapping paper! Plus green is my current favorite color :)
For unfinished projects, our ultimate one is our guest bedroom. On my husbands spring break he was kind enough to start stripping wall paper. We thought we were lucky with only 3 layers since the dining room had 5. Then we realized the paint we found under the three layers of wall paper was on top of another 2 layers of wall paper. Boy was it a mess.
We closed the door at that point and did not walk back in for awhile. Our next step will be drywall. I sure hope it works!
Amber @ Two Nuts in a Shell says
I really love the Ikea work top you chose. I find myself debating on whether or not it’s something that would work in our home (because we are BADLY in need of a new desk… well, a whole office really) but I think the modern lines stop me. I’m much more of a curves girl. We’ll see.
I’m stuck on one of my current projects. I’m refinishing an antique chair with one of those oval backs (it’s one of the Louis X’s style). I looked for every tutorial I could find to make the (damaged) cane backing into an upholstered one, but to no avail. The only tutorials I could find were for square backs, which are much easier to remodel! I’m pretty sure I know how I’m going to tackle it though. Right now, we’re just waiting on one more fabric swatch to get here so we can decided what we’re going to do. Currently, a golden pastoral toile is winning!
Fleurzty says
This is absolutely stunning. Great work! I love love love the armoire.
jessica says
This basement remodel is really inspiring! My husband and I are currently in the planning stage of re-doing our basement. Our washer and dryer are done there so its a space we use pretty often but its pretty dreary. We have talked about putting up drywall over our cinder block walls. Did you guys consider doing this at all?
Kasey at Thrifty Little Blog says
It must feel great to step into such a clean and coordinated storage room. I love the pops of green!
Tina says
We gutted our 1958 kitchen yesterday! Great timing, I know. But we have a full kitchen in our basement, which is now also the family room, so we won’t suffer! It’s already looking great & we hope to have it done in 2 weeks!
Joel says
Been following your blog for a while, and I loved what you did with the wrapping papers and the wardrobe doors. Keep up with the great work!
mic @ hishouse;herhelp. blog says
HAHA of course i have unfinished projects! don’t we all? i painted (4) canvases that are hanging above my fireplace. the edges are still bare canvas and really need to painted black or white! by now i dont really notice it but others sure do!
Meredith says
Maybe this is already in the cards, but I would LOVE a little video-tour of the basement once completed; it all looks fantastic in pieces but it’s hard to get a sense of what it would look like standing in the room. So inspiring!
YoungHouseLove says
Hey Meredith,
We definitely have a finished basement tour in the works. We just have a few more projects to take on and then we’re breaking out the video camera! Stay tuned…
xo,
Sherry
Katrina says
I love seeing how you transformed your basement! It’s amazing what your creativity can do! I think I’m going to take alot of your tips and apply them to our garage – so its less spookey and more clean lined
Amanda says
Wow. If any part of my house ever looks as good as your basement does, I will count my lucky stars!
Mrs. Moore says
Wow! This looks amazing. It all looks wonderful and I love even the detail of using wrapping paper to make the armoire look neater from the outside. Great job!
Kim at Yellow Brick Home says
We have a cabinet in our bathroom with the same frosted glass, and I constantly agonize over the fact that you can barely make out the line of our toothbrushes, face wash, etc. This inspires me to tackle the paper lining project! I just needed this push.
Good work!