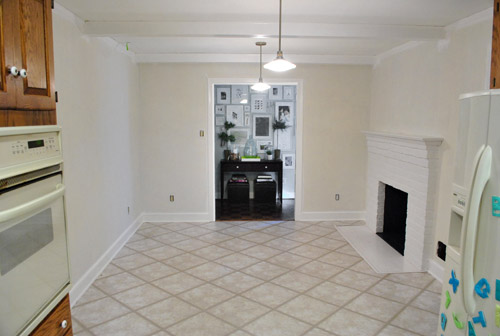
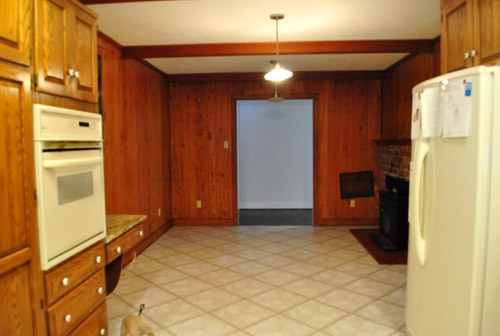
About a week ago (after we painted our brick fireplace) our kitchen looked like this:
Then we removed the desk and upper cabinet (that will be in the way of our big future doorway to the dining room) and after one coat of not-covering-at-all primer it looked like this:

Then we finally got the primer thing right after dealing with maddening bleed-through issues thanks to two days of applying coat after coat and three different types of primer (more on that here):
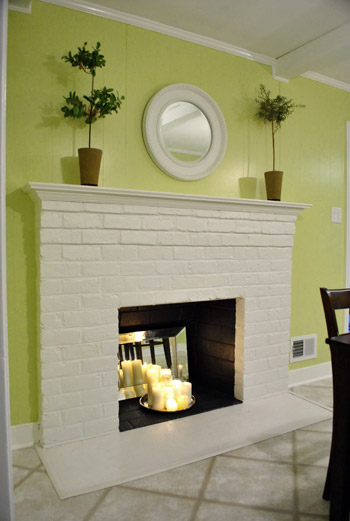
And now it looks like this, although it reads a bit more yellow in these photos than in person (it’s a smidge greener in real life).
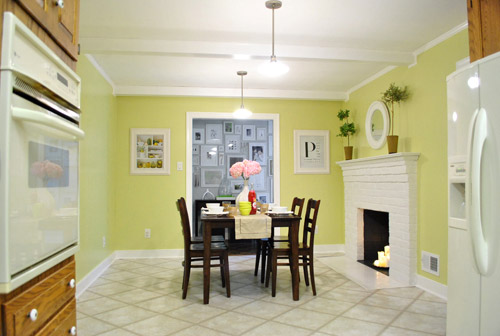
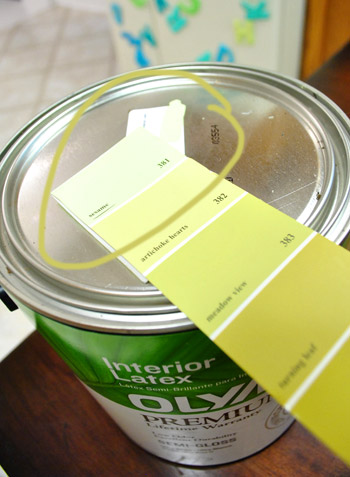
It’s definitely a warm golden green tone (aka: grellow). Sort of like the color of an artichoke heart.
There’s definitely a lot more to do in there, but we’re so glad to have the whole prime-and-paint-the-paneling thing checked off. Here’s a fun little video that encapsulates the entire process in three short minutes. Which is more than a little ironic because it took us just a wee bit longer in real life (you know, just a smidge). Just convert those minutes to days. See it below or here on YouTube.
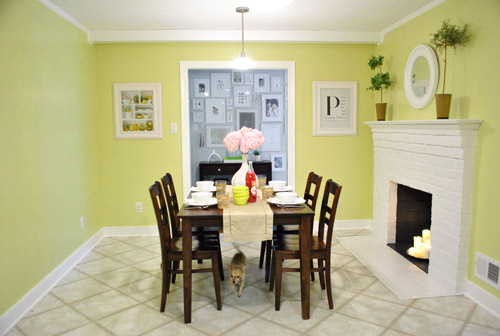
As for the paint color, after a decent amount of debate (and some pretty thorough consideration of the adjoining rooms that will be seen along with the kitchen) we opted for our new favorite color, which turned out to be Sesame 381 by Benjamin Moore (color matched to Olympic No-VOC paint in semi-gloss).
We were inspired by this kitchen (found here via Pinterest) since our cabinets will eventually go white, possibly along with our backsplash.
We chose this warm yellow-green color because we want the kitchen to be bright and happy (there aren’t any windows to the outside world – just one that looks into our sunroom) and it was suuuuuuper dark before we painted that paneling. We also knew the room could take a decent amount of color because:
- it won’t have any big long walls remaining when we add the extra-wide doorway to the dining room across from the fireplace (just slivers of wall here or there will remain, so the color won’t be overwhelming)
- we’ll be painting the cabinets glossy white later in this phase of our little kitchen makeover along with un-busying the backsplash (which will further temper the color on the walls)
- we’ll be adding an island in the place of our too-small table someday (with a different countertop and most likely a non-white base color to keep things interesting and layered)
- this room is surrounded by the dining room, the hallway, and the living room, which all have soft gray walls (so we wanted this space in the middle of them all to have some cheerful color going on)
When it came to our swatch-selecting technique we just hung up a ton of them and looked at them at all times of day to see which one we preferred. As for why we chose this swatch specifically, we decided:
- this golden-green tone will tie into the chartreuse curtain tones in the dining room and the cheerful green tone in our shaggy living room rug without being too matchy-matchy across the board (we didn’t want the exact same tone of green everywhere for fear that it would look a bit too “orchestrated”)
- a warm yellow kitchen is always a classic choice, but this color feels modern and crisp with the green undertones (and it’s not completely terrible with the oak cabinetry, which will stay for a little while)
- this tone is in Sue the Napkin – albeit a bit darker (a sure sign it’ll work with our whole house palette really well)
- unlike some of the other softer greens and greeny-gold tones that we considered, it really makes the white trim pop (lighter swatches didn’t have the same crisp effect next to the fireplace or the trim)
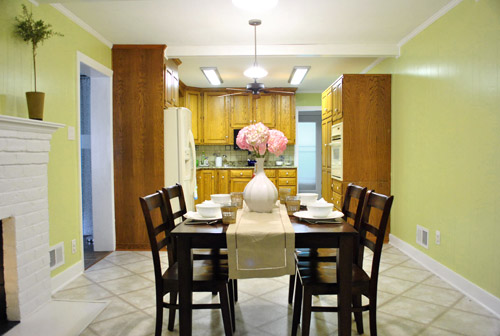
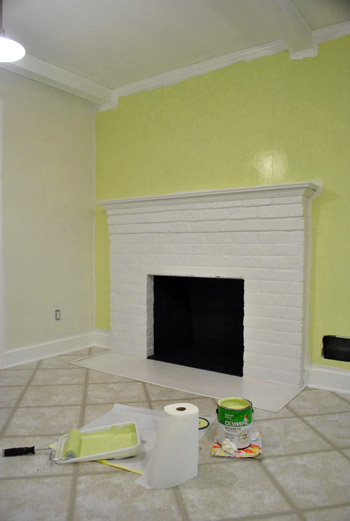
Here’s how it looked with the first coat going up around the fireplace (thanks to all that primer prep– we had really awesome coverage). Again, it’s looking more yellow and less green than it does in person in these photos, but you can really see how the white pops and how it turned a dark and brown-everywhere space into a sunny and bright room in the middle of the house.
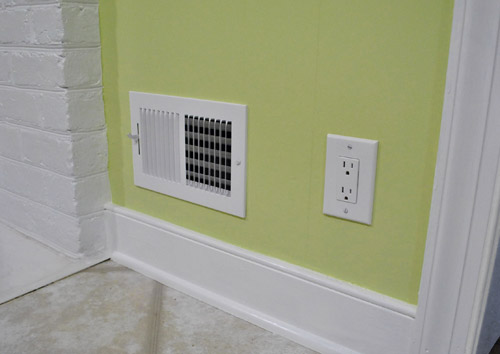
We also decided that it was high time we switched out all of the “bisque” colored vents, outlets, and light switches.

So we grabbed a bunch of crisp white ones from Lowe’s, turned off the power, removed the old ones, connected the new wires the same way they were connected to the previous switches, added the outer switchplates, and turned the power back on. The whole switch swap took about twenty minutes. So much better:
Some people opt to paint their vent covers so they blend in more, but for now we’re happy to leave ours crisp and new since we’re so used to old drippy painted-over covers (clean paint-free ones kind of feel like a luxury). Who knows if we’ll decide to add a few thin and not-drippy coats of paint to blend those vents in later though. We’ll keep you posted.
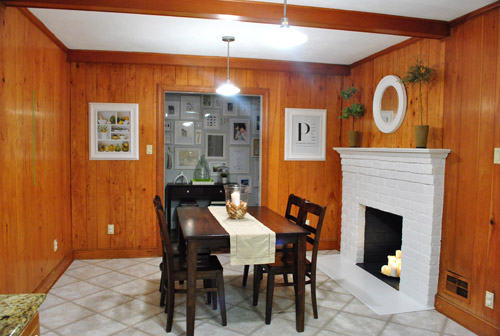
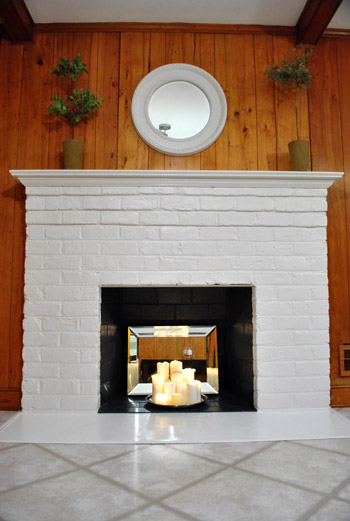
Oh and it’s really fun to go back and look at our fireplace, which originally looked like this:
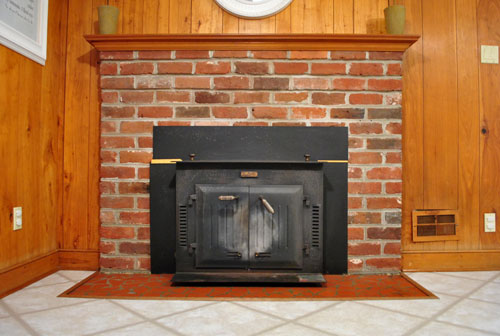

Then we removed the old unused wood stove and painted the brick, and it looked like this:
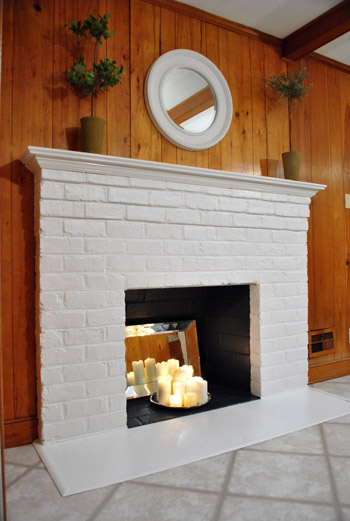
It’s amazing how much painted paneling can freshen things up even more:
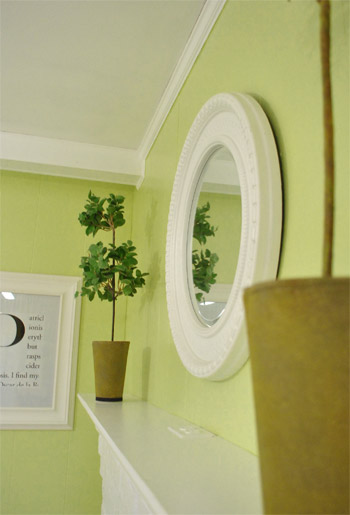
And we love how things like the white frames and the round mirror above the fireplace layer right in with the glossy white trim and beams:
Burger likey (he knows how to work that runway):
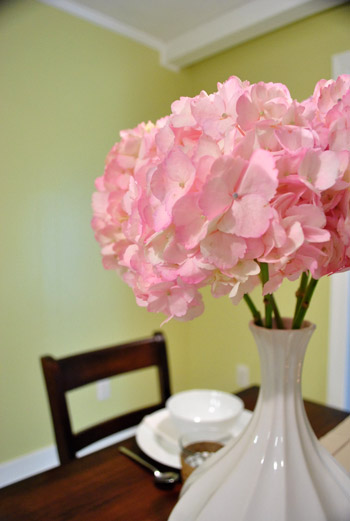
Oh yeah and see those pink hydrangeas? I wish I could say that we grew those, but they’re from the store. We figured to celebrate all that priming and painting we could spring for something soft and sweet, so these little pink snowball-looking-guys had me at hello (that’s an old vase from Target btw):
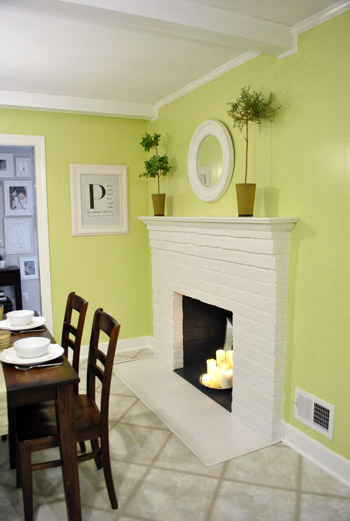
As for the opening to the dining room, here’s where it’ll be (it will line up exactly with the dining room window on the other side for balance):
We learned that we’ll need a permit to knock out so much of that load bearing wall, so it sadly won’t be anything we can do very quickly (and we’ll definitely be leaning on some pros for help). But we can’t wait to tackle it as soon as we can get through all the permit business and hunt down the right expert for the job.
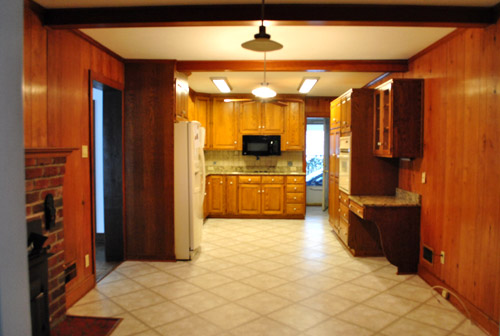
Now for some before & after bid-ness. Just because that’s my favorite part. Here’s the kitchen as it looked on moving day about six months ago:
And here it is now (still can’t wait to add that island, paint those cabinets, and upgrade the floor & appliances someday though):
Moving day again (yes, one of those lights was out):
And now:
The crazy thing is that these photos were taken around the same time of day so it definitely demonstrates how much lighter and more cheerful the space feels now that the dark paneling is a thing of the past. Oh and here’s the budget breakdown:
- Olympic Premium No-VOC primer from Lowe’s: $12
- Behr 2-in-1 Primer + Paint (in semi-gloss white): already owned
- Kilz Clean Start No-VOC Primer from Home Depot: $20
- Olympic No-VOC paint (in Sesame by Benjamin Moore) from Lowe’s: $22
- New vent and outlet covers from Lowe’s: $43
- Brushes/rollers/tape/paint tray: already owned
- Total: $97
So there you have it. The kitchen madness has officially begun. As we mentioned here, we’re definitely going to do this in phases (gotta save our pennies and just take things on as we can afford them). But it should be a whole lot of fun. As in, more fun than a barrel of monkeys. And definitely more fun than priming that paneling five hundred times. Do any of you guys have long term kitchen plans like painting the cabinets or adding an island or upgrading the flooring or making some overhead lighting switches (we’re definitely in need of some of that too)? Oh the possibilities…
Psst- We announced this week’s giveaway winner. Click here to see if it’s you.

Kim @ Life Analytical says
Love it! I’ve been thinking about painting my super dark, north facing, oak cabinet, dried mud walls kitchen in a greeny yellow color like Behr’s Pear. I really like the color you chose though.. I’ll have to swatch test it!
Michelle W. says
Absolutely amazing, youngsters! Your posts really brighten my day after a long day at work. I check your post as soon as I get home. Nice work, it’s stunning!
Barbara says
Ain’t it amazing how paint can transform? While cozy and warm before, it now is fresh, bright and modern. Great choice!
Jen says
Looks good but I can’t wait to see it with different flooring! Too bad that’s gotta wait till stage 2. The vinyl never bothered me before but now your table kind of looks like it’s floating! I definately agree that if you have some sweet hardwood under there it would ground everything way better.
Amanda says
Wow – John & Sherry, you guys did an awesome job! I can’t believe how amazing the transformation is. I love it! Something about having a beautiful kitchen is a wonderful feeling so I bet you guys are thrilled every time you pop in there. Can’t wait to see it after Phase 2 is done!
Linde says
BEST MAKEOVER EVER!!!!!!!!!!!!!!!
Amy says
I absolutely love it.
And I keep laughing at how much your changes mirror my own house! I have had soft gray walls and a darker gray couch for years in the LR. AND my kitchen and dining room are “grellow” with white cabinets in the kitchen! :)
Monika says
Grellow = amazing! Great job guys, it looks phenomenal! :)
Do you guys have any plans for the 4th of July?
YoungHouseLove says
I think we’re going to try to relax with the family and putter around with a few more projects on the ol’ masterlist.
xo,
s
Courtney says
I LOVE it! That was actually the color I was going for in my house, but I’ve learned that things look a LOT greener in Lowes, and in certain places in my house, and a lot yellower in most of my rooms. Our color looks right at night and a little more beige/yellow during the day. :)
C says
Wow! A million, zillion times better! Totally inspiring me to pick up some paint on the long weekend!
Have you ever painted laminate cupboards? That’s what we’re up against…UGH, dreading it!!
YoungHouseLove says
We haven’t- maybe you can google around for tips or a tutorial?
xo,
s
Kerri says
I have! I basically primed with Kilz (just the regular version, not the oil-based), then painted with semi-gloss latex paint – 2 coats. It was really easy and they’ve held up wonderfully.
Christina J says
LOVE IT!!! Can’t wait to see the cabinets painted.
Ashley says
What an amazing difference a little color makes! Great job! I am trying to convince my husband to paint our cabinets white. He’s of the “If it ain’t broke, don’t fix it” mindset, but I think I can convince him what a difference it will make in our kitchen!
Daria says
I love your “new” kitchen. And the main reason is the fact that it validates this color that have also used in our house for the living and the hallway. I have been thinking many times that we should change it to something more neutral, one of the arguments in my mind being “It’s too bright! John and Sherry would not choose such a color for their house!” So now that you ARE using it, it will probably stay with us for longer.
I also think it is interesting that you use a bright color in your kitchen when all the adjacent rooms are painted a neutral grey. I’ve always thought that adjacent rooms should have similar tones, so if one is bright all of them should be.
I have two questions for the two experts that you are, hopefully you can help me:
-our hallway is the same color as your kitchen, and our adjacent kitchen is a warm yellow, which sometimes I find too bright. I was thinking to paint the kitchen a sage green (something a little more neutral than your bedroom). Do you think it would work with the adjacent green-yellow in the hallway?
-we have a dark rusty-red sectional in the living room (an older cousin of your Karl) next to the green-yellow walls. What third color would your use against the rusty red and the green-yellow for pillows and accents? Teal? Orange? Or should I stick to neutrals like brown?
Thank you, guys. I know you are BUSY, so if you don’t have time for me, that’s OK, but I would really appreciate and trust your advice.
PS: My husband has no idea of the extent of my love for blogs like yours. It came in handy though when we redid out full-of-weeds patio this weekend and I showed him your method of leveling sand using PVC pipes.
YoungHouseLove says
The kitchen is right in the middle of everything. Like the eye of the house. So we thought looking through gray rooms to see a sunny greeny-yellow one in the center would be nice. And if you eye keeps going it sees the same soft gray again. So far we love the effect, and of course can’t wait to add that doorway to see how it looks from that POV! As for your questions, I definitely think a sage tone could layer in next to the greeny-yellow in the adjacent hallway. Just bring home swatches to see which ones complement each other best. And layering in some brown or mocha or even some crisp white and tan could look great! Just so it’s not too colorful everywhere you look- unless that’s your thing. In which case, amber or orange might look awesome!
xo,
s
Rachel says
Wow. Just wow. :)
Elle says
Honestly, yellow-green is probably my least favorite color ever, BUT you guys have made it look completely fabulous here. I just had to get out my Benji Moore fandeck and check out Sesame to see it myself. Great color. Hats off to you guys.
Mary @ stylefyles says
That paint color is fantastic and perfect for a kitchen! Once those cabinets go white it will be even MORE amazing.
I seriously can’t wait anymore for you guys to knock out that wall. Seriously, I’ve been pumped to see this ever since you first talked about it (aka: when you moved in). The anticipation is killing me!
Roshni says
AWESOME!! Just awesome!! Love the color!! I might change my mind about my own kitchen color now (I was going for yellow and white)!!
carolinaheartstrings says
Wow what a difference a little pain and a lot of primer can make!! Great choice in color. That is going to really rock some white cabinets!
Sam says
Oh wow! As soon as I saw your painted fireplace this was EXACTLY the colour I pictured for it. It looks amazing and just what I want my kitchen to look like! My living room is actually a really similar colour and I want to continue that into the kitchen, but the cabinets are a really orange-y wood laminate that just wouldn’t look right against it.
I can look at yours and dream though! It looks amazing, can’t wait to see what else you do.
Keep up the awesome work guys!
Megan says
Looks great! I had to laugh at the video cause thats exactly how our painting jobs look – I do the trim work, my husband does the walls.
Megan Brewer says
Congrats! It’s all coming together and looking lovely!
Megan
http://cottagebluedesigns.blogspot.com/2011/06/kids-and-books.html
DanielleR says
LOOOOVE! It’s so bright and cheery and inviting. The color is super, YAY! Great job!
Marlo says
What a fantastic transformation! LOVE IT!
Carol N. says
Wow, just Wow!
This one definitely gets ‘pinned’. While we do have a small window over our sink and a sunroom behind the kitchen, ours is also dark due to the dark oak cabinets and stained trim. I’m going to be working hard on the husband to give up his love of all things stained and go with this to give us a bright new look in the kitchen! Our appliances are all white too and I think that would look great with the white cabinets.
kelly says
can you believe that someone wouldn’t have changed all that dark wood?! i wasnt’ sure if you would leave the beams wood colored or paint them white but it looks so custom white. so why wait to paint the cabinets? just curious. i would want to get in there first!
YoungHouseLove says
We’re not waiting forever- just until our arms aren’t super sore and we don’t feel like gagging when we look at paint brushes. Haha. We’ve learned to just take it slow and go one project at a time so we don’t burn out and hate home improvement!
xo,
s
BrookeReviews says
It looks so much better and very cheery! Great choice for the color, once the cabinets are painted it’ll be fantastic. :)
Janet S says
great job! bright and crisp! love the change!
julie g. says
Unbelievable youngsters- I love it, well worth the blood, sweat and Kilz!
I’m glad you reminded me of the island becuase while I thinking you definitely needed to open the room up I was wondering about visually having too many tables between the kitchen and dining room area.
The island really will be a nice transitional feature linking the whole space together and the fireplace will look so wonderful from the dining room as well.
Also, no one asked my opinion but it looks like you’ll have enough space for a little casual seating area, e.g. two small scale cozy chairs with a table inbetween for enjoying coffee, reading, etc. That’s the one thing I’d love to add to my kitchen. Sometimes you want to be in there where the action is but not sitting at the table or island.
As always, thanks for sharing and enjoy the holiday weekend!
Nikki says
Love this transformation! i live in a teenie tiny little studio with my husband and 2 doxies, and we are trying to make a functional kitchen. we will definitely have to save up for some bigger items and experiment with layout to make it work, but i am excited and inspired by all of your ideas!!
pictures of my “kitchen” at the link
http://nikkithy.blogspot.com/2010/06/bag-of-hammers.html
Laura says
Congrats to you both. This was one of your best posts. I am truly impressed and, as always, inspired by your motivation and creativity. I sympathize that it is a vicious cycle and you immediately feel that you need to do the floors, add the island, etc. Its nice to see you stop and appreciate this transformation as it is. I know you know, but keep the paint handy, as Clara begins to toddle you will find beautiful handprints about 2 ft up around the parimeter in no time. Enjoy!
Kristin H. says
Do you think that people one day truly felt that dark wood paneling really looked good?? Like you think that the John & Sherry of the 70s would have done a blog post (or, ya know, a handwritten journal entry with polaroids) on “how to install beautiful wood panels” and everyone would have told them how amaaaaazing their new and improved kitchen looked?!
Anyway.. To the 2011 John & Sherry.. Looks amazing!! :)
Jackie Centeno says
Love it! It is definitely starting to look like a YHL house now.
Nevin says
It is amazing what a can of paint can do a room! I spend most of my day working in my kitchen – hope enjoy yours more now!
Trisha says
Looks amazing you guys! Although I agree with the other comments… it REALLY makes me want to see those cabinets painted!! They just do not belong now!
LARY says
Simply incredible! :)
Ali says
Looks great! We have a different layout for our kitchen, but we’ve been getting estimates to knock out a wall to open ours up into our family room… for a great room kind of effect. The cabinets will be shifted around to another wall and we’ll put an eat-in island where the wall was. We painted the walls (Olympic’s guacamole) and trim (Behr ultra pure white) and the cabinets white as well, but we’re not DIYers enough to do the big work!
If you don’t mind, be sure to post who you pick to do the wall demo. We’re still new to the area!
YoungHouseLove says
But of course!
xo,
s
Kirsten says
This is my favorite transformation so far in your new home – I can’t wait to see more!
Sadie says
Amazeballs!!
Shannon says
LOVE it! It looks fabulous!!! Great job, you two! Can’t wait to see what’s next!
lara says
love it! makes me ready to paint our paneling, though we might just go the oil base primer route in the interest of time.
Alexa says
Looks GREAT!! Can’t wait to see the cabinets white!
Question – what type or mini roller is John using to paint the beams? I have one that’s too thick and looking for an upgrade. Thanks!
YoungHouseLove says
It’s a small foam roller. I love them to avoid brush strokes and still apply paint nice and thin.
xo,
s
jess says
you guys are awesome! i totally laughed out loud when I watched the video and came to the “missing footage” section. Oh well! I’m a little too scared to paint over my wood paneled kitchen (at least for now), but you certainly inspire me to consider it!
Lauren says
This looks beautiful!! What a fun color choice.
I’ll be you’ll be happy once you paint those cabinets now–the new green and the old oak(?)are quite an interesting pair :) The white cabinets will look so crisp and clean, like the fireplace does!!
Can’t wait to see more kitchen updates!
maria says
it looks so different, so amazing what a little paint can do!! lots of work but worth it :)
and i actually don’t mind the wood color with the new wall color. looks good!
i redid my kitchen last year and have 2 glass front cabinets, and the inside is that ugly fake wood while the cabinet fronts are white and i want to paint it a pop color. i know i have to use oil based primer and latex paint, but do i have to sand since its so shiny? i live in a small studio and would rather not sand, as dust tends to linger.
this is the look i am going for. my walls are that color with white subway tile and black granite
http://pinterest.com/pin/41432054/
thanks
YoungHouseLove says
Maybe you can use a deglosser instead? Don’t want to create dust, but if they’re shiny it might be hard to get a durable result without stripping or deglossing a bit. Maybe ask around at the home improvement store to see what they recommend?
xo,
s
maria says
Thanks for responding!!
My cabinets are actually almost identical to the ones you guys had in your old house (mine are from home depot) and i noticed you painted the inside too, but didn’t give many specifics. did you sand before you painted?
i’ll definitely ask them when i go pick out paint tonight, but you always get such great results, you might know better than a kid who works at lowes, lol :)
YoungHouseLove says
We actually didn’t paint the inside of ours (we replaced the old cabinets that we painted as part of a Phase 2 removation, so the inside of those were white- but the original cabs were only painted on the outside. I don’t think you need to sand inside though- just good primer should do it. And maybe some shelving paper to keep dishes from sticking to the paint.
xo,
s
Susan says
Love it! Someday we plan to completely gut our kitchen–even walls and ceiling and start over. We actually might swap our kitchen with our bathroom. Since we own a two-family home we’re practicing all our DIY skills upstairs and we are hours away from our first tenants. Ack! I have to thank you guys. No way would I have had the confidence to tackle what we did in our rental but for your blog. I just finished painting my first room every by myself and my husband–who is very hard to convince–said, “Wow, now I want you to paint our apartment, too.” Happy Day!
Bailey says
LOVE THIS!!! My H and I just bought our 1st house, and I’ve been a YHL follower for alomost a year. The house was built in 1910, and the last time the kitchen was updated was 30-40 years ago! I’ve been going back and forth between yellow and green for the walls and I’m totally going to copy you! We are going to paint right over the faux brick that is on the wall right now…yeah…it’s pretty U-G-L-Y!
Kim says
I couldn’t wait this morning to read your post but made myself do all the things I needed to do first and enjoyed it while relaxing with lunch (while listening to the kids fight in another room – but at least they weren’t bothering me :)
LOVE LOVE LOVE this paint color! What an incredible kitchen you have now! It already looks like something out of a magazine and you’re not even done! Great job! Rest those arms for the next phase. And wish us luck – we’ll be painting our office this weekend (after 2 years of enclosing it from a screened in porch – yeah, finally to the paint stage!) I’m still trying to find the perfect blue though – how do you guys decide when there are all those choices out there!
YoungHouseLove says
We just hold up a million swatches and sometimes bring home pots of sample paint too. Good luck!
xo,
s
Courtney says
Sad-I don’t see my comment from earlier. Oh well… I am so excited to see that paneling painted! I can’t wait to see what else you do with this room.
YoungHouseLove says
Here it is! We have so many comments today that it’s hard to find stuff, but we read each one. It might help to know that they’re broken into pages, so if you don’t see it, flipping to the next page might help you track it down.
xo,
s
Beth C says
It looks beautiful! Great job!
Brooke says
Looks fantastic!!! Have you ever considered putting in either sky-lights or those sun-tube things (have no idea what the name is)—that funnel sunlight straight down into the room and look almost like a light fixture? Just a thought. Either way, the paint color worked some miracles and it looks so bright and cheery!
YoungHouseLove says
Definitely a possibility down the line!
xo,
s