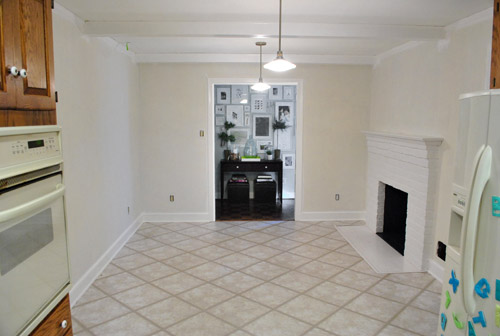
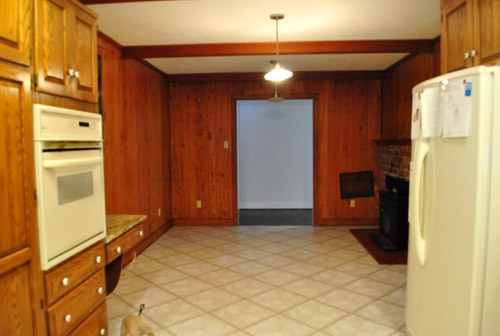
About a week ago (after we painted our brick fireplace) our kitchen looked like this:
Then we removed the desk and upper cabinet (that will be in the way of our big future doorway to the dining room) and after one coat of not-covering-at-all primer it looked like this:

Then we finally got the primer thing right after dealing with maddening bleed-through issues thanks to two days of applying coat after coat and three different types of primer (more on that here):
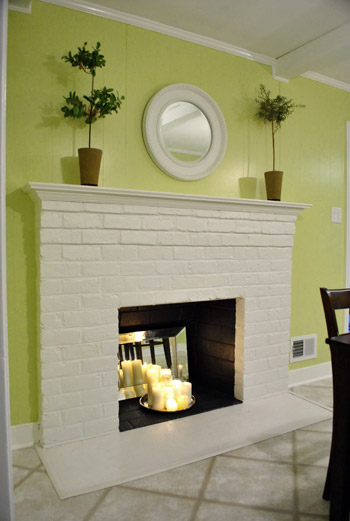
And now it looks like this, although it reads a bit more yellow in these photos than in person (it’s a smidge greener in real life).
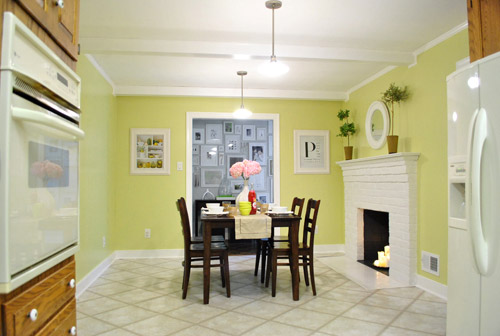
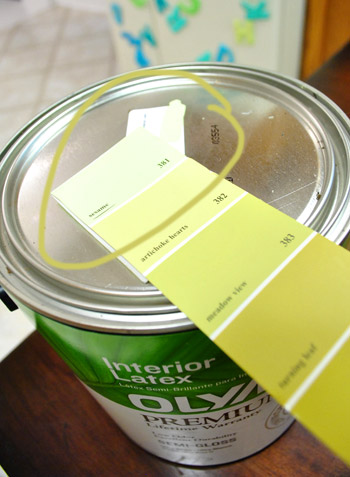
It’s definitely a warm golden green tone (aka: grellow). Sort of like the color of an artichoke heart.
There’s definitely a lot more to do in there, but we’re so glad to have the whole prime-and-paint-the-paneling thing checked off. Here’s a fun little video that encapsulates the entire process in three short minutes. Which is more than a little ironic because it took us just a wee bit longer in real life (you know, just a smidge). Just convert those minutes to days. See it below or here on YouTube.
As for the paint color, after a decent amount of debate (and some pretty thorough consideration of the adjoining rooms that will be seen along with the kitchen) we opted for our new favorite color, which turned out to be Sesame 381 by Benjamin Moore (color matched to Olympic No-VOC paint in semi-gloss).
We were inspired by this kitchen (found here via Pinterest) since our cabinets will eventually go white, possibly along with our backsplash.
We chose this warm yellow-green color because we want the kitchen to be bright and happy (there aren’t any windows to the outside world – just one that looks into our sunroom) and it was suuuuuuper dark before we painted that paneling. We also knew the room could take a decent amount of color because:
- it won’t have any big long walls remaining when we add the extra-wide doorway to the dining room across from the fireplace (just slivers of wall here or there will remain, so the color won’t be overwhelming)
- we’ll be painting the cabinets glossy white later in this phase of our little kitchen makeover along with un-busying the backsplash (which will further temper the color on the walls)
- we’ll be adding an island in the place of our too-small table someday (with a different countertop and most likely a non-white base color to keep things interesting and layered)
- this room is surrounded by the dining room, the hallway, and the living room, which all have soft gray walls (so we wanted this space in the middle of them all to have some cheerful color going on)
When it came to our swatch-selecting technique we just hung up a ton of them and looked at them at all times of day to see which one we preferred. As for why we chose this swatch specifically, we decided:
- this golden-green tone will tie into the chartreuse curtain tones in the dining room and the cheerful green tone in our shaggy living room rug without being too matchy-matchy across the board (we didn’t want the exact same tone of green everywhere for fear that it would look a bit too “orchestrated”)
- a warm yellow kitchen is always a classic choice, but this color feels modern and crisp with the green undertones (and it’s not completely terrible with the oak cabinetry, which will stay for a little while)
- this tone is in Sue the Napkin – albeit a bit darker (a sure sign it’ll work with our whole house palette really well)
- unlike some of the other softer greens and greeny-gold tones that we considered, it really makes the white trim pop (lighter swatches didn’t have the same crisp effect next to the fireplace or the trim)
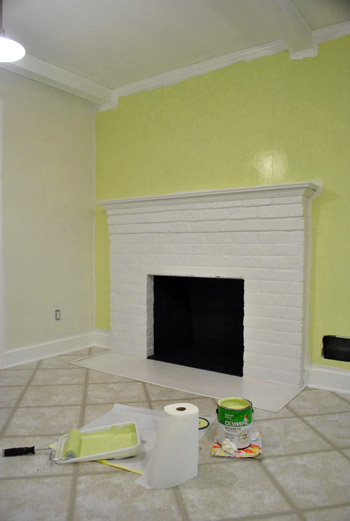
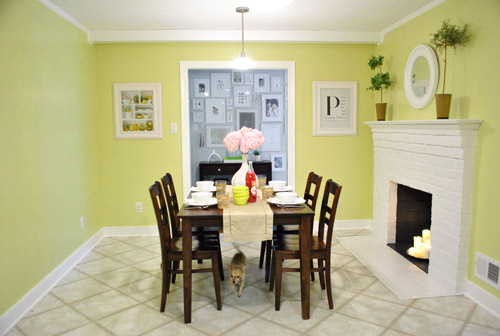
Here’s how it looked with the first coat going up around the fireplace (thanks to all that primer prep– we had really awesome coverage). Again, it’s looking more yellow and less green than it does in person in these photos, but you can really see how the white pops and how it turned a dark and brown-everywhere space into a sunny and bright room in the middle of the house.
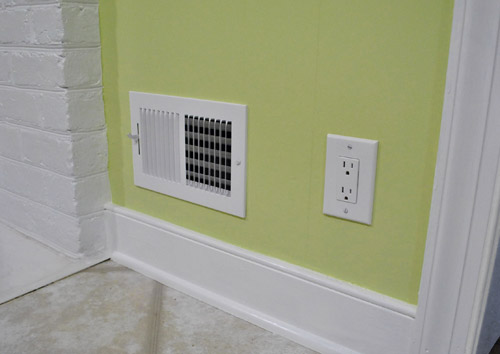
We also decided that it was high time we switched out all of the “bisque” colored vents, outlets, and light switches.

So we grabbed a bunch of crisp white ones from Lowe’s, turned off the power, removed the old ones, connected the new wires the same way they were connected to the previous switches, added the outer switchplates, and turned the power back on. The whole switch swap took about twenty minutes. So much better:
Some people opt to paint their vent covers so they blend in more, but for now we’re happy to leave ours crisp and new since we’re so used to old drippy painted-over covers (clean paint-free ones kind of feel like a luxury). Who knows if we’ll decide to add a few thin and not-drippy coats of paint to blend those vents in later though. We’ll keep you posted.
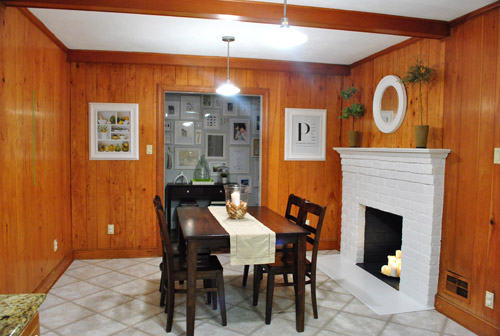
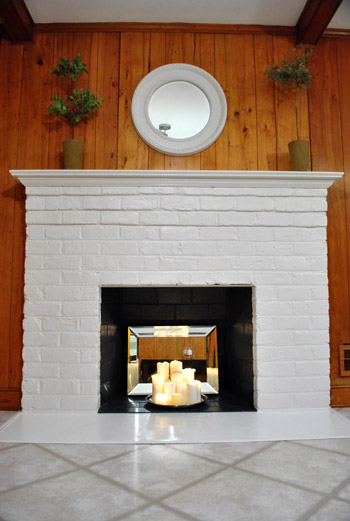
Oh and it’s really fun to go back and look at our fireplace, which originally looked like this:
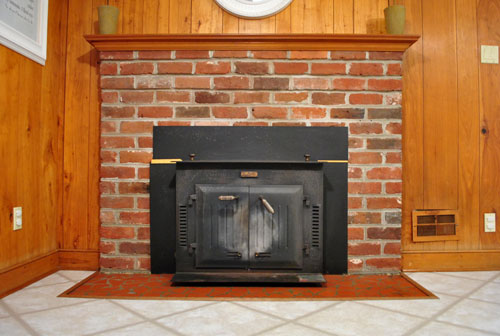

Then we removed the old unused wood stove and painted the brick, and it looked like this:
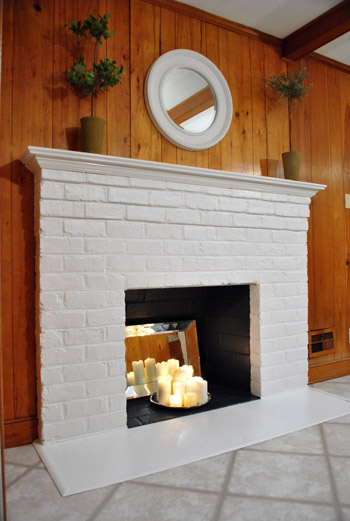
It’s amazing how much painted paneling can freshen things up even more:
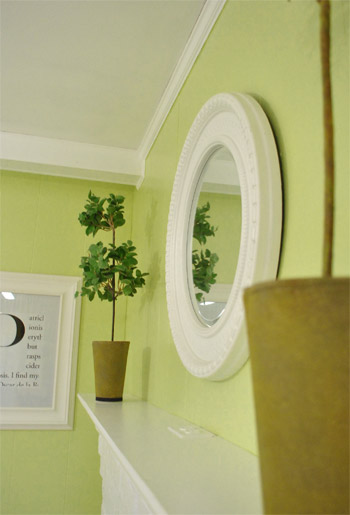
And we love how things like the white frames and the round mirror above the fireplace layer right in with the glossy white trim and beams:
Burger likey (he knows how to work that runway):
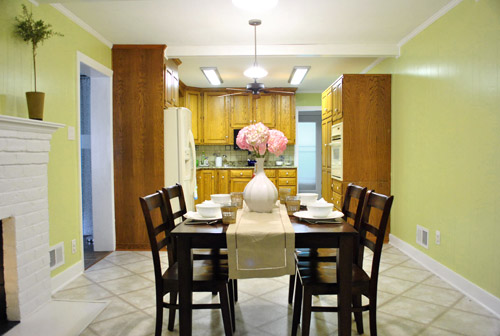
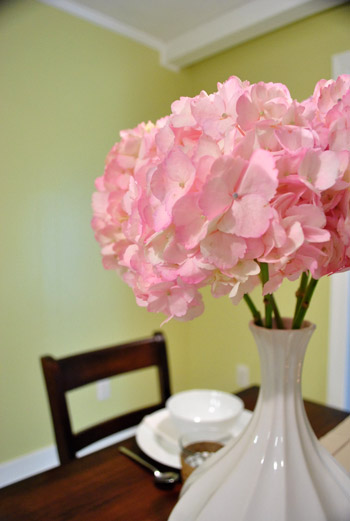
Oh yeah and see those pink hydrangeas? I wish I could say that we grew those, but they’re from the store. We figured to celebrate all that priming and painting we could spring for something soft and sweet, so these little pink snowball-looking-guys had me at hello (that’s an old vase from Target btw):
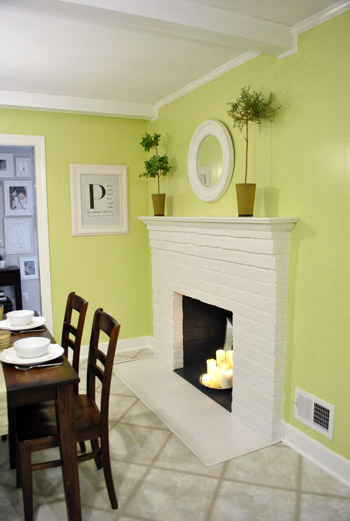
As for the opening to the dining room, here’s where it’ll be (it will line up exactly with the dining room window on the other side for balance):
We learned that we’ll need a permit to knock out so much of that load bearing wall, so it sadly won’t be anything we can do very quickly (and we’ll definitely be leaning on some pros for help). But we can’t wait to tackle it as soon as we can get through all the permit business and hunt down the right expert for the job.
Now for some before & after bid-ness. Just because that’s my favorite part. Here’s the kitchen as it looked on moving day about six months ago:
And here it is now (still can’t wait to add that island, paint those cabinets, and upgrade the floor & appliances someday though):
Moving day again (yes, one of those lights was out):
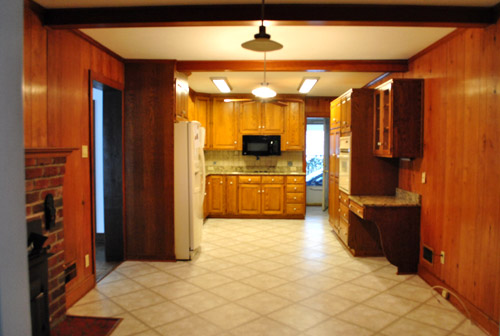
And now:
The crazy thing is that these photos were taken around the same time of day so it definitely demonstrates how much lighter and more cheerful the space feels now that the dark paneling is a thing of the past. Oh and here’s the budget breakdown:
- Olympic Premium No-VOC primer from Lowe’s: $12
- Behr 2-in-1 Primer + Paint (in semi-gloss white): already owned
- Kilz Clean Start No-VOC Primer from Home Depot: $20
- Olympic No-VOC paint (in Sesame by Benjamin Moore) from Lowe’s: $22
- New vent and outlet covers from Lowe’s: $43
- Brushes/rollers/tape/paint tray: already owned
- Total: $97
So there you have it. The kitchen madness has officially begun. As we mentioned here, we’re definitely going to do this in phases (gotta save our pennies and just take things on as we can afford them). But it should be a whole lot of fun. As in, more fun than a barrel of monkeys. And definitely more fun than priming that paneling five hundred times. Do any of you guys have long term kitchen plans like painting the cabinets or adding an island or upgrading the flooring or making some overhead lighting switches (we’re definitely in need of some of that too)? Oh the possibilities…
Psst- We announced this week’s giveaway winner. Click here to see if it’s you.

paintergal says
Absolutely love it! So bright and cheery. Can’t wait to see you work your magic on your cab’s.
Monica says
It really is amazing what paint can do! Total 180 and I can’t wait to see how it looks after the white cabinets come!
I have a favor to ask, would y’all mind covering searching for a expert to knock out a wall? We are looking to knock down a load bearing wall too and we had some work done when we moved into our house and we constantly had to call the guy to get him back to complete things he had missed. This guy had great reviews and was suggested to us by two people. I am just wondering what questions you ask before chosing someone.
YoungHouseLove says
Sure! We’ll definitely post about the whole hunt!
xo,
s
Nicole says
P.S. How do you not get frustrated when people ask questions you clearly answered in the post? You guys have WAY more patience than I do!!
YoungHouseLove says
We knew we tend to ramble, so we figure some people skim. Heck, sometimes John skims my posts and I skim his. Haha.
xo,
s
Lindsay says
You definitely have WAY more patience than I do with the repeat questions. I devour every word (not sucking up) that I read on here (sometimes because I am bored at work) and get frustrated with those questions!
Amber says
I have to admit, I was a bit nervous for the paint color when you showed it on an earlier post (this is coming from someone whose kitchen is kind of a bright asparagus green -most people think it was an odd choice, but I love it).
However now that I see how light and bright it makes the kitchen I am totally sold. LOVE IT. You two really know how to visualize a space!
Plein Jane says
It seems so unusual to have a kitchen without a window, but the original owners of our first house did it one better: They added a family room off the kitchen, but kept the “outside” window! Maybe their intent was to let in as much light as possible since they were closing the kitchen off, but it always had that “drive-thru” effect.
YoungHouseLove says
Haha- we have one above our sink that looks out into the sunroom. The funny thing is that it’s exactly the same set-up that we had in our first house!
xo,
s
Kristin says
I LOVE the transformation! One question, though. Did you have to bribe your local Lowes associate to match a Benjamin Moore paint color to the no-VOC Olympic paint? It seems that’s what you have to do here in Nashville. I tried to get them to match a VASLPAR premium paint to the no-VOC Olympic and the guy said he couldn’t do it. What gives?
Anyway…you picked a beautiful color!
YoungHouseLove says
Really? No! They seem happy to look up those formulas in the computer and match them so they get the sale (and not BM). Oh but I’ve heard they don’t like to match their own paint (ex: if they sell Valspar and Olympic they don’t like to steal from either one since they’re both their “clients”), so picking a color not sold in their store might be the way to go?
xo,
s
Emily says
Why not just have them computer match it to the swatch digitally, and not using the computer code. Cut off the Valspar label so they don’t know where it came from. I’ve had things custom matched to wallpaper, fabric swatches, anything.
Amanda says
You ran into this problem because you tried to match Valspar (a Lowe’s brand paint) to Olympic (also a Lowe’s brand paint). Most stores don’t allow this because of their contracts with the manufacturers. They will happily color match a brand they don’t sell to Olympic though.
Jill @ Craft in a Northern Town says
What an aweseome transformation! Love, love, love the color. We are slowing picking things off of our list in our “new to us” house too. Love watching all the changes!
Irene says
Looks amazing. It’s not a color I would have chosen, but I think it looks so bright and airy that it works for your space.
angel p. says
wow-ee!!!! Looks awesome!! I’ll bet the previous owners will see all the work you’ve been doing and wonder why they didn’t think to do it and enjoy it. Looks so great and bright!!!!!
Christin says
Love love love love love! Love the color. Love what a HUGE difference it makes in your whole space. Awesome. can’t wait to see what it’s like once you paint the cabinets. Fabulous work!
Al says
Love the power of paint. We have a dark kitchen and installed a tube light and it made a world of difference. You might consider doing it. Way to go on the bold color choice.
Christie says
Swoon….Your kitchen looks absolutely dreamy. I love it! Can’t wait to see those cabinets painted white now! :-)
Cristina says
Wow! The kitchen looks amazing! What a difference a change of color makes! I’m loving everything about it, especially the mirror in your fireplace. Beautiful!
Jamie R says
Looks fantastic!! But what happened to the tall, green holey lamp from HomeGoods that used to be on the mantle?
YoungHouseLove says
That started to scare us since Clara is pulling up and toddling around (didn’t want her to pull on the plug and have the whole light come crashing down) so we think we’ll use it in the playroom when that room takes shape (so the plug can be safely hidden behind a dresser and not tugged on).
xo,
s
Sarah R. says
I have plans to paint my kitchen walls and cabinets. The former owner loved yellow, apparently, so the countertops are yellow and there’s a green and plaid border, which matches the green and plaid wallpaper that occupies the back entry and basement stairwell. I can’t afford a big remodel, so my mission is to paint the cabinets (probably white) and to find a paint color that will go with the yellow countertops. I don’t love them, but I have to make them work for now. I found some great color schemes on design-seeds.com.
Karen says
Sherry, I second the painter’s cup. Makes it go so fast!
I just painted my breakfast room (a pretty butter yellow), and it makes me want to paint my builder’s grade golden oak cabinets white, like y’all are planning to do. Can’t wait to see how your cabinets go so I can get my courage up. Family is about half for it, half against, but the golden oak is so out of date looking, and our house is only 11 years old!
Your room looks great! Can’t wait to watch the rest of the transformation! Rest those arms first, though! :)
Shannon says
Amazing!! Great job! I can’t believe the difference.
Karen Maia says
Looks GREAT! You are the Petersik Power Rangers for sure.
LauraC says
Fabulousness! Looks, so, so good in there! It’s funny, I guess I was with it two years ago when we painted our kitchen: very VERY close to your color! Ours is a bit lighter and less yellow (think iceburg lettuce green; Behr Cabbage Green), but I never dreamed the coolest home decor bloggers would pick a color so similar to mine! Ha! My claim to fame.
Bob says
You are cracking me up with this “bisque” stuff. Can we get a picture that shows us this “bisque” color? As opposed to, I don’t know, cream. Or off-white? Or beige?
YoungHouseLove says
Haha. Same thing. Different name. I like saying Bisque because it makes me giggle. Don’t know why.
xo,
s
Bob says
You’re weird, Sherry. But that’s why I keep reading. You entertain me. :)
YoungHouseLove says
Haha, thanks I think.
xo,
I.B. Weird
Jill Stigs says
LOL…….it used to be called Almond!
Shana says
The video was so great! I loved the song and the super speed painting as it was played in fast forward. Not sure if you have done this in the past with other projects but I highly recommend it. Made me want to DIY something, right now, except I’m at work. ;)
Martina says
Wow! what an amazing transformation! Love-love-love your inspiration kitchen — the transformation will make the space hard to recognize when all is said and done! Great work and rest those arms a little before tackling the cabinets ;)
Lindsay says
Your kitchen looks terrific! And guess what? That color works wonderfully in all types of kitchens! My kitchen walls are almost the exact same “grellow” color — I used New Willow by Valspar. And I have dark cherry cabinets and a white/creamy countertop. It’s beautiful.
Lydia says
LOVE it!! It looks awesome!!!
Carrie says
Love the color! I want to repaint my kitchen green (currently it is a bright goldenrod) but I have red accesories (toaster, dish drainer, etc.) and I am having a hard time finding the right green to keep it from looking Christmas-y. Do you think this might work? I am about to give up and just go with the same color as the living/dining room and hall. : /
YoungHouseLove says
Oh yes- something more celadon or yellow-green will hopefully dodge the Christmas look. I’d aim for an artichoke-ish color! Maybe something a little softer if you’re worried?
xo,
s
Carrie says
Looking at your swatch I think I may have been looking at colors too dark. Sometimes lighter = pastel in my little brain. I’m gonna swing by tonight and grab this paint chip. I like a pop of fun color in the kitchen!
Eileen says
I had that issue too, but found this inspiration photo:
http://pinterest.com/pin/15094416/
so we went with a similar green in our kitchen, with red kitchen aid mixer and a few other pops – it works!
Carrie says
Thanks Eileen! Cute!
marissa says
What a difference! Looks great!
Megan says
Great job! I can’t wait to see it with the white cabinets and new backsplash. I think I used the same color in my daughter’s room! Or maybe it was one shade darker. Love it! What are you planning on doing with the floor?
YoungHouseLove says
We found hardwood flooring under the vinyl tile (which we hope goes throughout the kitchen and not just through half of it) so we hope to refinish those down the line during Phase 2 (since it involves removing all of the cabinets to get to it).
xo,
s
Sarah says
Oh. My. Goodness!! You guys have done such a terrific job, it looks amaaaazing! Almost makes me want a dark, panelled room just so I can transform it! Haha.
Congrats on your lovely, lovely home. Such an inspiration to us all! x
blerona says
I LOVE YOURRR HOUSE!! And YOur BLOG YOu guys are awesome!!!! bleorna
http://www.fashiontres.com
Jen @ The Decor Scene says
O.M.G. absolutely gorgeous!!! Love the color. It’s a new kitchen!!! Enjoy the cheeriness of this room. I can’t wait to see those cabinets painted. But seriously guys, you really choose the right color for this room in the middle of your home. Once you open up that wall, so much more sunshine will come in. Are you still going to widen the doorway to the Living Room from the Kitchen? I think I remember you guys saying something about that too. Thanks for sharing and I loved that 3 min. video of all that work. It paid off in the end though. Awesome job guys!!! :)
YoungHouseLove says
We’re not sure about that one. It can’t go much wider because of the fireplace and balance on the other side of the wall (the living room side) might get thrown off so we’re going to wait and see after we add the first wide doorway to the dining room.
xo,
s
Amber says
That looks SO much better. What is the picture to the left of the doorway?
YoungHouseLove says
That’s an old poster I got from allposters.com for $29 a while back. It’s a photo of a shelf with oil and fruit on it- it felt kitchen-y. Used to hang in our dining nook at our first house.
xo,
s
Jessica M. says
Where did you get the ‘P’ picture from? Sorry if this was already answered…I’ve been skimming so as not to repeat.
Thanks!
YoungHouseLove says
That’s a magazine monogram we made a while back. Here are those details: https://www.younghouselove.com/2009/10/how-to-make-a-magazine-monogram/
xo,
s
Melissa says
Wow – amazing! But seriously – how do you do it? I can barely get my laundry done!
YoungHouseLove says
A big thank you goes out to John’s mom who helped us with babysitting so we could get it done! Our trick is to wait for Clara to nap and do as much as we can then (along with after she goes at bed at 7:15. Otherwise we can’t both work together since one of us is on Clara duty and the other one of us is writing posts, editing photos, answering comments, etc. Except when we’re blessed with babysitting from J’s mom on occasion!
xo,
s
Cate says
I read every post and rarely comment, but I had to with this one! The painted paneling looks AWESOME…so much brighter and bigger-looking. We lived in a basement apartment with wood paneling for the first year of our daughter’s life, and we begged the landlord to let us paint the paneling, but he refused. :-( I wish we’d been able to!
Jordan@the2seasons says
I am amazed that is the same room. I think painting the trim on the ceiling made a huge difference as well. Great video you made it look so easy! Well the 3 mins made it look easy.
Laura @ Starting Out Fit says
You guys did an amazing job! I’m loving it!!!
My hubby and I are hoping to completely gut and re-do our kitchen this summer and that’s almost the colour we’re thinking for our walls. Very soothing!
Jen A says
Beeeeeeeautiful.
You’re kitchen eyeballs need some shades now.
:o)
Jennifer says
Wheeee! It’s so light and bright and fresh! I love it.
Zerique says
my kitchen is pretty much undergoing your same transformation . i am a teacher so every summer i take on a new portion of it. last summer i did the walls a very similar greeen to yours and painted my lower half of walls, thats paneling, and creamy white. it looks great and really livened up the room. i am waiting to paint the cabinets because there are about a million of them!!!!
Your work looks great!!!!
Shel says
WOW what a major difference a little paint can make. It turned out great. I’m shocked that you didn’t have any flooring protection or are you that good at painting? I’m just not there yet and I tend to drip paint all over myself.
We just started our kitchen reno…full remodel. Demo was not as exciting as everyone said it would be, in fact I didn’t like it at all. Unfortunately we had pretty much 4 cabinets aka no space at all and our kitchen is huge. The cabinets were disgusting and I wouldn’t put my kitchen items in them for fear I’d pull a bowl out and there would be a dead bug or something.
YoungHouseLove says
We have been painting for 5 years pretty consistently, so we’re fairly “seasoned” – haha. But we still drip sometimes. On carpeted rooms we use drop cloths, but with vinyl or hardwoods we just wipe random drips as we go. Seems to work.
xo,
s
Tiffany Hall says
check you! Dang, way to pound it out! Lots brighter.
Janette@The2Seasons says
Have you thought about having one or two solar tubes installed to bring in some natural light? We have one in each of our upstairs bathrooms that don’t have windows, and we LOVE them. We had them in our last house, and they were a priority when we gutted this place six months ago. Or, I should say when we HAD it gutted. I think the reward would be well worth your investment. SInce you have a rancher, you could easily have them installed.
YoungHouseLove says
We’ve heard great things about them. Definitely something to consider down the line.
xo,
s
Natalie says
You definately need a painter’s cup (I just use a solo cup) and a stool that has four steps for cutting in at the top. I would get dizzy looking up like that!
YoungHouseLove says
Yeah I should get one of those. I always joke that painting is my only exercise these days so I don’t mind my faux stair-master approach that much. Haha. Gotta squeeze it in when I can!
xo,
s
brittany says
love. :)
Elizabeth says
Watching that video makes me totally jealous that you have a painting partner. I can’t imagine only having to cut in…or only having to roll. Sigh.
YoungHouseLove says
Ploy friends with pizza and/or beer! We haven’t tried that yet but we hear it can work!
xo,
s
Elizabeth says
I’ve tried! No one is as committed to decor as I am! And every time my sisters help it just creates more work for me…they are terrible painters. LOL!
YoungHouseLove says
Oh man – maybe you can put out an add on craigslist. Looking for a painting friend. I’ll help you with a room if you’ll return the favor. Just make sure you’re not looking for more than that if you know what I mean. Haha. Maybe that’s a bad idea. Not sure…
xo,
s
Liz says
It looks amazing! You two did an awesome job!
Alysia says
Love, Love, Love. Seriously. It looks amazing.
My husband and I have been mulling over paint colors for our kitchen for almost 4 years now. I am worried it will never get done. If y’all ever want to house crash near Seattle… I’m your girl. LOL! Have a great day!
Jessica Marshall says
I love what you have done already! The color brightens up the kitchen so nicely and the white on the fireplace, baseboards, and mirror make a pop! Great job!
jamie says
Curious – what does it look like at night? We’ve had a similar shade of green in our kitchen for four years and though I love love love it in daylight, I hate how it looks at night. I don’t know if its the lighting or we were off on our color/shade selection. So I’m curious as to what yours looks like at night and what your go-to lighting suggestions are as well…
YoungHouseLove says
We have some pretty bright lighting in our kitchen (probably thanks to the lack of windows) so at night it still looks nice and cheerful (nothing weird about the undertones or anything, probably since it doesn’t get that dark because of all the added lighting). Maybe try adding brighter bulbs or even switching out a four bulb chandelier for a six bulb one to see if that helps?
xo,
s
Elizabeth says
You can also switch to Reveal bulbs and see if you like the difference…they completely change the color tone of the room.
YoungHouseLove says
Ooh great tip!
xo,
s
Martha says
I love your blog so much, and I really enjoy seeing the choices you make. It’s been quite inspirational. I have to say that I feel really validated now about the color choice that we made for our dining room – it’s Castleton Mist from Benjamin Moore and it’s the most beautiful grellow color. Bright but not overpowering. It’s awesome to see that YHL has picked such a similar color:) Thanks for making my day!
Kami says
I am thinking about doing my kitchen in phases also. Can knocking down a wall from my kitchen to the dining room be phase 1? And then phase 2 will be everything else….Never thought of doing it that way. Thanks for the idea!
YoungHouseLove says
Oh yes- breaking things down into phases (and even just taking things project by project) helps to keep it manageable and less intimidating!
xo,
s