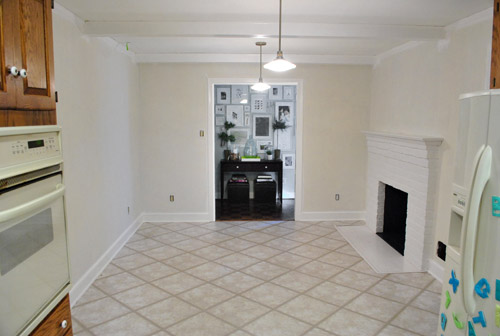
About a week ago (after we painted our brick fireplace) our kitchen looked like this:
Then we removed the desk and upper cabinet (that will be in the way of our big future doorway to the dining room) and after one coat of not-covering-at-all primer it looked like this:

Then we finally got the primer thing right after dealing with maddening bleed-through issues thanks to two days of applying coat after coat and three different types of primer (more on that here):
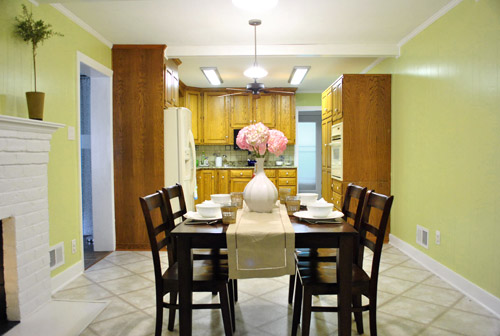
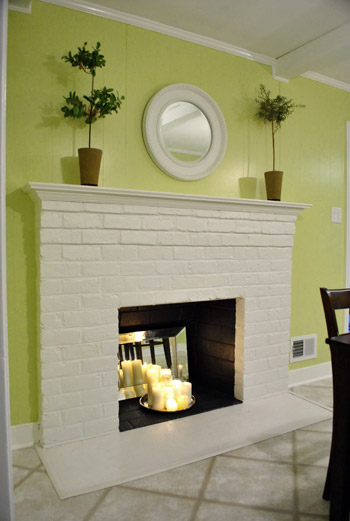
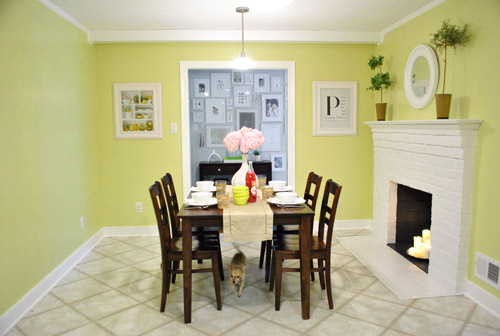
And now it looks like this, although it reads a bit more yellow in these photos than in person (it’s a smidge greener in real life).
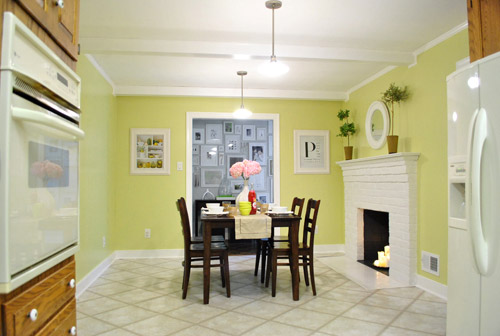
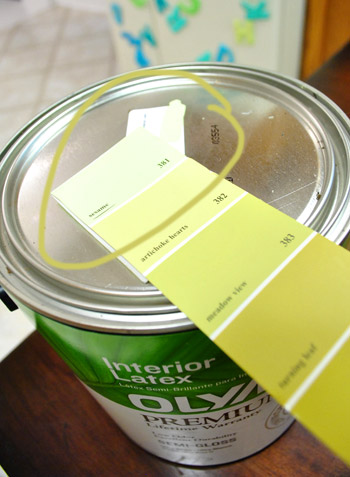
It’s definitely a warm golden green tone (aka: grellow). Sort of like the color of an artichoke heart.
There’s definitely a lot more to do in there, but we’re so glad to have the whole prime-and-paint-the-paneling thing checked off. Here’s a fun little video that encapsulates the entire process in three short minutes. Which is more than a little ironic because it took us just a wee bit longer in real life (you know, just a smidge). Just convert those minutes to days. See it below or here on YouTube.
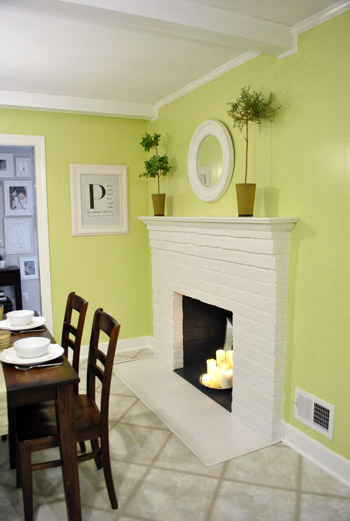
As for the paint color, after a decent amount of debate (and some pretty thorough consideration of the adjoining rooms that will be seen along with the kitchen) we opted for our new favorite color, which turned out to be Sesame 381 by Benjamin Moore (color matched to Olympic No-VOC paint in semi-gloss).
We were inspired by this kitchen (found here via Pinterest) since our cabinets will eventually go white, possibly along with our backsplash.
We chose this warm yellow-green color because we want the kitchen to be bright and happy (there aren’t any windows to the outside world – just one that looks into our sunroom) and it was suuuuuuper dark before we painted that paneling. We also knew the room could take a decent amount of color because:
- it won’t have any big long walls remaining when we add the extra-wide doorway to the dining room across from the fireplace (just slivers of wall here or there will remain, so the color won’t be overwhelming)
- we’ll be painting the cabinets glossy white later in this phase of our little kitchen makeover along with un-busying the backsplash (which will further temper the color on the walls)
- we’ll be adding an island in the place of our too-small table someday (with a different countertop and most likely a non-white base color to keep things interesting and layered)
- this room is surrounded by the dining room, the hallway, and the living room, which all have soft gray walls (so we wanted this space in the middle of them all to have some cheerful color going on)
When it came to our swatch-selecting technique we just hung up a ton of them and looked at them at all times of day to see which one we preferred. As for why we chose this swatch specifically, we decided:
- this golden-green tone will tie into the chartreuse curtain tones in the dining room and the cheerful green tone in our shaggy living room rug without being too matchy-matchy across the board (we didn’t want the exact same tone of green everywhere for fear that it would look a bit too “orchestrated”)
- a warm yellow kitchen is always a classic choice, but this color feels modern and crisp with the green undertones (and it’s not completely terrible with the oak cabinetry, which will stay for a little while)
- this tone is in Sue the Napkin – albeit a bit darker (a sure sign it’ll work with our whole house palette really well)
- unlike some of the other softer greens and greeny-gold tones that we considered, it really makes the white trim pop (lighter swatches didn’t have the same crisp effect next to the fireplace or the trim)
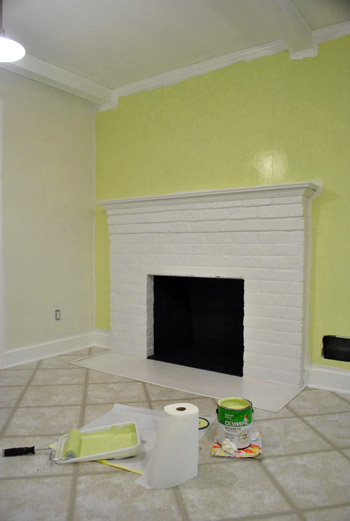
Here’s how it looked with the first coat going up around the fireplace (thanks to all that primer prep– we had really awesome coverage). Again, it’s looking more yellow and less green than it does in person in these photos, but you can really see how the white pops and how it turned a dark and brown-everywhere space into a sunny and bright room in the middle of the house.
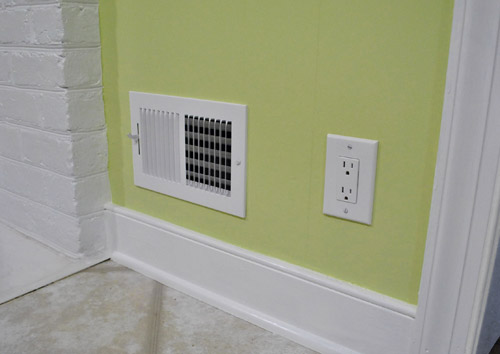
We also decided that it was high time we switched out all of the “bisque” colored vents, outlets, and light switches.

So we grabbed a bunch of crisp white ones from Lowe’s, turned off the power, removed the old ones, connected the new wires the same way they were connected to the previous switches, added the outer switchplates, and turned the power back on. The whole switch swap took about twenty minutes. So much better:
Some people opt to paint their vent covers so they blend in more, but for now we’re happy to leave ours crisp and new since we’re so used to old drippy painted-over covers (clean paint-free ones kind of feel like a luxury). Who knows if we’ll decide to add a few thin and not-drippy coats of paint to blend those vents in later though. We’ll keep you posted.
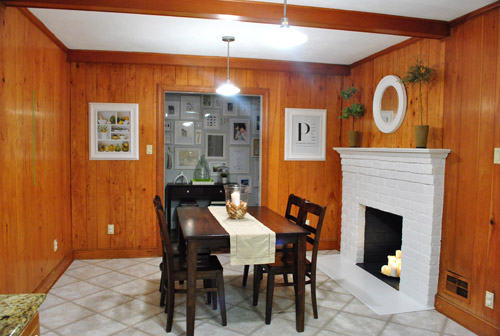
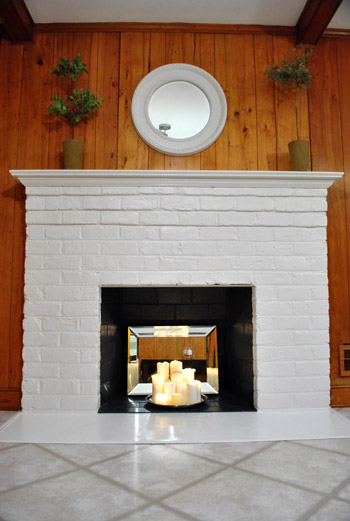
Oh and it’s really fun to go back and look at our fireplace, which originally looked like this:
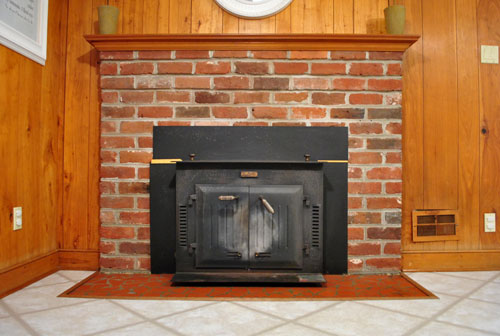

Then we removed the old unused wood stove and painted the brick, and it looked like this:
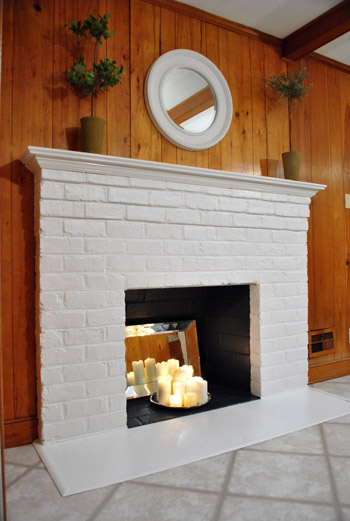
It’s amazing how much painted paneling can freshen things up even more:
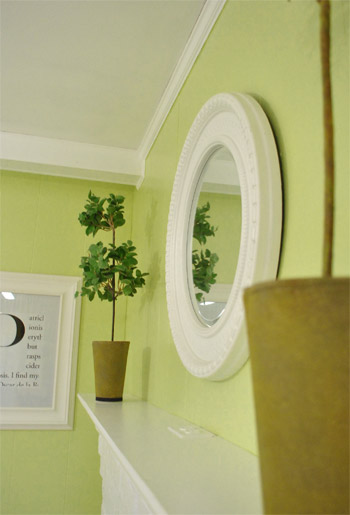
And we love how things like the white frames and the round mirror above the fireplace layer right in with the glossy white trim and beams:
Burger likey (he knows how to work that runway):
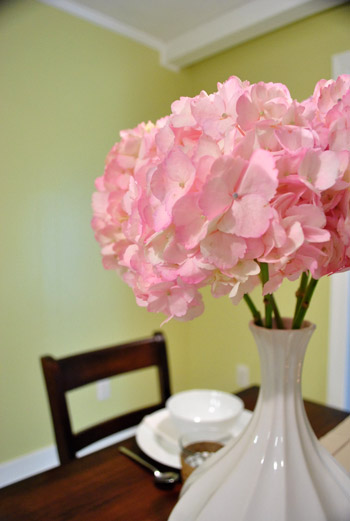
Oh yeah and see those pink hydrangeas? I wish I could say that we grew those, but they’re from the store. We figured to celebrate all that priming and painting we could spring for something soft and sweet, so these little pink snowball-looking-guys had me at hello (that’s an old vase from Target btw):
As for the opening to the dining room, here’s where it’ll be (it will line up exactly with the dining room window on the other side for balance):
We learned that we’ll need a permit to knock out so much of that load bearing wall, so it sadly won’t be anything we can do very quickly (and we’ll definitely be leaning on some pros for help). But we can’t wait to tackle it as soon as we can get through all the permit business and hunt down the right expert for the job.
Now for some before & after bid-ness. Just because that’s my favorite part. Here’s the kitchen as it looked on moving day about six months ago:
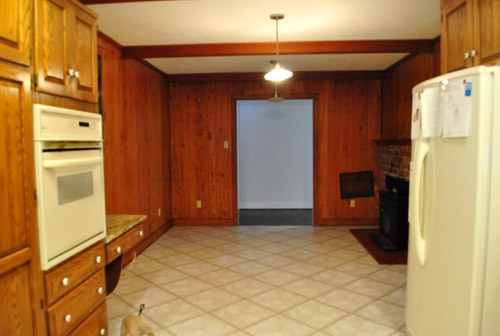
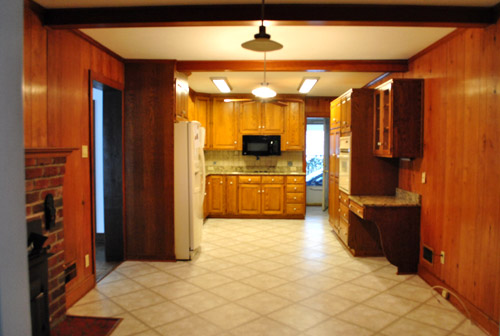
And here it is now (still can’t wait to add that island, paint those cabinets, and upgrade the floor & appliances someday though):
Moving day again (yes, one of those lights was out):
And now:
The crazy thing is that these photos were taken around the same time of day so it definitely demonstrates how much lighter and more cheerful the space feels now that the dark paneling is a thing of the past. Oh and here’s the budget breakdown:
- Olympic Premium No-VOC primer from Lowe’s: $12
- Behr 2-in-1 Primer + Paint (in semi-gloss white): already owned
- Kilz Clean Start No-VOC Primer from Home Depot: $20
- Olympic No-VOC paint (in Sesame by Benjamin Moore) from Lowe’s: $22
- New vent and outlet covers from Lowe’s: $43
- Brushes/rollers/tape/paint tray: already owned
- Total: $97
So there you have it. The kitchen madness has officially begun. As we mentioned here, we’re definitely going to do this in phases (gotta save our pennies and just take things on as we can afford them). But it should be a whole lot of fun. As in, more fun than a barrel of monkeys. And definitely more fun than priming that paneling five hundred times. Do any of you guys have long term kitchen plans like painting the cabinets or adding an island or upgrading the flooring or making some overhead lighting switches (we’re definitely in need of some of that too)? Oh the possibilities…
Psst- We announced this week’s giveaway winner. Click here to see if it’s you.

Kristin says
Beautiful!
We painted our bedroom walls light green (thanks to some advice from you in the comments a long time ago :-) ). Ours is a bit greener, with more blue undertones, which makes it more serene and perfect for a bedroom in my opinion. In fact, it is quite close to the color of your comments on the blog. The yellowy green looks great in the kitchen, a good place for such a bright and energetic color.
Our kitchen has white cabinets, white walls and dark grey vinyl floor (which we are not allowed to change), but we found dark green laminate countertops at Ikea (sadly, they don’t sell them anymore) which add great color to our tiny kitchen.
Jen says
It looks like you turned on the sunshine in there! Fabulous job.
I’m so surprised that the color way up at the top of the chip ended up like that on the walls. I felt the same way when I looked at the chip for Moonshine – that just looked white to me but it’s a lovely gray on your walls. Maybe my inability to see color differences is why I end up using approximately 47 paint samples every time I paint a room!
Melanie says
I’m a regular reader, but haven’t ever posted. Just wanted to take the time to say the kitchen already looks amazing with the painted paneling. I’m always constantly surprised how much of a difference paint can make! Can’t wait to see it with the opening and painted cabinets!
You guys are awesome! (Also, thanks to you, I am now addicted to pinterest!)
Alexi says
What a huge transformation! It’s amazing what just painting a room can do. I can’t wait to see the cabinets painted white. Love it!
valerie J. says
Amazing as usual! It no longer looks like a cave…it’s now a legit kitchen. :)
Allison says
It looks really amazing! For a second I thought you guys had the doorway into the hallway gallery widened like at the old house, but it’s the color and trim that just really make it look huge!
Crystal says
Talk about bang for your buck! That’s the best <$100 makeover I've ever seen. Scrolling back and forth between the before and after, the room looks several feet wider, and of course brighter. It's amazing what paint can do and I love the color you chose. I can't wait to see the cabinets painted white. But as an old boss of mine always asked…how does it make YOU feel?
YoungHouseLove says
Haha- well doing it made us feel tired. But now that it’s done it makes us feel giddy.
xo,
s
Tash says
Where is the “love this” button? So much brighter. Seems like such a huge transformation for so little money. Painting the cabinets will probably make it look like an entirely different kitchen.
How much space is in there to accommodate the island? Do you plan on getting rid of the table and chairs? I’m having a hard time imagining how the space will work if you have both.
YoungHouseLove says
Oh yeah, since we have a large round table in the dining room (which will be right off the kitchen once we open that doorway) we thought a second table was too much, but an island would be nice in its place.
xo,
s
Katrina says
That color definitely brought some sunlight into the kitchen! Our kitchen is in the middle of our house as well – so dark and dated. I would love to update it, but am unsure how to change it up without totally disturbing the flow of traffic between rooms. In the meantime, we just installed some desperately needed under cabinet lighting to help with food prep while we save for and dream up a kitchen redo plan. In the meantime, I would love to paint our first floor, but it’s pretty open and each room runs into the next with no clear place to stop one color and start the next. So it remains eggshell white (with wood trim) until we can figure out what to do. Any suggestions for how to deal with open floor plans? It seems that you guys went for gray on all the walls in the rooms that flowed together and chose a fun splash of color in the kitchen, which is a bit cut off (at least for the meantime) from the rest of the rooms.
YoungHouseLove says
Hmm, I would probably do all the same tone for the whole open space and then use pops of cheerful accent colors in the kitchen- or maybe an accent wall or with the backsplash or by painting the backs of glass-fronted or open cabinets. Hope it helps!
xo,
s
Katrina says
I was thinking that we may have to go that way as well. But I didn’t think about painting the backs of glass front cabinets – that could be fun! Thank you for the suggestions.
Melanie (melarse) says
Katrina – Our last house was all open and we went with BM’s Shaker Beige (decorated just like the old YHL house). But now that we are rebuilding our new house and YHL has given me the courage to have a bit more fun with color (we have 3 yr old), I’m planning to do gray walls in the new open floor plan – and add pops of color to each area – green, blue, turquoise & yellow. So much fun! Just need to find that perfect gray!
Melanie (melarse) says
Forgot to mention how beautiful the kitchen is!!! I am in love with it – great job!!
michelle@decorandthedog says
Love the wall color!! Want to come paint my guest bathroom for me today?
YoungHouseLove says
Haha, sure. Be right over!
xo,
s
Whitney says
WOW what an improvement!!! I love how bright and cheery your kitchen is now! And with white cabinets- that will be great!!
I have a dilemma, please check out my blog and let me know what you think!
http://whitneybrock.blogspot.com/2011/06/skirt-or-bare-leggin-it.html
Thanks!
YoungHouseLove says
So hard! We had a sofa with a clean modern skirt and loved it but also love bare legs like our current sofa. Probably can’t go wrong either way!
xo,
s
Erinn C. says
You guys are INCREDIBLE. Seriously I feel like I need to go home from work right now and paint a wall or something.
Reenie says
Just watched the video ~ too cute! And I’m amazed at what good painters you 2 are and you don’t cover the floor. I usually have it all over me ~ and the floor…..in fact I didn’t cover my hardwood floor in my dining room….and I have yet to scrub the paint off!!! HA!
{love+cupcakes} says
You guys are incredible!
Courtney says
Yay! This post makes me giddy. I have been waiting for you to tackle that paneling, and WHAT A DIFFERENCE! I’m sure the last thing you want to do now is more painting, but once you paint those cabinets…heaven! I also saw someone ask about appliances. You can find super great deals at scratch and dent places. I’m sure you already know that though. Good job! Thanks for sharing…I am inspired to get my paint brush out!
Anne says
Looks amazing! I love the color. We painted our kitchen cabinets last year with a paint sprayer and that was quite a project. Here are our before and after pictures…can’t wait to see yours!
http://hauteapplepie.com/2010/07/28/how-to-painting-kitchen-cabinets/
YoungHouseLove says
Wow- those look great!
xo,
s
Sarah H says
I see you and John have quite the system down.. hehe.
It looks fabulous.. I wasn’t a huge fan of the grellow but after seeing the transformation, I am in love! It looks like a brand new kitchen. I can’t wait to see those cabinets painted :)
jodi says
well done! it is so lovely and bright. an amazing transformation.
Kristy says
Woot! Way to go guys. Looks great so far. We painted an internal brown brick wall that runs the length of our house last year and a guesstimated 42 square metres and it took so much longer than expected. It was a mission but sooo worth it in the end. Getting in all the grout was the worst. All the way with Antique White USA.
Long time fan, first comment – all the way from Australia :)
COLLEEN says
great change!!!!!!!!!!!!!!!!!!!!!!!!!!!!!!!!!
Kayla says
it looks fantastic guys! it must be so exhausting (especially this particular primer debacle) to work for 3 straight days but your hard work always pays off. I absolutely love where the kitchen is headed!! so bright and cheery! cant wait for more :)
Dave says
Thought I’d send you a link to another couple (architects) for more some cool ideas.
http://chezerbey.com/house-tour/
YoungHouseLove says
Oh yeah we love that house!
xo,
s
Alissa says
I don’t know much about load-bearing walls. Is it always possible to remove them (or portions of them) and they can figure out another way to support the roof? Or is it – I shudder to think! – possible that the powers-that-be could come back and say, “Sorry, no, you can’t remove that wall, your house’ll fall down”? What would you do if you found out you couldn’t remove it?
YoungHouseLove says
Oh yes, we added a big doorway through a load bearing wall that led to our kitchen in our last house so we knew it could be done (they use a long steel beam to support the top of the door and in most cases it can be done – although sometimes with the use of columns in two-story residences). We always consult the pros when it comes to things like that to figure out the plan (you know, because our house collapsing would be a baaad thing, haha).
xo,
s
Marci says
Wow, Amazing transformation!!! I bet you can’t wait to tackle those kitchen cabinets now.
Andrea says
Amazing what a little paint will do! I LOVE the color – can’t wait to see the demolition!
Carrie says
LOVE LOVE LOVE! I’ve been anxious for your next kitchen remodel, because the first one was so awesome. I can’t believe how much bigger the room looks! Love the color and the white trim. Looking forward to seeing what’s next! Great job! :-)
Sarah says
IT. LOOKS. AMAZING!
Lauren A says
I LOVE this! The color is so cheery and fresh! I’ve been waiting to see what you were going to do with the kitchen as I’m dealing with kitchen issues myself (dark cabinets, an ugly built-in hutch that cannot be removed due to the flooring not going underneath it, lack of natural light). You two have given me so many ideas, along with the courage to actually follow through with them! I’ve still got a ways to go, but I’m getting there!
Keep up the awesome work!
debbie says
Looks great-love the color! My in laws are planning on painting some paneling in their house…..hope they don’t run into as many problems as you guys!!
Allison says
WOW–What a change!
Cortney says
Cannot WAIT to see it with the cabinets painted its gonna be Amazing! Even now the difference is AWESOME! LUV IT!
Holly says
Love it! That is almost the same color as our living room. I love how bright and fun it is!
Kristen says
I think with a kitchen that color I’d be more inclined to eat healthier foods!
Emily kidd says
Ok so an island doesn’t have to necessarily have to go in the middle of the lichen around the cabinet and sink and things?!
YoungHouseLove says
No way! We’re picturing something casual with stools and some storage that creates an eating area which houses servingware and stuff for setting the dining room table (which will be pretty close to the island once we open up that wall).
xo,
s
Emily kidd says
Ok y’all seriously just blew my brain with this! I have a similar problem but I have a lot of length instead of width
Kim at Yellow Brick Home says
Oh, it’s beautiful! Bright and cheery. Job well done, you two.
Mandie says
Looks fantastic! Love the color!! Total transformation! :)
PS: I need to change some of the black switches in our house… do you have a to do or video on that? (not the plates, the actual switches :))
YoungHouseLove says
We don’t have any video or posts about that (it’s hard to film when the room is dark because the power is off, haha). Maybe check youtube for a tutorial?
xo,
s
Laura says
It is such a pleasure to see all your wonderful design changes and the results of all your long, hard work. The room is looking so refreshing and inviting. Thank you for sharing it with us.
How do you do all that painting without drop cloths, without making a huge mess of splatters and spills on the floor???? Amazing to me.
YoungHouseLove says
We’re crazy so we don’t use drop cloths unless we’re on carpet. Otherwise we just wipe those tiny drips as we go. They definitely happen, but we’ve learned they come off vinyl and hardwood easily when wet (with a wipe) or dry (they can be “popped” off).
xo,
s
Alisa says
I love “popping” the paint off the floor. It’s a sickness..
Erin says
I love love love the color you chose! It looks a tad green, not totally yellow, on my screen. It’s gorgeous!
We’re in the middle of updating a ton of rooms in our house, and we just moved in about 2 weeks ago (it was a foreclosure). But right now I’m in the midst of priming our kitchen cabinets. I’m so excited to take them from stained and dingy dark brown (from the ’80s!), to bright white. I’m off to walmart to buy some more spray oil-based Kilz as we speak! That stuff has some great coverage, and it’s so much easier to spray the doors outside than brush. Of course, when I get to the topcoat I’ll have to brush, but at least this part can go quickly :)
Christina Miller says
What a massive difference. And it looks awesome! You are always so inspiring!
em says
Love the paint color and it looks 1000% better. But, I think you need to paint the cabinets asap as they almost look worse now by comparison! They are like unwelcome 1980s time travellers in a 2011 kitchen.
YoungHouseLove says
Someday! Just gotta let the arms recover. Even thinking about picking up a paint brush makes me gag right about now. Haha.
xo,
s
Laura says
Great job! It looks fantastic!!!! Love the color!
maia says
i opened up the door to your website and GASSSSSSPED! what a breath of fresh air – you too must be so happy w/ the results (i am and i dont even live there!) kudos on finally tackling the kitchen – i must admit, seeing the paneling made me cringe every time it made your blog topic of the day – so i’m sooooooo glad that it’s gone and i’m soooooo glad about these results.
ok i’ll stop gushing – big pat on the back for you two!
Rachel Tatem says
That’s awesome! Congrats on getting it done. There isn’t much that competes with that feeling.
BrittanyC says
Before reading this blog I NEVER, EVER, EVER.. EVER(!)… would have considered painting paneling an option.
When you guys moved in I was trying to imagine how you were going to tackle that room and make it more “yhl.” I should have known you would do just fine though. I mean, you’d think that hunting lodge from your old house would have been proof enough!!!
Ami says
Wow. I’m just about speechless. When I first pulled up this post I thought the pic with the paint was Photoshopped. It looks awesome. I love, love bright spaces and that paint color just changed the whole feel of that room. Great job. I bow to your color skill. And it will look even more amazing when the cabinets are painted. As in another comment, I thought the paint was the darker one on the swatch too. Had to compare it to the little smidge of paint on the can.
Tia says
Looks great! All of your hard work certainly paid off! Obviously you were way ahead of me with my “why don’t you paint the paneling?” suggestion a few days ago. LOL!
Erica says
Now THIS is a YHL kitchen!
pattilouwho says
Love it! Here is a link to an old post about when we painted our paneling. http://urbanbundle.com/2010/05/our-housein-the-middle-of-our-street/
The photos aren’t great because I wasn’t prepared to share, but you get the idea – oh, and we have much better toy storage now. :) Off to dream of painting our kitchen cabinets!
YoungHouseLove says
Love it!
xo,
s
rachel says
you guys are truly amazing. what amazing vision, and awesome DIYedness (that’s a word, right?) I wish I had just half of your awesomeness. can’t wait to see the cabinets painted. That’s next, right?
YoungHouseLove says
We’re not sure if the door opening or the cabinets are next. Or something easy like switching out hardware while we regain the feeling in our arms. Haha.
xo,
s
Sorcha says
Beautiful! The room is so bright and airy now. It’s really amazing what a huge different a coat (or ten) of paint and primer can do! :)