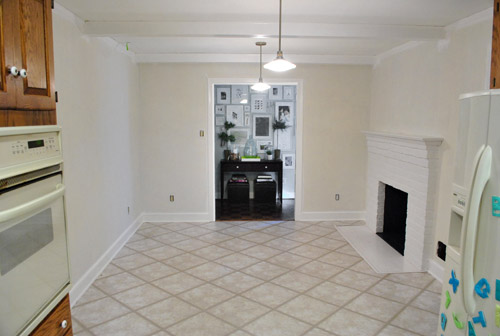
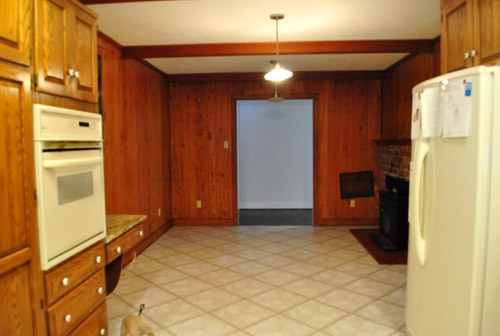
About a week ago (after we painted our brick fireplace) our kitchen looked like this:
Then we removed the desk and upper cabinet (that will be in the way of our big future doorway to the dining room) and after one coat of not-covering-at-all primer it looked like this:

Then we finally got the primer thing right after dealing with maddening bleed-through issues thanks to two days of applying coat after coat and three different types of primer (more on that here):
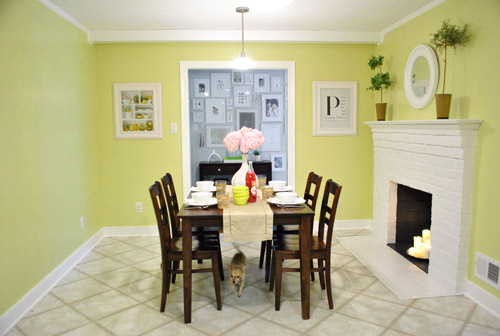
And now it looks like this, although it reads a bit more yellow in these photos than in person (it’s a smidge greener in real life).
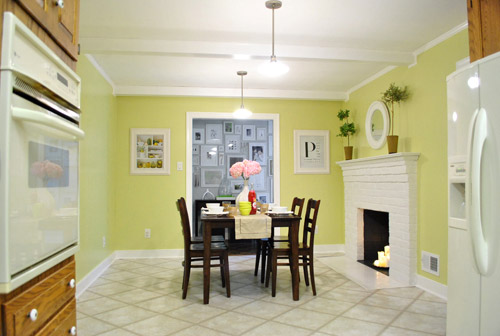
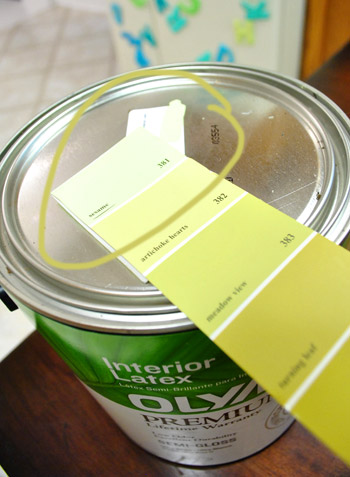
It’s definitely a warm golden green tone (aka: grellow). Sort of like the color of an artichoke heart.
There’s definitely a lot more to do in there, but we’re so glad to have the whole prime-and-paint-the-paneling thing checked off. Here’s a fun little video that encapsulates the entire process in three short minutes. Which is more than a little ironic because it took us just a wee bit longer in real life (you know, just a smidge). Just convert those minutes to days. See it below or here on YouTube.
As for the paint color, after a decent amount of debate (and some pretty thorough consideration of the adjoining rooms that will be seen along with the kitchen) we opted for our new favorite color, which turned out to be Sesame 381 by Benjamin Moore (color matched to Olympic No-VOC paint in semi-gloss).
We were inspired by this kitchen (found here via Pinterest) since our cabinets will eventually go white, possibly along with our backsplash.
We chose this warm yellow-green color because we want the kitchen to be bright and happy (there aren’t any windows to the outside world – just one that looks into our sunroom) and it was suuuuuuper dark before we painted that paneling. We also knew the room could take a decent amount of color because:
- it won’t have any big long walls remaining when we add the extra-wide doorway to the dining room across from the fireplace (just slivers of wall here or there will remain, so the color won’t be overwhelming)
- we’ll be painting the cabinets glossy white later in this phase of our little kitchen makeover along with un-busying the backsplash (which will further temper the color on the walls)
- we’ll be adding an island in the place of our too-small table someday (with a different countertop and most likely a non-white base color to keep things interesting and layered)
- this room is surrounded by the dining room, the hallway, and the living room, which all have soft gray walls (so we wanted this space in the middle of them all to have some cheerful color going on)
When it came to our swatch-selecting technique we just hung up a ton of them and looked at them at all times of day to see which one we preferred. As for why we chose this swatch specifically, we decided:
- this golden-green tone will tie into the chartreuse curtain tones in the dining room and the cheerful green tone in our shaggy living room rug without being too matchy-matchy across the board (we didn’t want the exact same tone of green everywhere for fear that it would look a bit too “orchestrated”)
- a warm yellow kitchen is always a classic choice, but this color feels modern and crisp with the green undertones (and it’s not completely terrible with the oak cabinetry, which will stay for a little while)
- this tone is in Sue the Napkin – albeit a bit darker (a sure sign it’ll work with our whole house palette really well)
- unlike some of the other softer greens and greeny-gold tones that we considered, it really makes the white trim pop (lighter swatches didn’t have the same crisp effect next to the fireplace or the trim)
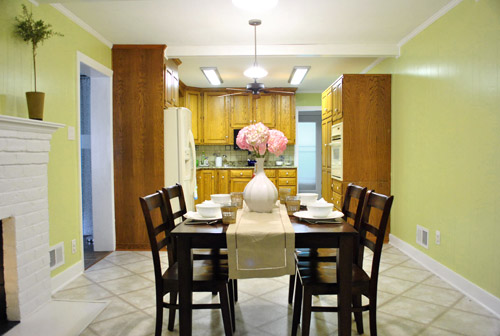
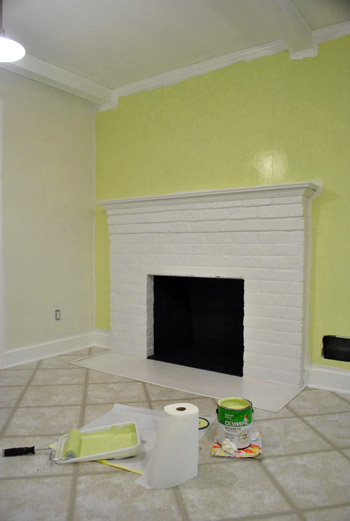
Here’s how it looked with the first coat going up around the fireplace (thanks to all that primer prep– we had really awesome coverage). Again, it’s looking more yellow and less green than it does in person in these photos, but you can really see how the white pops and how it turned a dark and brown-everywhere space into a sunny and bright room in the middle of the house.
We also decided that it was high time we switched out all of the “bisque” colored vents, outlets, and light switches.

So we grabbed a bunch of crisp white ones from Lowe’s, turned off the power, removed the old ones, connected the new wires the same way they were connected to the previous switches, added the outer switchplates, and turned the power back on. The whole switch swap took about twenty minutes. So much better:
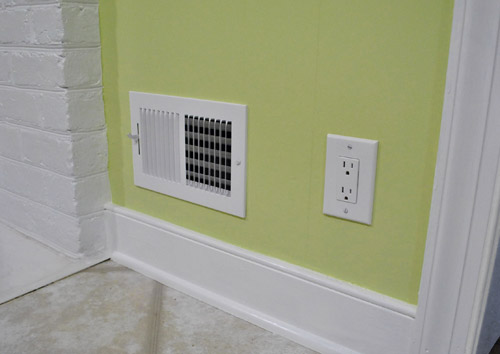
Some people opt to paint their vent covers so they blend in more, but for now we’re happy to leave ours crisp and new since we’re so used to old drippy painted-over covers (clean paint-free ones kind of feel like a luxury). Who knows if we’ll decide to add a few thin and not-drippy coats of paint to blend those vents in later though. We’ll keep you posted.
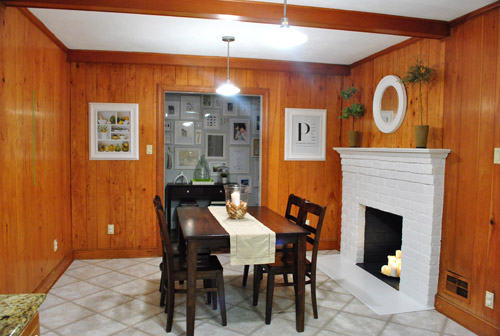
Oh and it’s really fun to go back and look at our fireplace, which originally looked like this:
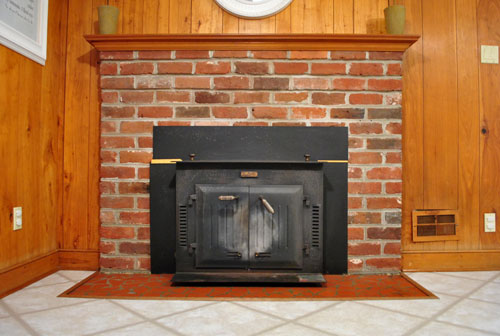

Then we removed the old unused wood stove and painted the brick, and it looked like this:
It’s amazing how much painted paneling can freshen things up even more:
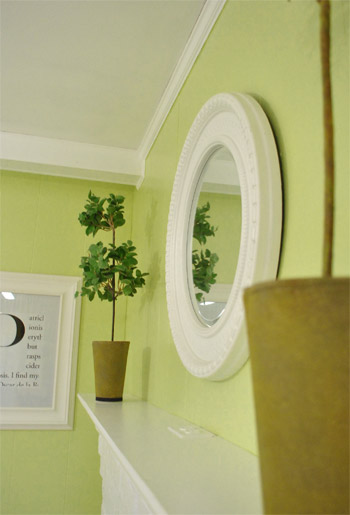
And we love how things like the white frames and the round mirror above the fireplace layer right in with the glossy white trim and beams:
Burger likey (he knows how to work that runway):
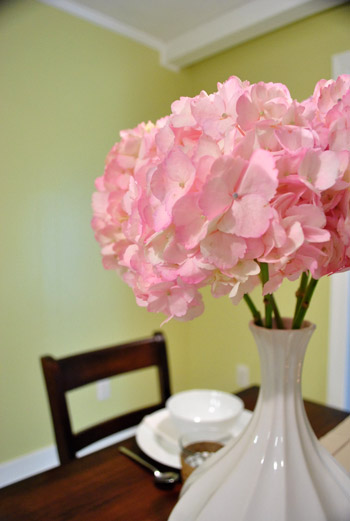
Oh yeah and see those pink hydrangeas? I wish I could say that we grew those, but they’re from the store. We figured to celebrate all that priming and painting we could spring for something soft and sweet, so these little pink snowball-looking-guys had me at hello (that’s an old vase from Target btw):
As for the opening to the dining room, here’s where it’ll be (it will line up exactly with the dining room window on the other side for balance):
We learned that we’ll need a permit to knock out so much of that load bearing wall, so it sadly won’t be anything we can do very quickly (and we’ll definitely be leaning on some pros for help). But we can’t wait to tackle it as soon as we can get through all the permit business and hunt down the right expert for the job.
Now for some before & after bid-ness. Just because that’s my favorite part. Here’s the kitchen as it looked on moving day about six months ago:
And here it is now (still can’t wait to add that island, paint those cabinets, and upgrade the floor & appliances someday though):
Moving day again (yes, one of those lights was out):
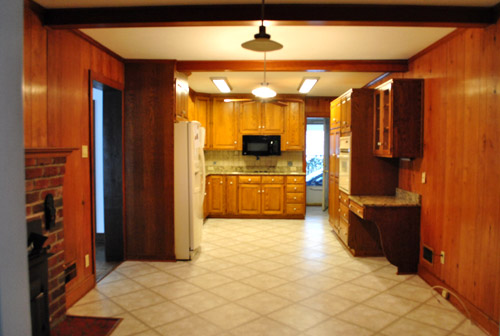
And now:
The crazy thing is that these photos were taken around the same time of day so it definitely demonstrates how much lighter and more cheerful the space feels now that the dark paneling is a thing of the past. Oh and here’s the budget breakdown:
- Olympic Premium No-VOC primer from Lowe’s: $12
- Behr 2-in-1 Primer + Paint (in semi-gloss white): already owned
- Kilz Clean Start No-VOC Primer from Home Depot: $20
- Olympic No-VOC paint (in Sesame by Benjamin Moore) from Lowe’s: $22
- New vent and outlet covers from Lowe’s: $43
- Brushes/rollers/tape/paint tray: already owned
- Total: $97
So there you have it. The kitchen madness has officially begun. As we mentioned here, we’re definitely going to do this in phases (gotta save our pennies and just take things on as we can afford them). But it should be a whole lot of fun. As in, more fun than a barrel of monkeys. And definitely more fun than priming that paneling five hundred times. Do any of you guys have long term kitchen plans like painting the cabinets or adding an island or upgrading the flooring or making some overhead lighting switches (we’re definitely in need of some of that too)? Oh the possibilities…
Psst- We announced this week’s giveaway winner. Click here to see if it’s you.

Gennia says
Oh my god, that looks so much better!!! What an amazing transformation! Props for seeing the potential beyond all the wood paneling. I have a lot to learn from you guys!
Lauren says
I am LOVING the white trim on the doorway. It has become like a frame around the frame wall, which I am a huge fan of. I also love how well the hall color and the kitchen color play together. very nice!
Kristina says
It’s absolutely beautiful. You made me actually get out my paint brush today. (After weeks and weeks of I’ll get to it) I’m painting my bathroom vanity red a la Katie Bower. Thanks for the extra push I needed.
Sherri says
Wow!I love the color & how it pops against the white.You two are definitely the rockstars of the DIY world. I’m also impressed that you don’t even need dropcloths. I use them & paint always lands on the spot that is uncovered! The white beams look so good with the lights-icing on the cake.Btw,your bright color choices have inspired me.I am spray painting pieces & accessorizing in a whole new way- stepping out of my earth-tone doldrums & having a blast. Thanks!
Kel says
All that for only $97 Woo to the hoo!
It really is true that paint is the cheapest way to make the biggest change. Love the colour. Can’t wait to see the next step and final product if the inspiration kitchen is anything to go by.
Liz says
Amazing transformaton. I must say those pink hydrangeas are fabulous. They really elevate the room. I was just telling my husband I want to plant a pink hydrangea–I think they look so antique/vintage/classic.
Claudia says
Wow! What a transformation? Looks great!
Susan (Between Naps on the Porch) says
Beautiful! Love the color! Don’t you just love how paint can completely transform a space?! I wonder if the old owners read your blog and what they think about the changes. They may be saying, “Why the heck didn’t we think of that?” :)
Chrissie @ Squeaky Shoe Stories says
Wow, this looks amazing! I’ll be sending this off to my better half to show how good painted panelling can look :-)
Leah - Bogue Living says
Absolutely brilliant!! I wonder who likes/d panelling? It makes me feel like I’m in a sauna LOL One of those things that will hopefully never go retro chic!
Rachel says
I really enjoy your blog. Just FYI. Or moreover, this is a comment that you don’t have to put your defenses up to read…
Anywho, I was wondering how Clara reacts to change. I mean, some days she must wake up from her nap or the next morning and just bam- things look different. . . how does she respond to your new kitchen color or such.
Or do you have tips for keeping her away while you are doing things? Getting household things done during naptime?
I am curious as she develops more language skills how she’ll react then. Anyway, I would love to hear about that!
Thanks for your blog!
YoungHouseLove says
We always joked that Burger probably thought it was normal to move all of your furniture out of a room once a month to paint it – and now it seems that Clara might start to think that’s the norm too. Haha. For example, when we painted the fireplace and took out the insert, she crawled over to it, pointed, giggled, and crawled off to read a book. So I guess she (and Burger) take it in stride and might even be mildly entertained by all of our “home work.” Thankfully she doesn’t seem distressed or confused though (she still knows it’s out kitchen where she eats, so her habits didn’t change and she didn’t seem thrown off in that way). As for keeping her busy while we work, when she’s awake one of us is with her (and the other one is usually on the computer writing posts or responding to comments or editing photos). So we only work on projects together when she’s napping or in rare instances where we can convince John’s mom to help us with some babysitting (as was the case with the big paneling project). Oh and her bedtime is 7:15 so we do a lot of projects in the evening once she’s in bed. Thanks goodness she’s an amazing sleeper- we just learned a few months ago that she’ll sleep right through loud hammering! We’re so thankful that she’s such an adaptable and happy girl.
xo,
s
Rae Ann says
I am knee-deep in kitchen plans also. I need to: paint cabinets; replace floor; 86 the, ahem, ‘retro’ florescent drop-panel fixture; replace backsplash; change floor. It boggles the mind!
Lindsey P. says
Wow! Y’all are going for the same color scheme in your kitchen that I am, although I have much larger expanses of wall to cover, so I plan to paint the walls grey and bring the grellow in through accessories and art and maybe a few glass-front cabinets painted grellow on the inside like in your inspiration photo.
Sandy says
I love the color you chose! It is one of my faves. I painted the kitchen in our last house that color. It was so cheerful. Your before and after is quite amazing. Thank goodness that dark paneling is history! Love following your blog. Can’t wait to see what you do next.
Melissa says
The bright white trim does so much! I am currently struggling painting my baseboard trim against a wood floor. How did you keep it so clean against your tile?
YoungHouseLove says
I used a thin line of green frog tape just to make it go super quickly.
xo,
s
Abby says
So very Fabulous absolute, classic fabulous, smile fabulous.!!!!! And love the grellow grey play! ( I cant wait till something happens to the tiling… even its a make-shift rip up the tile,… even before the cabinet repaint idea to then fudge and paint the floor. ) ( Sorry)
Magdalena says
Longtime reader. First time commenter. Have to say I think is my favorite project you guys have done yet in your new house. It is just such a major difference. It’s amazing what a little paint can do.
Rachie says
You did such a lovely job! We have that exact colour (well the UK version!) in our dining room and i love it with the white too – it looks so fresh!
Such a transformation!
Rachie xo
Kate says
insane how different it is!! looks amazing
Ana Silva says
Wow, what a great transformation. It looks so good now! I cannot wait to see that big opening you are doing. It is going to make a huge difference. So much natural light is going to come in. I am motivated to just go ahead and paint already.
barb calkins says
Can’t wait to PAINT CABINETS WITH YOU! We’ve been trying to get up the nerve to do it FOREVER. We also need a new color to brighten up the space. Do you aim to have a color palette that coordinates across the whole house (or most of it?) Love yer page! B
YoungHouseLove says
Yeah, we like to keep a whole house color palette in mind. Which doesn’t mean we can’t have a deep teal guest room or a grellow kitchen with some soft gray rooms – which we do – we just try to hold all the paint chips up together and even use something like an inspirational object (ours is a napkin on clearance from Crate & Barrel) to see how everything works together. Just so there’s some sort of subtle flow when you walk from room to room (instead of each room feeling like it could be in a different house). Hope it helps!
xo,
s
cindy says
Love the new kitchen…it doesnt even look remotely alike…we are going to paint the kitchen too which is currently a burnt orange….would you recommend going straight to the kilz no-voc primer? It was recommended that we use the valspar high def paint which can cover up colors too & is low VOC.
YoungHouseLove says
You could probably do really well with either (since you won’t have wood bleed going on, they both should have great coverage). Good luck!
xo,
s
melissa says
What a gorgeous room! I cannot wait until we redo our living room. It’s all over the place.
Teresa (Our Corner House) says
It is so much brighter and prettier! Great job and I personally like the bright white vent/outlet covers. They definitely feel so crisp and new.
We’ve been making our way through a total DIY kitchen remodel since we bought our place 6 months ago. Cannot wait until it’s done!
-Teresa
Whitney B says
great job guys!!!! it looks fffawesome (effing. awesome. ;) making me SO excited to see the delicious results when your cabinets are painted!! bot to rush you along, haha, just sayin.
the view from the kitchen area, across the table, through the hallway opening, to your gallery wall is a.maz.ing!
mad finger snaps to you (since your arms are so tired!)
Heldy says
O M G! What a transformation. I love it!
Brandan WH says
SOOO much brighter. What a different paint makes!
ShellyP says
OMG! I’m doing this with my cheezy “wainscotting” in my kitchen. You two continue to inspire me. how about a tutorial on how to switch out outlets and light switches? THanks!
YoungHouseLove says
So sorry! We tried to take pics and make a video but with the power off it was too dark. Maybe check out youtube.com for a tutorial? Good luck!
xo,
s
betty in munich says
Wow! What a huge difference, one of the best before and afters ever. Loved the video, do you guys listen to music while painting?
YoungHouseLove says
Yes- we had Pandora on the whole time. Music keeps us sane!
xo,
s
Bryn says
I’m stealing your color for my kitchen walls…they currently are green and red plaid wallpaper (I know…what were they thinking?!?!) and I’ve been looking at greens and yellows to brighten up the tiny, tiny space…thanks!!!
Anne says
WOW! What was the final color on the trim/fireplace? I was confused with all the primers! Will you paint the kitchen cabs the same color?
YoungHouseLove says
It was Olympic No-VOC paint in off the shelf white on the fireplace and Behr’s low-VOC paint + primer in off the shelf white on the trim and beams. Miraculously it’s all the same glossy white tone. As for the cabinets, we’ll either go with a white that “goes” and one that matches exactly (not sure which yet, we’ll probably research what paint might be most durable and bring swatches home to see how they work).
xo,
s
Briel K. says
That looks great! So bright and sunny now compared to before.
Turns out my sister and I will be driving through Richmond on Monday, not Sunday. Too bad we aren’t able to meet up! We are having a great time on our road trip though. Going to be exploring Charleston today! :)
YoungHouseLove says
Aw Briel, have so much fun!!! Picture us waving to ya as you pass through. And Burger will probably be panting and wagging his tail at that very moment.
xo,
s
SallyHP says
Beautiful! I love that bright, pretty color with all the crisp white accents. We’re in a new construction house and trying to take the paint one room at a time…thanks so much for your evolving floorplan that showed all your paint color changes; definitely made me think twice (or three times)about paining every room a different color :)
jennypenny says
I’m always amazed at the huge difference paint can make in a room. So bright and airy now. Love it!
Anne says
well that leads me to another question…do you think that the trim and the cabinets need to match if you are doing something in the white family? I was thinking of painting my cabinets an off white creamy color (Behr’s Seaside Sand)
but my 80s oak trim needs to be painted too in the rest of the house….wasn’t sure if I should stick with the seaside sand or go with the pure white.
YoungHouseLove says
If you’re going off white or cream with the cabinets I think the same color (or a very similarly toned) trim might be best so nothing looks dingy in comparison. I’m all about things that “go” though – so it doesn’t necessarily have to match (maybe the cabinets are a bit more creamy than the off-white trim for example). Good luck!
xo,
s
sarah k says
Love the new look! Can you do a primer on the light switch swap? I hired an electrician to install a new vanity fixture in our bathroom and he’s going to switch out the old light switch for a new one, but I’d like to do the rest of them throughout my house myself and a DIY primer from you guys would be great!
YoungHouseLove says
So sorry! We tried to take pics and make a video but with the power off it was too dark. Maybe check out youtube.com for a tutorial? Good luck!!
xo,
s
victoria says
kitchen looks so fab – nice job guys!! question for you about your frame gallery in the hall…my husband and i just hung a frame wall in our family room; however, all the frame are always tilting a little bit and looking crooked (UGH!) – any suggestions? appreciate your advice!
YoungHouseLove says
Command/3M makes awesome heavy duty velcro that’s 100% removable so it won’t hurt the walls long term (but it holds things in place really well!).
xo
s
Elizabeth says
I really love it. I dream of greenish/yellowish and white kitchens.
chrissa says
I am SO happy you’ve finally started.
Look at me all impatient with your kitchen ;)
Mary says
IT looks FABULOUS! So inspiring.
Lisa says
It’s funny–my takeaway from your video is this: you guys are such an inspiring couple. I love your teamwork and great spirit. You help me hope for good things for myself that are not all house-related–like a wonderful match with someone whose quirky interests and happy spirit mesh well with my own. :)
Hollie @ I'm Busy Procrastinating says
The kitchen looks so fresh and new! I started reading your blog after you moved into this house, so it’s all a first-time thing for me. I’m enjoying following along with every step you take, and it makes me want to buy a fixer-upper! We built our house custom three years ago, so there’s not much face-lifting to do around here. I know, woe is me. :)
Emily says
Love the transformation! It looks amazing! I’ve been toying with the idea of painting my cabinets a nice, crisp white as well and have seen this Rustoleum Cabinet Transformations product at Lowes and Home Depot. http://www.rustoleumtransformations.com/ Have you tried it or know anyone who has? Does it work or is it too good to be true? I’m a little hestitant to tackle such a big project without first doing my homework.
YoungHouseLove says
We haven’t tried it but other bloggers have (and have said good things). Maybe just google around for some reviews of it on other blogs? Centsational Girl had one I think (and loved it).
xo,
s
Jacks says
Terrific job!!!! Must feel good to see the result of your hard work :)
Shannon says
HOLY MAKEOVER BATMAN! That looks SO good!!!
Jesse says
WOW! I really love that color! The place is really looking great. I think opening up to the dining is a great idea, good luck!
Felicity @ Our Little Beehive says
What a huge difference! I’m glad you guys didn’t have to go the oil primer route. I gave up after two coats with water-based and just went straight to oil. Thankfully it’s still holding the bleed in a year ago…just not on the trim that I didn’t go back over with oil. Darn.
Kellie Buelo says
I so love it! As with all you do, I’m super impressed! I was so anxious for you guys to tackle that over all the other things in your home – all of which look awesome! Great work.
Nina says
What a diffence paint makes! Looks great! The room looks so much brighter.
I’ll be using the upcoming long weekend for some painting projects myself…
Heqther says
I’m new to your blog and am loving it!! Y’all are so inspiring! My husband and I are buying our first house next month and have lots of painting to do. What do you do with Clara during these big projects. We are trying to figure out how to juggle painting and our 3 month old.
Thanks!!
Heather