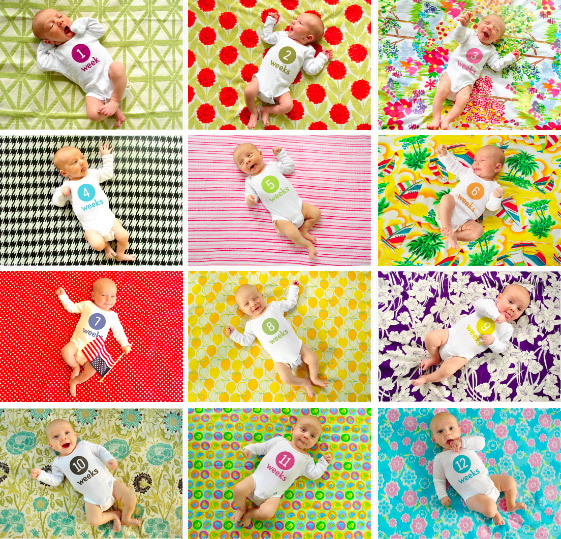
Many of you have asked questions here, on Flickr, and on Facebook about how the weekly photos that we’re taking to document Clara’s first year are really done. After answering a bunch of you individually, we figured the topic deserved a quickie “how to” post to collectively take care of anyone else out there who’s been pondering how we end up with images like this. You know we love a step by step tutorial. And documenting photos of your family can definitely fall under DIY art and decor – especially if they’re framed or even collected in a big coffee table book (which we eventually plan to do).
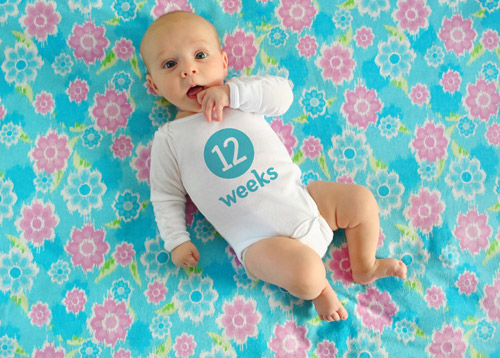
We’re not professional photographers, expert photoshoppers, or even seasoned baby wranglers… but after twelve weeks of taking shots of Clara on a fabric background and adding her age to her onesie “in post” we’ve developed a system that seems to work pretty well.
- Clara wears a plain white onesie (so far the same one, although she’s about to outgrow it) and we use Photoshop to add the text later
- We’ve only need one yard of fabric for each shot at this point, which helps keep the cost of the project down
- We usually snag our fabric at discount stores like Hancock or JoAnn Fabrics and use 40% off coupons to further save money
- We’ve also used already-owned fabric (and on-hand blankets & pillow cases) as backgrounds that are 100% free
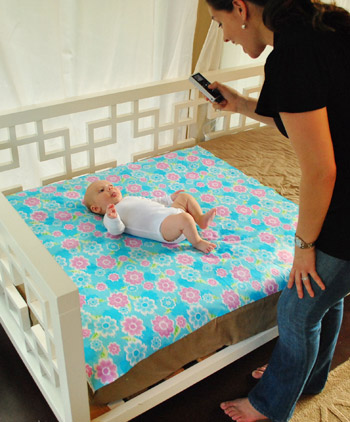
- We shoot them in the evening (around 5:30-6:30ish) because the light is indirect, which means no harsh shadows and no squinty baby
- We take the photos in our sunroom because it gets the most natural light (you might get a similar look by setting your baby on a blanket outside in the early evening).
- We use a Nikon D3000 (which we’re learning to use thanks to a lot of your advice).
- To keep photos looking consistent from week-to-week we always white balance the camera against Clara’s onesie before we begin (most DLSR cameras have a setting for this)
- We usually take between 75-100 shots to get one final frame we both love (yeah, we’re a little obsessed with the beanette)
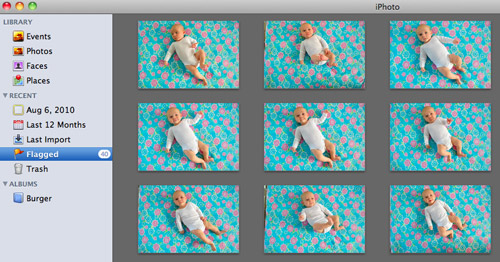
Now that we’re all caught up, I thought I’d breeze through what happens after we’ve snapped away at our tiny model and it’s time to finalizing our weekly image. First up is the sometimes long, often difficult process of selecting on our single favorite image. We use Apple’s iPhoto to sort through all of them, deleting the bad ones and flagging the good ones until we’ve narrowed it down to the one that not only represents Clara best at that age, but also isn’t too similar to past weeks’ photos (since we like them to feel as diverse as possible when it comes to composition).
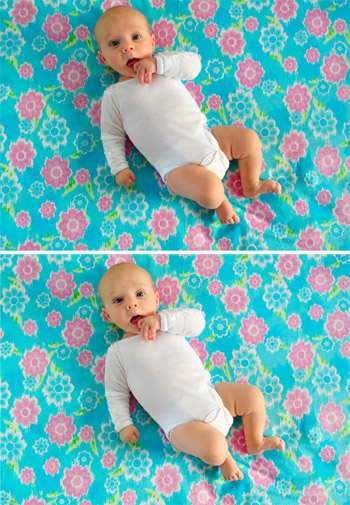
Once selected, we pull the winning image into Photoshop. Again, we’re not experts, but we’ve honed a pretty good process for achieving the fairly convincing look of text printed on a onesie. First we do some basic touch-ups like cropping the photo or lightening it up a smidge if necessary, and occasionally we do a bit of virtually smoothing out if the fabric has any crazy wrinkles that the iron didn’t seem to take care of (with the Healing Brush and the Clone Stamper). As a comparison of sorts, here’s the original picture on top as it looked straight from the camera, and the slightly lightened and de-wrinkled version below it:
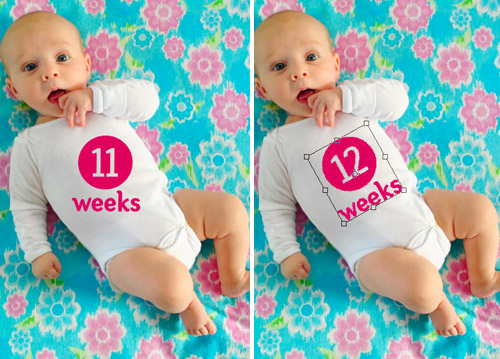
Then we add the text. At this point we usually just copy the text layer from the previous week’s file, but in case you’re starting from scratch we use a font call Fyra for the circled number and Otari for the word “weeks.” Both are free from the site FontSquirrel. Once dragged in we make sure the week is correct (in this case, we changed the week number to “12”) and we rotate the whole thing to line up with the angle of Clara’s body.
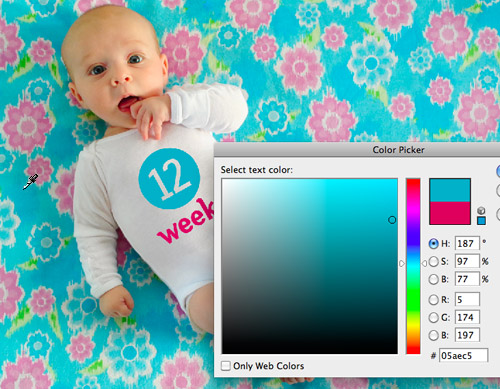
Then we select the color for the text. Usually we snag some color from the fabric itself (using the Color Picker tool) so the whole image coordinates, but sometimes we pick something complimentary to the fabric, like week one’s plum-magenta text that we liked against the green background.
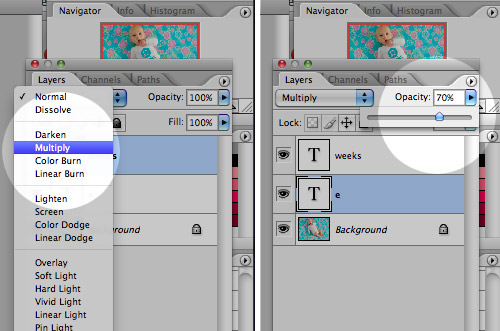
The trick we came up with for making the text appear to be printed on the onesie is a combination of layer style and opacity. We set the text layer to “Multiply” and bring down the layer opacity to somewhere between 60% – 80% depending on how saturated the color is. Note: sometimes we have to adjust the color slightly after these steps to make sure it hasn’t gotten too light or washed out.
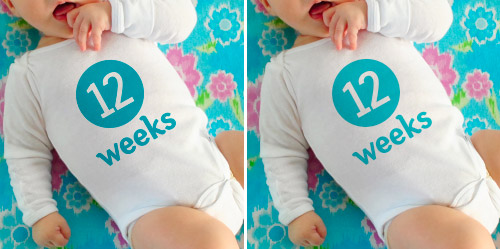
Here’s what the image looks likes before and after the “Multiply” and “Opacity” steps. You can see how it has subtly picked up the shading of the onesie behind it which tricks our eyes enough into thinking that it’s been there all along. Oh, and sometimes Miss Clara’s outfit is a bit wrinkled so I have to do some text chopping and skewing, but I haven’t gotten that process down enough that I’d feel comfortable advising others. Just trust me that it’s easier when her onesie is smooth (which is definitely the case lately since she’s outgrowing it)!
With that, we’re done!
Now that we’re nearly 1/4 of the way done with this year-long project we’re getting even more excited to amass all 52 images so we can get them printed in a nicely bound book for our coffee table (and the coffee tables of a few adoring grandparents). Plus we definitely think Clara herself will get a kick out of looking back at her weekly growth (and range of adorable expressions) when she gets a little older. Note: You can see bigger versions of the current dozen here on Flickr (we add the latest one every week there too).
Oh, and as for all of this fabric that we’re slowly collecting, the jury is still out on what we’ll do with it (make a quilt, sew some baby clothes, etc). Though our latest idea is that we’ll whip up an eclectic-looking banner or bunting that we can break out for birthday parties and even yearly growth pictures of Clara (sort of as an homage to her first year on Earth). At least until she gets too old and embarrassed to indulge us.
We hope this little picture play-by-play was helpful to anyone looking to adopt a similar method of documenting their child (or pooch, we could totally get behind that!). We’d also love to hear about any fun ways you guys have captured changes in your kids, family, or even your home – or if you’ve spotted someone else doing it in an interesting way (like the adorable Mila’s Daydreams project that we love). Spill those sentimental beans.
PS: If you’re looking to achieve a similar look but don’t want to bother with Photoshop, we learned of a company called Sticky Bellies that sells removable monthly milestone stickers that can be applied to any clothing.

Amanda says
Amazing! Great to know!
Laura in LA says
Loved the video and tips. Clara is adorable & Sherry motherhood becomes you, so pretty!
Melissa says
Thanks for this! I’ve been wondering how you do it in Photoshop and what you’ll do with the fabric afterwards. Such a good idea!
mariel says
hey guys!
i don’t know if you’ve heard of this little blog, but it’s a super-adorable pic-a-day of this little newborn and her daydreams! your weekly pics reminded me of this…obviously totally different, but so creative!!!
http://milasdaydreams.blogspot.com/
YoungHouseLove says
Oh yeah! We actually linked to it at the bottom of our post! Love it!
xo,
s
Angie Mae says
Great post, I’m saving this one for when we start our family!
Shareen says
So beautiful! And here I thought you DIY’ed yourselves some gorgeous onesies every week! Well, I guess you DID, just not in the way I thought. :)
Which photoshop program do you use? Adobe? I’m in the market for a good one…our first “child” (read: 65 pound 9 month old lab-border collie-terrier) is quite the photo subject!
YoungHouseLove says
Hey Shareen,
We have Adobe Creative Suite which comes with Illustrator, Photoshop, InDesign, etc. Of course we use Photoshop all the time (and rarely use the other programs) so maybe try buying only Photoshop to start?
xo,
s
Annapolitan says
My only question is how do you choose which one? She’s adorable in each and every one!!
Jasmine @ Eat Move Write says
This is a fantastic idea! I am definitely doing this if we ever get pregnant! (We’ve been trying for almost a year!)
Krista Haws says
It’s so much fun to watch Clara grow! I can’t believe how much bigger she is now than her first “photo shoot.” She’s just adorable! Thanks for the tutorial, I will use it when I get the chance with our first baby! :)
Ashli M says
Thanks for all the info and the adorable photo’s! Very sweet, We also love photo shop! Worth every penny
thanks for another great post!
~Ashli
http://www.maillardvillemanor.com
Amanda S. says
Love this post!!! What adorable photos and a great way of doing this!! And I totally vote for an adorable patchwork quilt. Look up postage stamp quilts (I think that’s what they are called) — mix 50% white patterned tone-on-tone fabric with 50% squares of these fabrics — it would be a treasure!! :) Look forward to seeing the coffee table book next year!!
shanna says
For everyone who wants to make these kind of photo’s but with a real printed onesie (also requires some photoshop knowledge); I’ve used this tutorial http://susanweinroth.typepad.com/a_little_bit_of_me/2008/04/those-cute-litt.html (see http://susanweinroth.typepad.com/a_little_bit_of_me/2010/07/at-one-month.html for her example, love that quilt btw) to make one. Nice plus of having a real printed onesie, is that is looks so cute one a little hanger in the nursery!
Kathi says
I’ve been looking for comparisons on various photo book companies (I’ve used my publisher and have been happy with them, but wanted to check out other options) and I stumbled on this in depth review….hope this helps those of you that are interested…
http://www.digitalhomethoughts.com/news/show/97676/the-great-photo-book-round-up-review-who-makes-the-best-photo-books.html
Tiffini S says
Where do baby photos come from? The dork! HA!
(Sorry, I had to…)
Marsha Ratzel says
I love this idea and have sent to all the young moms I know. Here’s my question which is really an extension of your idea. I have these three schoolhouses—one for each my children—where I inserted a school photo as they went k through 12th grade.
Honestly the schoolhouses are super ugly. They are an ugly dark brown and I’ve lost the little brass bell that hung from a cuphook at the top of the schoolhouse. Got them at a crafts fair way back in the day. But I love the history they show.
Any ideas on how to incorporate these kinds of things into a home? Because it won’t be too long before you’ll be collecting the famed school photos each year…wondering exactly where these very flattering (NOT) pictures of your baby should be immortalized.
YoungHouseLove says
Hey Marsha,
We’re actually planning to turn the 52 weekly photos into a coffee table book (through one of those book-making companies like Shutteryfly) so that’s what we’ll do with our photos. As for other meaningful photos (like the first day of school, etc) we love to display personal pictures in a grid above our sofa in the den, on our post card wall in the office, and in frames around the house. Check out this video to see many of our framing arrangements around the house: https://www.younghouselove.com/2009/08/getting-the-hang-of-it/
Hope it helps!
xo,
s
Ellen says
I love your weekly pictures!
I have been taking monthly ones of my little girl. I bought little stickers off of etsy. http://www.pickysticky.etsy.com. They work great.
I put her in the same chair every month and also use it as an excuse to buy myself fresh flowers. http://www.theronsos.com/month-by-month
Kelly says
so cute! I used to dress my son kai up as a bunny and different things when he was that age and I stayed home with him.
so fun!
http://www.kellyloves.wordpress.com
Tara says
Love love love this tutorial. you guys are such an inpiration in so many areas of life! I had. A couple quick questions: do you shoot these pictures in auto mode or do you set your own aperture/shutter speed etc.? Also when you say in the video that you are setting the white balance, is the wb setting in auto mode as well? Does the white balance set itself for all future pictures once you do the first white shot.? Sorry for all the questions, but a novice at photography like me needs all the help she can get. Thanks!
YoungHouseLove says
Hey Tara,
We’ve been practicing tough love and forcing ourselves to shoot in manual mode so we could learn the camera better. I found I’m most comfortable shooting in Aperature mode (so shutter speed adjusts automatically). I keep a fairly small aperature because it allows me to shoot in lower light and capture Clara’s fidgets, and then I compensate for any other low light using the exposure setting on the camera. That’s part of how I was able to get vibrant looking photos in a not so vibrant room as seen in the video (oh yeah, I also have set our camera to “Vibrant” color mode in our Settings menu).
As for white balance, often we leave it on auto but in situations like this where it’s important that Clara’s onesie look white from week to week we use a custom white balance setting (the one that allows us to set it by taking a photo of a white object). You need to do before each shooting session because even subtle changes in lighting (whether it be because you’ve switched rooms, time of day or in our case a whole new week) can skew a photo into looking too blue or too yellow if you rely on an old custom white balance setting.
That’s at least what we’ve figured out so far so I hope it helps!
-John
Kimberly V. says
I read through all your comments and didn’t see an answer to a question I have. If you’ve answered it before I’m sorry for repeating. On with the Q… How do you get your aerial shots of her? Do you use a latter or a chair? I wouldn’t think a tri-pod could get that high. It looks perfect how the cameras right over her. Can you post a behind the scenes pic of you taking the million pictures of her? I’d like to get an idea of how the magic happens. Thanks. :)
YoungHouseLove says
You can see in the video how John snaps those shots (he’s really shooting photos in the video). He just stands over her and shoots. It’s not right above her, just angled so the camera catches her from above. He’s 6′ tall. Hope it helps!
xo,
s
Nicole says
Fun post! I just bought some monthly onesie stickers for our soon-to-arrive baby girl on Etsy.
http://www.etsy.com/shop/pickysticky
Jo says
Thanks for the tips! I think the fabric would look fab made up into a ‘shaggy’ quilt. Very easy to do – it was my first ever sewing project. Google should be able to tell you how to do it.
Randa says
Clara is so adorable! I could just eat her up! (not really, don’t worry :) But all of her squirming and wiggling is too cute.
It was fun to watch Sherry photograph John photograph Clara. :)
Laura says
Our family tradition was “first day of school” pictures. My mom took a separate picture of both me and my brother standing next to my dad. It was cool because you could see how much we grew each year (because my dad stayed the same height, obviously!) At my HS graduation party, my mom had all the photos on display – I thought it was pretty cool. To this day, even though I am in grad school, my mom emails me to ask if I can send her a first day of school picture!
Jennifer says
Two things: First, Clara is adorable in the video! I loved every minute of minute of it! If ever down the line, she seems to lose her focus on you/the camera, an Etsy seller makes “Lens Pets” that are cute and clever!
http://www.etsy.com/shop/mandeefranee
Though, Clara does seem like a natural in front of the camera. :)
Second, I just sent you a card in the mail for your office wall, when come to find out, you posted your reveal the same day! Anyway, I still hope you enjoy it and congratulations on finishing the project — the room looks great!
Chari says
Awwww! Thanks for sharing the video :) Maybe I’m just a little emotional (I’m due Dec 1st)… but watching the vid brought some tears to my eyes. What a lovely baby! You look great too! Cheers!
Sandi says
Way cute! How about donating the fabric to someone who will then make something (clothes, pillows, dolls..) for less advantaged people?
Yessy says
I love Clara’s Weekly Photo. I would have liked to do something similar, but I did not prepare myself, so I just take picture of my little one every Thursday, you can see them on my facebook, what advice you can give me to improve this great experience?
Great Job, Congrats!
I love to see Clara’s Posts!
YoungHouseLove says
Hey Yessy,
Just grab a few of the tips from this post : photograph her in a sunny room around dusk, turn off the flash so it doesn’t have a glare, and follow your heart when it comes to the background and the composition! Just have fun with it!
xo,
s
Amanda says
I love the pictures you guys have been taking of Clara! I used photoshop in a similar way when I was planning my wedding. We wanted a unique way to display table numbers so I made a collar for my dog with flowers and a blank card and we added the numbers on with photoshop. It added a personal touch to our reception.
heather j. says
Okay, I know I may be a bit biased, seeing as I am obsessed with YHL, but she is one stinkin’ cute baby. Like, really cute.
Love the fabric choices, too :)
Amanda @ longroadset says
I just wanted to tell anyone who doesn’t want to dole out the cash for photoshop or photoshop elements, there is a free program called GIMP you can find it at http://www.gimp.org/ it’s virtually the same as photoshop, a little less fancy though.
But well worth the 2 minutes to download it.
Queenie says
Yep ,its still diy ,but ohhhhhhhh soooooo cute !!!
Amanda says
I haven’t actually tried this yet since my due date isn’t until November but I imagine that you could make the stickers pretty easily using sticker paper in your printer. For those that don’t have PhotoShop and want to be able to customize the font, colors, etc a bit more than the ready made stickers allow. The sticker paper runs about $10 a pack I think. Not 100% sure that this would work but might be worth a try.
Carmen says
Hi guys, thanks. I meant on your computer. How do you merge your pictures into one location? or don’t you?
YoungHouseLove says
Hi Carmen,
Lately we’ve been storing everything in iPhoto, but right now our photos are split between our two computers. Every year we combine them and create one back-up CD that we store in our safe. Hope that helps!
-John
Newlywed and Decorating says
I absolutely love this idea!! What a treasure to have. I will tuck this idea away for when I need it!
Anna, Sydney says
Funny. I was practically screaming at the screen “quilt! QUILT!” and now I see you already considered it. I know you don’t sew, Sherry (or John? hahah), but perhaps someone in the family or friend circle or BLOG circle would take that on for Clara. Make it big enough for her to use even as a young adult. Take to college. Pass on to her babies when THEY go to college…
Nice post as always. And Clara is getting cuter by the day. If that was even possible.
Jessica says
Looks awesome! I just wonder how well it will work when she is sitting up and there is not as much visible tummy when she is in that pose for a numbered week. I’m curious to see what you all do!
Brittany says
I think wk 11 has to be my favorite! It’s so cute to see how much she changes. Also I love yall’s blog & how you update everyday, nothing is worse then reading blogs that only update a couple times a month!
Diana says
I am so hooked on you guys. Now that you have Clara – I’m here every day. I especially love the videos, she is such a wiggle-worm! And her expressions – from day one with funny tongue pictures, I was smitten. I sound like a stalker, don’t worry, I’ve had children of my own. Problem is, they are teenagers now – long past the cute stage. Thank you for sharing her preciousness with all of us. You amaze me with what you accomplish – I think “shower” was on my wish list for every day for about 3 months.
Carolyn says
I love seeing the weekly pictures in one big group. It’s amazing to see the changes in such a small amount of time!
As for traditions and memory keeping, I have a strange, little question for you: I would like to start doing a monthly handprint with my daughter, but she is already almost 18 months old. Do you (or other readers) think it would be silly to start doing this now? I wish I had started this when she was first born, but sleep deprivation has prevented me from thinking of it earlier! Do you think it’s weird to start a tradition (be it child related, or wedding anniversary) after not doing anything for so long? I hope this makes sense, I’m a little tired today!
YoungHouseLove says
NO way! Do it now. She’s still so small and you and she will love that you’ll have a collection of growing hand prints to look back on. Hope it helps!
xo,
s
Happy Mom says
To document the growth of our wee ones for friends and family, I choose one picture each month and add a calendar “border” to it at Shutterfly. The borders are free, so it costs as much as a regular 4×6 print. I mail them to out of town grandparents, aunts & uncles. They just love to see each month as they grow! Most of them have them all saved together in a special spot. In almost 4 years I have only missed a couple of months!
Rebecca @ fresh chick design studio says
Ok…this project is way too cute!! Now I need to have another baby just so I can do this (: and design another nursery (; This is such a great keepsake!
Stephanie D says
Really, if she were any more adorable, I am SURE I would just die. I loved this video. Plus the photoshop tips were great!
jenn says
ridiculously cute
TJ says
My goodness… I have loved this idea since I saw your first post, but seeing all the different shots, I have no idea how you would ever choose, she is way too cute in all of the photos!
I am not a clucky person at all… Bambinos are not in my plans for the next 5 years, but I have to say watching that video really warmed my heart and made me want one of my own.
You guys are amazing xx
step says
Great Post. Love babies.
Marcy Tate says
I’d just like to say a huge given out loud: Everything you guys do is so amazing. This week is my favorite fabric so far!
Kita says
Hey guys!
I’m getting a Nikon D3000! I am so pumped up! I can’t wait so I can start taking pictures of … um anything! lol
-Kita
Jane Kostelyk says
Thanks for the video! Now how about a video tour of the house? Its nice to “interact with you”. :o)
YoungHouseLove says
Hey Jane,
Here’s a very old video tour of the house. We actually have a new one on the agenda once we finish a few more makeovers that we have in the works! Stay tuned…
xo,
s
Natalie Hua says
Clara is the cutest ever and you guys are the awesomest parents! I’m no where near but when I become a parent, i wish I should be just as fun and thoughtful as you guys! Clara is one lucky princess!
nue says
does this beautiful little girl ever cry? :)
YoungHouseLove says
Haha, well she did get frownie for a second in the middle of the video. But we’re so lucky she’s such a happy little girl!
xo,
s