Many of you have asked questions here, on Flickr, and on Facebook about how the weekly photos that we’re taking to document Clara’s first year are really done. After answering a bunch of you individually, we figured the topic deserved a quickie “how to” post to collectively take care of anyone else out there who’s been pondering how we end up with images like this. You know we love a step by step tutorial. And documenting photos of your family can definitely fall under DIY art and decor – especially if they’re framed or even collected in a big coffee table book (which we eventually plan to do).
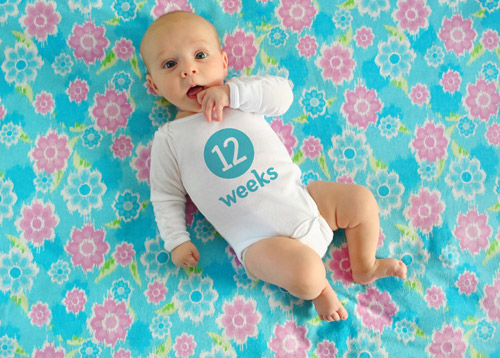
We’re not professional photographers, expert photoshoppers, or even seasoned baby wranglers… but after twelve weeks of taking shots of Clara on a fabric background and adding her age to her onesie “in post” we’ve developed a system that seems to work pretty well.
- Clara wears a plain white onesie (so far the same one, although she’s about to outgrow it) and we use Photoshop to add the text later
- We’ve only need one yard of fabric for each shot at this point, which helps keep the cost of the project down
- We usually snag our fabric at discount stores like Hancock or JoAnn Fabrics and use 40% off coupons to further save money
- We’ve also used already-owned fabric (and on-hand blankets & pillow cases) as backgrounds that are 100% free
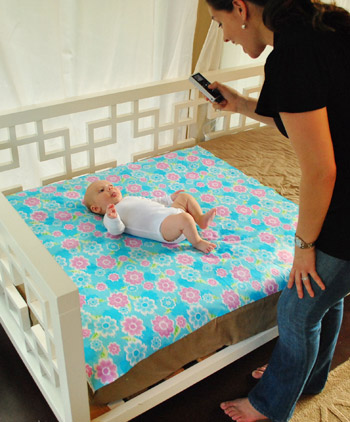
- We shoot them in the evening (around 5:30-6:30ish) because the light is indirect, which means no harsh shadows and no squinty baby
- We take the photos in our sunroom because it gets the most natural light (you might get a similar look by setting your baby on a blanket outside in the early evening).
- We use a Nikon D3000 (which we’re learning to use thanks to a lot of your advice).
- To keep photos looking consistent from week-to-week we always white balance the camera against Clara’s onesie before we begin (most DLSR cameras have a setting for this)
- We usually take between 75-100 shots to get one final frame we both love (yeah, we’re a little obsessed with the beanette)
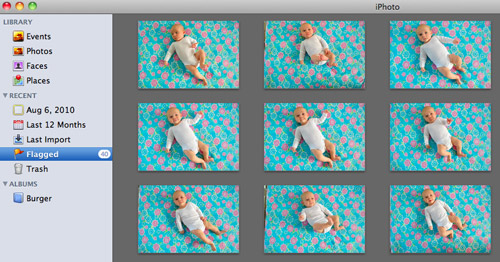
Now that we’re all caught up, I thought I’d breeze through what happens after we’ve snapped away at our tiny model and it’s time to finalizing our weekly image. First up is the sometimes long, often difficult process of selecting on our single favorite image. We use Apple’s iPhoto to sort through all of them, deleting the bad ones and flagging the good ones until we’ve narrowed it down to the one that not only represents Clara best at that age, but also isn’t too similar to past weeks’ photos (since we like them to feel as diverse as possible when it comes to composition).
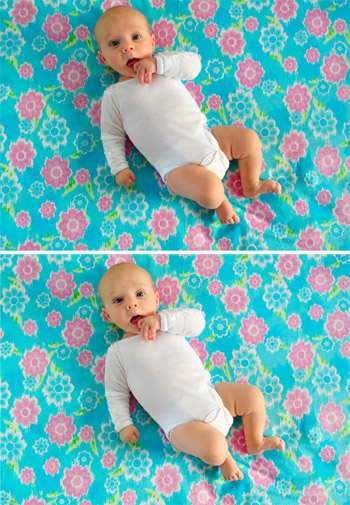
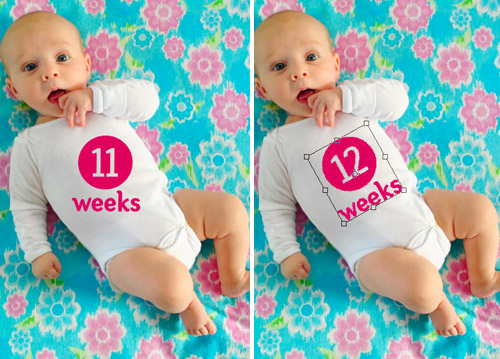
Once selected, we pull the winning image into Photoshop. Again, we’re not experts, but we’ve honed a pretty good process for achieving the fairly convincing look of text printed on a onesie. First we do some basic touch-ups like cropping the photo or lightening it up a smidge if necessary, and occasionally we do a bit of virtually smoothing out if the fabric has any crazy wrinkles that the iron didn’t seem to take care of (with the Healing Brush and the Clone Stamper). As a comparison of sorts, here’s the original picture on top as it looked straight from the camera, and the slightly lightened and de-wrinkled version below it:
Then we add the text. At this point we usually just copy the text layer from the previous week’s file, but in case you’re starting from scratch we use a font call Fyra for the circled number and Otari for the word “weeks.” Both are free from the site FontSquirrel. Once dragged in we make sure the week is correct (in this case, we changed the week number to “12”) and we rotate the whole thing to line up with the angle of Clara’s body.
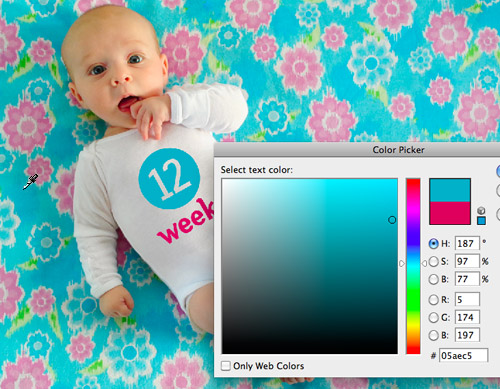
Then we select the color for the text. Usually we snag some color from the fabric itself (using the Color Picker tool) so the whole image coordinates, but sometimes we pick something complimentary to the fabric, like week one’s plum-magenta text that we liked against the green background.
The trick we came up with for making the text appear to be printed on the onesie is a combination of layer style and opacity. We set the text layer to “Multiply” and bring down the layer opacity to somewhere between 60% – 80% depending on how saturated the color is. Note: sometimes we have to adjust the color slightly after these steps to make sure it hasn’t gotten too light or washed out.
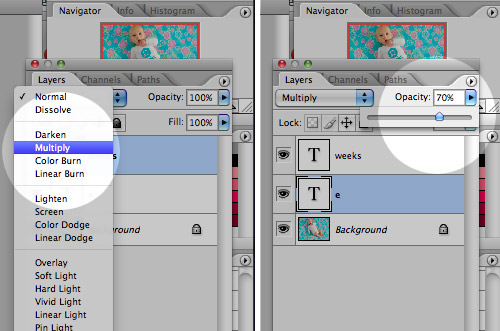
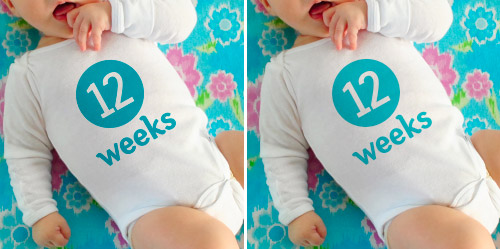
Here’s what the image looks likes before and after the “Multiply” and “Opacity” steps. You can see how it has subtly picked up the shading of the onesie behind it which tricks our eyes enough into thinking that it’s been there all along. Oh, and sometimes Miss Clara’s outfit is a bit wrinkled so I have to do some text chopping and skewing, but I haven’t gotten that process down enough that I’d feel comfortable advising others. Just trust me that it’s easier when her onesie is smooth (which is definitely the case lately since she’s outgrowing it)!
With that, we’re done!
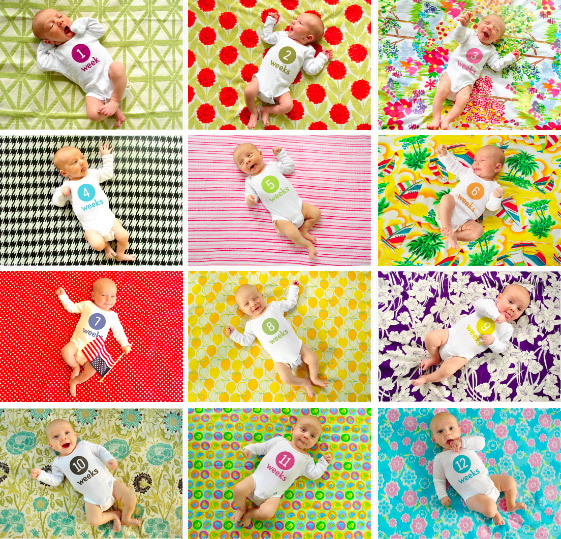
Now that we’re nearly 1/4 of the way done with this year-long project we’re getting even more excited to amass all 52 images so we can get them printed in a nicely bound book for our coffee table (and the coffee tables of a few adoring grandparents). Plus we definitely think Clara herself will get a kick out of looking back at her weekly growth (and range of adorable expressions) when she gets a little older. Note: You can see bigger versions of the current dozen here on Flickr (we add the latest one every week there too).
Oh, and as for all of this fabric that we’re slowly collecting, the jury is still out on what we’ll do with it (make a quilt, sew some baby clothes, etc). Though our latest idea is that we’ll whip up an eclectic-looking banner or bunting that we can break out for birthday parties and even yearly growth pictures of Clara (sort of as an homage to her first year on Earth). At least until she gets too old and embarrassed to indulge us.
We hope this little picture play-by-play was helpful to anyone looking to adopt a similar method of documenting their child (or pooch, we could totally get behind that!). We’d also love to hear about any fun ways you guys have captured changes in your kids, family, or even your home – or if you’ve spotted someone else doing it in an interesting way (like the adorable Mila’s Daydreams project that we love). Spill those sentimental beans.
PS: If you’re looking to achieve a similar look but don’t want to bother with Photoshop, we learned of a company called Sticky Bellies that sells removable monthly milestone stickers that can be applied to any clothing.

amc says
Good work youngsters…a happy baby like Clara must have fantastic parents!
Grace says
This is such a fantastic idea! You guys are great. I wish I would have thought of this…now we have four kids and I think we missed our window LOL!
Sophie says
All the picture look SO cute all together! Personally, my favourites so far are the pose in week six and her expression in weeks eleven (:
This is going to be such a wonderful thing for Clara to look back on when she’s older!
Cordia says
You could make a quilt out of all the fabrics that you can use to hang out on in the park or whatever with Clara and any future little ones.
Jessica says
This is such a great idea and I loved seeing the video of Clara in action! She’s totally adorable. At the end of the project, what about taking a square from each piece of fabric and making a big colorful crazy quilt? As for any leftover fabric, I wonder if it could be donated to an organization that makes quilts for hospitals or nursing homes.
Melanie says
Oh if only I had known about this when my little guy was born 2+ years ago. Clara is just way too cute. This video was adorable, combined with the song you chose. Brought a tear to my eyes. Good work Petersiks!
Kelly says
I am SO doing this when I have a baby :)
erin says
I am sure this has already been suggested, but make a quilt or something similar out of the fabric! Either just small squares from each or more!
YoungHouseLove says
Thanks for all the fabric ideas guys- it seems like the consensus is to consider a quilt. Duly noted!
xo,
s
Kelsey says
Just a tip–when Clara gets wiggly, you will need to somehow secure the fabric because she’ll start grabbing and wrinkling it. We used those stickers on our son’s onesie and around seven months old he started pulling it off before we could take 2 or 3 photos!
Here’s the collection of 12: http://tinyurl.com/27c6wfg
YoungHouseLove says
Thanks for the tip Kelsey! We’re sure we’ll figure something out. And your collection of photos is adorable!
xo,
s
Jen says
pickysticky.com also has stickers you can apply to a white onesie to take similar pictures. For those of us (me) who lack any photoshop skills whatsoever.
Clara’s a doll! Congrats!
Jessica @ How Sweet says
She is just too precious!
Jen @ The Decor Scene says
Love the step by step. So at the end of the 52 weeks, you will have 52 different fabrics? WOW! Cute ideas for the fabric in the end.
YoungHouseLove says
Hey Jen,
We actually mentioned that sometimes we use fabric or textiles that we already have on hand (like pillowcases, baby blankets, and duvets) so we don’t have to buy fabric each week. We’ll probably be left with around 30 1-yard pieces of fabric when it’s all said and done.
xo,
s
Susan says
So cute! My vote is for a quilt with all those fabrics…that way once she gets passed the ’embarrased’ part of life,she will treasure it forever!
Dawn says
What an awesome tutorial! You guys are awesome and I love love love your choice of fabrics every single week!
erika says
my vote is quilt, for sure!!!!!
Amanda@The Hand Me Down House says
These are some wonderful tips, thank you! :) I didn’t know you were adding the week to the onsie on the computer — it looked so real. And I guess I’m not the only one who was going to suggest a quilt. :)
Alyzande says
I’m sure it was a great movie, and really useful for those that like to make photoshop changes. However I was more transfixed by Sherry’s natural hip-sway-baby-soothe and your family happiness. Babies rock!
Holly West says
How much fun was that? Love seeing video of Clara.
Vicki says
Nice little step-by-step! Just wondering if you plan on doing this for future bambinos? My parents started out with a ton of photos for me (the first) and then as the novelty wore off it the number decreased sharply for my silbings! :P
YoungHouseLove says
Hey Vicki,
Of course! John’s a middle child so we know all about making sure we make just as much of a fuss over every baby. Honestly, how could we not? We’re mushy obsessed parents!
xo,
s
Jess says
I work with Photoshop a lot, and never really understood what “multiply” did until now, so thanks for the tip!
shanna says
The cuteness overwhelms. OMG.
Liz says
Oh, whew – I’m glad to learn you are using Photoshop for this. I knew you guys were too frugal to be buying/making special onesies every week! ;)
hunter says
You might want to consider using some of the fabrics to cover the photo books. There are a couple of book binding/covering techniques that would let you do that (it’s not hard, it just takes a bit of practice). It sounds like you’ll have way more than you would need for a quilt, so this could be fun too!
Sara says
LOVE IT! I think it would be cute to use the fabric as a photoalbum cover! Do a small quilt with all the fabrics and then use the “quilt” to cover the photo album!
Lindsay says
She is adorable! I am sure you guys are just eat up with her! My husband and I are talking about starting a family soon too! Just wondering how long you guys waited after getting married to have Clara?
P.S. I use photoshop too… I love it! I can pull my Autocad drawings right into the software and render them that way… it is great!
Lindsay @ A Design Story
YoungHouseLove says
Hey Lindsay,
We conceived just over two years of being married (and had Clara a few months before our three year anniversary). Hope it helps!
xo,
s
Laura says
make a quilt!!!
Barbara says
You know, if you have other babies, you’re going to have to do this for all of them or they’ll feel all left out (as I did – 4th child…first picture of me was at six months!!). I hope you have a plan!! :)
YoungHouseLove says
Hey Barbara,
Of course! John’s a middle child so we know all about making sure we make just as much of a fuss over every baby. Honestly, how could we not? We’re mushy obsessed parents!
xo,
s
Rebecca Smith says
What a cute idea to use fabric for the background! I did something similar with my little boy, except I used the same blanket as a background and made sure that the same sheep stuffed animal was in each one. It’s fun to see how he starts to get MUCH bigger than the animal each week!
Here’s a link:
http://www.facebook.com/album.php?aid=2108156&id=31403689&l=386ac54496
Definitely wished I had done white balance on each one so they are a coherent group. Wondering what to do with these at the end of this year…
Elissa says
thank you, thank you for this post! This is such a wonderful idea and all of Clara’s pictures have turned out beautifully, thanks again for sharing! I can’t wait to do with when our little one is born!
Rebecca Smith says
ps… it DOES start to get tricky when they can sit up, crawl, move, etc… :) Looking forward to your tricks on how to keep her still!
Dennis says
Those are going to make an amazing book!
suzanne says
Precious! I don’t know how you could be anything but obsessed with her!
… so I’m wondering… just how many hours goes into putting together a post like this? I was amazed at all the steps you take!
YoungHouseLove says
Hey Suzanne,
Good question! Recording, uploading, and editing the video took about 2 hrs, taking screen grabs of photoshop as we edited the pic took another 30 mins or so, and writing up the post was probably another 45 minutes. So about 3.5 hours or so? We recorded and edited the video this weekend and then wrote the post a bit later (early this week) though- so it’s broken up. But yes, blogging does take a lot more time than most people realize! Especially because you have to do (and photo-document) the projects first, and then blog about them. The funny thing is that we spend over 10 hours a week just answering comment questions so we definitely stay busy!
xo,
s
Jennifer W. says
You two are just so gifted…honestly…look how far you’ve come…from simply blogging for your fam to keep up with house reno’s to photoshop experts (I know you say you aren’t, but to the rest of us you are!) with your full time blog. I don’t know you, but am so proud of you:)
bridget b. says
how cute! i totally love the fourth of july picture!
p.s. am i the only one that thinks that Clara resembles her Grandpa P(in photos at least)?
YoungHouseLove says
Hey Bridget B,
Oh yeah- there’s definitely a resemblance! Could be the baldness though…
xo,
s
Karla @ {The Classy Woman} says
You guys are the 2 most creative people I know! I remember when you first began this project-I was in love with the idea. I am going to do this one day too when I have children. It’s a bit time consuming but well worth it! For people that aren’t blogging about the progress, they could always save them in a big folder with the date and do the photoshop part later (age in weeks), color adjusting.
I love the idea of putting them in a coffee table book. With so many affordable photobook options, it’s a wonderful and relatively inexpensive gift for family. :)
Fran says
She is so cute!!! Wish I had done this with my 3 boys.
Alexandra says
We are so excited about this idea and will be sure to follow by example once our bean arrives!
Thanks!
Anna J. says
Great idea you guys. Will provide smiles for your family for years to come!
sonya says
I LOVE LOVE this idea.. I don’t have babies yet but I’m totally bookmarking this because it’s something I could see myself doing. I am all about sentimental memory-making unique stuff like this. Thanks for sharing all the details!
Tanis says
I love this project! I vote that you should make up a quilt with all the fabrics that you have amassed at the end of the year. This is such a great idea, Clara is so cute!
Loren says
I love those little triangle party banners people have been using all over the internet I think it would be fantastic to use some of the fabric to make a ‘Happy Birthday Clara’ banner. With 30 odd yards of fabric I’m sure you would still have plenty left for a quilt/blanket.
There’s a tutorial for the type of thing I mean here (not my blog)
http://brassyapple.blogspot.com/2010/01/party-box-1-banner-tutorial.html
Design Love says
I love how you did this….I am so happy to learn any tricks like this, as I am not that computer savy! Thanks so much,and I think the bunting banner will be a great idea! I love them and am wanting to buy one from Etsy! I can’t sew either…..grrrr!
Beautiful baby btw…
Cinders
Amber says
This is the sweetest idea ever! I loved seeing her pictures. Her expressions are priceless.
Kelley says
I so love, love, love this idea. The compiled year of photos will be such a treasure one day. The colors are so fun and festive which seems to capture you new lives with Miss Clara to a “tee” (pun intended) ;)
Jen says
I love this idea! I wish I’d done it, too. I was thinking it’d be really fun to use any scraps (after you’ve done the quilt for her to keep, of course) to make some little flags to go with your little streamer thing in your office/playroom area. You could do like three strands of flags with like 17-18 on each one and then crisscross them for her to look at. That would be really cute!
Sara @ Russet Street Reno says
As a blogger, I understand how long going through pictures and choosing the perfect one can take. Then editing the winners is another long process. I applaud your efforts, and WOW thet results are so worth it! She is going to love looking at these when she is older!
CarMaj says
Great idea and thanks for the step-by-step! Clara is such a cutie pie!!
Lindsey Kaye says
I love these – and I’ve been wanting to ask you (or a photoshop familiar friend) how to get the week you add to be shaded and wrinkled like the fabric underneath. Now I know, and will be promptly putting that new skill to use!
I love the idea for party bunting and a keepsake quilt. You’ll have plenty of fabric for lots of projects; your own already wonderful ideas and the many more that will come from your readers. My husband and I have been putting away all of our formerly favorite t-shirts (mostly band shirts) to make a quilt for our first little one. We thought we’d make just one to pass along from child-to-child but after this last move and another closet/dresser clean-out it looks like we might have enough for each to have their own someday!
Christine says
I love all the fabrics, such pretty colours and patterns!! Though none compete with the cuteness of that little bebe!
Snickrsnack Katie says
I have loved this idea from the beginning and I most definitely want to do the same exact thing when I have a beanette of my own! :-) Thanks for the play by play!