When we decided we wanted to do a wood planked ceiling in our sunroom, I think I kind of just envision walking into Home Depot, strolling down the beadboard ceiling aisle, and loading up our cart. Piece of cake. Easy as pie. Insert third dessert related idiom here.
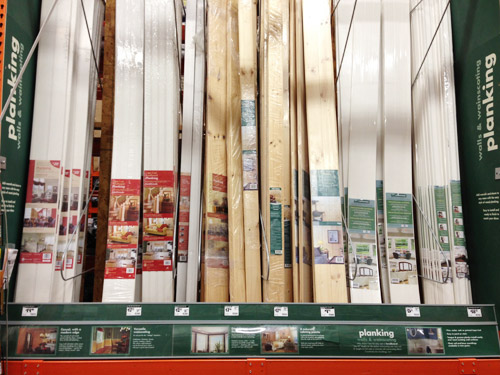
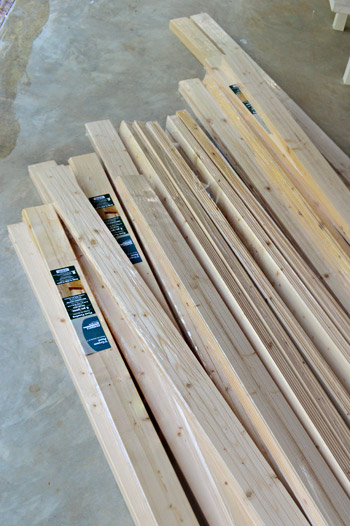
Well, turns out there are lots of options for achieving the beadboard look. Historically, beadboard was made up of individual tongue-and-groove planks – kinda like a hardwood floor. Except between each board is a little ridge or indentation, aka the “bead.” Just look at this assortment of choices…
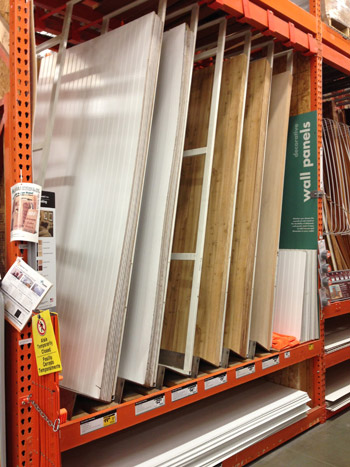
There are also lots of panel options. You know, those full 4ft x 8ft sheets of the beadboard pattern? We considered this option first because it seemed to be the most affordable (often less than $1 per square foot), but ultimately decided against it. Partly because installing these huge panels on our high ceiling seemed somewhat daunting (although Rhoda’s tutorial with the rented drywall lift made it seem less so, but we’d need to rent a truck to get them home and also had to factor in the cost of renting a drywall lift, which might counteract the savings). Mainly we skipped them because using panels meant there would be seams where one sheet meets another one – and, although you can cover those up with trim, we decided that on our sloped ceiling it just wasn’t the look we were going for.
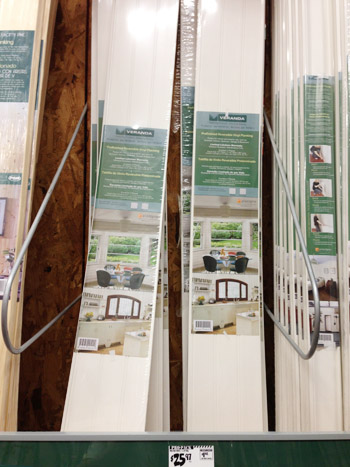
The next option we considered most seriously were these vinyl planks. Vinyl is a tempting option in an outdoor space because it won’t rot or warp from exposure to moisture. I read some message boards where people complained that these looked “too plastic-y” but the deal killer for us was actually the price. These were about $1.79 per square foot, so they were nearly twice as expensive as the panels (which would essentially double our project cost right off the bat).
Knowing we wanted a more authentic plank look (versus a panel) and that we didn’t think the cost & look of vinyl were ideal for us, we eventually narrowed all of our choices to these: individual tongue-and-groove wood planks. Both Lowe’s and Home Depot sold similar options (neither of which are online unfortunately). The Lowe’s option came in under that $1 per square foot mark, so the price was right. And we were also excited to be getting a more traditional look – both without any fake seams and with some real wood grain in the mix. The final cost for 20 six-packs of 6″ tongue-and-groove planks worked out to be $297 (at $0.94 per square foot). Admittedly it was a bit more than we pictured ourselves spending on this part of the project (we originally guessed that we could come in under $250) but we ultimately just want a result that we’re happy with for the long haul.
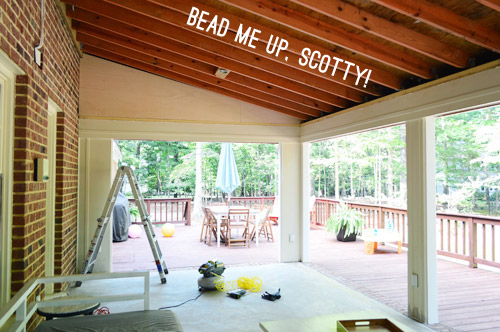
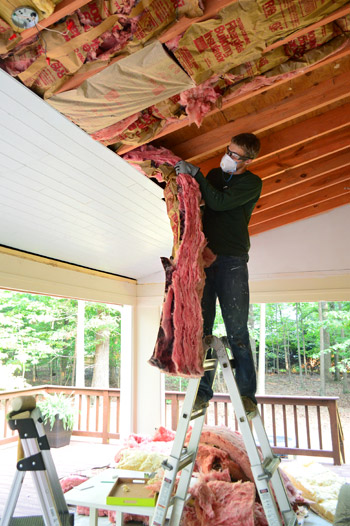
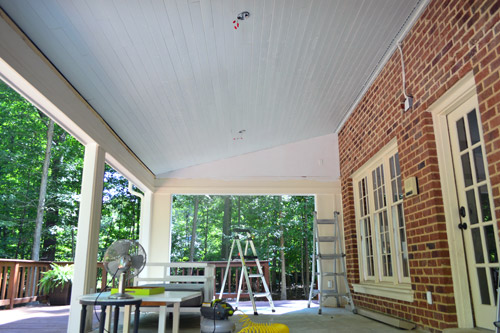
Unlike the large beadboard panels, we could fit these in our car and install them without buying any additional equipment like a scaffold or a drywall lift – but just like the other options, this choice also had its downsides. For one, installation would be more tedious since each board is only 6″ wide, meaning all 40 rows would need to be installed piece-by-piece. And wood is also susceptible to moisture issues (warping, rotting) if it’s not properly protected and maintained. Thankfully our entire sunroom’s exterior is wood, which has held up well for decades – so we had confidence that our new sunroom ceiling would stand the test of time if we prepped it properly. Which meant that before any planks could be installed, we needed to prime and paint both sides of them… one by one. Even though the backs won’t show we primed and painted them anyways so the whole board would be protected and sealed in.
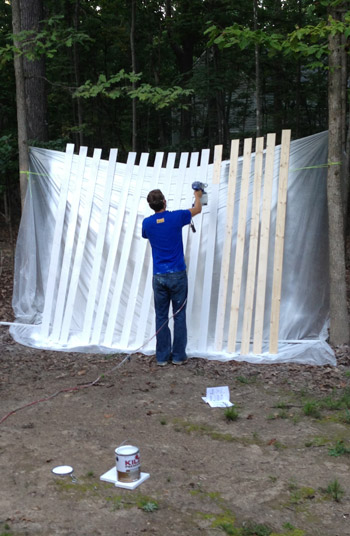
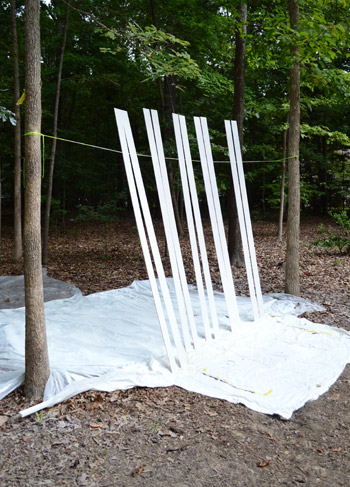
Pictured above was my first painting station, which didn’t work out so hot because the plastic drop cloth kept sticking to the backside of the boards. So eventually I figured out a method that worked: drop cloths on the ground and some nylon rope tied between two trees. I could get 10-12 planks done at a time (getting two done with one swipe of the paint sprayer – spraying their backside and then flipping them right over to do the front). Update: Here’s an affiliate link to a paint sprayer that’s similar to ours on Amazon since ours isn’t available anymore).
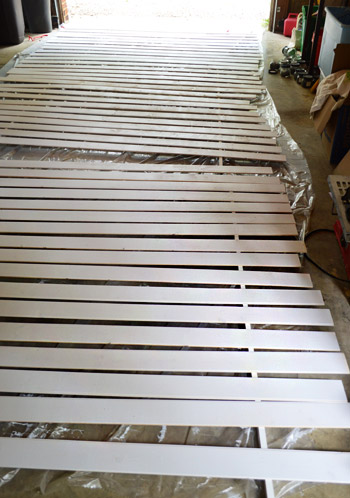
This process alone took about four days worth of two hour sessions, since we had 120 boards to do – front and back, primer and paint. We only had room for about 45 of them in our makeshift drying station in the garage (that way they didn’t get rain / dirt / leaves on them while curing) so I primed and painted one group, then installed them, then primed and painted the next, and installed those. Factor all the various paint sprayer cleanings into that, and let’s just say it wasn’t my favorite project in the world. But I knew once we got them up on the ceiling it would all be worth it. At least that’s what I kept telling myself.
The primer we used was good ol’ Kilz Premium and the paint was Benjamin Moore’s Regal Select Exterior in the low lustre finish (we just told the guys at the paint desk what we were doing and they said that would work well). The color was called “In Your Eyes.” It’s a nice, pure light blue. We didn’t want the color to be too bold (we worried it would reflect into the living room window and make the whole room blue if it was too dark) and we also didn’t want it to clash next the the brick exterior of our house. We also wanted to make sure it read as blue, and not gray or green in some lighting situations. If you’re looking for a blue porch ceiling, we’ve also rounded up the best haint blue paint colors!

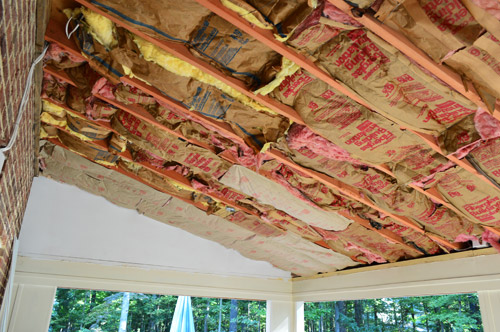
Now, before I get into the installation part of this project – a note about insulation. After a few commenters confirmed our instincts to re-insulate the ceiling to help keep some of the summer heat from getting through, we decided to go for it. The sun beats down on this roof all day, so even though the doorways have been opened up for some nice cross-breezes, apparently insulation can keep open rooms cooler by absorbing that constant sunlight shining down from above. So we mostly used the leftover insulation that was in the ceiling before (remember we removed it here?) despite how ugly it was. It was still relatively new and would do the job just fine – although we did have to buy one new roll to fill some gaps.
And then we learned we should NOT have insulated the roof in this case. Oops. We were able to remove it later (more on that in a moment) so please ignore the presence of insulation in these next few shots…
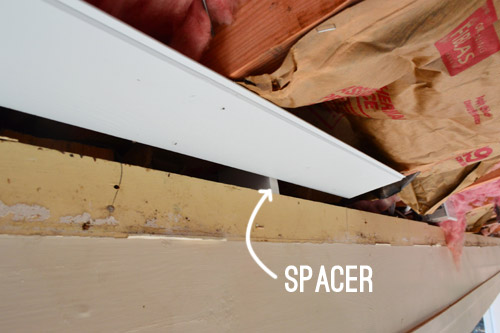
Installing the planks was giving me hardwood floor deja vu. From that process, I know that setting your first board straight against your wall is a crucial step to ensure your whole project isn’t crooked. So I cut a few spacers out of scrap wood to place along the front wall to keep my first row even.
We hung our planks in this direction (running parallel with the long wall) so that we could attach them directly to the joists (every 16 inches). That way they’ll be nice and sturdy (nailing them in at such close increments will hopefully keep them from sagging or warping down the line). That wall is about 20 feet long, so it took about 2.5 boards to complete each row.
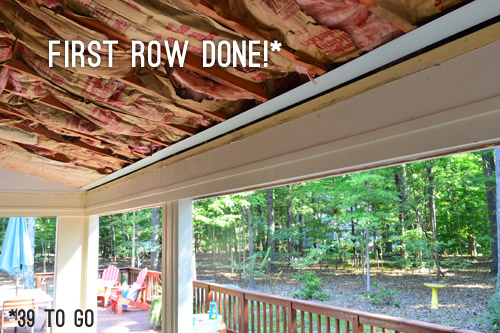
Also borrowing from our hardwood flooring experience, we wanted to stagger the breaks between boards from one row to the next. This makes things more secure since there’s not one area of weakness for each row that lines up, and also looks nice since the boards don’t all break at the same place. So if we started one row with a full board, we started the next row with a partial scrap so they weren’t ending on the same joist.
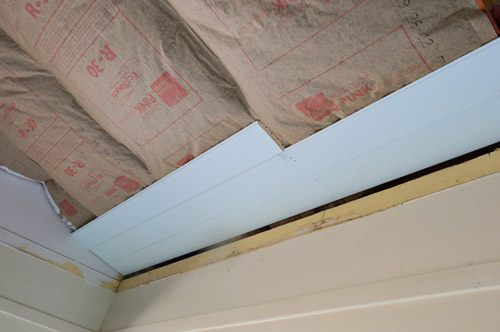
Sherry helped me by doing a lot of the cutting while I did the nailing – and the other thing we did to make the seams less visible is to cut everything using a scarf joint. By cutting every end on matching 45° angles, the boards will overlap each other a bit and will be more likely to stay together and look more seamless in the long run.
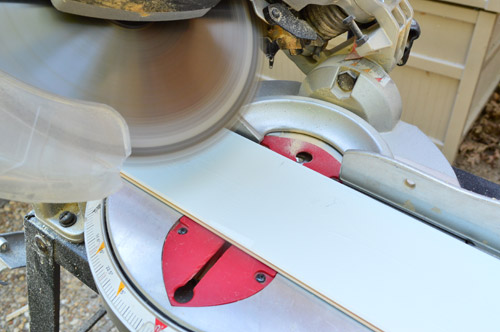
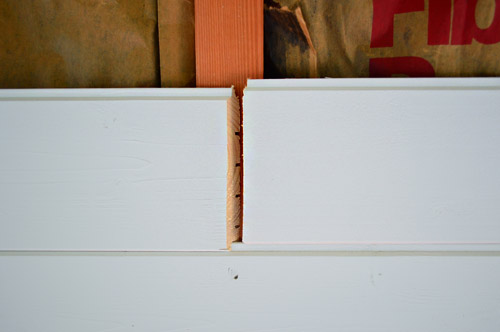
You can see it a bit closer here, as we’re installing one board next to another. You’ll notice we also cut everything so that all of our seams coincided with a ceiling joist. This meant we could nail both ends of a seam into the joist, further discouraging the ends from bowing away from the ceiling.
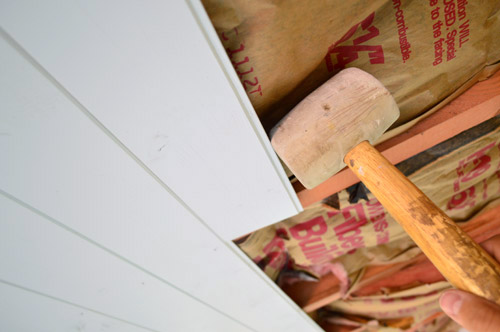
All of that cutting was definitely a bit of a time suck, so it was nice to have an extra set of hands for some help with that. And luckily the rest of the install went pretty much like clock work. The tongues and grooves helped each board slide on the ceiling pretty nicely, though it sometimes took some light encouragement with a rubber mallet.
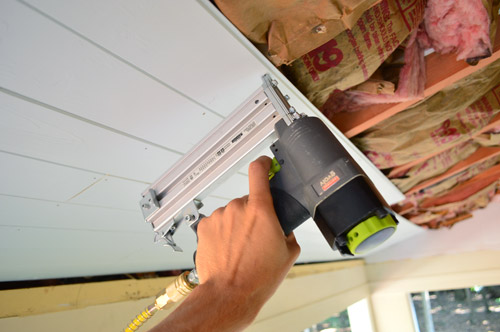
Follow that with a shot from the nail gun into each of the joists (with some wood glue along the joists before installing the plank) and we were in business. Update: Here’s an affiliate link to the nail gun we bought on Amazon.
It took us a good 5 hours to get our first set of 45 boards hung (over the course of a few days), so it definitely was a slow-going project. And I’ll admit the idea of hoisting a few 4ft x 8ft panels up there was starting to sound pretty appealing. But at least the breakneckback speed meant that we were able to catch our little insulation error before it was too late (instead of having to remove the entire ceiling, we could pull everything out since the beadboard hadn’t progressed too far to block anything from our reach).
The issue we learned (first from a commenter, and then later confirmed by the framing expert who helped us remove the drop ceiling) is that insulation traps heat (duh) and needs airflow in order to sweat that heat out. Since our insulation would’ve been installed smack dab between the roof and the beadboard ceiling, there’d be no air flow. Not only could that mean built-up moisture that could threaten our beadboard, but the hot insulation could actually result in a roof that doesn’t even meet its expected lifetime due to all that trapped heat burning it up prematurely. So we’re very grateful to have learned the error of our ways so that we could correct it before it meant tearing out our new ceiling. And we figure with the cross breezes we get paired with the two fans that we’ll be installing, this little shady retreat from the deck will be nice and cool by comparison – even without the insulation.
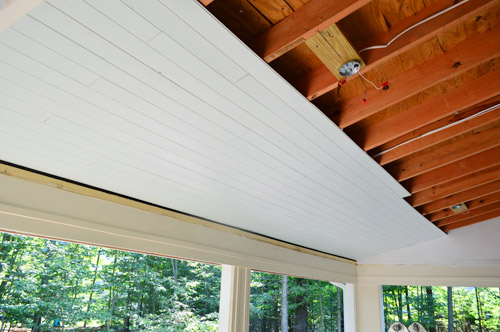
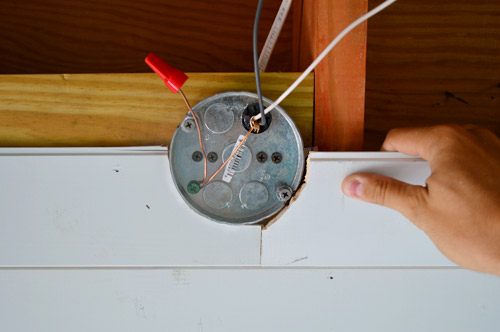
After another round of priming and painting, we could get to work installing our second set of planks. At this point I pretty much had my rhythm down and I think it only took me four hours (big difference, I know – but this was without Sherry manning the saw so I was a lone ranger for this part). I probably could’ve chugged along a bit faster if I didn’t have curveballs like jigsawing around the two fan fixture boxes, but those weren’t too bad in the end.
When I had that batch up, it actually started to look like a ceiling.
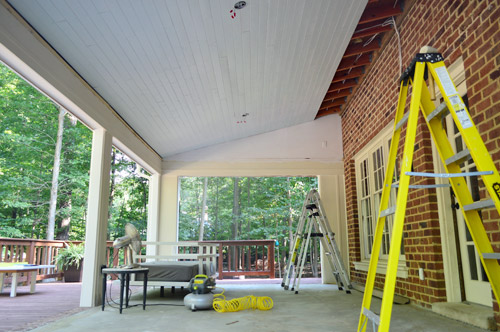
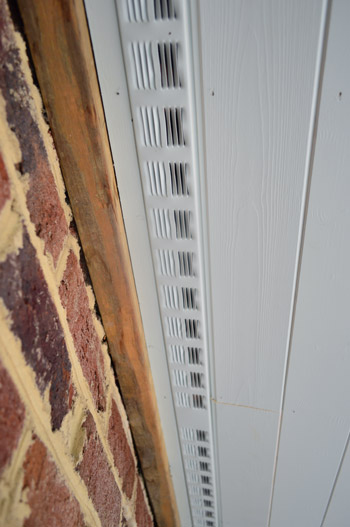
My final day of ceiling installation went pretty quickly since I only had a small sliver of space to finish. The height was becoming a bit challenging and my neck and shoulders were basically numb from working above my head for so many days in a row, but I was somewhat excited for a new challenge: adding a row of vents across the top to help introduce a bit of air flow up there – which was also recommended by our framing guy during our remove-the-insulation conversation.
At last, all of the ceiling boards were in. I guess technically it’s not a “beadboard” ceiling since our planks don’t have the bead design engraved into them – they just lock together to create that look. We’re glad we went with a simpler 6″ plank because, given its size, we think a smaller bead detail might have looked a bit too busy up there.

Sadly our ceiling work is not quite done – but we’re in the home stretch. We just have to add trim around the edges, which will need to be caulked and painted. Plus, I want to go back and try to fill the many, many nail holes in the boards themselves before painting over the whole thing one last time for that protected-against-the-elements result (we figure one more coat over all the planks, now that they’re pieced together, will help keep moisture out of the seams).
Progress feels good. It’s almost like having the feeling in my arms again.
Here’s what our to do list is looking like now:
Rip up the old carpeting(more on that here)
Remove the sliding doors and tracks to open things up(more on that here)
Convert outlets to outdoor-safe rain-proof ones with covers(more on that here)Add fresh casing to the openings and caulk like crazy to waterproof everything(more on that here)
Demo the old ceiling in hopes of possibly lofting it (get a pro in here for advice)(more on that here)
Remove old beams, reinforce ceiling stability, and re-route electrical for two fans instead of one(more on that here)Prime, paint, and install our beadboard ceiling- Add trim around the ceiling, caulk and paint that, and hang two ceiling fans
- Repaint the columns & interior of the sunroom with white exterior paint (it’s currently cream)
- Tile the floors (we bought something that’s outdoor safe and less slick than the glue-stained concrete here)
- Get a rug, furniture, and maybe even add some outdoor curtains and lanterns/sconces?
- Build an outdoor fireplace like this down the line
I think this puts us at more than halfway done, but we still have floor-tiling to check off before we’re really coasting towards the finish line. Did anyone else spend the last week priming and painting a whole lot of stuff? We also tackled Clara’s walls, ceiling, and closet, so it was quite possibly the most painting we’ve ever done in a week’s time. Plus Sherry conquered another area of blue trim, so we’ll be back with those details in a day or two.
Psst- Wanna know where we got something in our house? Just click on this button:


Ceci Bean says
Say Anything! Yes. Love it.
Fave line: “I have her my heart. She gave me a pen.”
Ceci Bean says
err, gave. obviously.
YoungHouseLove says
Haha, I knew what you meant!
xo
s
Abby says
This is going to look great!! I’m just wondering if your framer suggested using pressure treated wood? It looks like from the photos that the 1x6s are not pressure treated. At this point, of course you should just go with it, but do watch for any kind of warping or bowing because you do not want any moisture getting behind that wood and into your roof framing. In general, you want to use pressure treated wood for any exterior application. I’m from the Southeast, so we worry more about that down here, but it is still a good idea to use it in any case.
YoungHouseLove says
Thanks Abby! He did say never to use not-pressure treated wood for outdoor framing, but since it’s decades old and has stood the test of time he said whatever was there should be great for us – there were not signs of rotting or bowing, so that was music to our ears!
xo
s
Katharine says
OHHHHHH EMMMMMMM GEEEEEEE!
Sarah says
Looks great so far!!!
Donna says
This post is very reminiscent of our process of deciding on and installing a ceiling in our new addition, including priming and painting. Our solution to storage of painted planks before installation was to stack them, separated by sponges from a large stash we had inherited. Measuring, cutting, and installation on our vaulted ceiling was a team effort of my husband, son and father. Unfortunately, with just a few boards left to install (and just a few weeks from completing the addition), a huge storm blew through and FIVE trees came down like a karate chop on the peak of the roof. (Incidentally, the storm also toppled one of your yellow tulip chairs, but didn’t damage it.) We’re sad that my husband and son have no more vacation days to spend, and the repairs will have to be done professionally (covered by insurance).
YoungHouseLove says
Oh my gosh, what a frustrating speed bump at the end! So glad it was covered by insurance though!
xo
s
Nicole says
We’ve been procrastinating our porch project because we got so hung up on the ceiling!! I’m SO THANKFUL TO HAVE YOUR BLOG, and more specifically, THIS POST, TODAY. I’m telling myself the project will be finished before fall ends. We were going to use the panels, but after seeing the only viable option was crappy particle board, we also switched that decision to the tongue and groove.
Like one of the early commenters, I also pictured the planks going the other way, so I’m glad to have a visual of the opposite. KEEP UP THE GREAT WORK, GUYS!!! :)
Mary says
Thanks for showing the thought process in selecting the planks instead of panels or vinyl. You always do this, but in this instance in particular it really made the idea of tackling something this big more approachable.
In other news your book is currently available in Portland,OR public libraries (where I live) In fact, it was so highly desired I saw to ladies politely play tug of war with a copy at my local branch today (not kidding!). If you thought you weren’t famous, think again. Retired ladies are fighting over your literature :)
YoungHouseLove says
No way! That’s so sweet Mary. Thanks for that unbelievably awesome visual.
xo
s
jeannette says
i have no fear of any kitchen appliance but power tools freak me totally out. maybe sherry could write a little essay on how she got over her prudent fear of power saws. eeeeeeeeeeeks.
YoungHouseLove says
I used to be scared too, but my warning would be: it’s addicting! You feel like the queen of the world when you’re using a saw! Haha!
xo
s
Diana says
WOW! That sounds like a horrible project but at least it looks great so the hard work paid off!
Kim says
Lloyd! Looks great.
caroline [the diy nurse] says
It looks sooo good! I’m so happy you went a bit southern and painted it blue. Keep them haints away! ;)
Kate says
Oh my gosh! I love it! When I have our three season room built, I’ll have to do the plank ceiling. And I love the paint color!
Isabelle says
Hi J & S –
Love the look that’s starting to form here :-) One question (and sorry if you’ve already answered this…). Is the rest of the trim on the porch going to be stark white or more of a cream to match the current trim on the window and door to the porch? If white… do you have plans to eventually paint ALL the trim on your house with a bright white? What work!
If you give a moose a muffin…
YoungHouseLove says
Haha! I love if you give a moose a muffin. As for the trim, it’ll all eventually get painted crisp while like the rest of the house’s exterior.
xo
s
Sherri says
The planked ceiling looks gorgeous and the blue color will look so dreamy and soothing. John, I am wondering if this is one of the most difficult jobs you’ve encountered with DIY projects. I remember the deck you installed at your last place had its share of problems. How does this compare?I can’t even imagine how your neck and arms feel, because even painting a ceiling is killer. I stand in awe. You are a man of steel!! Excellent job!
YoungHouseLove says
The deck still holds the title of “hardest DIY to date” just because it was all so serious and structural (failing that one inspection was a pretty low blow for me) but any work over your head can be rough too (heck, we hate just painting standard height ceilings since it’s such a pain in the neck – literally). But it’s always worth it when it’s done!
-John
Megan L says
Okay, I am seriously impressed. You guys are such hard workers! I’m tired just reading about it! Way to go.
Alison says
Every time my boyfriend and I get stuck in a down pour, he says we are getting Cusaked On. Have you ever noticed how many times John Cusak gets rained on in movies?!? It’s ridiculous. The reference and post made my day! Great work!
YoungHouseLove says
That’s hilarious!
xo
s
Celia says
De-lurking from Japan to say HA! I loved the John Cusack shot. Well played. Oh, and your outdoor room is going to rock!
Lauren says
We used the same materials on our patio ceiling a few years ago! Although we just polyed over ours in a clear finish, I love the white too! http://www.hausofgerz.com/2011/06/patio-in-progress/
YoungHouseLove says
So pretty!
xo
s
Anna, Sydney says
Great work! Wow, get tired just reading about it. But now I see a snow clad verandah with a lit up Christmas tree in your new indoorsy outdoor space. Maybe a firepit until that fireplace comes together?
Seaweed & Raine says
So you might have a crink in your neck and arms/shoulders that feel like they are ready to fall off – but seriously, it looks a million times better already!
Rebecca says
STUNNING! I have been reading daily since your first home and your blog is the first I check every morning. I am slowly doing projects around my home but it seems to take me a LONG time to finally get that AH-HA moment and really know what I want to do with a room. It amazes me how you guys can look at a space and in a few short months have this vision! Bravo! I was actually giddy when you bought this new home bc it is so similar to many homes in my area that need some love! (which is our next step in home buying)Thanks for all the smiles and inspiration you bring to my life!
YoungHouseLove says
Thanks Rebecca! All the best with home-buying!
xo
s
Tara & Nicole Michael Crochet says
LOL at John Cusack pic!
Your porch is awesome! I want to sit there, recline, have a glass of lemonade, and enjoy the shade and breeze!
Amy says
Wow, that looks amazing!! So, I’m totally gonna steal that color and paint my ceiling in my entry room with it. Why not, right? It’s gonna look totally awesome, just like your outdoor room! …and it’ll always remind me of John Cusack – huge bonus! ;)
jill says
Holy cow, I read that whole thing with my mouth hanging open in awe. Super impressive project!
Sharon says
Love the “Say Anything” reference in the picture of the paint. And the ceiling looks amazing!
Mancil says
Looks great guys! Good job
Elaine says
Man, my arms and neck are sore just thinking about doing all of that! Rock on John!
Jessica says
I haven’t been able to find any info about what kind of paint sprayer you use. I didn’t see it in the common tools/wishlist space. Please help!
YoungHouseLove says
Here’s that post for ya! https://www.younghouselove.com/2013/05/buh-bye-blue-trim/
Hope it helps!
xo
s
Kate says
Your ceiling looks great! We’d like to purchase the same boards at Lowe’s for a project we’re doing in our bathroom but can’t find the info. anywhere on your post or in the comments. Tried to zoom in on the photo but it’s a bit too blurry. Any chance we could get some more details on what kinds of boards they were? Sure would love that, thanks so much!!
YoungHouseLove says
Sure! They’re not available online so you’ll have to find them in stores, but they’re in clear packaging and there are six in each container, and they’re about 6″ wide and there are some that are a plane front (like ours) and an option with a groove down the middle to give the appearance of two boards (those aren’t the ones we grabbed).
xo
s
Kate says
Thanks for the info- we found the boards at our Lowe’s. Thanks again! :) Kate
YoungHouseLove says
So glad! Good luck with everything!
xo
s
Rhoda @ Southern Hospitality says
Bravo, you 2!! That ceiling is looking amazing & you are right, beadboard panels would have been brutal trying to get those up. I was really glad to get mine all finished & painted, but my porch is smaller than yours.
And oops, I did put insulation in my ceiling (listened to my dad!), so I hope it’s not going to be a horrible thing down the road. I didn’t know about heat building up with insulation. I have a metal roof over my porch, so we will see how things go. I have a nice breeze back there a lot of days.
YoungHouseLove says
Aw thanks Rhoda! And maybe it’s ok with a metal roof! Or you might have some ventilation room up there so it’s cool!
xo
s
Erika K says
Perhaps I missed this in a previous conversation so please forgive me if you’ve already discussed. Did you guys select a blue color for the ceiling because you just like the lovely, airy feeling or was it a more purposeful selection? I’m vacationing in New Orleans at the moment and toured the beautiful Garden District. I noticed that almost every home had blue ceilings on their porches. Our guide told us it’s a Southern old wives’ tale: blue porch ceilings prevent birds and bugs from nesting there because (it’s commonly thought) that they think it’s the sky. I love the blue ceilings and it never occurred to me they did it for practical purposes:)
YoungHouseLove says
In the south it’s sort of a tradition (it’s said to keep bugs away as well as evil spirits, haha!) but we just like how charming and southern it looks!
xo
s
bob says
Did you investigate radiant barrier insulation?
I am planning on installing a ceiling on my sunroom and a hot sunny area of California.I believe some rigid foam insulation will also help and will still leave plenty of air space in the rafters.
YoungHouseLove says
We didn’t look into that, but it sounds promising! Good luck with everything Bob!
xo
s
Kim says
Any possibility of getting the product/manufacturer’s name? I have read all the comments, called the Alexandria Lowe’s, talked to their 1-800 number, sluethed around on the internet, talked to manufacturers in U.S. and Canada, and can’t find 6″ v groove boards anywhere! Obviously the product exists but…
YoungHouseLove says
So sorry, we don’t have any packaging it anything left. Anyone have info for Kim?
xo
s
Ted Wattron says
I have a question about the insulation.
Why didn’t you install foam ventilation baffles to allow air flow between the roof and the insulation?
It seems to me that you could get the benefits of the insulation and also allow for air flow by doing this.
Thank you for the great article!
YoungHouseLove says
Never heard about that. Sounds like a great option!
xo
s
Roger says
Are you sure you use 6″ wide boards? I am doing a very similar project and at Lowes I see the six packs of paneling boards that are 3 and 9/16 inches wide. Pack says 5/16″ x 3-9/16 x 8ft, item number 409414 , $14.86
YoungHouseLove says
Weird! Maybe they changed them or discontinued them? We are fairly positive ours are 6″ (we said that a few times in the post, so we don’t think it’s a typo).
xo
s
Vinson Matthew (@vhinz316) says
This look works particularly well in bathrooms with low ceilings, because the vertical lines help to visually elongate the space. In this design, the beadboard runs straight from the floor to the ceiling, with the only molding used a cornice at the top where the beadboard meets the ceiling; no baseboard is used, because it can ground the design, making the room look shorter.
RogerB says
Well, I am 60% complete putting up the boards on my porch ceiling project. I finally got around to looking at the instructions (slip of paper) that came with my boards. It says not to use in high humidity areas such as bathrooms and to use indoors only. Uggghhhh! Maybe they mean don’t use as siding or something like that. This is near a pool, so there could be some humidity issues. I am priming and painting the ends and backs as well so my fingers are crossed that I will not have a problem. What do you think?