This week I was actually inspired by a request from Clara, which came by way of John’s mom. She was laughing as she told me that she overheard Clara telling her cousin that she didn’t have a clock in her room. Random, right? So I thought: I’ve never made a clock… but I bet I can make her something fun – maybe even something that she can interact with somehow. They sell those clock kits, so it can’t be too hard, right?
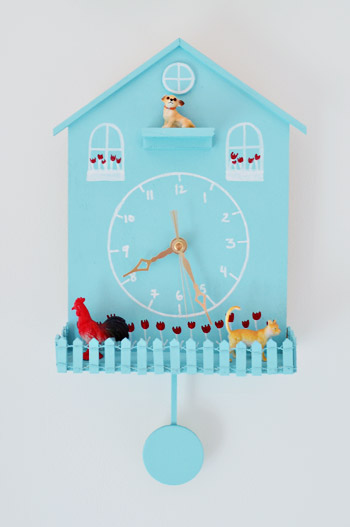
So here’s where I ended up…
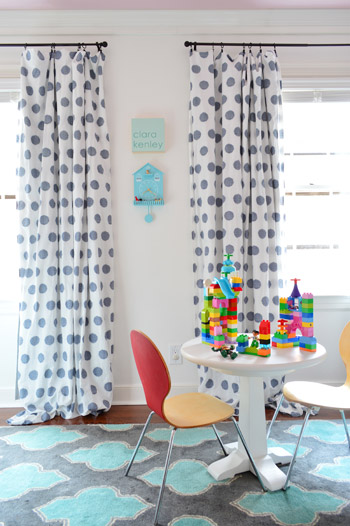
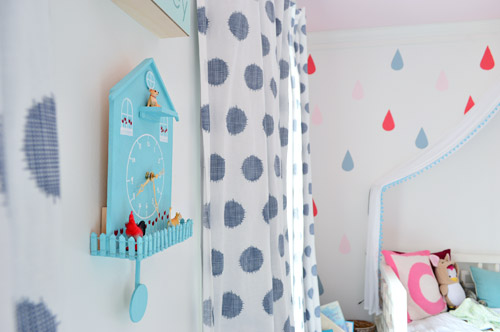
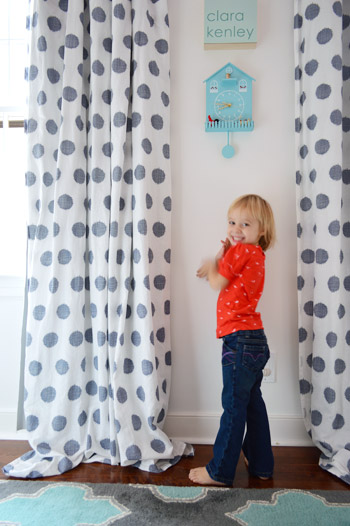
And here it is living it up on the wall in Clara’s room.
I originally thought it could be fun to use a birdhouse and add the clock hands to it, but a lot of them jutted too far away from the wall and didn’t have enough of a “face” for a clock kit to complete full rotations without hitting some part of the birdhouse and getting caught. Then I came across this DIY cuckoo clock, and I loved it! She has awesome directions and even offers a free downloadable template for anyone who’d like to get exactly the same look, but I was looking to adapt it, so I just used the house-like concept as a jumping off point and decided to add some fun little 3D details that I thought Clara would appreciate.
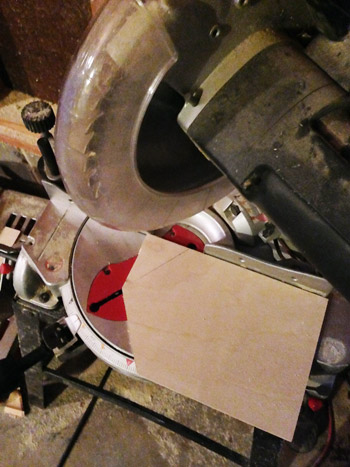
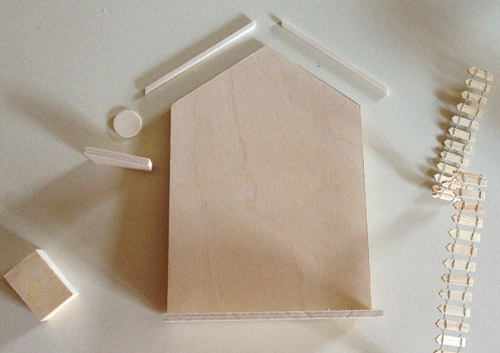
So I hit up JoAnn and grabbed a small 12 x 12″ sheet of quarter inch plywood for $3 (thanks to a 40% off coupon), that I came home and cut down to be the shape of a house with the miter saw (if you don’t have access to a saw, this wood was so thin and light that I bet you could have scored it over and over again with an exacto knife and cracked off the corners to get the same affect).
I had also grabbed a few little objects at the craft store when I grabbed my board for the background, like a small picket fence ($2.99), a little bag of variously sized disks of wood ($2), and a thin trim piece (90 cents) that I could use to add a little roofline. Here they are all disassembled…
And here they are all put together. I just used craft glue to create a little ledge along the bottom as well as a smaller shelf about 3″ below the roof (that wood was leftover from my board that I used to create the house-shaped background) and also glued the little trim pieces along the top to create a little roof-like detail with a round disk of wood under it to mimic a cute little round window.
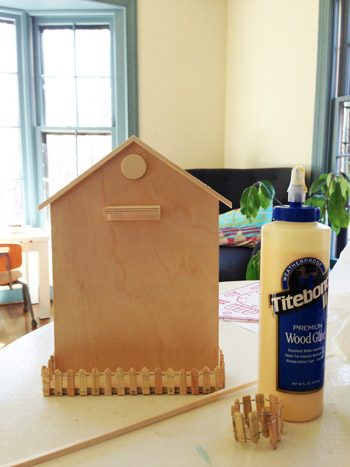
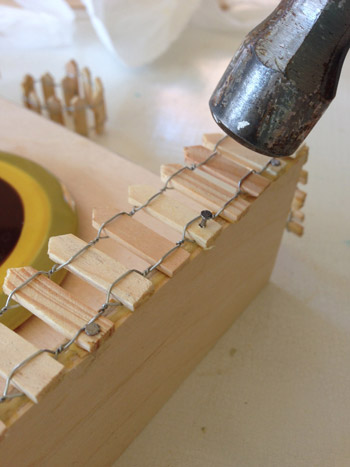
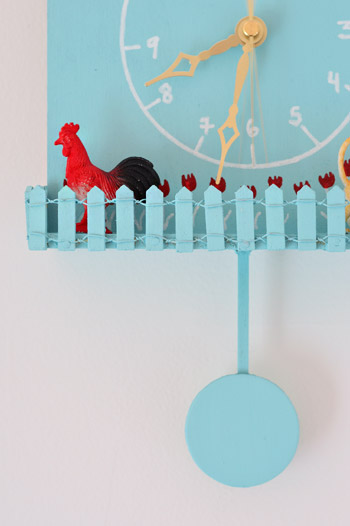
The tiny picket fence was one of my favorite details, which I just glued and nailed with some small picture nails, so that it wrapped around the entire ledge on the bottom.
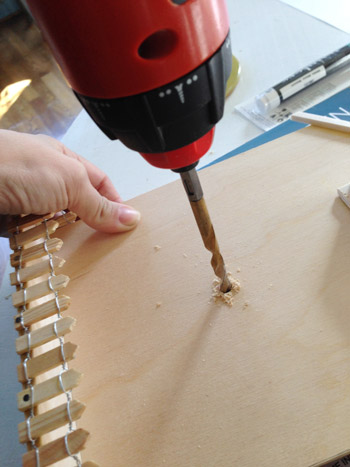
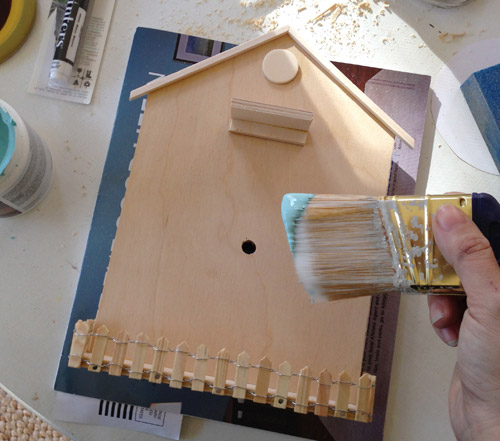
Then I marked the center of where I wanted my clock hands and drilled a hole big enough for the clock mechanism to slip through.
Next was painting time. I asked Clara what color she wanted (fully expecting her to say pink) and she said blue! Go figure. Thankfully, I had an old test pot of Embellished Blue by Behr leftover from this project, so I applied two coats for some nice even coverage.
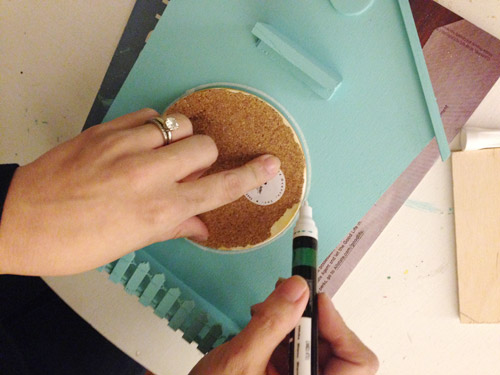
After that had fully dried, I moved onto the sketching part of the project. First I used an old coaster to trace a circle for my clock face with a white paint pen.
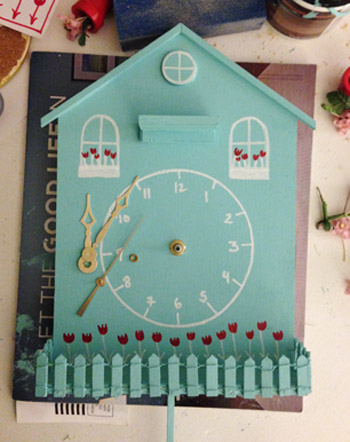
Then I free-handed some cute other details, like a window frame around the round piece of wood I had glued on under the roof, and a few other windows with stems coming up from some window boxes (my inspiration cuckoo clock gave me courage since her sketchy/imperfect drawings were so charming to me). I also added stems along the bottom behind the picket fence and in both windows so I could use a red sharpie to add some flowers in those spots.

Here’s everything all sketched out. Once that dried (the paint pen only took about 10 minutes to be fully dry) I moved onto my clock assembly. I had grabbed a clock kit from JoAnn for $6 (you know I used a 50% off coupon, right?) and originally considered painting it, but ended up liking the vintage-y gold finish. It just felt sort of cuckoo-clock-ish to me, I guess.
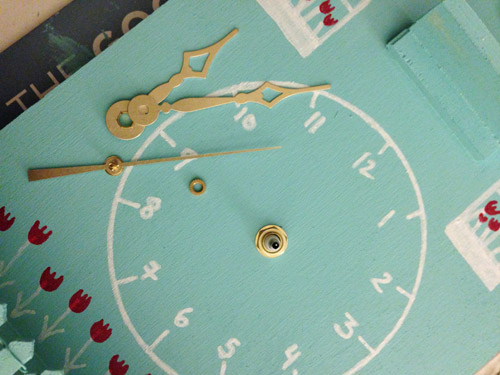
It’s pretty simple to snap the clock together. You just put the mechanism in the back, slide the spire through the pre-drilled hole, and then slip on the hands and the nuts and bolts they provide in the recommended order.
It probably helps to see the back of the clock too, so here’s how that looks. The black thing with the battery is of course the clock kit, and since that sticks out from the wall, I glued three pieces of scrap wood back there to make it more stable (so it sticks out from the wall the same amount along the top and bottom. Then I added one of those little metal hangers on the top block to hold the whole thing on the wall.
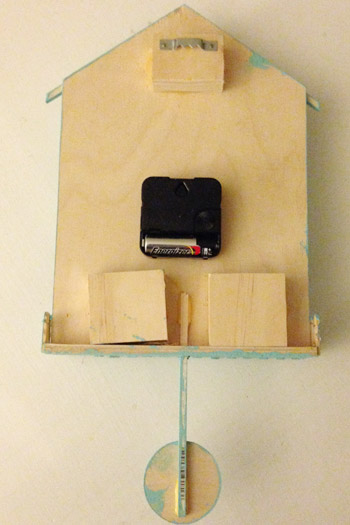
I also drilled a little hole in the base of the shelf and inserted a 4″ piece of trim leftover from the roof with a larger disk of wood, which I painted blue like the clock. It doesn’t swing back and forth, but I love that it adds to the quaint cuckoo clock feeling.
Overall, it probably took me two hours to shop for it, cut, glue, drill, paint, sketch on it, and add the clock. And my total cost was under $15 ($6 for the clock kit, $3 for the wood backing, and $5.90 for the accessories like the roof pieces, the round disks of wood, and the picket fence.
I think it ended up being another one of those crafty projects (like this one and this one) that could make a really cute holiday gift. Even if you just go simple and paint the clock white with gold or silver paint pen details. Without the extra shelves and the fence it could even be an under $10 project.
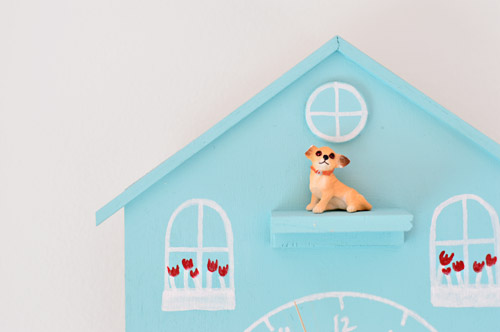
The best part of all is that Clara is SO INTO HER CLOCK. It’s adorable. I knew when I added the shelf along the bottom and the smaller shelf along the top that she’d get a kick out of seeing various little animals and dragons and fairies on those ledges (you’ve seen her playing with her pretty extensive collection of those here). We didn’t want to hang the clock too low since it’s somewhat delicate and the clock hands can easily get poked into the wrong “time” – so now our ritual is that every night before bed she tells us who she wants on the top shelf (like “Burger Statue!”) and who she wants on the bottom shelf (“Red Rooster and Kitty!”) and we put them up there for her and tuck her in.
Have you guys ever made a clock with one of those kits? Honestly the hardest part was probably drilling a big enough hole to slide the spire though, but that wasn’t even that hard (I just used a few different drill bits, gradually getting bigger, until the hole was the right size).

Stefanie says
LOVE IT! I was just looking at some nifty clocks on TheGrommet .com for my daughter’s room, but the idea of making my own to really fit her personality is even better! Thank you for all the helpful links, etc. Awesome sauce!
YoungHouseLove says
Of course! Good luck Stefanie!
xo
s
Stefanie says
Sweater bomb!
https://www.sweatergenerator.com/?U3RlZmFuaWU6Ojo6NTI4YTkyZWZlNTJkNDo6Ojo=&entry_id=4870#/main/sweater
YoungHouseLove says
Haha!
xo
s
Heather @ What Does She Do All Day? says
Adorable! It’s so funny that she mentioned she didn’t have a clock because my 3.5 year old just asked me the other night during our bedtime routine why she didn’t have a clock in her room!
YoungHouseLove says
So funny! Apparently it’s a coveted thing among 3-4 year olds!
xo
s
Patsy says
Love this, you are truly amazing! Her room is so cute!
anna says
i LOVE that blue!
the only time i’ve used a clock kit was with a record, and i put bright yellow numbers on it. the black/yellow contrast was pretty cute.
YoungHouseLove says
That sounds really cute!
xo
s
Gina at CampClem says
You Better Just Hush. This is just glorious! What an inspiration! I LoVe IT!
g i n a
Kierstin says
I can’t believe how friggin’ cute this is. Stunned. The “Burger” figurine puts it over top.
Melinda@LoveMelinda says
So cute! I’m trying to think of a boyish version for my son…
Christina says
I love this, especially the pendulum and that she can move the animals!
We painted a clock to look like spiderman that you can see on our blog, I need to post now about how we used your same clock kit to make one out of a frisbee.
YoungHouseLove says
So much fun!
xo
s
Kelli says
You are so stinkin’ crafty! Go Sherry! Clara is blessed. :)
Marlena says
That is so cute!
Cindy @Made2Style says
This is so incredibly amazing for so many reasons! I love that you guys make so many wonderful things for her. You just know she’ll cherish them forever and hopefully pass them down to her own children. Made with so much love!!
Alex says
That is so adorable!
farzana says
I was just thinking of making a clock for my 3 yr. old. I love you guys for giving this tutorial, it’s easy & adorable. Love your blog.
Ginny says
Absolutely adorable! How fun that Clara gets to choose which little figures to put on it each night. I’ll bet she learns to tell time at an early age. (That’s the former homeschooling mom in me coming through, LOL.)
fmchoff says
Great project! I’m cuckoo clock obsessed after a trip to Switzerland in high school. I definitely see it in our future for the “big boy” room we are working on before #2 arrives this spring. I think the only thing I would add is to make the medallion gold like the clock hands.
I love the movable plastic animals, my almost 2 year-old is obsessed with them and carries them around constantly. Brilliant idea to incorporate them into her clock!
Rachel says
This is absolutely adorable. So so precious! I love that the little animals can move about freely. How fun for your sweet girl.
Lisa K says
This is the cutest thing ever! I think my kids would adore something like this! Love it! :)
Angela says
I’m super impressed! That’s adorable. And that it only took 2 hours, amazing!
karen @ paperfancy.com says
That is just so darn cute (or dern) as we say in Va. Love the blue color too.
The rug in Clara’s room is fab – u – lous!
Silke says
Totally off-topic, the clock is adorably cute and all, but HOW LONG have Clara’s legs gotten all of a sudden??!!!
YoungHouseLove says
I know, right?!
xo
s
Jill says
Love, love, love this! My 3 year old daughter would be all over it! although, I think I’d also have to get a Burger statue as she’s obsessed with puppies. That would be the only thing she’d notice if I showed her a picture of this. :)
amy says
This is adorable – definitely my favorite craft post you’ve done!
Kaye says
In regards to the bit about getting the hole in the middle bit enough: have you heard of hole saws? I just learned about them when building a shelving unit out of pine and plumbing pipe…we needed a 1-inch hole in the boards for the pipe to go through, and I had no idea how to do it until I discovered hole saws!
It’s basically a drill bit that starts drilling a hole (to anchor the hole saw in the center and prevent “jumping”) and then when you get about 1/4 inch in, the saw part that circles the drill bit starts into the wood and you end up with a hole whatever width your hole saw is. They’re super handy when you need a hole bigger than a normal drill bit.
It blew my mind how easy it was and that I’d never heard of it, and wanted to share :)
YoungHouseLove says
Such a great tip Kaye! Thanks for sharing!
xo
s
Terianne says
Good God, I love this so much I’m starting to have heart palpitations. I might copy this almost exactly for my daughters room (hope you don’t mind). She loves clocks (though has no concept of time right now). Thanks for the inspiration :)
YoungHouseLove says
Of course! Send pics!
xo
s
Catherine says
I absolutely adore this! I want one for myself. :)
bella says
That is extremely cute and I want one.
Jennifer says
LOVE your blog. You guys are so amazing! My husband and I just bought our first home. It’s a definite fixer upper. Will be referencing your blog a ton through our process. Quick question, where did you get Clara’s curtains? They are so wonderful. We think that in the new house our two kids are going to share a room, at their request. : ) Thanks!
YoungHouseLove says
Thanks Jennifer! They’re from ikea a few years back. Maybe try eBay?
xo
s
Linda says
I was noticing the cute rug in Clara’s room, can you share the details, I love it!
YoungHouseLove says
It’s from a local place called The Decorating Outlet, but I’ve also seen it on Joss & Main. The manufacturer is Rizzy Rugs if that helps!
xo
s
Cristina says
Love the clock in my favourite colour
Love the carpet too. Eould be perfect for under my dining table ( would you give me a hint about where to find it?)
Thanks,
Cris (all the way from Spain)
YoungHouseLove says
Thanks Cris! It’s from a local shop called The Decorating Outlet, but I’ve also seen it on Joss & Main. The manufacturer is Rizzy Rugs if that helps!
xo
s
Jana H says
Your clock is adorable but once again those awesome curtains caught my eye. Do you have a post on these or a source?
YoungHouseLove says
They’re from Ikea a while back but I don’t think they sell them anymore. Maybe try ebay?
xo
s
Timothy says
this is so awesome!!this is the first post ive read twice
YoungHouseLove says
Thanks Timothy!
xo
s
Alex says
Hi Sherry, I love the tips and idea you have shared in this article. I especially liked you combined a clock kit with some free-form design.. Seems like a tough task but I am going to give it a try and see if I can get some good result. Looking forward to see more tips from you.
Heather says
I facilitate teen and adult crafts at my library. We’ve made a lot of clocks, but the easiest is to use an old cd as the base. It already has a hole! And you can paint it, bead it, create A fish around it, scrapbook paper it… Whatever! Yours is tres adorable!
YoungHouseLove says
Love that!
xo
s
sheryl says
Toooooo cute! I want one for my bedroom!! Actually you have inspired me to make one for my two youngest girls for their bedroom. I am betting that even I can handle this project cause basically I will be copying you (he he..)! Thanks for the inspiration.
BTW I love your blog and think you and John do such a terrific job. God bless!
YoungHouseLove says
Thanks Sheryl! Good luck with it!
xo
s
Elena says
This might be my favorite thing you’ve made!! Absolutely love it.
Kylara says
I’m a little late to the party, but I had to come over and tell you that this is just too adorable for words.
While I no longer have little ones for which I could make one of these, you have perhaps sparked my interest into making a few of these to give out as gifts or for my summer craft table.
I love your easy explanations and you could creatively go nuts with this. Each one could be unique, the possibilities endless and all that LOL
Thank you for sharing this with us and I might just have to try my hand at this one!
YoungHouseLove says
Thanks so much Kylara! Hope you have fun with them!
xo
s
Jennifer says
Love it! I’m going to make one for my niece for Christmas. Would you mind sharing the diameter of your circle? Thanks.
Jennifer
YoungHouseLove says
Maybe 4″?
xo
s
Mari Corona says
Wonderful share! Must pass along :)
Sarah C. says
I’m in the process of making a barn-themed version of this for my mom for Christmas. Just a tip, for others without a miter saw. I tried scoring it with an exacto knife, but it wouldn’t cut through the center layers of my quarter-inch plywood. I visited a friend who makes miniatures, and she thought her miter saw would splinter the wood. So, we used a jigsaw and before every cut, scored it with an exacto knife and put a strip of masking take over the line. For the trim pieces and accents, we used her miniature dollhouse miter saw. So fun!
On to assembly! :)
YoungHouseLove says
Love the tip, Sarah! Thanks for sharing!
xo
s
yellebellyboo says
I love it! I made my own clock too (http://yellebellyboo.blogspot.com/2012/10/owl-clock.html) and it’s one of my favorite crafts!
YoungHouseLove says
Amazing!!
xo
s
Peter says
Hi Sherry, This is so incredibly cute!. I love the Craft you have shared in this article. For me this is the best part is – “The tiny picket fence was one of my favorite details, which I just glued and nailed with some small picture nails, so that it wrapped around the entire ledge on the bottom.” Looking forward to see more work from you.