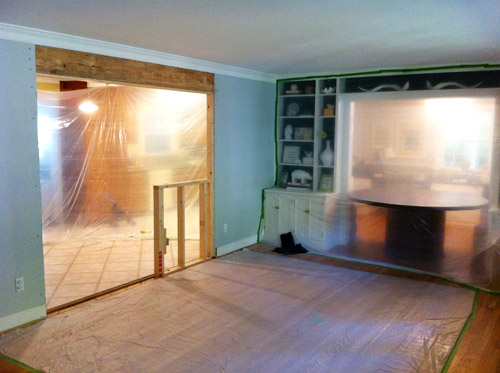
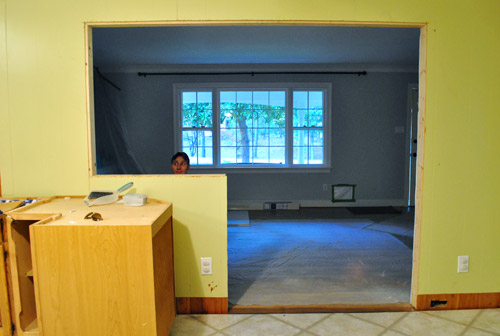
As exciting as it is to have both that section of wall and the contractor gone, there’s still a lot of work ahead of us before our opening is finished. Unless this is your idea of beautiful dining room:
Oh and speaking of the contractor, locals have been asking for Steve’s info – and now that we’ve worked with him and were extremely happy with his result, we’ll share (we only like passing along people’s info after we work with them, to be sure they’re someone we’d recommend). He’s a licensed Class A contractor as opposed to a handyman (so he doesn’t hang doors or build furniture or do odd little jobs), but if you have any big structural work (like knocking down walls, building additions, etc) he’s your guy. His email address is sstruder@hughes.net.
But back to our next steps with the opening. We left the protective plastic up because drywall installation was next up, which can be kinda dusty itself (especially the sanding part). We don’t consider ourselves to be drywall installation experts by any means (it was my least favorite part of our bathroom renovation two years ago) but this particular job seemed straightforward and small enough that it’d be silly to hire out. We just needed a span of it across the top of the doorway on the dining room side (to cover the exposed header on that side) and a few sections around the half-wall.
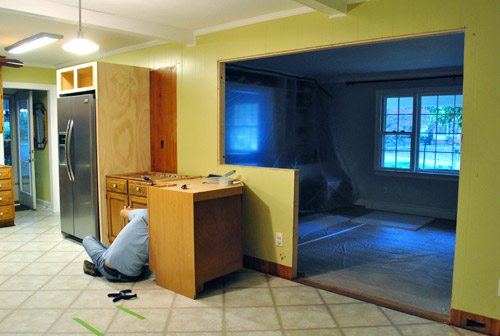
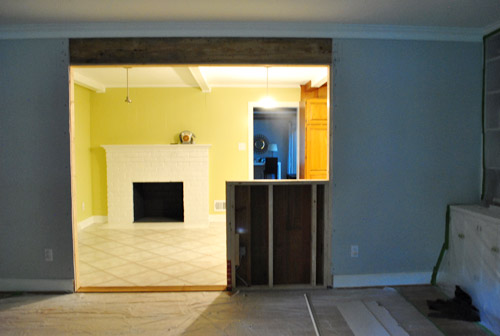
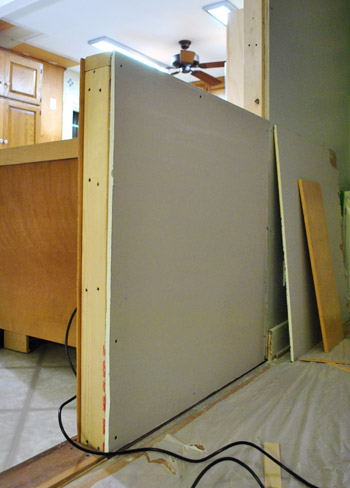
And actually, the kitchen side of the half-wall will be paneling instead – which is why we had the contractor leave all of the scraps from his demolition. So I simply measured, marked, and cut using my little jigsaw. It was super quick and easy.
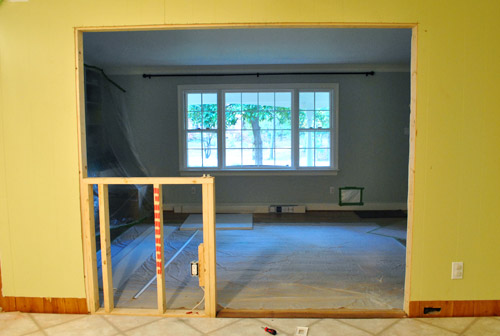
So easy that I went ahead and set the cabinet against it before proceeding further (Steve actually suggested doing this before drywalling the back so I could see my studs which would allow me to drill into them more easily/accurately). Note: there will be a 12″ counter overhang behind the peninsula with stools tucked under it, so you won’t see very much of the half-wall from this direction at all when we’re done. And we’ll be topping the half-wall with a chunky wooden ledge to add even more function and balance.
Already looking more finished, right?…. right?
Okay, not really.
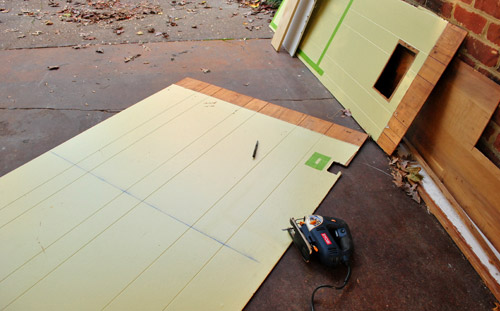
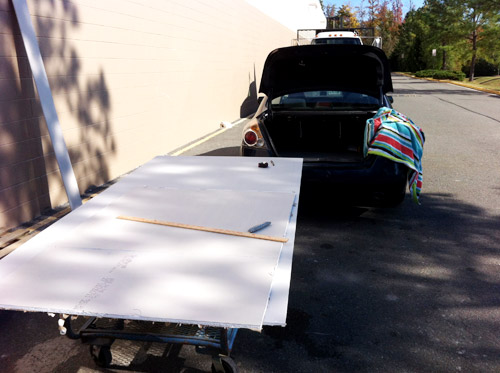
But I was kind of avoiding my next task: getting the drywall pieces home. Obviously I can’t fit a 4ft by 8ft slab of drywall into our Altima. And renting the truck at Lowe’s or Home Depot is always an option, but spending $19 to transport $14 worth of drywall seemed silly. So I took another suggestion from Steve The Contractor: cutting the drywall to size before bringing it home. Which is how I found myself setting up shop in the Lowe’s parking lot. Have I no shame? Nope. Especially to save a buck (or 19).

Basically I brought my tools with me (measuring tape, pen & blue chalk line to mark, razor blade to cut, yard stick as straight edge, towel to try to keep the car clean-ish), bought my drywall, and spent about 45 minutes carefully measuring, slicing, and snapping my pieces to size outside. The drywall in the dining room is actually two panels thick for some reason, so I had to cut two of each size to keep it flush for a hopefully seamless result.
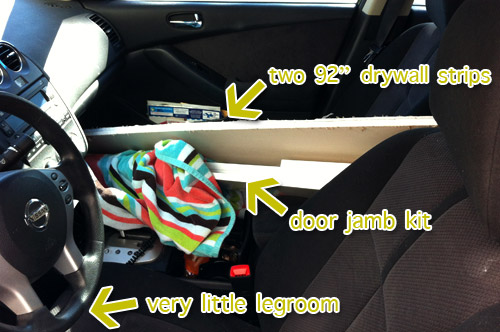
I managed to get my half wall pieces (plus a few scraps) in the trunk…
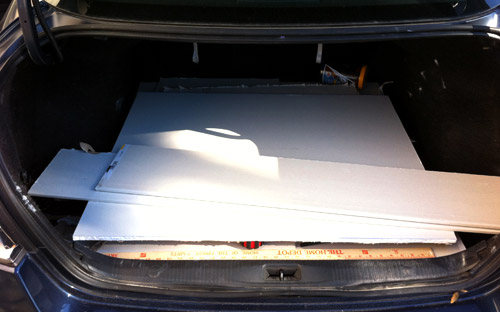
…and the long pieces for covering the new doorway header barely slid through the middle of the car (along with the door jamb kit, but that’s for my next phase of the project). Booyah!
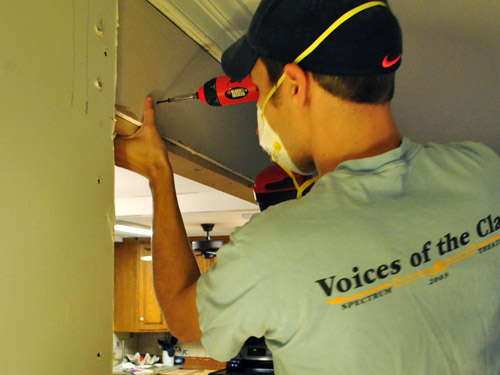
Even though it was a bit awkward working in a public parking lot, it was nice to come home and jump right to screwing the drywall into place since it was already cut to size. Sherry helped me by holding one edge up and then I’d screw a few “holding” screws so she could hop down and take flattering photos like this:
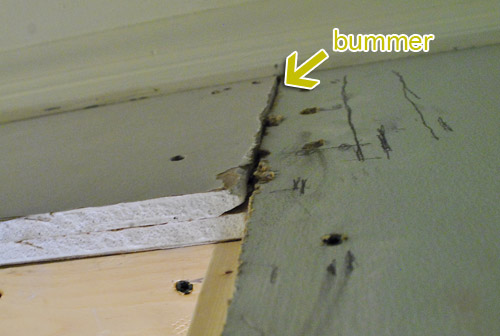
But this is where my wow-this-is-going-better-than-I-expected luck ran out. Despite my best measuring efforts (we even took photos of a tape measure next to the existing drywall and the drywall in the store to pick the right depth), my new doubled-up drywall was a smidge thicker than the existing doubled-up drywall. And a smidge is not acceptable when it comes to drywall. This would have looked all sorts of awkward even with mud and tape and some sanding (it would still read as a slope when the light hit it).
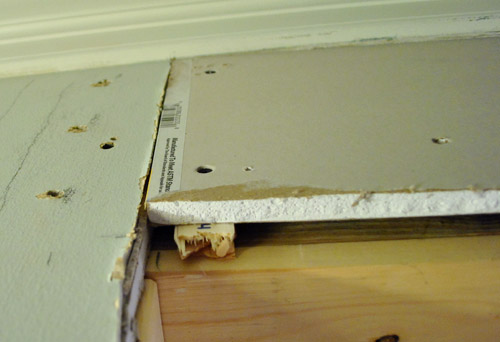
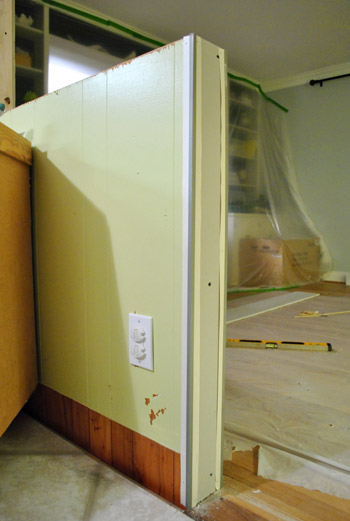
So I ditched one panel and relied on a technique that I used while hanging hardibacker and drywall in the bathroom that we gutted: shims. I added some wood shims to get my new drywall flush with the rest of the wall. Only I didn’t have that many shims and furring strips, so I also had get resourceful and dip into our stockpile of paint stir sticks to help us out. We learned that a few of them screwed together were actually just as dense as a furring strip or two. And since the wood + steel header is beyond solid, everything held nice and firmly. You can see them poking out there a bit on the bottom (don’t worry, that’ll all get covered by trim).
I basically repeated that process for the big panel on the half wall (being sure to get things as flush as humanly possible before drilling). I know what you’re thinking. Yes we’ve accrued quite a stash of stir sticks over the years (probably because they give us one when they hand over our paint and we usually paint right away when we get home so the paint is still stirred from the store’s mixing job).
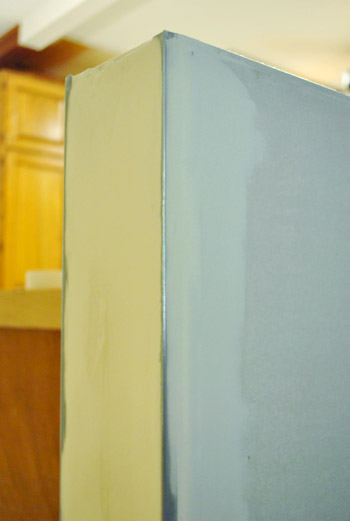
Fortunately for that little end cap I didn’t need to match any existing drywall thickness (since it’s a new plane) – so a single piece of drywall just went on straight into the wood frame. Then we used some metal drywalling corner strips to make the edges a bit sharper. Although they’re typically not meant for where paneling and drywall meet, we’re no strangers to “improvising” along the way, and you’ll see how it all turned out a bit later (spoiler alert: looks good).
So that completed the hang drywall part (with only one minor hiccup, thankfully). Next up was the drywall mudding part. I left that to Sherry because she has more finesse than I do when it comes to that stuff (at least I tell her that to get out of doing it – the same way she’s better at cutting in).
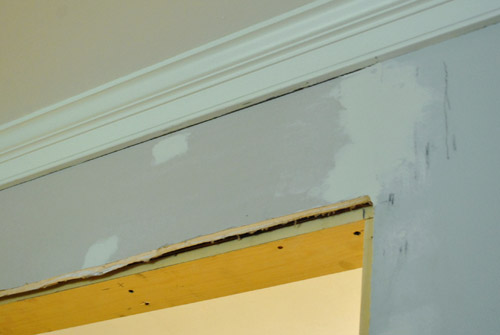
So Sherry broke out her spackle knives (the girl has a nice assortment) and started the fun process of taping, slapping up some drywall mud, smoothing it, letting it dry, sanding it, and then repeating that process. Although she didn’t tape this crack since it was especially tight (not even much of a crack thanks to a super tight fit).
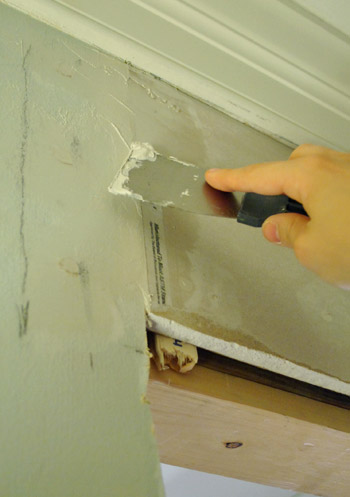
She ended up doing three rounds in most spots, since she wanted things to be as smooth and seamless as possible (she decided to caulk that crack up near the crown molding instead of trying to get mud in there with a putty knife, so that’s why it’s untouched in this photo):
As for the corner things we used around the half-wall, they actually came out really well (admittedly better than I hoped, since I always worry that something catastrophic might happen to leave the walls looking weird and lumpy). Of course I realize as I write this that I didn’t take a photo from the other side so I’ll have to work one of those into a future post. But the corner piece and drywall mud seem to work just fine with the wood paneling – and once it’s all primed and painted it’ll effectively be “sealed” in there for a nice durable and straight-looking end result.
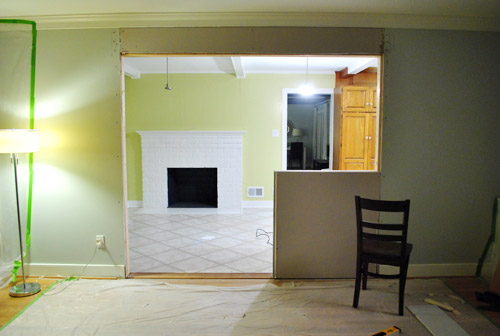
So… it’s definitely looking more finished than it did this morning… but nowhere near totally finished.
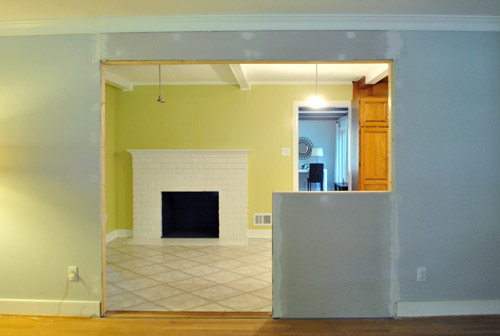
I’m the first to admit that the entire opening still looks kind of crazytown because:
- there’s not any trim to unify it with the other doorways nearby
- the baseboards aren’t complete on either side (they just end at the half-wall)
- there’s no wooden ledge above the half-wall to add some extra function and balance (we’ll tackle that along with the trim/baseboards next)
- there’s not a big peninsula with stools and a giant slab of counter behind the half-wall to make sense of it
- there are lots of things we have to prime/paint, so it’s looking extra rough
So the whole thing is sort of out-of-context right now. But it’ll get there – slowly but surely. Oh and we mentioned this in a past post (this one), but for anyone tuning in now, here’s why we opted for a half-wall instead of a full opening with a peninsula floating between each room:
- we didn’t want the peninsula to look like an afterthought (like it was placed in the middle of a doorway without much planning)
- we thought the half-wall would ground the peninsula, so it would feel solid and supported (instead of more like it’s floating between two rooms)
- we already have four base cabinets in the dining room thanks to the existing built-ins (so we don’t need additional cabinetry/storage)
- because of those existing built-ins, we thought an open bookcase, cabinet, or other form of built-in located less than three feet from the giant wall of existing built-ins would be a bit much
- our threshold would be a lot more seamless (if the half-wall weren’t there, there’d be an awkward strip of cork flooring between the peninsula cabinet and the dining room floor)
Next up? The door jamb, that ledge on top of the half-wall, and trim. Then comes primer and paint. And THEN it’ll start looking finished – especially once we begin to assemble the peninsula behind it. Of course there’s still the whole half-countertop-less kitchen going on (more on that here) but at this point we like to think of that as a minor detail.
Psst- Sherry got in on an interesting discussion about what’s in and what’s out over on Centsational Girl today. It’s definitely one of those fascinating everyone-has-a-different-take reads.

tricia says
WOW! Amazing! I cannot get over how great this looks. Love it!! You guys are making some real progress…I don’t know how you do it!
amy says
I was curious about the wall texture where you are patching~ i read your previous comments and saw that y’all don’t have textured drywall. Maybe it’s a regional thing, but that seems so unusual. All the houses we have remodeled (which were 50 year old ranch style homes) as well as every new construction house we’ve ever looked at has some type of texture on the walls. I think texture is used 99% of the time because it provides a better surface to paint on than the paper on drywall. Every ranch style home we’ve seen has crows foot texture and almost every newer home we’ve looked at has orange peel texture. I say all of this because I think I remember this topic coming up in your last house (when you redid the bathroom) and there was no texture there either. It’s made me so curious because I have never seen or heard of a house with absolutely zero wall texture, unless the wall has been previously wallpapered or will be wallpapered. Is that the case with the 2 houses y’all have lived in? Another reason people use some type of texture is to hide seams and flaws- I have found that it’s nearly impossible to truly hide sheetrock joints, no matter how much you smooth and sand (hence, why there are no builders who leave walls untextured). I realize that y’all haven’t lived there forever, but I wonder what the story is with that? Just curious and somewhat intrigued with the “no-texture” house.
YoungHouseLove says
I think it’s definitely one of those regional things! I actually haven’t seen a house in Richmond with textured walls. They’re all smooth (both in old ranches and new constructions like John’s sister’s house). You honestly can’t see drywall seams at all (to the point that we thought we had plaster walls in the dining room and were shocked to discover two layers of drywall after they cut things open). We love smooth walls (especially because you can stencil and make subtle horizontal stripes like we did in our last home’s bathroom more easily) but it’s probably one of those personal preference things!
xo,
s
Danielle says
I live in Michigan and the majority of homes have smooth walls as well. Some really old homes with plaster walls will have a rainbow pattern, but drywall or sheetrock homes are smooth. I never notice the seams either. In fact, we just redid some drywall in our house and we were able to make the seams invisible with tape, mud, and lots of sanding.
KathyG says
And I live in Az, and here you’ll see just about all of it, orange peel, down to the more contemporary 80/20, which means that a texture was put over the drywall, but it’s smoothed out leaving only 20% ‘holidays’ as they are called. It’s a smooth finish, but it’s not naked drywall.
Heather says
WOW.
You guys… just… WOW.
I am getting more and more excited about your kitchen renovation every single day.
Shelley says
LOVED reading the post on Centsational Girl. What a fantastic idea for a blog post!! It was fun to read everyone’s design perspective.
Dana says
I know you mentioned a ‘wood cap’ on your knee wall.. I wanted to let you know that we have a knee wall and we used the same granite as the ‘cap’ that is on our kitchen countertops – it turned out great and ties the 2 rooms together! I think your white Corian would look awesome as well!
YoungHouseLove says
That’s a fun upgrade idea if it’s in the budget for sure!
xo,
s
Megan says
yay for Frugal Power! reminds me of the time I used 3 groupons in a row at Nordstrom’s The Rack…walking out with my purchase and then coming back in to do it all over again. NO SHAME!
Erin says
I laughed when I read the part about cutting up drywall in the parking lot. My husband has totally done this in order to haul the stuff home in his 1992 Honda Accord wagon. (old house, old car) I showed him this post and he felt validated : )
Kacie says
Wow. That is some dry walling skills. It took us FOREVER to drywall our kitchen tear out. Ugh. May not ever do it again… although it’s supposed to be easier the more times you do it. Right? ;-)
Kacie
http://www.acollectionofpassions.com/
YoungHouseLove says
Yes! I think it does get easier. I remember it being a lot less smooth and a lot more infuriating in the bathroom reno. This time I dreaded it, but after three mudding and sanding sessions it looks like I paid a pro. So proud!
xo,
s
Chris says
Favorite quotes that aren’t actually dirty from this post: (Hopefully not inappropriate, I really like you guys and thought these were hilarious out of context.)
“it was nice to come home and jump right to screwing”
“she didn’t tape this crack since it was especially tight”
“she decided to caulk that crack”
YoungHouseLove says
Haha, lots of that’s what she said’s going on here.
xo,
s
Colleen in MA says
LMAO!!!
mp says
It looks great!
Jen says
Two tips for you- drywallschool.com – great site for drywalling- made my jobs super easy with e tips he provides and for shims, if you run out, you can just slice up 2x4s or any other wood scraps with your miter saw….good luck with your project
YoungHouseLove says
Thanks Jen! Great tips!
xo,
s
pendy says
Awesome work…
Did y’all notice that the view of the opening now resembles a ‘P’?
YoungHouseLove says
Haha- we were joking about that. It’s our hugest monogram yet. Haha.
xo,
s
Tracy says
So I have a question…is the peninsula counter not going to be as high as the half wall? I guess I was just picturing it being the same height for some reason. Or is it going to be one of those split level countertops? I feel like I missed something.
YoungHouseLove says
We debated and debated and looked at countless pics and decided we liked the idea of the half-wall going up just a few inches above the counter so we could cap the half wall with a wood ledge that we could set things on. That way it won’t look like the counter is also in the dining room (it’s a nice subtle devision, so it’s clear that the peninsula is on the kitchen side as opposed to being shared. We just couldn’t picture seeing just a big counter slab beyond the dining table when you enter. So we liked the idea of seeing a clean capped half-wall with a peninsula beyond it in the kitchen. It’ll make a lot more sense in few days when we build that ledge and start assembling the rest of the peninsula!
xo,
s
Mike Grant says
I’m cracking up (pardon the pun) at all the comments on the lack of tape on the joints. My guess is next time you will tape all your joints just so you don’t have to hear about it over and over. Looks great. I don’t know where you guys find the time.
Jill says
I am amused at how many people love your title. John, you might need a rapper name to go with Sherdog.
Jdawg? John-Z? Johnye West?
Also, did you guys put some extra hardwood flooring down where the wall used to be?
Jill says
J-Diggity Dog!
Jill says
Jiggy P?
Jiggywidit!
YoungHouseLove says
Haha. I call him J-Diggety. Oh and as for the threshold, that’s actually just a sliver of leftover wall paneling that we cut and turned over (so it’s not painted) and nailed in. Eventually the cork flooring in the kitchen will go right over it (it’s flush) to meet the oak in the dining room in a nice clean line.
xo,
s
Love this Life says
I love that you are so hands on! I can’t wait to see the finished product. We are building a home again so I can relate with how involved this process is.
Colleen in MA says
John, you are such a sweet talker. “The girl has a nice assortment of spackle knives.” LOL
But seriously, thanks for the breakdown of the project. Although this type of project is beyond the scope of my patience / time / skills, I appreciate the behind-the-scenes look. I think it helps me better evaluate the state of my house and the hiring of contractors. Good stuff.
Jill says
Bwahahahaha… oh no you dint just use those lyrics as your blog entry title… LURVE IT.
PS I think it is time to get a gas hog/truck/suv, yall!! :)
Michelle N says
You guys might know this already but wanted to share just in case you didn’t. Ikea had this new program called Ikea Family and they offer in-store discounts. I guess it’s kind like a rewards card like at Kroger. Not sure how everything works yet because I haven’t picked up my card. Oh and it’s FREE!!!
http://info.ikea-usa.com/FAMILY/
YoungHouseLove says
Yes! We signed up and even got a free tea and ice cream cone. Love it! Haha.
xo,
s
Elizabeth says
I was just watching Income Property on HGTV (one of my faves!), and the kithen had off white penny tile, white upper cabiets, and then dark wood lower cabinets. Would you ever consider having mix matched cabinets (light on top, dark on bottom)? It looks really nice. I wish I had a link to show you!
YoungHouseLove says
We love that idea! But the two super tall cabinets in our kitchen (the built-in around the fridge and the pantry) don’t make lowers and uppers very clear (they’re sort of lowers + uppers combined, so we’re not sure what color they would be if we did something so contrasty on the bottom and top). But we love that look!
xo,
s
Jenny says
I am SO excited for you guys. Seriously, reading these posts has me sort of on edge for the finished bit. Living my dream home design fantasy life through you guys, one post at a time. :)
Caitlin @ Hardly Housewives says
Love the title… our blog is only a week old but I have one hip-hop themed title already plus about 4 more in the short term “pipeline”. Gotta keep it interested!
Lacy @ downMODERNhome.com says
WOW! It looks great (even in process)– such a great idea to take this approach to the space.
Allison says
BEST.BLOGTITLE.EVER! ;) Baller is now stuck in my head…
Kim says
On the topic of contractor advice, you might want to ask Steve about your laundry room window…if you end up converting your carport to a garage, I think (keyword=think) it needs to be fire-rated or removed.
YoungHouseLove says
Yup, we’ll definitely be asking about those safety things when we get there! The office window looks into the carport so we’ll have to deal with that one too!
xo,
s
ashlee@238windsor.blogspot.com says
you’ll never guess what i (finally) did?
took down my cabinet doors to paint them, and listed my upper cabinets and island for sale! all part of the master plan.
Molly says
Best tittle for a post ever!!
Laura says
I am so thankful for your crazy titles.
No lie, all these years I was saying “shock holla” which makes absolutely no sense. It could’ve been “shock collar” too, but that’s just plain strange to put in the song….
Now I will go read the post.
Robyn says
Looks great!
Have you considered widening the wall into the living room as well? Now that the wall is open that doorway seems so small! It would really unite the spaces to be able to look all the way through to karl… or would it make your house too fish bowl-y to look through the front window, through the dining room, through the kitchen into the living room… but you guys do like open spaces!
On a different note, thanks for the many hours of entertainment you have provided and the many ideas to day dream about when we move back to America and FINALLY get to buy our own house!
Robyn
YoungHouseLove says
Yes- we’d love to open that (it’s part of our original someday-plan) but it’s going to be tres expensive since it’s an original brick exterior wall (before they added the addition it was the back of the house) so it’s super thick and load bearing and would call for a mason!
xo,
s
Regan @ RenovatingRothenbergers says
I love that you set up shop in the parking lot!! :) Looking great!
Emily says
Looks amazing so far! I think I might be just as excited about this as you guys :)
Just had to tell you–I had a dream last night about your floors!! I was in a store (Home Depot maybe?) and saw a sample of the cork. The employee told me “That’s the VERY same flooring they’re using in the YHL House.” I was SO excited to be actually TOUCHING IT! Ha!
YoungHouseLove says
LOL, that’s hilarious!
-John
Priscilla says
Had you guys considered getting roof racks for your car? I use them all the time to bring stuff back from Home Depot. Of course for bringing back wall board, you need to buy some extra 2x4x8s to put under the wall board, but then you can take back the wood after you get the wall board home. You can often get them off of craigslist.
YoungHouseLove says
You’re the second one to recommend them- might have to give them a look! Especially off craigslist!
xo,
s
Ilana says
Looks great, how sturdy will it be? Will someone be able to lean against it or rest their elbows on top?
YoungHouseLove says
Oh yes, once it’s painted the primed it’ll be like any other wall in the house. Sturdy and lean-able/restable. Haha.
xo,
s
Kyle says
I.laughed.so.hard. when I read the title. GO YOU GUYS! This looks awesome.
Mari says
I know you are committed to the idea of the half wall (heck, you already built it/drywalled it/put electrical in it), but here me out on this: I think the half wall does a disservice to the desire of making the opening look as if it had always been there. To me, it feels like an 80s cut out (sorry!). I understand all your stated reasons for needing it, especially the gap in flooring, but couldn’t you have considered building out the corner cabinet in the peninsula to make it feel more like a piece of furniture?
Maybe everything really will look better when you finish out the details on the half wall, but even with those details completed, you really in the end have carved out part of a new opening.
YoungHouseLove says
We definitely considered that option, but a corner cabinet in the peninsula to make it feel like a piece of furniture would still make it feel like a piece of furniture sitting in the middle of two rooms to us! Right smack in the doorway. Plus we think it would add business to the dining room side (with that wall of built-ins 3 feet away) so we like the idea that the eye will travel right past it and move around the space instead of “catching” on something there in the doorway. It’s definitely one of those personal preference things, but we have seen some gorgeous non-80s half walls (our neighbor added one and it’s finished to look very chunky and Craftsman) so we’re looking forward to seeing it through!
xo,
s
Lisa R. says
Hi,I was just looking at the pictures of the work that you have done…great job,and you are so clean as you go!I was wondering how many solid walls are remaining in the front dining room,do all of the walls have openings?
YoungHouseLove says
There are three doorways in the dining room – one that leads to the hallway (to all of our bedrooms and bathrooms), one new one that leads into the kitchen, and one that leads to the office (which we someday plan to replace with french doors for optional privacy when we don’t feel like cleaning all of our papers before a little gathering).
xo,
s
Gillian says
Im a little confused, do you not need to plaster your drywall before you can paint it? I’m assuming its the same as what we here in Northern Ireland call plasterboard..
YoungHouseLove says
Might be a regional thing, but here we tape, mud, sand, repeat that a few times and then just prime and paint.
xo,
s
Christine says
I know this is completely unrelated to this post, but what types of places do you find all your frames for your hallway?
Also, I’m psyched to see all the awesome-ness happening in your house/kitchen!
YoungHouseLove says
Mostly Ikea, Target (on clearance) and yard sales!
xo,
s
Chelsea says
The title of this blog post make me literally laugh out loud! Made me think of gangster drywalling.. thanks for the giggle :)
Alise says
This might be the best title for a post I’ve ever seen. It made me happy and of course started singing! It is so much fun to see the progress, can’t wait to see how it develops. You guys are great!
Lisa G says
LOVE it all! The opening is awesome- making me even more excited to get to our opening b/w kitchen and den. Love the title- so fun. And REALLY love that John cut the dry wall in the Lowes parking lot. Great work y’all. I want to stop by to see it!!
YoungHouseLove says
You have to come see it in person Lisa! Bring the kiddos and we can all run through it!
xo,
s
Lisa G says
You KNOW Richard will run laps around it! Clara + Sophie can chase him :)We’ll be over.
YoungHouseLove says
Haha- sounds like a plan. Clara says “Sophie” when we walk by your house now. So cute. She’s working on Richard. It sounds more like “Reek-ar.”
xo,
s
Lisa G says
Ahh! I love it. I need to hear sweet Clara say that. Richard is a hard name for little ones, Sophie just calls him bro-bro.
Kim Bowman says
I was just wondering why you decided to keep the wood paneling in the kitchen. I was kind of expecting you guys to tear it down and use drywall in the kitchen. Just curious as to why you kept the wood.
YoungHouseLove says
We had painted paneling in our first house’s den and think it’s cozy. The subtle vertical lines don’t bug us (they’re just added texture to us). We’re weird I guess, but we like it! And definitely don’t hate it enough to gut out the cabinets and drywall! Haha.
xo,
s
Ali says
Looks great, guys! And I can relate to the cutting drywall in the parking lot–my Mother-in-Law and I just did that yesterday!
Michele says
While you had the contractor there, did you ask them about the double sided fireplace? I know one project at a time, but doesn’t hurt to ask while you have him in your clutches.
YoungHouseLove says
We think we might need a mason for that since it’s a ton of brick-work. We’d definitely love to use the same contractor to convert our carport into a garage someday though!
xo,
s
Jacob Kligman says
Very nice use of the space!
Luisa says
Love it. Great floor plan. Is there a reason you wont just go ahead and drywall the whole kitchen. I know it gets spendy but looks like you could DIY it easily. Just wondering if you’ll have paneling regrets. Keep up the grand work!
YoungHouseLove says
We had painted paneling in our first house’s den and actually think it’s cozy. The subtle vertical lines don’t bug us (they’re just added texture to us). We’re weird I guess, but we like it! And definitely don’t hate it enough to gut out the cabinets and drywall! Haha.
xo,
s
Jennifer says
Busted out laughing at the post title and knew it was John right away!! Best EVER!!! JP _______ (insert crazy rapper type name.
Liz says
well done! i’ve spackled the walls of every room in my house, and the only one i’m satisfied with is the hallway. le sigh. should have sucked it up and done multiple mud coats and sandings.
eileen marie says
I was on Censational Girl already, but didn’t recognize Sherry’s picture -ha! You guys are moving at lightning speed in your kitchen! I can’t wait to see the *nearly* finished product once you add the ledge, etc. I think once the kitchen is complete, it is going to look really sharp w/ the white cabs & counters and dark floor!
Chris says
Oh the joys of the remodel… I think deep down I like watching you guys do this work because it’s not me doing it!