When our saga last left off, our heroes were being shuffled around the kitchen. That is, if a refrigerator and a pantry are your kind of hero.
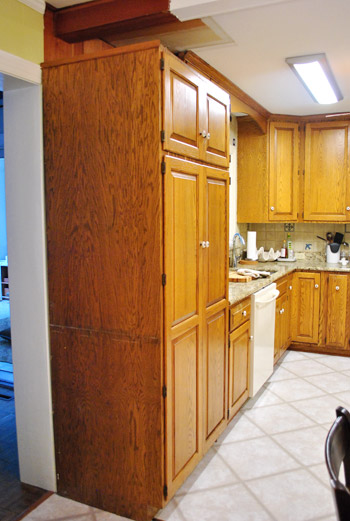
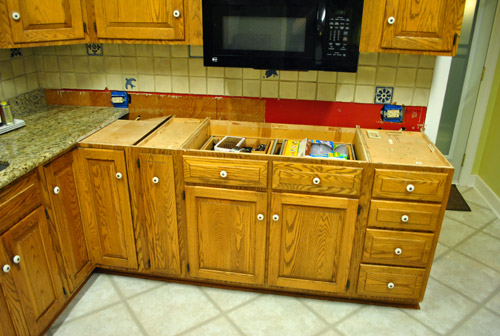
But before our new appliances arrived last week, we had to put the moves on a few more things. First in line? The cabinet that held the wall oven.
You probably recall that we were ditching the wall oven because it was burnt on the front, bisque colored, and cooked things unevenly. We opted not to replace it with another wall oven because (1) wall ovens are expensive – usually 1K more than ranges, (2) our cabinet is unconventionally narrow – most modern wall ovens wouldn’t even fit, and (3) the tall cabinet was big and bulky (we’d like the pantry and the fridge to be the only two tall things in the room). So that whole tall cabinet was getting the axe – but of course we’ll be repurposing parts of it.
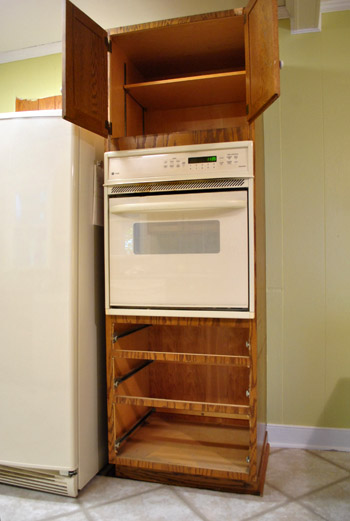
Once emptied, we unscrewed it from the back wall, removed any trim, and shimmied it out of its hole in the floor. Oh yeah, this was all after turning the power off.
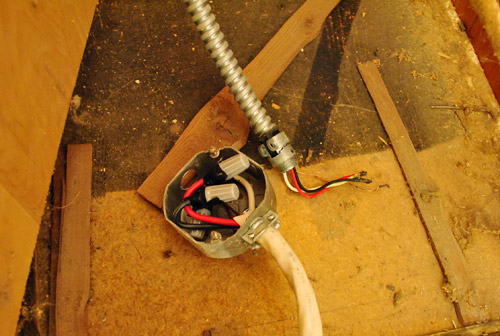
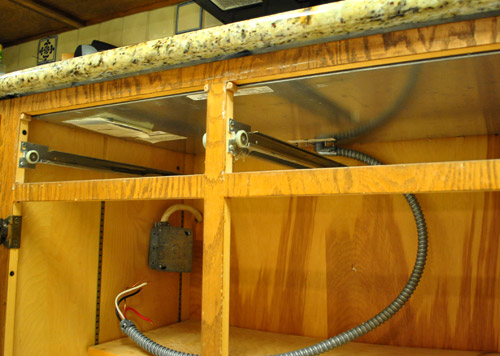
The darn thing was hardwired, so rather than just unplugging something, I had to do a bit of “unscrew this, rescrew that” to get it disconnected. Don’t worry about the crazy exposed wire. I capped it, put everything into the metal box (which had a lid) and left the electricity turned off to that area of the house until the electrician arrived this morning to take care of it all – and to finally figure out what that mystery wire is above the pantry (details as soon as we know!).
With a few more screws unscrewed and a bit more shimmying (we feel like we do a lot of that lately) we had the oven out of its wall hole and ready to be moved out of the room (we’re donating it to the Habitat For Humanity ReStore).
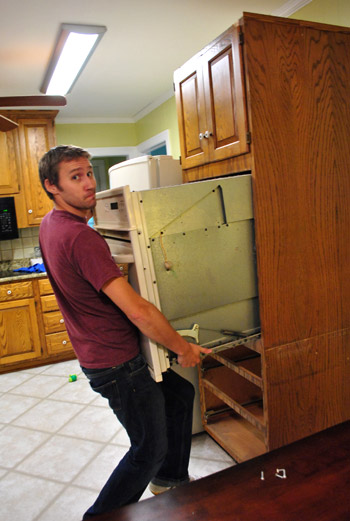
Once the oven was removed, the cabinet itself was awesomely light, so it joined our stockpile of kitchen scraps in the sunroom (we’ll be reusing things like the doors and drawers and possibly some of the other oak trim). We’re hanging on to everything until we’re done with the kitchen just in case a piece comes in handy (so our sunroom looks crazy – we should snap a photo for you guys). Then once we’re done, we’ll try to donate or craigslist as much of it as we can.
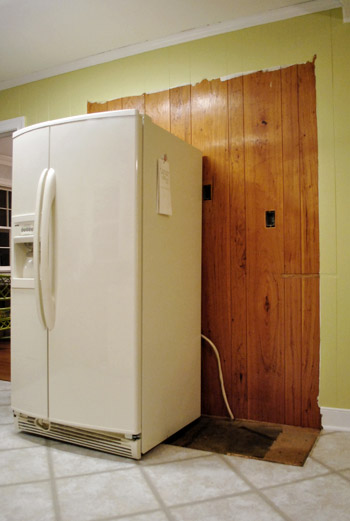
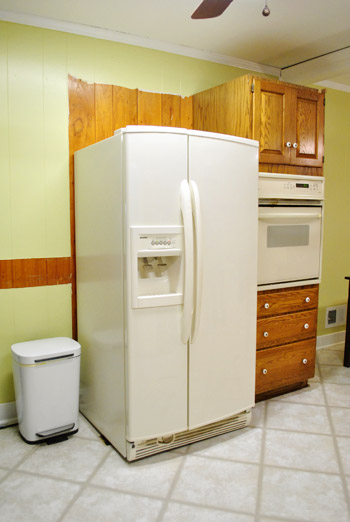
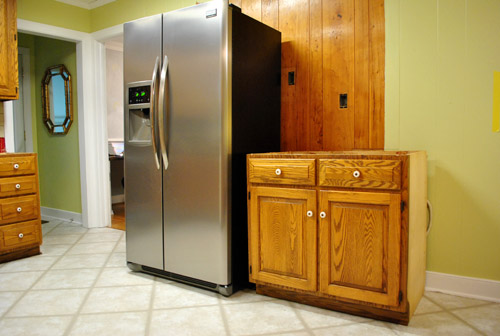
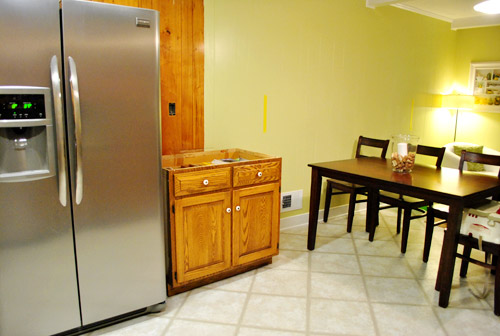
The womp-womp of having just exposed more unpainted paneling wasn’t so bad. Mostly because the next morning our new appliances arrived. Joy. The fridge got installed in place (the old one was hauled away to be donated to a local church) and the new stove temporarily sat by its side (not hooked up, because it will soon live on the wall to the left of the fridge as you face it – more on the future floor plan here). The dishwasher and microwave are sitting in boxes in front of the fireplace. Yes, our kitchen looks pretty insane right now if you couldn’t tell. And although the only new appliance that we’re actually using is the fridge, so far we love it.
With the wall oven gone and the new stove not in place, we’d lost our baking function in the kitchen. No good. So our next mission became getting the new stove installed in its soon-to-be-permanent home. Only problem? This stood in our way:
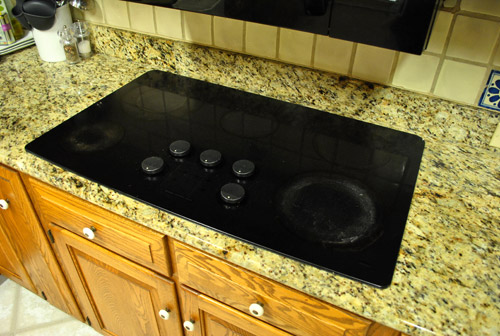
It was time for the cooktop to join the wall oven in craigslist/donate purgatory (we planned to craigslist it because it’s a pretty nice JennAir model). We started by emptying the cabinet below and I disconnected the electrical in the same turn-off-power-and-cap-it-all-in-a-metal-box-and-leave-off-power-to-that-area-until-the-elecrician-arrives-this-morning fashion.
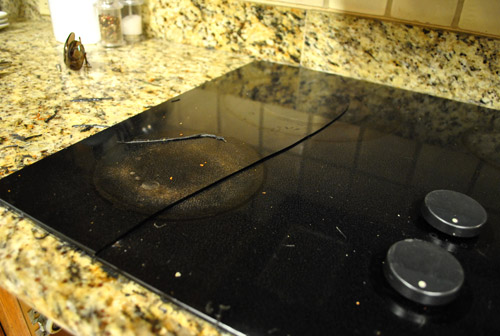
Based on the installation manual (which I looked up online), I should’ve just been able to lift the cooktop out (it wasn’t screwed in)… but this sucker wasn’t budging. That’s when we discovered this:
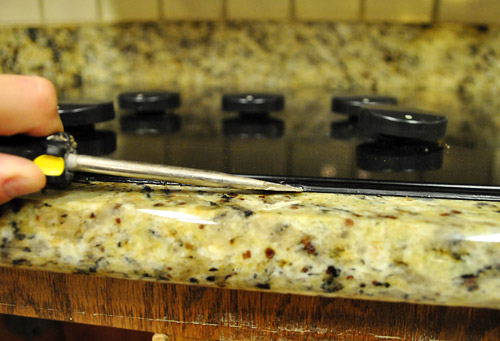
It was glued down with some sort of black silicone. Sherry did some quick Internet research on “removing cooktop glue” and came to the conclusion this was baaaad news. Apparently you’re not supposed to glue down your cooktop because it makes it very difficult to remove (uh oh) without completely shattering the glass (double uh oh) and many folks were rambling about how mad they were at their granite installers for gluing theirs in which they only learned was completely wrong after it needed to be removed to be serviced or replaced and was shattered in the process. Even though it wasn’t looking too good for our “craigslist the cooktop” plan, we were determined to at least give it our best try. So we started gently scraping and slicing the caulk to free the cooktop.
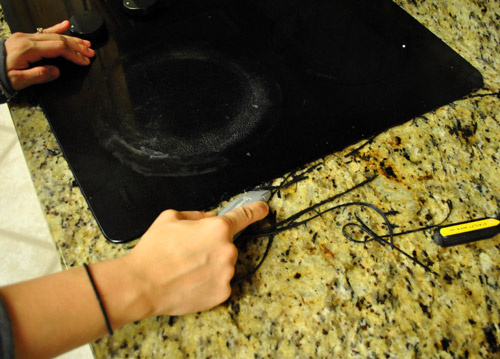
Well, the odds won. After about 15 minutes of trying to sloooowly and caaaarefully pry it up, we got our first crack in the glass. Then our second. Then our third. Then… well, we just accepted the fact that our cooktop wasn’t really sellable or donate-able anymore. Sucks. But from what we hear, any drop-ins that are caulked usually suffer a similar fate. So if you’re adding one remind your granite or countertop folks not to glue it down!
With our rescue mission having turned into a recovery, we plugged away at trying to detach the cooktop from the granite. After all, this whole section of granite was next on our remove-list (to make way for the stove) and it was already gonna be heavy enough without a cooktop piggybacking on it. So Sherry kept working on the cooktop while I started with the granite backsplash – which, ironically, came out quite easily. Having the backsplash out gave Sherry enough room to cut along the back edge of the cooktop (even her small hands couldn’t fit back there with the backsplash in place). Perhaps this would do the trick?
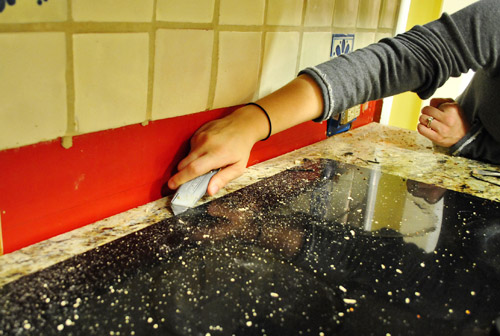
NOPE. No luck. So we gave up on trying to remove the cooktop and decided to just carry it out with the granite instead. Sherry was quite excited to turn her attention to something that (based on my backsplash experience) would be much more satisfying.
And it was. After a few slices along the silicone caulk that held the granite in place, Sherry was able to wedge a crowbar and screwdriver in a few places and start to pry it up within minutes.
Once it was fully detached, we called in reinforcements (my dad, whom we had invited over to “help with a little project”). Because granite is HEAVY. He must’ve known our definition of “little project” usually calls for work gloves, so he showed up wearing his.
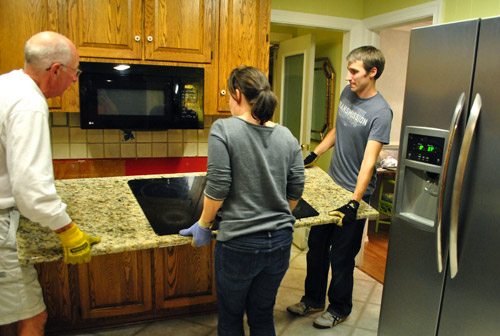
Moving it actually wasn’t that bad. We were able to get it into the carport no problem, where it now sits awaiting – you guessed it – our craigslist/donate bonanza. Meanwhile, back inside we were left with this: no cooktop or granite, but still a cabinet where our stove needs to go.
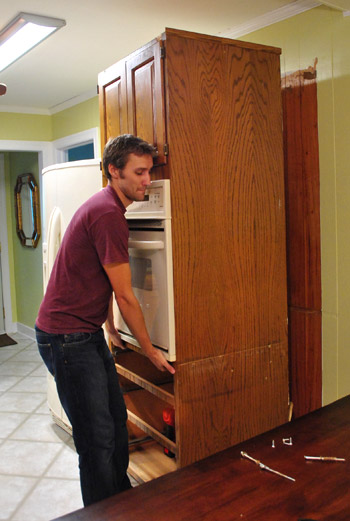
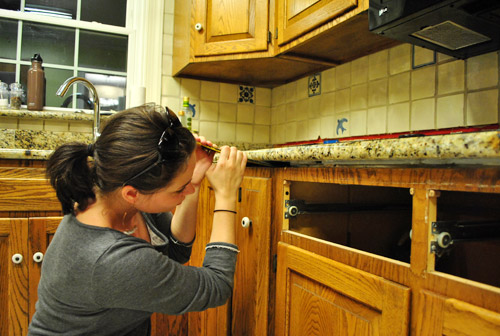
So with everything emptied, we pried out some more trim and unscrewed a few more screws…
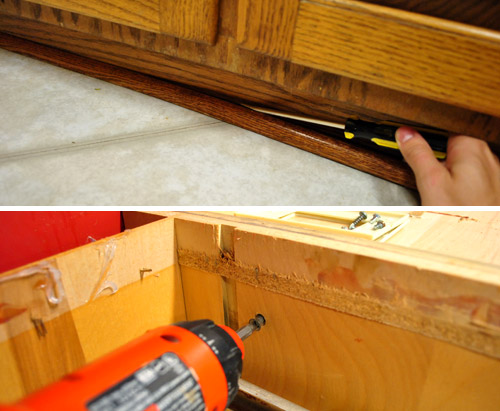
…and pulled the cabinet right out of its spot…
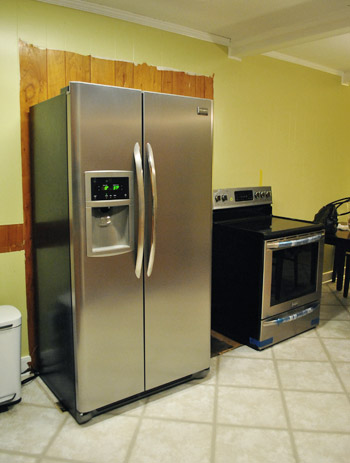
…and shimmied (darn it, there we go again!) the stove into place.

We left all of the wrapping on the stove as a visual reminder not to try to use it (it won’t be ready until the electrician finishes with things this morning since he’ll be converting the raw wires to a standard plug).
A couple of other things to note about that picture:
- See how close the top of the stove is to the bottom of the mircowave? That’s how awkwardly low our microwave is hung. Not normal, right? Can’t wait to upgrade to a properly hung range hood.
- The stove is 30″ wide, but the cabinet base had been 36″- so we’ll add some 3″ filler pieces to make it look built in (since the hood is vented/ducted to be centered over the 36″ opening, moving the stove to one side or the other would be major ceiling surgery that we just don’t want to take on). But once we add 3″ filler pieces and paint everything white we think it’ll be pretty darn seamless – and definitely worth having a work triangle instead of some sort of odd work parallelogram.
- The stove is counter-depth, so although it looks a bit deeper, we just didn’t push it in all the way (since the electrician is coming and we’ll have to pull it back out).
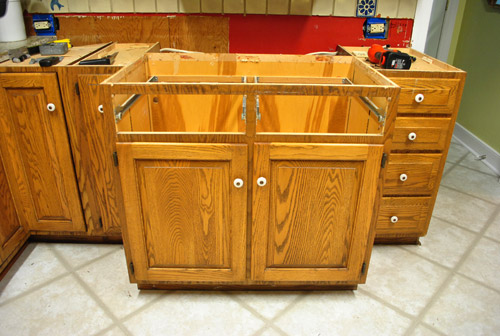
Oh, and speaking of that 36″ cabinet base. It did not end up in the sell/donate pile. Instead, it’s getting put to use where the giant wall oven cabinet used to live:
Yup, it’s gonna be part of the new workspace that leads from the fridge (which will get built in) all the way around to the peninsula that we’ll be adding. By reusing this cabinet it means we only have to buy 2 new ones to create our peninsula (one corner base cabinet and one 21″ drawer base cabinet). But we’ll talk more about that later (we got planz, yo).
With every item that we check off of our kitchen to-do list it seems like ten things get added, so I won’t even attempt to lay it all out here. But the main things are securing materials (backsplash, cabinets, counters, etc), painting the exposed paneling, and scheduling our wall knock-down-fest (we finally picked a contractor to help us – so it looks like we might accomplish it within the next month). Woo hoo!

Amanda @ Our Humble A{Bowe}d says
Wow, you guys are really chugging along! I love seeing your progress. It’s funny because our kitchen remodels are kind of parallel right now. We just added a new vent hood: http://ourhumbleabowed.wordpress.com/2011/10/18/ventilation/
I would highly recommend the site we bought ours from. They’re cheap but not cheap quality. Just thought you might want to know.
YoungHouseLove says
Ooh – looks so good!
xo,
s
kelly taylor says
you sure have been busy!
Kristen @ Popcorn on the Stove says
Ah! So many things happening! I am really digging these changes. Too bad about the cook top but at least we now all know you can’t glue them down!!
LauraC says
Hundreds of other cooktop lives will be saved through this post. ;-)
YoungHouseLove says
Hahaha- too funny. We certainly hope so!
xo,
s
Meredith says
Would it have been possible to remove the granite with the cook top, and then sell/donate them as a unit? Not to second guess your decision, but I’m just asking for others with glued-down appliances. :)
YoungHouseLove says
That might have been possible if we had known that it would definitely break- although it would call for a very specific floor plan for someone to want the unit in that exact spot- and we’d feel bad if they bought it thinking it could be removed and then it broke on them!
xo,
s
Manda says
I’m so excited for you guys! With your amazing history of room makeovers, I’m sure your kitchen will be a spectacular site to see!
Hooray for Young House Love!
Mandy says
I love living vicariously through you guys!!! So glad that the cabinets are so easily removed, and can’t wait to cheer along with every update. You make me want to go do some demo in my own house!
Erin says
I love seeing how everything comes apart. I am not sure that I would ever dare try what you do (at least, not yet), but it is so satisfying to know that with some the right tools, even a kitchen can be dismantled. Thanks for sharing the journey!
Rachel Tatem says
Wow that is a shuffle! We just had to rip everything out and put in new (because of water damage by prior owners) your way actual looks harder. I’m excited to see what you do!
Leslie N says
It’s looking great! Excited about seeing the progress! You guys ended up getting the exact same appliances that we have – except our range is gas and your model is about a year and a half newer) and they have been really great appliances! No complaints at all – we love them.
I’d be honored if you would check out my latest project! http://life-embellishments.blogspot.com/2011/10/project-post-9-old-porch-post-ledge.html
-Leslie
YoungHouseLove says
So charming- I love it! And so glad to hear you have the same appliances and love them!
xo,
s
Maureen @This (Kinda) Old House says
How exciting!!! I swear I am living vicariously through you guys right now. I am eagerly awaiting the start of our bathroom re-do. So, you guys are feeding my DIY soul right now. :) This kitchen will be epic!
Nicole says
Wow. This project is impressive. Actually – you guys are impressive! Talk about a crazy game of tetris! Well done :)
Gavin S. says
So exciting! Things seem to be moving along at a good clip in the Petersik house this month. Keep up the great work–I’m looking forward to seeing the finished product!
robin @ our semi organic life says
Wow such progress! That is heavy duty stuff you guys! These are my fav posts!
tae says
Congrats on the demo! This is so exciting! Can’t wait to see what you do next. I don’t think you’ve mentioned this, but are you planning to get a new sink?
YoungHouseLove says
We have a nice big deep stainless sink so we’re keeping it! We have learned to love one big single bowl (we used to have a double and big pots never fit in either side).
xo,
s
Stephanie says
Okay, I have a question I’ve always wondered the practical answer to. If you have a single bowl, how do you hand wash dishes? Do you just rinse over the soapy water?
YoungHouseLove says
We use our dishwasher! Haha. Just kidding. When we scrub something we just use a soapy rag (no standing water under it usually) and then set it out on the counter with a towel to dry.
xo,
s
miriam says
What a bummer about the cooktop! Good thing you got such a good deal on all your new appliances– that’s got to make it hurt less.
I have to say though, I really admire how you guys tackle these huge projects one step at a time. It makes the whole process look so much more doable than on the HGTV shows where they demo everything and then rebuild it in (what seems like) 30 minutes! Although it’s got to be hard living with an in-progress kitchen, I’m sure.
YoungHouseLove says
Aw thanks Miriam! Our last kitchen took us 113 days (that’s how long we didn’t have a sink or working stove) which was crazy! And we actually had lots of help with that one (we’re DIYing a lot more with this one) so we anticipate that it’ll take a while- so breaking it down into bite-sized chunks and trying to keep things like a fridge and a sink for as long as we can is the name of the game!
xo,
s
Kate says
Wow — things start to get real when backspash starts coming down! It definitely makes it a lot more clear that things are “in progress”! Can’t wait to see how things come along!
Are you going to temporarily cover the drawers where the granite is now missing so you’ll have some extra workspace or just leave it as is for now?
YoungHouseLove says
As of today it’s still just open, but for the long term we might use some scrap wood to cover it so we have more “counter” again!
xo,
s
sarah (sarah learns) says
your kitchen is really coming along!!! i can’t wait to see what you tackle next. :)
Jamie@WrightHouseAffairs.com says
PROGRESS: I love seeing it…even baby steps :) Did you decide on the new countertops you will be using?
YoungHouseLove says
Not yet- still debating! Deets as soon as we get there…
xo,
s
Brandi @ His Shabby Her Chic says
You guys sure put in a lot of work last night. Shimmy shimmy! Looking good so far!
Elisa @ The Self Life says
It’s like a giant puzzle – except with seriously expensive pieces. Hehe. How do you guys like this renovation compared to completely gutting a kitchen and starting from scratch? At least you’re not washing dishes in a tiny bathroom? Hah!
YoungHouseLove says
It’s much more of a challenge (like a super hard puzzle) to reuse things instead of starting from scratch- but we actually like the whole “game” of it. We sit in there and debate things and just see what shakes out! And of course it feels good to get to reuse things for the eco reasons and for we’re-cheap reasons. Haha.
xo,
s
Jeanne G. says
Wow, I thought my microwave was hung low over the range, but it looks like you guys probably can’t even make a big pot of soup until after your microwave is gone. I can make a pot of soup, but I have to take the pan off the stove to get any soup out of it.
YoungHouseLove says
Yeah – it’s insane. Can hardly fit the tea kettle.
xo,
s
Julia @ Chris loves Julia says
You guys have insane imaginations. You can visualize things so well. I am loving watching everything come together. It sounds like this is going to be an exciting month. Sherry, do your sunglasses serve as safety goggles, too? Or are they just your fav accessory?? :)
YoungHouseLove says
I wear them like a head band- I know it’s so weird, but head bands give me headaches but sunglasses hold my hair back so I can work!
xo,
s
Julia @ Chris loves Julia says
I hear ya! And I totally get it.
Sayward says
Amen to sunglasses as headbands! Sadly, it’s a lot easier to do this in the summer and/or outside – in the winter and/or inside, people give me questioning looks. (doesn’t stop me though)
fd says
I get this too. But now I wear glasses for my getting older vision and the glasses on my face and glasses on my head look is just weird.
Gwenalyn says
I do the same thing with my sunglasses! Not weird at all.
Missy K says
I can really begin to visualize what the kitchen will be like. One of my favorite things about how you guys approach your projects is the nice balance between reusing and repurposing old stuff when it works and knowing when to let go and go for something new.
Already looking forward to the next update!
Wendy says
Wow – I am so excited with your changes. Are you able to move the stove over and use the extra 6 inches for a narrow shelf – for wine bottles or cookbooks? Since the top cabinets are going to come down from that wall maybe the stove doesn’t have to be centred. Also just an aside – make sure to put your flooring under your dishwasher or you will have a terrible time trying to remove it if you ever
need to replace it. You won’t be able to “shimmy” it out with the countertop overtop of it.
YoungHouseLove says
Since the hood is vented/ducted to be centered over the 36″ gap, moving the stove to one side or the other would be major ceiling surgery that we just don’t want to take on!
xo,
s
Jackie says
Hi there! Looks great so far…one thing, have you considered moving the fridge to the right and the low cabinet to the left? From the pictures, it looks like it would visually give you more space when you entered the room instead of having the tall fridge right there at the doorway…your eye would not be blocked by the fridge. could be just the picture though…you guys know best. Love your site…have been with you from almost the start!
YoungHouseLove says
We just thought that folks sitting at the peninsula would rather look at a low cabinet than stare at the side of the fridge – but the fridge will be moving over to the right, so there will be more space between entering the room (plus once it’s built in with wood that’s painted white, it’ll visually feel a lot lighter than those dark black sides). Can’t wait for that!
xo,
s
Rachel says
Is it just me, or do the knobs look extra eye-bally with the former stove cabinets coming forward in that one picture?
Everything looks great so far–can’t wait to keep following the progress!! It’s always the highlight of my morning at work :)
YoungHouseLove says
Seriously! Eyeballs everywhere.
xo,
s
diana says
Yes, like it’s hair is attached at the back to the wall, and the eyeballs are bulging! Poor thing!
The fridge and stove are gorges! (Remember your brother’s wedding?)
YoungHouseLove says
Haha. Nice walk down memory lane to Dan’s wedding. Those were the days!
xo,
s
Angela says
We’re doing a kitchen remodel in the next few months. My Uncle gifted us with his cast off appliances, brand new, they just wanted to go stainless as well. And, you’re right! We have a wall oven currently, were gifted the wall oven and it doesn’t fit! UGH! BUt, we’ve been planning on remodeling and are picking cabinets now.
STressful but fun! Good luck on the rest of your remodel!
Erica @ Erica's Inspiration says
I totally see the vision…this is going to look awesome!! Are you aiming to be done with the remodel by Christmas or Thanksgiving?
YoungHouseLove says
We’d love to be done by the beginning of January. Since we’re doing a ton of things ourselves (and our last kitchen, which was smaller took 113 days) we figure that’s a good goal!
xo,
s
mribaro says
This goes hand in hand with keeping your tradition of spending Christmas holidays in the middle of a major renovation :) Yay for being consistent!
Melanie @ Mailbox Journey says
Wow! You guys are really getting this kitchen done! Loving the progress so far.
ellis says
This is ridiculously exciting. :)
meganleiann says
Awesome! I am really excited about this project. I have to say that I love that there was stuff still in your drawers. Totally something I would do. :)
erin says
That’s a pretty awesome Dad :)
ashlee says
what colour do you plan on painting your cupboards? white? what shade of white? i had originally picked out lamb by martha stewart but i’m questioning whether it’s white enough.
YoungHouseLove says
Decorators White by Ben Moore is our favorite by far! Not too stark but not yellow or ivory at all.
xo,
s
Nicole says
Just be careful! I tried Decorator’s White automatically on YHL’s suggestion and bought a gallon of it. It looked awful in my house… way too stark (not your fault J&S – I know you always make that disclaimer!). So make sure you test beforehand! I now have a barely used gallon of Ben Moore Decorator’s White paint for sale if anyone’s interested! I live in NH.
YoungHouseLove says
Oh yes! We recommend bringing home a swatch and a little test pot if you can.
xo,
s
Devon @ Green House, Good Life says
Nicole — have you looked into getting your gallon of Decorators White re-tinted to use somewhere else in your house?
YoungHouseLove says
Oh that’s a great idea!
xo,
s
Kristen says
How exciting! I love hearing about the kitchen makeover!
Crystal says
You guys make things look so easy! Makes me want to go in my kitchen and start switching cabinets around.
Katie G says
It like blows my mind that you decide you want your kitchen to look differently and then you can just make it happen! It’s the same way I can’t fathom how skyscrapers are built…but on a bit of a smaller scale :)
YoungHouseLove says
Haha, I’m with you on skyscrapers. And bridges! I look at them and think “I’m so glad someone bothered to figure that out- because I never could!”
xo,
s
Keely says
So exciting!
It looks like the microwave had the same issue your new oven has, with a few extra inches on either side, and the installers filled it in with matching paneling. It looks perfectly fine there (except for the microwave being so low) so I can’t imagine why it wouldn’t work around the oven.
Are you guys going to take out the rest of the granite and try to sell it all at once? Seems like that’d be best for the selling, but it’ll suck to have ALL your countertops gone at once.
YoungHouseLove says
We’re holding onto the granite we removed until we remove that side of the counter (probably won’t happen for a month or so since we don’t want to take it up until we have new counters coming since we’ll lose the sink). Then we’ll craigslist all of the granite together!
xo,
s
Sami says
Have you guys made a decision on counter tops? I may have missed it somewhere but I don’t think so. You didn’t put the counter top material (or look) in with the tile/floor/paint color layout yesterday. Just curious.
YoungHouseLove says
Not yet- can’t wait to figure it out though!
xo,
s
Tammy says
Wow – lots of progress!
I just have to ask, with both of you and John’s dad in the photo – who is taking the pictures? I’m assuming that someone needs to get credit for documenting the process.
YoungHouseLove says
John’s momma! She’s the best. Although sometimes we’ll use a tripod with a camera timer.
xo,
s
Sandy says
You guys are totally making me want to tear apart my kitchen! Bad news for the boy when we just got the house pretty much back together from the last crazy tear apart project!
Janice says
Woo Hoo – great progress. I am loving seeing all this unfold.
By the way, instead of adding fillers to each side of the stove, why not just move the 4-drawer cabinet over closer to the stove.
YoungHouseLove says
We love when cabinetry goes right up to a doorway (the whole room feels custom). So a gap to the right of that cabinet between the cab and the door might look less seamless than a wall to wall look.
xo,
s
Janice says
Gotcha! I am totally excited to see the first brush of paint on the cabinets. I have been planning to paint mine (oak stained in red mahogany, actually quite nice, but not the look I like) for two years now and can’t work up the nerve.
Ruthie says
Whew, I think that was the most intense blog post ever!
Do I spy with my little eye a Dr P shirt?!
YoungHouseLove says
Haha- it gives John power!
xo,
s
Elisa @ The Self Life says
HAH. This response is crackin’ me up.
Ruthie says
Funny, My husband would say the same thing. Now, if only they made a “bacon” shirt!
YoungHouseLove says
Haha, if only…
xo,
s
Meredith says
Gives John Power….hahaha!!!We have a friend who calls Dr. Pepper “Vitamin P.”
YoungHouseLove says
Hilarious!
xo,
s
Chrissie says
This is so exciting! I’m totally living vicariously through you guys. Our kitchen remodel is a ways off, we’re focussing on our wedding atm, but I’m itching to get stuck into the house! One big thing at a time…
erin says
We have the same problem with our over the range microwave and can’t wait to move it/replace with a functional range hood. I can’t wait to see how yours turns out!!
Ainhoa says
As soon as I read that the cooktop was glued down I thought “uh-oh”. I didn’t it made the glass crack though – I just knew you weren’t supposed to glue it down or attach it in any way.
Things are looking good! Can’t wait to see the wall opening.
Kate says
I am so ridiculously excited for you all! So much progress!
KinMD says
Looks great! So fun to watch from afar… I can’t help but wonder what Clara makes of it all…she goes down for a nap and wakes up to… new appliance!…rearranged cabinets!…no countertop! Is she having fun with the changes?
YoungHouseLove says
Yes! She loves our new appliances- just looks at her reflection in the oven door and taps on the fridge squealing “milk!”
xo,
s
Kristen@Turning a House into a Home says
So much shuffling! It’s great that you’re able to use a large amount of the cabinetry towards your new and improved kitchen! I love the work with what you’ve got mentality…while also completely changing things around.
katharine says
Where does laying the new floor come in this process? Will it not run under things or that doesn’t matter?
YoungHouseLove says
We’re currently trying to figure out when that happens (flooring generally goes in after cabinets are set, since it would get all scraped up if we were moving things – although appliances can be carefully set into place afterwards). We have to test to be sure there’s no asbestos in the floor tile or tile liner, which would change the game a lot!
xo,
s
Barbara Brake says
Just had ours tested in two of our bathrooms and unfortunately they came back positive for asbestos in the paper backing – not a fun exercise (or cheap!) to have it removed… hopefully yours will be free from it!
YoungHouseLove says
Ugh! Here’s hoping…
xo,
s
Thais Bessa says
Just to read that made me feel exhausted and in need of a 20 minutes nap (although I am at work and people might stare).
I’m glad you guys sorted the permission/contractor thing. I think this kitchen re-do has become the most anticipated one of the interweb!
Riva says
Your new appliances are GORGEOUS! Congrats!
ESBlondie says
Kitchen remodels are the best! I can’t get enough of your updates :)
And yay for new appliances.