Favorite project ever! Ok, I probably say that to myself every month or two, but this one might reign supreme for a while. Especially in the small/easy division (our sunroom reno and Teddy’s built-ins might have given it competition if it fell into the heavy-duty upgrade category, but there’s no way it belongs there because it was so simple). Ladies & gentlemen (gentleman?), I give you… Clara’s closet:
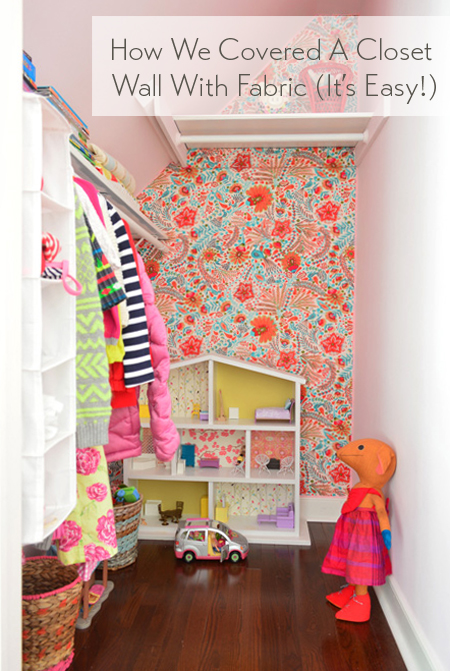
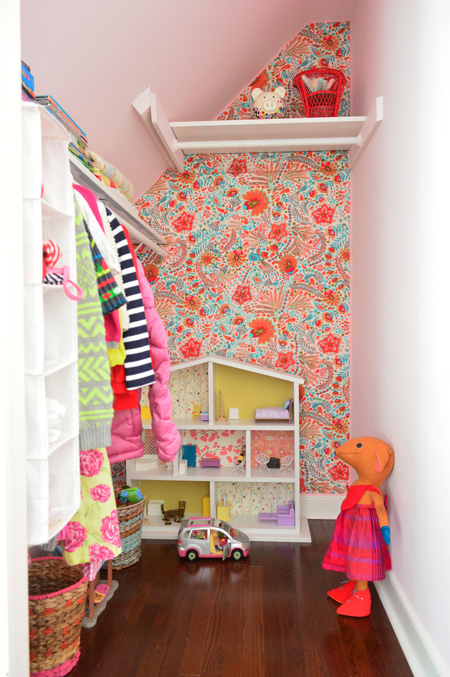
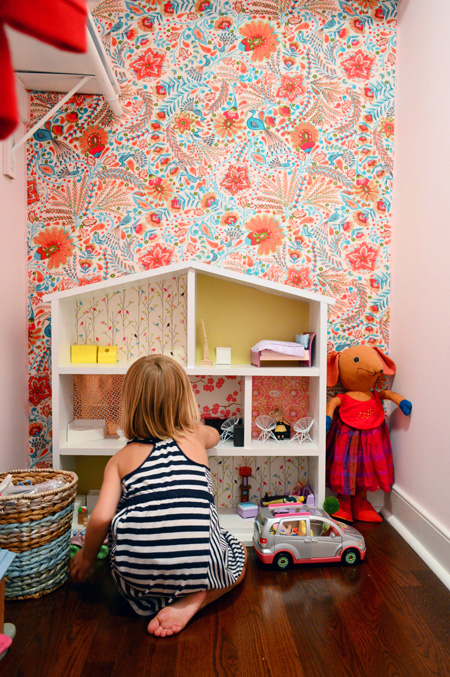
I’ve been obsessed with the idea of covering the back wall of Clara’s closet with something fun for a while, especially since images like this inspired me to add some playful to make it feel more like a little hideaway within her room. Right after we moved in she proclaimed her closet her favorite spot in the whole house. She plays in there a ton since there’s a lot of space in the back for her dollhouse and a few other favorite toys since we store most of her clothes in her six-drawer dresser with the exception of a few hanging items – and it’s a super deep closet, clocking in at 6.5′ feet deep and 4 feet wide.
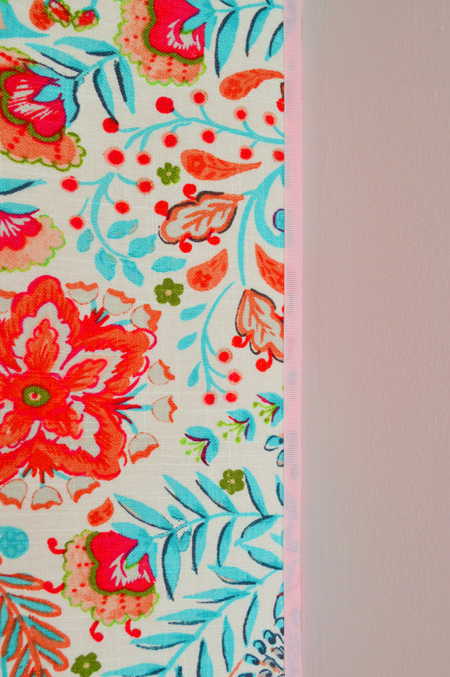
I thought we would end up using wallpaper or a stencil for some back-wall pattern, but then we came across this fabric (called Peaceful Perch by Waverly at a local fabric shop called U-Fab – but here’s an affiliate link to the same fabric on Amazon) and just KNEW it was the one.
Clara was with us and before I could even say “what do you think?” she was rubbing her face all over it (she’s her mother’s daughter) and saying she loved the birds. Jackpot. I was going to cover that back wall with that fabric if it was the last thing I did.
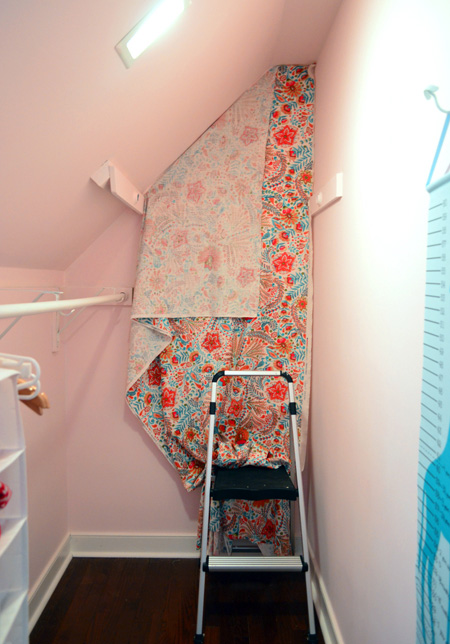
So I bought three yards of it (enough to go from floor to ceiling with a little wiggle room to spare) and rejoiced that the bolt’s width was easily wide enough to cover that back wall. When we got home Clara went to color something in the office and I fed Teddy in the living room and then she walked into the living room ten minutes later and screamed “YAY! DID YOU MAKE MY CLOSET PRETTY?! I can’t wait to see it!!” Needless to say the girl never covered a wall with fabric. But neither had I.
The surprising news is that it only ended up taking about an hour and a half to adhere the fabric along that back wall and another half hour to trim it all out for a finished look, so it can’t be done in the time it takes to feed a three month old, but it can be done between feedings (even if your son is on an every-two-hours schedule). In other words, it was way less intimidating and time consuming than I initially expected. And all it set us back was the cost of the fabric, some fabric glue, and some ribbon.
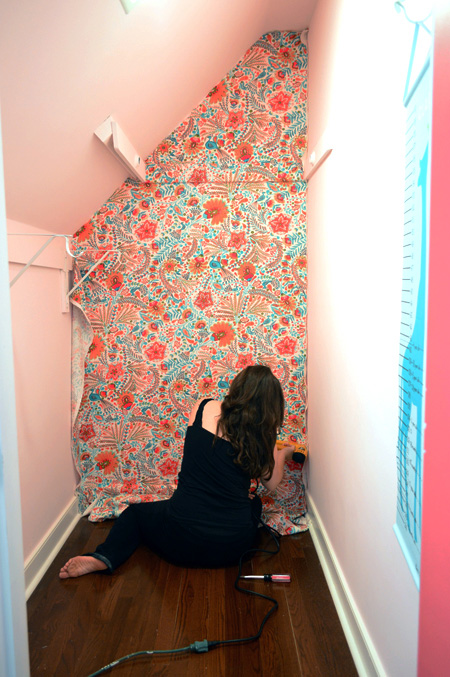
The first thing I did was empty her closet.
Everything came out, including the shelves and hanging bars that you see here which I removed as I went (I needed free access to all of the nooks and corners along that back wall).

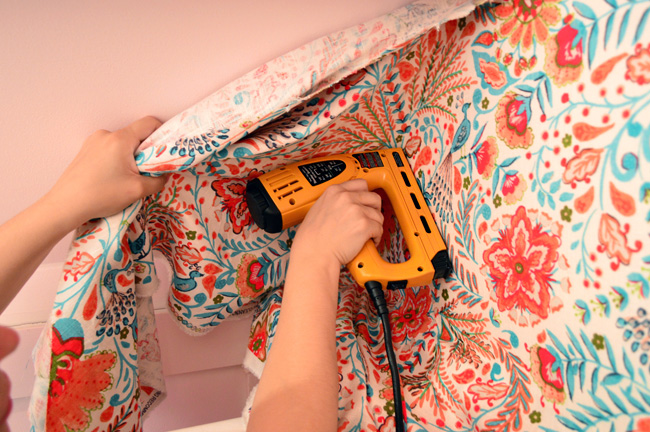
I stood on a step ladder with my staple gun and started in the top right-hand corner, stapling it nice and tight around the perimeter of the back wall. Every few inches I shot a staple in, making sure they were nice and tight against the wall, and that the fabric wasn’t wrinkled or folded. By starting in that top corner with my completely untrimmed three yards of material, I knew I could work my way down and across, keeping things tight and straight as I went, without running out of fabric. It really was that simple.
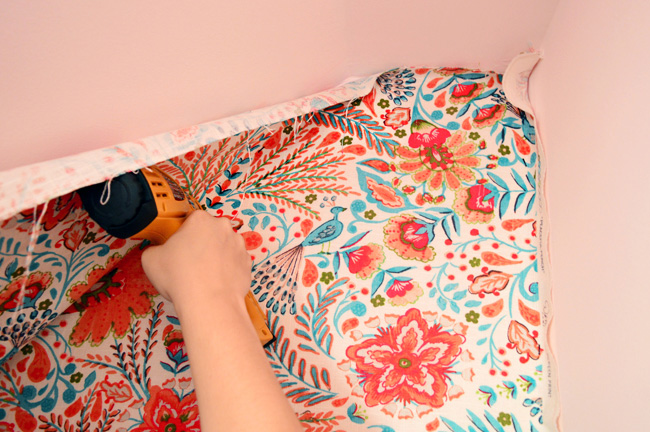
I think if I had been working with something striped or geometric in a the-naked-eye-can-tell-if-that’s-not-level way, it might have been more of a challenge, but since this print is so wild and free, I really just focused on keeping things pulled taut, and stapling them every few inches around the edge.
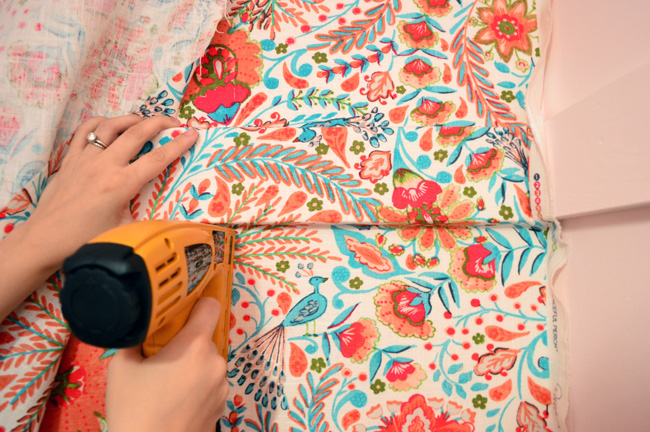
I even realized that I could wrap the fabric around the shelf board on the back of the closet with a few staples on either side of it so it was nice and clean looking.
My only real warning would be that if you have a big flap of extra fabric going on like I did on that angled part (I didn’t trim the fabric at all before hanging it for fear of cutting it off at the wrong angle or taking too much off that would make the entire remnant unusable), just be sure you don’t staple it behind itself or something. I never did that, but almost did a few times. If you did it wouldn’t be the worst thing because you can just pop staples out with a flat-head screw driver if you mess up anyway.
I did that a few times if I thought I hadn’t pulled something tight enough, or when I got to the bottom of the wall and felt like the corner had a crease or a bubble it shouldn’t have. You just sort of undo a few staples and re-pull things and re-staple until you like the look.
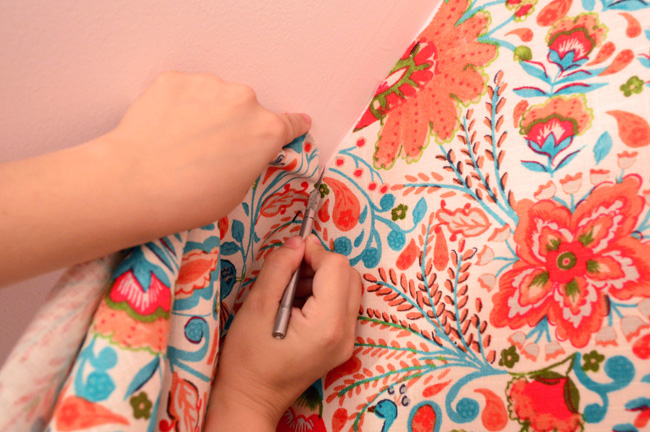
When I finished with all of my perimeter stapling, after the obligatory victory dance with the unplugged staple gun (unplugged is the key word), I ran an exacto knife along the entire perimeter of the back wall to cut off the excess. You’ll want to put a nice new blade in there to get as clean of a cut as possible. I tried to push just hard enough to cut through the fabric but not hard enough for it to go into the drywall. Since it’s the corner and I knew I’d be adding a trim piece of ribbon for a finished look, even if I jammed it into the drywall a little, it wasn’t a big deal, but for the most part I could slide it through the fabric without digging into the wall itself.
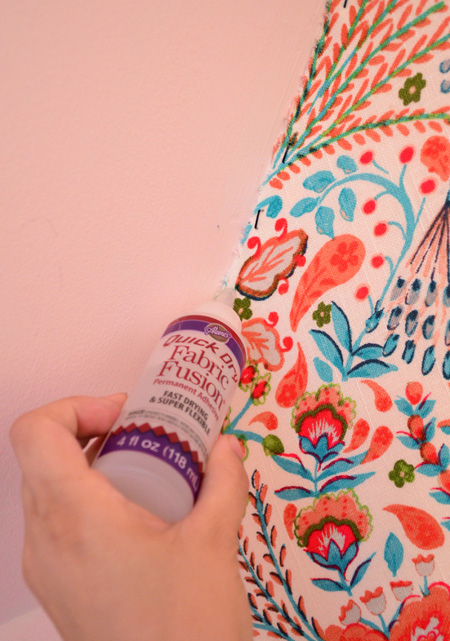
Next came the ribbon for that nice polished edge. I held up various ribbon remnants in red, pink, blue, and white that we had on hand and John and I both liked how the pink looked because it blended into the wall color (bold colors like red made it a little busy when combined with such a bold fabric, so we liked the more seamless look of the soft blurs-into-the-wall pink option).
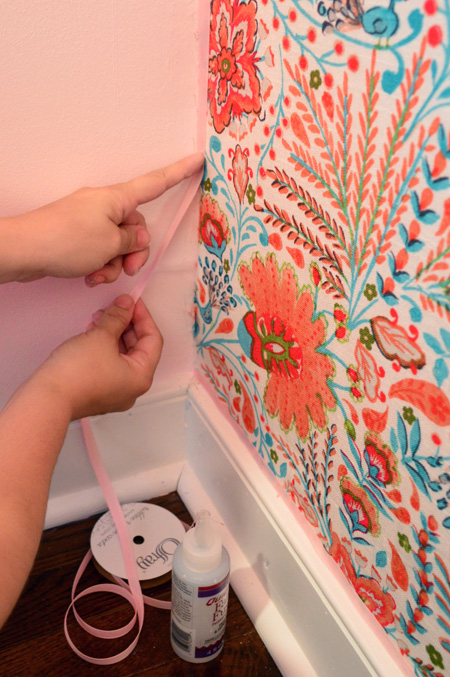
We didn’t have enough pink ribbon just laying around, so I ran out to JoAnn and grabbed two 6 yard spools (we calculated that we’d need around 8 yards to go around the wall’s perimeter) and also grabbed some Aileen’s Fabric Fusion glue to attach that all the way around. It was almost like clear silicone caulk, so I just ran a thin line of it down the edge of each wall…
… and stuck a pre-cut-to-size ribbon against it for each portion.
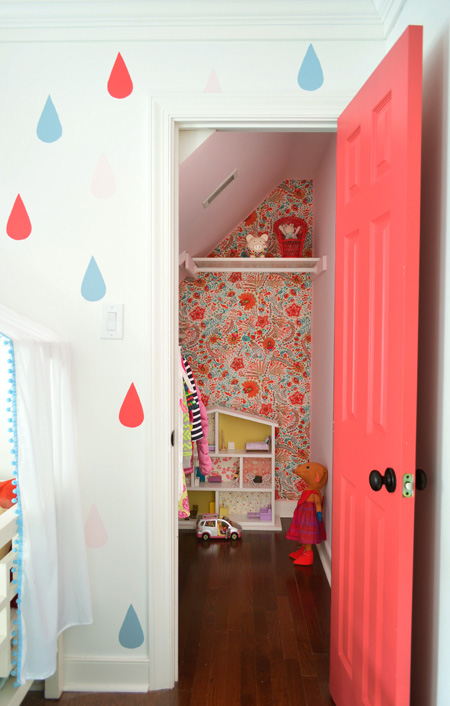
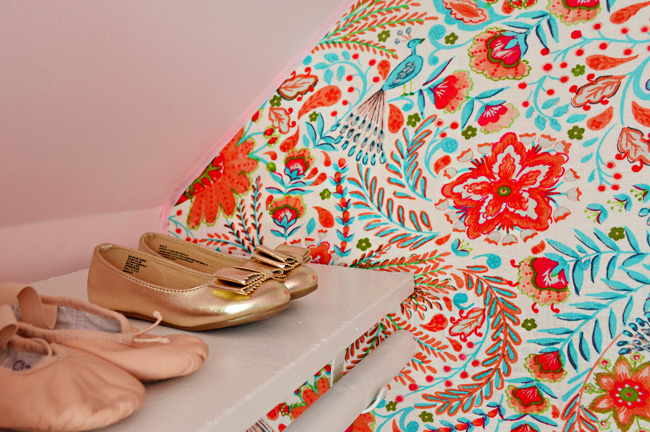
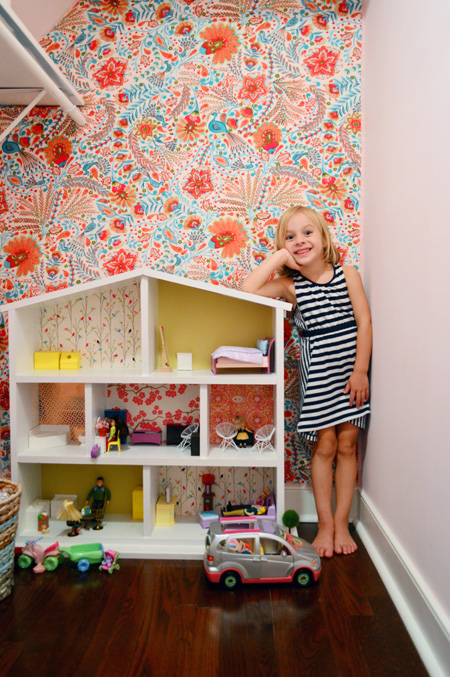
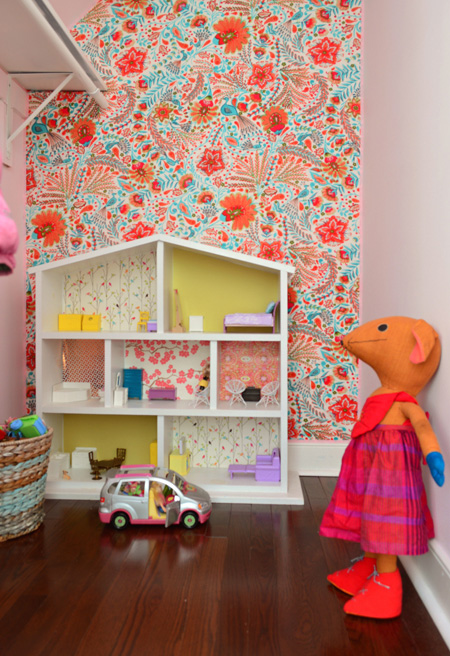
Here’s the finished result:
Once that dried (within about an hour) I brought back all the shelves and hanging rods I had removed, and put the closet back together.
Clara’s PSYCHED about it.
So is momma. Dad’s pretty keen on it too. Burger and Teddy are ambivalent, but I’ll take it.
The coolest thing about this project is that I completely expected it to be one of those kinda-complex-and-tedious jobs that are worth it in the end, but it ended up being one of those surprisingly-simple-and-straightforward projects that make you beam because it looks way more expensive and complicated than it was. We already have had a few people over and all of them thought it was wallpaper until they touched it and said “no way, it’s fabric?!”
What did you guys do this weekend? Any kids-room stuff? Fabric projects? Victory dances with your 16 pound baby? Sometimes I feel like all I manage to get accomplished is to feed these kids and keep them semi-clean, so fun little projects like this are pretty exciting. Especially when I can squeeze them in between feedings. We also managed to get a little hiking in this weekend, and although it involved a particularly “memorable” port-o-potty visit with Clara, it was pretty awesome while it lasted.
Update – Wanna know where we got something in our house or what paint colors we used? Just click on this button:


Taya says
I L.O.V.E. IT!
Gwen says
Oh, my gosh! That is the prettiest thing ever. I’ve seen people starch the fabric and put it on the wall, but stapling is seems SO much easier.
Carrie says
16 pounds!?! Big (& adorable) Boy!
Love the closet too – hoping to do something like this in our Master Closet.
angela says
Hey Petersiks! 1st: Has anyone called out the fact that you’re one family member away from being the PeterSIXs? ..maybe one day the PeterSEVENS
:) LOL
2nd: I would *love* to have room type categories for the whole blog (not just mood board) 3rd: Even more complex the ability to select more than one category to filter search results.
But really, no worries, you don’t have to change a thing, I LOVE YHL no matter what <3
YoungHouseLove says
Aw thanks Angela! We’d love to make the categories more specific! And Ptrsix was actually John’s family’s license plate growing up (there were four kids + his parents). Of course punny/math-loving John came up with it! Haha!
xo
s
Laurie says
My Mom put fabric up on her ceiling when I was a kid in the 70s. It was very avant guarde at the time and it made the ceiling match her curtains. (there’s a joke in there somewhere)
On the kid time expectation note…my nephew asked me to knit him a sweater once while we were watching a movie. At the next commercial he asked me if it was done yet.
YoungHouseLove says
So funny!
xo
s
Rachel W says
This is darling!! Great job!!
Kismet says
It looks awesome and you did a great job.
Question, that back shelf and rod are awkward looking. Why not take them down permanently? They aren’t really being used and that left hand set up on the wall looks funky. Maybe a sconce or pretty chandy back there? Just a thought.
YoungHouseLove says
That could be fun too! Thanks to the sloped wall, the hanging rod on the left side is pretty low, so we opted to leave that higher shelf and rod for longer items as she grows :)
xo
s
Naomi W. says
I also have seen this done with liquid starch. You roll liquid start on the wall, put up the fabric and roll more on thop. This was done by Miss Mustard Seed.
Heidi says
LOVE IT! Pretty sure if that was my closet (and I was Clara’s age) I would never want to play anywhere else again!
Karen says
When I saw how big Clara’s closet was I had to laugh because my reading room that I’ve been working on is not much bigger. I had the need for a small table in there and couldn’t find one that worked, so I built one. That’s what I did this weekend. In fact, I built it out of old shutters!
If you’d like to see it, you’re welcome to check it out!
Thanks for this post,
Karen
http://www.flimsypi.com/?p=643
YoungHouseLove says
Love that!
xo
s
haverwench says
We scored a great bargain this weekend on a lounger futon for our new guest room. The seller was asking $100 and we got it for only $70. Much better than the $450+ we were expecting to spend on an IKEA daybed. (http://ecofrugality.blogspot.com/2014/07/a-fortuitous-find.html)
YoungHouseLove says
Congrats! Such a deal!
xo
s
Sam F says
Oh, that picture of Clara in her “new” closet with that cute striped dress!–so cute!! She’s so expressive and I just love hearing about her. Such a fun project!! I’ve been thinking of doing something similar in my linen closet-papering or painting the back wall, but just can’t decide if it’ll feel too crazy with the other things stored in there? But this inspires me to just go for it and add a little hidden quirkiness.
Erin says
I’m totally doing this! I’ve wondered how I can dress-up (pun intended) my closet without investing in expensive and temperamental wallpaper and this sounds like the solution I need. I’ll shop for fabric this week. Thanks for sharing!
Olivia says
That looks amazing, love it!
Barbara says
Very cute. Now all she needs is a soft rug to sit on while she’s playing with her dollhouse.
katalina says
I want a big mouse in a dress to guard my closet. oh and I want cheerful fabric in my closet too.
maybe I want clara’s room!
love how the floral wallpaper echos the dollhouse papered walls….
Sabrina says
Love it! Where did you get that adorable mouse?
YoungHouseLove says
That was $5 at an estate sale!
xo
s
Faye says
When my boys were small (they are now 13 and 16) I decorated their closet as a play space for them as well. My Mom sewed 7 or 8 large pillows for them of various sizes. They stayed in the closet for a reading nook but they also played with the pillows all the time. They used them to build forts, roads and houses for their Rescue Heroes. I hope Clara has as much fun in her closet as they did.
YoungHouseLove says
So sweet!
xo
s
deb says
that clara is one cute lucky kiddo!
Vel says
Looks absolutely perfect!!!!!! I bet your thinking of what other walls to put fabric on!
LavandulaLady says
Did you remove the wood support piece for the perpendicular rod & shelf? I don’t see where you would have wrapped it, like you did for the one that’s higher up. So if you did, what is the shelf resting on?
YoungHouseLove says
That support piece is still there, I just wrapped the fabric over it, but instead of stapling it on top and bottom to define it like the higher shelf, I just let the fabric sort of flow over it (so it’s less visible) because it was making the other side of the back wall look buckled and bubbled if I wrapped it around more tightly. You can kind of see where the shelf is resting on it in this photo (see how there’s a crease that’s in shadow right under the shelf?).
xo
s
Misha Horne says
Love this! It looks just like a room in the dollhouse! :)
Dawn says
Looks amazing!
Clara’s growing so tall.
I’m going to skim the rest of your comments in hopes you’ve identified the source of the mouse (it’s not Angelina Ballerina I don’t think?). Whatever it is, it’s adorable.
Dawn says
Ah – see it right above me!
Casey says
What an awesome closet! 4 feet by 6.5 feet is so big for a closet…but it’s so small if that’s the exact size of your bathroom. (And my kitchen is only a bit bigger!)
Jill says
Love love love Clara’s closet!! You guys are awesome!!! What a great idea. I’m off to find a wall I can do that to for my girls :)
Milky says
Looks adorable!
My suggestion is that in a few years when you finish the bunk/movie room, you should put a little secret trapdoor through from Clara’s closet. We always wanted to put secret passages in our house for the kids but couldn’t find a good spot! All our closets back onto other closets. So inconvenient :)
YoungHouseLove says
FUN!!
xo
s
Narelle says
Looks great! Can you tell me where you got that adorable mouse doll from?
YoungHouseLove says
That was $5 at an estate sale!
xo
s
bfish says
It is really cute! Would love to see you use this technique in a more visible space in your house —
Amber says
That looks amazing and is giving me IDEAS about my closet!
Anywhoo, this weekend I changed out my garbage disposal with the help of youtube, my brother on facetime and calling the 800# (seriously, better instructions on how to get the knockout plug for the dishwasher would be appreciated).
BEHOLD, I CAN PUT STUFF DOWN MY SINK AGAIN!
Emily @ Life on Food says
We picked colors for our front door. Going from white to yellow. It is going to smile at everyone going by!
Amanda L says
That photo of Sherry from behind is gorgeous! Totally magazine quality. And the one of Clara makes her look SO BIG!
Bonnie says
YEARS AGO…I lined a little nook using fabric and fabric starch! Yup, plain ole’ fabric starch, full strength.
The Starch acted as a “wallpaper” paste and it was easy peasy!
Mari says
You rock!!! Great job nice share added to my must try folder :)
Kara says
Can’t believe your babe is 16 pounds! My 4 month old just tipped 14 pounds. Guess mine’s going to be long and lean like his daddy. I love keeping up with Teddy since our boys are close in age. I feel ya with feeding, changing, rinse, repeat.
YoungHouseLove says
Clara was long and skinny like a string bean. This guy was 90th percentile in height and 80th in weight at his last checkup! I can’t get over how solid he is, but he sure is adorable ;)
xo
s
Lily says
I LOVE how this pops! great idea!
x Lily
whilemyboyfriendsaway.blogspot.com
Katie @ Little House of Four says
What a lovely place for clara to play in. The fabric is absolutely perfect for a little girls room. I would have loved a space like this when I was a kid!
Jess says
That looks fantastic and it’s always nice when a project takes less time than you think instead of more! I wouldn’t be able to use the method you have because all of the walls in our house are brick (pretty common in Western Australia because of termites). However, I have seen people basically ‘glue’ fabric to the wall using fabric starch, which also makes it removable. :)
katz says
Love it. So cute! Wonder if a rotary cutter would work well?
YoungHouseLove says
I bet it would if it was sharp enough!
xo
s
JoDi says
That really turned out great! Love Clara’s secret hideaway. It’s such a great space to play.
Erin @ DIY on the Cheap says
Love this! I’ve been looking for fun ideas for the back wall of our closet nursery, and I was thinking stenciling or wallpaper too. Might have to try fabric! Great idea.
Annelies says
Love how it looks ! And I also love hos you two decided together on the color of the ribbon. You are a good team.
And how tall and grown up does Clara look!
Kaitie says
I thought you guys weren’t crazy about the pink as a wall colour in the closet? Any plans on changing it or has it grown on you (or maybe Clara refuses to give it up, haha)? I think it’s super cute as is, for what it’s worth.
YoungHouseLove says
Totally grew on us! And Clara loves it too, so that sealed the keep-the-pink deal.
xo
s
Dana@chocolateandsunshine says
This is one of my favorite projects. Love the color selection, the pattern and the whimsy of the whole project. When my daughter was young, her closet was painted in bright, cheerful colors so she could hang out, too. Why not try this project on the back of a wall shelf, too. The trim possibilities are endless. Love your fearlessness!! You two rock.
YoungHouseLove says
Thanks so much Dana!
xo
s
Monae says
So cute! I have tried the liquid starch with fabric in our front room-
http://thestarbuckfamily.blogspot.com/2014/04/spring-has-arrived-at-our-houseor-at.html
but quite frankly it was a bit of a pain. I didn’t even think about just stapling it up! SO clever. I may just have to try this out in another place in our house. I just love her closet too-so much fun to play in!
I have a 4 1/2 month old 16lber around here-so I totally get the feed,change diaper,try to get to sleep,…repeat. =)Love your blog-thanks for sharing your cute family and fun house ideas with us!
YoungHouseLove says
Thanks Monae!
xo
s
Sally says
LOVE IT!! Is it wrong that I, an adult, would like to have a pretty closet like that? haha
YoungHouseLove says
No way, I want one too!
xo
s
Angela Boone says
I really love Clara’s closet. It looks so cute. We are building a closet organizer in my daughter’s closet today. I like Clara’s dollhouse- did you make it? My kiddo has the Fisher Price Loving Family dollhouse, but I’d love to get her something like this instead. Oh, and Clara’s pretty cute, too :)
YoungHouseLove says
Thanks Angela! Here’s the link to those dollhouse building (and decorating) posts: https://www.younghouselove.com/2012/05/building-a-house-for-dolls-part-2/
xo
s
Chelsea says
I think this might be my first comment, (even though I’ve been a huge fan of YHL for a while now)!!! This post couldn’t have come at better timing! We are near the final stages of finishing a little built in home office under our basement stairs and I keep staring at the back wall thinking it needs something special. I’ve seen fabric covered accent walls a few times but this is the first time I’ve seen it shown through a tutorial. You’ve convinced me to go for it! Thank you so much for the inspiration and easy-to-follow steps!
Chelsea
chelseasgarage.blogspot.com
YoungHouseLove says
Good luck Chelsea!
xo
s
Mikkelsen says
What a great idea! My wife and I are looking for decoration tips for our daughter’s room and I think I found the right blog! I like the color combination, it looks great:) Thanks for sharing!
Vicki says
I have put fabric up several times over the years–in my daughter’s room we used Snoopy sheets and laundry starch–easy, peasey…
When I taught school I faced a tan concrete block wall every day at back of my room—BORING–
I bought plaid table cloths in primary colors at a discount store for like $1 or 2 each–
and used starch to adhear them to the wall…tedious because of the height and trying to match the plaids from tablecloth to tablecloth–and wringing out heavy material that size is not easy
but finally got them up–made a nice, bright change to a room that was fairly dark most of the time too…
Laundry starch is great for walls where you can’t staple–
use it full strength–just wring the material out and smooth it on the wall–dries w/o a color–and comes down simply by pulling fabric off the wall–
you do get flakes up there that can be brushed off after fabric is gone…
YoungHouseLove says
Sounds awesome Vicki! I can’t believe you could make the stripes line up from the plaids! That’s talent.
xo
s