Tweakity-tweak-tweak. That’s the sound of a little course correction that went on in our house last night. See, our kitchen underwent a little bracket redux. Yup, after taping things off, photoshopping them, and then (ahh!) drilling right through our wall of tile to install our brackets, we were completely sold on their spacing, which we landed on because:
- Functionally, that’s where the wall studs were
- We thought keeping the same distance between the brackets on each side of the hood would create balance on an unbalanced wall
But then we lived with them for a while and more things kept going into the kitchen (new lighting, a new dishwasher, new art, new floors) and with every change we noticed – first just in photos, and then in real life – that the eight brackets on the left side of the hood were – gasp – looking a little crowded.
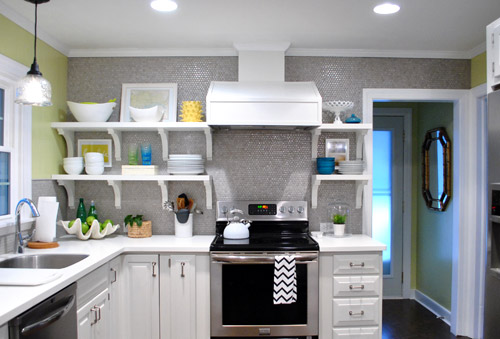
So sad. Especially since a few of you mentioned that you thought six would have looked great on that side after we installed them (but we were too drunk with excitement or adrenaline or whatever it is that gets into your blood when you take a room that looked crazy dark and dated and start updating it). I think it just took some time for our eyes to adjust, so we had to live with things and let the room evolve until it became unbelievably obvious to us. And then we were suddenly right there shaking our heads and saying “oh why did we go with eight brackets on this side when six would have looked soooooo much better?” It’s like when your mom tells you she doesn’t like your tenth grade boyfriend or your best friend confesses those jeans look terrible on you but you’re in denial or just somehow completely blind to it and then later it hits you and you have a what-was-I-thinking moment and ditch the dude/burn the pants.
Thank goodness nearly everything that we’ve done to both our first house and this one can evolve and change as we go (like the living room, for example) or our first house’s paint colors (we painted nearly every room at least twice there, along with painting the trim twice too). Live and learn, right? So the good news is that the whole: “if at first you don’t succeed, try, try again” thing really does have a ton of truth to it when it comes to making your house a home. Just keep your rooms moving and growing and someday they’ll be right where you want them to be! Even if you don’t get it right on the first (or even the fifth) try.
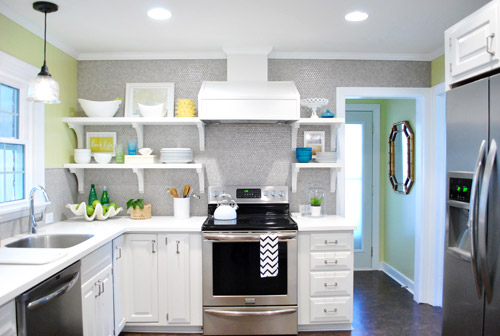
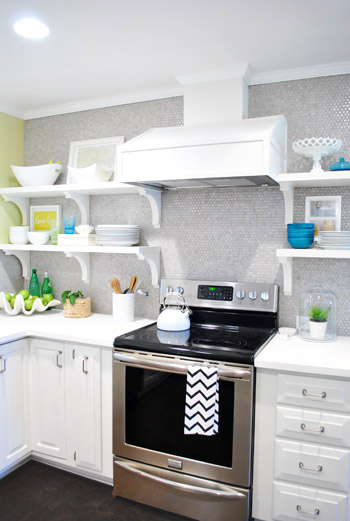
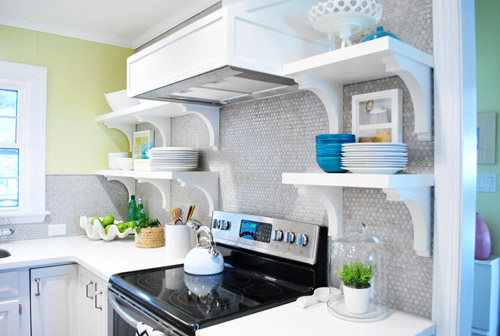
So here’s our kitchen after our little bracket redux. It’s simpler, right? And we actually love how the middle bracket lines up with the line of the counter, so it still has balance since things are aligned so they look intentional. Whew. Note: the middle bracket is in the direct middle of the other two, so if it looks further to the left or right, it’s just the angle of the pic.
But we drilled through the tile to hang those eight brackets on the left side, so how did we undo that snafu?
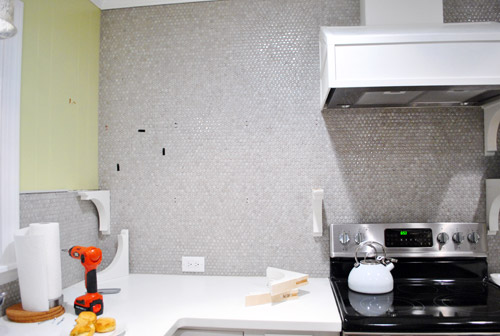
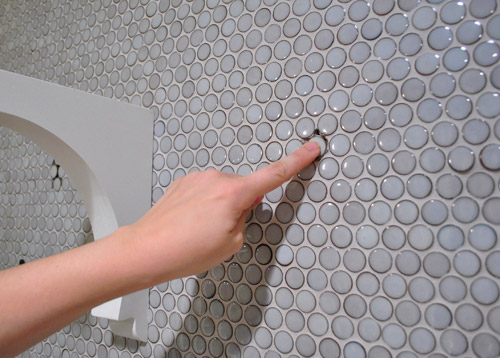
Well, first we cleared the shelves (the black stuff is just small pieces of 3M removeable velcro that holds up my Love Life frame).

Then we removed the shelves (by unscrewing a few screws that connected them into the brackets) and slipped all the brackets off of the wall screws that they were resting on. You can vaguely see them in this picture below (they look like colons since there are two screws for each bracket).
Then we measured and drilled new holes for our middle bracket using a drill bit meant for tile to drive the screw into the wall (these new holes would replace the two middle brackets of yore). Since these screws weren’t going into a stud this time, we used heavy duty anchors in each of the two holes to hold up each of the two brackets (the top bracket and bottom one). Since the outside brackets on each of the shelves go into studs and the heavy duty anchors are really darn strong, each shelf could probably support a few John pull ups. Yup, they’re in there good.
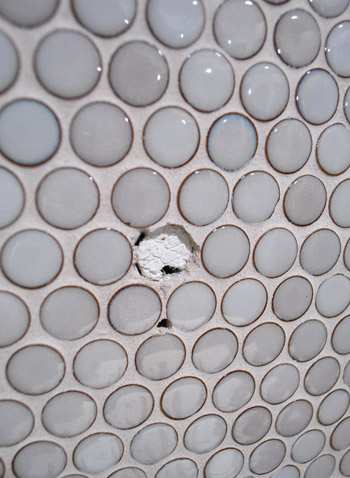
Next we chiseled out the old tiles that had holes drilled into them. I completed this task completely on my own in about five minutes (seriously it was really easy) by using a flat-head screwdriver and a hammer to bang the screwdriver into the grout around each tile that I wanted to remove (sort of creating a chisel).
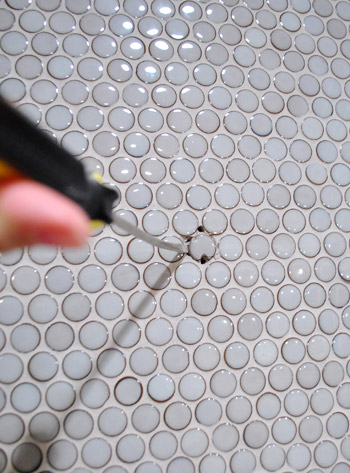
After about four chiselings around each tile, they just popped right out. Oh and see how one of the holes was in the tile (which we removed) but one of them was just in the grout? That happened with each bracket, which was nice because it meant we only had to pop one tile out and just would need fresh grout to fill those second holes.
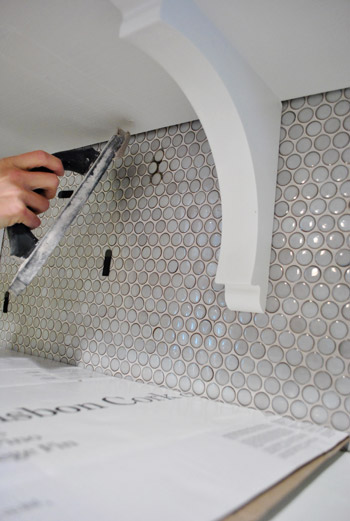
Next I used tile adhesive to stick new tiles right back into those holes:
And then all that was left was to mix up a tiny batch of grout to fill those telltale holes around the new tiles.
Ta-daaaa! It’s like those extra two brackets were never there!
Well, if you squint you can see that the grout is still drying in these pics, haha. But once it dried it was completely impossible to tell that we replaced a few tiles and moved those brackets. Whew. And as for how much this upgrade cost: zero point zero dollars. Hurrah.
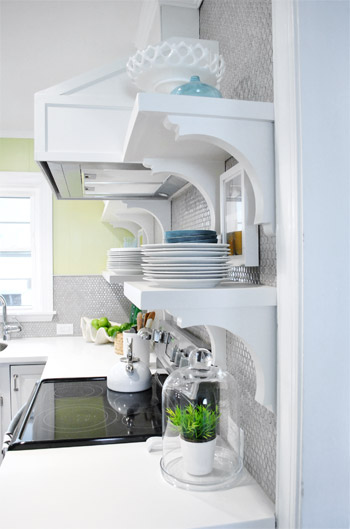
Here are those babies with a little side-angle action going on:
And here they are completely from the side (I love this view, so I always find myself glancing to the right when I walk in the door from the laundry room to gaze).
So the lesson is that even if you’re thinking things through, mapping them out on the wall with tape, and relying on photoshop before pulling the trigger – you still might end up tweaking things after you dive in, do something, and live with it for a while. But thankfully there are so many re-DIYable things, that home improvement is hardly ever a one-shot-only endeavor. It’s probably safe to say that every project has at least nine lives, like a cat. And getting started is the only way to get any closer to that elusive finish line, anyway!
What have you guys done and then redone lately? Anything you’ve lived with that has slowly started nagging at you and jumped back onto your to-do list? Have you ever chiseled tiles out? It’s totally my new favorite thing to do. Sometimes it’s just satisfying to bang on something with a hammer and watch the dust fly.

hyzen says
I didn’t mind it before, but it looks WAY better now. Seriously, it’s crazy how such a minor detail can make such a big difference.
Shellie says
Love it! I never would have had the guts to undo and redo what I had just barely finished!
Case in point…we painted our master bedroom and I instantly hated the color, waited 6 months and finally repainted….and I still hate the color (I really suck at picking paint colors!) That was about 6 months ago. Now we have kitchen cabinet painting on the DIY schedule for the first week in April (my birthday present!) so it will have to wait a little longer, I guess!
YoungHouseLove says
Aw man, here’s hoping the third time’s the charm!
xo,
s
Skooks says
YES! They always did seem a bit much for me before, but the extra breathing room really works so much better. As for me, I’ve got a bathroom paint color that seemed like it would be great when we put it up, but now both my husband and I kind of hate it and want to change it. :P Wish that upgrade would cost 0.00 but oh well. It’s just paint!
tk says
Something was bothering me everytime I saw a pic of your kitchen. I thought it was the brackets I didn’t like, but now I love them. So much lighter and roomier up there now. Actually makes the shelf space appear larger.
Also I love would a post sharing any tips about photographing projects or staging photos you learned from having the pros in your home for so long.
YoungHouseLove says
They used all sorts of special equipment for shooting, so we didn’t get to take many everyday tips (other than shoot in natural light whenever possible. We staged everything ourselves so our tips for that would just be to play around with things and think about what would really be functional (don’t stage something that makes no sense, would never happen, etc).
xo,
s
Alison says
So much better! I wasn’t completely sold on the shelves, but now I am. It’s funny how a really small thing can make such a big difference. Good work as always!
Kate says
I thought it looked fine before, but I like how much simpler it is now!
I’m a serial re-painter. Choosing exterior paint colors was a nightmare for me because we hired it out, so I couldn’t easily (or inexpensively!) change the color. Thankfully, I love what we chose.
Angela M says
When you first did this, my sister-n-law and I both talked about how we didnt really like the brackets. I told her it looked really crowded and it was the first design choice ya’ll made that I didnt really like. I definitely think taking the 2 out made it less crowded and I like it a lot better! I knew ya’ll wouldnt let me down! :)
Susan (Between Naps on the Porch) says
I thought it looked awesome before but seeing it now with three, I definitely prefer this look. Feels more open. It’s beautiful! Good going on the repair work!
meekasmommy says
Looks so much better now! Love that you guys are willing to admit mistakes and fix ’em… and walk us through all of it :)
Jenn @My Southwestern Life says
It looks way better this way! It makes your kitchen look much more open and airy.
Emily Morrice says
I have to agree – that looks way better!
but the comparison is trivial in that it already looked great!
also I LOVE clara’s poof! my daughter Lily (who YHL readers always tell me looks like Clara!) would love one but she already has a large foot stool in her room so I don’t think we could spare the space it would take up :(
Kellee says
so much better! Definitely not as cluttered.
Kasey M. says
After how much work you two put into tiling that wall and putting up those brakets I think it would have KILLED me to do this fix, even if it only too a few short hours. Psychologically I would feel like I was redoing the whole thing and it would make me cry.
All that to say…I’m so impressed with your follow through. You two are really amazing.
Jenn says
totally love the subtraction… I couldnt figure out why I didn’t love it before, but now I know.
You guys are so smart.
Vanessa says
I knew there was something bugging me about your gorgeous shelves but I couldn’t put my finger on it. I absolutely loved them but always felt there was “something” and couldn’t figure it our. That was it. You nailed it. It looks great.
Carley says
I never noticed the 8 being crowded but wow, what a difference with six! It also makes the counter below the shelves look more open.
We want to tackle our kitchen. It was actually somewhat updated with new cabinets by the previous homeowners, but we want to add cabinetry to the “eat in” side that we never use. I’m all about storage!
Wiggs says
Color me impressed at how perfectly you re-styled the shelves – it’s almost like nothing moved! I think the change is a surprisingly great improvement, and I salute you two for owning it! I’m the type who would convince myself that it looked better the first way, so I wouldn’t have to admit the mistake. I’m also the type who buys shoes that are one size too big and then continues to wear them, convinced that this is how they’re supposed to fit.
Angie K says
I am totally TOTALLY impressed with not just your courage (I would have lived with them, totally fearful of dealing with the holes) but also your ingenuity of replacing the tiles!
Or maybe I am just not diy savvy enough to know about this kind of fix :)
Looks really super! Love the kitchen progress :)
GirlyObsessions says
I was also wondering what you might do with the extra two brackets. I know you two don’t like anything to do to waste!! I love the new look of the shelves. Less crowded for sure! Hey, there is nothing wrong with a little trial and error. Like you, every room in my current house has been painted twice in the 5 years we’ve lived there. Such an easy way to change the look of a room!
YoungHouseLove says
We’re thinking about seeing how they’d look on the peninsula but they might get in the way on knees. Will keep you posted!
xo,
s
Blanca says
It does look great but if you look at the before picture you can see the the items seem to have their own little cubicle or display “section”. It looks like things a “grouped”. Can you see the difference? I like the 6 brackets but I liked the display of the 8 brackets better. It’s like the brackets worked as dividers.
YoungHouseLove says
Oh yes, I just put the objects back up where they were but it’s a rotating display! Things move around and I’m sure I’ll play around with them more to fit things within their little bracket zones! I just wanted to watch The Voice last night, so I was done after grouting. Hahah.
xo,
s
Blanca says
It really is breath taking.
Sheela says
Looks really nice! Now your shelves have a bit more breathing room.
Aaren says
Much better!! I do this all the time…I complete a project and just stare at it, you can feel when something is “off”! Especially with paint colors. I’m totally guilty of painting and then repainting a room in the same weekend!
Melissa @ HOUSEography says
OMG – Looks soooo much better. I loved the brackets but also thought it was looking a little busy – especially with your stuff on it. Also odd numbers just look more natural as we all know.
Lindsey @ arkadian belle woods says
WOW! That made it so much brighter! What a big difference! I love it!
Jessica @ Quirky Bookworm says
I never noticed the crowdedness really, but I do agree it looks better now!
Also, am I the only one that thinks of Jane Lynch on Arrested Development whenever I hear the word tweak?
YoungHouseLove says
Haha, now I’m going to every time too!
xo,
s
Candace D says
Hey, I didn’t hate the brackets before, but it does look so much better! Really sets off the styling of the shelves.
You guys are awesome! Bethany should have you decorate her new apartment! How great would that be…and Brynn and the Bean and Cookie and Burger could all play together! : )
YoungHouseLove says
Oh my gosh, that would be so crazy stressful but kind of amazing and fun. Can you imagine how fancy it’s going to be? I can’t wait to see it! I pause the show when they show the blueprints so I can look at the layout. I’m crazy!
xo,
s
Jillian {Her Split Ends} says
Love love love…what a difference the 1 less bracket {per shelf} makes! It really feels so much more open and clean and lovely! Nicely done. I totally agree that sometimes you just have to settle in with things before the right solution pops out to you. AND great tips on repairing the tile…who KNEW it was so simple.
CHeers!
~ Jillian
http://www.hersplitends.com
Ashley@AttemptsAtDomestication says
This does look so much better! And WAY less crowded!
I’m still working on unpacking our house, but I got the bare bones of the guest room set up. http://www.attemptsatdomestication.com/slowly-but-surely/
Dave says
I was wondering why you guys when so crazy in putting brackets on the one side it looks way to heavy.
Much better now.
Jacquelyn says
After all that work I would have probably just left them. But wow, I love the change! I really makes a huge difference and with your patch work no one will be able to tell(with the exception that you told everyone on here)!
MsC says
Wow, what a difference! Amazing. I hadn’t pinpointed what was bugging me about the room (though it’s beautiful, don’t get me wrong), but something felt not quite right. Now, it feels perfect! What’s weird is that I was blaming the cork floors for my “meh” feeling, but now that the extra bracket is gone, I love the floors! Was blaming the wrong thing on the “too busy” feeling, I guess.
Esther says
Much nicer! I kept thinking that it looks too busy, but now with two of the brackets removed, I can breath, haha.
Looks great!
BTW, how are you liking having the open shelving for dishes? I’m thinking of going in that direction for my kitchen as well.
YoungHouseLove says
YES! So loving it. You should see me unload the dishwasher. I fly without any doors in the way! I’m such a fan. And even after being on vacation for a week in Hawaii we haven’t had dust issues. It’s constantly rotating so things are used often enough to stay dust free!
xo,
s
janie says
Wow, it does look a million times better. I’d never even noticed it.
Have you thought about lowering the hood? It really bothers me that it lines up with the shelf like that.
YoungHouseLove says
We like that it lines up, but it’s definitely a personal preference thing! All the rooms we pinned on Pinterest that we loved had a hood that lined up with the shelf, and the hood recommended hanging it at that height for it to be most efficient, so we designed the shelf to be there so they could line up!
xo,
s
alison says
Wow! That does look better. I thought it looked fantastic to begin with, but I agree now that it looks less crowded. Nice fix :)
heather s. says
So glad you made the update! I’m one of the ones who thought it was too crowded with the extra brackets (and still think floating shelves would be divine there) so I’m glad that you listened to your readers again (just like with the bed/light in your bedroom). Sometimes it takes someone else’s perspective for us to really see things in our own homes (been there, done that).
Christina says
Love it, love it!!!
r8chel says
Looks good! I’m sure you’re going to get lots of comments now from those of us who always thought eight looked too crowded, but were too polite to say anything. Haha. :)
Debbie @ My Little Mess says
I never noticed the odd placement of the extra brackets before but now that you pointed it out and change them, I agree that it looks a million times better and much more balanced!
Elle says
I love, love, love this change! I thought it looked totally fine before, but I really like how more open and uncrowded that side looks now.
Random thought, and I apologize if twenty other people have already suggested this: Have you considered putting something tall on one or both of the top shelves? I’m wondering if there was a tall vase or picture up there, maybe the large gap between the top shelf and the ceiling would look more intentional.
Fabulous job with the whole kitchen. Even though I hope you’re not done, because I’m rooting for a cool roman shade on that window eventually…. :)
YoungHouseLove says
Oh yes, we added that big picture up there and love it, but it’s definitely a constantly rotating display! I’m sure I’ll switch things out a million times!
xo,
s
peggy w says
looks great!! big improvement in the busy-ness (i originally wrote business, but wasn’t sure you’d get what i meant…oh spelling conundrum) area.
Tessa says
Nice tweakity tweak tweak for a big impact! I thought all the brackets looked great when you first put them up with empty shelves, but found it a bit cluttered-looking once you put all your pretty stuff on them. And great that you had penny tile so that it was a simple change!
Sarah says
It looks MUCH better. I also originally throught it looked overcrowded before, but I’m a “nothing on the counter” unless I’m cooking kinda girl. So, maybe it was just a personal preference?
I thought it was all the stuff on the shelves making it look overcrowded. Who knew that removing a bracket on each shelf would fix not only this the problem, but also makes the hood look better. Certainly not me. Great job!
Kari says
Never thought about it before, but now that I see it – I like the ‘revised’ version better, too! Looks great :)
Sarah says
My first thought was “oh no, how are they going to fix the holes in the wall??” but of course you thought of it and it looks amazing.
I probably never would have that “hey that looks dumb with eight brackets” but it sure loooks better with six!
Jimmy says
I love it. This is what sets you two apart from “normal” people (of which I include myself). I would look at that “problem” and think, sure it might look better with only three brackets. And that is as far as I would take it. File it under “oh well.”
It’s good to see just how easy it was to fix it, but I can go ahead and guarantee that I would never re-do something like this for aesthetic reasons. Now, if something broke, or it turned out I put one of the shelves up really crooked, sure. You guys are gangsta, and this is why we keep coming back.
I fixed some shelves two days ago, but only because the person before us installed them in a manner that couldn’t hold up a few cookbooks (and we found out the hard way to the sound of crashing shelves): http://www.thebookofjimmy.com/retracing-steps/
YoungHouseLove says
Oh no! So glad you got those fixed!
xo,
s
Pam says
good for you for changing it. It wasn’t right; did you just get a little too lined up in things..ahem, lining up. I notice you do that! But then, I’m the person who has things .lined up. to that visitors during a house tour commented on my groups of 3…so you know who’s making the observation! ;-}
Best regards
Brenda says
They look great! It’s not until I look at the pictures of them now that I realize how crowded eight brackets looked. Glad it was an easy fix!
Urban Wife says
Yay for less crowded! I gotta admit…I got really scared halfway down when I saw the holes and missing tile. But success, it looks fab! (Not that the 4 brackets didn’t look great before)
The Mrs @ Success Along the Weigh says
Wow, you know I really liked them how they were but now that I see them this way, it looks a lot more balanced. I’m glad it wasn’t TOO much of a pain to redo and get the way you want it. If you don’t address those things in the middle stages of stuff like that it ends up being all you can see when you go in the room. Great job!
Tanya says
So much better, I feel like I can breathe when I look at it now. Of course it still looked fabulous previously too…
Tanya xx