This morning, while Clara was doing this:

I attempted to tackle this:
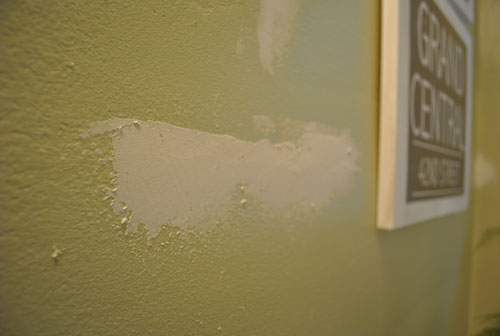
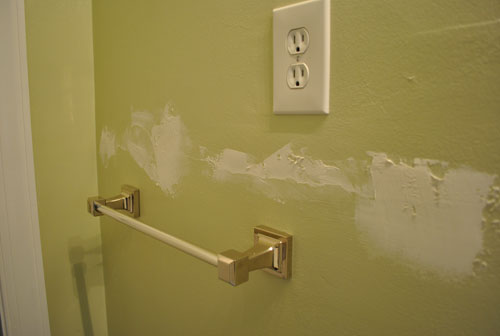
A few days ago I slapped some spackle on the walls in the bathroom (we like Dap Crackshot), because as happy as we were with the big bathroom overhaul, you could tell it was definitely our first rodeo when it came to drywalling. And in our hurry to get paint on the walls we were a wee bit less careful with the mudding and taping than we could have been. But thanks to Operation Sell This House we’re making all those never-got-around-to-them tweaks to get things looking as close to perfect as possible. You know, tackling all of those projects that we’ll never get to enjoy ourselves but that we hope will woo someone else into moving right in (story of a seller’s life, right?).
Anyway, so after the spackle was applied to those cracked and uneven areas of the wall a few days back and I was 100% confident it was totally dry (trust me, semi-dry spackle is not what you want to work with) I finally decided to sand things down. Here are the tools you’ll need for this project:
- Dap Crackshot Spackle (as we mentioned)
- 100 grit sandpaper or a sanding block if that’s your thing
- A bra and underwear (or just underwear if you’re male or anti-bra)
- A post baby body (well, this one’s optional)
Did I lose you somewhere along the way? It’s actually quite simple. I learned a long time ago that sanding down spackle is a messy undertaking. So if you’re wearing a ton of clothes they all get caked in chalky dust, which flies everywhere when you remove them. So the fewer clothes the better. In fact, if you’re particularly brave or into nudism you can totally tackle this project on in the buff. It’s not like there are sharp tools that you’re using, and heck, you are in the bathroom (or another private room in your own home).
So all this quick fix entails is smoothing on some spackle with a putty knife (I like one with a bit of flex), giving it a while to dry (ideally a few days), sanding it down with 100 grit sandpaper so it looks as smooth and flat as possible, cleaning up all that dust that flies everywhere (we prefer to vacuum it all up while it’s dry so it doesn’t smear all over the floors and fixtures – which it can do when it’s wet), and then hopping in the shower and tossing your undergarments in the wash.
Next up I have to roll some primer and a bit of paint over that sanded down spackle for a cross-your-fingers-that-it-looks-good result (using the same type of roller that we used to paint the whole room should help match the texture for a less obviously “patched” look that a brush can leave). Can you guys handle the excitement? Here’s hoping it works out.
And speaking of works out, here’s an update on that asparagus plant that the dudes at Home Depot swore I couldn’t kill.
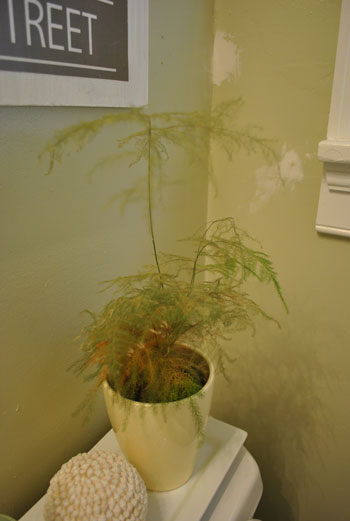
Things aren’t looking too promising for him (see what he originally looked like here). Eh, you win some, you lose kill some.

Mike @HA says
I’m debating hiring out the muding and taping when it comes time to put finishing touches on our future basement reno. Do you think it’s worth it or can a DIYer do it right the first time? Also, there’s spackle (might even be a DAP product?) that goes on pink and dries white. It’s the best invention ever.
YoungHouseLove says
Hey Mike,
It can definitely be DIYed to perfection! We just had a long hard road in the bathroom (encountering things like crazy metal flashing in the mortar walls, etc) so we ran out of steam and didn’t do the most thorough job with the mudding and taping.
xo,
s
kelly says
Sounds like a big project!
Cait @ Hernando House says
I totally feel you on plants that are supposed to be hardy! I accidentally killed my succulent, which would be ok except I’ve lost the receipt for the 1 year guarentee. So, I second that “you win some, you kill some” sentiment.
And I love the fact that you have never-got-around-to-them things, too. You ARE human! ;)
Carol N. says
My plants all look like that too Sherry. I’m trying now with some succelents to see if I can do any better.
Amanda @ Our Humble A{Bowe}d says
Always items on the to do list. We have tons of little things… Of course, we’re not in the process of selling.
Good luck with the sale.
http://ourhumbleabowed.wordpress.com/2010/06/22/our-future-projects/
Kelly says
It looks like your walls are textured. Am I correct? We have textured walls and I have areas that need some spackling badly but I’m not sure how to get the same texture as the original walls.
YoungHouseLove says
Hey Kelly,
We actually have flat walls (no texture except for the slight depth added by the roller). Hope it helps!
xo,
s
Lindsay@Tell'er All About It says
I believe in the old adage that a house is never truly finished….it’s only abandoned. Not that there’s anything wrong with that! But after awhile you do really run out of steam on a home and are ready to move on! More power to ya guys!
Jessica @ How Sweet says
My to do list is ever growing…
Lindsey says
Hi Sherry-a few spackling tips. Based on your pictures, you might want to choose a much larger spackling blade. Even a small nail hole requires a 8-10″ spackling blade. Get a nice amount of spackle on the knife and “pull the spackle tight” by applying a area about 6-8″ out from the blemish or wallboard line. It seems like a lot but trust me, the larger radius makes the issue of spackle lumps and bumps less of a problem. Also, if you have a nail hole or blemish that puckers when you spackle it, give it a tap with the butt of a screwdriver before you spackle. This makes it more of a dimple and prevents the trapped air that causes bubbling. Good luck.
liz @ bon temps beignet says
Aww, your poor little plant : / We have a bamboo plant (from IKEA) in our bath and it seems to have held up very well in there over the past 3 years.
Also, the previous owners of our house closed up a huge window to add the master bed & bath. You can totally see the outline of the old window if the light hits the wall just right.
Elisa says
Aww, poor plant… He looks so different in the “before” picture. Is it too late to intervene? Can you fix him? :(
YoungHouseLove says
Hey Elisa,
I might try moving him to a sunnier spot…
xo,
s
erin says
I thought about getting one of those asparagus ferns after you did since I have such a black thumb! I have two plants that are alive right now and seem to be thriving on neglect and under watering – a rubber plant and a lemon button fern. I almost feel guilty buying plants since I usually kill them off so quickly.
Snickrsnack Katie says
Good luck with the spackling!
As for the plant… I guess I think it is weird to have a plant in the bathroom, anyway. Sort of like…. eating in the bathroom. It just is weird.
But that’s just me! Maybe try a succulent, like a cactus or something.
Pamela says
I have a great neighbor who comes over whenever I have a spackling crisis. He’s a DIYer who is completely rebuilding his house from the inside out. Matte paint helps tremendously with wall imperfections!
As far as that asparagus plumosus goes, the next stage is brown dust. You may want to replace it before that happens.
kyle says
On a rather unrelated note, I LOVE the massive increase in pictures per post!
Jess says
The house we live in now has a few rooms with painted-over wall paper. I HATE the way the seams look, but not sure what to do to fix it up. Any YHL peeps have some cheapo, easy-ish ideas for fixing MY walls??
YoungHouseLove says
Hey Jess,
The real fix would be to remove the wallpaper and sand/repaint after it’s gone (which is the only way that we know to get rid of those seams). We suppose you could try to skim coat things, but it’ll probably crack off since the wallpaper isn’t a great “foundation” to begin with. Hope it helps!
xo,
s
Cheri@IHeartOldHouses says
We learned the hard way that painting not quite dry mud is a no-no. I’ve put off fixing the uneven/slightly cracked spots on our walls because for some reason I thought we needed to sand off the paint first, but you make it look fairly easy (if dusty)…guess I’ll have to give it a shot!
Angela S. says
Oh, no, your plant! I fell in love with your fern and bought myself one shortly after your original post went up (and it has been growing like crazy ever since!!). I’m wondering if yours is not getting enough sunlight. I work in biotech but am known around the office, er, lab, for my ability to save coworkers’ plants from the brink of death. I find 90% of the time plants fail because they aren’t getting enough light, with the remaining 10% being too much/too little water. You might be able to save it by cutting off dead or yellow foliage and moving it to a sunnier location.
YoungHouseLove says
I’ll give it a try!
xo,
s
tarynkay says
Re: Mike- You definitely CAN do the drywall yourself. It’s not difficult or anything, though it is hard to get perfectly even and it will take you way longer than it would take a professional. You might not want to do it, though. I’ve got to say, drywall is my very least favorite DIY task. I would rather do anything than drywalling, so much so that we ended up hiring out the last room rather than doing it ourselves. Hanging the sheetrock is the easy part, it’s the mudding and sanding that drove me mad. So I think that your plan of just hiring out that part is brilliant.
caligurl says
good thing you do a better job of raising babies than raising asparagus! :op
clara is adorable! the poor plant…. notsomuch (mine look like that when i have them, too… thus…. i no longer have any living plants!)
i do a lot of painting in my undies…. i’m a messy painter!
Cordia says
Ha ha, I had to scroll back up to see who wrote the post. I can definitely sport the post baby body still (yes, it has been 10 1/2 months since baby boy was born- dont judge me,lol)-yikes! I have some MAJOR spackling to do in our fourth bedroom that will have to do until we can redrywall down the road. Good idea about wearing as little as possible. Guess I will make sure to leave the old cruddy shades up until I finish that project,lol!
I bought some type of little fern for my bathroom as well as some other plants for around the house and so far so good. I probably remember to water them once a week. The fern in my bathroom is at the mercy of my cats as I have noticed it keeps getting pruned and not by me!! I have no where high to put it out of their reach for now. Not putting up a shelf until I finish the walls- yes, I am procrastinating on that area too.
House Bella says
It seems so simple – unless you live in torture like me and have orange peel walls! It is the PITS. Spray on texture gives me nightmares at nights, and always, ALWAYS looks bad. No matter how you apply it. I am so jealous of your nice, flat, easy walls. Tear.
Keri says
I love your list of “tools” needed for the mudding project and that you were honest about doing the work in the almost buff:-). So funny! We have lots of little jobs like that that we need to tackle, too. Another weekend, another project!
Mary @ stylefyles says
My thumb is also far from green….I seem to destroy every plant I try to keep. Here’s hoping I’ll figure it out….someday.
Aimee says
I had an asparagus fern for a long time and every summer I’d put it outside and it would thrive. In the winter I’d bring it in and put it in front of our sunniest, south-facing window and it would shed ALL winter – plant food, water, nothing appeased it. If you find a fix I’d love to hear it but I don’t think it’s you!
Lois Victoria says
We made the move from the Atlanta area to beautiful Hawaii about 3 years ago for my husband’s job – talk about transition! Now with a little one on the way we’re making it a round trip and heading back home to be near family (and everything Southern we miss so much!). Our list-sell-shop-buy is going to start up early next year so I’m excited to see you two go through it first!
Rebecca says
Hah! All of my plants seem to die. I either over water or under water them. It’s ridiculous. :)
Emily @ The Happy Home says
painting is a whole ‘nother project appropriate for nearly-naked DIY. just saying. especially if it’s that natural-y, low VOC stuff.
Jason says
Jess – taking off the paper is a good idea if you can but when it’s under a ton of paint it’s not easy. My bath I took paper off to find paint underneath, but then realized that paint was over old paper and was flaking of here and there.
My entire house – even the ceilings are painted over wallpaper from years ago, many coats of paint. In the areas where the seems start to show or it flakes – you can skim and sand that whole area. This had been done prior in my house and given that I had my drywaller *I am in the it’s cheaper(if i mess up) and easier to have them do it boat – but I buy the materials* do more of these spots when he was in and he can make it look pretty flawless.
There is a point however where the paint can begin to unadhere to the paper (old leaks like I have on the ceiling, etc) that the skimming would be never ending and you just can’t fix it all. At these points you may want to have sections repaired – cut out old and put in new – they can do it in no time and to them it’s easier to mud that than to mud over imperfections – or so he said.
That said – I have the spare bedrooms left, and since it is cheaper to have them in at one time (already had them in twice) I’ll probably DIY those rooms only.
Catherine says
Funny, I just found that same fern growing wild in my grandmother’s backyard over the weekend! Keep it moist, that’s probably why it’s turning brown, not enough constant moisture. Good luck with the spackle repair :)
Krysta says
I have a sansevera (mother-in-laws’ tongue) in my windowless bathroom and in my equally dark family room, and they do great. I just rotate them to a sunnier spot in the house for a couple weeks any time they start to look “whimpy”.
Nikki says
Too funny…I never thought about doing messy projects in my underwear. Maybe I will trade in my old pair of paint pants for a pair of paint panties. Whew-say that five times fast! :)
Sarah says
Will there be a part two post to this? This is just what I’m experiencing too. We have a major dry wall crinkle from the previous owners and we’ve just kind of ignored it. Are you using spackle for uneven parts of the dry wall or just little cracks? We have a full line from top to bottle from pealing dry wall tape. Thinking about giving your solution a try.
Please let me know!
Our Thanks!
S
YoungHouseLove says
Hey Sarah,
We’ll try to remember to toss up an after picture. Basically it should just look like a regular old painted wall, so just try to picture that if we forget. As for the spackle, we use it to fill dings, cracks, etc. But it could also work for building up some putty over that distinct line that you’re dealing with. Good luck!
xo,
s
Holly says
Have you ever tried ‘sanding’ down spackle with a wet sponge? It works wonder and leaves no dust mess! We use a sponge, like you’d use for cleaning up grouting after tile and a bucket of water! ;)
Felicity says
My grandfather was a professional painter and his trick was to sand with a damp sponge. Does just as good a job as sandpaper with minimal mess. And I suppose you could still do it neked if you wanted….
YoungHouseLove says
Haha, that’s funny because I used a wet cloth afterwards to wipe things down on the wall and noticed that it smoothed things out even further. Great tip!
xo,
s
Jasmine @ Eat Move Write says
Have you tried growing bamboo? It’s the only thing I don’t kill. And, I could pretty much kill any plant. ANY plant. Even a cactus. I’m not sure what it is about me, but they basically come into my house and immediately die.
YoungHouseLove says
Hey Jasmine,
Haven’t tried bamboo yet, but we love easy-grow succulents like burro tails.
xo,
s
Eileen says
I have textured walls all over the house which make spackling a bit more challenging. We have a projector rather than a traditional tv, so I prepped, spackled, sanded, primed 2x, and painted 2x the wall across from it and never quite got the texture right on this teeny place in the corner. My DH doesn’t notice it, but it bothers me from time to time. If/when we ever move, I will seriously consider texture to be a supreme negative.
BTW, did you two end up watching the Vanilla Ice Project? It’s actually not that bad! It’s more of a show than a stepxstep DIY program. I was interested since his house is in FL and it’s always nice to see ideas from houses down here (You see lots of houses from up north, but FL’s a whole different muggy/wet animal). They’re showing re-runs quite a bit, so there’s lots of time to catch up!
YoungHouseLove says
Hey Eileen,
Yeah, we were mildly impressed!
xo,
s
Debbie says
Somebody else beat me to it. I was also going to suggest using a sponge. A friend does drywall for a living and he say’s to use a big car sponge. You know the big fat yellow ones. Thick enough to hold on to, no dust and an extremely flat finish. The only drawback is you have to let it dry before you can prime.
I also agree with another poster that you need a wider putty knife. Helps feather the edges so they’re less noticeable.
And you’re not the only one that can’t keep a plant alive indoors. Outside I can plant anything (trees, shrubs,perennials etc.) and have the greenest thumb on the block. Indoors my thumb is as black as can be!
Rebecca @ the lil house that could says
Drywall is definitely not easy to get perfect. My husband once put a giant hole in our wall to run a cable line. It was imperfectly patched FOR A YEAR. Then we finally sought professional help. If you don’t get it even, once you paint it it’s definitely noticeable. We learned that the hard way… ;)
Love the color of the sheet Clara is sleeping on. So peaceful (baby & sheet color)
Jules says
I have many house plants and trees, many of them years old. I have never, ever, been able to keep an asparagus fern alive. When I saw you got one, I was hoping it would live so I could ply you for tips. Still, I’m glad to see I’m not the only one!
Kristin says
I love the way flat walls without texture look.
In germany, when you rent an apartment or house, you have to use highly textured, wood-chip wallpaper everywhere. In some rooms it might look beautiful, and it surely hides imperfections, but I have just seen too much of it. Besides, this wallpaper has to be painted (even if it’s white), which at least hepls hiding seams. Funny how different things can be in other countries, right?
Good luck with your spackling project!
Kay says
Okay I love almost everything you guys say but today I’m struggling. I’m a mental picture kinda gal. I need instructions that are spelled out in such a way that I can get a mental picture. You guys in your scivies or nude covered in dryway dust is NOT the mental picture I need, lmbo. It’s like burned in my brain and I like ya’ll so now I’m uncomfy…hoping to go clear my mind and come back for a later post.
susan says
I learned lots today by reading your post and the COMMENTS! Susan
Sharon says
Your post came at the perfect time, I am attempting to spackle (or plaster as we say here in NZ) for the first time this weekend. I’m definitely going to try the wet sponge tip too.
Michelle Z. says
Please tell me that one of you held that poor fern under the other’s nose and said, “Our love fern, YOU KILLED IT!” at least once. (I hope you saw that movie, or my joke makes no sense.)
YoungHouseLove says
Hahah, we haven’t said that yet. But we still have time…
xo,
s
Kyle says
@Jasmine I totally killed bamboo.
One thing I haven’t managed to kill though is my snake plant from college. It lived in a practically windowless dorm room for 5 years, was neglected for weeks at a time, and was knocked over more times than I can count. It’s been around for 9 years now and it is about 7 times its original size–I hear the only way to whack that thing is to constantly severely overwater or to not water at all, ever.
Sasha says
Have you guys ever had problems with touch-ups after? In the last two houses we have lived in we have had to paint little spaces, and in over half of the rooms, the wall paint seemed to oxidize and the original paint no longer matches. It even happened in the house we live in now. The past renters made no attempt to paint the whole wall and now we have random spots that do not match the orignal. We have taken precautions and gotten the paint remixed/shaken at paint stores but still have this issue. Any ideas?
YoungHouseLove says
Hey Sasha,
So far we haven’t had those issues, but maybe it’s because we’ve been here 4.5 years as opposed to trying to paint walls ten years after they have been painted? We also keep our paint in the basement so that it doesn’t freeze and thaw (which can effect the color over time). Hope it helps!
xo,
s
Chrissy says
I kept killing houseplants too until I discovered I was overwatering them. It’s not something you would think of, especially if you’re trying super hard not to kill it and therefore overcompensate by using too much water- especially true if you use decorative pots that aren’t drainage-friendly. What happens is, the roots get so soggy they literally rot and grow mold, so your plant has a delayed reaction to the problem and all of a sudden turns brown & dead-looking, which is also why it can be in the sunniest spot in the house but still look dead-ish. Once the root rot sets in, you can’t save it unless you catch it early and cut the diseased parts off the roots. If you haven’t already, either use super drainage-friendly pots or keep careful track of how often and when you water- with most plants, it’s actually better to slightly underwater than over. Hope this helps! ;)
kyla says
Have you tried the “Pink” spackle? It goes on pink and dries white so you know it’s safe to sand. Love it, and the pink makes spackling just a little more fun.
YoungHouseLove says
Oh yeah, we’ve used that on occasion. Very helpful indeed.
xo,
s
Kristi W says
Boy, I know what you mean. We recently had to do a ton of spackling in our kitchen. After sanding, our entire house was covered in a layer of white dust. If I could go back in time, I would have put up plastic to close off the other areas of the house. It’s such a messy job. I do love the sanding block though.