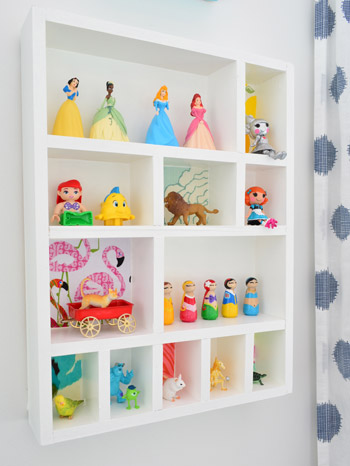
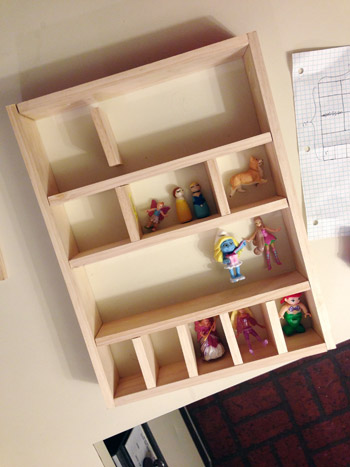
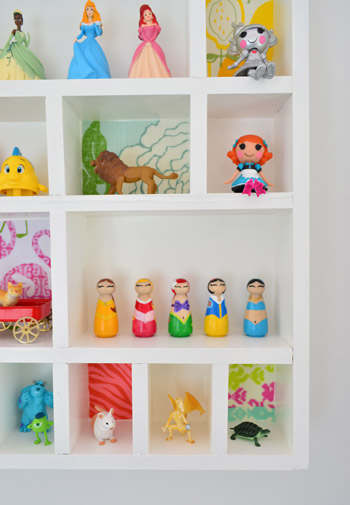
More years than not we are working right down to the wire on Clara’s homemade Christmas gift (as in, things are drying in the garage on Christmas Eve) – and this year was no exception! But the fun part about sharing them the week after we give them to her is that we get to include cute photos of her enjoying them… which is definitely our favorite part to witness. Introducing Clara’s new figurine cubby:
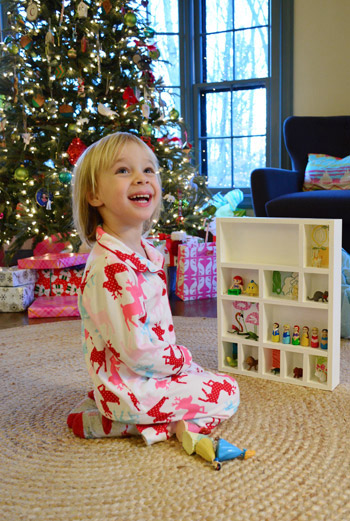
Girl loves it.
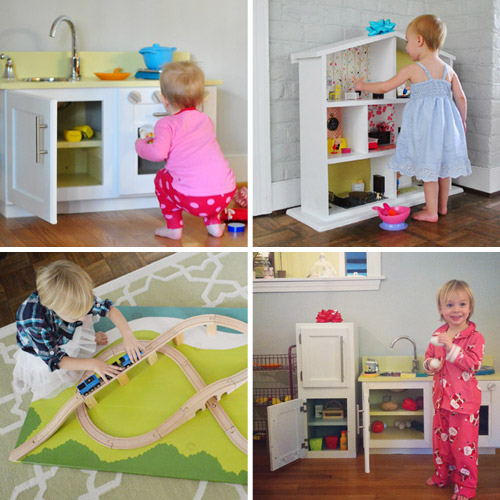
After racking our brain about what we could make her this year (a tool workshop? a fruit stand? a cardboard playhouse?) we decided that Clara still gets a lot of use from the larger things that we’ve already made her (like her play kitchen, her refrigerator, her dollhouse, and her train board – all of which are still out around the house). So we didn’t want to build another large floor-space-using thing since we don’t really have an obvious place to put it.
But there was a definite interest of hers that we knew we could address vertically (aka: on the wall). The girl loves little figures. Whether they’re small animals, tiny winged fairies, lego people, or even random items like ninja turtles and plastic dragons, the bean has a serious passion for those tiny knick-knacks and toys (our bare feet on the other hand, are not a fan).
So we thought a wall-hanging box with a bunch of cubbies for her little friends would be a fun spot for her to house them – and we even decided to personalize it with fabric from her photo project that she picked out beforehand (not knowing what it would be for). That way she’d have a hand in “customizing” her Christmas surprise.
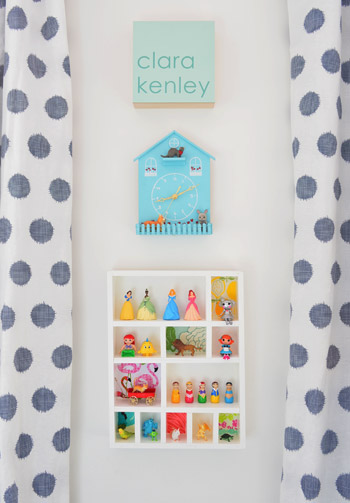
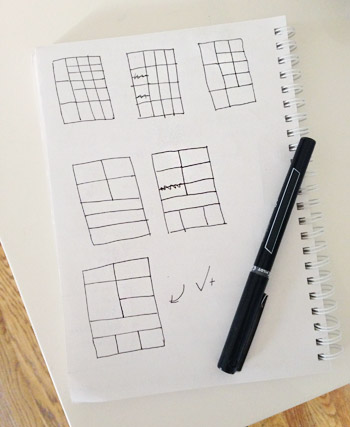
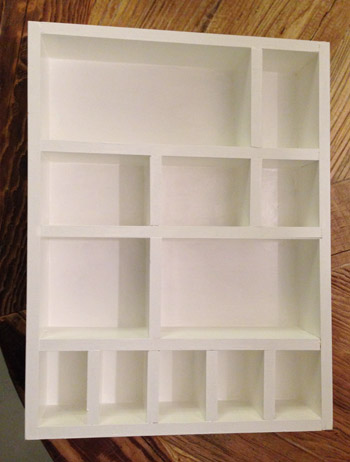
We chose this spot on her wall below her blue clock since she already loves putting figures on the small ledge of the clock (although only about three of them can fit). We thought a 13″ x 17″ sized box would fit best under there, so we started by sketching a few shelf configurations.
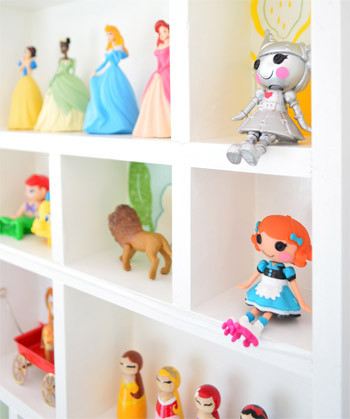
At first we considered doing a slew of cubbies that were the same size (like this charming figurine shelf) but we also wanted to accommodate different sized toys. In the end, we thought a variety of cubby sizes would work nicely since Clara likes to group some of her figurines (like all of her peg princesses) while keeping others apart (in her words: “silly mommy, birds don’t play with dragons!”). So after landing on a final shelf plan, we started building.
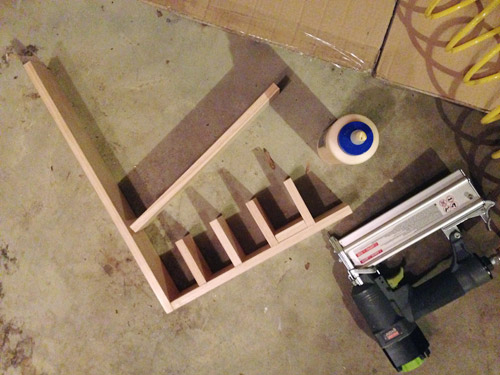
Once we had a rough sense of dimensions, we bought a bunch of 1/2″ thick craft boards from Home Depot (totaling around $20, including extra for bad cuts) and John cut the top, bottom, and side pieces along with a variety of divider pieces for the interior.
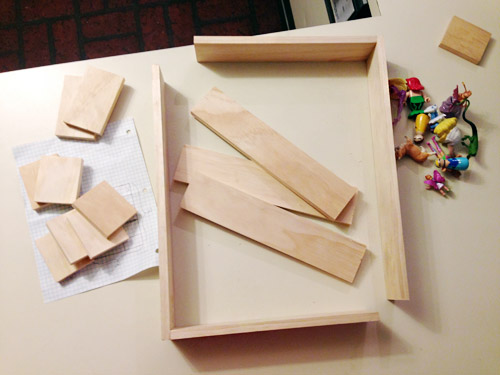
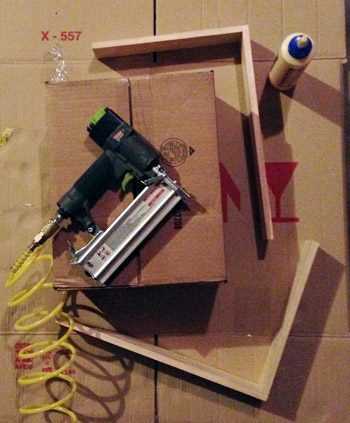
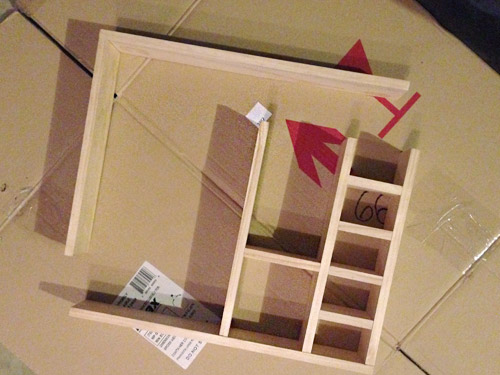
You can see in the picture above that the outer frame pieces are semi-attached already. We did that using wood glue and some 1/2″ brad nails. To try to get the corner all square John held it against the corner of a box when nailing (which also helped brace them together while using the nail gun).
Before assembling anything else, we took a moment to bust out some toys from Clara’s collection to double-check our plans. You know, to make sure the sizing and spacing made sense. Aaaand it didn’t. Well, not totally. So we shifted things around a bit more and I ran into the garage and cut a few more pieces to make it work.
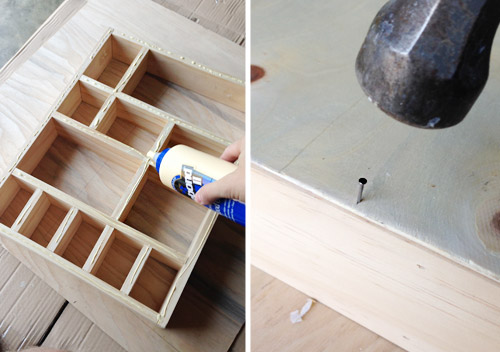
Once all the pieces were cut, we started building from the bottom up. Using a spacer that I had cut, we set the first row of vertical dividers in place with glue and nails (from the bottom). Then John put the first horizontal shelf on top and glue/nailed them from the top as well.
We let that dry overnight and then added the next row of shelving in the same way.
Once all of the insides had been attached, we finished off the frame by attaching the other L-shaped piece we had first constructed. Then John added a thin piece of leftover plywood as a back (cut to size on our table saw) with – you guessed it – glue and nails. It kinda felt like adding the cardboard back-pieces to Ikea bookcases.
Then it was just one coat of primer and two coats of Simply White paint in semi-gloss (which in retrospect would’ve been easier to do before attaching the back piece).
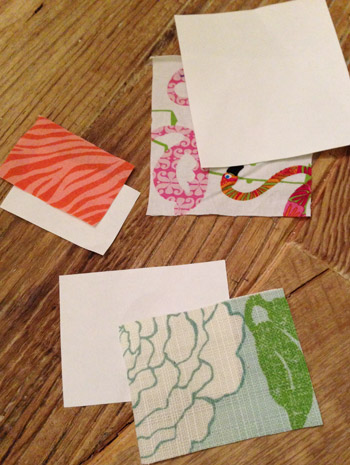
Once it was built, primed, and painted, it was onto the fun part. Asking Clara which fabrics she liked best. Turns out the girl is very decisive, and she landed on her favorite right away (“the one with the pink flamingos!”) and also pretty quickly pointed to five others, while dismissing a bunch of options with a “nope” or a “next!”

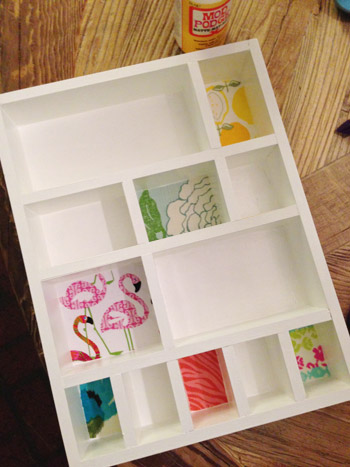
Then when she was all tucked into bed on Christmas Eve, I scurried to get the fabric in place. First by making little paper templates for the cubbies where I wanted to add fabric rectangles (I used them to cut the actual fabric nice and accurately). I didn’t want to add fabric to all of the cubbies for fear that it would look too crazy, so again I drew inspiration from this figurine shelf and did about 50% of them, while leaving the other half white.
I considered using starch to adhere the fabric, but then thought “can’t I just Mod Podge them?” A quick google search answered my question (“yes!”) and since I already had that on hand, it was nice and fast (without any last minute craft store runs). I used a small craft brush to paint the back of the cubby with the Mod Podge (not the fabric itself) and then I carefully placed the fabric right against the Mod Podged shelf-back and pressed it all so it was wrinkle free and stuck nicely in place. Thirty minutes later it was 100% dry and completely secure. So simple.
Clara was really excited to see her gift in the morning. Not only did she love that her little friends now have a place to call home, she also liked seeing the fabric that she remembered choosing the night before. I really do think kids get the biggest kick out of being a part of the process, especially in their room, so it was sweet to see her face light up and hear her say “You remembered my flamingos!”
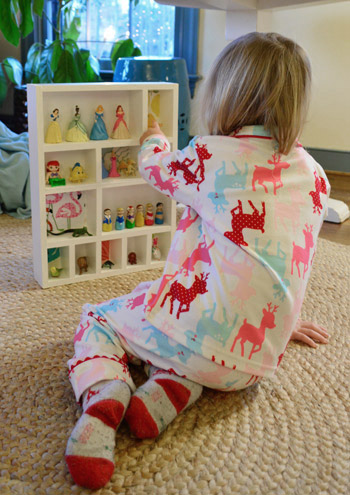
We weren’t sure if she would actually play within the cubbies, or just use them as a home base for keeping things housed when she’s not actively using them, but it turns out she likes to do both. She plays “apartment” with them in their cubbies (apparently Ariel doesn’t mind sharing a room with a dragon) and she has also been pulling some (ok, all) of them out to play with them elsewhere, but has been awesome about bringing them back “home” when she’s done.
So that’s what we built, painted, and fabric-a-fied for Clara this Christmas. Our total was $20 since all we purchased was the wood for this project, but if you don’t already have things like wood glue, paint, or Mod Podge on hand it could run you around $5-20 more. Oh and to hang it we screwed two d-rings like this directly to the back of the cubby, and then hooked them over screws which we secured to the wall with anchors for a nice firm hold.
Did you guys make any homemade kid gifts? A few people have shared some amazing play kitchens with us in the last few days. Has it really been two years since we made Clara’s? Crazytown.
Psst- Wanna know where we got something in our house? Just click on this button:


Jacqueline says
My thirteen year old daughter has a letterpress filled with food erasers and tiny figurines (the fascination with tiny figures seems to last a while) and it is one of her favorite things. One of my favorite things too – no more searching through the vacuum canister for someone who was left on the floor!
YoungHouseLove says
That sounds awesome!
xo
s
AnnieM says
If Clara loves little figures, I would HIGHLY recommend Playmobil sets. They are awesome and very durable :)
The shelves are wonderful, by the way. Exactly the kind of present my organizer-lover daughter loved when she was that age!
YoungHouseLove says
Thanks for the tip!
xo
s
Diana says
I love Playmobil! I knew few other people who had them when I was growing up so I still get excited to see sets in stores. I have my box of them in the basement!
Holly says
I wanted to do the same thing for my 4yr old. I have actually been looking at antique malls for a “cubby” to house her pet shop pets. I love the idea with mixing the figures. I don’t know why I didn’t think to make a cubby myself. I also love the peg dolls. I just bought different sized wood pegs to make a wood peg family & friends!!!! HNY!!!!
Christy Niebaum says
For Christmas we crafted a last minute (literally, on Christmas Eve) chalkboard for our daughter. And it was completely free! We had some leftover MDF from a kitchen project that I painted with chalkboard paint. We also had some leftover trim from a guest bedroom project that my hubby cut to make a frame for the board. We just glued the trim down, clamped it for a few hours, caulked the seams and applied a quick coat of white paint (trim was already primed). Voila! She’s been having so much fun with it.
We are also crafting a play kitchen for our daughter’s birthday inspired by the one you made for Clara. I’ve been on the hunt for salvaged kitchen cabinets, but no luck so far. Not even at the Habitat Restore! I’ve put feelers out to all the local FB swap groups, but no bites yet. Do you guys have those FB swap groups in your area? Like Craigslist, basically, but on FB. I’ve been selling all sorts of stuff on there the last week and using the money to offset our play kitchen costs, but also just to bolster our little one’s budding savings account.
Happy New Year, Petersiks!
YoungHouseLove says
We’ll have to look into FB swap groups! Never heard of that, but they sound awesome! And I love the last minute chalkboard you made!
xo
s
Katy @ The Non-Consumer Advocate says
I painted a thrifted stool for my younger son to use as a bedside table. I did an argyle pattern in Portland Timbers colors, and he love, love, loved it!
Here’s a link:
http://thenonconsumeradvocate.com/2013/12/how-to-make-a-painted-argyle-table/
For my older son, I took scanned images of his artwork and had them printed on T-shirts. No link.
I would have loved to have a figurine cubby when I was a girl. Great job!
It’s very similar to what Trish from Modern Thrifter did for her daughter’s Calico Critters, although she painted a thrifted shelf:
http://modernthrifter.com
YoungHouseLove says
Love that argyle table! What a cool effect! And thanks for the link to Trish’s creation. Love that too!
xo
s
Michelle says
What a special gift. I love that you make Clara something every year. Her face is priceless. So cute.
I made my youngest(14)a Mod Podge comic book canvas that I saw on Pinterest. He loves comics and is a big fan of Green Lantern. I bought a comic book took it apart and glued it on a large canvas. I then took a page and glued it on three smaller canvases and attached them on to the big one. I also painted and glued wood letters that say pow,zap and bam onto the small canvases. It really turned out nice The best part he loved it and thought it was the coolest gift ever. Now his brother(20)wants one.
YoungHouseLove says
That sounds so sweet Michelle! What a lucky guy. And I love that his older brother wants one now!
xo
s
Sabrina says
I love it and need to make about a million of them. We have a giant bin just labeled “figures” Things were tight her for Christmas so I homemade a lot of things. (thanks pinterest!) I made candy cane play dough, a stuffed kitty, super man cape, and those princess peg dolls. I made all the peg dolls but left out Tiana because the movie scares my daughter. To which she of course asked “where is Tiana?” lol making that one now. We also had a birthday party and I made tinkerbell peg dolls for the girls (22 of them) and felt peter pan hats for the boys. We are starting on making a kitchen for my little guys birthday out of an end table. Totally hitting up your blog for help with that!
YoungHouseLove says
That’s so cute! I love that story!
xo
s
Rae Parkin says
Dear Young House Love,I have read your blog for a long time.I have three daughters nearly your age.Also 5 grandchildren under the age of three and a half.My kids make Christmas magical for those little ones.Really? A shelf for your daughter? That is a gift?. Everything posted in the last few weeks seems kind of sad and joyless.And cheap. Sometimes,it is worth spending money. My husband and I built a faux Colonial house in the eighties.Just love it,still.Bought appropriate, excellent quality furniture then.No crap from IKEA.Why are you just buying the cheapest stuff ever?I expect that Sherdog will never allow this to be seen. My daughters houses are lovely.
YoungHouseLove says
You should have seen all the things under the tree for this girl! Every year we make her something, but we also buy her stuff and she gets tons of gifts from relatives and friends. So we share a tutorial for whatever we make and then we share a post about the other things we all got each other, which is coming up tomorrow. Clara made out like a bandit at usual ;)
xo
s
Ana Silva says
Wow. She must really not read your blog because her statements are not even accurate. Christmas isn’t about gifts anyways. It’s the thought that counts! Christmas is about celebrating the birth of Jesus Christ not how many materialistic gifts a kid can get. Keep up the great work John and Sherry.
AlisonG says
Rae Parkin, you sound materialistic and judgemental. I agree with the other comment, what about celebrating Christ’s birthday? Happy New Year to you.
Erin says
Love this! Such a functional gift that can last for years to come as her tastes change. Happy New Year!!!
YoungHouseLove says
Aw thanks! It makes me smile when I walk by her room and she’s rearranging everyone again. Such a cutie!
xo
s
leeann patton says
I didn’t know Clara’s middle name was Kenley…that’s my granddaughter’s name, and its spelled the same way. Awesome!
YoungHouseLove says
So cute! It honors my dad (Ken) and my Great Aunt Lee!
xo
s
Patsy says
So love this! one. I so amazed at your creativity. It looks perfect with the clock.
Diana says
The pink flamingo fabric would be my favorite too! Clara has some good taste. =)
Kelsey says
You guys seriously kill me. I am pregnant with my first, a baby boy in june. I can’t wait to see what you do for the nursery and future crafts for him. It makes me sick how beautiful your house is, but i love that you guys take your time one day at a time and you enjoy the journey. It give me hope that my house will be done one day to half your standards. ;]
YoungHouseLove says
Aw, thanks so much Kelsey, you’re so sweet. And congrats on the little boy on the way! So exciting. We can’t wait to dive into nursery stuff, hopefully really soon!
xo
s
kelsey says
Absolutely thoughtful and divine. I am expecting my first baby in june. A boy. So i can’t wait to see what you have planned for the nursery. We just did shelves in our bedroom as nightstands and I finally finished my kitchen table and chairs. Santa’s lazy elves (cough cough me) finally got around to do it. Anyways do you guys have colors picked for the nursery? How do you even start planning decor and design? You always seem so organized. I hope my house is at least half as cute as yours one day.
YoungHouseLove says
I think right now we both love the idea of using the large bike prints that John framed out with wood in the nursery, and those have some bold green in them, so we’re leaning towards wood tones, rich green hits of color, some black & white, some natural elements, etc. I think we honestly just wait for something like that to “strike” so that we have a starting point, whether it’s art or a rug or even something functionally necessary like more storage space (ideas tend to grow from there and then we just take it one day at a time and see where we end up). Hope it helps!
xo
s
Colleen Pastoor says
I love this! My Papa used to make us cedar ‘knick knack’ shelves of all different shapes and sizes when we were younger. I love how the white paint and fabric updates the look.
I made a couple kiddy DIYs, but nothing so serious! This year I managed story stones and a couple plush turtles.
YoungHouseLove says
That’s so sweet! I love hearing how grandparents built such sweet things for kids. How lucky to have them around (and so handy!) to make things like that.
xo
s
Brooke says
We made our daughter a stage! She loves to sing and perform, and all she asked Santa for this year was a “princess guitah” (she is 3). So, Monday before Christmas, my husband built the bast and back stand (it is about 4.5′ wide, 8″ off the ground and 3.5′ deep) with metal rods that rise on each side of the back corners to about 5′ and then connect across the back. We painted it the color our home’s trim (a creamy white) and I stenciled gold polka dots across the stage portion. Then I made two curtain panels and we slid them across the back. She has used it every day since Christmas and LOVES it! She can’t get enough of her gift from “Santa”!
Check it out at http://www.okiedokeandholymoley.blogspot.com.
YoungHouseLove says
So sweet!
xo
s
Olivia says
Great idea – so simple and lovely! I would have loved this as a little girl, I’m not at all surprised that Clara is a fan!
Pamela Bertone says
Sherry-I think you’re onto something with that cubby. You’ve found a way to make cleaning up fun for your daughter. Nice!!! I posted on FB that I have an enormous “7” that made me think of you. I worked for the Rappahannock EMS Council in Fredericksburg, VA, where we all conducted a massive clean-out today and came across 2′ x 2′ “magnets” with numbers on them that were used to identify ambulances years ago. As soon as I saw the “7” and how graphic it is-plain black “7” on white background but LARGE, I thought of all the great gallery walls you have and how awesome an enormous “7” properly matted might look. I left a message on your FB page so you know I’m legit and not some creepy stalker. I can meet you in Fredericksburg, or closer to Richmond. I’ll treat you to Starbucks:) My kids both go to VCU and I work in Fredericksburg, so I’m somewhat familiar with your ‘hood. Or, I can mail it to a P.O. Box if you have one. I understand your wanting to keep your privacy private so I’m happy to oblige whatever works best for you. I can take a photo of the BIG “7” if you’d prefer.
YoungHouseLove says
Aw thanks so much! That’s so sweet of you! Will have to check out FB and get back to you!
xo
s
Ana Silva says
Love it! Pinned :)
Sara says
I love this! I’m going to make a bigger one with smaller cubbies for my kids’ Lego mini figures!
Timothy says
i love Clara’s room so much!! you guys did so amazingly great on it!!i cant wait to see what you do with a boys room because you succeeded so well with a girl :)
Amy Baker says
Totally random….but I was just thinking about the silhouette pic yall did of Clara when she was a baby-are yall doing an updated one anytime soon? I was thinking about doing one of my girls :)
YoungHouseLove says
That would be fun! I’d love to do an updated one!
xo
s
Priyanka says
I have been this close to commenting at various points, since I started following your blog 2 years back, but today I just haaaaddd to say, this is super cute and one my favorite projects of yours. I have a little daughter too, and everyone time you create something for Clara, I totally add it to my list too.
YoungHouseLove says
Thanks so much Priyanka!
xo
s
Lindsay says
Where did you find the adorable princess peg dolls? So cute!
YoungHouseLove says
My friend Heather made them for some friends and relatives this year for the holidays. Aren’t they cute? I think you can find similar items on Etsy though. Clara loves them!
xo
s
Carla says
This is so cute! My daughter, also nearly 4, would love it.
Please tell me what kind of anchors you used! (Backstory: my sweet husband has implemented a “everything must be screwed into the studs” rule and it’s killing my big design ideas. Surely there must be some type of wall anchor that could hold a decorative shelf symmetrically placed over our damn toilet, yes? Thank you.)
YoungHouseLove says
Oh yes, just check out the anchor dept at Home Depot! They have so many of them for various weights/strengths. I think we used the ones with the yellow plastic anchors (I forget if that’s 20lbs or what, but it’s so much heavier than most shelves or mirrors, and they even come stronger than that). Good luck!
xo
s
Christina says
I remodeled my girls’ doll house this year! It was super fun and everything can be easily fixed with hot glue. They loved it!
YoungHouseLove says
So glad! Sounds like fun!
xo
s
elizabeth@ourcrazysweetlife says
Gorgeous, creative gift. I love it!
Carolyn B says
Love it! This is proof that gifts can be functional and fun! Good for you for making her something to treasure for years to come!
Kristin Corbin says
LOVE IT! =)
Beth Marie says
SO adorable! Ah how I wish to have a girl who would love to make her stuff pretty and neat.
Moy says
Yahooooo!
You just created a business with this project. Customized to hold makeup, for craft rooms,sewing, collector items, or even disney /lego themed, etc. you can even ship it flat .
Brilliant……hugs, Moy
Jace says
Can you post a pic with the dimensions penciled in? Or just post the dimensions and I can try to figure it out?
YoungHouseLove says
Sure, it’s 13″ by 17″ – we’ll try to update the post with a sketch with the dimensions penciled in soon!
xo
s
Jace says
Thank you!! My girls have similar toys and they would love this! Im going to see if my handy father in law will build them :)
Meg says
This is absolutely adorable, and my sister and I would flipped over something like this as kids! Our “play people” filled giant plastic bins as a kid, our favorites being the cute little Disney princesses we would get in Happy Meals and tiny Polly Pocket dolls. Love!
Christi Davidson says
Hi. I am having severe house design anguish and at 2 a.m. last night, I decided I was going to try and get your readers’ (and hopefully YoungHouseLove’s) opinion. Due to the freaky ice storm in Texas, we had damage that ultimately resulted in a new gutter (and new exterior paint color trim) on our house. Because my house looks so ugly now, I’ve used Kristie Brown’s photo to show you what the gutter color WILL look like, along with a similar brick color. Now…the big decision/ask. We’re thinking a green door. Either olive or apple green. I’m having a dickens of a time deciding — after trying about five samples. Help? Please!? I would be eternally grateful. Also, so would my husband who is tired of looking at paint swatches. Thanks! Christi.
Here’s the photo that shows the what the new gutter/trim will look like.
http://thedecorologist.com/wp-content/uploads/2010/07/DSC_4480.jpg
YoungHouseLove says
That’s a gorgeous gutter color and brick color, so for the door I would do a rich green tone. Not too neon, and not too olive – sort of a muddy grass green I think would be gorgeous. How about trying Agave by Benjamin Moore?
xo
s
Gabi M. says
We made almost all of our kid’s Christmas presents this year. I sewed a Rapunzel dress (that was supposed to be for Halloween), added rhinestones to a princess brush from the Dollar Tree, and made play makeup with old make-up containers and nail polish (this turned out to be the biggest hit of Christmas). For our son I finished sewing a Toothless Plush (started a year and a half ago), we made over a Guess Who Game with Star Wars characters and spray paint, made over an old treasure chest, and my husband made him a Darth Vader book shelf/nightstand and a pirate sword. We had SO much fun! The best part is we didn’t plan all of those things, we just made them as we went so there was much less stress. However we were still building, painting, and assembling Christmas Eve, but that’s how we roll!
YoungHouseLove says
That’s amazing!
xo
s
Liz says
This is such a great idea! We’re feeling very overwhelmed with toys after this Christmas…any tips for storing stuffed animals and dolls?
YoungHouseLove says
There’s a big basket in Clara’s room with a lot of stuffed animals and dolls and she keeps a few in her bed to sleep with and some of her dolls just get carried around all the time (at least Barnacle and Melinda seem to be attached to her wherever she goes!).
xo
s
Stephanie says
love it! I wish my kids wanted something like that. I got a wood one at Goodwill that doesn’t have such large openings, but I’m totally cutting out some of the pieces to make larger openings and painting it white. Brilliant!
JEN C says
3 years ago I came across a hanging ribbon organizer at a garage sale for $5. (Here is a pic of one http://www.pinterest.com/pin/62839357270143294/). I had yet to find a use for it. I don’t have that much ribbon and it just didn’t seem to look right anywhere in my house, but I liked it so I added it to the basement pile. Hubby has told me so many times that I should just throw it out, but I insisted I loved it and would find a use for it. Then yesterday I read your post. My 4 year old daughter has a bunch of those Disney princess dolls that come with the clip on dresses as well as a bunch of other figures of similar sizes. I pulled it out today, dusted it off, and removed the ribbon rods. She’s in love with it. She says “I saw this yesterday on your computer! It’s for my clip dolls!” She proceeded to choose “rooms” for each doll. I’m putting it on her wall tomorrow. If she continues playing with it, I plan to add fabric like you did. You guys are the best!
YoungHouseLove says
That’s so sweet Jen! LOVE that story!
xo
s
Mandy says
LOVE it! The fabric looks great in there. My husband built doll sized bunk beds and I made doll sized quilts, mattresses, and pillows for our girls for Christmas. And just like you, we were working up until Christmas Eve night. They turned out great, and the girls were thrilled that their dolls have beds and quilts that look just like theirs.
YoungHouseLove says
So sweet!
xo
s
Laura J says
As usual, your gifts are so cute and thoughtful!
Off-topic, but where did you get the dot curtains/fabric? I need them in my life!
YoungHouseLove says
Thanks Laura! Those are from Ikea a while back. I don’t think they sell them anymore, but maybe try ebay?
xo
s
Christina says
I love your gift for Clara! A much better place to keep all her people than lined up on a windowsill (that’s where we most often find them around here…)
For Christmas our son got some toy tools so we made him a work table. It took about half the day, required minimal tools, cost us zero dollars, and he got to help and plays with it all the time, so I think it’s a huge success!
http://ashcraftcreative.wordpress.com/2014/01/04/a-vacation-of-building/
YoungHouseLove says
So much fun! He’s a lucky guy!
xo
s
Karen says
Hi guys,
I have been searching your posts both on your site and your family blog detailing the painted princess peg people Clara received. I wanted to use it as inspiration for a project I am doing for my daughter. Can you tell me where I can find the post?
Thanks!
YoungHouseLove says
Those were something we shared on Facebook/IG. The Etsy vendor is HethrFether (a college friend of mine who ROCKS and is so amazingly artistic). Hope it helps!
xo
s