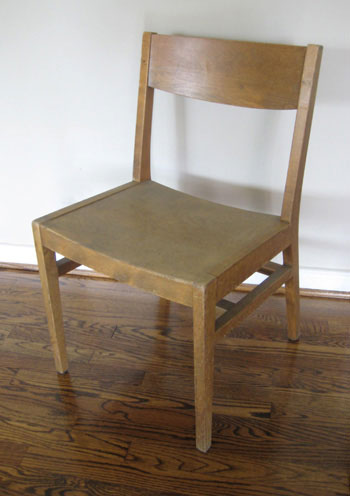
A lot of people were interested in the details when it came to the thrift store chair that we refreshed for our latest column in R. Home magazine. Here’s the play by play.

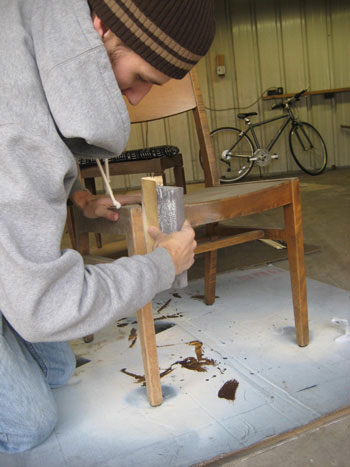
We picked up the chair for $10 at Diversity Thrift here in Richmond. Then we lugged it home and I got down to business sanding it. We used 100 grit sandpaper to rough up the semi-shiny finish until we got down to the bare wood. Another way to prepare a piece for painting is to prime it with oil-based primer. However, since the chair was very old and we were able to get down to the bare wood with some gentle sanding, we opted to skip that step. Had we been planning to paint it white or any other pale color, we probably would have primed it as well.

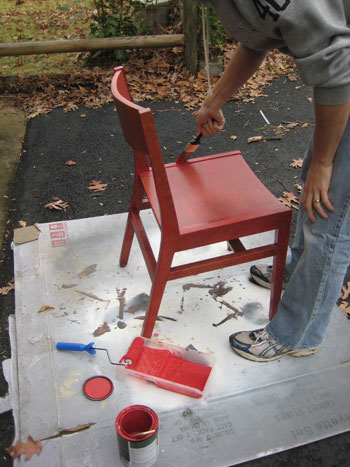
Then we applied three thin, even coats of semi-gloss latex paint (in Valspar’s Fabulous Red- the same color we used on our front door). Red always calls for at least one more coat than most other colors to capture that true tone without any hints of pink. The key to getting a smooth finish when it comes to painting furniture is to use a brush. You can see that we briefly used a mini roller, but any roller creates small pricks (tiny spiky things) as it applies the paint, so we went back to our trusty paint brush for a smooth, even finish. You might also notice some leaves in the background of this picture. That shows you how far ahead we work when it comes to our column (we actually completed this project last fall for the March/April issue of this year).

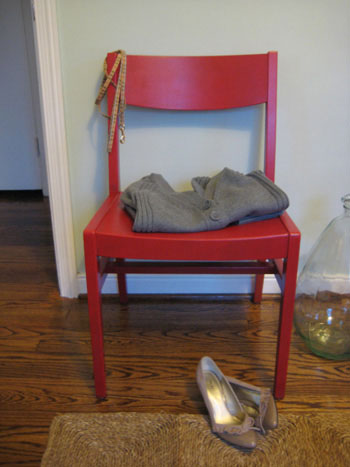
After three coats of the semi-gloss red paint, we just waited for that baby to dry (we always give things at least 24-48 hours to avoid hair-pullingly-frustrating smudges or dings). Sometimes we suggest an optional coat of protective polyurethane for pieces that should be super durable and wipe-able (a kitchen table for example) but because this piece is more of an accent chair, we left it well enough alone (and the semi-gloss finish of the paint still gives it a nice sheen, along with a functional wipe-able finish).

Not only was this total chair makeover quick and easy, it was also super affordable. The entire makeover cost us just $25 for the $10 chair and some paint. And if you use semi-gloss paint that you already have laying around, you can transform a thrift store chair for even less in under a few hours.
You may ask what happened to this lovely chair. Well, R. Home is actually giving it away to one lucky local, so if you live in or around Richmond you could make this totally refreshed accent chair yours. And if you’re not local, just make your own! We promise it’s easy. And totally rewarding too.

Tam says
Great job..I cant wait to do a chair..I have yet to do one just yet.
Amanda says
Interesting about your experience with roller vs paint brush. I’ve always heard to use a low nap roller (actually I bought the exact one you have in the picture) vs a paint brush, because you get the lines from the bristles on the brush instead of a more smooth finish from a roller. Good to know that hasn’t been your case, because I’m about ready to embark on painting my roll-top desk and definately bought rollers for the main parts of that. I’ll have to give it a try with both and see what is better. I do know when painting Brian’s kitchen cabinets, the finish is much better using that roller then the paint brush- we tried to use it as minimally as possible to avoid the harsh lines.
YoungHouseLove says
Hey Amanda,
Oh yeah when it comes to the walls, a roller yields a much smoother finish. But we’ve always had a lot more luck with brushes when painting wooden pieces of furniture. And apparently we’re not alone- our local Benjamin Moore paint specialist also swears that they cut down on bubbles and inconsistencies when it comes to refinishing furniture so she says she’s allergic to rollers for anything but walls. She even claims that metal surfaces like a garage door look much better when they’re done with a brush (talk about a big job!).
Of course with a brush the key is to do thin even coats and not glob everything on there so you have drips and bristle marks. Yuck! Good luck with that roll-top desk… and don’t forget to take before and after pics for us!
xoxo,
Sherry
Amara says
John:
Thanks for the info. That chair is gorgeous. I know you said you prefer a brush over a roller. However, how do you feel about spray painting a piece like this. Any problems you can think of?
YoungHouseLove says
Hey Amara,
Spray painting is a great way to refinish an items of furniture (there’s even spray primer so you’re sure to get great adhesion). There are only three things to be careful about when spray painting:
1. Do it in a ventilated area (not inside! maybe in the garage with the door open or even in the driveway?)
2. Be sure to cover anything in the surrounding area with cardboard or a tarp if you don’t want it coated with spray paint dust (it’s much messier than painting)
3. You obviously have less control with spray paint than you do with a brush, so be sure to apply the paint in soft, steady even strokes without having the nozzle too close to the piece (this is the #1 rookie mistake that we made a few years ago before we knew better- and everything looks terrible with drips and uneven coats of spray paint).
Slow and steady (along with keeping the nozzle far enough away) is the key. The goal is three thin coats instead of one thick one. The first coat won’t completely cover the piece, but step back and let it dry and go in for another light coat afterwords instead of spraying too much paint on all at once. Hope it helps! Good luck!
xo,
Sherry
Nicole says
I’ve seen so many different posts here and elsewhere about refinishing furniture. I’ve never done it but your explanation seems so simple. I really want to try tacking something like this – and it would be a tackle for me – I am not very handy at all (but do want to be!). Thanks for the photos. The chair looks great!
Mark says
One trick I learned years ago when painting something red…is to use a light grey primer. It balances out the pink tones in the paint and will give you a richer red in less coats.
Laura says
You guys never fail to deliver! Thanks for the “extra” paint tutorial – you answered all my questions! Now if I ever get caught up in the archives! I’m still only in May ’08 – but I love it; just means there’s a TON of content!
Bethany says
umm, I love the chair, and I love the post, but I’m obsessed with the shoes! Where did you get them?
YoungHouseLove says
Hey Bethany,
Those shoes were the find of the year at Target (!) for $7 (!). Needless to say I am even more smitten with Target for providing home decor AND shoes on the cheap! The label says they’re Mossimo if that helps. Happy shoe hunting!
xo,
Sherry
Erin says
Nice work, the chair looks great! I just made over a bathroom cabinet using a 2″ mini roller. It covered well thanks to the high density, but I did have to touch up some small spots with a paint brush.
Bridgett says
Just a quick tip on painting furniture. If you leave it out in the direct sunlight for the afternoon, the heat really helps “bake” the paint on. If I have a piece that I am going to be keeping a lot of things on (like a buffet or dresser), I always be sure to put it out in the sun after the paint dries. It really helps to keep the paint from adhering to other items.
YoungHouseLove says
Ha! Bethany – when I first read your comment I thought you were asking my shoes. I was thinking “well, um, If you really want to know: they’re just a seen-better-days pair of running shoes I bought online…”
Thank goodnes I realized you were asking about Sherry’s in the last picture. Because I’ll be the first to say that my shoe collection is not very enviable.
Oh, and great tip about baking in the sun, Bridgett. If only the sun had been shining that weekend!
-John
Bethany says
Too funny! I like your Asics too, John. You two have inspired a whole new change in my house these days–fresher colors, less store-bought goods. Thanks for constantly rewarding us with fresh and budget-friendly information. I love that it’s now ok to say “I can’t afford that piece, but let’s make a cheaper version ourselves.”
lauren @ yardcandy says
hey guys, i’m still not totally sure when to sand and when to use the oil based primer. you’ve inspired me to paint an old armoire i had been thinking of posting on craigslist. not sure if it’s real wood of heavy duty mdf. does this matter as far as sanding vs. a primer?
YoungHouseLove says
Hey Lauren,
Sanding and priming both help to prep your piece and ensure that paint adheres well for the perfect “foundation.” So either or both will definitely do some good in any case! Some people do both, and some people do neither (which is a baaad idea, we always at least do one of the two).
If you’re painting something large like an armoire, unless it’s super sleek and shiny (in which case primer even may have a hard time adhering) you can skip sanding and go straight to priming with an oil-based primer. Just apply one even coat, wait for it to thoroughly dry and follow it with two coats of semi-gloss latex paint (applied with a brush for the best finish- and if you must use a roller never use a foam one!). Of course you want to keep each coat of paint thin and even- and wait for them to thoroughly dry before moving onto the last coat. Then let the armoire dry for at least 48 hours and enjoy it for decades to come! Hope it helps. Happy painting…
xo,
Sherry
Lisa says
I’m about to paint a chair and step-stool vivid orange. So this tutorial is perfect timing. I’ve painted lots of furniture before, but it’s always nice to re-read and think it through! Thanks!
Aimee says
Hey guys!
I’m in the process of repainting my Grandmother’s antigue kitchen chair. I opted to use leftover Ralph Lauren red paint from our 1/2 bath (to save some bucks!). The problem is that it’s a “Satin” finish. So, after 3 coats of paint on the chair, it’s very boring and dull. I bought semi-gloss polyurethane, but haven’t put it on yet. Will that yield a glossier result? Or should I use high gloss polyurethane? Also – have you tried the spray polyurethane? Because there are spindles on the chair that have quite the curve to them, I was wondering if spraying it on would have better results. Thanks a million!!!
YoungHouseLove says
Hey Aimee,
I definitely think a spray poly is the best way to go in your case- just be sure not to spray it on too thick or it will drip all up and down those lovely spindles! A thin and even application is the key – and don’t forget that getting the nozzle too close to the piece or hovering over one are for too long is a surefire way to get pesky drips and poly pooling! Good luck. You can do it!
xo,
Sherry
kristen says
yes, grey primer is the key to red paint, folks!!!!!!
Torey says
I have some ridiculous shellac covered wood kitchen cabinets (circa 1960) that I will be repainting. Do you think I could just prime them with the oil primer rather than sanding all the shellac off? I really don’t want to have to sand all that junk off. Any advice would be appreciated!
YoungHouseLove says
Hey Torey.
Here’s our cabinet painting tutorial. Have at it! And good luck…
xo,
Sherry
Nina says
Adorable! And I have that same leash that’s wrapped around the chair, for my dog! Good taste!
Missy says
Thanks for the tutorial! I’ll be using this great info a ton this summer! I have lots of furniture that needs some help!
It looks so easy… and fun!
Amanda says
Hmm… I’ll have to give the brush technique a try! I have before pics on my blog already and will definately do a before/after post and let you know!
Erica says
I wish I lived in Richmond…this chair is awesome! You guys have inspired my husband and I … we are going to have to check out some of the thrift stores here in Raleigh!
John says
Hello, I really like your chair. I was wondering, how many quarts of paint do I need to paint a chair about the size of the one your painted?
Thanks :)
YoungHouseLove says
Hey John,
One quart should do the trick! Hope it helps.
xo,
s
Dianna says
We love going to junk stores for great furniture and accessory finds. Don’t forget basements, attics and garages, we have found great pieces there too. Go to this link and check out the Hoosier Cabinet we restored.
http://www.decormadesimple.com/hoosier-cabinet.html
Pink Desk Chair says
Pink Desk Chair Find The Best Deals On Pink Desk Chair.
Marilyn says
I got a sofa/chaise hand me down, in a beige color. I would love to spruce it up. I can sew basic items, but don’t think I can take on sewing an entire cover so I was looking for slipcovers, but can’t find any for a chaise. Any ideas?
YoungHouseLove says
Hmm, have you tried googling around for the term “chaise slipcover”? That would be our only idea other than seeking someone out (a friend? someone on craigslist?) who could whip one up for you. You could also google around to learn how to sew a slipcover yourself since you have basic sewing knowledge already. Good luck!
xo,
s
rocio says
You are fantastic!!!!!!!!! I am absolutely in love with your blog
Sharon says
I am trying to stain a chair I have sanded… can’t seem to get the seat right though. Going around the slats (?) on the chair back results in blotches and just a total mess on the bottom of the chair. What am I doing wrong and what can I do to correct it?
YoungHouseLove says
You might need a chemical stripper for areas you can’t reach. Try asking around at the hardware store and hopefully they’ll show you what product will help. Good luck!
xo,
s
jaime ciavarri says
Hi guys,
I was going through a bunch of your tutorials and they are so helpful. Any advice you can offer for when you have to strip a piece a furniture instead of just sanding off the paint and stain? I just picked up a little bookshelf at yard sale for $10 and it is my first thing I have ever tried to refinish. It is painted and under the paint is a dark stain.( I put a chemical stripper on it, but it still is pretty difficult to get the paint off. Thats when I came in and went to your blog to rescue me :) )
thanks!
Jaime
YoungHouseLove says
So sorry- we haven’t tackled that type of thing yet, but we would probably google around for tips and ask the paint pros what they recommend (sometimes the folks at places like Benjamin Moore or small hardware stores like Ace or True Value are really in the know). Good luck!
xo,
s
S. Jones says
I’m finally getting around to re-painting my wood adirondack chairs on my front porch. I’m painting them the same color red that they already were but they needed freshened up. I lightly sanded them and just put on my first light coat of (BEHR exterior semi gloss enamel) with a brush. It looks a bit too sreaky / I can see my brush strokes. Do you have any advice for my 2nd coat? What kind / brand of brush do you suggest? There’s a lot of slats with little spaces should I be using a small brush?
YoungHouseLove says
The easiest way to eliminate brush strokes is a small foam roller. Thin coats are key too! Good luck.
xo,
s
Amie says
Hi,
I love your blog! I have a question for you.. I am working on my very first project in which I am giving our kitchen table and chairs a makeover. I have used oil based primer (spray paint) and oil based cherry red paint (spray paint) on the chairs. The spindles, legs etc.. have a wonderful finish however, the actual seat of the chair has come out a bit rough to the touch and looks a tad bit uneven. Would that be because of my primer? I don’t get it. Anyway, I am going to try to use some “inbetween coat” sand paper to smooth it out but also wondered if I should do a coat of poly to smooth it out and give it extra durability. I have 3 kids so this is a concern with the paint. What are your thoughts? Should my poly be oil base? I already have some of that (in a can, non spray). Would I just use a foam brush to put it on? Help! :)
Thank you,
Amie
YoungHouseLove says
Hmm, not sure. But you’re right, it might have something to do with the primer. I would definitely use some in-between coat sandpaper to smooth things out. And poly would definitely give it durability so it’s a good choice, but be sure it’s smooth before applying the poly (it won’t smooth things out further, so if they’re bumpy, they’ll just be glossy and bumpy with poly on them- haha). As for the spray poly, I’ve never used that, but since you sprayed the rest of the chair I’d just spray on the poly according to the can’s directions (and not use a brush since I’m afraid that’ll get messed up since it’s supposed to be sprayed on). Hope it helps!
xo,
s
mary anne daniels says
Hi – your directions and choices of paint and poly impressed me. i’m about to begin a progect of painting 4 kitchen laddler back chairs. i would like to add a distressed look to them after the 3 painting coats. how would you recommend doing this? for example, on a red chair would you wipe it with a dark color and then wipe off? appreciate your thoughts on this technique – thanks
YoungHouseLove says
You can use a glaze (and wipe it over the paint to distress it) or you can paint an accent color under the main color and sand it once they’re both applied and dried to “reveal” the accent color in certain areas under the main color. Perhaps there’s a video on youtube to help? I’d try searching “how to distress furniture” – good luck!
xo,
s
ashley says
hi! cute chair! i always get so confused re: painting old furniture, so thank you for the info!
just wondering what color that red is? i love it. might want to paint our kitchen table that color.
thanks!
YoungHouseLove says
It’s Valspar’s Fabulous Red. Hope it helps!
xo,
s
Deborah says
So, I know this is an old post, but I’m thinking of painting my dining table and chairs. They have a stain on them that due to two children has been rubbed off in some places. When you say “rough up down to the wood” – do this mean you need to sand all the finish off entirely? I suspect so, but it seems like that would take forever! Thanks!
YoungHouseLove says
Hmm, you just need to get under the stain/sealer, so you don’t need bare wood, you just don’t want half of the table to be slick and sealed and half of it to be raw (since they’ll take the stain different ways and look all weird). Hope it helps!
xo
s
Casey says
I really want to paint some of my miss-matched living room end tables. I have cream carpet and a cream couch. Would I use the same color on both miss-matched end tables to keep it uniform? Do you have any color suggestions for someone who loves your designs but unsure how to choose a color? Thank you in advance for your help!
YoungHouseLove says
Hmm, if you have a cream carpet and a cream couch, I’d use the same color on the end tables to unify them but not cream since that sounds like the whole room will look flat. Maybe try a rich mocha color on both of them?
xo,
s
Daisy says
Hiya, I’m looking to paint some old chairs… I have some kitchen and bathroom paint, do you think this would do the job?
YoungHouseLove says
Sure, as long as you sand and prime them first, that paint will work on top!
xo
s
Maggie says
I’ve been spray-painting some thrift store chairs different colors to go around an antique oak table. I’m lightly sanding the chairs, applying Krylon primer, then painting with Krylon gloss paint. The problem is the chair seats. The rest of the chair comes out with a nice finish, but the seats remain rough and the paint sort of “pills up” leaving little bits to sand or brush off. The seats just don’t look as good as the rest of the chair. Any suggestions?
YoungHouseLove says
Hmm, maybe try sanding and spraying a few more light coats and if that doesn’t work, consider adding a chair cushion to cover the seat if it just doesn’t take paint well?
xo
s
kristy says
Hi there! I am also painting some old wooden chairs from a thrift store. $25 for 4! Sweet deal.. I’m doing them in black to make them cohesive because they all different. I’m wondering if it’s necessary to seal with ploy? And I also heard that an eggshell paint was the best for this project. Is that true? PLus if I don’t seal it, should I then just use the semi gloss?
YoungHouseLove says
Yes, semi-gloss is fine without sealer or you can use eggshell and then seal them.
xo
s
Janice says
Hi, I am about to sand and paint some barstools – just the tops since they have a metal stand. Why do you use oil based primer instead of water based? Can I use water based primer instead? I have some Bullseye 123 on hand.
YoungHouseLove says
Sure, that should work! Just do thin and even coats and you should be fine!
xo
s