Adding a headboard to your bed is one of the best ways to add polish and coziness to your bedroom. And, lucky for you, making your own DIY upholstered headboard is super easy and affordable (ours only cost $66!). This means you can customize the fabric, size, and design to get exactly the look you want. Believe us, we’ve done A LOT of them over the years!
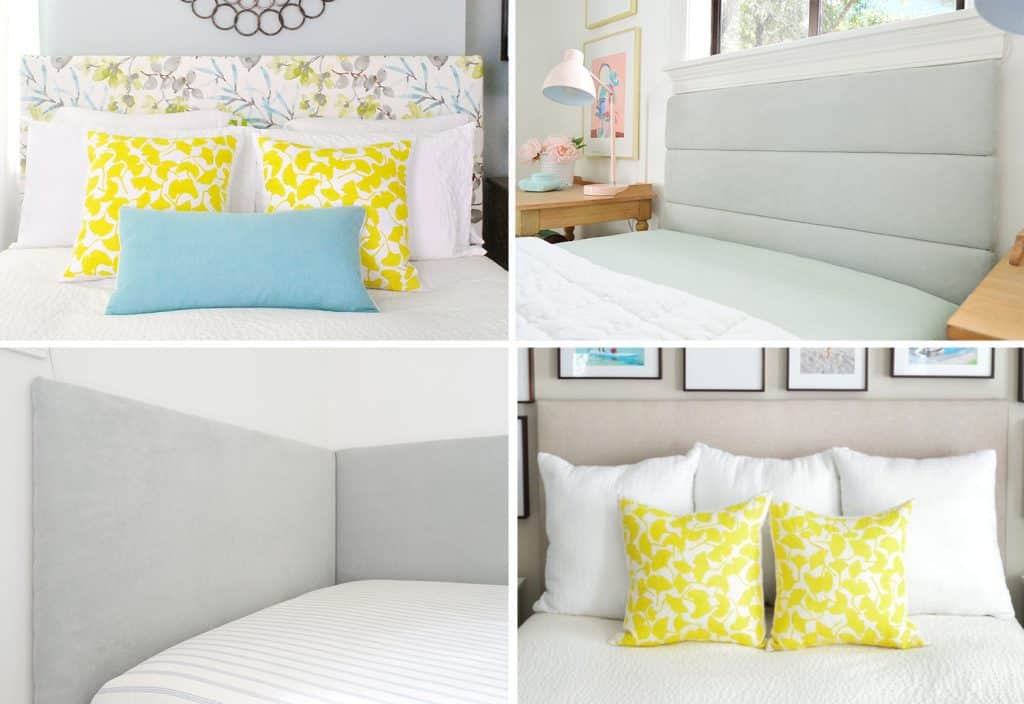
Today we’re going to take you through the step-by-step process to create the first headboard in the grid above (top left). It’s our favorite, classic headboard tutorial. But you can check out more headboard ideas below:
- How to make a channel-tufted headboard (top right)
- How to make a daybed-style headboard (bottom left)
- How to make a wall cleat to hang a headboard (bottom right)
Materials & Tools

Your exact supply list may vary from ours, but generally, this is what you’ll need to make your own upholstered headboard for your bed:
- Fabric of your choosing (we used 2 yards)
- Extra loft batting (we used 4 yards)
- 5/8″ plywood or MDF
- Two or three 1×3″ whitewood boards
- Miter, table, or circular saw to cut your wood (optional)
- Heavy-duty staple gun & staples
- Screwdriver and screws
Why Add A Fabric Headboard?
We wanted to add a headboard because fell out of love with our 4-poster bed (so we cut off the posts!) and wanted something cozier instead. You know, something plush we could lean up against at night. And the short wood headboard that we currently had wasn’t cutting it.
But generally, headboards can add a lot of personality and polish to a bedroom. Bedrooms without proper headboards can scream “college dorm” or “first apartment,” so adding one is a no-brainer upgrade. Plus, depending on the fabric you choose, it can add some bold color and pattern to a room OR add to the restful, zen space you’re trying to create.
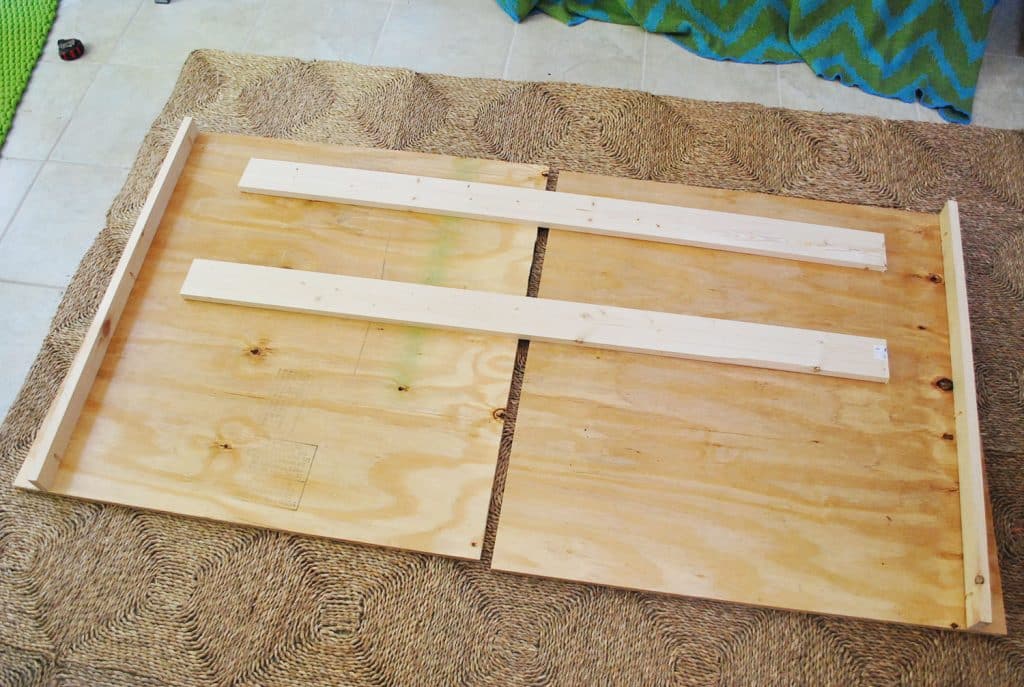
Step 1: Build Your Wood Frame
There are a few ways to create the wood frame for your headboard (including this super lightweight option) but for this particular bed, we constructed a sturdy plywood frame. If you want a simple rectangular design, this step can be as simple as cutting your plywood sheet to size (or having them cut it for you at the home improvement store). For our queen-size bed, we ultimately decided on 65″ wide and 31″ tall. But you can easily customize your dimensions depending on the location or width of your bed.
Ours looked a little more complicated, and I’ll tell you why…
First of all, we were planning to place our DIY headboard around the existing headboard/posts leftover on our Ikea Edland bed. We concocted a plan that would sort of “wrap around” the existing posts, which we mocked up in Photoshop below. But this concept would also work if you wanted to create a popular “winged” headboard look as well.
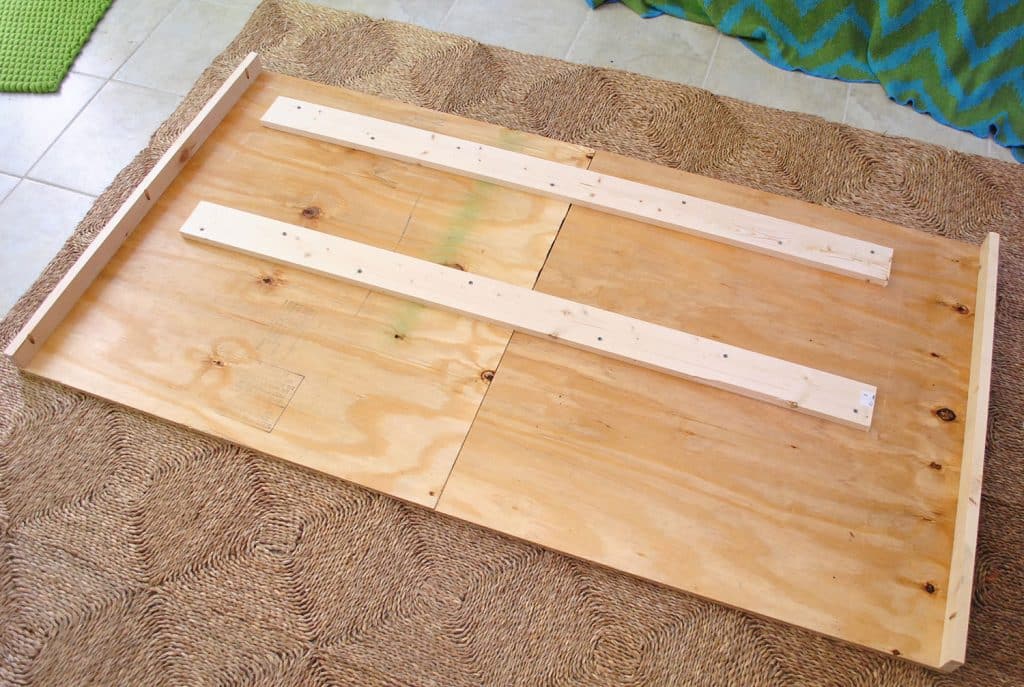
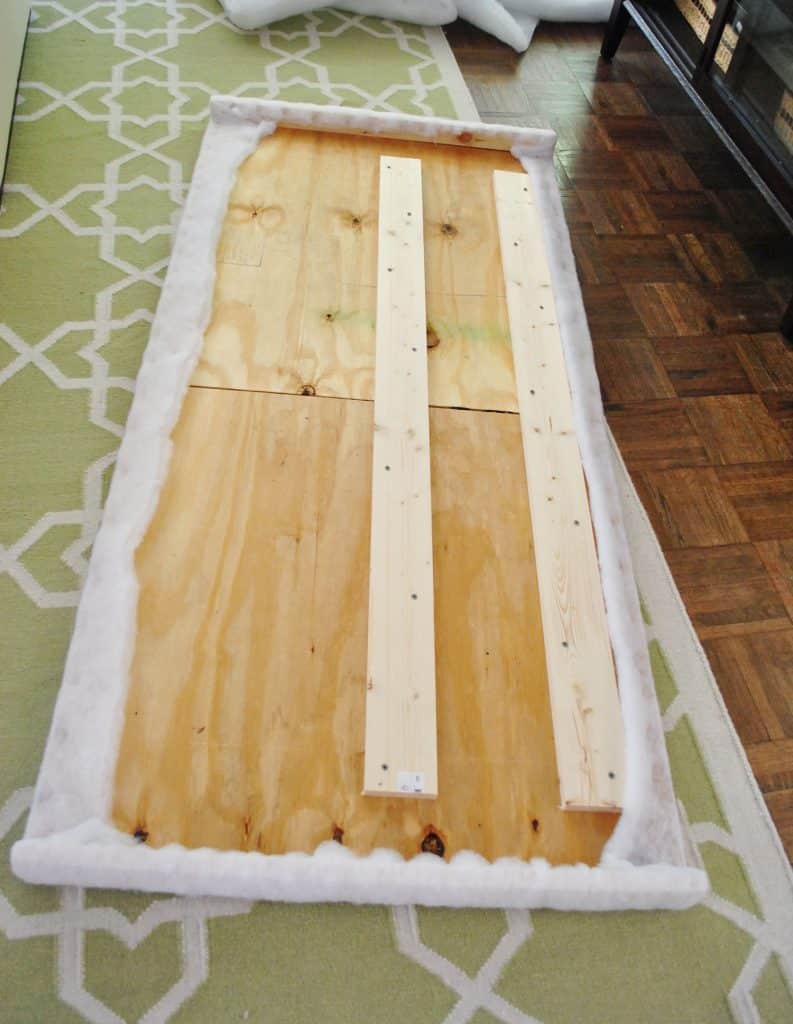
To add these small side pieces, we attached two 1×3 whiteboard boards to each edge using screws drilled into pocket holes we drill using our Kreg Jig. Alternatively we could’ve secured them with wood glue and nails.
The other reason ours was more complicated than a solid sheet of plywood was that we couldn’t fit it in our little car (ha!). So at Home Depot we had them rip it in half, and we reconnected the two halves at home with scrap pieces of whitewood boards. We’re fancy like that!
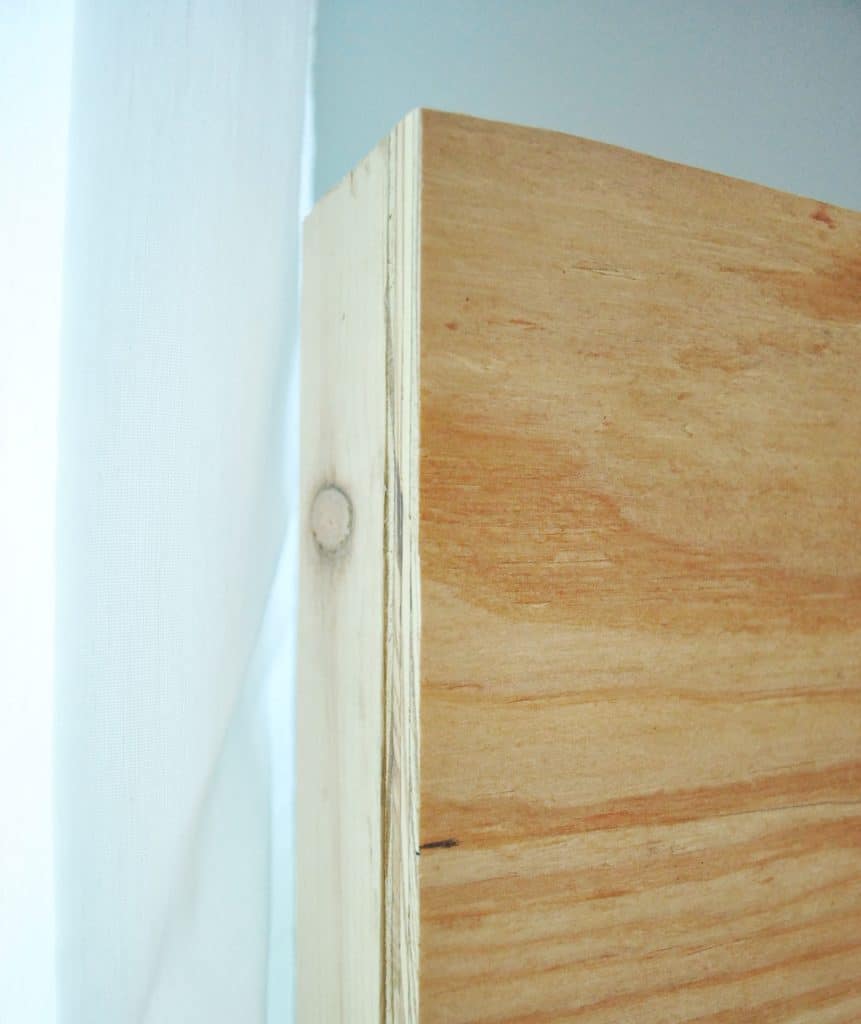
Before proceeding we upholstery, we brought our frame in to make sure it fit around the existing bed frame like we planned. Phew – it did!
You can also now see what that wrap-around piece looks like, and how it hides the existing bedpost. And since we’d soon be upholstering it with fabric, it didn’t matter that the edges were a little raw looking.
Step 2: Add Your Batting Layer
If the carpenter in you trembles at the idea of upholstery, just remember: if you can wrap a present, you can upholster a headboard!
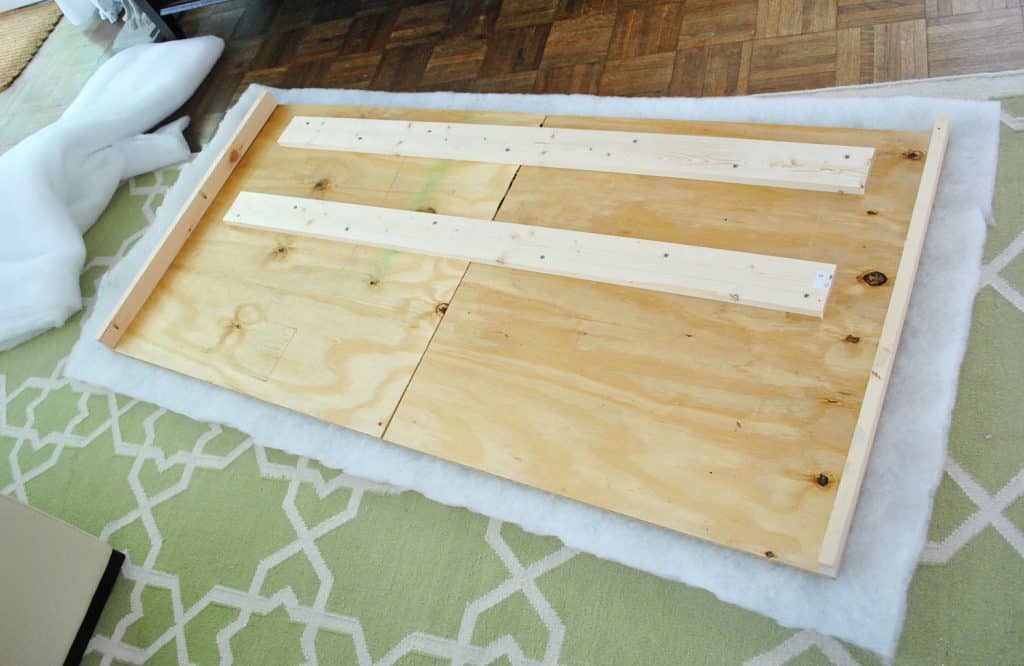
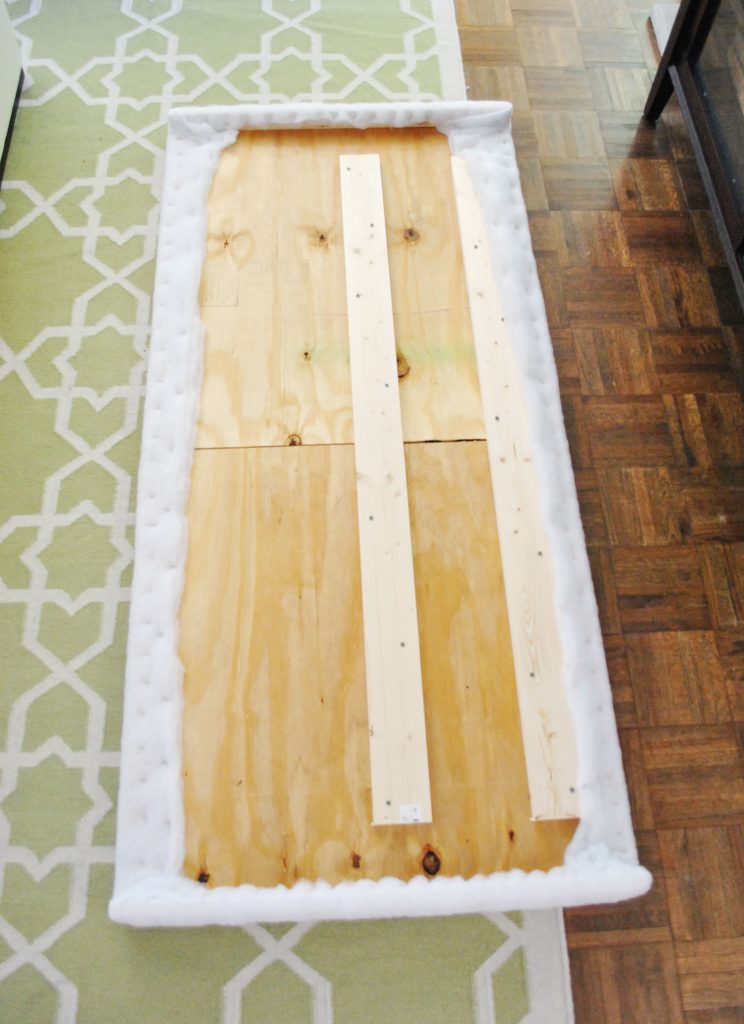
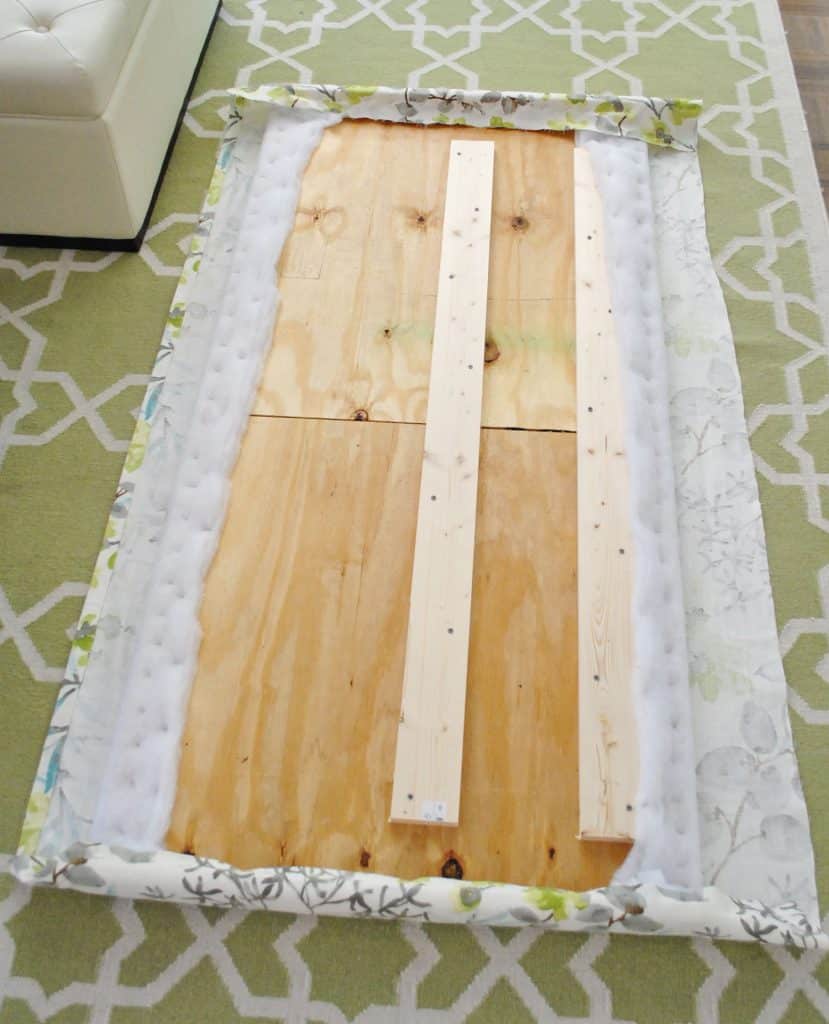
Before adding our fabric, we wanted to first add some padding in the form of extra loft batting. We decided to do two layers so it’d be plenty plush, but still not lose its shape. Sherry trimmed a 2-yard section of batting using regular scissors, laid it on the floor, and we placed our frame on top of it. You’ll want about a 2-3″ overhang on all sides.
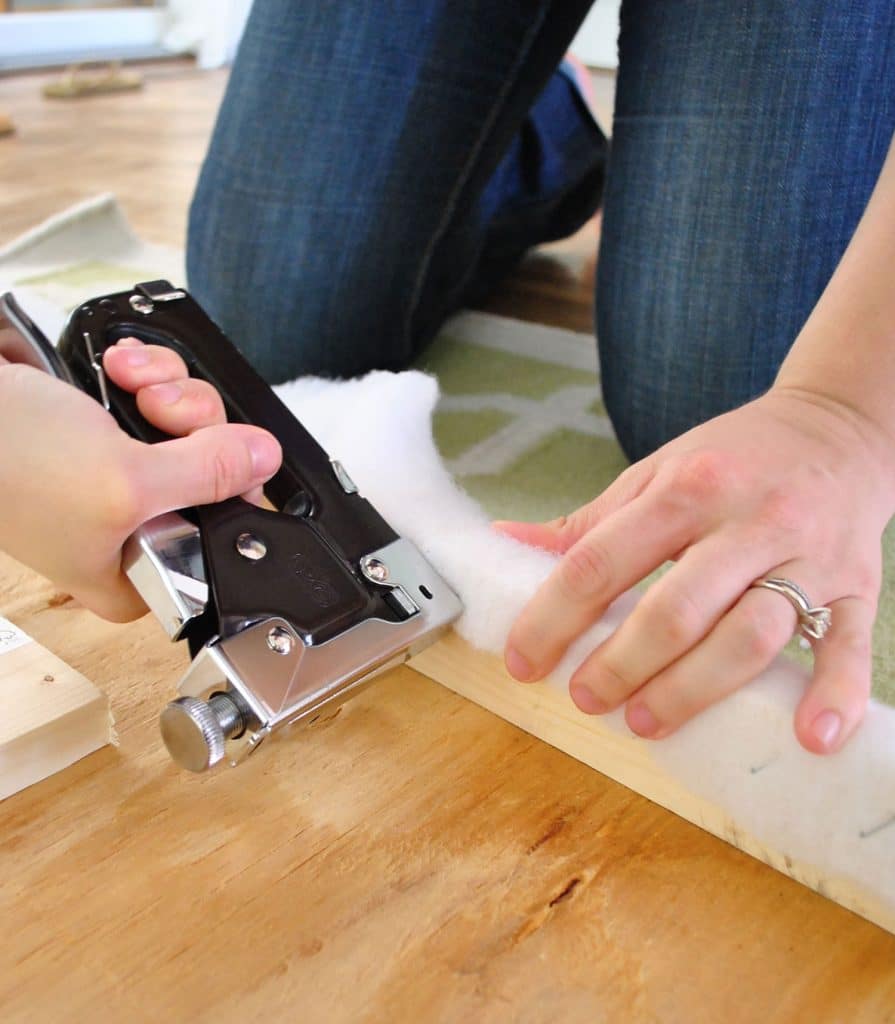
Then we used our staple gun to begin attaching the batting. We just wrapped the batting tightly around the edge and stapled it every few inches.
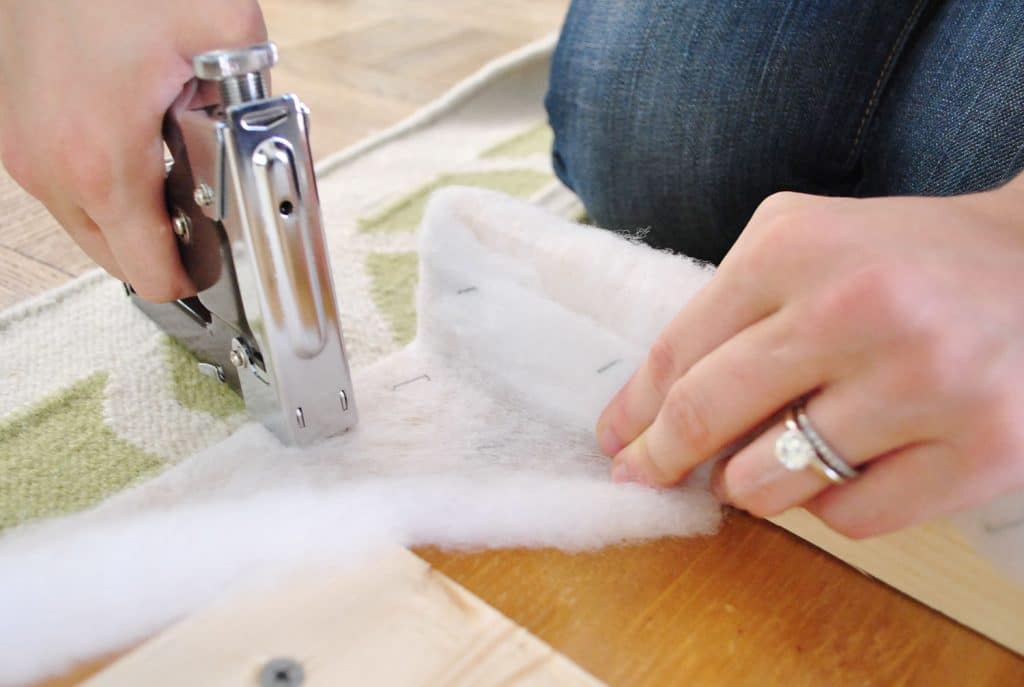
When we came to a corner, it was just like wrapping a present. You just fold it back and staple it so it all looks smooth from the front. Try to pull the batting tight so your corners don’t get too bulky. Bam, bam, bam – it’s done.
We just worked our way around the back of the headboard, stapling away. At some point John made me pose for this awkward photo too. Winning.
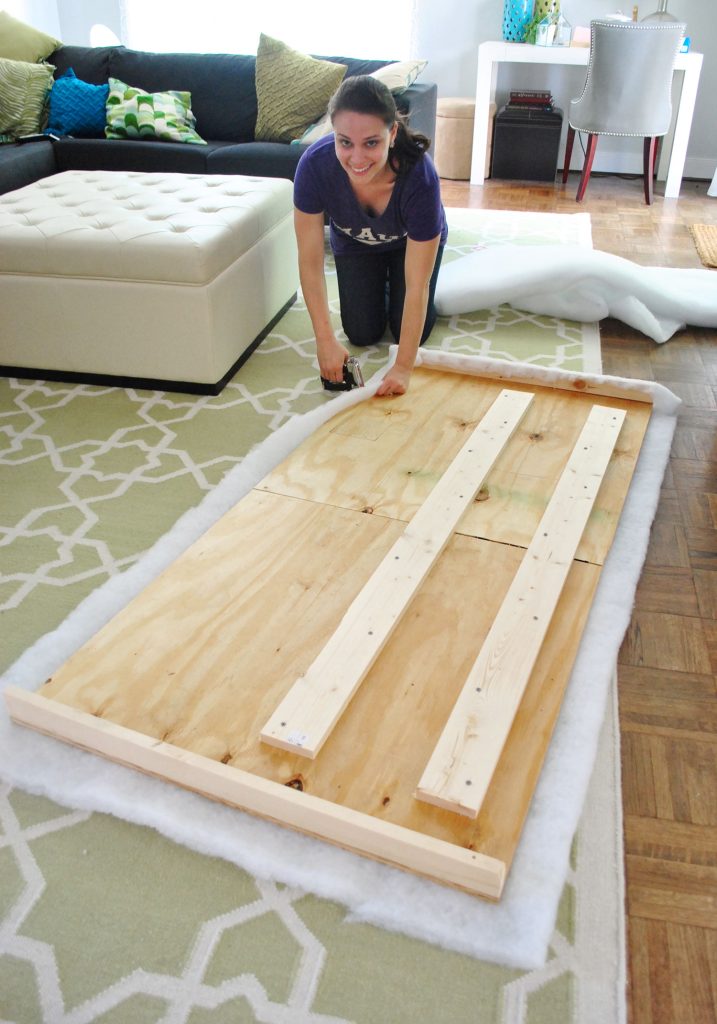
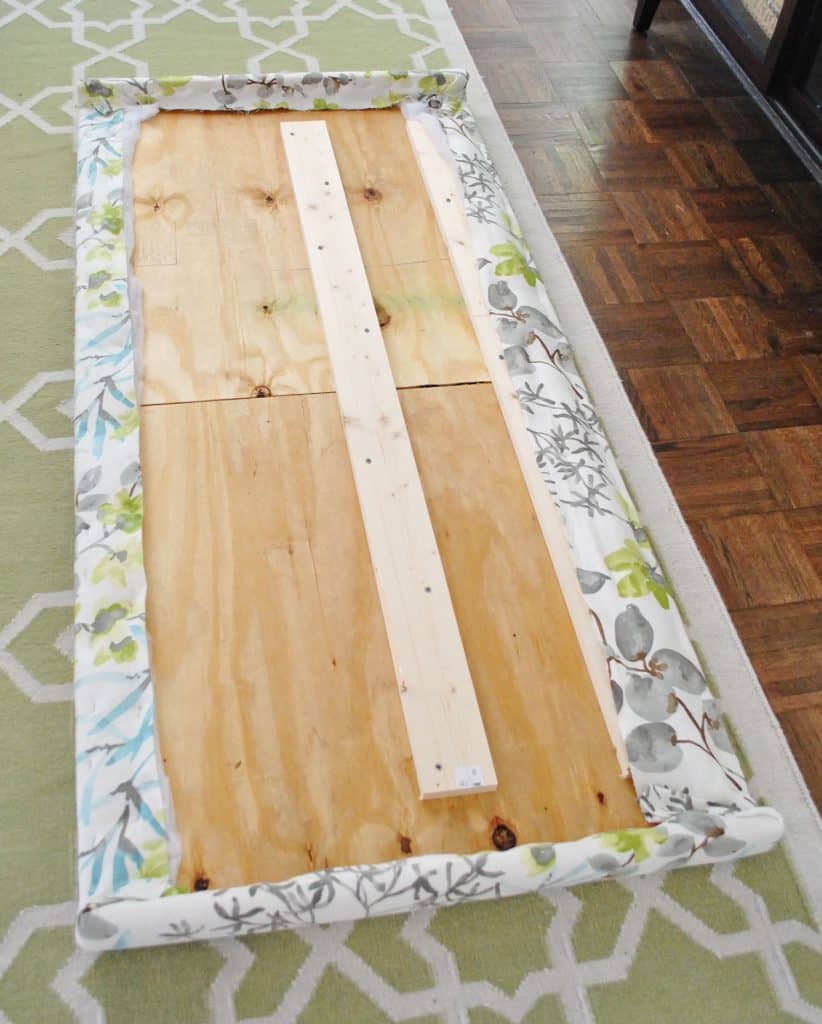
Eventually the whole thing was stapled nice and tightly around the back.
We decided to do a second layer of batting, just repeating this process. Here’ what it looked like with the double-thick batting!
Note: Another option is to use upholstery foam that you attach to your plywood with spray adhesive. We prefer the batting method since it’s easier to wrap around the edges. But if you’re looking for a much thicker, cushier feel – it may be faster to use foam, rather than wrap 4 or 5 layers of batting. Too many layers of batting can also make it difficult to staple into the wood.
Step 3: Staple On Your Fabric
Here’s where the fun really begins. Now you can repeat that process, but with your selected fabric! Just give it a good ironing first to make sure it’s free of creases or wrinkles before you start.
Just like with the batting, we laid it flat on the floor and placed our (now batting-covered) frame on top, making sure it was pulled taut underneath to avoid any wrinkles. Then I trimmed offthe excess fabric around the perimeter, leaving a few inches for it to be wrapped and stapled around the back, just as I had with the batting.
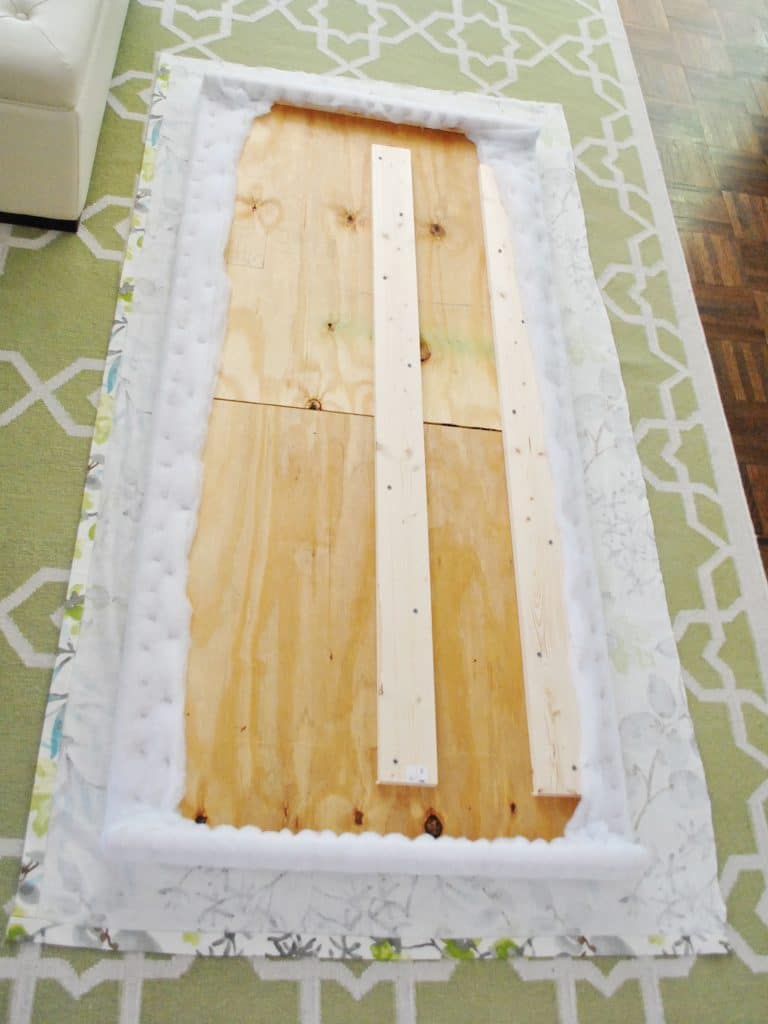
We started by stapling each side, being sure to pull it extra tight so it won’t end up all loose and baggy over time. I started with one side, pulling it all very tightly, then stapled along the opposite side, again pulling it nice and tight.
Once it was secured on those two sides, I did the same thing to keep it secured vertically, by pulling tightly and stapling the top side and pulling it tightly and stapling the bottom side as well.
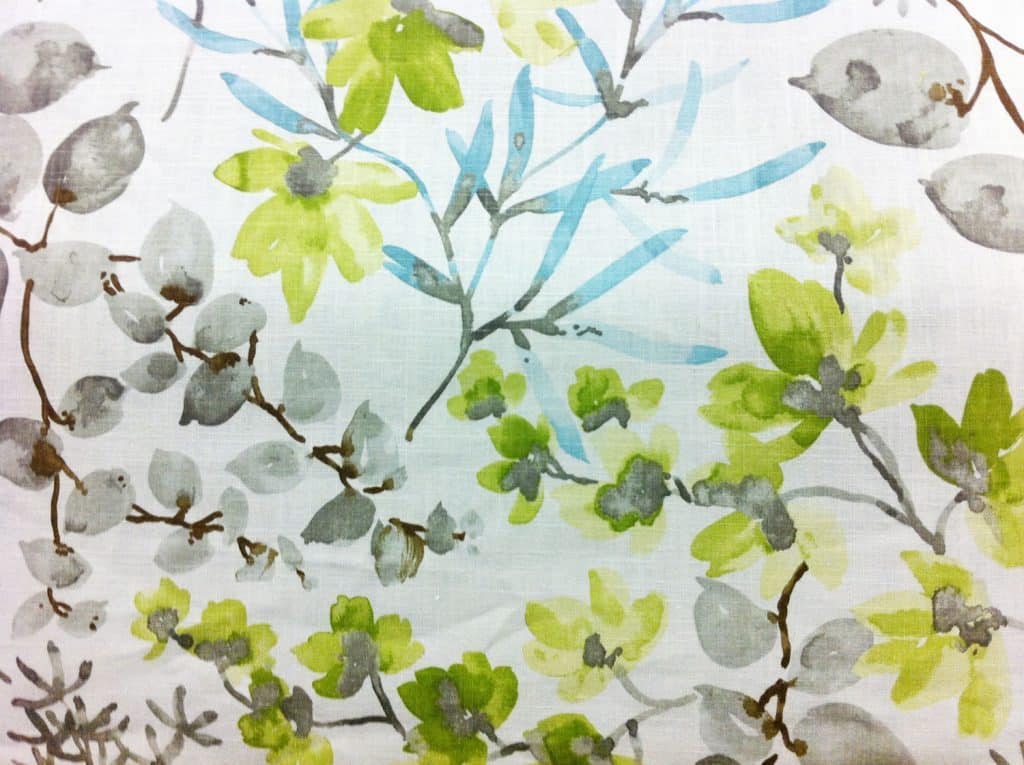
Then we flipped the headboard up to see it in all of it’s plush, tightly upholstered glory. Bing, bam, boom. The whole upholstery step took less than forty five minutes to complete. Is it weird to call it one of my favorite fabric projects to date? I just love love love the pattern.
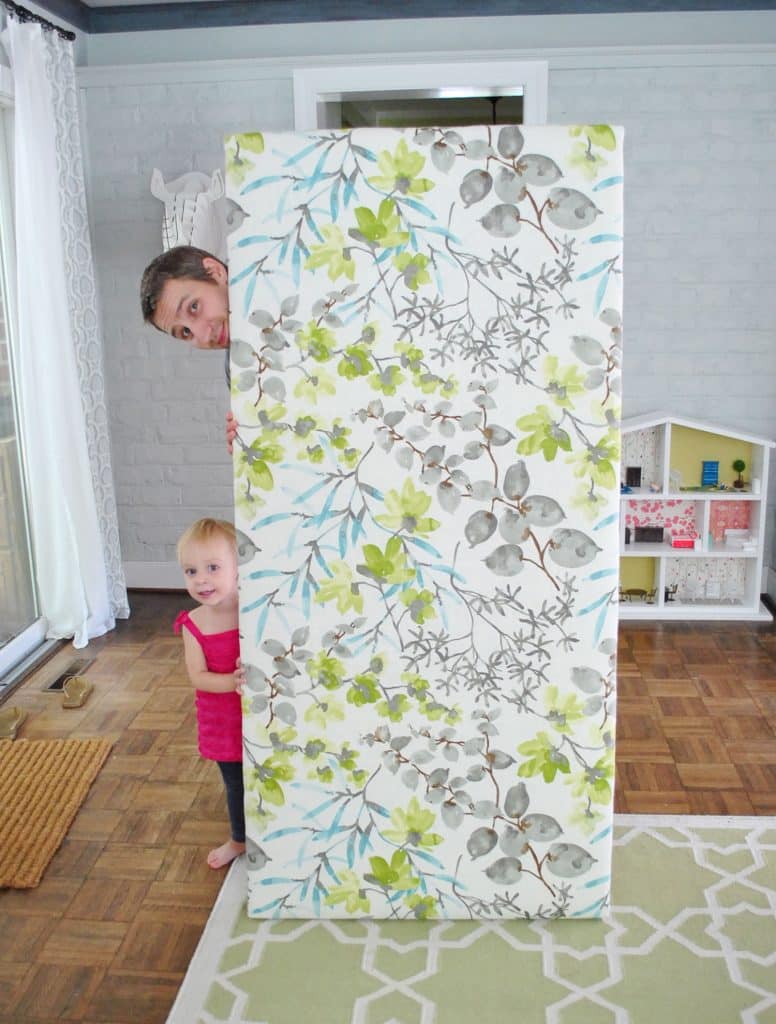
It’s hard to tell above, but in this angle you can get a sense of how plush it is. It’s cushy, but still tight – so we won’t worry about it getting baggy with everyday lounging against it.
Step 4: Hang Your New Headboard
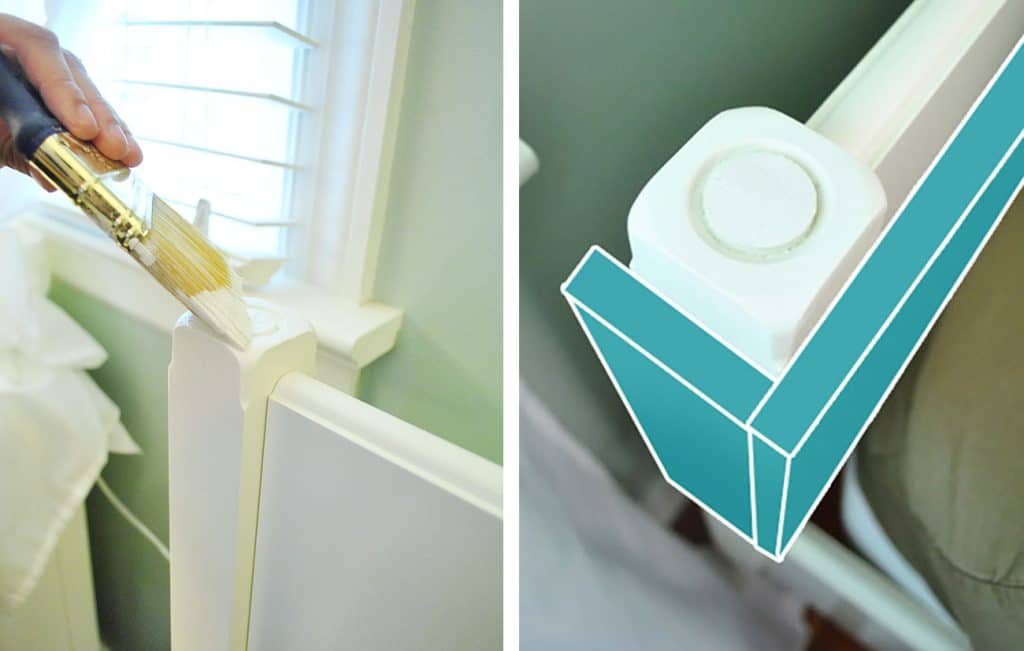
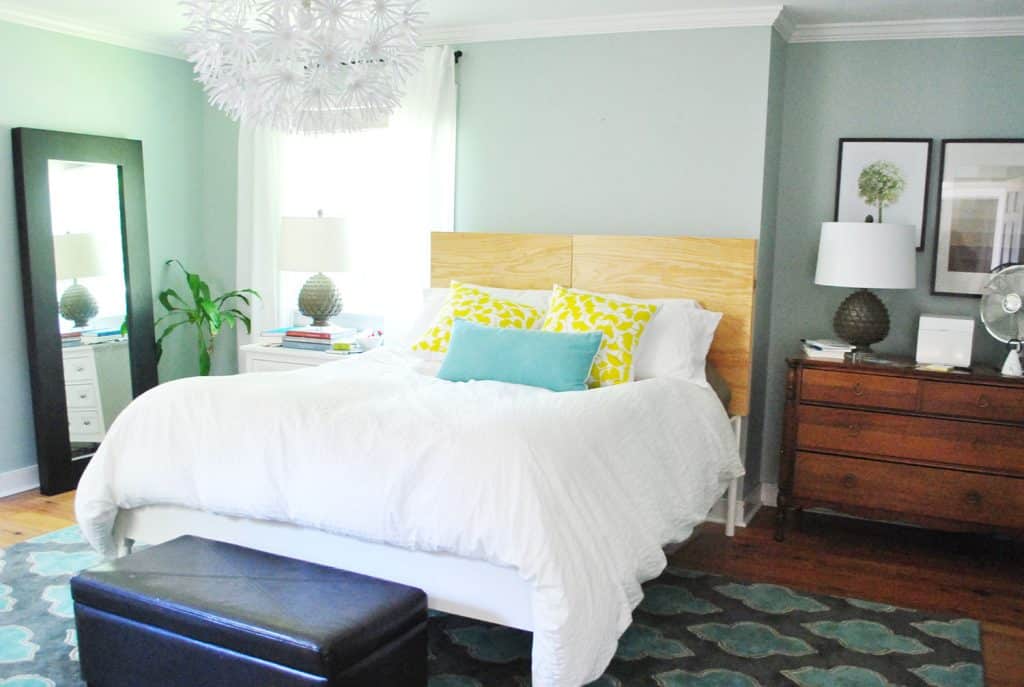
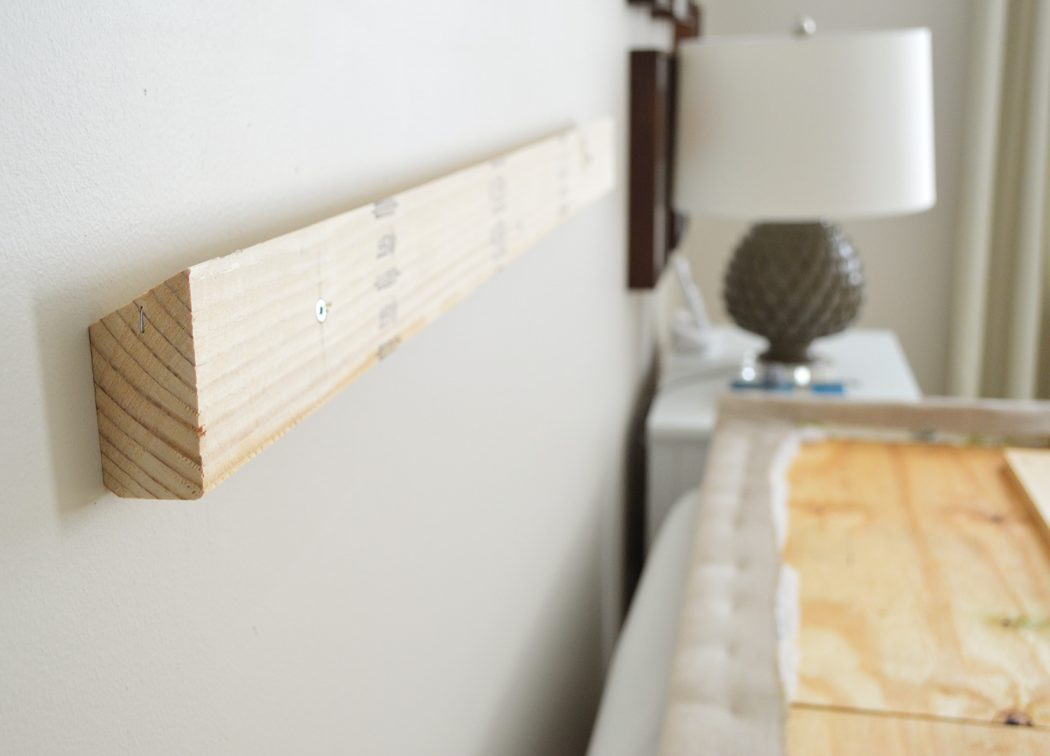
Now you’re ready to attach your headboard to your bed. This can be done in a few ways, depending on your bedframe. When typically like to install a headboard directly into the wall, since it’s often sturdier than attaching it to the bedframe. To do that, usually a french cleat works great. We cover how to DIY a french cleat in this post.
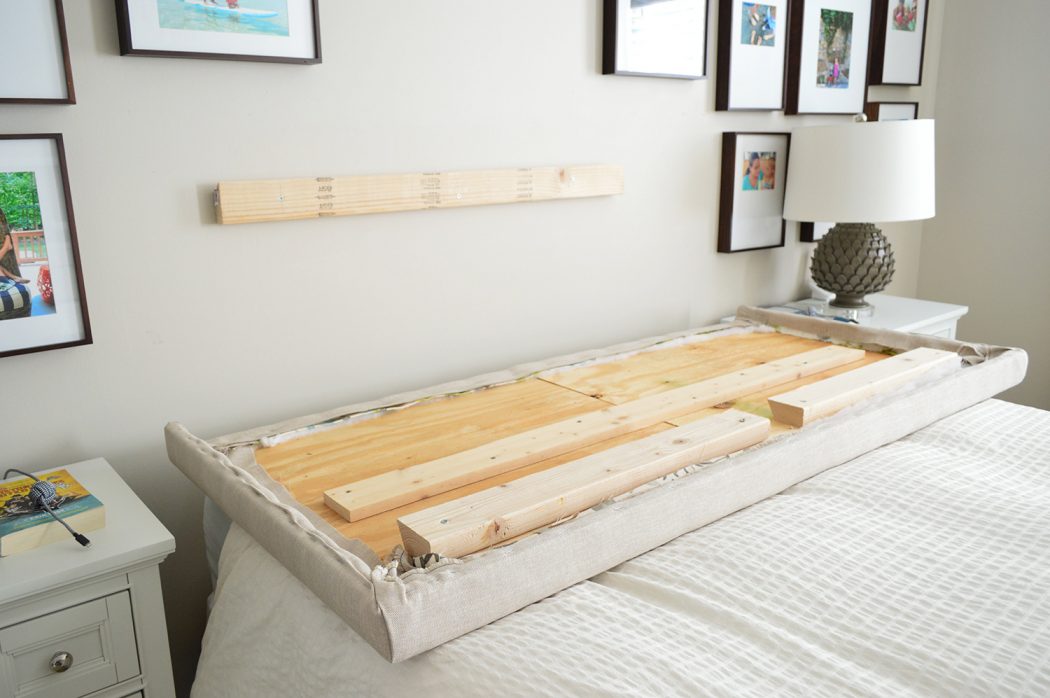
Actually, the headboard pictured above is the same one constructed during this tutorial – a few years later we just updated it for our new home with new fabric and a new top piece (just like we had added the sides pieces in this post). You can see the french cleat below, which is essentially two 2×4″ cut at an angle. One goes on the wall, the other on your headboard. You can also purchase pre-made metal cleats for just a few dollars.
TIP: Try to hang your headboard so it hits the top edge or slightly below the top edge of your mattress, that way there is no gap between the two.
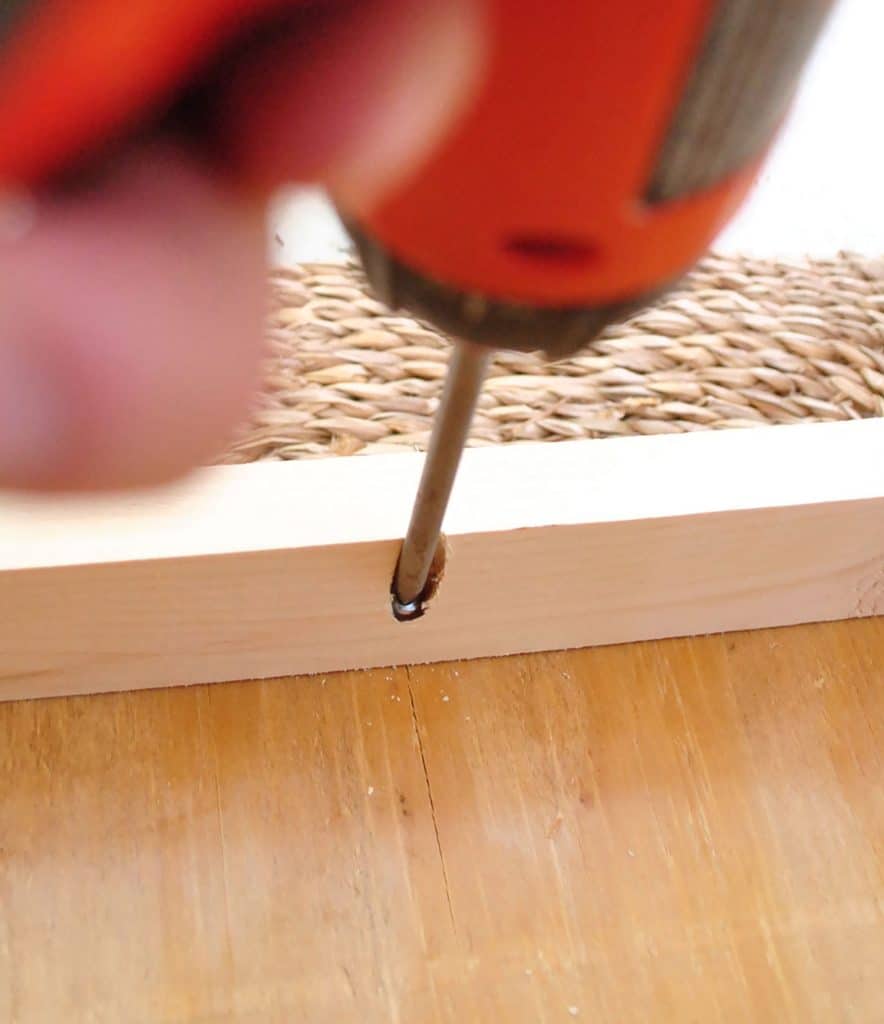
But in the case of our postless-four-poster bed, we chose to screw the new fabric headboard into old wooden one that was part of the existing bedframe, just careful to use screws that wouldn’t poke through the other side.
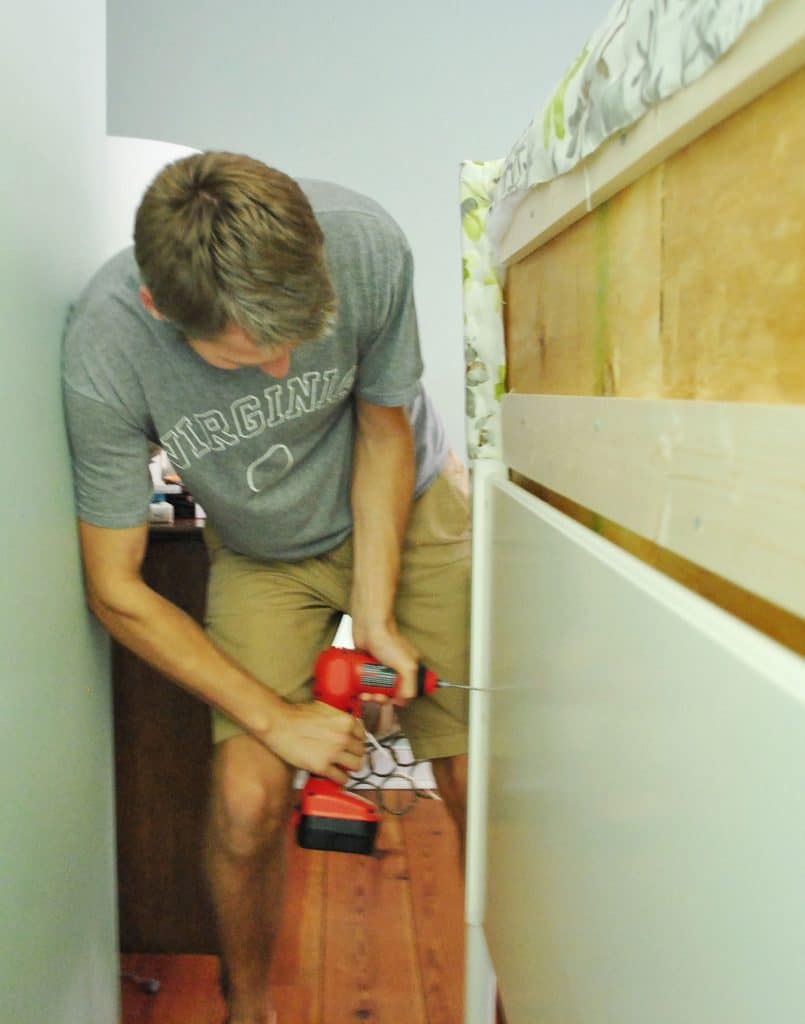
Here’s John putting the final screws in on the backside, pushing the new fabric headboard tight to the bedrame for a snug, secure fit.
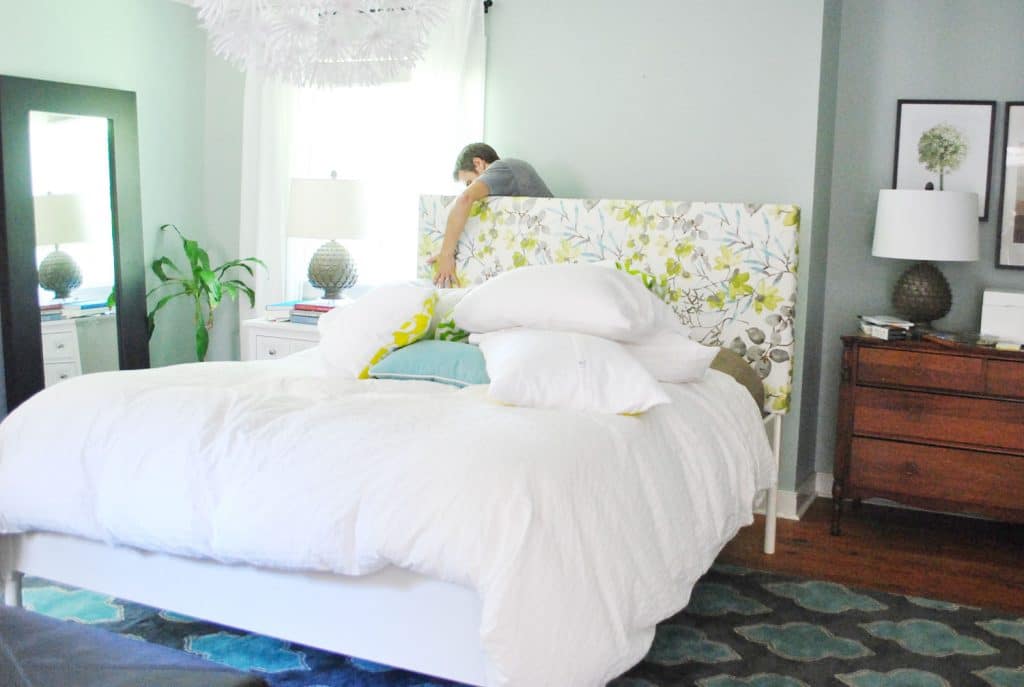
Step 5: Enjoy Your Handiwork
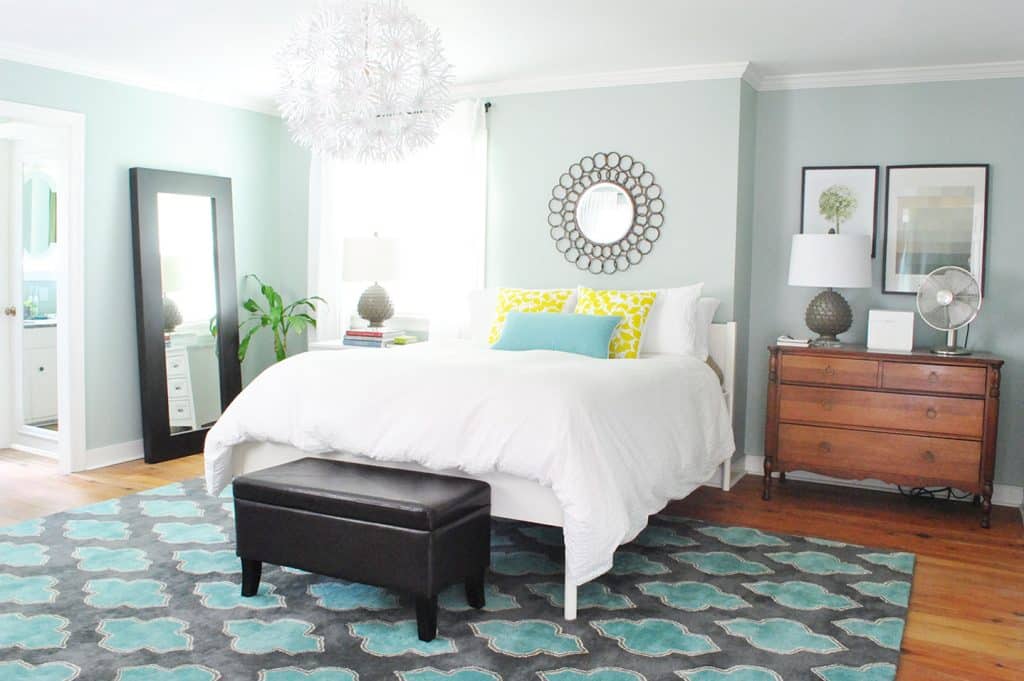
Once it was attached, we just pushed the bed back into place and beamed at it. If only it had been bedtime already that so we could immediately enjoy it’s plushness!
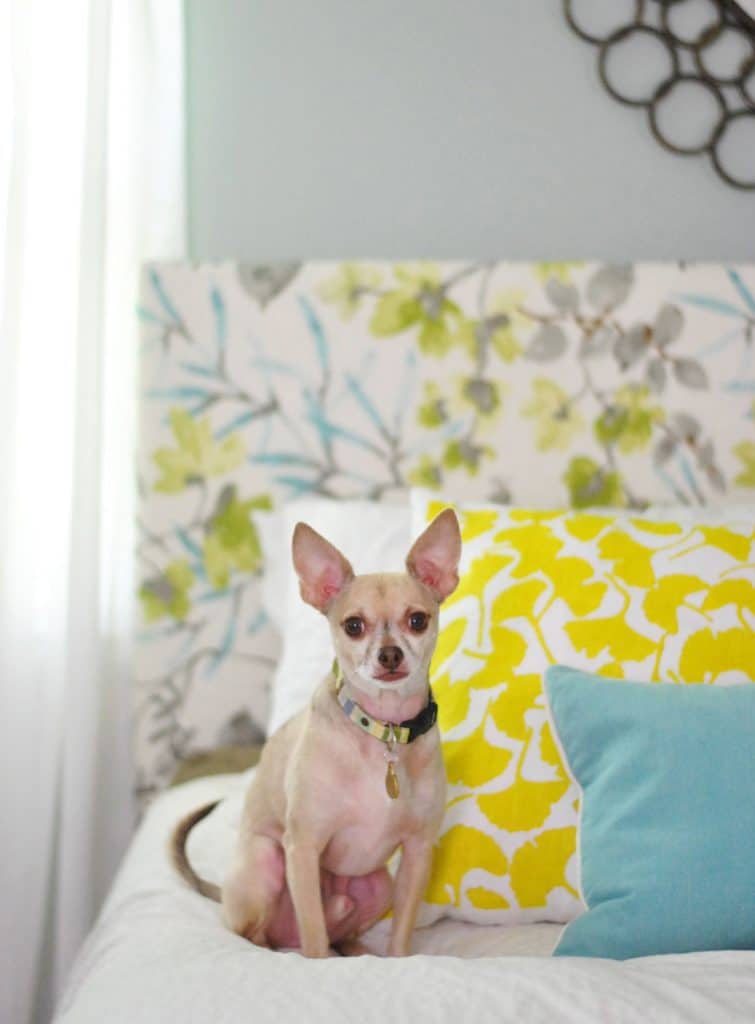
We loved how the fabric is sort of like the bridge between the yellow ginko pillows (since there are greeny-yellow flowers in the headboard fabric) and the turquoise in the rug (thanks to those subtle leafy sprigs of turquoise in the headboard).
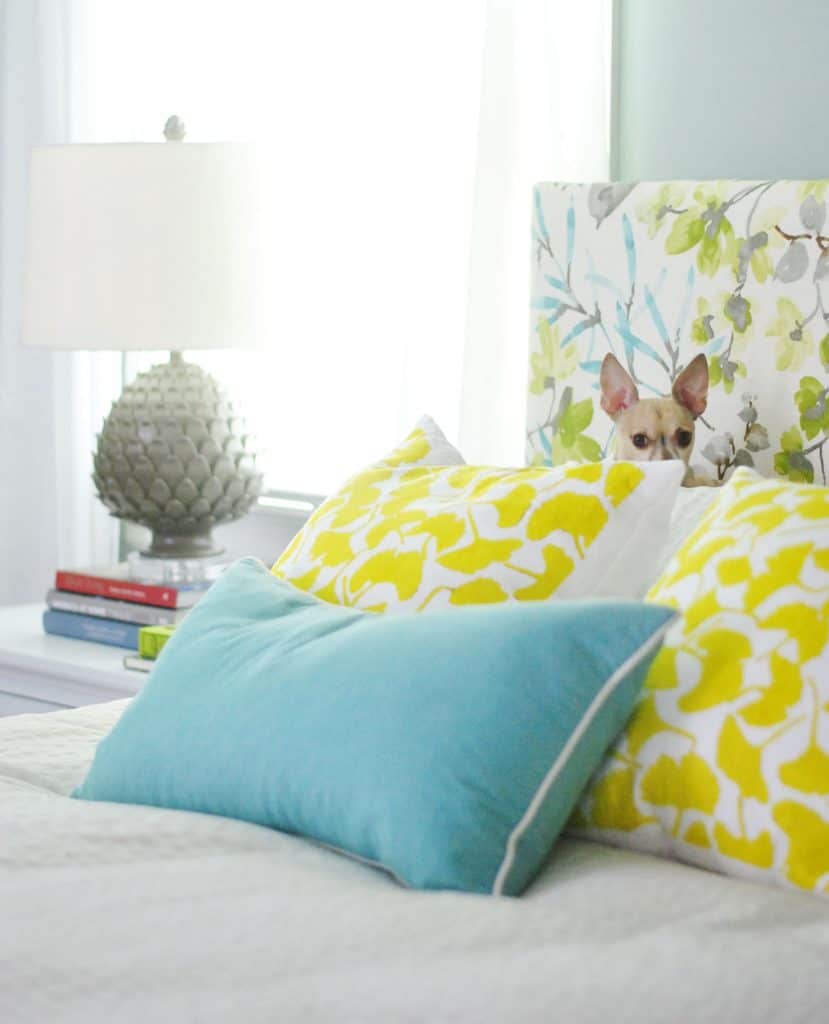
I even think Burger looks especially dapper in front of this new backdrop.
DIY Upholstered Headboard Cost
As for a budget breakdown here we go:
- Wood frame (plywood and some bracing boards from Home Depot): $22
- Two layers of extra loft batting (from JoAnn thanks to a 50% off coupon): $4
- Discount designer fabric (from a local fabric outlet called U-Fab): already owned – but it was originally $20/yard ($40 total)
- Total spent: $66 (if you add in the fabric we previously bought for a book project and reused for this)
Sixty six bucks isn’t pennies, but compared to upholstered headboards that are sold at places like Overstock, it’s at least $100-200 cheaper than even the most basic types. And considering places like Ballard Designs charge around $400-$700 for custom headboards (where you get to pick the fabric) it was awesome to get to choose the fabric and whip this up ourselves.
*This post contains affiliate links, so we may earn a small commission when you make a purchase through links on our site at no additional cost to you.

Elle C. says
Love, love, love the new headboard (and of course, the new room arrangement). But pretty please, don’t stain the dresser! It looks like it has so much history and character, and it “goes” without being matchy-matchy. I know I have no clout with you guys and what you do with your stuff, but I might be willing to name my next kid Burger, or only wear soda shirts for the rest of my life if you leave the dresser.
YoungHouseLove says
Haha, no worries Elle! We promise to give it a ton of thought before doing anything to it! It has remained untouched for this long- so who knows where we’ll end up!
xo,
s
M'lea says
I have a couple tricks for your next upholstery project. If you pre-line the headboard or piece with a neutral cotton or cheap lining fabric you can pull it as tight as you need to, then you don’t have to pull your face fabric as tight. This is helpful so you don’t distort your pattern. Not necessary here just wanted to share the knowledge. Also if you have a huge pattern repeat that you are wanting to center or make sure it stays in the same spot when you turn it over to staple… pin pin pin! Pin it in place and it will not move on ya! Looks amazing and I totally approve on the whole switch-a-roo with the bedroom furniture. Love you guys!! P.s. these are the things I usually do when making cornice boards.
YoungHouseLove says
Great tips!
xo,
s
Patty C says
Love it, love it, love it! It’s beautiful and pulls everything together so nicely. I love the close-up of the chandelier, too. So pretty.
Liz C. says
they did a tufted headboard over at 320 Sycamore: http://www.320sycamoreblog.com/2012/04/diy-tufted-headboard.html
YoungHouseLove says
Pretty!
xo,
s
Kristyn Pankiw says
I love that fabric! I found it on Target a few months ago actually and fell in love with the color scheme–so much in fact, my boyfriend and I are designing his bedroom in the same colors! Here’s the link to the chair I spotted the fabric on: http://www.target.com/p/avington-upholstered-armless-accent-slipper-chair-gazebo-cloud-floral/-/A-13916598
YoungHouseLove says
Love that!
xo
s
Kate says
Hi Sherry — love the fun headboard!
But question, what are the final dimensions of the headboard? Know you cut it down once you tried it out. We’re building a headboard later this month, and I’m stuck to figure out the ratio of bed to headboard. I was thinking that it should extend about 2 1/2 feet above the mattress (and then maybe the first foot is hidden by the pillows). But interested to see your scale.
Thanks!
YoungHouseLove says
Our final measurement was 32″ tall by 65″ wide. Hope it helps!
xo,
s
Kathryn says
I’m just seeing this post now (you miss a lot if you don’t check in for a few days!) but I am absolutely IN LOVE with this headboard. If this was in a store I would snatch it up in a second. The pattern is amazing, it ties in your colors (and my fave colors) so well, and it makes a huge difference. Wow! Great job!
YoungHouseLove says
Aw thanks so much Kathryn!
xo,
s
Janette Diaz says
It is probably just me, but I think the wooden dresser to the right of the bed would look great in a shade of grey.
YoungHouseLove says
Always another possibility!
xo,
s
Stephanie says
I was browsing around for pillows for my living when I spied this little guy: http://www.etsy.com/listing/101306006/mod-linen-watercolor-floral-lumbar
The same fabric as your headboard! …Thought I’d send it along in case, even though you already have a traveling hoard of pillows :)
YoungHouseLove says
No way! I love it!
xo,
s
Holly says
Really pretty!
tosha says
love love – that fabric is *perfect* – like another commenter already noted, it’s elegant but happy. Just lovely. Also, here’s one more vote for not staining the dresser or the floors – I think the red in the dresser is so lovely
Jess says
Hey Sherry and John! Quick question, I want to recover my king size upholstered headboard but all the fabric I fall in love with doesn’t seem like it’s wide enough. How do you get fabric that fits?
Everyone is telling me to find a flat sheet but I can’t seem to find one I like enough. I even tried a huge fabric showed curtain but it was still a tad bit short.
Thanks for the help!
YoungHouseLove says
Hmm, that’s tough. I would go to a fabric store and see if they sell extra wide yardage (some upholstery fabric is thick enough and then you can have enough yards lebgthwise to cover it). Good luck!
xo,
s
Jill Browning says
Your bedroom looks super awesome now with the new arrangement. I also love how the lighter woods of the dresser and floor balance the black/dark brown? of the mirror and bench. Well done!!
Stacey says
Just got done making this last night! It looks awesome thanks for the tutorial!!
YoungHouseLove says
Yay! So glad!
xo,
s
Katherine says
Hi, I know you said that the fabric was deep discount, but do you have any clue what it’s called or who manufactures it? I’m on the hunt for fabric and love what you used!
Thanks!
YoungHouseLove says
Yes, it’s in the post! It’s by Braemore, called Gazebo in colourway “Cloud” – which was $20 a yard from a local fabric outlet called U-Fab. Hope it helps!
xo,
s
Christine B. says
Love your headboard. Can you tell me what paint colour you used on your walls? I LOVE it.
YoungHouseLove says
Sure, it’s called Carolina Inn Club Aqua by Valspar.
-John
Jenny says
This whole room is just too beautiful for words! You inspire me everyday with this blog. Major fandom over here!
YoungHouseLove says
Aw thanks Jenny!
xo,
s
Katie says
So, I was just browsing Targets chairs and think I found one that matches your new headboard material. I thought it looked familiar! Wasn’t expecting that! :)
http://www.target.com/p/avington-upholstered-armless-accent-slipper-chair-gazebo-cloud-floral/-/A-13916598
YoungHouseLove says
No way! That is the exact fabric.
-John
Jeremiah says
I was wondering where you got your mirror in your room or did you make it? I have been looking for a mirror like that, but haven’t found one that isn’t very expensive. let me know. thanks
YoungHouseLove says
That was from Hobby Lobby during a 50% of sale. It was really cheap!
xo,
s
Tonya says
I agree the darker wall color looks better. Warms up the room and makes it appear more cozy and a classier richer feel.
Sarah says
Where did you get that rug. Amazing.
YoungHouseLove says
Thanks! It was from a local outlet here in Richmond called The Decorating Outlet for $250 since it had a small hole that we repaired, but I think shadesoflight.com sells it too!
xo,
s
danielle says
Hi,
I was just wondering where did you get your rug? I love the pattern and it looks soft.
Thanks!
YoungHouseLove says
Thanks! It was from a local outlet called The Decorating Outlet here in Richmond but we hear that shadesoflight.com sells it too!
xo,
s
Jag says
Love the entire bedroom. Where did you find the gray and teal rug? It really grounds the room.
YoungHouseLove says
Just scroll back a comment for that info! Hope it helps.
xo,
s
Shanti says
WOW! Amazing! I can’t even begin to tell you how beautiful this looks. I am an interior designer and ppl always commment on my house and how great its coming together, but I am wayyyyyyyyyy jealous of your bedroom! I LOVE your usuage of colors, patterns and textures! It all fits SO nicely. I am on my way here soon to start my DIY headboard project as well. Looking forward to finally tacking that. I think once I get that, and a rug our bedroom will feel as complete as yours does!
Kate Malkiewycz says
Just a thought about the dresser. I haven’t read all of the comments so apologies if it’s been talked about or you’ve agreed apron something. You could perhaps paint the drawers with colours that tie into the headboard and cushions? You could do three different tones of green, yellow or blue ( I.e. full strength one drawer, half strength the next, quarter strength the other etc, etc.) Or you could perhaps paint each drawer in the different colours of the headboard.
I don’t normally comment but when I came upon your headboard and blog from pinterest I couldn’t help but feel excited and share my thoughts!
Thank you for a great blog!
YoungHouseLove says
That’s another fun idea!
xo,
s
Ashley Spence says
I love everything about this room! Beautiful! As soon as our new floors are installed I am using your detailed tutorial to make the headboard. Would you mind telling me the name of the paint color used in the room? And the rug? It’s stunning!!
YoungHouseLove says
Thanks! The rug is from a local outlet (The Decorating Outlet) in Richmond and the paint color is Carolina Inn Club Aqua by Valspar.
xo,
s
Beth says
Beautiful! My favorite colors:) may I ask where you got that amazing rug? The turquoise and slate one?
YoungHouseLove says
That’s from a local outlet called The Decorating Outlet. Hope it helps!
xo,
s
Mollie says
Very cute! Can you please tell me where you got your green and white rug? Looking for something just like that!
YoungHouseLove says
That was from jossandmain.com a while back. Hope it helps!
xo,
s
Maria says
I love your style…it’s my style. You are amazing at executing these projects with such charm and your choice of color is always refreshing. Congrats on the house, the love, the family, and your joy of all things DIY.
Hillary says
OK, so I LOVE your blog, I get so much design inspiration from you guys. I am having the hardest time finding an area rug that I like and then I saw yours ( the green one in the living room and the one in this bedroom) Where did you guys get them? Have any good tips on where to find good looking yet inexpensive area rugs? Thank you!!
Hillary says
aaahhhh, just saw the few comments above mine…question answered!!
YoungHouseLove says
So glad.
xo,
s
Cherie says
I love the rugs in both pictures, but especially the green one. Mind sharing where you got these from?
YoungHouseLove says
That’s from jossandmain.com a while back and the one in the bedroom is from a local outlet called The Decorating Outlet.
xo,
s
Miki says
THANK YOU! You have no idea how long I’ve been mulling a project like this over and I always land on “too complicated” (I am not too crafty). I think that with the help you just gave me, hubs and I can pull this off tomorrow. Bless you. I’ll send a picture!
Teri dunn says
Hi There,
Love what you’ve done in your bedroom….
You don’t happen to remember the paint colour do you.
Love it the way it is… don’t change it :)
Cheers,
from canada
Teri dunn says
never mind saw the colour cheers.
Teri
Preethi says
Hey there, that bedroom of yours look awesome.i just loved ur turquoise rug:). Even the other green rug with the pattern looks fab.great job.from where did u buy those rugs,plzz let know.coz we bought a new house and design planning is in progress.thank you. Xoxo:)
YoungHouseLove says
Just scroll back in the comments for that info. Hope it helps!
xo,
s
Cindy says
The headboard looks awesome. How did you remove the post on the bed frame? I have a bed that I would like to remove the posters. Thanks Cindy
YoungHouseLove says
We wrote about it in our archives so it should come up if you search: Ed bed posts dremel. The quick answer: we cut them clean off with a Dremel Multimax. Hope it helps!
xo,
s
Cricket says
Random but where is the green area rug from? The one in the shots where you assembled the headboard. Thanks:D
YoungHouseLove says
That’s from jossandmain.com. Hope it helps!
xo,
s
orangesugar says
I would have to say I’m in love with the headboard (http://orange-sugar.blogspot.com/2012/01/diy-diamond-tufted-headboard-with.html) I made. It’s diamond tufted with nailhead trim. The only downside is I can’t see enough of it because of our angled ceilings.
YoungHouseLove says
Pretty!!
xo,
s
Lynn says
This is beautiful!! I love your room. This is a funny question but where did you get your green and white patterned rug where the project was photographed? Love it!!!
Thanks so much!!
YoungHouseLove says
That was from jossandmain.com a while back. You might also want to try wayfair.com and overstock.com. Good luck!
xo,
s
karon says
Where did you get the rug in your bedroom…LOVE it!!!
YoungHouseLove says
Aw thanks! It’s from a local outlet called The Decorating Outlet here in Richmond, but we hear they’re sold at other places like Shades of Light too. Hope it helps!
xo
s
Dea Win says
Awesome! I love this it is so pretty and don’t seem too complicated!
Lindsay says
Your room looks amazing! I love it! I am also sooooooo in love with both of your rugs….the green one and the gray and turquoise. Where are they from? I need one for my entryway.
YoungHouseLove says
Aw thanks! The bedroom one is from a local outlet called The Decorating Outlet and the one in the living room is from Joss & Main.
xo
s
robyn gardner says
I absolutely LOVE this. I am in the process of working my way through my entire house updating, remodeling and in general refreshing. I started with my master bath and bedroom and just finished a gorgeous diamond tuft upholstered headboard, window valances, and I’m building the bed bench (that will be the same fabric and diamond tufted as well) this week. I also did a bedskirt in the same fabric, but made it extremely tailored with box pleats to offset all of the ‘cushy’ in the diamond tufting. The headboard I wanted was $2600 and I built what appears to be the exact same one for $90. I was VERY happy with it!!
YoungHouseLove says
So glad!
xo
s
Crystal says
You’ve probably already noticed but the fabric you used on your headboard is shown as curtains in the October issue of BHG magazine pages 65-70 and there is also an amazing upholstered chair on Target.com with the same fabric. You really know how to pick ’em! http://www.target.com/p/avington-upholstered-armless-accent-slipper-chair-gazebo-cloud-floral/-/A-13916598#?lnk=sc_qi_detaillink
YoungHouseLove says
That’s so funny about the curtains in BHG! Hadn’t seen that yet! Love it.
xo
s
Tish says
I really hope you reply to me….. I have been looking for a rug like the one in your living room. Please tell me where it came from! Thanks so much
YoungHouseLove says
That’s from jossandmain.com about a year ago. Maybe try overstock.com or wayfair.com?
xo
s
Jennifer says
I just saw this fabric in October’s Better Homes and Gardens. Someone had used it for curtains. I thought I recognized it so I had to come check!
YoungHouseLove says
So funny!
xo
s
Christina S. says
Where did you get the paint color on the walls now?
YoungHouseLove says
That’s Valspar’s Carolina Inn Club Aqua. Hope it helps!
xo,
s
Lauren says
Hi Petersiks! I’m a few months behind you guys with my headboard adventures and decided to revisit this post of yours in hopes for some inspiration (and motivation) to finally get my headboard project underway. I have been handed down a beautiful headboard that has a mahogany frame with a fabric panel desperately in need of an update. My current bedspread is the palm leaf duvet by west elm (http://www.westelm.com/products/palm-leaf-duvet-shams-b818/) and I would love to find a fabric that adds some color but isn’t too overwhelming. Do you all have any suggestions for finding the fabric?? I know you all love U-fab, but unfortunately I’m up in Arlington so that would be a bit of a trip for me.
YoungHouseLove says
Hmm, I would just recommend bringing home swatches (they’re usually free at fabric stores) to hold up to your duvet and see what looks good. Generally going with a pattern that’s noticeably bigger or smaller than your duvet should work (something of a similar scale could compete). Good luck!
xo
s
Lauren says
Thanks for the advice!! Hopefully my room will turn out as beautiful as yours! :)
YoungHouseLove says
Good luck Lauren!
xo
s