Adding a headboard to your bed is one of the best ways to add polish and coziness to your bedroom. And, lucky for you, making your own DIY upholstered headboard is super easy and affordable (ours only cost $66!). This means you can customize the fabric, size, and design to get exactly the look you want. Believe us, we’ve done A LOT of them over the years!
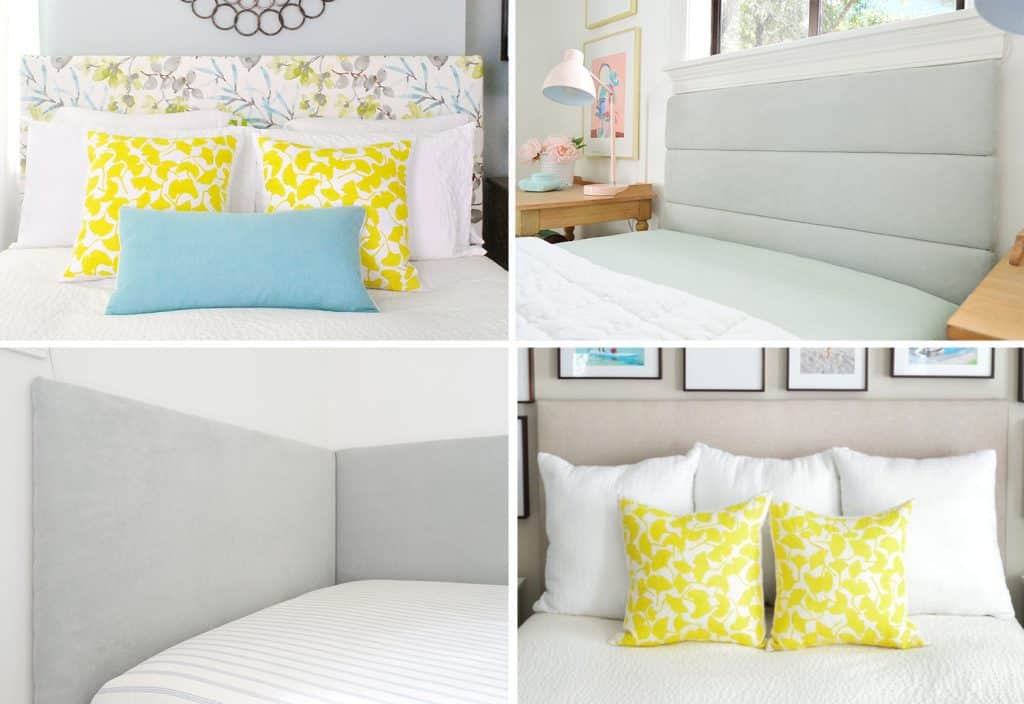
Today we’re going to take you through the step-by-step process to create the first headboard in the grid above (top left). It’s our favorite, classic headboard tutorial. But you can check out more headboard ideas below:
- How to make a channel-tufted headboard (top right)
- How to make a daybed-style headboard (bottom left)
- How to make a wall cleat to hang a headboard (bottom right)
Materials & Tools

Your exact supply list may vary from ours, but generally, this is what you’ll need to make your own upholstered headboard for your bed:
- Fabric of your choosing (we used 2 yards)
- Extra loft batting (we used 4 yards)
- 5/8″ plywood or MDF
- Two or three 1×3″ whitewood boards
- Miter, table, or circular saw to cut your wood (optional)
- Heavy-duty staple gun & staples
- Screwdriver and screws
Why Add A Fabric Headboard?
We wanted to add a headboard because fell out of love with our 4-poster bed (so we cut off the posts!) and wanted something cozier instead. You know, something plush we could lean up against at night. And the short wood headboard that we currently had wasn’t cutting it.
But generally, headboards can add a lot of personality and polish to a bedroom. Bedrooms without proper headboards can scream “college dorm” or “first apartment,” so adding one is a no-brainer upgrade. Plus, depending on the fabric you choose, it can add some bold color and pattern to a room OR add to the restful, zen space you’re trying to create.
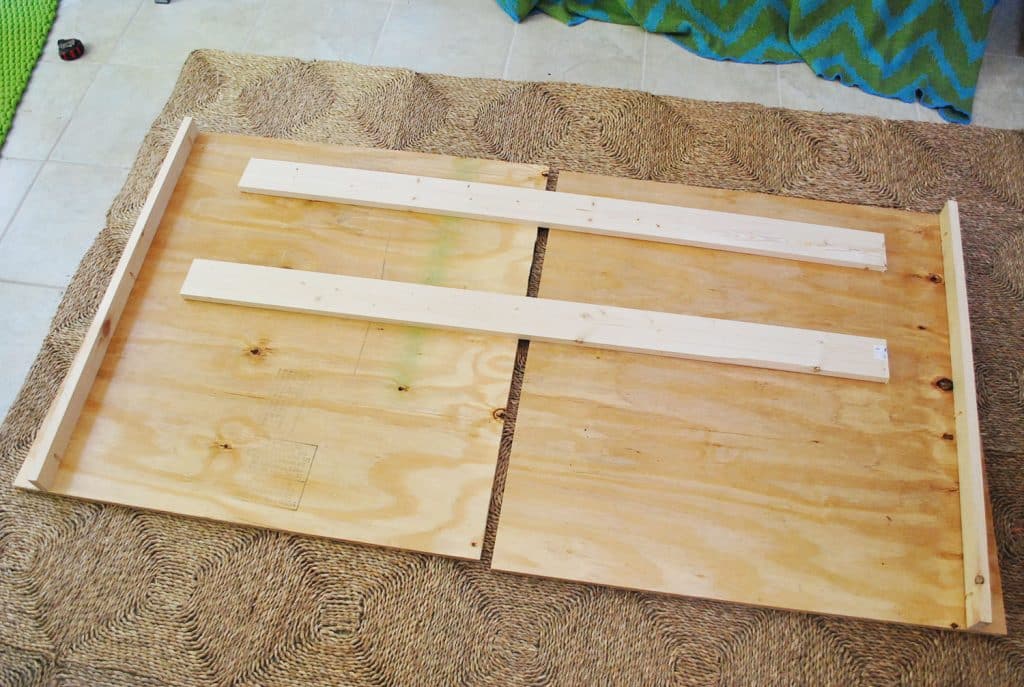
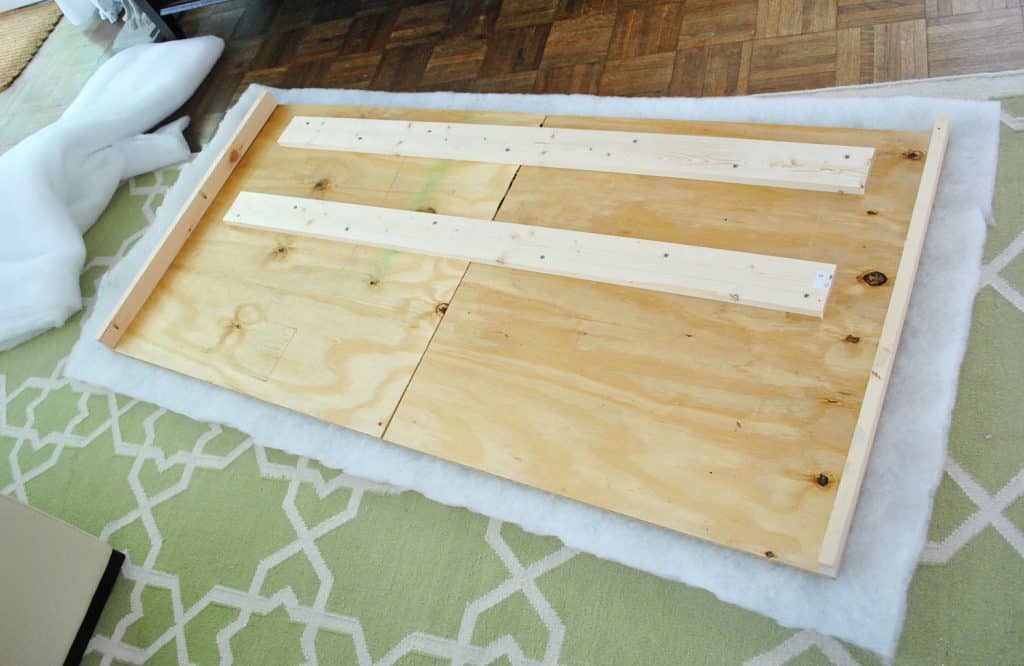
Step 1: Build Your Wood Frame
There are a few ways to create the wood frame for your headboard (including this super lightweight option) but for this particular bed, we constructed a sturdy plywood frame. If you want a simple rectangular design, this step can be as simple as cutting your plywood sheet to size (or having them cut it for you at the home improvement store). For our queen-size bed, we ultimately decided on 65″ wide and 31″ tall. But you can easily customize your dimensions depending on the location or width of your bed.
Ours looked a little more complicated, and I’ll tell you why…
First of all, we were planning to place our DIY headboard around the existing headboard/posts leftover on our Ikea Edland bed. We concocted a plan that would sort of “wrap around” the existing posts, which we mocked up in Photoshop below. But this concept would also work if you wanted to create a popular “winged” headboard look as well.
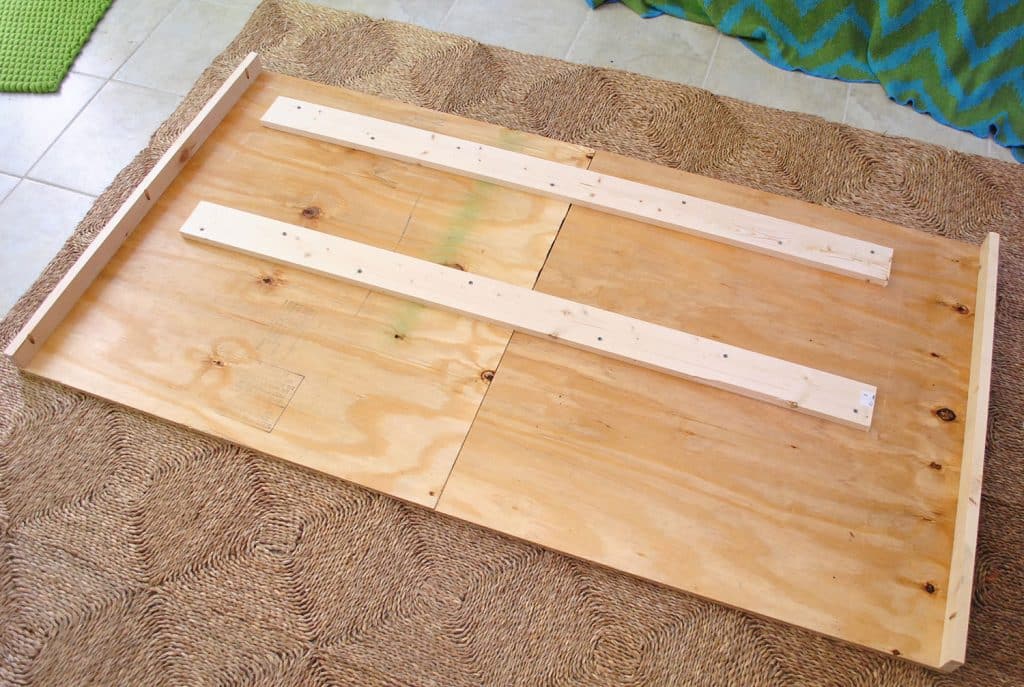
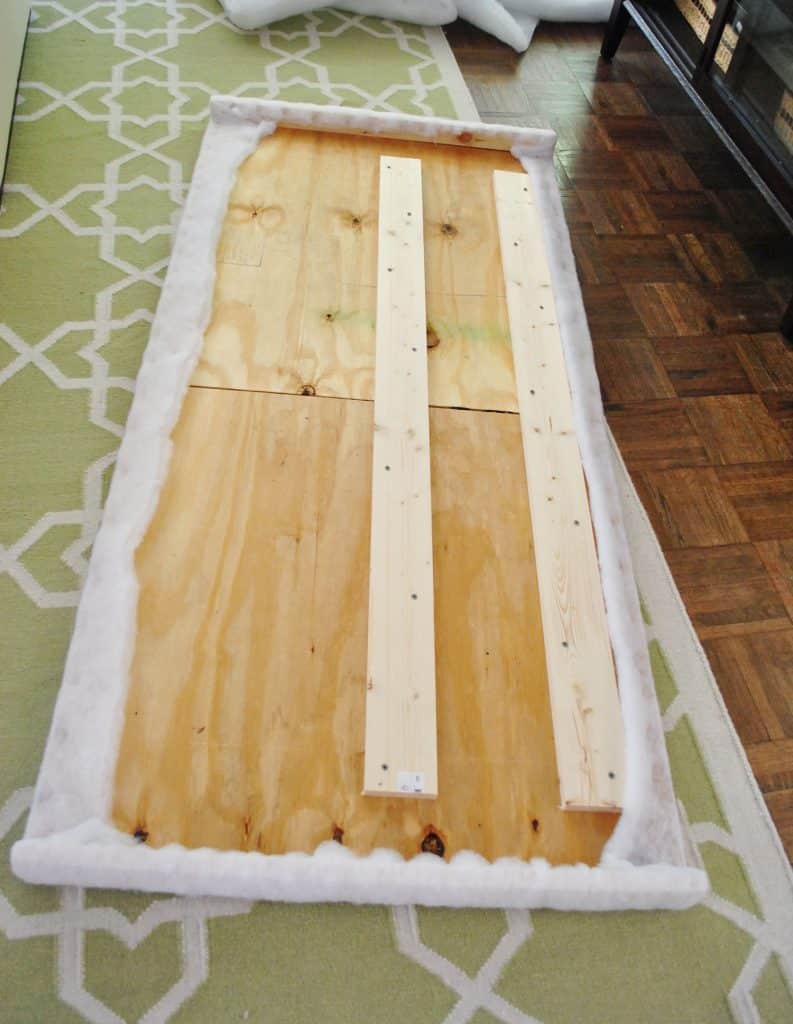
To add these small side pieces, we attached two 1×3 whiteboard boards to each edge using screws drilled into pocket holes we drill using our Kreg Jig. Alternatively we could’ve secured them with wood glue and nails.
The other reason ours was more complicated than a solid sheet of plywood was that we couldn’t fit it in our little car (ha!). So at Home Depot we had them rip it in half, and we reconnected the two halves at home with scrap pieces of whitewood boards. We’re fancy like that!
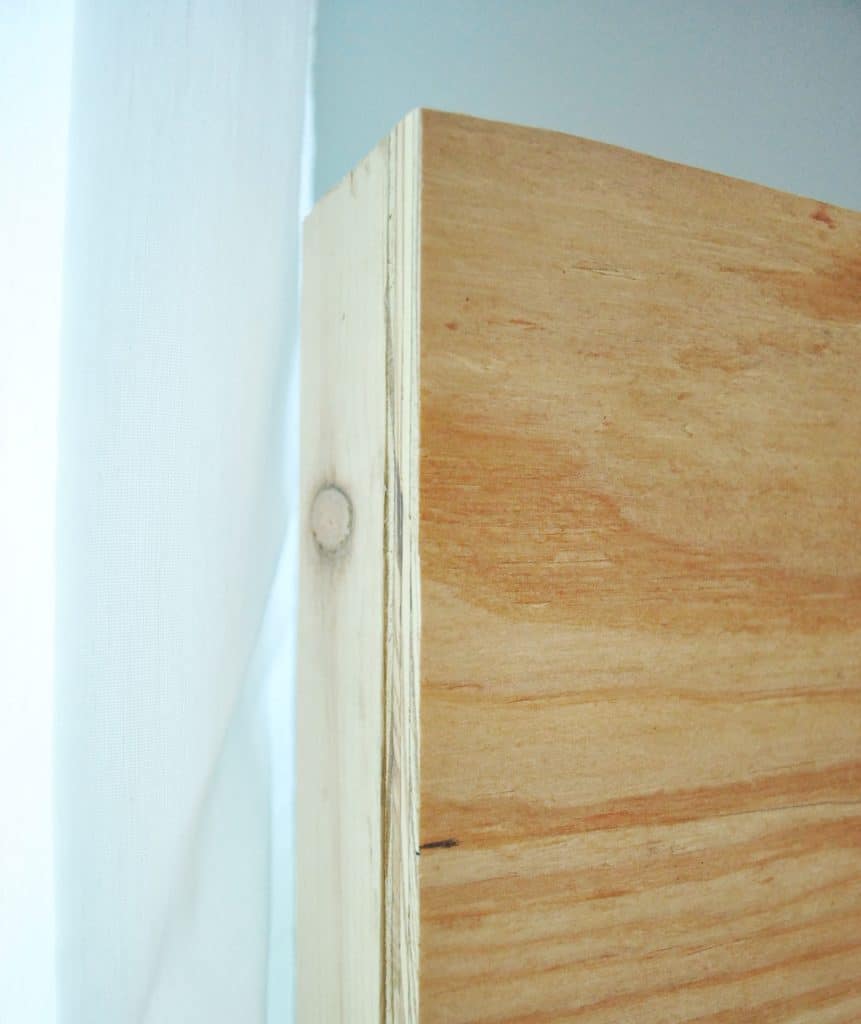
Before proceeding we upholstery, we brought our frame in to make sure it fit around the existing bed frame like we planned. Phew – it did!
You can also now see what that wrap-around piece looks like, and how it hides the existing bedpost. And since we’d soon be upholstering it with fabric, it didn’t matter that the edges were a little raw looking.
Step 2: Add Your Batting Layer
If the carpenter in you trembles at the idea of upholstery, just remember: if you can wrap a present, you can upholster a headboard!
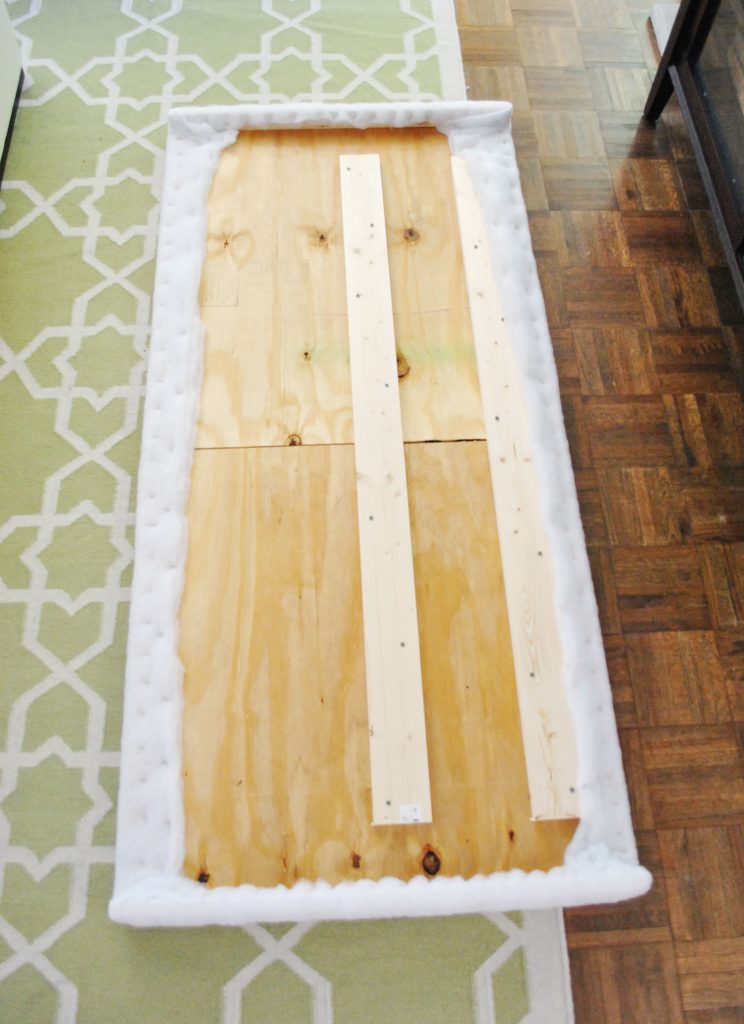
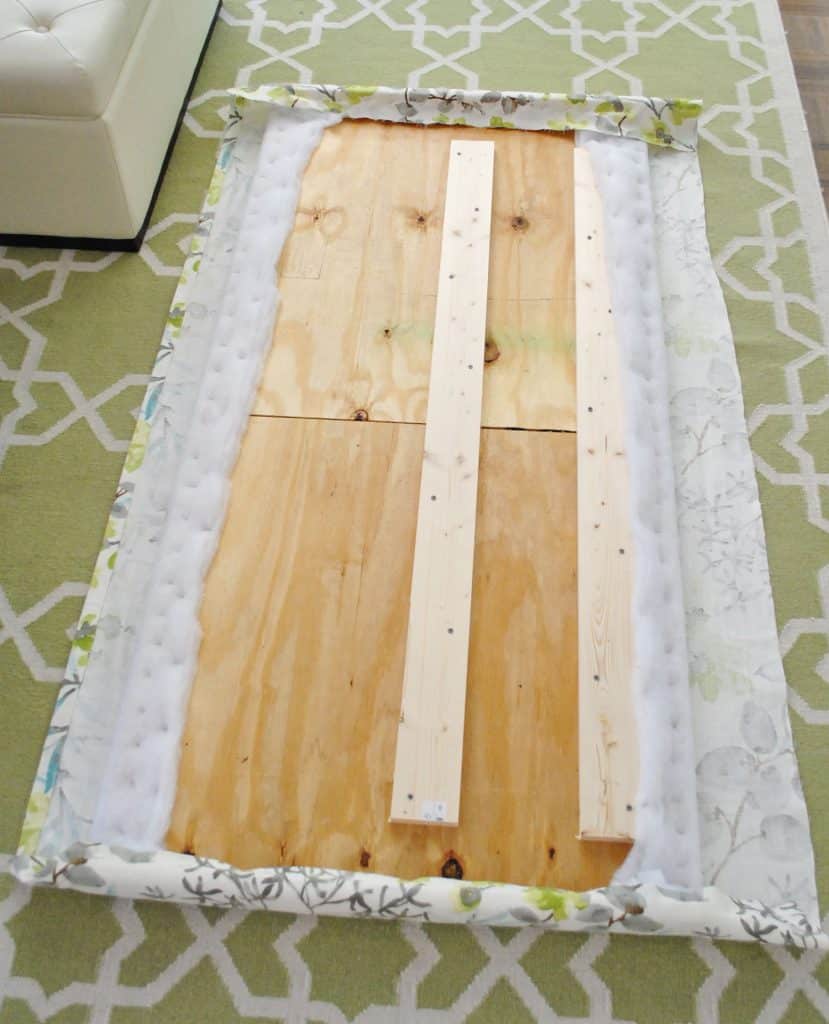
Before adding our fabric, we wanted to first add some padding in the form of extra loft batting. We decided to do two layers so it’d be plenty plush, but still not lose its shape. Sherry trimmed a 2-yard section of batting using regular scissors, laid it on the floor, and we placed our frame on top of it. You’ll want about a 2-3″ overhang on all sides.
Then we used our staple gun to begin attaching the batting. We just wrapped the batting tightly around the edge and stapled it every few inches.
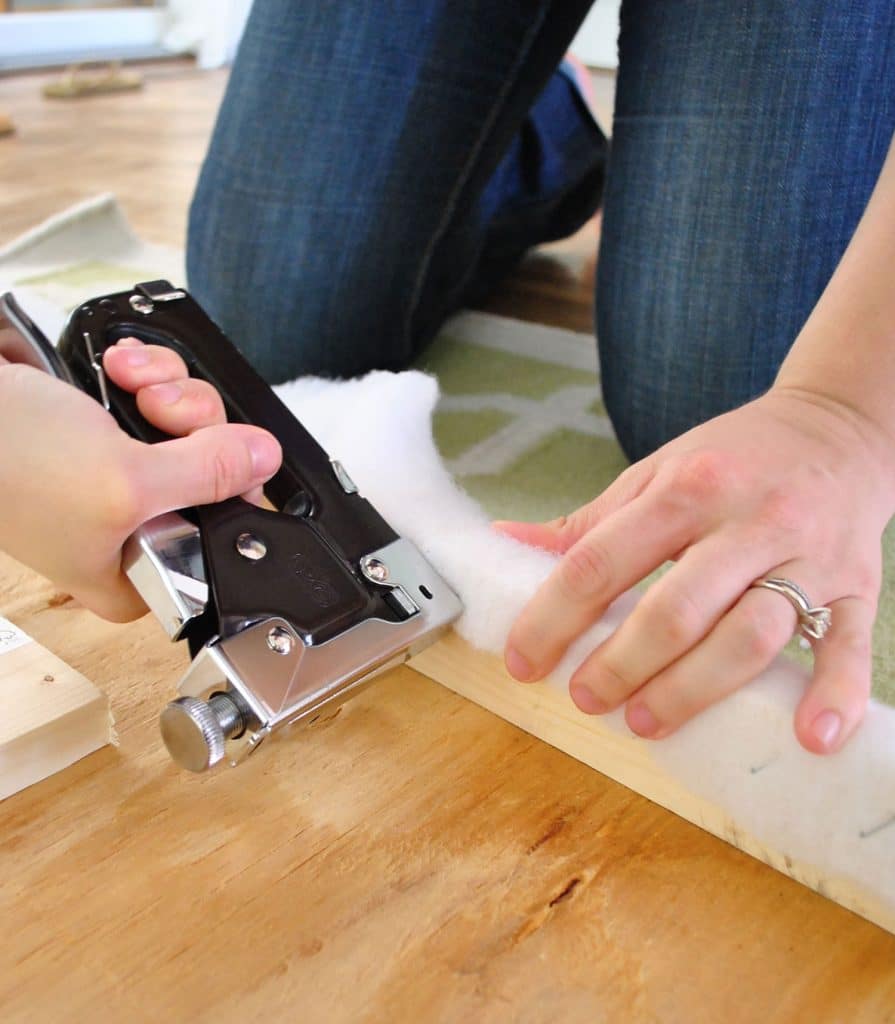
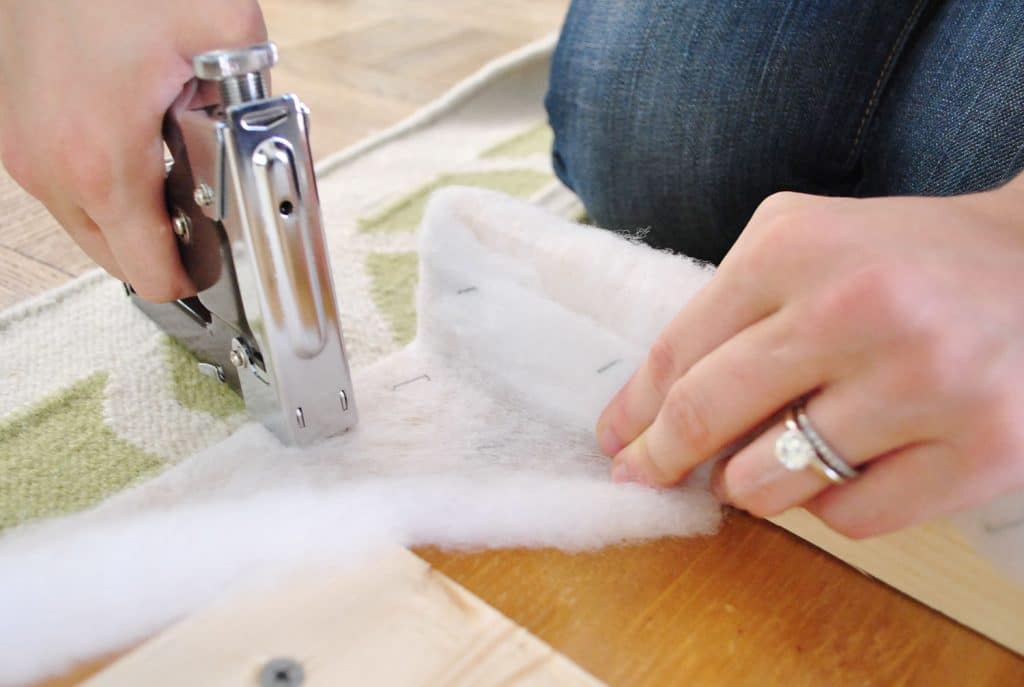
When we came to a corner, it was just like wrapping a present. You just fold it back and staple it so it all looks smooth from the front. Try to pull the batting tight so your corners don’t get too bulky. Bam, bam, bam – it’s done.
We just worked our way around the back of the headboard, stapling away. At some point John made me pose for this awkward photo too. Winning.
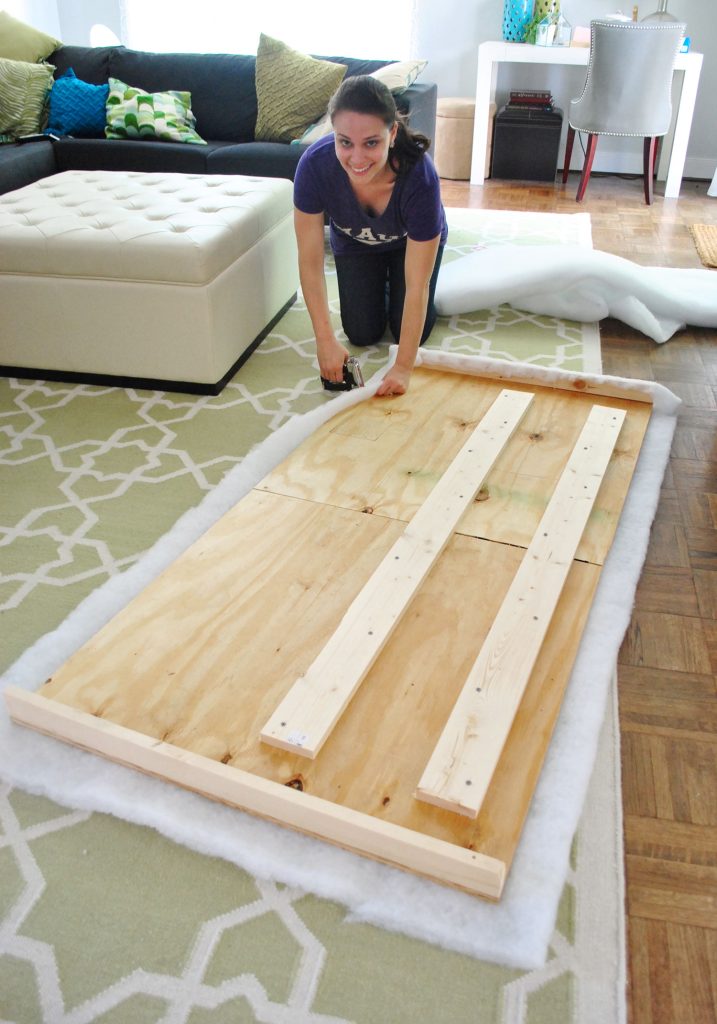
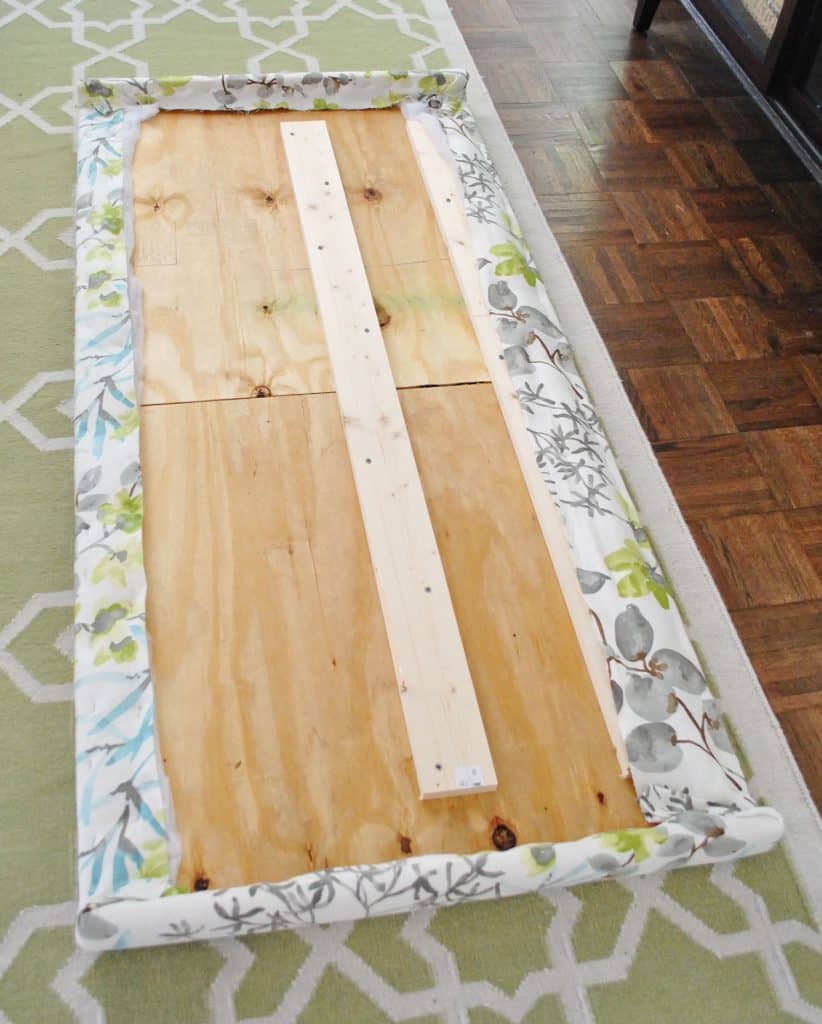
Eventually the whole thing was stapled nice and tightly around the back.
We decided to do a second layer of batting, just repeating this process. Here’ what it looked like with the double-thick batting!
Note: Another option is to use upholstery foam that you attach to your plywood with spray adhesive. We prefer the batting method since it’s easier to wrap around the edges. But if you’re looking for a much thicker, cushier feel – it may be faster to use foam, rather than wrap 4 or 5 layers of batting. Too many layers of batting can also make it difficult to staple into the wood.
Step 3: Staple On Your Fabric
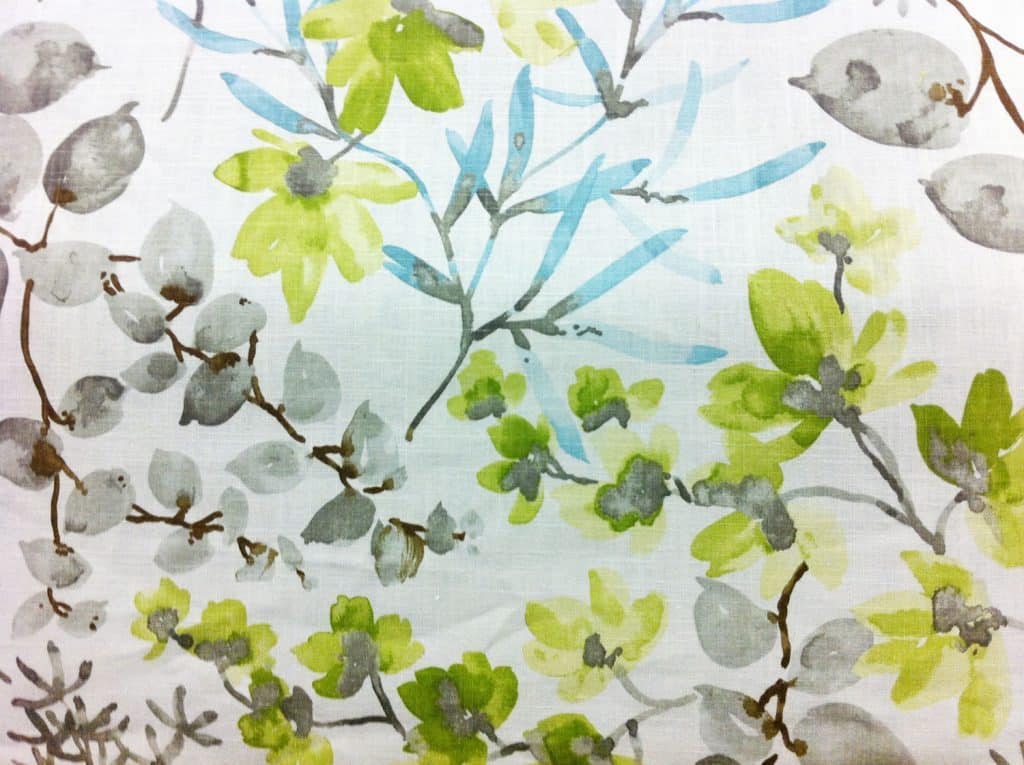
Here’s where the fun really begins. Now you can repeat that process, but with your selected fabric! Just give it a good ironing first to make sure it’s free of creases or wrinkles before you start.
Just like with the batting, we laid it flat on the floor and placed our (now batting-covered) frame on top, making sure it was pulled taut underneath to avoid any wrinkles. Then I trimmed offthe excess fabric around the perimeter, leaving a few inches for it to be wrapped and stapled around the back, just as I had with the batting.
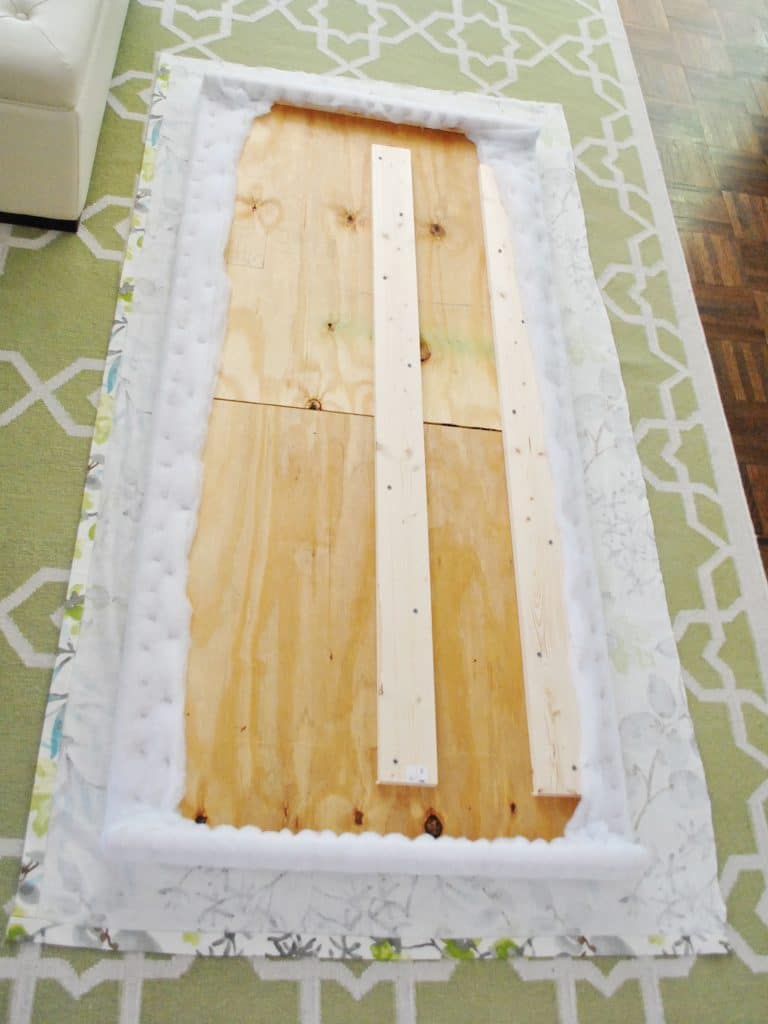
We started by stapling each side, being sure to pull it extra tight so it won’t end up all loose and baggy over time. I started with one side, pulling it all very tightly, then stapled along the opposite side, again pulling it nice and tight.
Once it was secured on those two sides, I did the same thing to keep it secured vertically, by pulling tightly and stapling the top side and pulling it tightly and stapling the bottom side as well.
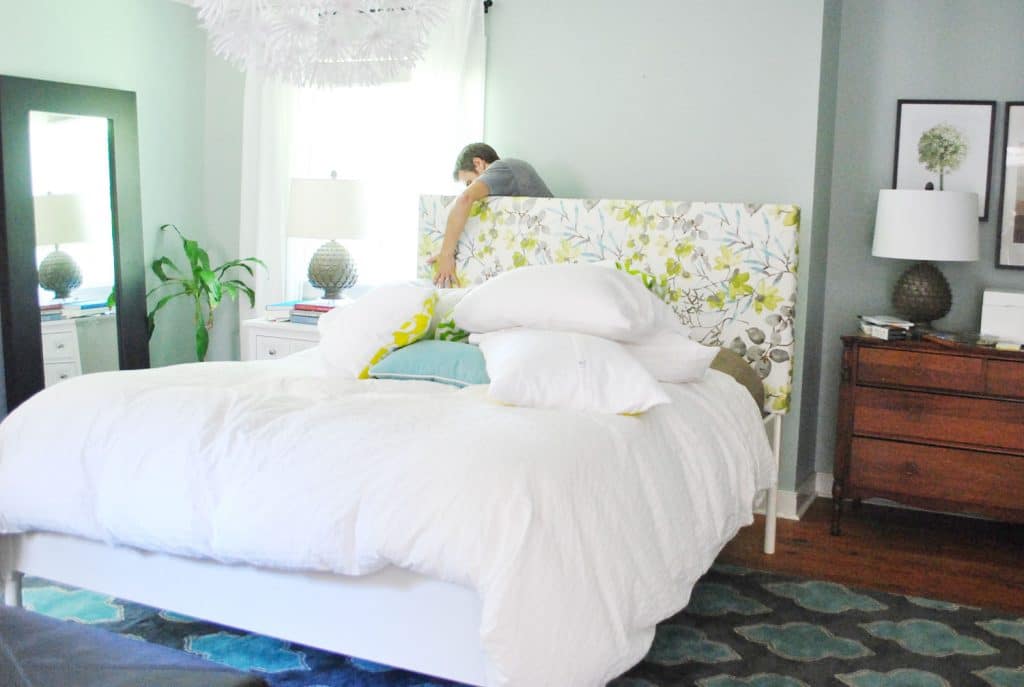
Then we flipped the headboard up to see it in all of it’s plush, tightly upholstered glory. Bing, bam, boom. The whole upholstery step took less than forty five minutes to complete. Is it weird to call it one of my favorite fabric projects to date? I just love love love the pattern.
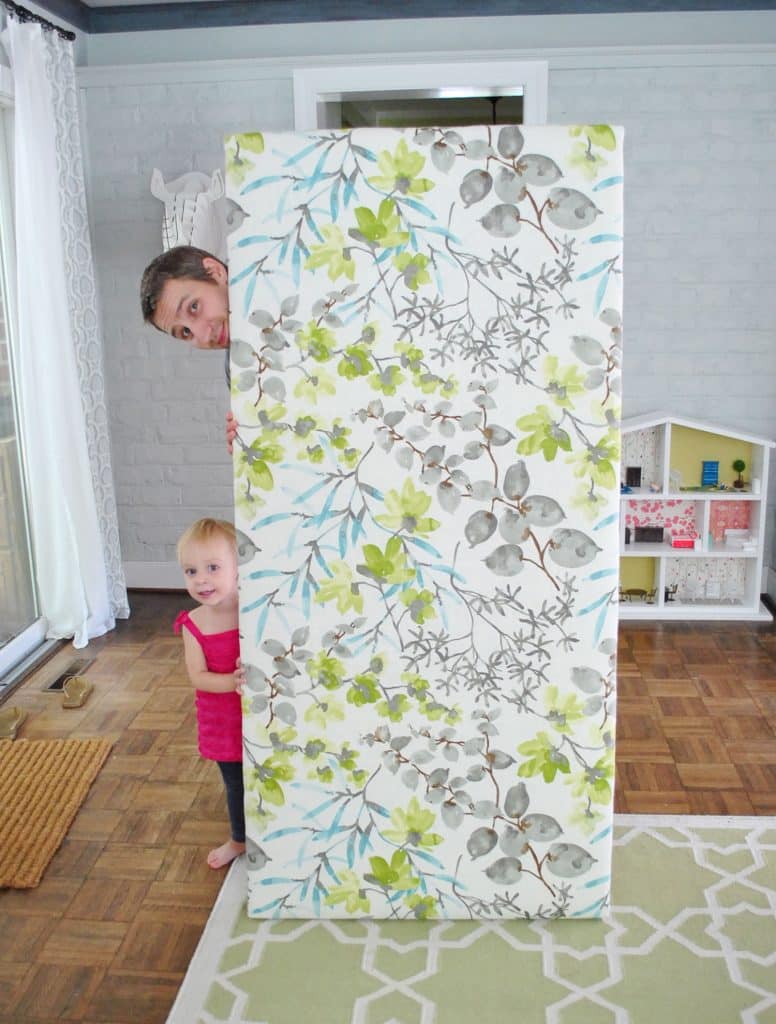
It’s hard to tell above, but in this angle you can get a sense of how plush it is. It’s cushy, but still tight – so we won’t worry about it getting baggy with everyday lounging against it.
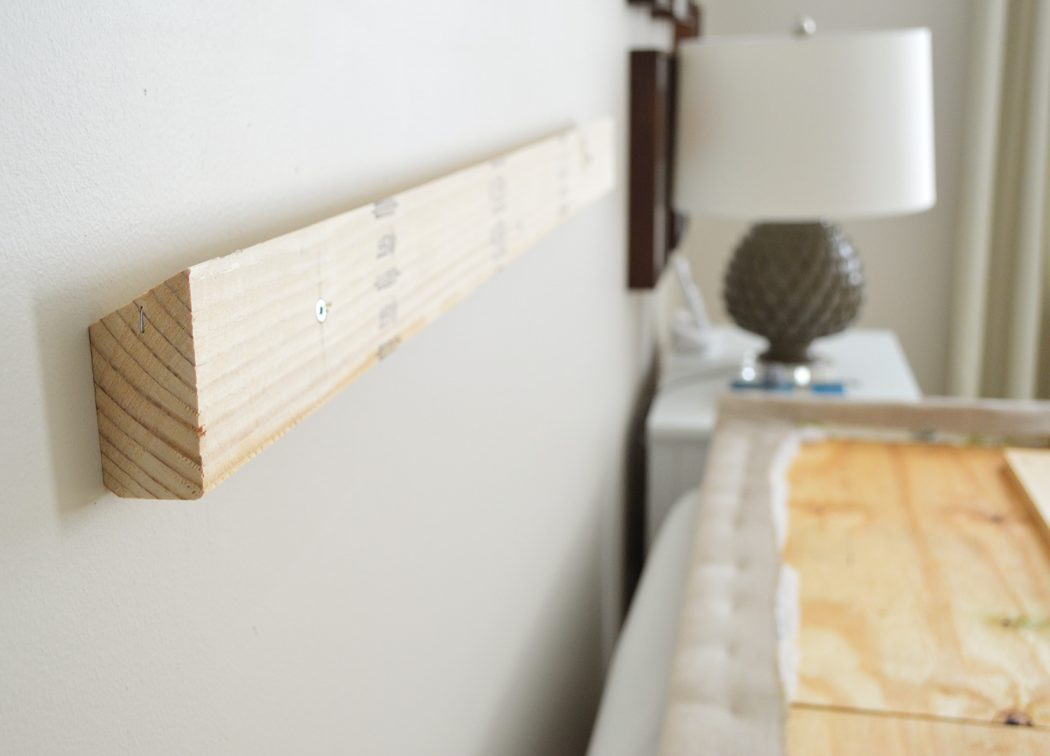
Step 4: Hang Your New Headboard
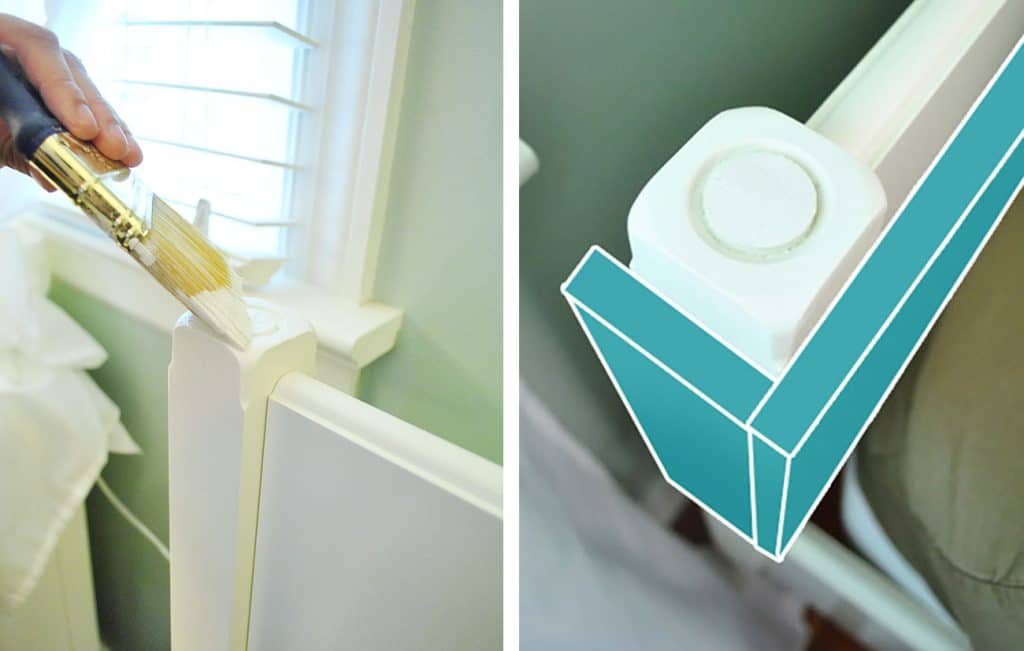
Now you’re ready to attach your headboard to your bed. This can be done in a few ways, depending on your bedframe. When typically like to install a headboard directly into the wall, since it’s often sturdier than attaching it to the bedframe. To do that, usually a french cleat works great. We cover how to DIY a french cleat in this post.
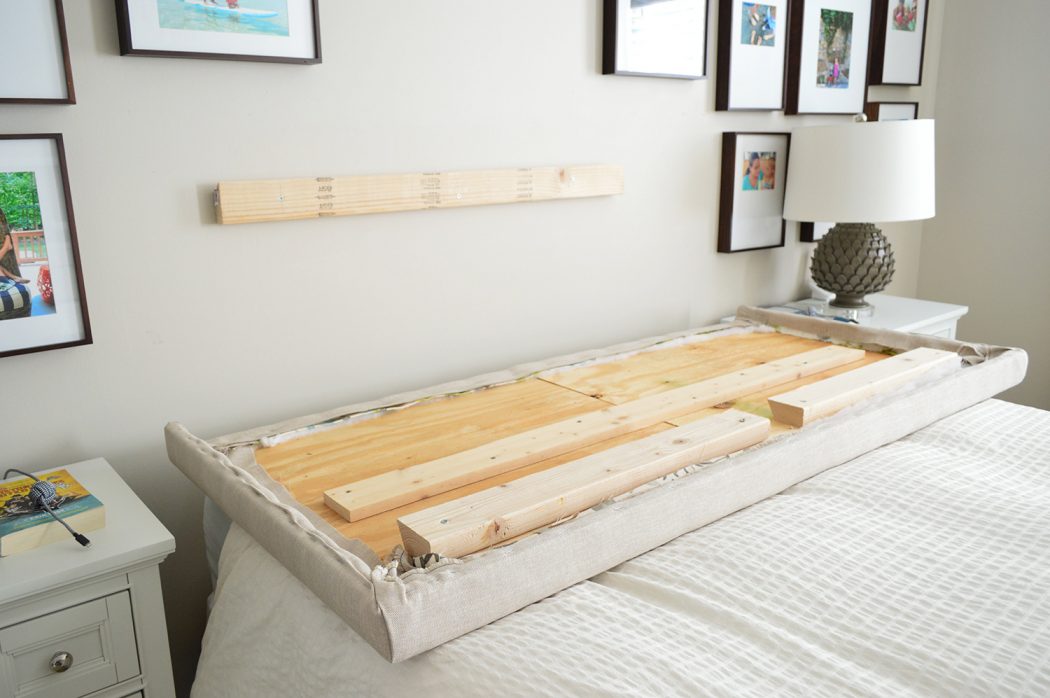
Actually, the headboard pictured above is the same one constructed during this tutorial – a few years later we just updated it for our new home with new fabric and a new top piece (just like we had added the sides pieces in this post). You can see the french cleat below, which is essentially two 2×4″ cut at an angle. One goes on the wall, the other on your headboard. You can also purchase pre-made metal cleats for just a few dollars.
TIP: Try to hang your headboard so it hits the top edge or slightly below the top edge of your mattress, that way there is no gap between the two.
But in the case of our postless-four-poster bed, we chose to screw the new fabric headboard into old wooden one that was part of the existing bedframe, just careful to use screws that wouldn’t poke through the other side.

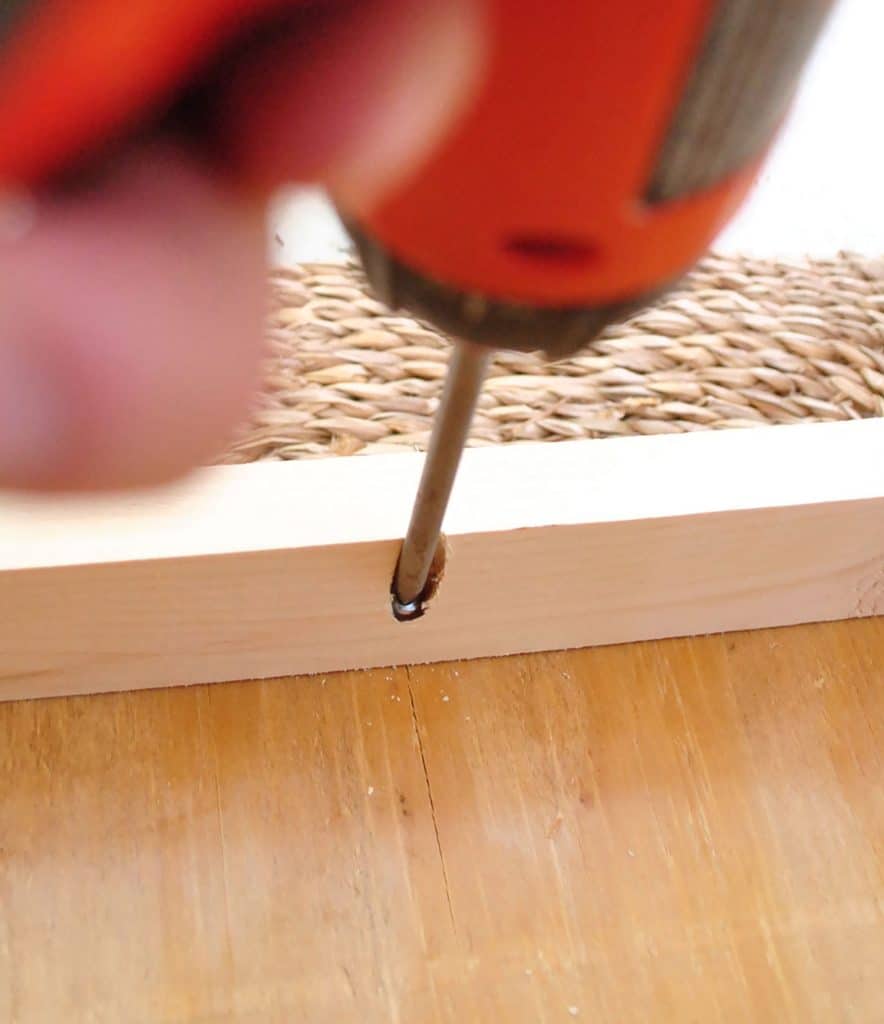
Here’s John putting the final screws in on the backside, pushing the new fabric headboard tight to the bedrame for a snug, secure fit.
Step 5: Enjoy Your Handiwork
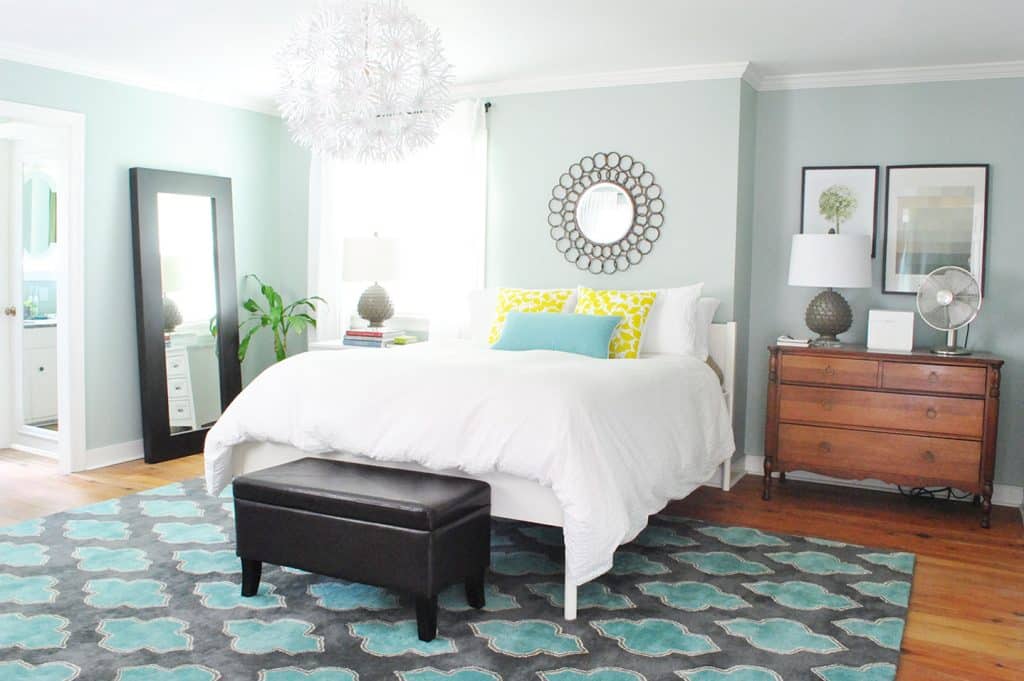
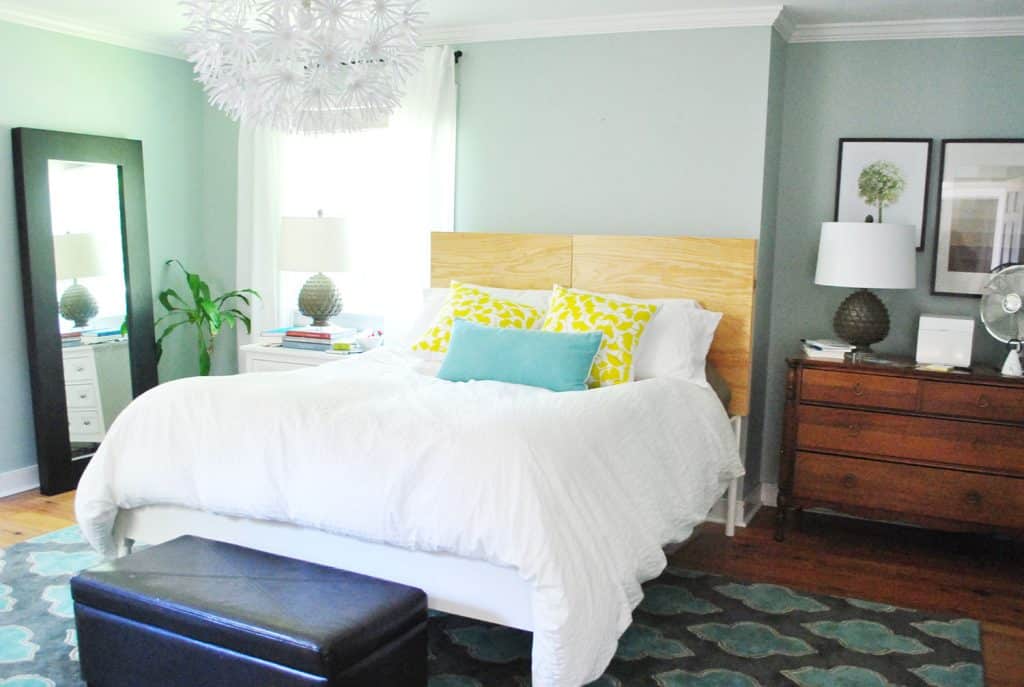
Once it was attached, we just pushed the bed back into place and beamed at it. If only it had been bedtime already that so we could immediately enjoy it’s plushness!
We loved how the fabric is sort of like the bridge between the yellow ginko pillows (since there are greeny-yellow flowers in the headboard fabric) and the turquoise in the rug (thanks to those subtle leafy sprigs of turquoise in the headboard).
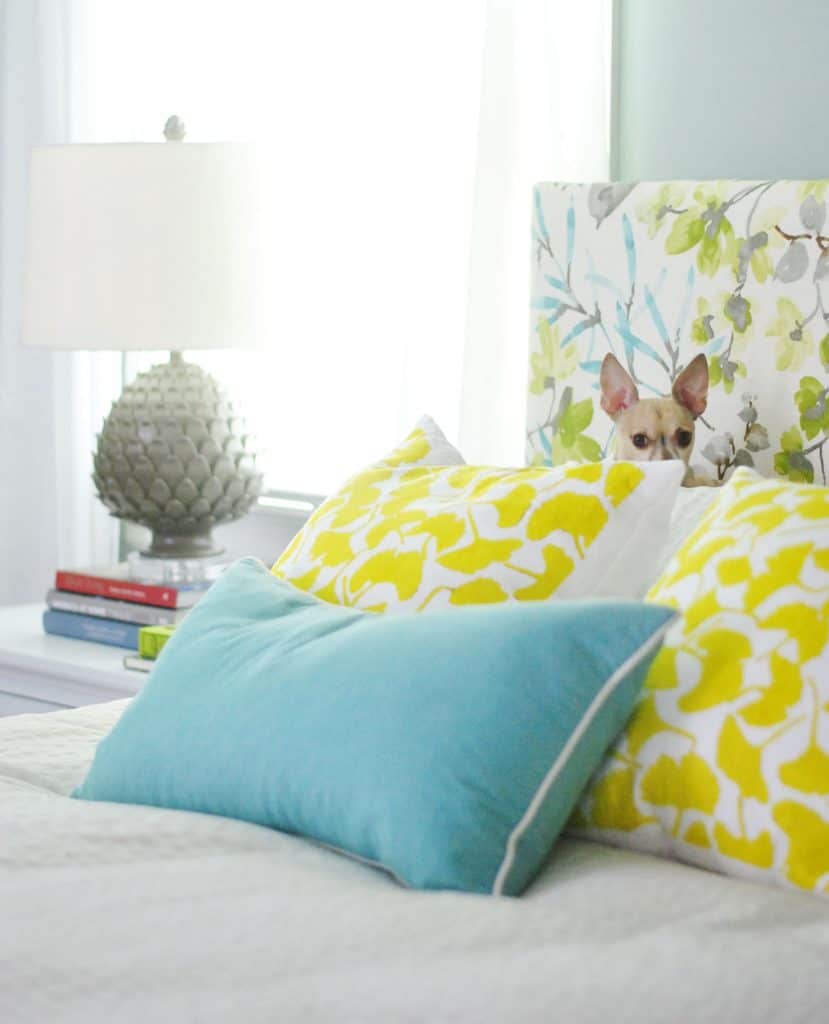
I even think Burger looks especially dapper in front of this new backdrop.

DIY Upholstered Headboard Cost
As for a budget breakdown here we go:
- Wood frame (plywood and some bracing boards from Home Depot): $22
- Two layers of extra loft batting (from JoAnn thanks to a 50% off coupon): $4
- Discount designer fabric (from a local fabric outlet called U-Fab): already owned – but it was originally $20/yard ($40 total)
- Total spent: $66 (if you add in the fabric we previously bought for a book project and reused for this)
Sixty six bucks isn’t pennies, but compared to upholstered headboards that are sold at places like Overstock, it’s at least $100-200 cheaper than even the most basic types. And considering places like Ballard Designs charge around $400-$700 for custom headboards (where you get to pick the fabric) it was awesome to get to choose the fabric and whip this up ourselves.
*This post contains affiliate links, so we may earn a small commission when you make a purchase through links on our site at no additional cost to you.

Tiffany says
I’m going to comment without reading all the other comments first (I’m on vacation right now. Woot!). So I don’t know if it’s already been said, but I vote that you paint that room STAT! OMGee, love the darker color. It really makes the headboard pop and helps to play off the darker gray in the rug. Love the room, and I would seriously have a hard time getting out of bed every morning. :-)
Jeanna Walton says
I’m in love with the fabric……..it goes so well with the rug and the other colors in the room :) The room looks amazing and it seems so “you”! The only teeny tiny little thing I might add is, I wish the headboard was a little taller. I know you were going for a non-traditional look, but with the pillows added on the bed, you can only see about 1/3 (maybe) of that great fabric, and I would have liked to see a bit more of it!!
Claudia says
Oh my gosh, this looks so awesome. I am so into those summery blues and greens, we’ve lived without a headboard for 11 years and I keep telling the man that I’m tired of living like a college kid! Maybe this will tip the odds.
Em says
I really think you should consider a solid fabric for the headboard. A dark solid fabric would anchor the bed to the wall more (John wants to paint the walls darker because there’s not enough contrast between the headboard and the walls). And, it seems like there are too many patterns going on. Your rug is bold and makes a statement, the headboard competes with it.
You guys are great – it’s just something to consider!
YoungHouseLove says
Thanks for the thoughts Em! We definitely think as we make the room “ours” it won’t appeal to everyone, but we’re in love with our new headboard. John included. Love that man! And we’re both leaning towards darker walls now that I photoshopped things, just because it could cozy things up a ton – which is something we would love along with bringing in the fun pattern in the headboard (everything solid that we photoshopped instead of a pattern for the headboard looked really blah and matchy so we had fun taking a risk with something a little less expected!).
xo,
s
Paige @ Little Nostalgia says
The room looks so much more balanced this way! And of course I haven’t seen it in person, but to me it feels bigger. Is that the case when you’re in it?
YoungHouseLove says
Yes, since you don’t walk into the bed after a few steps into the space (now you can take like eight big steps into the room) it feels a lot bigger!
xo,
s
Gillian Luce says
OMG, I LOVE the pictures of Burger! Don’t get me wrong the headboard is gorgeous (like HGTV type stuff) but I just love the dog pixs included!! :) Really enjoyed meeting your lovely family at Haven. Hope to see you guys at another conference soon!
YoungHouseLove says
Aw thanks Gillian! It was awesome to meet you too!
xo,
s
Delana says
I wasn’t sure at first, but this layout is definitely growing on me! :) I know this room is always evolving, but have you thought about moving the mirror above the bed to the right behind John’s “nightstand”? Then, the art that’s there can be moved over to the empty wall? I think putting that mirror there would balance out the mirror on the other wall and also add some “light” to balance out the window. As always, great job guys!! :)
YoungHouseLove says
We tried the art and mirror swapped and just liked this better (something round in the mirror seemed to play off of the chandelier in the middle of the room and it looked unbalanced the other way) but who knows where we’ll end up!
xo,
s
Jane Nelson says
If its weird to be in love with a headborad, then I’m a total freak. I made my own upholstered tufted headboard a couple of years ago, and my heart still goes pitter-pat every time I walk in the room and see it. It adds some softness to a room with a lot of wood furniture in it. And the best part is, I’ve been asked at least 5 times if we got it from Pottery Barn. Nope, and I didn’t pay that much for it either!
Y’all did a great job once again – it totally makes the room!
Robyn says
I think it looks great. I don’t like matchy matchy so I am against staining the dresser and the floor both. I thinks unmatched adds character. While the darker color of the walls does add drama, I love how airy and bright your bedroom is. What is the paint color? Perhaps it is on a past post that I missed. Great work!!
YoungHouseLove says
The paint is Carolina Inn Club Aqua by Valspar.
xo,
s
Leah Concepcion says
Looking at the before and after pictures of your bedroom, I’d have to say that it looks home-ier now. The before picture, in comparison, looks great but in a model-home type of way. Now it looks like a fresh and cozy retreat! Awesome work!
Angela says
Love love love!
Michele @ Moonfield Lane says
Oh, it looks beautiful! And I love the photoshop rendition of the darker walls. I don’t have any yellow in my living room (with the same curtain fabric as your headboard) but now I may try some yellow pillows, too. Again, gorgeous!
alg at rental house rules says
#youngheadboardlust ;)
YoungHouseLove says
Haha, thanks!
xo,
s
Elizabeth K. says
I don’t think it’s weird that you are in love with the headboard… I think it’s weird that I am.
Seriously, I think this was an AWESOME choice, and I LOVE the fabric!
YoungHouseLove says
Hahahah, that’s funny. Feel free to come over and pet it.
xo,
s
Meagan {Green Motherhood} says
I just love that fabric! It’s looking beautiful.
The before and now is so different; you’ve made it such a cozier space!
Can’t wait to see what’s next.
Welcome home!
Erin says
Love the headboard! I have been wondering this for a while but haven’t seen the info anywhere:
Where did you get the Ginkgo pillows from?
I LOVE ginkgo trees and used the leaf motif for our wedding decor :)
YoungHouseLove says
I wish I remembered the name of the store. It’s a shop in Old Towne Alexandria (northern VA).
xo,
s
Lesley@ChaoticallyCreative says
I just saw that you asked if anyone has made a headboard. I made a nailhead one for my son’s room and now I am tackling one for my 2 year old. I am going to use his crib and make it into a upholstered headboard. It should be interesting. Here’s Gavin’s headboard http://chaoticallycreative.com/2012/02/05/gavins-world/ Lesley
YoungHouseLove says
Cool!
xo,
s
Megain says
I am in the process of making a headboard. I have read many tutorials online and all of them involve 2 inch foam (or s0..some say 1 1/2 inch is enough) and then batting on top of the foam.
Is there a reason why you did not use foam?
YoungHouseLove says
We have made other headboards (one that we still have 7+ years after I made it) with extra loft batting, and it’s only around $5 instead of $20+ for foam!
xo,
s
Tina C says
I love, love, love it. Like someone else said, I’m a daily reader but rarely comment. The improvement in the overall feel of the room is just huge. Well done! I’ve been looking for a unique headboard for our king size bed for a couple of years and have just recently started thinking of going the upholstered route. I think you just might have given me the courage to go for it myself. But, I want to add a curve and nail head trim, too. Hopefully that won’t make it too hard. Oh, and I love that you let Burger enjoy that pretty bed, too.
Tina
YoungHouseLove says
Aw, thanks so much Tina! You can totally do it!
xo,
s
Beth C says
The headboard looks great! I love how the pattern works with the yellow and white pillows.
Shelly says
I have trust that you will do what you need to do about the staining of the floor and dresser. :) And even though we all make different choices in decorating, there are very few steps you guys have taken that I don’t completely love. I have a very similar dresser (maybe the same) and it was so damaged I painted it white. But I loved it either way… I do like the look of one white/one wood night stand. It looks great with the nook.
Rachel May says
I love the fabric you chose-it really ties all of the colors together nicely.
Did you have any issues running into old staples since you used multiple layers of materials?
YoungHouseLove says
Thankfully not! It’s so random where you staple each time, so I only hit a few old ones, most of them went in fine since I didn’t aim for specific spots.
xo,
s
Marjorie says
So beautiful! congratulation! you and your husband are doing a great job with yours house! I love the fabric your choice for the headboard!
p.s You have a beautiful family! I enjoy reading your post and watching your pictures!
Best regards, Marjorie.
YoungHouseLove says
Aw thanks Marjorie!
xo,
s
Mary says
I love the changes you’ve made. It looks like a whole different room! Funny experience I had with dark stain…I hired a man to sand and stain the 1926 original oak floors in my bungalow. I insisted on a 65% Jacobean/35% Ebony mixture – he was so upset that I chose a dark stain that he refused to buy the stain. I had to run to Home Depot to get it and insist he use it. He spread a little on the floor and said “see…yuck!” and I responded “YES! That’s exactly what I want!” He wasn’t happy, but did the floors my way. He did an amazing job and I love the stain. Go with what you love :) Wood stain just seems to be one of those things that people get very passionate about.
YoungHouseLove says
Haha- that’s so funny!!!
xo,
s
Abby J. says
I love it! I especially like the extra plushness – I would love to DIY a headboard for that exact purpose. Right now we have a lovely hardwood set, though, so I don’t think that is likely to happen soon. But maybe the set can go in a guestroom (once we have one!).
I definitely agree with John that the room needs to be a bit darker. Your new headboard would really POP with a darker color on the walls and I think the whole room would look so soothing and lush with a darker color.
LynnMA says
I’m really liking what you’ve done with the room. Much cozier than the previous layout. Also, another vote for not restaining the dresser. It has a beautiful patina (at least in the photos) and adds a wonderful glow and charm to the room which is hard to replicate. Also, if the dresser is a quality made piece, you should look into restoring it vs. restaining. Restaining could devalue it.
Another reader asked how hard it would be to recover the headboard. Instead of stapling on new fabric, you could easily slip cover it or even simpler, create a really wide band from a complimentary fabric to wrap around the headboard, perhaps allowing 4-6″ of the sides to show. Use velcro to attach it to the backside of the headboard. You could create a different look for each season of the year…how fun that would be!
YoungHouseLove says
Oh yes, that’s another great way to go!
xo,
s
LARY@ Inspiration Nook says
LOVE THIS!!!! I’ve been thinking about doing this to our bed too, this might’ve convinced me to get the mister and head to Anawalt!
Meg Smith says
Love it! The bed on the other wall makes a huge difference! Perfect fabric for that room too!
Justine Wilkinson says
I absolutely LOVE that fabric. It’s almost making me go weak at the knees (good thing I’m sitting down right now.) Two of our beds have bed frames that we wouldn’t want to change, but there’s one bed that is basically begging for a headboard like this. Now I just need to find me some of that fabric over here in the UK.
A job well done by you two, as usual!
YoungHouseLove says
Aw thanks Justine!
xo,
s
Marcia says
My bedside lamps are about 3 ft. tall and came with thumb switches on the cords. Once you get used to them, it’s a much shorter reach. I’m sure they come in a splice kit where they can be added to existing lamp cords. Might work for the smaller wing-spanned of you!
YoungHouseLove says
Thanks for the tip!
xo,
s
Katie says
I love it! And I’m with John. I think the bedroom looks really feminine right now, and while that’s pretty, it looks more balanced for a man living there as well with the darker walls.
I’m working on an upholstered headboard in the near future. My husband works at Kravet fabrics and they recently sold their last season Italian leather cow hides for ten dollars each to the employes. My husband called me up and asked me if I would be interested in any cow hides, and after hearing how much they were, I made him get four. One of them is destined to be our new headboard.
Maria says
Love it, love it, love it…
I want to do this project but my bed does not have an existing headboard or posts so I have to figure that all out. Meanwhile, I will start looking for fabric.
Burger is so cute in those pics!
Jill says
Ha, I just read what you have written next to the comments box. “Hee!” to your “Boo spam filter.”
I would be sad to see your dresser and floor go so dark because that leaves the room in almost entirely cool colors, and you lose a lot of the warmth. However, I can see that that is just personal preference. If you want sort of a cool & peaceful bedroom vs. a warm and cozy once, then I can definitely see arguments for that.
But on more technical note,
1) I do think you’d lose a lot of nicely layered effect that you have now. The pine floor relates to the yellow pops on your bed without matching, and the dresser relates to the wood tones in the pine floor without matching. If they both went dark, then they’d match each other and the mirror frame without really relating to anything else.
2) However, if you made just the floor dark, then the dresser wouldn’t relate to anything anymore, so I think you should change both or neither, but maybe not do them the exact same color to keep things layered and interesting.
3) When the dresser is that dark, I think it throws itself WAY out of balance compared to the white cabinet on the other side. The black side is MUCH stronger/heavier, so what would you do on the other side to balance that? Statement curtains? Paint the white cabinet something else?
4)If you were to keep the dresser the same color, this is a great tutorial for bringing it back to its original glory: pinterest.com/offsite/?url=http://www.the-brick-house.com/2010/09/refreshing-vintage-wood/&shatoken=229e870976e120f5907d4778b0032582b1fbda48&pin=247135098271470940
And on a less technical point, I love your artichoke lamps!
YoungHouseLove says
Thanks Jill! We’re just going to take things one step at a time and see where we end up! I’m sure the room will continue to evolve, and maybe after we stain the floors darker we’ll leave the dresser, or even paint it instead of staining it dark! Who knows where we’ll end up!
xo,
s
heather s. says
It looks great! I added a padded insert to my headboard back in November to add a little cushion for my head while reading in bed.
http://athomewithh.blogspot.com/2011/11/remember-my-gorgeous-new-headboard-yea.html
YoungHouseLove says
So sweet! I love it!
xo,
s
Click here says
Wow!!! This came out great!!! Everything came together, love it!!! :D
Lisa says
I really like it! So bright and fresh. I also loooove U-Fab! I am in Charlottesville, where the other one is and they have everything there! I get overstimulated when I go in lol. Nice job!
YoungHouseLove says
Aw thanks Lisa!
xo,
s
JessiBee says
It came out beautiful! That fabric is gorgeous! I love that you guys opted to go with just layers of batting. It seems like everyone uses foam so it’s nice to hear that batting can be cushy used on it’s own. I am way too cheap to buy upholstery foam! $4 is more my speed haha!
Carrie says
I loooooooooooove that fabric! Oh so lovely!
I’m making a fabric covered headboard. Or was going too, had the plans and everything. But my mom called me from a flea market, she had found a king sized fabric headboard for $10! $10! So we cut it down to fit my queen bed and I finally found the fabric (well, leather. My OCDness has to be able to wipe it down.) and we should be covering this week sometime! Since I have no headboard at the moment I am super excited!
Katrina says
I like it so very much!! It honestly looks so much better than before, I wasn’t a huge fan of the ed bed, I love it now :)
Jen@The Decor Scene says
I LOVE all the changes to the bedroom and this one is my favorite. Your room feels inviting and calm for sure. I think the biggest change that made this room, was moving the bed to the other wall. I really love it. It just “works” now. :)
Kim says
Very pretty! I also think it would have been cool to give the top of the headboard a scalloped look that mirrored the pattern in your rug–like if you cut it in half? That’d be a bit more work to make sure the fabric stayed tight, but I think it’d be a fun way to break up all the other straight lines in the room.
Still cute though!
Julia says
Wow, that looks sooo much better! The fabric is a great choice.
I have to admit I didn’t like your bedroom too much in the past and I wasn’t really sure about your recent changes … until you gave Ed the “haircut”! And now with the headboard I think things are really coming together nicely.
I love seeing rooms evolve like this, so keep going :)
Julia says
Oh, and I vote for staining the floor and the dresser darker.
I just think the room looks less busy in the photoshopped picture.
Lindsay says
Sherry, it looks like your wedding band has diamonds in it. How do you keep it from getting gross with all the DIYing or worse losing a stone? Is it an eternity band? Sorry for all the random questions. I’m just trying to decide what kind of band I want!
YoungHouseLove says
My tip is gardening gloves! When I put those gloves on and work outside it gets all steamy in there and cleans my ring! Otherwise it’s all cloudy and messy, but I don’t own cleaner so I have to go garden to get it clean. Haha. Or I use a toothbrush with regular old water to scrub it if there’s paint on it.
xo,
s
Beth says
I love the new layout and headboard! I have always made an effort with bedrooms to make the bed face the door. It just seems more inviting to me and I think it has the same effect here.
I have to agree with the thoughts on keeping the dresser and floor light or one dark and the other light. But, I am coming to that conclusion from some of my own design issues. I have dark floors and a lovely dark wood cradenza that my dad built 40 years ago…. I’m talking chopped down the tree and everything! So I couldn’t possibly refinish it for sentimental reasons. It sits flat on the floor which really makes the whole wall look heavy. I am hunting for more reflective hardware and lightening the accessories.
Whatever you decide I’m sure it will be lovely and of course design and our tastes are always changing! :)
A quick question, does your chandy put off a good amount of light? I have been eyeing it at Ikea for my home office that needs more light.
YoungHouseLove says
It’s not super bright, but it’s enough for reading or getting dressed at night (we usually turn on the side table lamps for more light if it’s not enough). Using a CFL bulb can make it brighter since you can up the light without going over the recommended wattage!
xo,
s
Donna M. says
Love that fabric and I’m totally impressed how much you guys get done. I’d do a project like that but every step has 5-10 days between it.
Classof65 says
My husband and I are serious read-in-bed people and we’ve had all kinds of bedside tables and lamps. Currently we each have bedside tables, but instead of table lamps we now have sconces. They’re the kind that have an adjustable arm so we can reposition the actual light to get the best illumination on our books or Kindle without glare and we have fabric shades so the light focuses right where we want it. I’ve tried to imagine your bed with sconces instead of table lamps, but I’m not really good at that, so you might want to photoshop before you would decide to change it in your room, but the sconces are handy for us and easy to turn off and on.
Lisa says
Who cares if reaching the lamps is easy right now? Get the lamp remotes!! It is one of the best under $10 items ever! My mom introduced me to them, and I thought they were kind of silly. But then she gave them to us and now my husband and I think they are great. We have the touch remotes and we didn’t even know we needed them. The kids love them too – they can turn the lights on and off over and over and over!
YoungHouseLove says
Sounds like fun!
xo,
s
Jimmy says
I too made my own headboard a little while back. It was actually a Christmas present to my wife. I used an Ana White design, and I’m really happy with how it turned out (and how much money I saved doing it on my own): http://www.thebookofjimmy.com/?p=462
YoungHouseLove says
So cool!
xo,
s
Lee says
Nice headboard! Love the print! But…what if you change the color scheme of your bedding..? It won’t match anymore!
…or I guess you can just never change it? haha
YoungHouseLove says
Or we can just get two more yards of fabric and switch things up! It’s so easy to recover something once you do the batting thing- it’s just a top layer that you switch out from then on out!
xo,
s
The Vintique Object says
Popping in to tell you how much I love the way your bedroom looks rearranged and with the tall posts gone. Great call — there’s something nice about walking into a room and seeing the bed straight on.
I have to say that I love the yellow-y tones of your floor with the different toned dresser. So pretty and has that collected over time look.
Camille