Adding a headboard to your bed is one of the best ways to add polish and coziness to your bedroom. And, lucky for you, making your own DIY upholstered headboard is super easy and affordable (ours only cost $66!). This means you can customize the fabric, size, and design to get exactly the look you want. Believe us, we’ve done A LOT of them over the years!
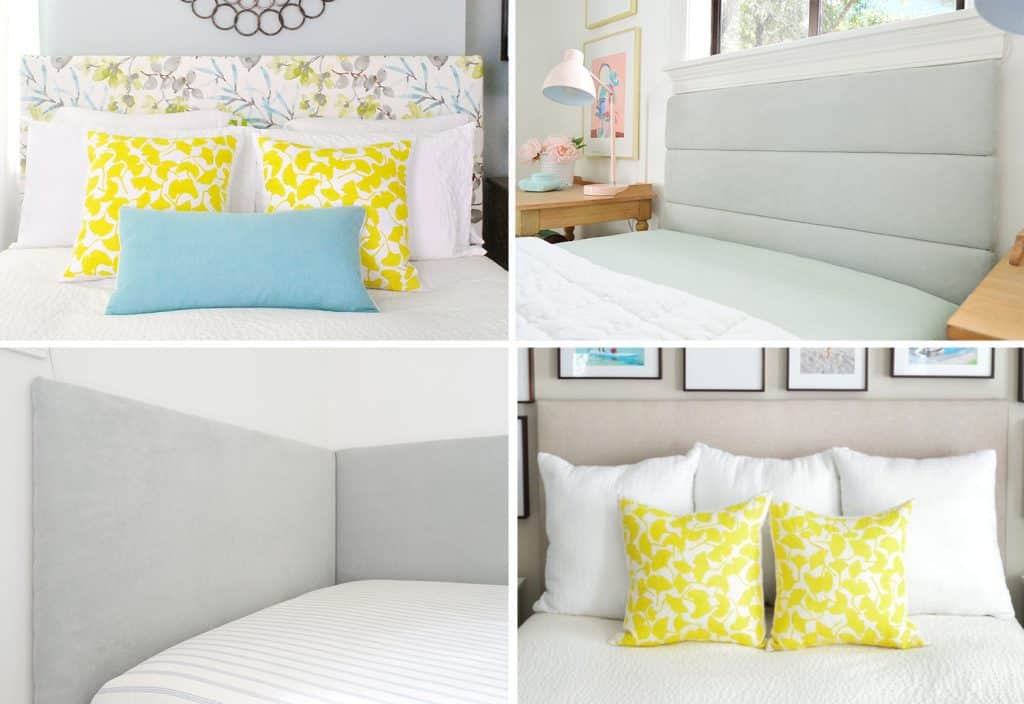
Today we’re going to take you through the step-by-step process to create the first headboard in the grid above (top left). It’s our favorite, classic headboard tutorial. But you can check out more headboard ideas below:
- How to make a channel-tufted headboard (top right)
- How to make a daybed-style headboard (bottom left)
- How to make a wall cleat to hang a headboard (bottom right)
Materials & Tools

Your exact supply list may vary from ours, but generally, this is what you’ll need to make your own upholstered headboard for your bed:
- Fabric of your choosing (we used 2 yards)
- Extra loft batting (we used 4 yards)
- 5/8″ plywood or MDF
- Two or three 1×3″ whitewood boards
- Miter, table, or circular saw to cut your wood (optional)
- Heavy-duty staple gun & staples
- Screwdriver and screws
Why Add A Fabric Headboard?
We wanted to add a headboard because fell out of love with our 4-poster bed (so we cut off the posts!) and wanted something cozier instead. You know, something plush we could lean up against at night. And the short wood headboard that we currently had wasn’t cutting it.
But generally, headboards can add a lot of personality and polish to a bedroom. Bedrooms without proper headboards can scream “college dorm” or “first apartment,” so adding one is a no-brainer upgrade. Plus, depending on the fabric you choose, it can add some bold color and pattern to a room OR add to the restful, zen space you’re trying to create.
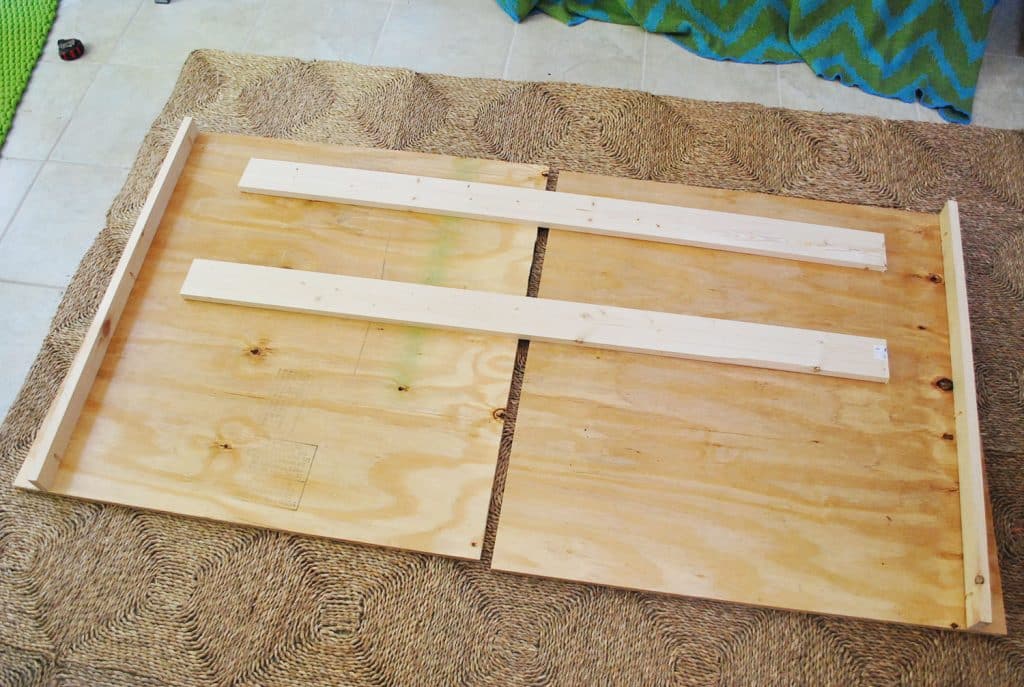
Step 1: Build Your Wood Frame
There are a few ways to create the wood frame for your headboard (including this super lightweight option) but for this particular bed, we constructed a sturdy plywood frame. If you want a simple rectangular design, this step can be as simple as cutting your plywood sheet to size (or having them cut it for you at the home improvement store). For our queen-size bed, we ultimately decided on 65″ wide and 31″ tall. But you can easily customize your dimensions depending on the location or width of your bed.
Ours looked a little more complicated, and I’ll tell you why…
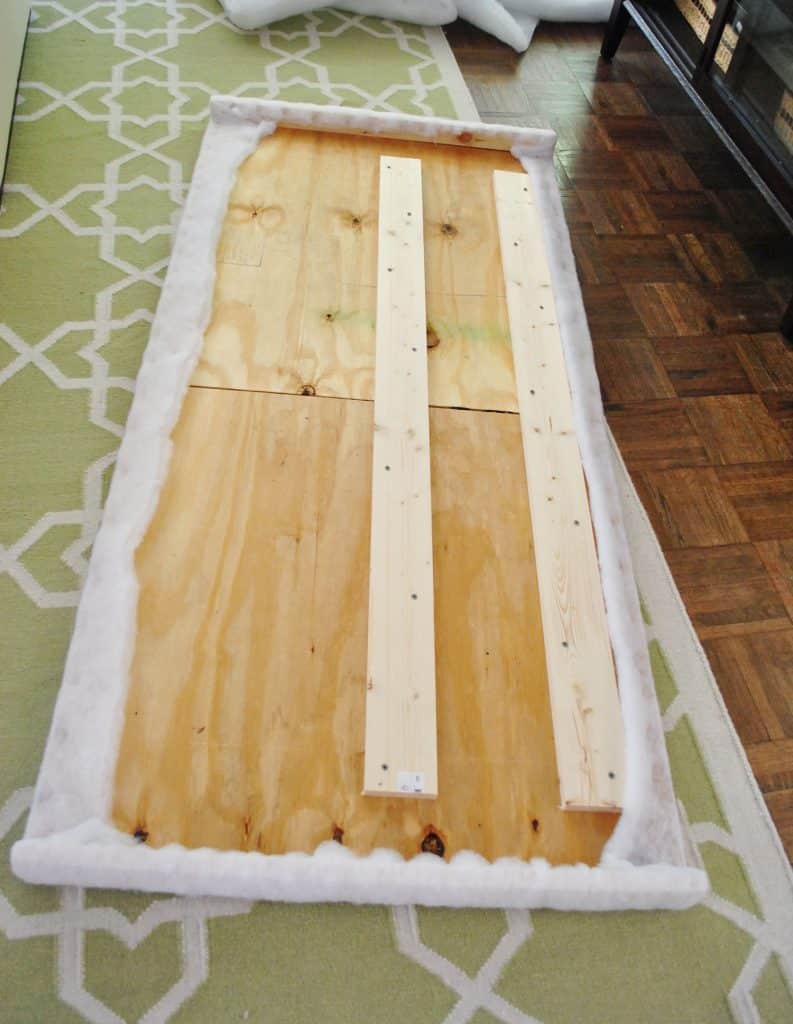
First of all, we were planning to place our DIY headboard around the existing headboard/posts leftover on our Ikea Edland bed. We concocted a plan that would sort of “wrap around” the existing posts, which we mocked up in Photoshop below. But this concept would also work if you wanted to create a popular “winged” headboard look as well.
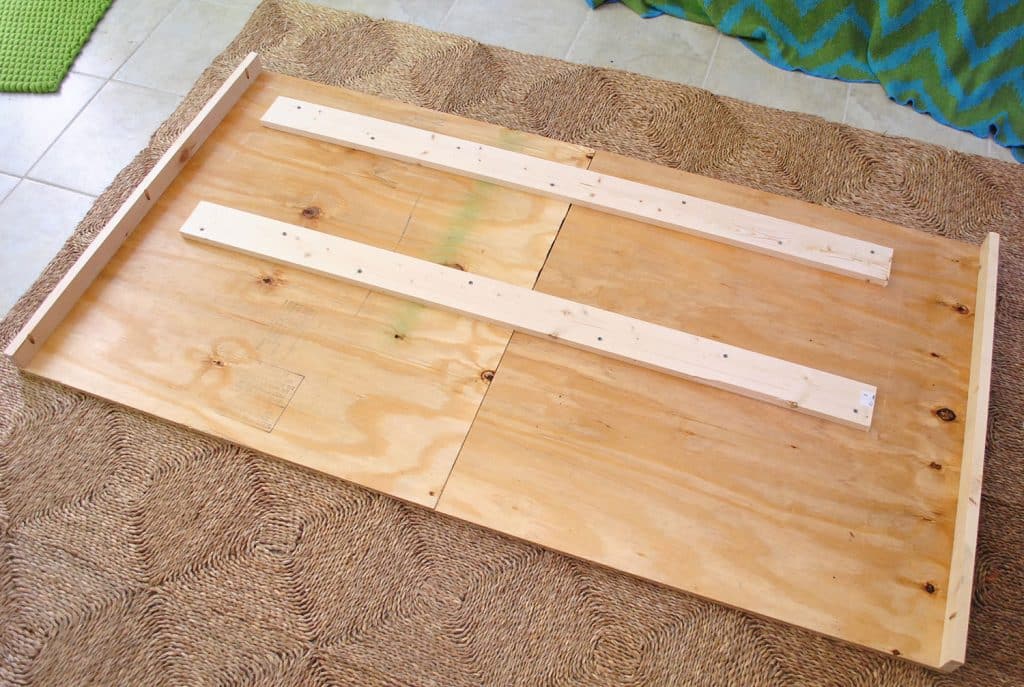
To add these small side pieces, we attached two 1×3 whiteboard boards to each edge using screws drilled into pocket holes we drill using our Kreg Jig. Alternatively we could’ve secured them with wood glue and nails.
The other reason ours was more complicated than a solid sheet of plywood was that we couldn’t fit it in our little car (ha!). So at Home Depot we had them rip it in half, and we reconnected the two halves at home with scrap pieces of whitewood boards. We’re fancy like that!
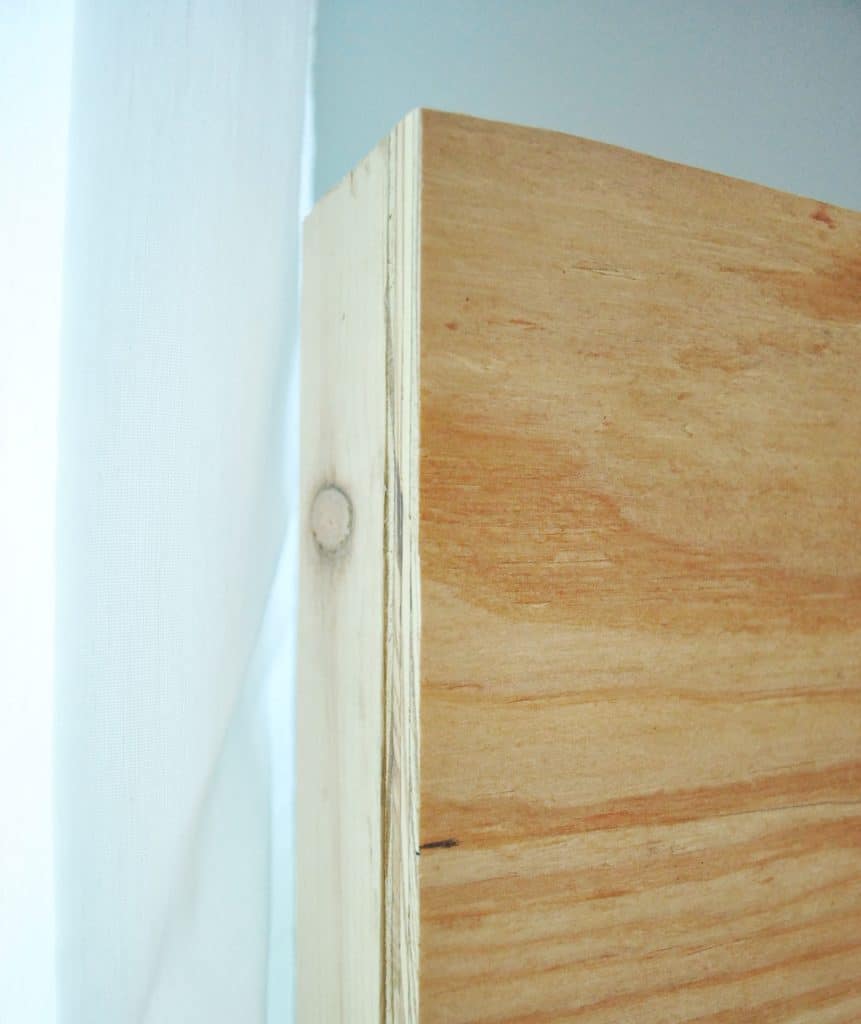
Before proceeding we upholstery, we brought our frame in to make sure it fit around the existing bed frame like we planned. Phew – it did!
You can also now see what that wrap-around piece looks like, and how it hides the existing bedpost. And since we’d soon be upholstering it with fabric, it didn’t matter that the edges were a little raw looking.
Step 2: Add Your Batting Layer
If the carpenter in you trembles at the idea of upholstery, just remember: if you can wrap a present, you can upholster a headboard!
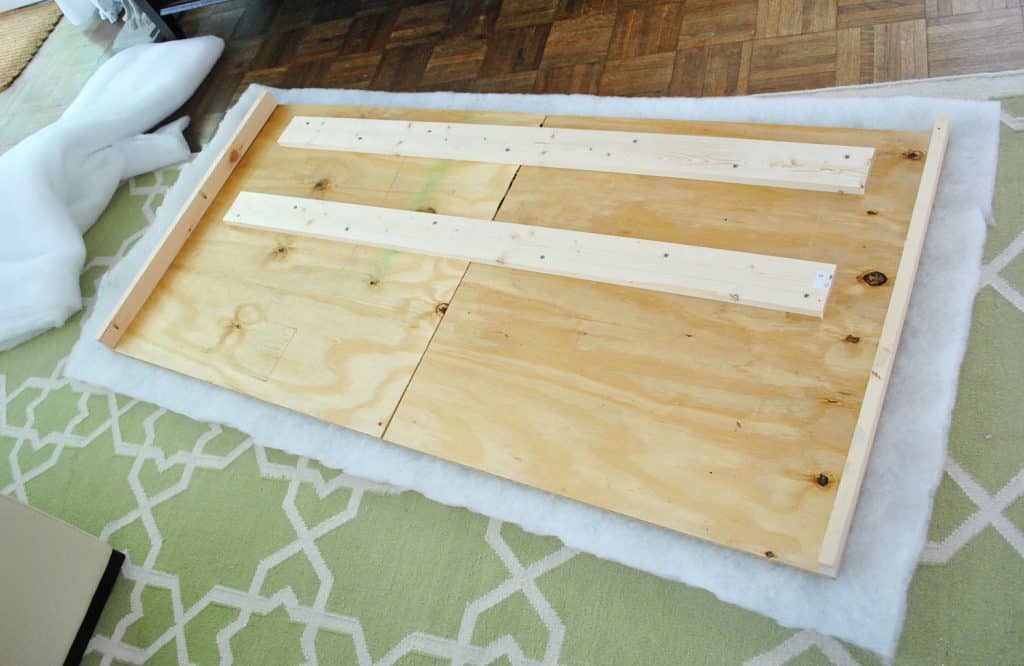
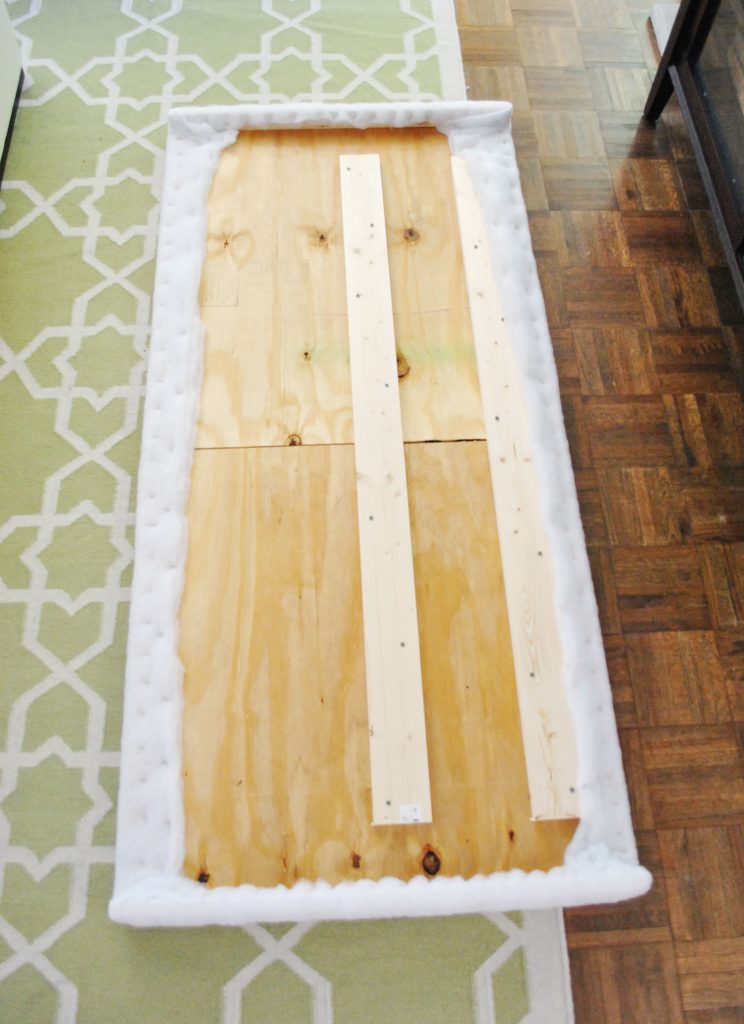
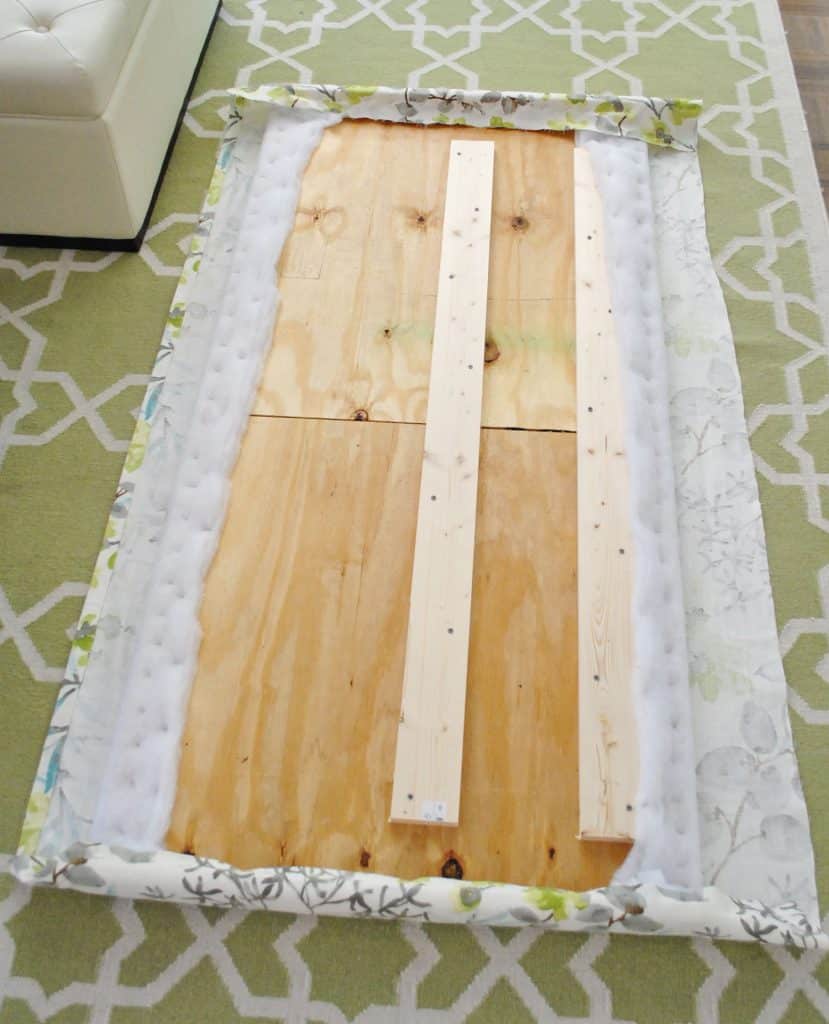
Before adding our fabric, we wanted to first add some padding in the form of extra loft batting. We decided to do two layers so it’d be plenty plush, but still not lose its shape. Sherry trimmed a 2-yard section of batting using regular scissors, laid it on the floor, and we placed our frame on top of it. You’ll want about a 2-3″ overhang on all sides.
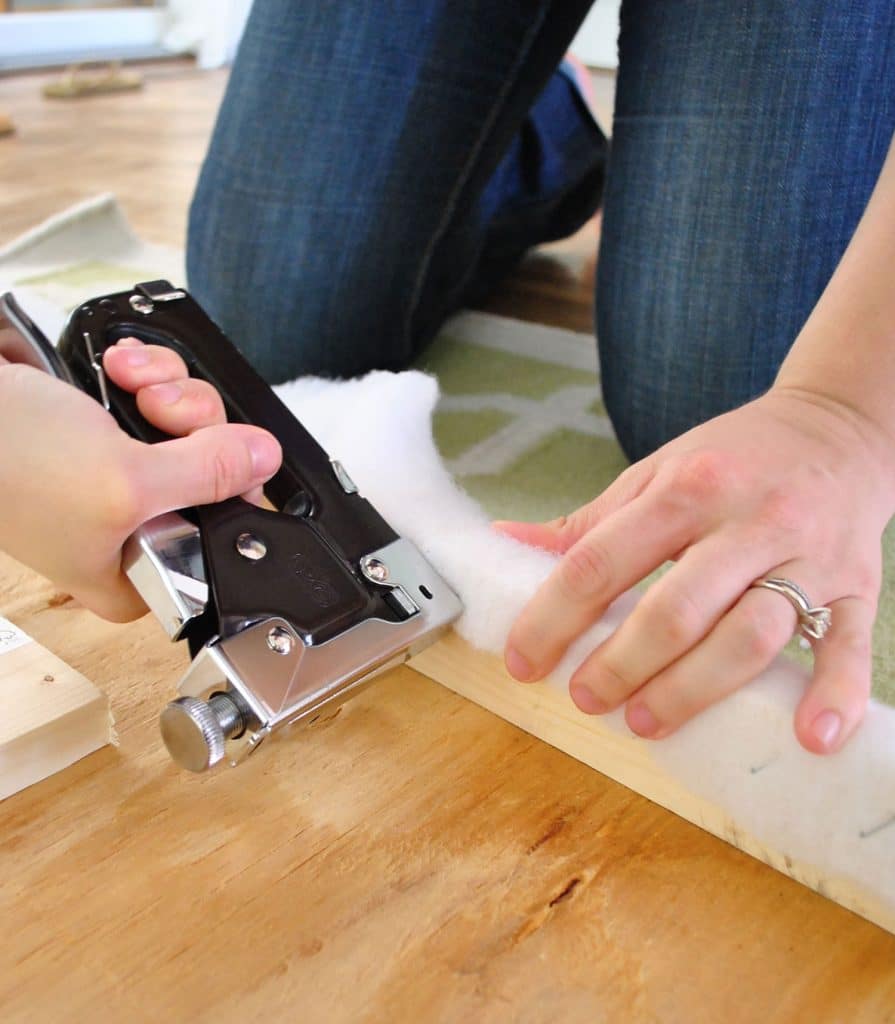
Then we used our staple gun to begin attaching the batting. We just wrapped the batting tightly around the edge and stapled it every few inches.
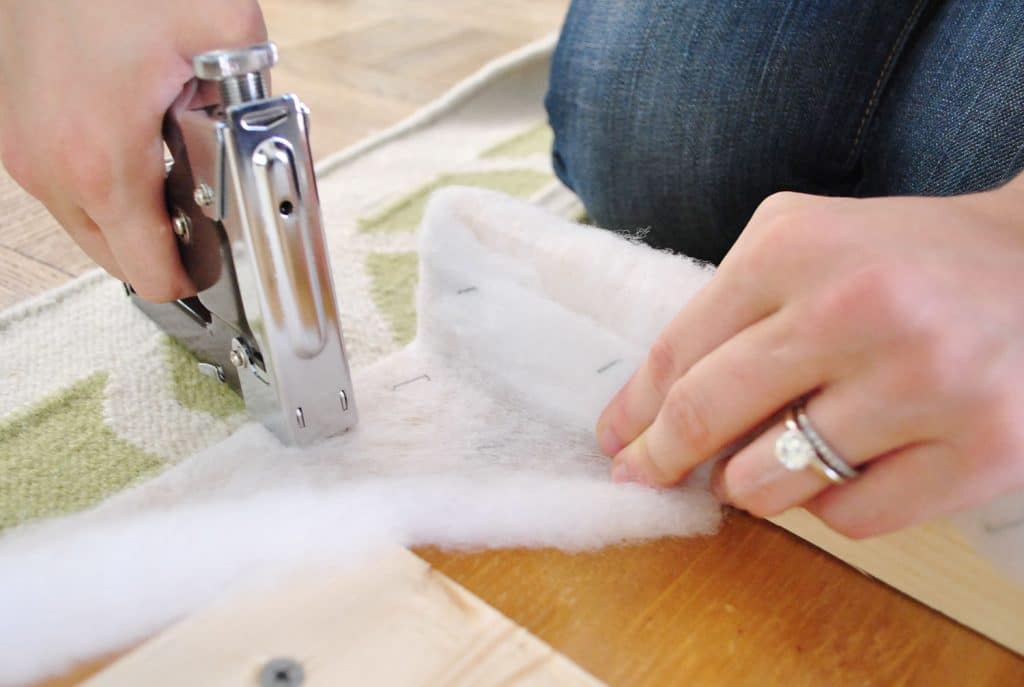
When we came to a corner, it was just like wrapping a present. You just fold it back and staple it so it all looks smooth from the front. Try to pull the batting tight so your corners don’t get too bulky. Bam, bam, bam – it’s done.
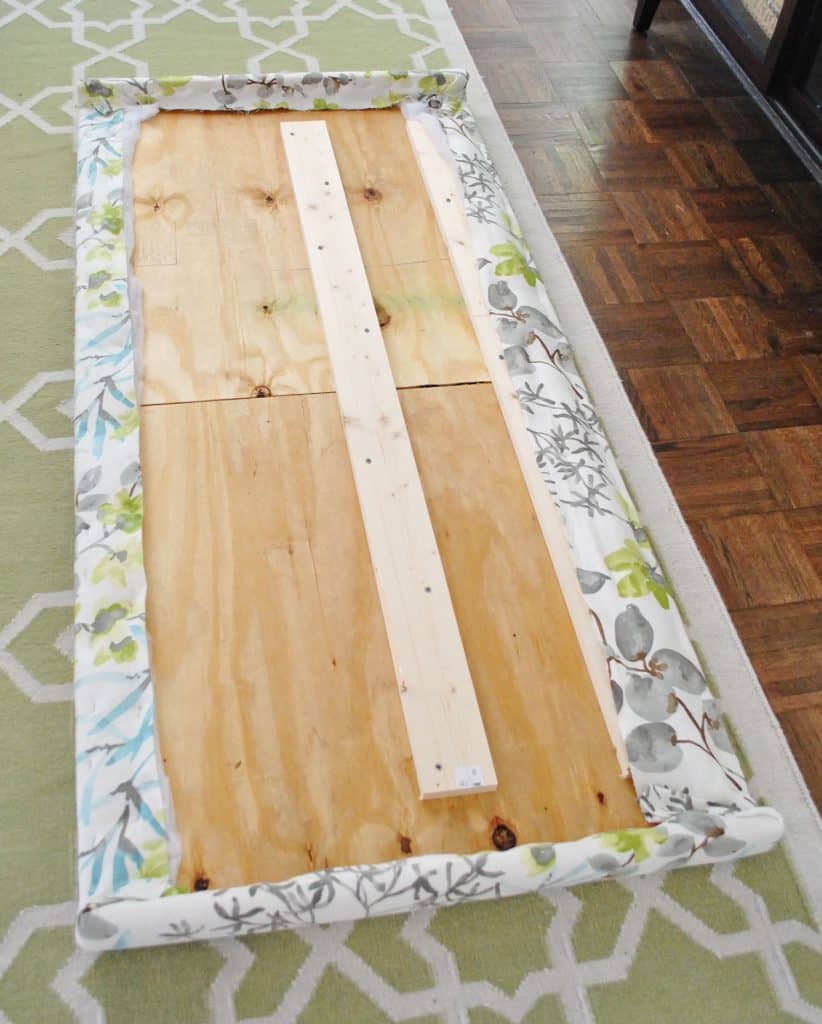
We just worked our way around the back of the headboard, stapling away. At some point John made me pose for this awkward photo too. Winning.
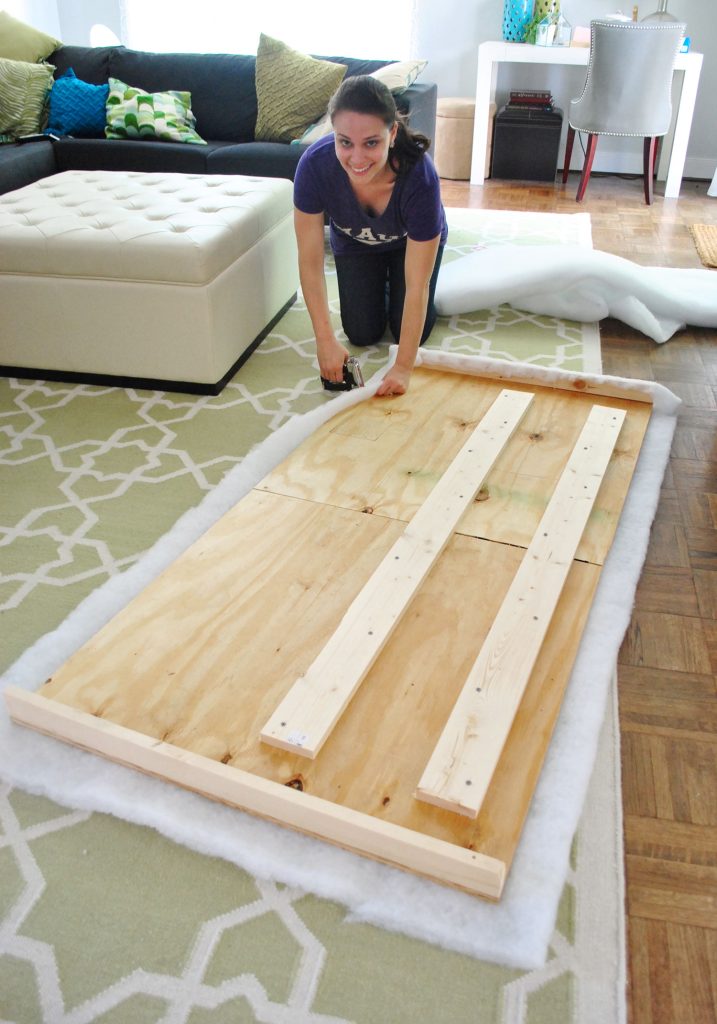
Eventually the whole thing was stapled nice and tightly around the back.
We decided to do a second layer of batting, just repeating this process. Here’ what it looked like with the double-thick batting!
Note: Another option is to use upholstery foam that you attach to your plywood with spray adhesive. We prefer the batting method since it’s easier to wrap around the edges. But if you’re looking for a much thicker, cushier feel – it may be faster to use foam, rather than wrap 4 or 5 layers of batting. Too many layers of batting can also make it difficult to staple into the wood.
Step 3: Staple On Your Fabric
Here’s where the fun really begins. Now you can repeat that process, but with your selected fabric! Just give it a good ironing first to make sure it’s free of creases or wrinkles before you start.
Just like with the batting, we laid it flat on the floor and placed our (now batting-covered) frame on top, making sure it was pulled taut underneath to avoid any wrinkles. Then I trimmed offthe excess fabric around the perimeter, leaving a few inches for it to be wrapped and stapled around the back, just as I had with the batting.
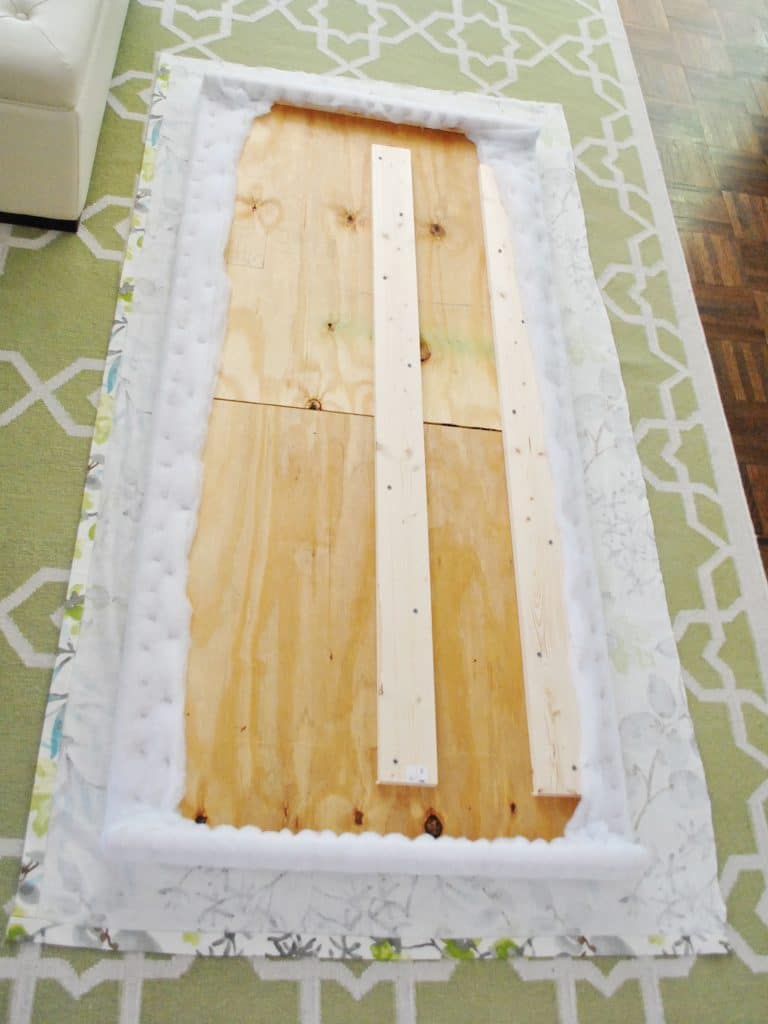
We started by stapling each side, being sure to pull it extra tight so it won’t end up all loose and baggy over time. I started with one side, pulling it all very tightly, then stapled along the opposite side, again pulling it nice and tight.
Once it was secured on those two sides, I did the same thing to keep it secured vertically, by pulling tightly and stapling the top side and pulling it tightly and stapling the bottom side as well.
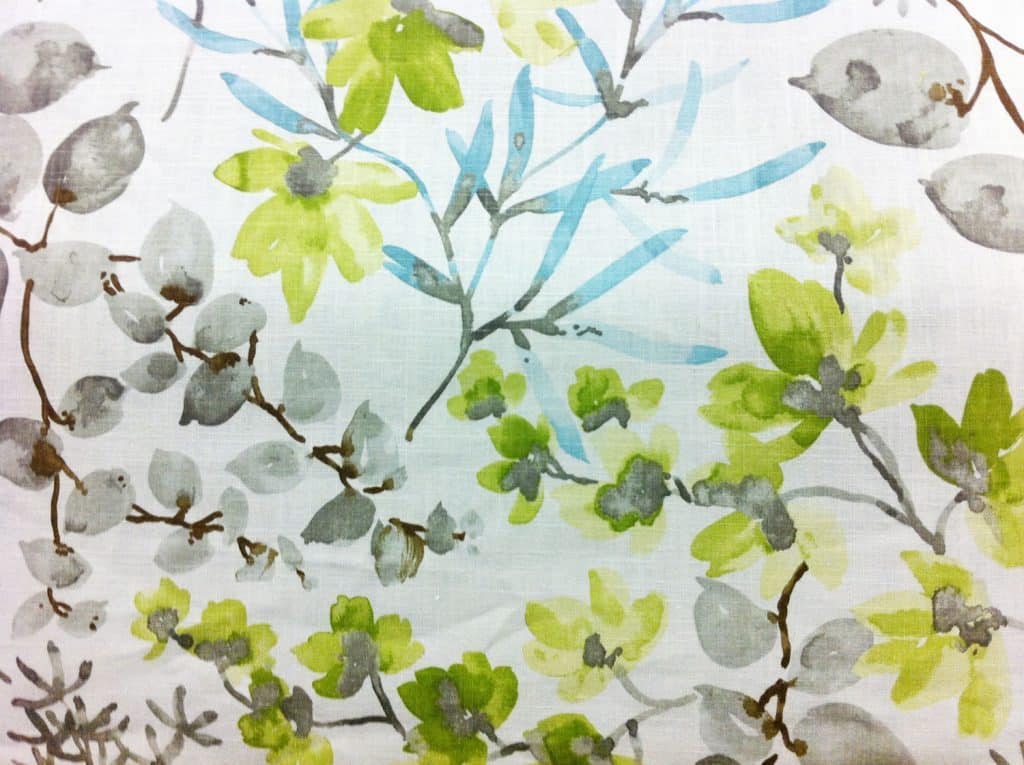
Then we flipped the headboard up to see it in all of it’s plush, tightly upholstered glory. Bing, bam, boom. The whole upholstery step took less than forty five minutes to complete. Is it weird to call it one of my favorite fabric projects to date? I just love love love the pattern.
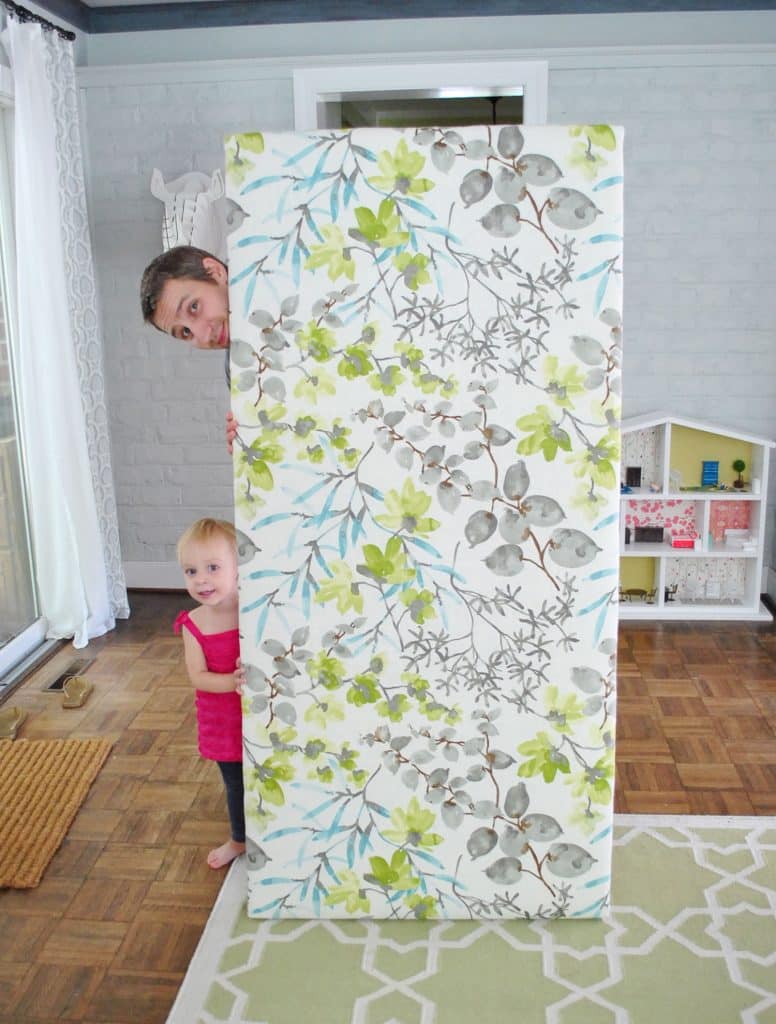
It’s hard to tell above, but in this angle you can get a sense of how plush it is. It’s cushy, but still tight – so we won’t worry about it getting baggy with everyday lounging against it.
Step 4: Hang Your New Headboard
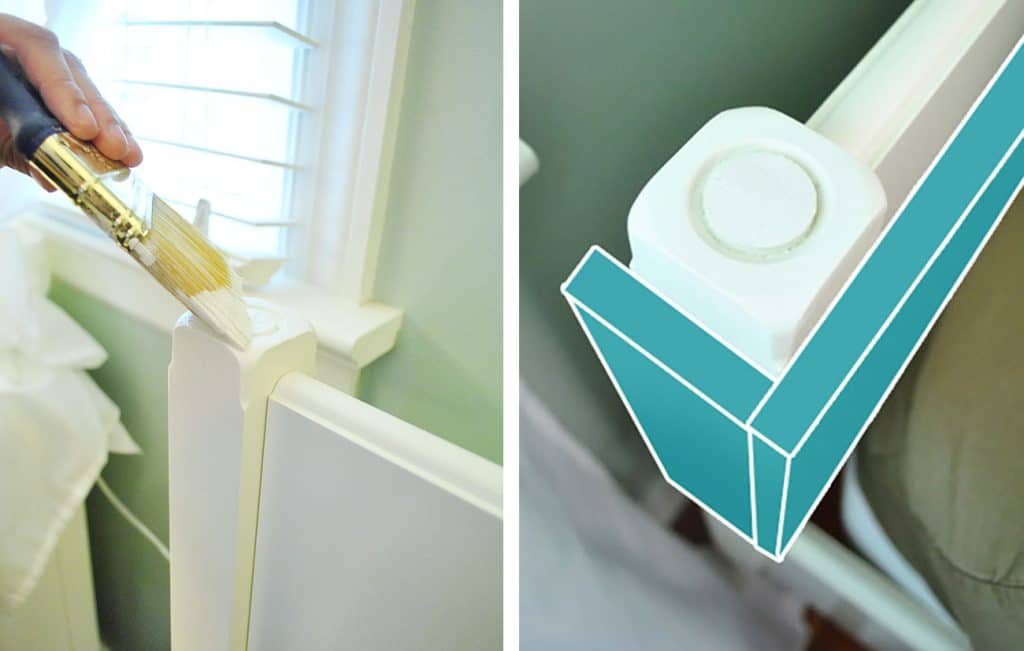
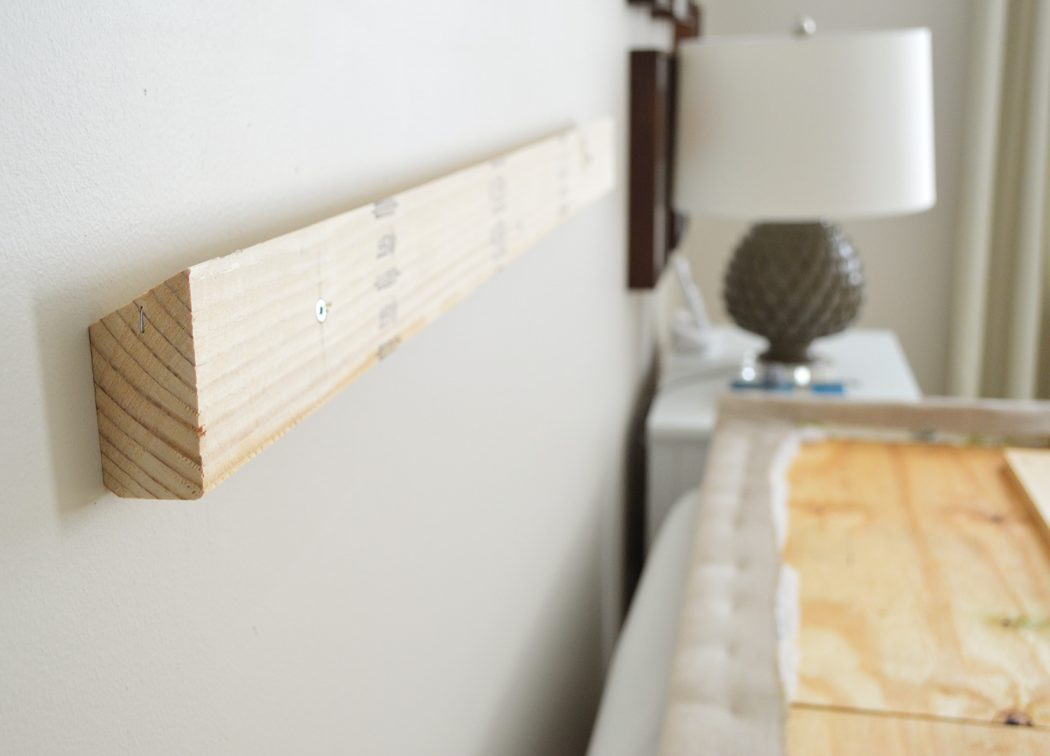
Now you’re ready to attach your headboard to your bed. This can be done in a few ways, depending on your bedframe. When typically like to install a headboard directly into the wall, since it’s often sturdier than attaching it to the bedframe. To do that, usually a french cleat works great. We cover how to DIY a french cleat in this post.
Actually, the headboard pictured above is the same one constructed during this tutorial – a few years later we just updated it for our new home with new fabric and a new top piece (just like we had added the sides pieces in this post). You can see the french cleat below, which is essentially two 2×4″ cut at an angle. One goes on the wall, the other on your headboard. You can also purchase pre-made metal cleats for just a few dollars.
TIP: Try to hang your headboard so it hits the top edge or slightly below the top edge of your mattress, that way there is no gap between the two.
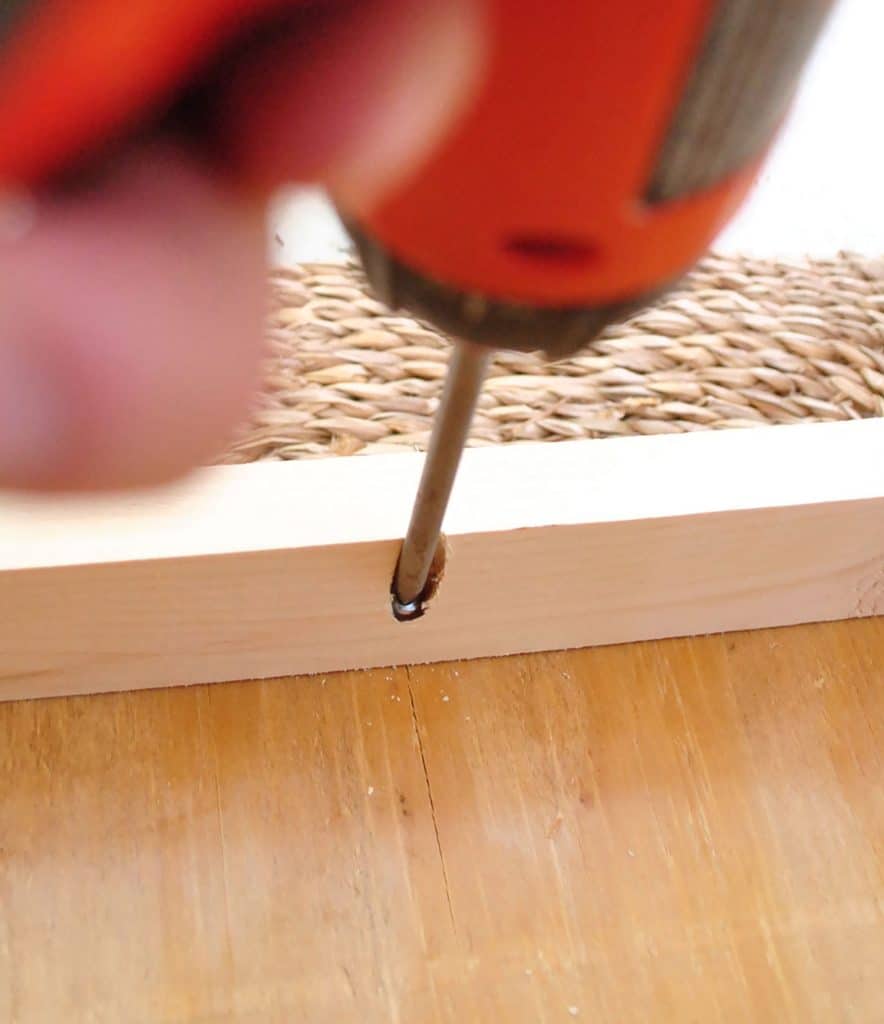
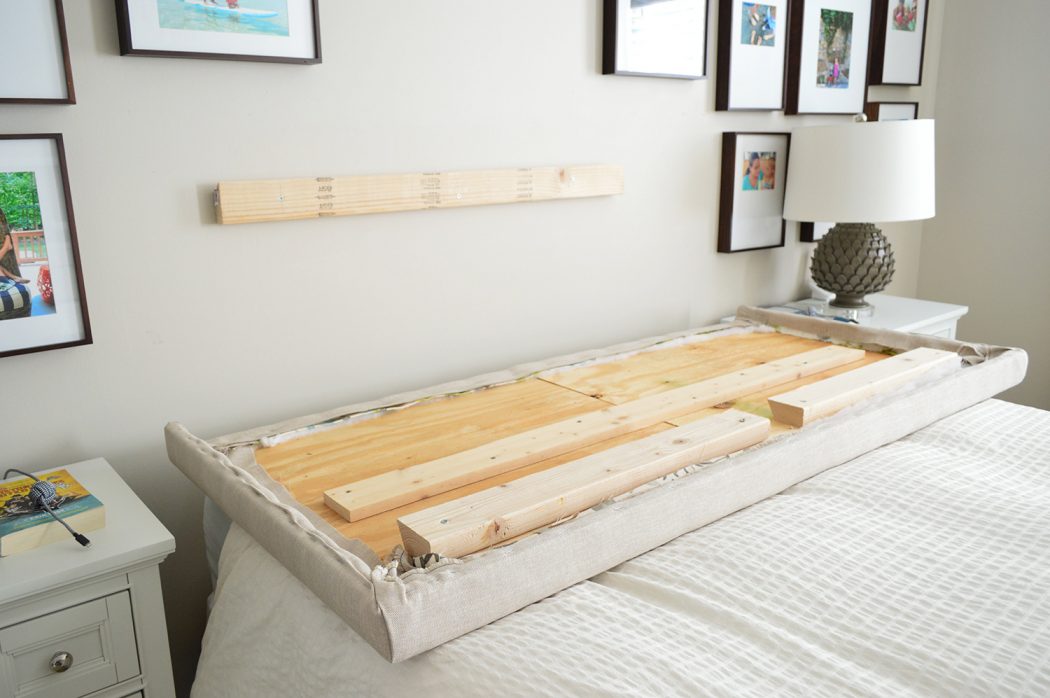
But in the case of our postless-four-poster bed, we chose to screw the new fabric headboard into old wooden one that was part of the existing bedframe, just careful to use screws that wouldn’t poke through the other side.
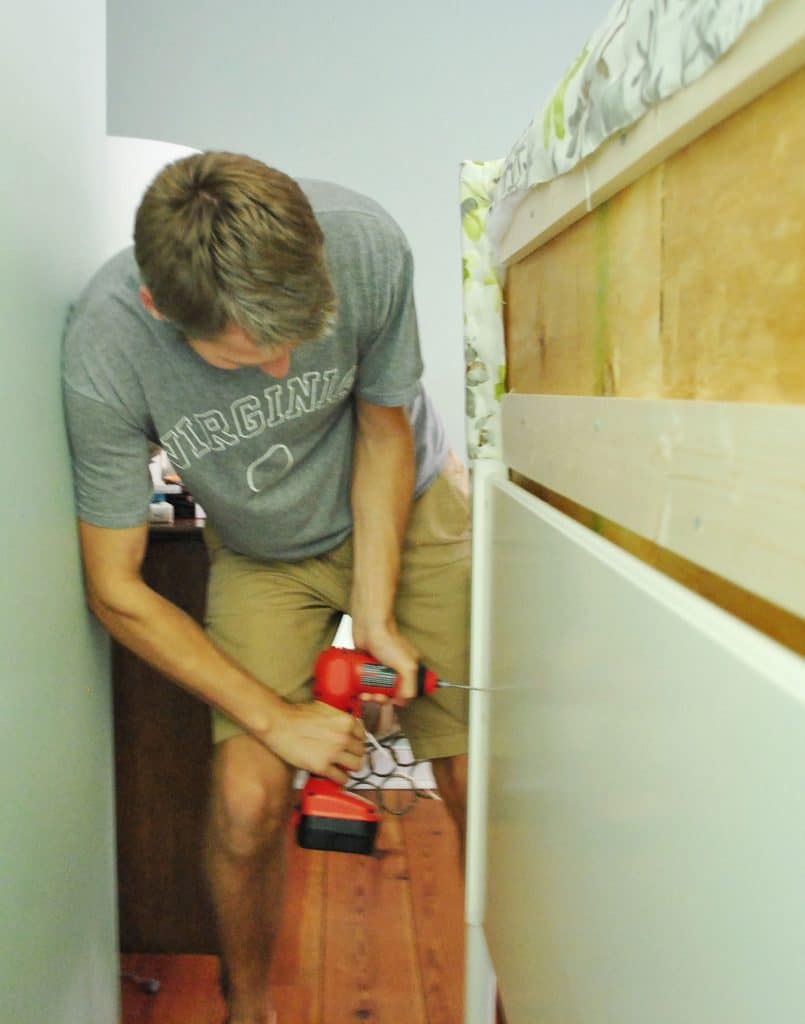
Here’s John putting the final screws in on the backside, pushing the new fabric headboard tight to the bedrame for a snug, secure fit.
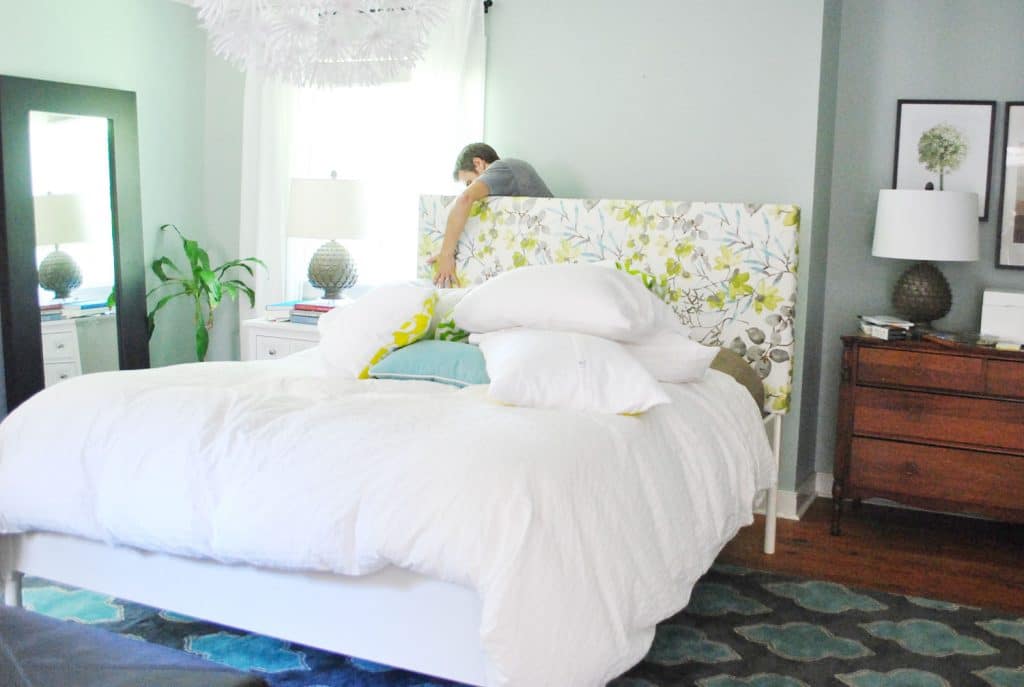
Step 5: Enjoy Your Handiwork
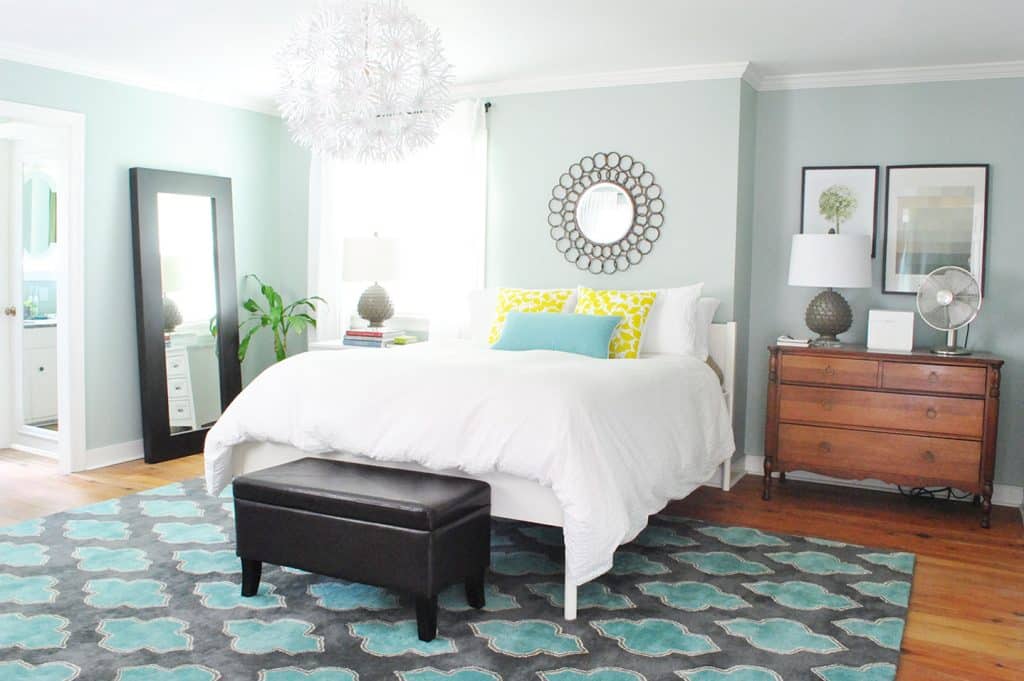
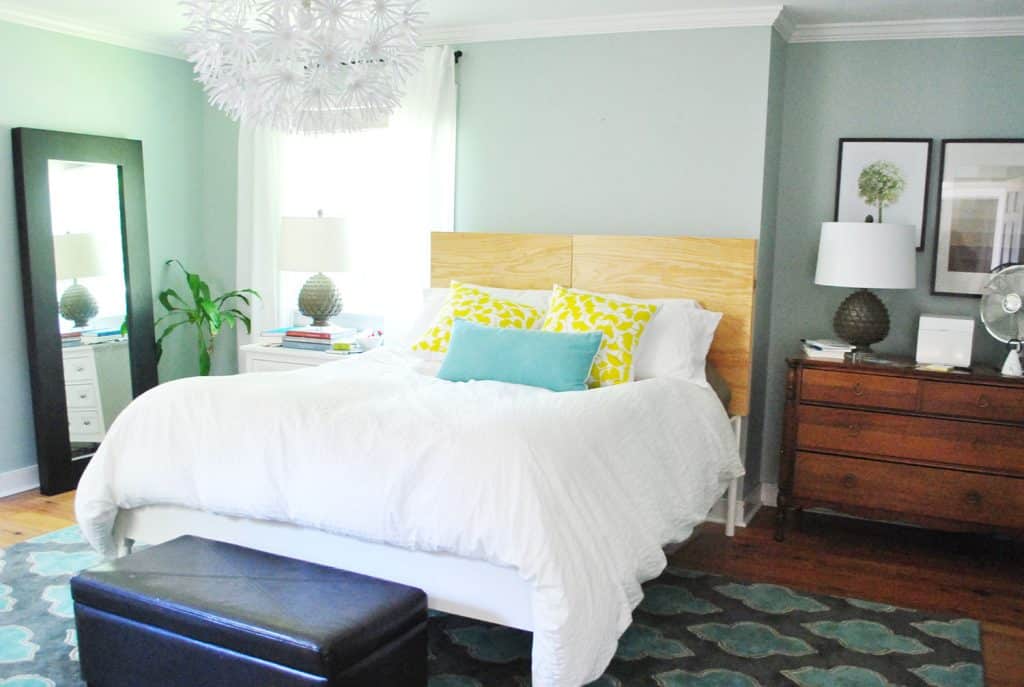
Once it was attached, we just pushed the bed back into place and beamed at it. If only it had been bedtime already that so we could immediately enjoy it’s plushness!
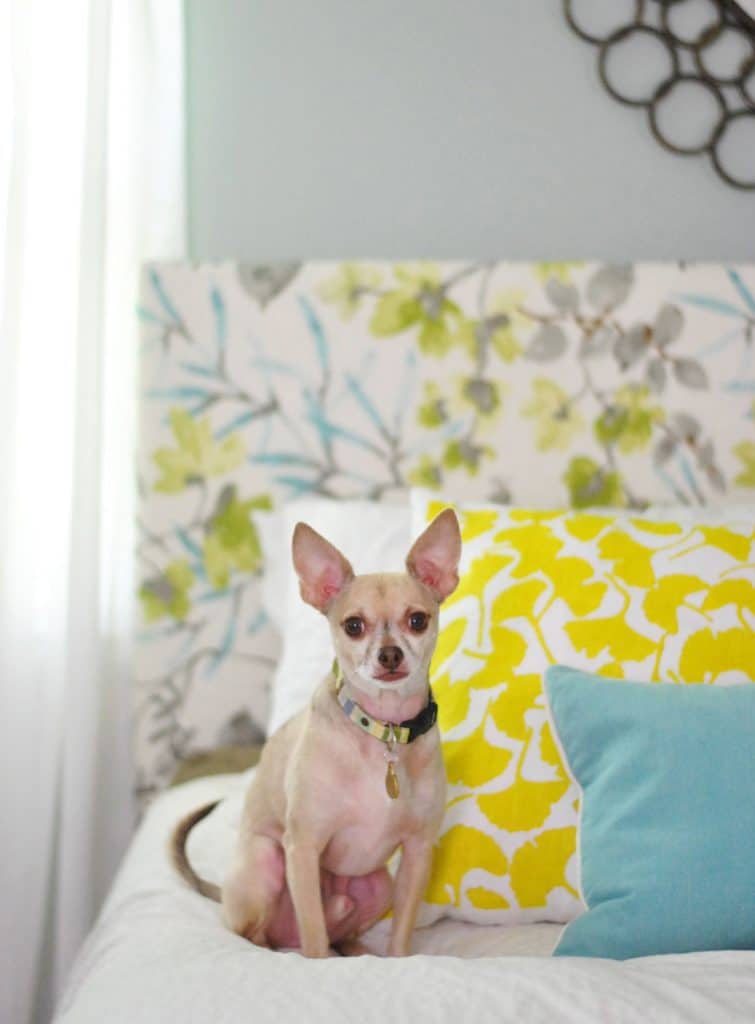
We loved how the fabric is sort of like the bridge between the yellow ginko pillows (since there are greeny-yellow flowers in the headboard fabric) and the turquoise in the rug (thanks to those subtle leafy sprigs of turquoise in the headboard).
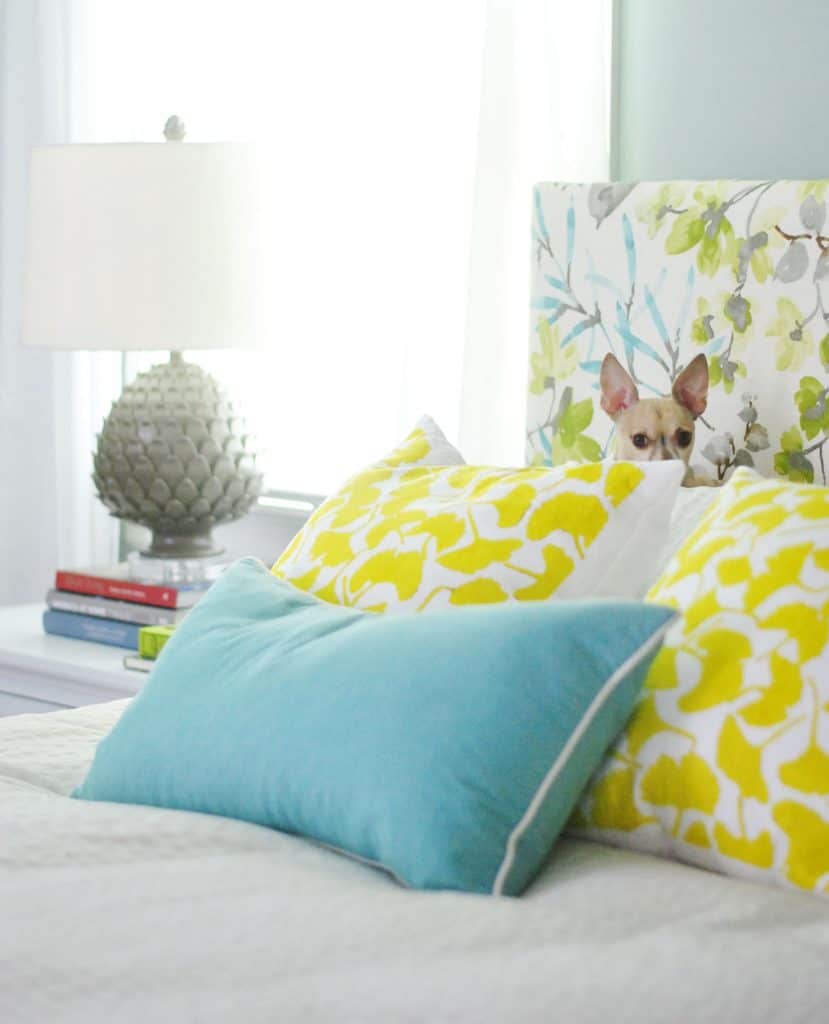
I even think Burger looks especially dapper in front of this new backdrop.
DIY Upholstered Headboard Cost
As for a budget breakdown here we go:
- Wood frame (plywood and some bracing boards from Home Depot): $22
- Two layers of extra loft batting (from JoAnn thanks to a 50% off coupon): $4
- Discount designer fabric (from a local fabric outlet called U-Fab): already owned – but it was originally $20/yard ($40 total)
- Total spent: $66 (if you add in the fabric we previously bought for a book project and reused for this)
Sixty six bucks isn’t pennies, but compared to upholstered headboards that are sold at places like Overstock, it’s at least $100-200 cheaper than even the most basic types. And considering places like Ballard Designs charge around $400-$700 for custom headboards (where you get to pick the fabric) it was awesome to get to choose the fabric and whip this up ourselves.
*This post contains affiliate links, so we may earn a small commission when you make a purchase through links on our site at no additional cost to you.

Lilly says
so jealous, I’ve been telling my hubby we need to make one for about 5-6 years now and still don’t have a headboard, nothing, nada behind my bed but a big blank wall for years. we have the wood materials in the garage too u guys wanna come make me one?
YoungHouseLove says
Haha, sure! Be right over!
xo,
s
Carolyn says
Not to advocate for more work… but I LOVE the darker wall option. It would really tie in with the rug– beautiful. However, your current walls are a great color too :) Bravo on the headboard. I’m saving that fabric for potential curtains in our house.
Catherine says
Love it! It’s looking so fresh and pretty :) And actually I prefer the dresser the way it is now. I think it would layer with darker floors nicely too. Although I can’t see the finish up close, so I understand it might be worn and in need of an update!
Angela says
Love it! So pretty and bright! Glad to see the house was spared in the tornado! :)
YoungHouseLove says
Us too! We didn’t know what we’d find when we got home last night but thankfully we were all ok (our neighbors had a tree on their house, but they were ok too!).
xo,
s
Missy G. says
Love that fabric! And love how your bedroom has come together. Looks nice and airy, but still cozy, if that makes sense.
And 4 different DIY headboard projects?! This makes me even more excited for your book release!! Eeek! Hope that y’all are able to come anywhere near Baton Rouge! Have car, will travel, haha.
Christy says
You guys are awesomely creative (& hilarious!). Your room turned out beautiful. By the way, I love how Burger both matches the decor yet stunningly manages to stand out! Lol. Great job guys!
Erin says
I’ve been reading since you guys moved into this house and I love how everything is coming together. Do you think you’ll do another update post and address how you’ve moved a little bit away from Sue the Napkin? (From what I remember it was more groovy 70’s golds and greens.) I do love the colors and patterns you are using now, which are softer and closer to neutral shades than big bold Sue!
YoungHouseLove says
I think we oddly enough are still on a Sue kick! Her colors are dark teal, light turquoise, grellow, navy, white, etc – and they all still end up being our favorites. Although we have also added some other colors to the mix (like Clara’s soft pink walls, some soft gray walls, pops of yellow, dashes of orange and red in the art in the office and kitchen, etc). I think as things evolve we like adding a few bold things in every room (a bold rug or bright patterned curtains, etc) and then we layer in softer things so it’s not all too crazy!
xo,
s
Erin says
Welp, I actually looked at ol’ Sue after I posted that comment and I can see it now. Much more blue and green shades than my brain remembered! More importantly, the bedroom looks great!
Christina says
Where are the yellow gingko pillows from?
YoungHouseLove says
Those are from a small shop in Northern Virginia – wish I remembered the name. They were on clearance and it was in Old Towne, VA.
xo,
s
Lynn @ Our Useful Hands says
Nice headboard transformation! The room seems to be a pretty nice combo of woman/man living space. Everything is not all pinks and purples and everything is not all blacks, browns and leather either. I like the campaign darker color John is pushing for because it’s just a tad darker than our grey bedroom and we really like that color family. Today we put in our first insurance claim since moving in. Thanks to Tropical Storm Debby we are now finding all the roof leaks in this little old house. Hopefully this process is not as painful as I am building it up in my mind.
My best, Lynn
YoungHouseLove says
Oh no, I hope it’s all ok and easier than you think!
xo,
s
J+H @ Beyond The Stoop says
in our old apartment we secured ours to the wall, because we only had the standard metal frame that doesn’t have any supports for a headboard… similar concept, but the braces in the back were mounted to the walls instead of the bedframe!!
love the way you did it. i’m dying to steal that pattern! if i can find it.
cheers!
Alison says
Oh my gosh!!!!!!! I love love love it!!!!!!! You always find the most amazing fabric!! I swear I must be fabric challenged or something.
Emma says
Looks great! You must have an overwhelming urge to read books in bed now and lean on that lovely headboard. Way to go on that fabric choice!
YoungHouseLove says
Haha, we definitely were excited to come home from Haven to see it again!
xo,
s
evilbunnie says
How did you know that I was looking for that exact fabric! I saw it as drapes in the smith+noble catalog, and couldn’t find it elsewhere, and now you found it for me!
I love you guys. You complete me.
YoungHouseLove says
Aw, you complete me too. You had me at evilbunnie.
xo,
s
Mamaw03T says
Love the headboard and the fabrick you chose for it. Love how the room looks with stained dresser, floors and with darker paint on the walls. For some reason, I like my house bright, but my bedroom on the darker side. Good job, y’all!
YoungHouseLove says
Thanks Mamaw!
xo,
s
Alexandra says
I L.O.V.E LOVE your fabric choice! It brings the colors in the room together so nicely. I have been inspired to take on my own plain jane headboard… thanks for the inspiration!!!
p.s. I adore the doggie shots! Burger is the cutest!
elizabeth says
I was able to find the remotes, or something similar! Thanks for the idea!
http://www.homedepot.com/webapp/wcs/stores/servlet/ProductDisplay?productId=100654961&storeId=10051&langId=-1&catalogId=10053&MERCH=REC%2d%5f%2dSearchPLPHorizontal1%2d1%2d%5f%2dNA%2d%5f%2d100654961%2d%5f%2dN
YoungHouseLove says
So glad!
xo,
s
Daphne Johnston says
I am totally loving the rearranged room! It looks so much more balanced now (even with the offset wall)! And your color are fantastic. We redid our bedroom with dark furniture and teal/blue accents a year ago and we love it, but now I’m definitely thinking we need some yellow in there!!!
John@Our Home From Scratch says
Looks great guys! I’m very impressed with how you adapted it to your existing bed frame. Such a clever solution.
danielle says
I love your headboard and your room! I’ll be embarking on my own headboard adventure soon…I agree with some other posts – the warm brown of the dresser/floor looks great but it’s your room :) Can you tell me where you got your bedroom rug? Looking for something just like it for my living room.
YoungHouseLove says
The rug is from a local lighting outlet called The Decorating Outlet (it was super on sale since it had a hole that we were able to hide). The label says Ritzy Rug though, if that helps!
xo,
s
Claire says
The headboard looks great! Any tips on how to make sure you are not stapling staples when you are covering a head board? With all those layers I’d be worried I’d run out of real estate. Thanks!
YoungHouseLove says
I thought that would happen too, but somehow I only did that a few times! It’s funny how you probably couldn’t hit the other staples behind it unless you were trying except for a few random incidents, it’s just a different spot that your gun lands on each time without many overlapped spots in our experience. Hope it helps!
xo,
s
Shannon says
LOVE IT!!! The fabric is so pretty and really ties it all together.
I have to admit I like the darker shade wall color, too. Really makes the bed pop!
Kathleen says
Love the fabric on the headboard. I love me some yellow-green and turquoise. Those are colors I’ve used in my house.
2 years ago I made a headboard for my best friend. We were intimidated by using lumber because we had nothing to cut it or the 1×2. Instead we used a 4’x8′ sheet of foam insulation. It was 2″ thick. We cut it with a bread knife (a utility knife didn’t work and well you use what ya got although a hack saw might have worked also.) We left it the 4′ tall and just leaned it behind the bed. It was light weight so the legs of the bed and the pillows just pushed it into place. I was prepared to use some heavy duty velcro to hold it to the wall but it wasn’t necessary. We wrapped, stapled and then used duct tape to keep everything in place since the staples weren’t as grippy as if in wood. I made a nail head trim on the front. It was easy, just push into the insulation board by hand. It turned out just great!
YoungHouseLove says
That sounds really cool!
xo,
s
Tina says
Absolutely love the picture of Clara looking up at John behind the headboard – she is so stinkin’ cute!
Karen L. says
Really love your choice of fabric as well as the clear way you showed us how you did the headboard. It’s all so beautiful.
I totally trust your design choices on whether the pretty old dresser needs “updating” or not. You’re right that it’s a personal preference kinda thing. I refinished/stained an old (it was old even back in 1972) oak dresser when we were first married and it’s been in many, many homes of ours through the 41 years of our marriage. I gave it to our son who used it all through his college years and now it’s been in most of his five children’s rooms and it’s going strong!
I love seeing it and thinking of the days I spent refinishing it so long ago. And to think I just found it beside someone’s trash can and then hauled that heavy piece home to our little first apartment!
Gina says
I recently got a sample of that fabric! I absolutely love it! Your headboard looks great. The whole room is beautiful. Love the changes you’ve made.
Haley says
The room is really coming together! I see similar comments as I scroll, and I must echo the sentiment not to stain the dresser, unless it looks dated in person. I love the idea of painting the room darker and staining the floors, but staining the dresser might feel too matchy. I think it looks expensive to have older pieces with different finishes.
My husband probably loathes you for it, but you’ve totally inspired me to freshen up my bedroom :). I ordered a duvet cover and shams from Overstock for $40 (for a king no less!), a black & white chevron rug for $88 and am eyeing grey velvet curtains on Overstock for $120 (for 4 panels). I’m thinking about painting my dresser something bold (I’m thinking bright red, but I’ve been told that I should tie into the apple-y green accents in the master bathroom). I wish I had you two to walk through my house and give me advice, like your landscaping lady – haha!
YoungHouseLove says
In person the dresser is in really bad shape, so it needs to be refinished no matter what, but we promise to think long and hard before deciding what color stain. Won’t do anything rash (it has already been over a year! Haha). As for your bedroom, it sounds really charming! Good luck with it!
xo,
s
Krysta says
That fabric is beautiful. I questioned using it on a headboard, but seeing the finished product I love it. And I have to say I agree with John on the darker paint color. The photoshop mock up made me catch my breath!
Kayla says
I loooove these recent changes in the bedroom. Small changes that pack a huge punch! Do you think you might consider tufting the headboard or adding nailhead trim (or other embellishments?) in the future? I admit, it looks great as it is and probably doesn’t need it, but I would be curious to see what else you might come up with, or to hear why you ruled it out.
YoungHouseLove says
I think we opted for a simple clean-lined effect (no turfting or nailheading) since the room has some other focal points (a mirror over a window, a giant chandelier) but if we thought the room was more basic and needed more oomph those are great options!
xo,
s
Erin C says
Looks awesome!
I thought it went bing, bang, boom? Maybe thats too dirty sounding. ;) When are you going to do another installment of “Get on that already!” I’m dying to see a picture of the playroom/storage area. Our guest bedroom has become our catch-all and I’m convinced I’m the only person on the face of the planet that has a junk room!
Oh, and I pre-ordered your book last night. Can’t wait!!!!
YoungHouseLove says
Oh man I have so many things to get on! Haha. Will get back to that soon hopefully! Between the deck and our recent travels and squeezing in things like this headboard right before we left, we’re all over the place!
xo,
s
Lindsay says
i am IN LOVE with your headboard! seriously, i have read every post for the past 2+ years (plus basically all the archives from before that) and this may be my FAVORITE PROJECT EVER!!!
YoungHouseLove says
Aw thanks Lindsay! You’re so sweet!
xo,
s
Amy says
The headboard looks great! Unsolicited opinion: the dresser is SUCH a pretty, warm color, and it looks great with the cool walls. I wouldn’t stain it darker! The photoshopped pics just look a little cold, I think, with lots of very dark and very light cool tones. I think it looks friendlier/cozier now. But obviously do what makes you guys happy. :)
Kristen says
I love it! I have been pondering tackling this project myself, and this process seems much easier than the other one I had in mind.
Question for you: Our bed doesn’t really have anything to attach this new headboard to once we create it. What are your thoughts on attempting to put “legs” on it versus just screwing it to the wall?
YoungHouseLove says
That’s a great alternative too!
xo,
s
Ashley/Happy Penguin Press says
That fabric is gorgeous! I just used Braemore’s Gorgeous Pearl for pillows in my kitchen’s eating area:
http://www.onlinefabricstore.net/decor/drapery-fabric-and-supplies/drapery-fabric-by-manufacturer/braemore-gorgeous-pearl-fabric-.htm
YoungHouseLove says
Pretty!
xo
s
Ashley says
Love it!
For our headboard I made a couple months ago I spent $0. I used a drop cloth we had, batting we had, and a bunch of cardboard boxes glued together to make one giant thick piece. Then hung it on the wall with a modified french cleat (ghetto style!)
YoungHouseLove says
That’s awesome!!
xo,
s
katalina says
they say to use the colors you wear to decorate–just did not know that Burger was the one picking all the colors! I expect to see a picture of ears sticking out between the pillows!
the darker walls — would it be that gray horse color you likes in the office?
Beautiful and Happy– wish my bedroom looked like that!
By my eye now goes to the plant in the corner now–love the pot but I think you need a different vertical fuller plant!
YoungHouseLove says
Yes, that’s exactly what John wants to do! It’s a really pretty color!
xo,
s
Susan says
Your bedroom is coming together spectacularly! That fabric is perfect and you guys did a great job on the DIY headboard and bed remodel! Can’t wait to see the next move!
Or your book!
Susan
Nicole says
I love love love this! Your bedroom looks insane now! Awesome. I’ve been planning on doing a fabric headboard in our room, and i think this post just tipped the scales enough for me to start it. Thanks so much for sharing everything you do with us.
PS> If burger’s ears were any bigger, he’d tip forward. I love that guy!
Heather says
I love it! The fabric is gorgeous. And as for the darker walls, do it! I just painted ours a dark grey and it’s super moody and awesome.
Sherry from BC says
I love the new headboard. Great instructions. I may have to make one for my spare room which is headboardless….is that a word? I have 4 huge pillows on my bed for reading in bed cause I have a wooden headboard. I love the interplay of the different colours, patterns & textures in your room. Though now I feel the next step should be changing the ottoman at the end of the bed. Not sure to what, but is that the next tweek? I do like the slightly darker version in the photoshop. I have to say I am very impressed with how you handled your trip with the posts….you were able to keep your regular readers happy while traveling…..so considerate to those of us that need our daily YHL fix.
YoungHouseLove says
Aw thanks Sherry! It’s always hard to travel and especially to travel and speak somewhere and still keep up with the blog (we’re dreading the book tour for that reason) but we try to cram in as many projects as we can before we leave and then scramble to write things up while we’re gone to keep you guys entertained. Haha.
xo,
s
Sherry from BC says
One of the women I know who does a blog says she can write posts and have them timed to publish in the future. I don’t know the details as I am not there yet but I found this interesting. Do you do that? Or upload as you go? I am just getting going in the blogging world and tips help. The tutorials/instructions that the two of you post are so much more readable than others I have found on the blogosphere. Can’t wait for your book.
YoungHouseLove says
We can’t do that since we’re committed to answering comment questions as they roll in. So if we put up a post that auto published itself, but weren’t around to respond to it, we might end up having to answer the same ten questions twenty times each instead of getting to them sooner so they were asked less often- does that make sense?
xo,
s
katalina says
forgot to add– I think all these trees on your neighbors house is a good reason to get that tall tree in front chopped down– they you want to photoshop out of the photos!
Morgan says
Yay headboard! Love it! And yes, darker color on the wall would look awesome.
ShellyP says
The room looks fantastic with the new headboard. Yes, I concur with John’s suggestion to paint the room darker. That headboard will be more pronounced with the contrast of darker walls. Great work!
ruthy says
ohhhhhhhhhhhh!!! I LOVE it! It looks so fresh and whimsy!
Sarah says
Loving the new room! so much more cozy…I am also in the John camp of repainting a little darker, i like the photoshop repaint color. Also,…every time I see you the “darker floor and dresser” images my heart goes….noo. I love the character with the current stains…it has it’s own identity. But in the end, it’s your room…so do what you love!
Megan says
I LOVE it. I always enjoy your additions of color in your house. I am a very neutral color gal…but someday I’m hoping your inspiration brings me be brave enough to add more color! It takes a lot for me to like color, and I love what you do with your house. Your bedroom looks great~! I LOVE the darker floors, chest of drawers, and the darker wall color. It looks great like that! Thanks for sharing!~
Rhianna Wright says
LOVE IT! That fabric is to die for!!! I love the idea of the dark floors, but the dresser seems really dark in the picture…but I know that photoshop isn’t totally accurate to what you guys would actually do. I love how the overall room is bright and airy, but I personally wouldn’t darken the wall color if your doing dark wood also. But so far I love everything you guys do!
Denise says
Sherry, I love the new furniture arrangement in your bedroom and that fabulous rug. Just curious, did you photo shop your headboard in a solid gray fabric with the new floral fabric as accent pillows? Or maybe try gray/grey paint on the walls? I can’t decide what is not working for me…but you and John always tweak your rooms to perfection!
YoungHouseLove says
Oh yes, we tried a lot of solid colored headboard options (navy, gray, turquoise, yellow) but in the end we wanted more pattern I think!
xo,
s
Andrea says
Great project and love the fabric!
Question – does it matter how you staple, especially the fabric? For example, do you start at the center of each side and work your way to the corners? Staple one whole side at a time, or go back and forth from, say, top to bottom? Or just work your way around the perimeter? Thanks!
YoungHouseLove says
I usually do one staple in the middle of one side (after pulling very tight) and then work my way towards either side of that edge. Then I do the same thing on the side across from it. And then repeat that with the other two opposite sides. Pulling tight and trying to keep things consistent is the key. Good luck!
xo,
s
Kristy says
Ooooh, pretty pretty!!! I’m loving the way the room has evolved.. it feels sooo much better now! :) And I’m with John, the darker color looks pretty great. Keep it up Petersiks, it’s looking good!
Katie says
I love it! It’s so pretty and springy! It was great to meet you at Haven – y’all are just as sweet and funny in person as you sound on the blog!
YoungHouseLove says
Aw thanks Katie! We had so much fun there!
xo,
s