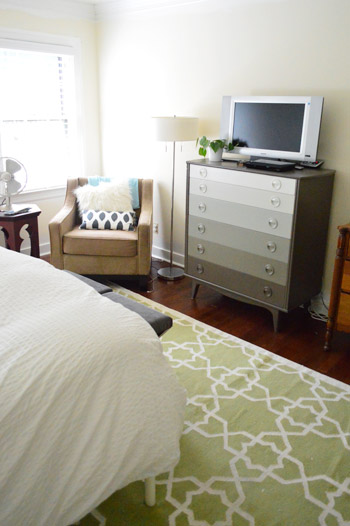
One thing we were excited about doing differently in this house vs. the last one is having a TV in our master bedroom.
And while we did briefly have a TV in our last master, we never hooked it up to a DVD player or bothered to get a second cable box. Heck, I’m not sure it even got plugged in.
We’ve never been gung ho about having a bedroom TV (and we realize it can be a hot topic) but as two people who struggle to snap out of blog mode at night, we thought it would help fight the temptation to work on our laptops (which happens all the time downstairs on the sofa) if we were snuggled in bed instead. So we took the plunge and ordered two set top boxes for this house. One step closer to living the dream, y’all.
Except, once again, we didn’t get the bedroom one hooked up. In order for our alarm system to work, we needed a phone line which led to a pre-move installation of cable/phone/internet, but before moving in all of our furniture we weren’t sure where we wanted the Verizon guy to put the new cable jack in the wall upstairs. So he convinced me I could easily do it myself whenever I was ready and off he went, leaving me wondering if he was persuasive or just lazy. Either way, we had another non-working bedroom TV on our hands (well, until we hooked up the Blu-ray player for the occasional weekend movie).
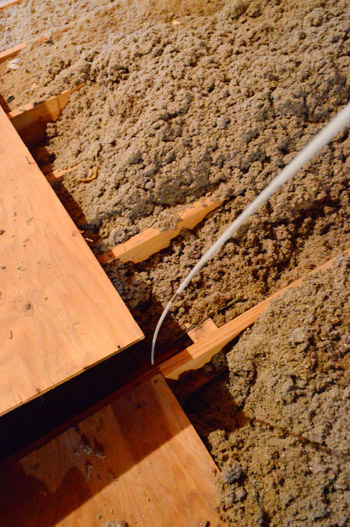
I’ve never done any sort of wiring through walls, so I was pretty unsure how this would all turn out. The basic goal being to snake a cable from an existing splitter in the attic, down through the wall and out a new hole in the bedroom. Between the basic instructions from the cable guy and a few YouTube videos I felt brave enough to start drilling a few holes in our attic. But first I had to figure out where. So I followed a visible electrical wire in the attic to help me pinpoint where the wall was amidst all that insulation (the wall I was looking for runs parallel to the joists).
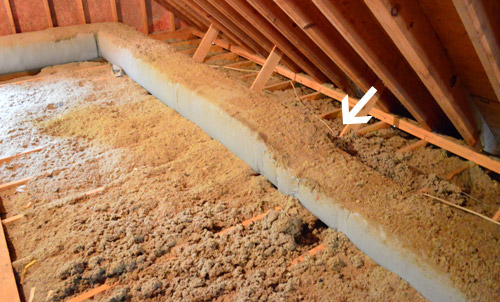
I also knew I was at the right place because (after some digging) I found the phone line that also connects to a jack in our bedroom. Seeing where both of these wires were threaded through the attic floor gave me confidence that I would be making a hole in the right piece of wood.
I was having trouble translating my measurements from the bedroom to the attic. For some reason I couldn’t wrap my head around adjusting for measuring against drywall in one space and an exposed rafter in another. So instead I used other fixed reference points to figure out where I should drill. For instance, I knew where the phone jack was in the bedroom and could see where its wire snaked through in the attic. So, here went nothing.

Meanwhile, in the bedroom I used a jab saw to make a small hole where I wanted my wire to come out. Crossing my fingers the whole time that this was more-or-less below the hole I’d just drilled overhead.
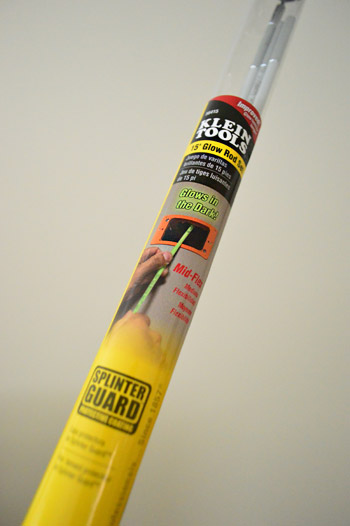
In order to connect my “dots,” I bought this set of glow rods from Home Depot. They’re basically flexible fiberglass poles (almost fishing rod-ish) that are stiff enough to poke through insulation, but bendable enough to snake around corners. Oh, and they glow in the dark since, well, it’s dark between your walls and glowing makes them easier to spot.
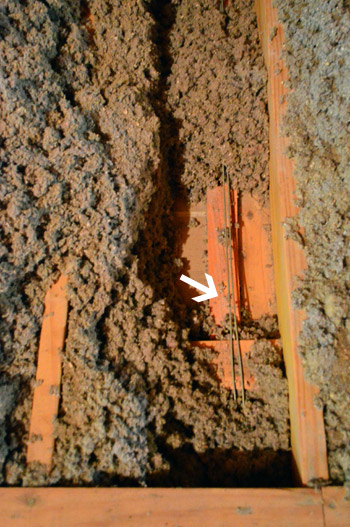
So here you can see me jabbing the long glow rod in through the top of the attic. It took a little bit of effort to jab it through the insulation in the wall, but it wasn’t long before I felt it hit the bottom.
This is the part where I should have gone downstairs to see the rod glowing nicely through that hole in the drywall. Nope. Didn’t happen that way. My “measurements” were off enough that my holes were just barely on opposite sides of the same stud. Oops. So rather than create more drywall to be patched, I drilled a couple more holes upstairs in the attic…
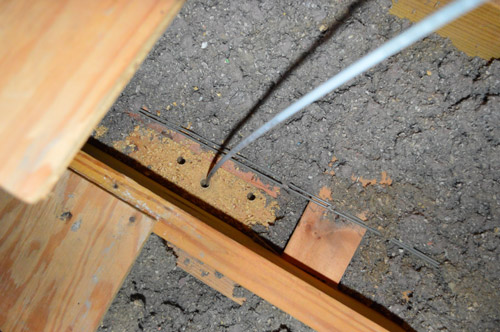
…til I found one that did this. It was a glorious moment, I’ll have you know.

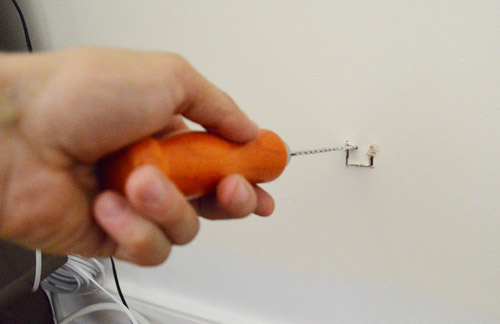
Of course in my haste to thread my glow rod through the wall, I forgot to actually attach the coaxial cable to it. Oops again. So I pulled it back out, taped the cable to it (I’m sure there’s a more professional way to do this) and snaked it back through to its destination.
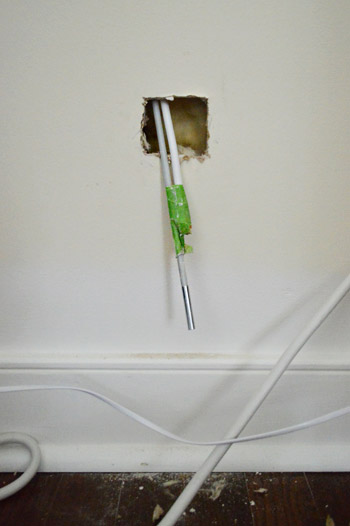
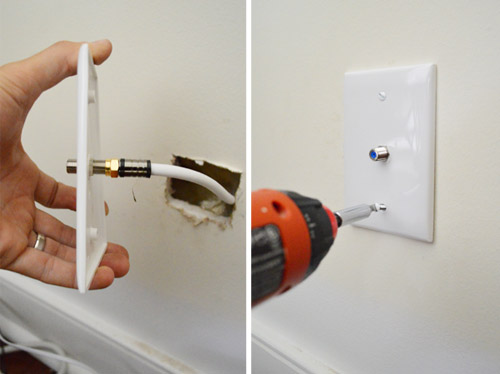
After untaping things, I pulled the glow rod all the way out leaving the cable ready to be attached in place. To do so, I used this simple wall plate that I picked up a Home Depot. The coaxial cable screwed into the backside just like it would connect to a cable box, and then I screwed the plate directly to the drywall. I figure there’s a more polished way of doing this, but this was already an upgrade from the cable-poking-up-through-a-random-floorboard that I’m used to (that’s been the setup in every home and apartment we’ve ever had).
Oh, and of course I attached the other end of the cable to the splitter that was already in the attic. It had previously sent cable into the guest room for the previous owners, but I removed that hookup that popped up through the floor in there when we installed our new hardwood floors right before moving in.

So in theory we were all set to watch cable in our room. Huzzah! But Verizon had other plans. I’ll spare you the details (it involved two trips to their store to swap out set top boxes while they struggled to get our system running due to a random glitch in our area). Instead, just enjoy these selfies I took whilst trying to capture how much I enjoyed talking to support for two hours on a beautiful Saturday afternoon.

But eventually all was good in TV land. Especially the part where we got the multi-room DVR service working. Now things that we record on the downstairs TV can be watched upstairs. Is this what it feels like to be king? I think so.
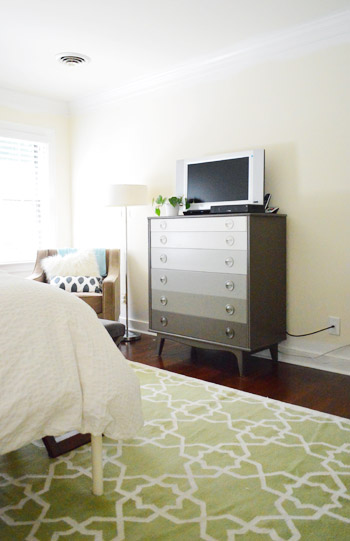
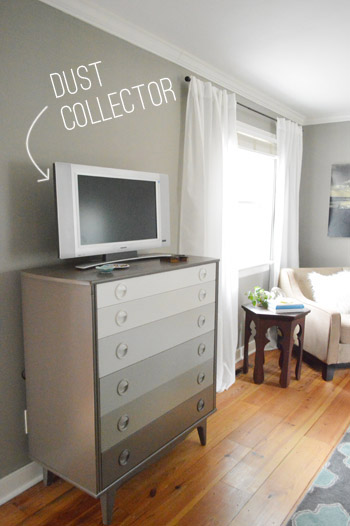
Oh, and yes I realize it seems funny to go through all of this trouble and still not have the jack hidden behind the dresser. But since we eventually plan to get a wider piece for this spot (this skinny one looks kinda weird on that big wall to us) we figured it made more sense to put the cable jack near with the other outlet on the wall. Why spread out your eyesores when you can concentrate them in one spot that will eventually be covered?
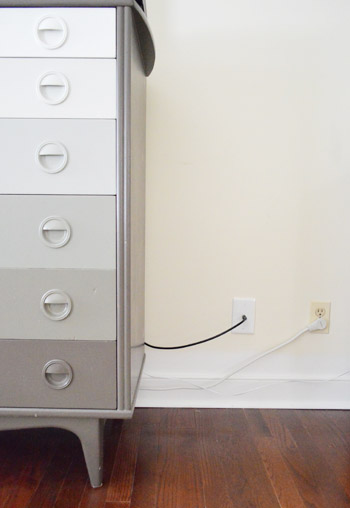
But I guess we could at least stand to get a white connector cable so it blends in a little more. Eh, maybe next weekend. For now I’m enjoying the fact that we dodged the $150 fee that Verizon charges for doing the job. All told, it was about $40 in materials and an hour or two of work (not counting those phone hours spent working out a random DVR glitch that was going on in our area) – but for my first foray into in-the-wall wiring work, I’d say it was a very satisfying project indeed.
Psst- We announced this week’s big Kohler giveaway winner, so click here and scroll down to the Rafflecopter box to see if it’s you.

Steffanie says
So cable wires in the attic? What else should I be looking for up there? I had no clue.
Our bedroom TV is a major dust collector too. Though, since we are moving, I am going to keep the bedroom TV but put it on the side of the room so I have an exercise video area. At least that is what I am telling myself now :)
Darlene says
Ditto needing more insulation in your attic and sealing the holes you drilled for the wiring. In fact, any hole that goes through a ceiling into the attic such as light fixtures or wiring that goes through the top plate should be sealed. Air infiltration is much more of a heat loss than not enough insulation.
we added in-ceiling speakers to 4 rooms in our house and I got to run all the wires in the attic ’cause Hubby woudln’t fit. Wish I’d had one of those glow thingies!!
myamogabi says
this is amazing! I think I would have screamed for the verizon guy to come back!
Kristin says
Congrats on the project! I hope it helps you to relax and get your mind off the blog once in a while.
Sometimes I envy how easy these things seem to be in american houses… here in germany all walls are made of stone and wallpapered (so for me it’s a bit funny that you are a little scared of wallpapering but not of painting drywall – for me it would be the exact opposite), so in order to install cable completely invisible you would have to cut the wallpaper, cut a small slit into the stone, put the cable in, plaster everything and put the wallpaper back up. Ah well, at least we don’t have to look for a stud when hanging anything on the wall.
And I can’t wait for the new Dexter season to come to germany!
Julia @ Cuckoo4Design says
These types of jobs always scare me ;) but I also couldn’t live without my bedroom TV!
bella says
Good job, John. I think those household tasks, though not “highly visual”, make me feel like I accomplished something really great. Ok. Soooo, most of those tasks are done by my husband, but they still make me feel great. ha!
Kevin says
Great job! Looks like a pro did it.
Someone may have already said this, but I have a small tip for anyone who wants to try this stuff… anytime you run a cable like that, it’s a good idea to also run a pull-string along with it for future use. Since you’re already making one run, it’s no more effort to just add the string, and then if you ever want to run anything else to that location (like maybe a telephone or network cable), you just tape it to the string and pull it through. If you do, though, it’s a good idea to also run another string each time. :-)
YoungHouseLove says
SO SMART!
xo,
s
Ellen M says
Perhaps those two hours is why I have cut my cable cord. Well I still have internet through them but other then that I am using my Roku. It is cheaper (just pay for hulu plus) and at least for me (two jobs & a dog keep me busy) I always have enough to watch.
Just something to consider since it has no cables through the walls (hooks into my wireless router). The downside is you need a roku box for each TV but in the scheme of things with the cable box rental charge it seems to balance out for me.
(no affiliation to Roku just a happy user of their device)
YoungHouseLove says
Sounds good!
xo,
s
Stephanie L says
Injury prevention is part of my job, so I’m professionally compelled to post this –
http://www.safekids.org/video/tv-tip-overs-emerging-danger
YoungHouseLove says
Thanks Stephanie! We anchor all of our bookcases, dressers, and our TVs! Here are some posts about that in our archives for anyone wondering what we use: https://www.younghouselove.com/2012/03/for-our-viewing-pleasure/ https://www.younghouselove.com/2013/04/be-our-guest-er-bookcase/ https://www.younghouselove.com/2010/06/office-progress-bookcase-building/
xo
s
Trevor says
Ada boy, good job doing that yourself. Now you just need a big screen and you will truly be a king!
Grace says
You make it look easy John! Re the wider dresser: why don’t you switch your ombre dresser with the wider dresser you got for Clara’s room?
Grace says
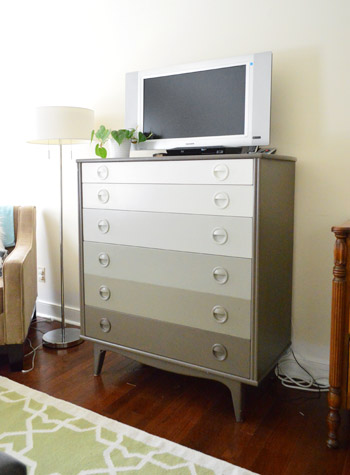
What is the wood thing that is already to the right of the ombre dresser? (seen in pics 1 and 3)
YoungHouseLove says
That’s the dresser from John’s parents from our last bedroom. Our bedroom is a room full of mismatched dressers. Haha!
xo
s
YoungHouseLove says
We have our eye on another dresser option for the master so we’ll have to see where we end up! We’ll definitely keep you posted :)
xo
s
Grace says
Ahh. I was just looking at your house tour and saw that one (I think?) as a bedside table? What do you use as a bedside table there now instead? I’m looking for creative bedside table options!
BTW where did you fit Clara’s new dresser in her room anyway? I can’t remember seeing a view of it since you moved.. Thought I saw her old dresser in a pic – you fit both??
YoungHouseLove says
Her new dresser is actually in the garage (we haven’t found the perfect spot for it). And as for our bedside table, there’s nothing there on John’s side of the bed for now, but we have our eye on something for that spot (hence moving the other dresser away and measuring to see if the new idea would fit). Will definitely share everything as it happens!
xo
s
Grace says
Really? Isn’t it for the big girl room and the other dresser for the nursery/spare bedroom? I assume you would have made sure it fit since you already had the new house when you got it, no?
No spot for it in her (big girl room), nursery/spare room, guest room, or master?! Woah.. That’s a lot of bedrooms a poor dresser can’t fit into..
YoungHouseLove says
We bought it to work in her big girl room at our last house since it was affordable and good for that space (buying furniture for a house before we’ve moved in and arranged the furniture is a skill we don’t possess). I’m sure we could shove it into any room we’d like but we’re trying to thoughtfully put this house together and make sure each piece is something we love in a layout that’s really functional. I think every time we move, certain pieces work better than others in the new space – but it all works out in the end.
xo,
s
Sherri J. says
Good job! I know I’m always a bit worried when I have to go digging into the attic or into the house and transfer wires across multiple rooms, so you get points in my book!
Sandra T says
Nice job with the cable work (always a pain in the patoot…) and I would love to say THANKS for the line at the end about the winner of this weeks freebie! I miss those!
YoungHouseLove says
Sure thing! I try to remember each week but since the move our heads have been more full of stuff, haha!
xo,
s
Shawne B. says
I respect your decision to have a TV in the bedroom, but I believe the bedroom is only for 3 things:
1. Sleeping
2. Wink, Wink Nudge Nudge
3. Building a little fort :-)
YoungHouseLove says
Haha!
xo
s
Bernadette says
Great fab post on this process. Knew some of it but not about the glow sticks. So what I’d like to know is how to get the multi-room DVR service? Is that a product or a subscription from a cable provider? I so want to watch what gets taped on the DVR on other TV’s in the house.
YoungHouseLove says
Oh yes, just call your cable provider and hopefully it’ll be something they can enable remotely and it’ll work like a charm.
xo
s
Erin says
We had a glitch too after a storm and we live in Richmond. Our box isn’t working. Love the ombre dresser.
Trevor says
I’ve done a bunch of low-voltage cable installation before (networking, coaxial, speaker wire, etc.), but am just getting into other DIY projects now, so thanks for the great blog!
To finish up your installation a little nicer, you should pick up a single-gang low voltage mounting bracket: http://www.amazon.com/Arlington-LV1-1CS-Voltage-Mounting-Bracket/dp/B000UEAJWU/. All you do is cut a larger rectangle into the drywall for the bracket to slide into and the clamps attach to your drywall. Then, you can screw your wall plate directly into the mounting bracket, instead of into your drywall. This will ensure you have a nice, securely-mounted wall plate. Most installers from the cable company don’t bother with this step, and that’s how you end up with cable jacks that look bad or don’t stay put. I’ve used this mounting brackets for every wall jack I’ve need to install for any type of project (ethernet, speakers, cable, etc.)
As for the glow rod, you actually used it correctly the first time! It’s usually easiest to fish your glow rod through the wall to find the correct route to the opening, then attach your cable on the other end, and pull the glow rod back up. Otherwise it can be sometimes tricky to try to push your glow rod with an attached cable through a wall if you’ve got a tricky route you’re trying to navigate.
Hope that helps!
YoungHouseLove says
Thanks for the tips Trevor! Very helpful.
-John
Airyckah says
Sounds a lot like how most of our wiring is.. randomly run.. lol
I hope you don’t mind, but I used your profile picture for a post about my favorite bloggers on the new blog I started. I hope you like what I write and will follow me… http://midnightmindness.blogspot.com/2013/07/my-favorite-bloggers.html
YoungHouseLove says
Thanks so much for the mention!
xo,
s
Liberty says
I like the idea of placing a wider piece on furniture where the dresser currently lives.
Although if all else fails, its a great excuse to buy a lovely wicker basket to place next to the dresser and hide the wires. ;)
Brooke says
Nice! This was the first project that my parents’ let my little brother do in our house growing up. He ran coax to my room for the TV I got in late middle school / early high school. It worked great except MTV had a lot of static. He was 10 or 12 years old at the time so I guess that was still good for a first attempt. He later wired up the whole house with Cat5 when he was in high school. He is now almost done with his Master in Electrical Engineering.
karen downes says
I know this is off topic but I love the chest of drawers. Did you paint it yourself or did you buy it?
YoungHouseLove says
That’s an old thrift store dresser that we bought and painted for our book, so the tutorial is in there.
xo
s
Kate Craig says
I’m a little scared about all the people who are going to try this themselves now, haha!