Happy Friday, y’all! We’re painting the foyer today (pics on Monday – woop woop!) but I realized that I forgot to share two bathroom related happenings. And one’s a giant oops moment, so this should be fun.
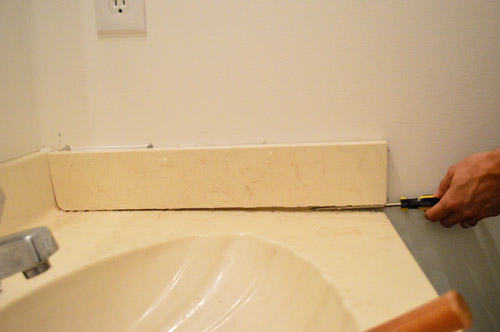
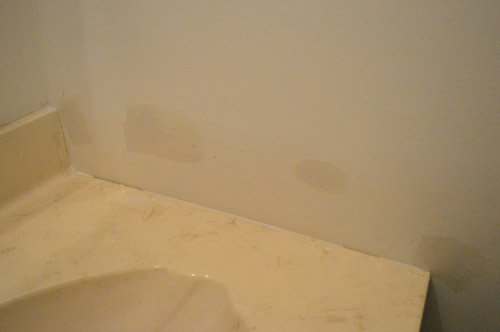
First of all, it’s fitting that this thing is called a vanity because I did a little surgery and removed its love handle. It’s hard to see in some of the more recent photos of the bathroom, but this one shows it loud and proud:

That slab of counter against the right wall just felt imbalanced to us, and it’s actually a pretty simple DIY project to remove it. So if you have a side-splash thing that you’re not in love with (most modern sinks these days don’t have them at all and the walls are just fine) here’s how we gave ours the boot.
First we fired up the ol’ liposuction machine manual screwdriver and shoved it under the side slab, trying not to dig into the top of the sink (remember you just want to loosen and remove the side slab, not ding up the sink underneath it). You can use a rubber mallet or even a hammer to tap the screwdriver under the panel along the top seam, bottom seam, or even the side seam like this:
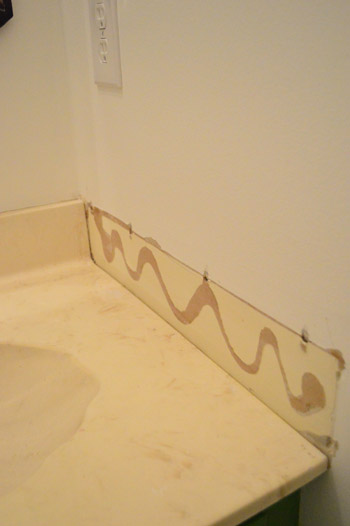
Eventually it got loose enough for us to yank it right off, although we were left with four puncture marks in our wall – along the top seam – where the screwdriver dug into the drywall.
Here’s where I said to myself: Self, don’t panic. Breathe in. Breathe out. You can do this.
I grabbed a sanding block, just to get off any chunks of glue or drywall that weren’t flush with the wall. Then I got my spackle and a 2″ putty knife (I like Dap Crackshot Spackling paste, not only because the name is entertaining but because it does the job). Using the spackle knife I just smoothed spackle over the entire area that I wanted to smooth out, building it up just a smidge beyond the wall in all areas so that when I sanded it down it would be smooth and flush again.
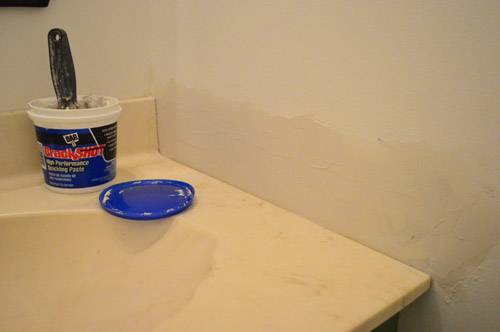
After it dried (I usually wait about 5 hours just to be sure), I got my sanding block again. I prefer a block since it has straight edges which can help you keep your wall straight instead of ending up with something wavy and pitted. This will be dusty, and you might panic because often when you sand something smooth there are a few little low spots or dings that come through and you’re all “man, I just want to paint this and be done with it” – but RESIST my friend. Put the paint brush down.
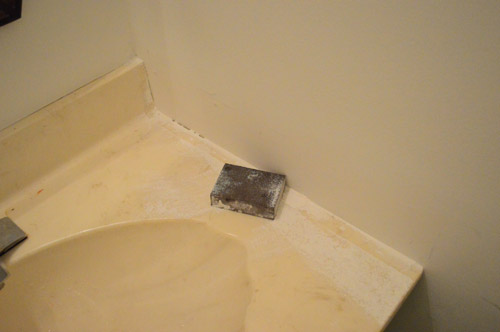
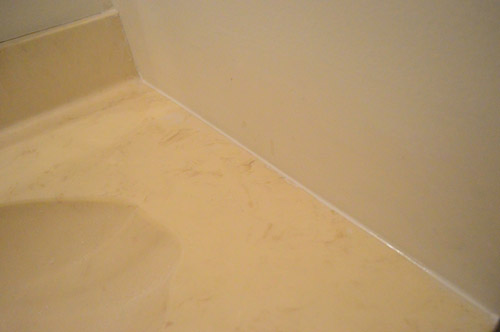
Wipe down all of the sanding dust and then go back with your spackle for a second pass at those dings and low points. Trust me, this ten minute second step is the difference between a smooth wall and an annoys-you-everytime-you-look-at-it wall. Here are the spots I spackled again, just to get them nice and flush.
After it was all dry, once again I used my sanding block to sand them smooth. Then it was time to caulk a nice clean line between the vanity and the wall with white paintable silicon caulk (paintable is key, and for brands I like Dap). That’ll keep any water from rolling down the side of the vanity, so it’s a nice “housekeeping” step – plus it just looks nice and finished. As for application, I just squeezed a line of caulk down the wall into that crack and then used my finger to smooth it out a few times until it was clean and unassuming.
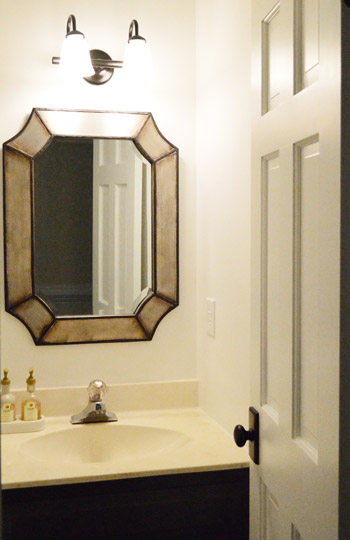
Then (and only then!) did I allow myself to grab my paint brush and touch up the wall so it was nice and seamless. This was one of those lessons I have had to learn over time. You will never, ever be in the mood to do that second pass of spackle (“gee, there’s nothing I feel like doing more than spackling and sanding this wall that I already spackled and sanded”) but it makes all the difference in how smooth it looks in the end. At least for a bugged-by-dings girl like me.
Speaking of smooth, we spilled half a quart of the Baby Fern paint that we used on the vanity (and then painted over) right onto the concrete floor in the garage. Whoops.
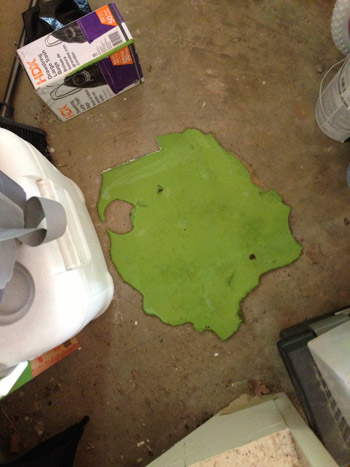
There was panicking. It was a hot gelatinous mess. While we struggled to remain calm we both came to the same conclusion: let’s not touch the paint at all. Let’s not try to clean it up or thin it out or add water or anything. Let’s just let it sit there, and hopefully once it dries it’ll be a thick enough glob that we can peel off like a giant latex sticker.
So we waited about a week for it to fully dry, and then we yanked on it…
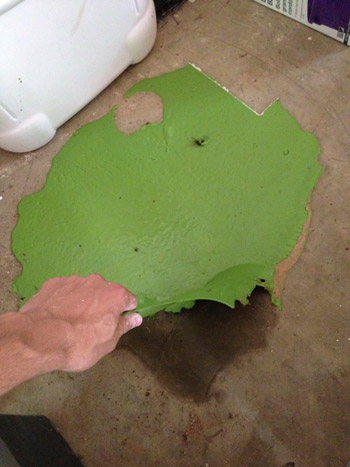
Wouldn’t you know it peeled right up in nearly one piece (there were a few spots we peeled off a second later that were left behind). There initially was a big brown wet-looking mark under it, which you can see in the picture above, but we hoped that once the mass of latex was up off of the concrete it would just dry itself out and go back to being normal looking.
Well lookie here. Besides a few slightly tinted spots, it’s not noticeable at all. In fact we’ve since moved all the stuff that was framing “the scene of the crime” and we can’t even really pick out the spill spot anymore.
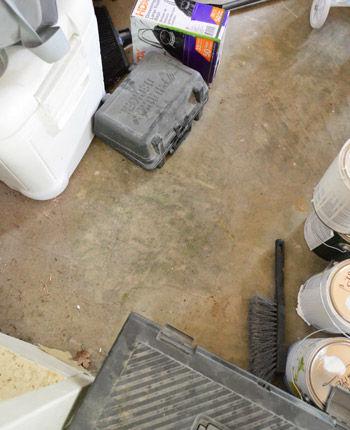
I still kind of can’t believe our leave-it-and-peel-it-later approach actually worked. And I’m endlessly grateful that it was so easy (even attempting to wipe that up when it happened might have taken a while and resulted in a giant mess). So when in doubt, just do nothing and wait a while and hopefully whatever problem you have will peel off like a sticker. Well, I guess that advice doesn’t work for everything, but for a giant goober of paint in the garage, it was a pretty darn good outcome.
**********************************
Psst- We’re trying out a new little bonus feature on Friday posts by ending with four fun projects, chats, or questions going on over on the Forums. You know, just in case you don’t want to go back to work just yet…
 |
 |
 |
 |
 |
|||
| by ElizabethAnn | by KatyRICEdesigns | by KellyLawler1 | by ArtisanDesarts |
 |

Anele @ Success Along the Weigh says
You know, I didn’t think removing that side piece would make that big of a difference but it does! Looks great and yes, definitely fill in those dings because if you don’t, you’ll always see them. I do not know this from experience…at all..nope…um…okay, fine…I do.
GENIUS on the paint spill! I know I probably would’ve been tempted to get rid of it right away but your way is much smarter which is why you are you and I am me. :)
Happy Friday guys!
Liz says
It looks a lot better! What a great quick fix. :)
Tandra@LittleHousesBigDogs says
Very cool, I had visions of Slimer from Ghostbusters when I saw the paint mess! I wish I had an easy “love handle” removal, but unfortunately we have some “extra padding” in the form of tile inlay covering over it. Previous owner was creative!
YoungHouseLove says
Aw man, a stubborn love handle!
xo,
s
Jenelle says
Every time I see that picture of your vanity painted green, I think you completely covered it in Frog tape. Then I realize it’s paint. Then I get really relieved when I remember you painted over that color. Good call. :)
Julie says
I love the self talk!
“Self, don’t panic”
I’m so using that from now on! Looks great. Can’t wait to see pics of the foyer Monday!
Lisa E says
How clever to just let the paint sit there until it dried! I would have never thought to do that and would have made an even bigger mess in my attempt to clean it up. Nice sanding job, too. I’m impatient so my attempts are never great.
Julia at Home on 129 Acres says
Ditto to all of the above. I have to say I’m probably most impressed with the paint spill/clean up over the love handle removal and wall patching. I cannot believe that leaving it alone worked so well!
Misty says
Does this sink have one of those scalloped edges in the front? I’m sorry, but those are the worst! Who ever thought that was a good idea?! I’m pretty sure I’m not offending you since I think you are going to eventually replace it :)
YoungHouseLove says
Oh yes, we have five scalloped seashell shaped sinks in this house (which is especially amazing because we only have 2.5 bathrooms). They’re all on the to-do list!
xo,
s
Caitlin says
Ugh we have 4 scalloped sinks! Eventually we’ll replace them too but for now, but until then plan is to resurface them in white so they aren’t yellow scalloped sinks. gotta use what you got!
Amanda says
Caitlyn, what are you planning on using to resurface your sinks? I would love to do mine as well in white!
Jess @ Little House. Big Heart. says
That looks so much better! It was way off balance before. You’ve do some much for that little bathroom in such a short time!
I’m scared to death of inflicting puncture wounds in our walls. They’re 73 year old textured plaster and I have no idea how to patch them! (Guess I’ll just have to learn and blog a how to for others like me, huh?)
YoungHouseLove says
We’ve patched 55 year old plaster in our first house and it was exactly the same method that worked! It’s crumbly but spackle works really nicely if you let it dry before sanding. Good luck!
xo,
s
jennifer@heim-elich says
wish that post had been there two week earlier when I dropped a huge bucket of emerald green latex wall paint (http://heim-elich.blogspot.de/2013/04/neue-farbe-im-gastebad.html) in my laundry room (unsealed natural stone tile…). I attempted to clean… Not finished yet… I so wish I would have just let it dry…
YoungHouseLove says
Boo! That looks stressful. So sorry we didn’t spill ours a few weeks earlier for ya!
xo,
s
Gabby @ Cookie Cutter Unique says
Our townhouse in Richmond has the “love handles” in the bathroom too, not a good look. I honestly never even thought about yanking them out…the love handles on my person are a different story.
YoungHouseLove says
If only I could take a sanding block to mine… haha!
xo,
s
Kara says
I think your bathroom posts are inspiring us to take the plunge on painting the cabinets in one of our condo bathrooms. The bathroom and kitchen cabinets match and we’ve been wanting to paint the kitchen ones, but it seems like a big commitment if we don’t love it. Starting with the bathrooms seems a little less scary.
YoungHouseLove says
Oh yeah the bathroom vanity is a great place to start! Good luck Kara!
xo,
s
Stacy says
That is what I did. Started with bathrooms to gain my confidence. So pleased will my results! You can do it, Kara!
Melissa says
So, this is kind of unrelated, but I’ve wanted to do a few projects, including our kitchen cabinets with chalk paint. I’ve seen a few posts in the forum sections of YHL, but I wanted to see if you guys would do a blog on chalk paint. Have you used it? Tell us about wax, etc.
YoungHouseLove says
Here’s a post where we used it for ya: https://www.younghouselove.com/chalking-it-up/
xo
s
Sarah says
And here I thought this was going to be a weight loss related post ;) So glad the wait-n-peel method worked in the garage.
Dena says
Very lucky on that green paint spill! While renovating my son’s closet this summer (ripping out falling-down shelves, adding new ones, painting interior) he spilled an ENTIRE GALLON of latex eggshell paint on the tan carpet. He basically used 10 rolls of paper towels to suck up the 2″ depth of paint, and dumped bucket fulls of water on it, then sucked it up with a shop-vac — and the carpet came clean. You’d never know it. Now that section of old carpet is lighter and cleaner than the rest (darn it!).
YoungHouseLove says
That’s amazing! What a lucky outcome!
xo
s
Kay says
That paint looks like Nickelodeon slime! Glad you guys were able to get it off the floor.
Amanda says
I spilled a quart of paint at Lowes a few weeks ago. It was in the clearance section and I was thinking about what I could do with it. It was a soft mint green. Thankfully the man working in the paint department thought it was funny and laughed. I now have a badge of honor on the floor in the paint department at Lowes.
YoungHouseLove says
Oh my gosh I would have totally wigged out. Way to make your mark Amanda.
xo
s
Ethne @ Wom-Mom says
Love the green goober. Can’t wait for Monday’s reveal – I’m very interested to see what color you’ve tied together with your blue door!
YoungHouseLove says
Wahooo! Every time we dip into a paint can, the house starts to feel a little more like ours :)
xo
s
Kelly says
While painting our living room, we silled maybe a half cup of paint ON OUR CARPET. Not a rug, but carpet! We very quickly googled what to do (what did people do before the internet?!) and followed the method of dousing it with water while using the shop vac to suck it up. We probably poured 2 gallons of water on our carpet in the process, but it worked like a dream and nobody would ever guess that paint had ever spilled there! Phew!
YoungHouseLove says
Oh my gosh, that sounds intense! So glad it came out!
xo
s
Ashley@AttemptsAtDomestication says
That would be a great and cheap temporary solution for our half bath! Definitely going to have to talk the hubs into this!
Katie says
Sigh. Just another post that makes me frustrated with our textured walls! It’s so impossible to get the textures to match when doing something like this. How I long to just spackle and sand and call it a day!
YoungHouseLove says
Anyone have tips for Katie? Maybe if you spackle and sand it smooth and then spray it with texturizing spray it’ll blend in? Anyone ever used that stuff?
xo
s
Katie says
I’ve used it before actually… it’s just very difficult to get a good match. One of those things that looks fine from a distance but just looks a little bit “off” close up.
YoungHouseLove says
That stinks! Anyone else have tips for Katie?
xo
s
Jaimee says
We have added texture to walls before by mixing spackle with water in a paint pan, then “painting” it on with a textured roller. You can vary the amount of texture by adding more/less water or changing the nap of roller you use. It is a little bit trial and error BUT – if you don’t like it just wait for it to dry, sand it smooth and try again! Just make sure you use a new drywall primer before painting the surface.
YoungHouseLove says
Sounds awesome!
xo
s
Lisa in Seattle says
We have used the aerosol texture sprays with great success on both small wall patches and a larger part of a wall. First, and it sounds like a duh but you’d be surprised, be sure to use the same texture you already have, whether it’s orange peel (which I think is easiest) or knockdown. Make a few practice sprays on scrap wood or something *other* than your wall. For a small patch, you can make a cardboard template with a cut-out exposing only the sanded area you want to re-texture; this avoids getting texture overspray on your existing surface. TAKE YOUR TIME! Rushing it will just make a mess. You can do it!
VNM says
I spilled some paint in the foyer of my condo while repainting. While it was still tacky-wet, I poured two whole boxes of kosher salt on it, let it sit and scooped it up with a paddle scraper, then wiped the residue with goo-gone.
It worked perfectly. Now I always buy two boxes of salt when doing paint projects.
YoungHouseLove says
That’s genius! The salt must have soaked it up really well! Love the paint-spilling tips guys!
xo
s
Martha says
Who’d have thought? I bet cat liter would work too . . .
Julianne says
It’s amazing what a difference this small change makes! Our main bathroom has 2 of these same “love handles” that should get ths same surgery. Who knew it could makes such a difference? Thanks for the tip!
Brittney Everett says
That hunk of paint could make a really cool piece of artwork somewhere…. I’m picturing it as like a crown molding under a light, or put pictures on it and it would become the frame…… the possibilities are endless!
YoungHouseLove says
That would be fun! Sadly when we pulled it off it got really thin/stretched out (sort of like a thin latex fabric).
xo
s
Cindy says
Can I ask a simple format question? Why do you have your blog formatted to leave your page when you click on a link? Wouldn’t you want us to stay on your blog and have the link open in another window so we don’t forget about you and come back to where we left off? I enjoy clicking on links that other commenters leave, but I don’t necessarily want to leave your blog, I just want to hop over for a little look-see.
YoungHouseLove says
Thanks for the feedback Cindy! We try to make all the links in our posts open in new windows whenever we remember (admittedly some slip through, but for the most part we click a box that makes that happen). If commenters leave links to their site there’s no way for us to format their comments to open in a new window, but if you click the back button on your browser it’ll hopefully take you right back to where you were on our site :)
xo,
s
Amanda says
I think the best way to do this is just to right click on the link and select “open in new tab” or “open in new window.” Then you don’t have to worry about forgetting where you were and won’t lose the first page if you accidentally x-out of the linked page. The downside is that you might end up with 50 tabs open :)
Jamie says
You have just convinced me to get rid of the spare tires around my bathroom sinks. Think double height back/side splashes in lovely pale orange tile with a border. I’ve hated them since day 1, and I think it’s something even my pregnant self could do with the right mask and tools.
Stacey says
That looks great! My biggest downfall is not having the patience for that second coat of spackle!!! I have a wall right now that is already painted that has a few of those dings… you may have inspired me to go back for a second coat. Hopefully it will work even after I painted? I don’t know how people drywall/spackle for a living… :)
Stacey
YoungHouseLove says
I know, right?! The pro drywall/mud folks are my heros? Have you seen them work? So fast and always so steady. I’m always in awe.
xo
s
Teresa @ wherelovemeetslife says
“This will be dusty, and you might panic because often when you sand something smooth there are a few little low spots or dings that come through and you’re all “man, I just want to paint this and be done with it” – but RESIST my friend. Put the paint brush down.”
Seriously… this is like every patch job I have done… LOL Thanks for the laugh!
Jenny says
Yes! Thank you for this. Now I at least know the right thing to do. Whether I will do it or not remains to be seen, but knowledge as at least part of the battle, right?
Oh, and anyone else enjoy having white walls that blend half-decently with spackle? As in, thank goodness that the spackled-unpainted spots in the white bathroom blend better than the spackled-unpainted spots in the blue dining room…haha.
YoungHouseLove says
Haha!
xo
s
Kimberly @ Turning It Home says
I am so envious of you smooth, flat walls. All of the walls in every house I’ve lived in are textured and it drives me up the wall. Although if you look at the texture close enough (which I do) you can see textured parts that look like faces. My husband thinks I’m crazy for pointing out faces on the wall, but I notice my toddler staring intently at the wall… so I know she sees it too. Haha!
Hm… After reading that, it does seem a little crazy. Off to the insane asylum I go. :)
YoungHouseLove says
Haha, I love it! She got her wall staring skills from her momma.
xo
s
Alex says
You’re not alone… Ree’s even written a post about it. :) http://thepioneerwoman.com/confessions/page/5/ So funny!!
YoungHouseLove says
That’s hilarious!
xo
s
Kimberly @ Turning It Home says
Haha, I’m crying now! Thanks for the laugh!
Julie @ Living on the Ledge says
You’d never know there was a side counter slab there! Or a mess of green paint, for that matter. I can’t believe that stuff peeled up!
Judith says
Awesome how well the peeling off of the paint worked! I wish I could do that in my kitchen. Not that there’s paint spilled, but the previous tenants painted the bottom half of the walls there with latex paint. It’s a very old house, and that part was not painted but varnished. Meaning, a totally smooth and non-breatable surface. Nowadays people use tile or just wallpaper (this is Germany, painting right on walls isn’t very common), but varnishing used to be the way to go if you wanted wipeable.
Now I have walls that I can’t paint over, because the paint didn’t adhere to the surface properly and peels if you scratch it a little. No nice, big areas either. They painted on just one layer, so it’s very thin, and the previous baby-blue shimmers through. I can’t sand it either because of the rubbery nature of the latex paint.
I’ve lived with that for two years now and have just about made up my mind to try wallpapering over and hoping it doesn’t fall down. The other tenants only lived here for a year and made many stupid quick fixes that cost me a lot of time to undo and then do something real, but the kitchen walls are the worst they left me.
Oh, the colour, you ask?
Fire-engine red.
With a slight tinge towards bright orange.
*cries*
YoungHouseLove says
Oh Judith! I am crossing my fingers that the wallpaper route works like a charm!
xo
s
Sarah says
OMG, I so wish the previous owners of our house had your spackling philosophy! Where they did bother to spackle, they gobbed it on and then painted over it – no sanding involved. There will be lots of drywall removal in our future! Along the same lines, I also wish they had your wallpaper removal philosophy! They did a horrible job of removing it, left behind huge pieces, and then painted over it. Paint is awesome but it’s not a miracle worker! DIY Fail!
YoungHouseLove says
Oh no! Sounds like you have quite the adventure ahead of you!
xo
s
Jennifer says
Am I the only weirdo that loves spackling? It’s actually dangerous when I take it out because I’ll find every tiny hole I can and spackle it. Needless to say I end up doing a lot of sanding, priming and repainting in my house.
YoungHouseLove says
I love you for that. Like seriously, you’re my spackle idol now.
xo
s
Laurie says
No Jennifer, I adore spackling too and I’m awesome at it! One of the few talents I have and there is just no way to showcase it. :-(
Amanda says
Jennifer, you’re not alone! I enjoy doing it as well, it’s the sanding I don’t like because I’m too much of a perfectionist! Haha
Mary | Lemon Grove Avenue says
Mental note for the future on the blob of paint. ;) Do you guys plan on resurfacing the garage floor, or will you just keep it with the concrete?
YoungHouseLove says
I think we might use porch and floor paint on it down the line when we make a workshop on one side and add shelving/etc.
xo
s
Ally says
I so want to feel the big green paint sticker. Peeling paint is one of life’s great pleasures. Sorry. Weirdo alert.
YoungHouseLove says
Haha, I know what you mean. It was like peeling elmer’s glue off my hands in school (that was my favorite pastime).
xo
s
Vanessa B. says
I love posts like these. At the beginning I’m thinking, “Well, that isn’t going to make a difference.” And at the end I’m like, “What?! That makes a huge difference!” I’m off to look for potential love-handle-ectomies I can perform around my house.
And the paint tip is awesome too. Along the same lines as the salt tip, my local Sherwin-Williams uses kitty litter for their paint spills. Pour it on, leave it and then sweep it up. Though I think peeling it up is way more fun.
YoungHouseLove says
Kitty litter sounds really smart too!
xo
s
Sarah says
This is a response for Katie about the textured walls. Our walls are textured and we took out a closet and had to patch a whole section of new dry wall. My hubby found a natural sponge at Dunn Edwards and then dipped that in a watered down mixture of joint compound. Sponged it on the wall and it matches almost perfectly and our house was built in the 60’s
YoungHouseLove says
Great tip Sarah! Thanks for sharing it.
xo
s
Joelle says
That green paint just wasn’t meant to be in your family…it’s cursed!
Tara G. says
I spilled a can of paint in the “and” part of the kids’ jack and jill bathroom…the family saw me wear a new kind of crazy that day! The toilet, however, has never been cleaner after that clean-up job!
YoungHouseLove says
Wahoo! Sounds intense and jubilant. So glad it came out!
xo
s
Laurie says
I’m so impressed you dared to take off the love handle! It never even occurred to me that I could go without it. I was shopping for replacement countertops just the other day and was obediently looking only at the ones that had a love handle.
Dang! I forgot my own rule of question everything!
Caitie says
Pure.Brilliance! is there anything the two of you can’t do? I’m impressed every day.
YoungHouseLove says
Thanks Caitie, you’re so sweet.
xo
s
Jamie says
Oh man, I thought I had a new life strategy in, “when in doubt, just do nothing and wait a while and hopefully whatever problem you have will peel off like a sticker.” Riiiiight up until you conceded that “Well, I guess that advice doesn’t work for everything.” Haha, glad it worked for your problem though!
erin says
i never quite understood why they put the love handle there either. i have one. and i have considered removing it. but it also is up against a tile wall. so I’m not quite sure how that’d work out! our bathroom is tiled from floor to about between 1/2 – 2/3 ways up!then they went and put back splash around the sink, when there’s already tile. PUZZLED!
jeannette says
so interested in you life/work plan system, with tweaks to the blog, its direction, new content, altruistic projects and strict boundaries for time off. blessings on you, l’il grasshoppers. loving the four friday lagniappes.
YoungHouseLove says
Aw, thanks Jeannette!
xo
s
Sara Wozniak says
My mom had a paint bucket spill in the office they were redoing, and I just happened to be there when it happened. My mom panicked, but I got a dust pan, cleaned it out, and used the big rectangular spac knife and scooped it up and back into the bucket. However, that was also on a wood subfloor, don’t know if the wait and see method would have turned out as successful!
YoungHouseLove says
Smart!
xo
s
Sarah says
Back in high school I was painting my bedroom a very similar green (yea, what was I thinking) and when I was carrying the paint inside I dropped the gallon on the cream colored living room carpet. IT WAS AWFUL. We were scraping, scooping, sucking with a shop vac and scrubbing for hours and even after all that there was a very obvious green cast to the carpet. I thought my dad would be furious (bc my mom sure was) but when he got home he just shrugged his shoulders and said “eh it’s probably about time for new carpet anyway”. It was a couple years before they actually got around to doing it though so that side if the room was green for awhile.
YoungHouseLove says
Oh man, I would have been freaking out! So glad Dad was cool about it. I’m breathing a sigh of relief for you from here.
xo,
s
Crystal @ 29 Rue House says
Similar thing happened to my sister and I – we painted two walls a fuschia color and the other two a bright blue in our shared bedroom. I think we each picked out a color. Some of the fuschia got spilled and we did clean it up but not that well so there was a hard, globbed paint section of the carpet that we just covered up with a bed. lol I don’t remember my Mom being too upset about the floor but I’m sure she thought the wall colors were awful!
Christine says
makes a huge difference! Off to do our great room bathroom love handle pronto :-) Quick question – why did you apply the grout first and paint later rather than paint first and then grout? Either way, it looks terrific!
YoungHouseLove says
I scrubbed the grout before we moved in so it’s cleaned, just discolored and faded in a few areas. I mainly am putting it off because I have a million other things I’d rather do (haha!) but I’ll hopefully get to restoring it someday…
xo,
s
jillian says
Hi guys, true testament of my love for this blog: I went on vacation to Ecuador for a week, and your blog was one of the few things I HAD to regularly check on the internet. Thanks for always keeping me entertained, even if I’m a thousand miles away!
YoungHouseLove says
Aw thanks Jillian!
xo,
s
Cortney says
I can vouch for the kitty litter clean-up method!! Works for anything viscose: paint, laundry soap, shampoo…
And I can also vouch for the annoyance of textured walls. For now, I’m painting them with really nice Ben Moore paint in eggshell finish. That seems to minimize the appearance of texture. But if I figure out a way to skim coat or win the drywall lottery, I’m SO ripping out some walls.
Kate Carlin says
What color did you end up painting the vanity? It almost looks like you stained it….we have an awesome cabinet that I would like to paint brown so it almost looks like wood, but I can’t find the right paint.
YoungHouseLove says
It’s Silhouette by BM. It’s a deep chocolate gray color with a hint if plum in some lights.
xo,
s
Renee says
Wish I could remove the “love handles” in our bathrooms for a temporary better look, but the builder put the love handles up first and then the counter. So if I pull the love handles, I’ll have a big gap between the counter and the wall. Weirdest thing I’ve ever seen. Guess I live with the look until we can pull everything out and put in new counters.
YoungHouseLove says
Oh no! I’ve never seen that!
xo
s