Hope you guys had an awesome Labor Day. We split time between family and house projects which is pretty much our sweet spot. This week is going to be especially hairy thanks to having book stuff nearly every day, but we did manage to eke out a few things to share and hope to be back to normal next week (might not be as on top of comments until then either).
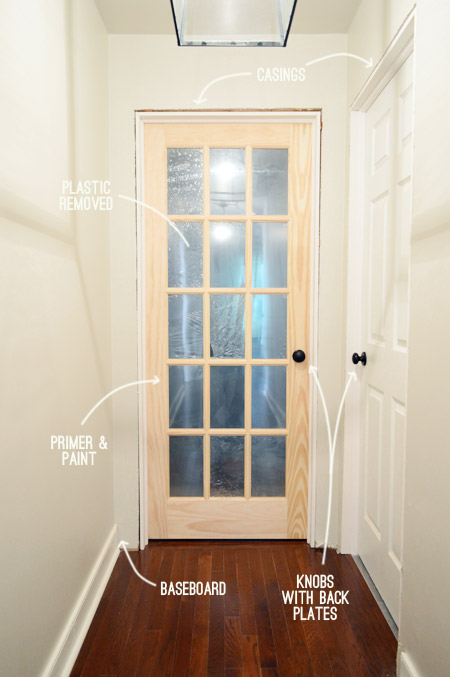
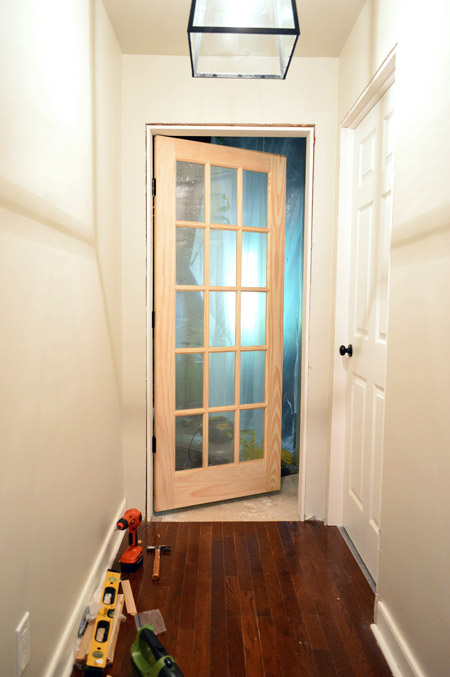
But back to my jamb. Or should I say my jambs? They don’t have casings yet, the leftover doorknobs will be upgraded to these backplated-versions, and one door still needs to be painted like whoa – but boy does it feel good to have two doors hanging on this side of the hallway. And because a bunch of you requested the full play-by-play, here’s how we added jambs and hung both doors – complete with details on carving out a spot for hinges and a doorknob.
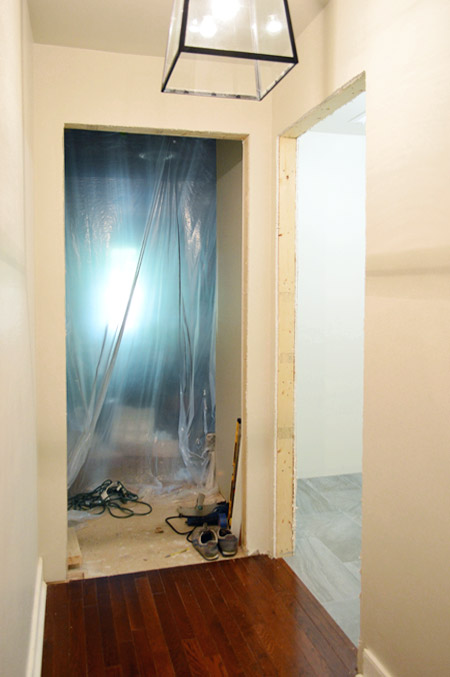
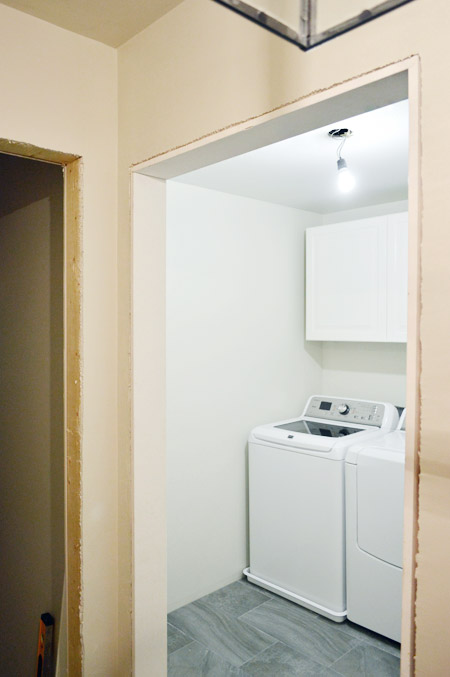
Until last week, things have looked like this. The door-less laundry room wasn’t a big deal, since it actually made working in there easier. But the plastic drop cloth closing off the storage room was less than pretty and less than convenient.
Installing these two puppies gave me a whole new respect for doors. They’re a relatively complex operation, at least considering how much I took them for granted.
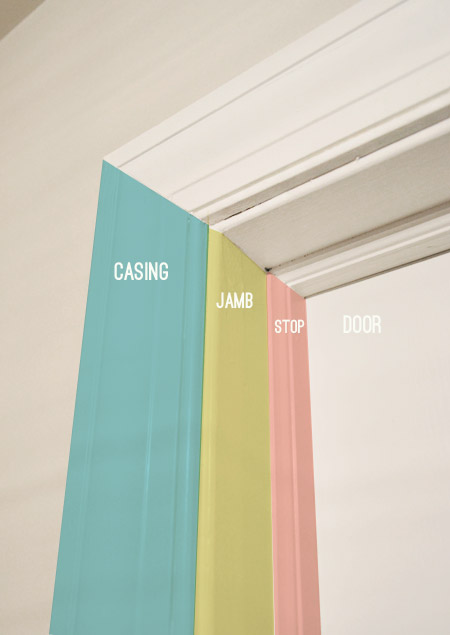
On top of the hardware (hinges, dooknob, strike plate) the doorway itself was made up of three separate trim pieces. All of which we’d be installing.
We debated purchasing a pre-hung door for the laundry room (one that comes already placed in a jamb, which saves you from having to carve out spots for the hinges and knob) but we had trouble finding one that matched the style we wanted for the storage room door, plus it was hard to beat the price on the slab (aka: not pre-hung) version. And since the laundry room door was an existing door that we’re reusing (it used to lead to the storage room), I’d be stuck making a jamb for that one anyway. So we decided to attempt making a jamb for that already-owned door first and if all went well (or at least okay) we’d proceed with hanging the other door from scratch too.
Well, not totally from scratch since Home Depot sells these $19 jamb kits for doors up to 36″ wide (ours are 32″).
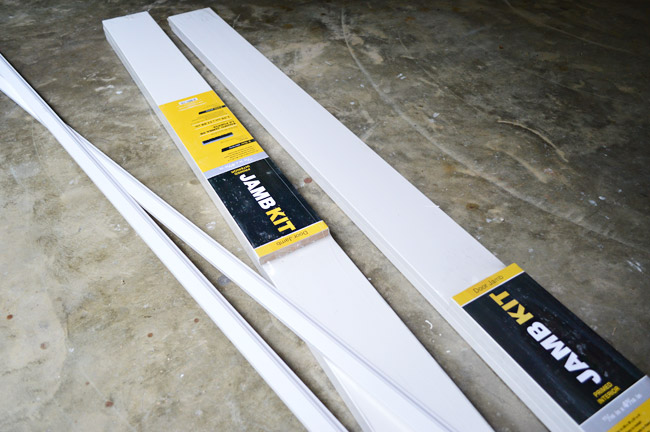
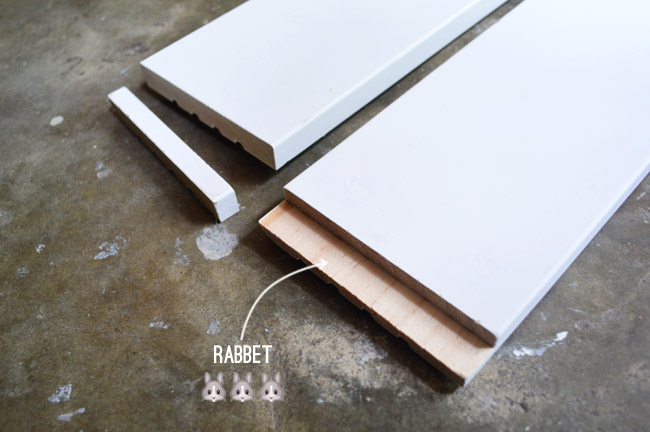
Besides coming in three pre-cut pieces (two sides, one top) the nice thing about the kit is that the two side pieces already have a rabbet joint cut on one end so that the top piece can sit nicely across the two. Ours needed a slight trim to fit into the framed doorway, so I was just careful to cut it off the non-rabbeted end.
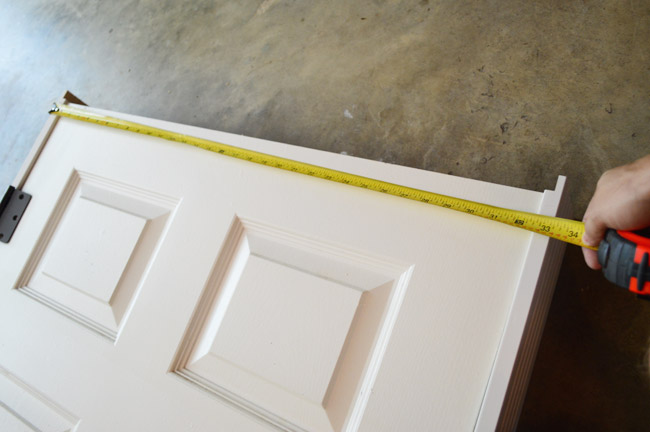
We propped up the door on the ground using some scrap wood so I could construct my jamb with gravity on my side. I leaned the side pieces in place, but couldn’t place the top piece until it was cut down a little bit.
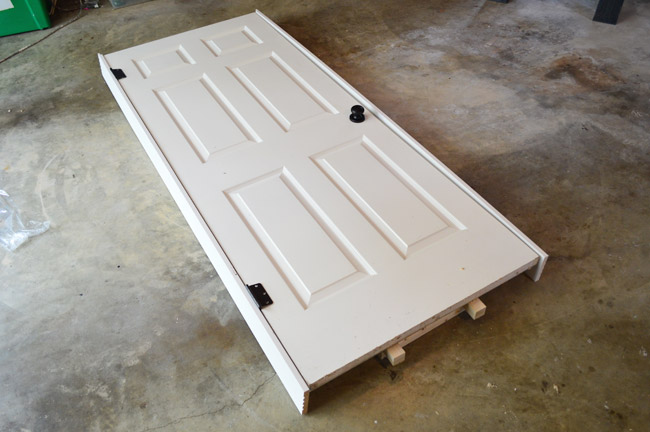
I measured the width from jamb-edge to jamb-edge, but had to account for both the fact that it was sitting in the rabbet joints (so it’d need to be a little shorter than my measurement) and that I wanted to give it about 1/8″ of breathing room around the door too.
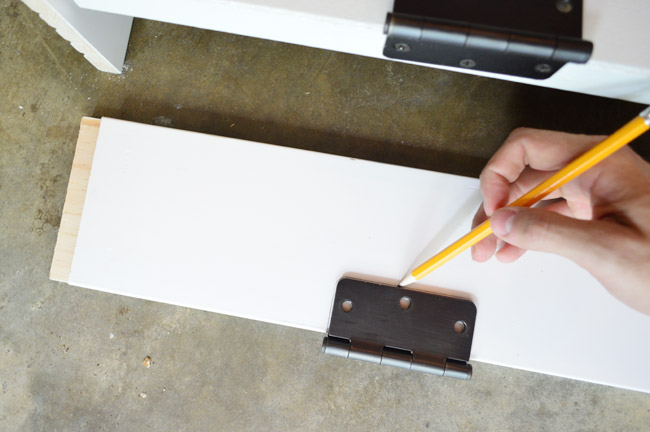
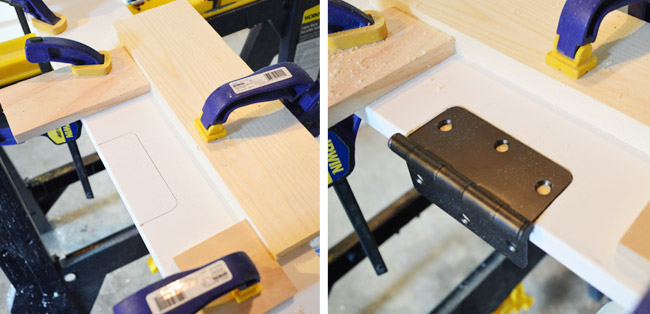
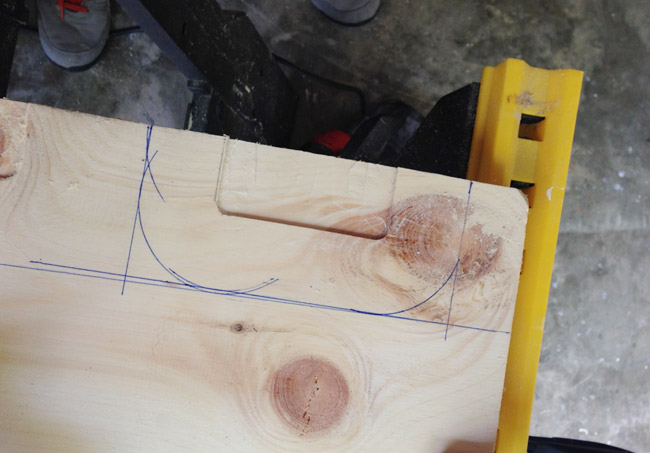
Once that was cut, I started the process of mortising/routing out the spots for the hinges on the jamb – since they need to be recessed into the wood to work. Since they were already attached to our door, I marked where the hinges should go on the jamb based on their door placement.
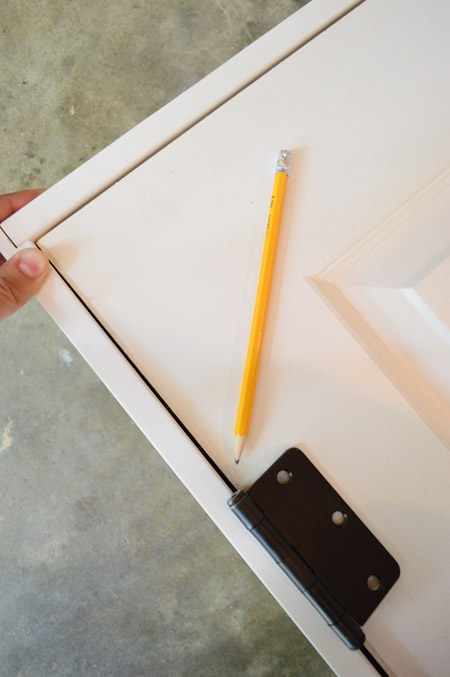
Once I had marked where on the jamb each one should go, I used a spare hinge to trace out the shape that needed to be routed out.
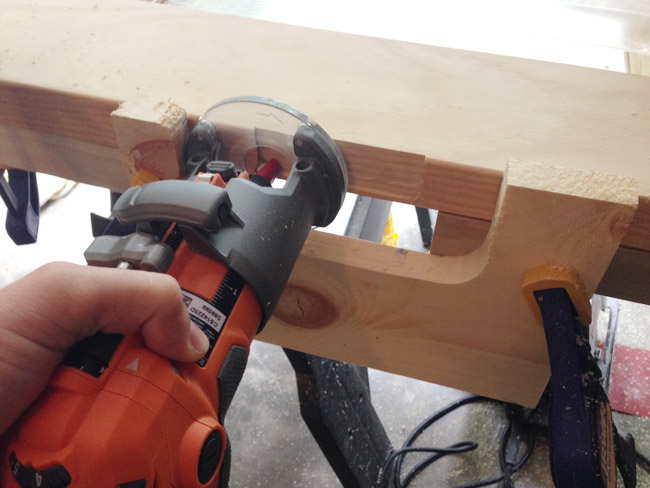
I purchased a compact router for $99 at Home Depot (it’s called a Rigid 1-1/2 HP Compact Router) and an $18 bit meant for work like this. I had done some of this work by hand before and it wasn’t super fast or super precise, so I decided it’d be worth the investment this time around.
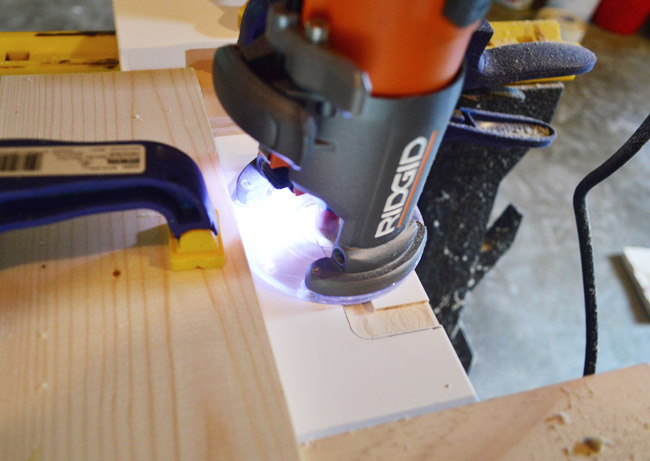
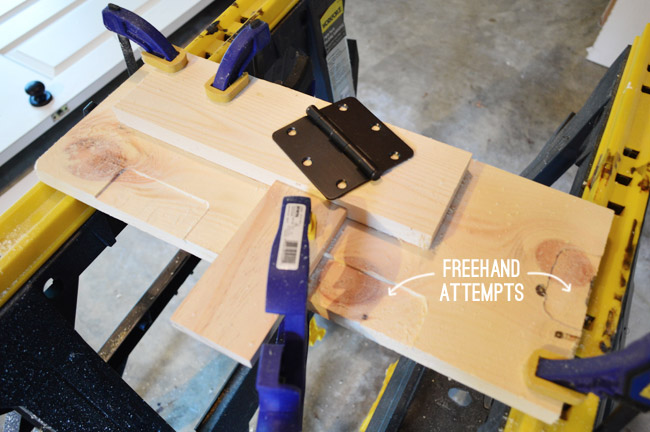
Before taking my new router for a spin on the jamb, I practiced on a scrap board first. My freehand attempts weren’t great, so I started clamping some other wood scraps as sort of a guide. You can see how that worked out for me on the routed hinge spot on the far left of the board below. Muuuch cleaner.
When the time came to make my official first cut on the jamb, it came out awesome (if I do say so myself).
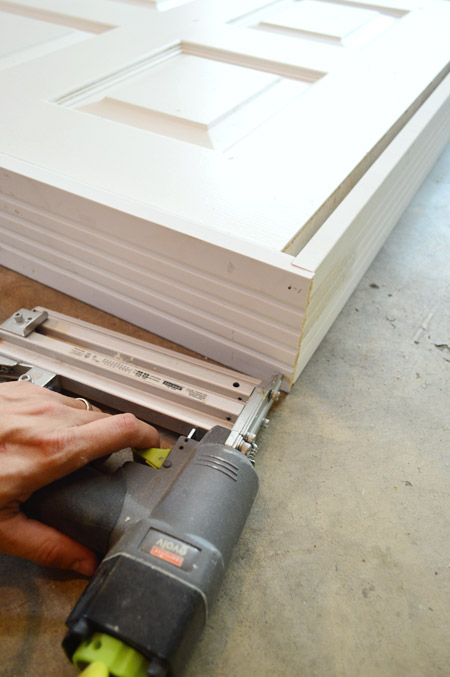
With both spots for the hinges cut, I could nail my three jamb pieces together. I used a 2″ nail through the side pieces into the top.
Here’s the jamb that Sherry and I pushed loosely in place within the framed door to the laundry room. You can see that we started the process of hanging this door before we did any of the backsplash (took us a while longer to tackle the glass one).
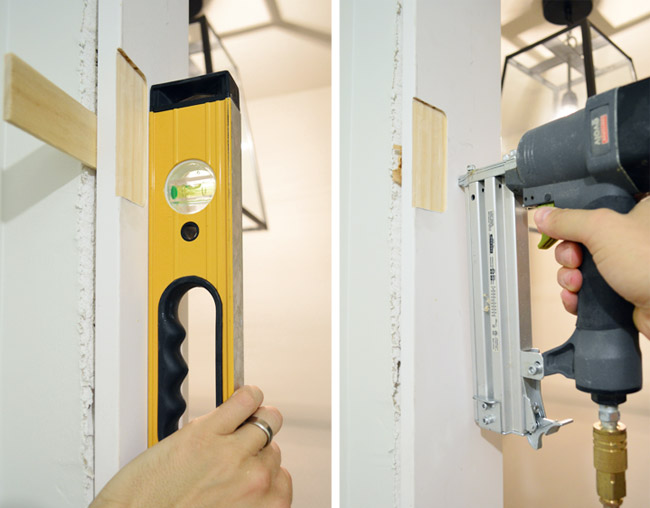
The next part is the most persnickety: getting every side of the jamb level and plumb. We did our best, adding shims – especially under the hinges – to help us adjust things where needed. Once we were satisfied, I nailed the jamb into the door frame on all sides.
I lost Sherry to Teddy at that point, but thanks to some shims under the door I could hang it myself by screwing the hinge into the jamb. Here was the moment of truth.
The moment was a bit of a whomp whomp because it didn’t work. Sad trombone. It was a little tight on the top corner.
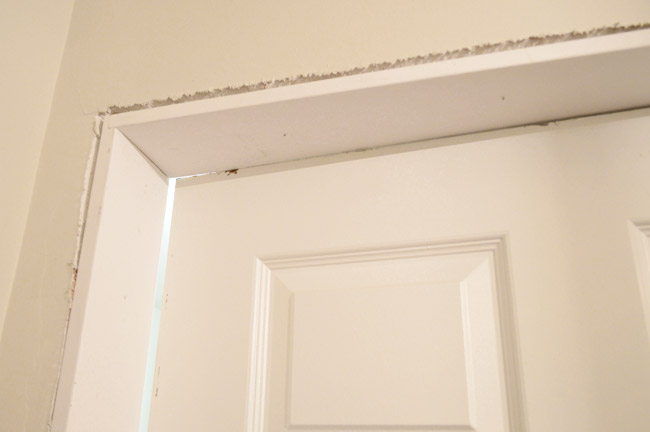
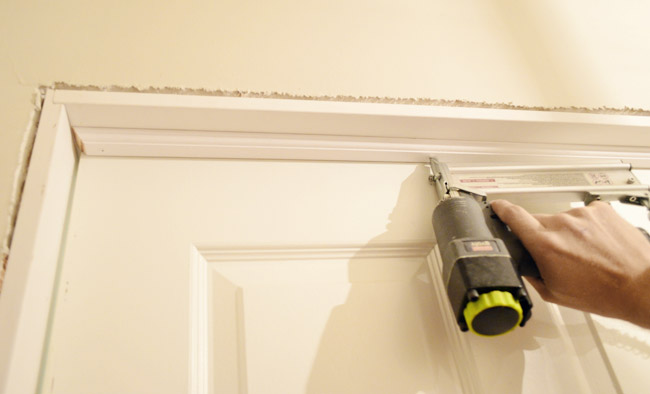
I checked all my levels again, and it turns out that the top corner had slipped out of plumb when we turned our attention to the bottom. So I shoved a couple more shims in there to correct it and things were back in working order. Now that the door closed well, I could attach the strike plate (where the door latches), and nail in the stop molding around the jamb.
I was pretty darn happy with how it turned out, though it was definitely not speedy.
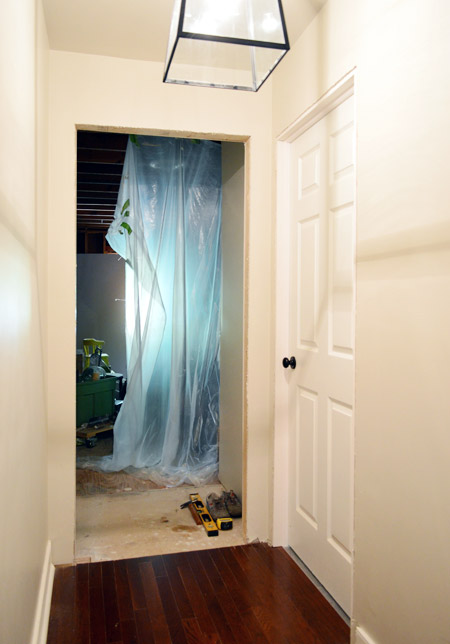
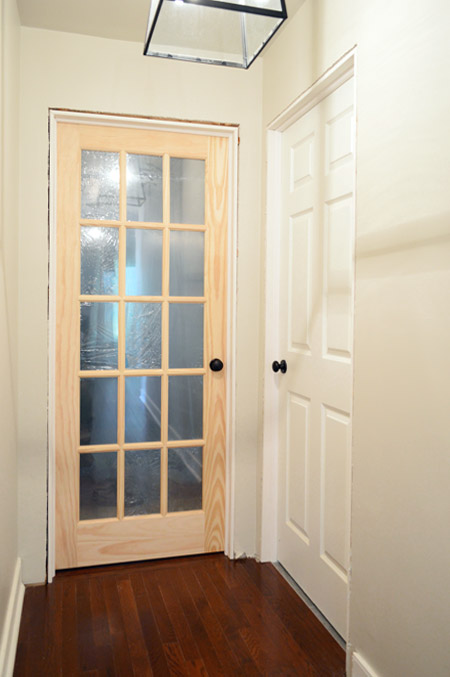
A little while later (we finished up the backsplash and the counter in between these two doors) it was time to wrestle this puppy into place (the glass isn’t frosted, it’s just covered in protective plastic).

Since the door didn’t have any hinges, I’d have to route out spots for them on both the door and the jamb this time. And since it’s a heavier door, I was adding three hinges. Instead of carefully clamping scrap wood each time around to guide my cut, I decided to make a template out of my practice board. Here’s where I marked where I needed to cut (using my jigsaw).
Here’s my wooden guide in action on the door, as I routed out the spot for the first hinge.
Once I had the three hinge mortises made on the door, I propped it up and loosely held the jamb pieces in place so I could mark the hinge placement on the side jamb piece. I also put some shims up top to ensure that I didn’t run into the same problem we had last time (having a tight fit up top).
With the hinges traced out on the jamb and my wooden template at hand, it was pretty quick work to route out the spots on the jamb.
I’ll fast forward a bit, since the process was the same from here the second time around – we nailed together the jamb pieces, brought them into the space, and then leveled, shimmed, and nailed everything in place. With Sherry’s help I got the door hung much faster this second time around… and it worked great! We were relieved. There were high fives and a fair amount of bad moon-walking.
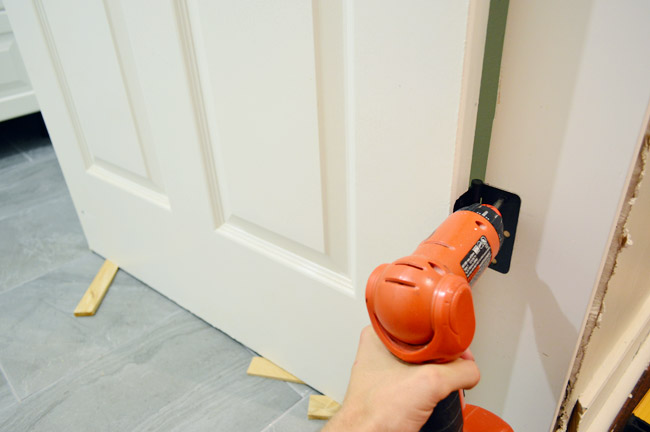
Our dancing was cut short because this door still needed a knob. I bought this $19 kit to help drill the holes for the doorknob precisely. It wasn’t the sturdiest thing in the world, but it was worth the money just to have some instructions to follow – and the right size drill bits handy.
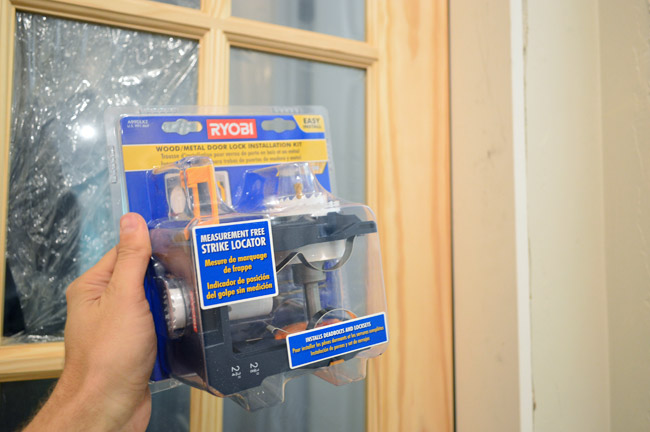
Basically, it clips onto the door, using the strike plate as the guide for where it should go (of course, I had to add the strike plate first).
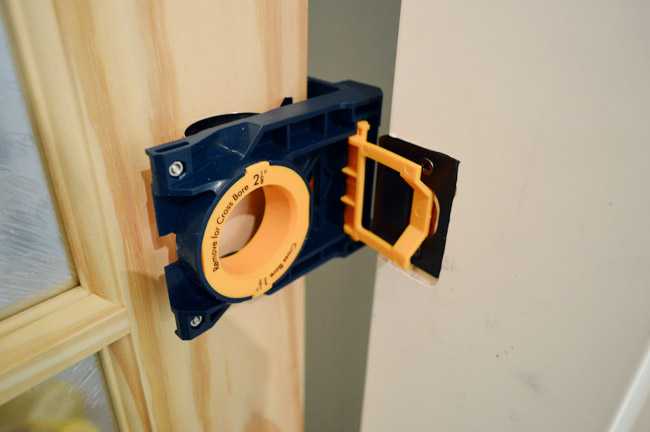
Then using one of two cross bore bits (depending on the one your knob requires) you drill a big honkin’ hole through the door, per the instructions.
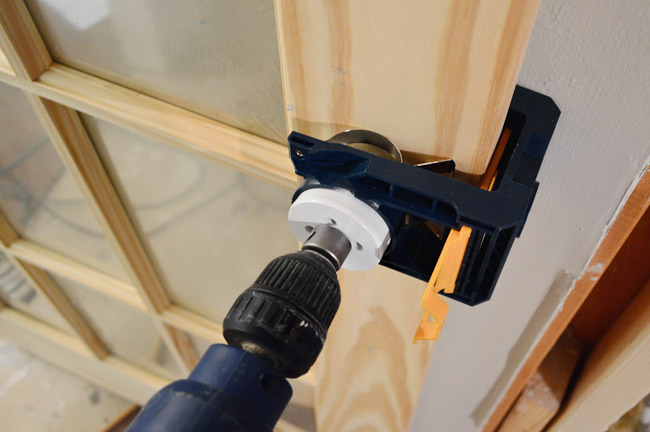
Then you use the other bit to bore through where the latch will go.
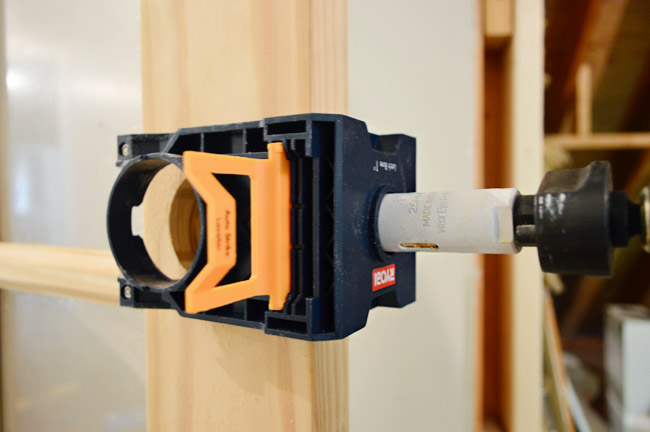
If all goes well, you end up with something that looks like this.

The part it didn’t cover – and maybe this is just specific to the knobs we own – was routing out a spot on the end for the latch to recess into. I used my router freehand, so it didn’t come out perfectly but it does the trick just fine (we can smooth things out with caulk or wood putty before we prime/paint).
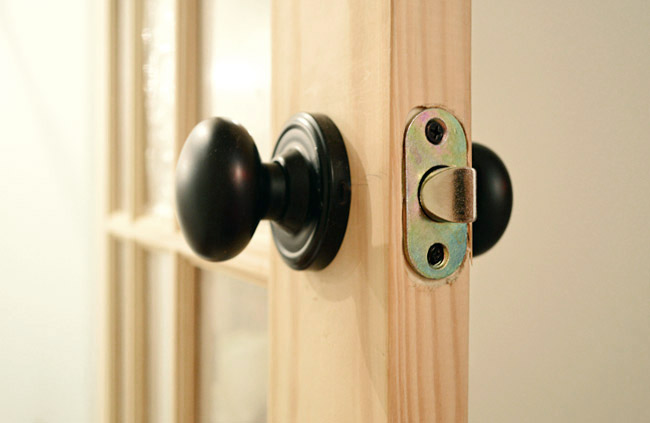
The victory was that it was hung, it closed securely, it stayed open when you opened it (some doors that aren’t hung level slowly close themselves when open), and it looked pretty – even in its unpainted film-covered state.
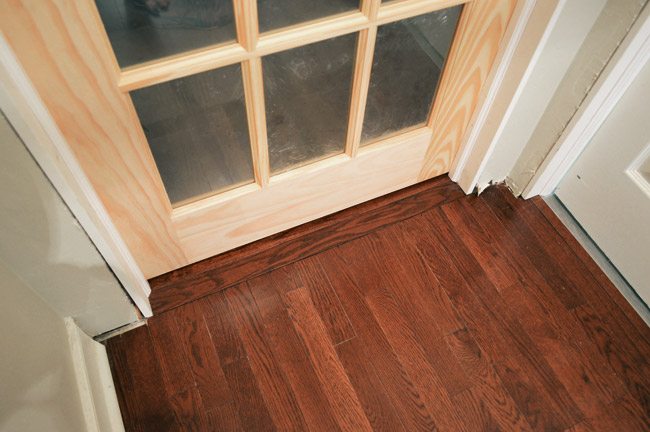
Since the wood floor was a little short of extending all the way to the door, I nailed in a couple of extra hardwood pieces to create a little horizontal threshold. We actually really like how it looks, so we hope it works with whatever flooring we end up with in the storage room. I do wish I had extended the wood flooring just an inch further into the laundry room so the tile didn’t peek through (d’oh) but I’ve been comforted by noting how many other thresholds/floor changes don’t align perfectly with the doors that I never really noticed before this project – so maybe nobody else will notice either? Until I pointed it out on the internet.
We plan to paint it when we spray all of the molding, and obviously the casings and such will go in when we do the rest of the room. We also ordered two more door knobs with the decorative back plates that we need, so they’ll match the other rooms off of this hallway.
We did tons of laundry last week for the first time since the laundry room door went up and it was AWESOME to be able to close the door. It really does make the laundry substantially quieter. But what we’re really loving is not having to wrestle that plastic drop cloth every time we go into the storage room. Life is good when the drop cloths come down.
It’s pretty exciting to stare down the barrel of close-to-done when it comes to this little addition of ours (if you can call the laundry room that, since it used to be unfinished space). On one hand it feels like it has taken us a while to get this far, and on the other hand it’s pretty amazing that this room wasn’t even drywalled a month ago – especially since our first and second houses’ kitchen renovations took us over four months each (and those were already finished rooms to start with). In the words of Dory: just keep swimming.

Stacey C says
Looks great! You have the patience of a saint! Looks like it has come so far so fast – congratulations!
Diane says
More Burger!
shauna says
This is a really great project, such smart space planning!
You could get one of those threshold transition pieces to cover the seam of the wood floor.and tile. You might have to shave a little height off the bottom of the door to make it fit but it would elimate that little annoyance everytime you looked at it.
Allison says
You both are so talented! We have to hire someone to replace our doors with pre-hung because our beautiful freshly painted door does not close so well with our 1963 door frame :(
Keri says
I am so excited for you guys! Great job!
Anele @ Success Along the Weigh says
Wow…I’m in awe. I called Jeld Wenn when the urge for new doors struck because I think I would end up a twitching heap if I tried. So I bow to you, sir.
Now to quote Midnight Starr…’play another slow jamb, this time make it sweet.’
YoungHouseLove says
Picture me swaying softly while gazing at the door.
xo
s
Sarah H. says
Awesome! Next time you are hanging doors try separating the hinge when it’s time to hang the door. You can attach the jamb side without having to wrangle the whole door whilst keeping things straight :)
Did that make any sense?
YoungHouseLove says
Smart! We sort of did that, but rather than separate the hinge – we just hadn’t screwed them into the jamb side yet. I can’t imagine trying to wrangle the whole door! :)
-John
Olivia says
Love the Dory reference. Lol.
And great job on the doors!
Scaldino Basement Solutions says
Looks like you guys are doing a great job so far. I don’t think I’d have the patience for a project like that. Way to go!
MaryBeth says
Is your storage room heated/cooled? If not, you may want to consider weather stripping for the bottom of the glass door.
YoungHouseLove says
Thanks MaryBeth!
xo
s
Kelly says
If you’re ok with a temporary solution there are DIY tutorials online for window draft stoppers like this one: http://www.thelittlehouseinthecityblog.com/2011/02/how-to-make-diy-draft-stopper.html
It might not work out if that door gets a lot of use, but figured it was worth mentioning.
YoungHouseLove says
Thanks Kelly!
xo
s
Theresa says
When it came time to replace all doors in our home we went with pre-hung doors. That was a big enough job. Perhaps camera angle, but the door knobs don’t appear to be placed at the same height.
YoungHouseLove says
They’re both 37″ to the center of the knob from the ground, so it must just be the angle.
-John
Erin says
I concur; doors are surprisingly complex! I replaced a door over the summer and found the hinge kit I’d invested in to be quite useful. Like your door knob kit, it clamped in place and cost around $20. It was a time saver and gave me some peace of mind since my routing skills are sub par.
Veronica says
Not going to lie… with the pictures of the new door I am dying to see the long hallway shot with the new doors in place. So neat to watch a vision come to life.
Lauren says
For a split second I thought you had painting the casing, jam, and stop those delightful Easter pastels. It would have been a bold choice ;)
Also, this post made me want jam. That’s all.
YoungHouseLove says
So funny!
xo
s
Theresa says
Looks great. Door is a four-letter word in our house. They always take more time and effort than we think… but you did get another new tool so it was worth the effort.
Reenie says
Great job!! :)
patrick says
whats the chance you buy that Jam Kit again? With all the customization you did with your own router & installing the handle yourself, I prefer getting stock Poplar and creating your own stop. It is more time consuming, but the result is much sturdier. just my thoughts. :-) looks great! Time to move again?
YoungHouseLove says
So cool that you’ve created your own jamb & stop with poplar! Do you paint it or leave it raw? As for moving, neverrr! Well, at least not for a few decades ;)
xo
s
Sunny says
Great work! I’m curious if you considered hanging a barn door for the laundry room to avoid the swinging door taking up space in a small room?
YoungHouseLove says
We definitely considered that but opted to keep the laundry door the same as the other 5 doors in that upstairs hallway so it felt like it had always been there. That way the glass door at the end of the hall can be the star without competing with a barn door next to it.
xo
s
Tanya says
I have a random question… Where will you store your ironing board? Also are there any outlets in the laundry room?
YoungHouseLove says
Our last post (just scroll one back to see that) shouts out the extra pair of outlets we added on the side wall. As soon as the trim is complete we can bring in all those functional items for the other walls, like the ironing board (we’re going to wall mount that). Can’t wait to bring in other things – like a drying rack and a laundry sorter – so it feels like a real laundry room!
xo
s
Rosie S says
Having recently completed a similar project, I know how hard it is to hang a door. But it CAN be done and beautifully, as you have shown! Also, I am still in awe of the threshold perfection! :)
YoungHouseLove says
Thanks Rosie!
-John
Olivia says
Jamb on it.
kristin says
I love this so much! I was really obsessed with your idea of a frosted door from the get go and haven’t been able to get it out of my head. My boyfriend is a contractor and they put clear glass doors on a built in bar of a house he just flipped. It got me thinking … can you frost glass yourself after the fact? I think that would be cool. And also I like to try to DIY everything. :)
YoungHouseLove says
Yes, you can spray it or use frosting film! That way it’s removable so you can go back to glass if you want to later. That’s what made us go for glass instead of a permanently frosted door.
xo
s
Kelsey says
Wow! These turned out great. I pulled off all our doors to paint them when we moved to our house in November – and wow it was tough to get them back on and level (by myself). I can’t imagine the patience needed to place the jambs too. Great work!
YoungHouseLove says
Thanks Kelsey!
-John
Kate Benca says
Just in case you need to do another door, or for those who are planning on putting in a new door, if you go to an actual door shop (local contractors will know where to go), it’s just as cheap to buy a pre-hung door as it is to go to Home Depot and buy all the parts to hang it yourself. (The solid door you installed would have cost about $60 here in CA.) My husband sells windows and doors, so I’m always hearing him laugh at how “diy’ers” go to Home Depot when they could go through him and get the stuff he sells (windows, doors, trim, skylights, etc.) at 1/2 the price.
So…if you have a contractor friend, ask him/her where they get their materials. If you don’t need it TODAY it could end up saving you a TON of $.
YoungHouseLove says
Great tip!
xo
s
Angie K says
It looks amazing, what a crazy change of pace to have a house big enough to add your own configurations to unfinished spaces!
I had a thought for the floor transition. I wonder if you could put a strip of 1/4 round molding along the bottom of the door to match the rest of the casing? Or something along those lines? It might be less obvious than the contrasting floor transition. Or, it could look more obvious…who knows!
Also, only a tiny bit related, I recently purchased a Zing Air (computerized die cutter) and I’m totally in love with it (like crazy in love). You could do some fun designs on the glass window with vinyl that would be totally removable if you had a die cutter. And…knowing your mad design skills and love of all things craft related, I bet you would fall as in love with the Zing as I have! It will even cut thin metal/plastic and balsa wood! It’s not cheap, but I thought I’d throw it out there because I know you two would love it! (I don’t represent whatever company makes the Zing, fyi)
YoungHouseLove says
That sounds awesome Angie!
xo
s
Emily says
Looks great and the thing you didn’t mention this time around is how much light comes through! I love it.
YoungHouseLove says
It’s A WHOLE NEW WORLD! Even in the middle of the night I see light coming down that side of the hall thanks to the moon!
xo
s
Leah says
I know I’ve mentioned this before, but if you want even more light, go for a solar tube! You can get it installed, but I’m pretty sure you could install it yourself. I had some in the house I grew up in, and I was always amazed at how little we needed to use the electric lights. I totally recommend them to everyone I know who lives in a house (someday for me . . . sigh).
YoungHouseLove says
I’d love one or two of those down the line in the laundry room!
xo
s
Leah says
One would be enough to light the whole space pretty well. Ours was in my bathroom, and I rarely needed to turn the light on in there. Even during the night, the moon gave enough glow to see by.
YoungHouseLove says
So cool!
xo
s
terresa says
Love the bunnies!!! :)
Cat @ MaryMarthaMama says
Haha, its so funny that you mentioned Dory. I was totally channeling her this weekend while painting the millions of railings on our deck… “just keep painting, just keep painting…”
Cathy C. says
Since the attic isn’t conditioned air, any ideas on how you will keep air from leaking around the door until you do finish it?
YoungHouseLove says
Weatherstripping should do the trick (that’s how the previous door to the attic was set up and it was around 40 degrees warmer (or colder) whenever we walked in.
xo
s
Bree says
Have you considered staining the door? Could be very pretty!
YoungHouseLove says
We considered that but we love a white glass door and with all the wood on the floor we think we’re happy with that mix. We eventually we want to add white french doors leading into the office downstairs (and already have a white glass door that leads from the sunroom into the living room) so we want them all to be the same – like they’ve always been here together.
xo
s
Christina says
I read “persnickety” as “Petersikety”. I thought, “Oh, is that their word for a shortcut?”. Haha!
YoungHouseLove says
Ha!
xo
s
Lee Ann says
Wow! Impressed! Doors and hinges are a pain; I’m always agonizing that we’ve routed out the wrong side of the door for the hinges, etc. So far, so good. Makes me think of that statement: “Measure twice; cut once.” And that always makes me think of a dear old metalsmith I knew long ago. His favorite motto was: “Cut to fit; beat to size; paint to hide!” LOL!
YoungHouseLove says
So funny!
xo
s
Rachel says
You two are amazing! I can’t believe you have built a whole room! And such a magnificent looking one at that. You really inspire me to get stuff done (on a much smaller scale). Thank you
YoungHouseLove says
Thanks Rachel! We definitely couldn’t have done it without the help of the framer, plumber, and electrician! And Lesley who came up with the idea to reconfigure stuff to gain that added light in the hall. We bow to her brilliance!
xo
s
My Crappy House says
I give you a lot of credit on this one. I’ve hung a few prehung doors and it sucks a lot. Hanging one from scratch… that’s a real accomplishment.
And I have a tip. I can’t take credit for it, but I can’t recall where I heard it. (Somewhere online.) If your door is swinging closed (as one of mine was), you pull out the top hinge pin and give it a whack with a hammer bending it slightly. Put the pin back and no more swinging closed. (And no, it doesn’t affect the door operation at all – still works perfectly.) If your door is swinging open, you take out the bottom pin and do the same thing. It’s a little ghetto, but it works.
Jackie says
Wow it is truly inspiring that this room didn’t even exist not too long ago!!! Do you guys spray your baseboards too? Last week I hand painted all my baseboards, and they don’t look as neat as I wanted. Great job , you guys rock!!
YoungHouseLove says
We still need to add baseboards to certain areas (in the laundry room, around these doors) so we’re planning to spray that when we tackle our wood door. Hope it turns out smooth!
xo
s
Mili says
Really like your new laundary room! Is there a reason why you didn’t put a sink (to deal with stains which might need extra attention) in the new setup.
YoungHouseLove says
Thanks Mili! We debated adding a sink but it would have been pretty small so we opted to skip it. Thankfully we have a sink down the hall and our washer allows us to soak things (it’s a top loader so it doesn’t drain whenever you open the top, so it’s easier to add things).
xo
s
Jessika says
This is no joke. Hanging doors is NOT EASY. I made a temporary partition in our giant upstairs room, and I had two spare french doors (long story ), so I hunt those on the partition so make it look prettier. OY. NOT easy. Looks like it should be easy. BUT IT’S NOT. Right angles and opening space and recessed hinges and and and. I feel you– this is not an easy project.
Tiffany says
Doors look great….but something totally off subject today. Did you see Lowe’s new vine “Fix in 6?” they put out? It says “Put a Fan on the Deck to keep the mosquitos away without bug spray”!!
So for all of the YHL doubters….you have Lowe’s backing you on that one ;)
YoungHouseLove says
So funny! It really works!
xo
s
Ana Silva says
You never cease to amaze me.
Christy Niebaum says
Doors and framing are one of the most tedious projects, don’t you think? We replaced all of our cheap, builder grade doors with nice, white six-paneled doors a few years ago. Talk about a beast of a project! And my husband (a civil engineer) complained about how poorly the doorjambs were installed when the house was built. Really messes with the way some of the doors hang. We weren’t able to get our latches to fit nicely into the recess either, but were able to fill with wood putty and they look ok now. Although, three years later, I really wish we had used caulk instead of wood putty because I think caulk stays cleaner looking. Seems like the wood putty get smudged and dirty.
YoungHouseLove says
So good to know! Thanks for that tip Christy!
xo
s
Cindy says
Having the tile show under the laundry door would drive me crazy after all the hard work I had done. It’s the only doorway in your upstairs that shows. Is there a way to score the tile and remove it to put wood there? It would seem way more finished.
YoungHouseLove says
I bet we could do something like that!
xo
s
Lil says
It all looks so pretty and finished…I doubt I would risk messing up the tile!
Diana says
Wow. I hope I never need to hang a door like this. And by “I” I mean my husband.
haverwench says
Pump up the Jamb! Pump it up, you’re pumpin’!
YoungHouseLove says
Best song ever.
xo
s
Crista says
Looks great! Any reason why you hung the door to the laundry room with the handle on the right side?
Crista says
Oops! I meant the door to the storage room! Sorry! Just curious as to your rhyme or reason behind it.
YoungHouseLove says
We wanted the door to swing that way for better access to the storage room and so we don’t block a light switch in that vestibule. The door knob on our bedroom door on the other end of the hallway is on the right side too, so it swings open and you step in :)
xo
s
KarenM says
Gosh I love these projects you guys do. We will be moving out of our house within a year but naturally the day after perusing the blog for the first time in a while, I bought Grey paint to cover my (ew) orange bedroom walls, and started ripping up carpet in the spare room to reveal 120 ‘ s hardwood floors! This is getting addicting.
Noelle @ Noelle Mullins Design says
This is such an amazing solution to the laundry room/bonus room area. Thinking back to the way it was, it seems almost crazy to walk through the laundry room to the bonus room when this solution was available! Love it! Can’t wait to see everything completely finished.
L says
I’m interested to know why there’s tile showing from the laundry room when the laundry room is closed? Transitions always go under the door, so just curious.
YoungHouseLove says
That’s in the post for ya ;)
xo
s
L says
I’d have to fix that … that would drive me crazy!
HK says
Hi
I found the EZ-Hang door hanging kit. Costs $5 for one door. Based on my lack of skillz, I would probably use this type of thing. And a prehung door.
http://www.ezhangdoor.com/home
Your doors look awesome. We have a room we need to close in with a door. Even with a kit, I will keep this bookmarked.
YoungHouseLove says
Thanks for the tip!
xo
s
Helen says
You’re doing a great job on your new room and it looks amazing, but as you’re so busy I thought I’d let you know how much I also love the super simple update posts too! I’d love to see a post where you just reorganise your drawer or move some ornaments!
YoungHouseLove says
Thanks Helen!
xo
s