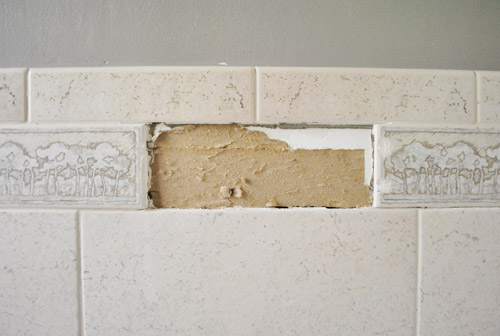
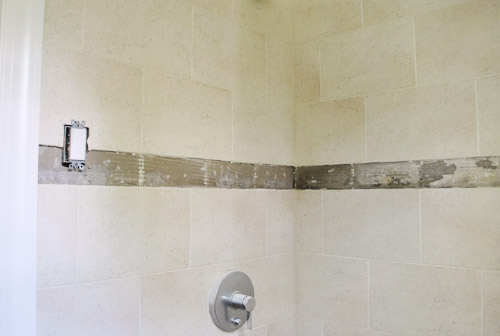
We no strangers to removing unsightly trees. In fact, taking care of the dead/dying/dangerous trees that we were warned might fall on our first house during our home inspection was a big part of the transformation of the front yard. But taking out these particular trees was a new challenge… because they were in the form of tile in our bathroom:
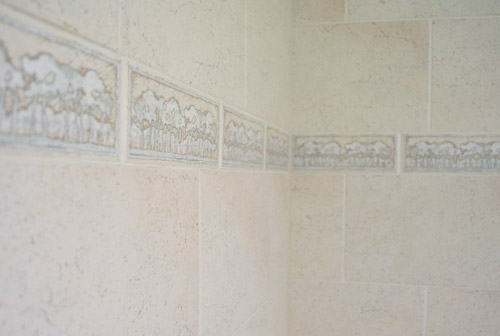
We’ve never been crazy about the beige-on-beige color scheme going on when it comes to the tile in that bathroom, but at least most of it is neutral enough to not call that much attention to itself. Except for that tree-tacular border. Every time we walk in the opening chant from The Lion King plays on repeat in our heads. Feel free to listen to it as you read this post (you can bet your buns we were singing it throughout this project).
It’s just not what we would have picked to encircle the entire bathroom (it’s on all four walls, the same tree sketch on each tile, over and over again). It’s like groundhog day without Bill Murray.
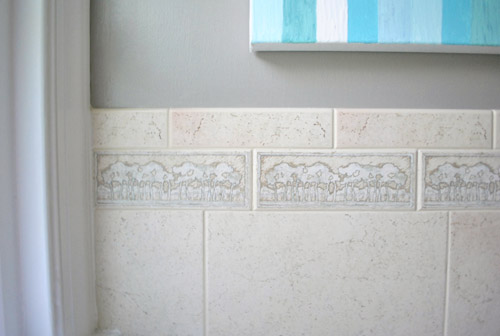
Thankfully, tile isn’t permanent. And we’ve seen people cut out offending tiles (whether they’re broken, ugly, or both) and replace them with something more their style. We even tackled a little bit of that in our kitchen when we did some bracket-reduction surgery here.
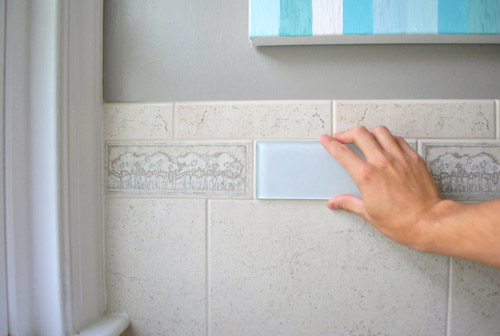
So we debated for a while about what we wanted to put in its place, and finally decided on some classic clear glass subway tiles (sort of like the glossy and reflective cousin of the classic white subway tile). They were the perfect size and we felt like they’d help update the room like some of the other beige-to-white changes that we’ve made (painting the of-white trim, swapping out the beige toilet, etc). See how holding just one of them up to the old border sort of modernizes and freshens the whole room and breaks up the monochromatic beige-on-beige tile action? They sort of look blue here (since they’re reflecting the blue painting) but they’re clear glass in person – which is really cool since they pick up colors in the room, whatever they are.
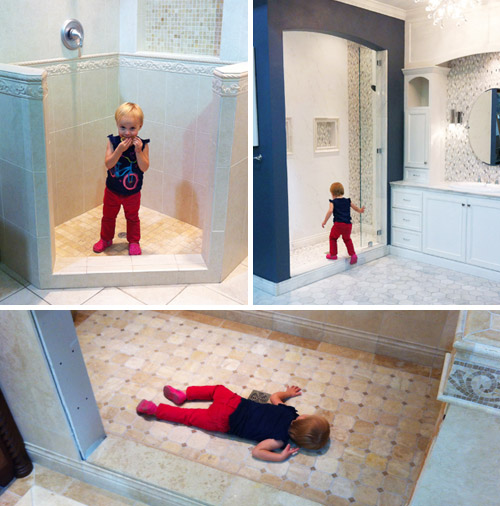
After checking out a couple of sources (local tile shops and big box stores like Home Depot), we found these guys at The Tile Shop, which is also where we got our kitchen penny tile. And with our 10% discount (the code is YHL10, which works for everyone) we only needed about $50 worth of tile to redo the entire border. So it actually was a pretty quick and easy shopping trip… except for having to repeatedly peel Clara away from all of the displays. For some reason she’s obsessed with crawling in and out of all of the fake showers. And laying down in them. We call that last shot “The Crime Scene.”
Even though the tile was pretty affordable, the project total quickly jumped with the purchase of the tool that we’d need to cut out the old tile: a Dremel MultiMax (here’s an affiliate link to the one we bought for ya). It – plus the special head for grout – ran us about $130. But I called it part of John’s Father’s Day gift (and a late Mother’s Day gift to myself, haha) since it was high time we “transplanted” those tree tiles. We figure it’s a tool that’ll come in handy a lot over the years (it has a bunch of different heads), so it’s not just a one-project-thing. We’ve actually used it on two other projects since, including the deck so it’s already paying off!

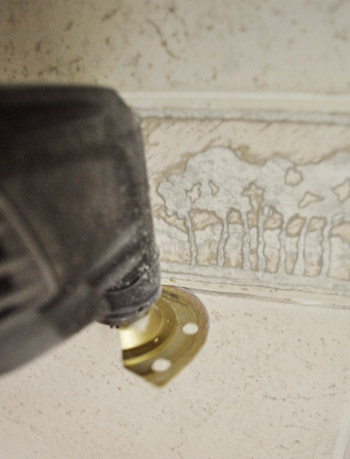
We were a bit hesitant to just have at it, but the Dremel felt like a pretty straightforward tool. We attached the special grout attachment, plugged it in, turned it on, and slowly pressed the oscillating head (it sort of just shakes back and forth quickly) into the grout line.
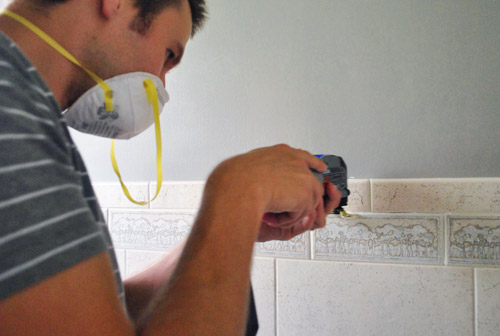
John got to take it for a spin first (new-tool-lover that he is) but I also got in on the fun. It wasn’t the fastest process in the world, but we liked that the attachment was strong enough to break up the grout – but not really strong enough to majorly scratch the tile. So if we slipped a little bit we didn’t have to worry about ruining the surrounding tiles (you probably could, but you’d have to lay into them with some force, and that wasn’t our game plan). Oh and once we got started, the groove between the tiles acted as a natural guide to keep our line straight – so that was nice.
Once we had removed the grout around one tile we half expected it to just pop off the wall with a light flick of the flat-head screwdriver. Nope. Instead it just chipped off a bit and came flying at us like a ceramic bullet.
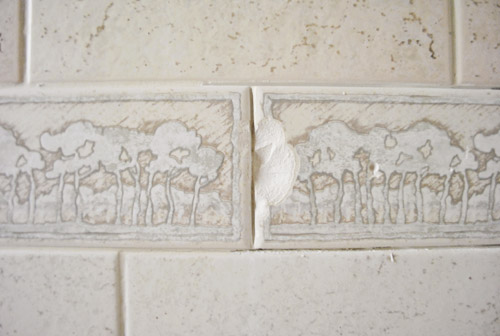
In an unusual reversal of roles, I was just about ready to throw up my hands and declare this entire project too difficult (I’m usually the chipper we-can-do-it cheerleader while John voices his doubts). I think I was just riled up because that chipped piece of tile-shrapnel hit my neck and gave me a small cut. Thank goodness we were both wearing safety glasses so the eyeballs were protected. Since John’s neck remained unscathed (and he probably was enjoying this role reversal of being the one who soldiers on) he carefully tapped at it the edge a bit more with a screwdriver and hammer… and eventually was able to get under our first tile!
A bit more prying later and voila – we had one tile down, and about three dozen more to go.
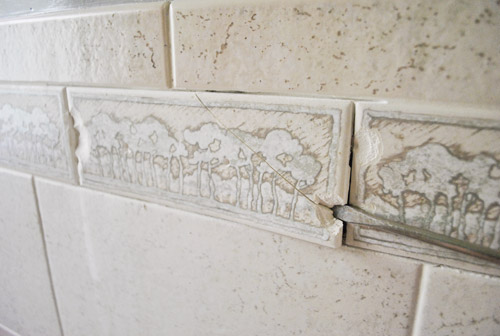
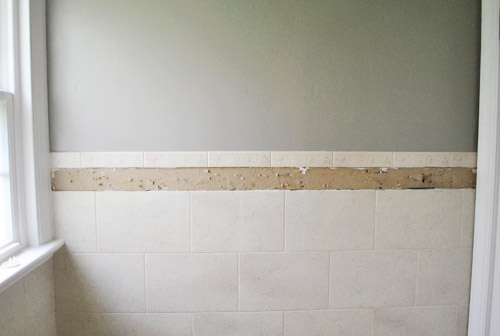
You can see in these shots that it looks like these tiles were applied to drywall, not cement board. It’s not ideal, but not problematic enough that we were going to tear the whole thing off and replace it with with the sturdier stuff (this is not the shower wall, it’s the wall next to the toilet).
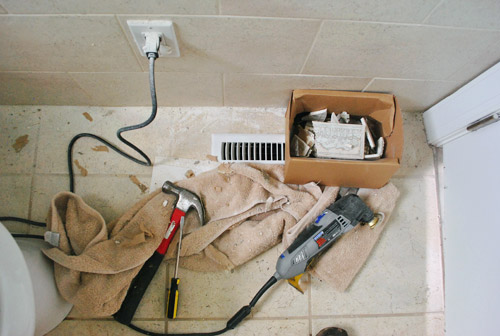
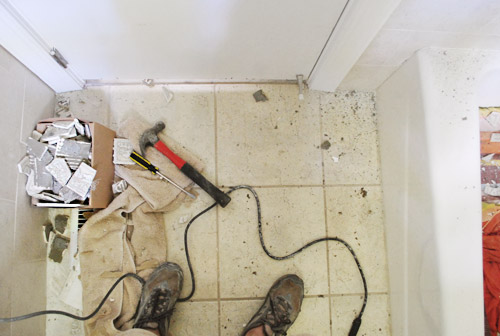
Did I mention this process was kinda messy?
The other rows of tile came off easier actually (the difference between thinset on cement vs. thinset on drywall paper) so the process speed up a little bit (although cutting out all of that grout was still more time consuming that we expected).
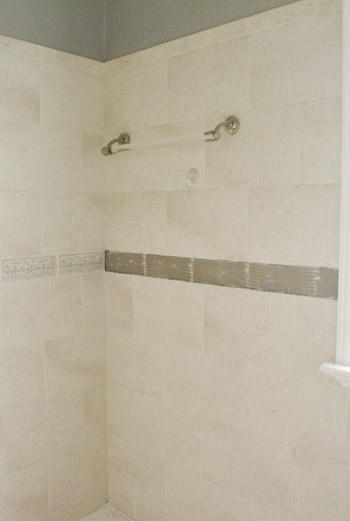
But by the end of Clara’s nap (about 2.5 hours this particular day) we had managed to get all of the tile off the wall successfully, without any more tile-inflicted wounds. High fives ensued. Update: A few folks have asked why there’s a light switch in the shower in the photo below this one, but it’s actually located outside of the shower curtain near the door to the bathroom, so it doesn’t get wet.
And we had continued to make quite a mess on the floor. More high fives were enjoyed.
Accomplishing any project within the span on one nap always falls within the “victory” column for us. After taking another half hour to sweep up and wipe down the room (followed by showering in the hall bath), the room was ready for tiling. But we’ll cover that tomorrow since we still have a few things to finish and some photos to snap before we can share that whole shebang. Who else has rocked some tile removal? Anyone use a Dremel (or similar rotary tool) for the task? Any high fives going on, or are we the only ones trying to keep those alive?
Psst- To follow this bathroom sprucing project from the start, check out this planning post, this painting post, this light-swapping post, this art and trim-painting post, this toilet-updating post, this window frosting and shampoo wrangling post, and this toilet selling/buying and door-cutting-down post.

Amanda says
I love that tile – it’s definitely going to look much better!
annabelvita says
Um, so, the pictures of clara reminded me of a story about my best toddlerhood friend (she moved away and we lost touch). Her family were looking around a bathroom showroom and she’d just been potty trained. Long story short, she went “number two” in the showroom toilet, which was installed on top of carpet.
Hahahaaaa. Can you imagine? Her poor parents!
YoungHouseLove says
Oh my gosh- that’s so hilarious/terrifying. We’ll have to keep a close eye on Clara when she starts potty training.
xo,
s
MaryLea says
We just removed half of the tile backsplash in our kitchen where we removed a wall over our cook top to make it “open concept” and into a peninsula — had to be careful because the granite backsplash was right against it and we wanted to keep it. I cut out the grout with a grout knife by hand then the tiles popped off with a mini crow bar and screw driver. Hubby also has a little dremel tool like your but ours is the generic knock off version from Harbor Freight for about half the cost. It was a lifesaver for the kitchen wall removal project — great for cutting weird things like pieces of random duct work in the ceiling while we added an exhaust hood and for cutting out wall studs in tight spaces! : ) The tile looks great — it’s better already without the trees!
YoungHouseLove says
That sounds like such an awesome update you guys did! Congrats!
xo,
s
liniv says
Hi! If you have the time, can you expand a little on the whole tiling drywall vs cement board? We recently completed a little tiling project in the kitchen (just from counters up to cabinets over the oven), but we adhered the tiles directly onto drywall. I guess I never even thought that we’d have to tear down drywall and replace it with something else first. Is that necessary for small tiling projects? Ack!
YoungHouseLove says
It’s best to tile over cement board since it’s built to hold the weight over time. Since your backsplash doesn’t get wet and probably isn’t too heavy (doesn’t go all the way to the ceiling, etc) you’re probably just fine!
xo,
s
Amanda says
Eeks to the ceramic bullet! Glad you two are okay.
Amber says
That’s going to look great when you’re done! I really like the new accent tiles you guys chose! And I have to say, we picked up a Dremel Multi Max recently, and love it too! We actually got ours for $16 bucks brand new!! Lucky for us, my Dad works at Lowe’s and he spotted them marked waaay down, so we jumped on that inside tip pronto, haha! Already used it to notch out some vinyl rails when we replaced our entire front porch last month. It’s great!
YoungHouseLove says
Holy cow that’s the best deal ever!
xo,
s
Emma says
I love the change already! Peeping drywall means you are halfway there!
I have a few mislaid tiles in my kitchen, but I am not using a dremel tool for it. I bought a grout ripper from HD. It looks like a screwdriver with a triangle head on the end. You trace the grout with it, and it crumbles beneath. If it doesn’t work out, I’m definitely getting the dremel.
But you are right to just make this small change. I bet the potty room is much more livable after this! Yay for fun tile. You have fabulous taste in tile!
Donna says
Y’all are FEARLESS!!!
Jay says
Are you sure that the light switch just outside of the shower is up to code? The National Electrical code specifies that all electrical switches, outlets, etc be at least 3 feet from any shower enclosure. Not sure if your local code specifies something different or if the photo is just deceptive in the location.
YoungHouseLove says
It’s a pretty deceptive shot. It’s outside of the shower curtain, never gets wet, and was in our house when we bought it (we had an intense inspection and it never came up while other not-to-code things did). We might not choose to add one where it is, but it’s there and seemed to pass code when it was installed since we saw that paperwork at the time we bought the house. Hope it helps!
xo,
s
Lesley says
When you started the post, I actually thought you were going to rip out all of the tile just for the sake of doing in the trees – I almost yelled out that you could just replace the accent tile strip. (Yes, I’m aware that you wouldn’t be able to hear me, but I come from a long line of people who yell at sports teams on TV like it will help.)
I was actually going to suggest the taupe/mocha glass tiles to coord with your paint colour. Like the white even better though.
Oh, and along with the “TV coaching”, we are chest bumpers around here.
YoungHouseLove says
Haha, chest bumping is a nice full body answer to the high five.
xo,
s
Stephanie says
I loooove that tile.
There’s been no tile removal in my life. Although I have a bunch of tiles in my townhouse that I’d like to attack with a sledgehammer. They’re not necessarily ugly.. just BLAH.
ps. High fives are awesome. My friends and I like to alternate between the high five and the fist bump.
YoungHouseLove says
Ah yes, the fist bump. We like it as long as it doesn’t squeeze the high five out.
xo,
s
Heidi says
Just be careful with how you apply the tiles. Glass can show the trowel lines if you aren’t careful.
YoungHouseLove says
Oh yes, our glass tiles have an opaque backing so that hopefully won’t be an issue!
xo,
s
Karen J says
cool project. I always imagined it would be a lot harder to remove a row of tile. Question: Do you already have a Dremel? If yes, can this do more than your other one? Just asking because we have a Dremel, of some sorts, but I don’t know which one (but I don’t think it was this big). Wondering if this would make a good Father’s Day gift for my husband. I would have to poke around in the garage to find out which one we have, to keep the gift on the down low.
YoungHouseLove says
Oh yes we had a Dremel Trio but it couldn’t do much. Should have bought this one from the start (but maybe it wasn’t out back then). We definitely prefer this one and will probably craigslist or donate the Trio since it’s pretty inferior.
xo,
s
Gaidig says
Wow, I’m so impressed with your tile removal job. It’s good to know how to do it. We’ve got a couple of broken ones that need replacement, but that may end up waiting for a total revamp & bathroom expansion, especially since we probably can’t find replacement tiles to properly match 1956 grey.
In other news, when I read your post title, I immediately thought of a line from the Indigo Girls song “Devotion”: “Taking dead trees down before the winter freeze; I said let ’em rot and fall where they may.” So I guess I’m the only one singing “I gave it up all for your love” rather than “circle of life”.
YoungHouseLove says
Haha, too funny!
xo,
s
Nadia says
Omg! I just went to preorder the book and got my first glimpse of the cover!!! Soooo cute! It’s so YOU! Must admit though…was expecting to see a little bit-o-Burger; I’m sure his little diva self is not happy! Lol!
YoungHouseLove says
Aw thanks Nadia! Burger is alllll over the inside. I mean, Clara got the short end of the stick when it comes to book pics. Haha. But she squeezed in there sometimes too…
xo,
s
Alison says
Is John giving you bunny ears on the cover? Too funny!
YoungHouseLove says
Haha, yes he is.
xo,
s
emilymarion says
I read the line “having to repeatedly peel…” as “having to repeatedly pee!”
And I thought “Those Petersiks get crazy excited about their tile!”
Loving the tile choice and John’s gray & white striped shirt.
YoungHouseLove says
Hahah, that’s hilarious!
xo,
s
angel p says
I actually used a dremel in a similar fashion 2 months ago. I was pulling up some carpet and the little metal piece that they attach the tack strip too was caught slightly under the tile that ran next to the carpet. When I tried to remove it a piece broke off of my tile about 1″ in. I panicked because I did not want to replace all the tile. I got a dremel with some sort of diamond blade and I trimmed down all the tiles in that row by 1″. Once we layed down the new wood floors and put in the threshold you can not even tell. whew!! Dremel to the rescue.
YoungHouseLove says
That’s amazing!
xo,
s
Tracey says
Small changes reap bigger rewards sometimes. At this time last year, I remodeled my powder room by painting the cabinet a deep chocolate brown, adding a ceiling to countertop tile wall and placing an oval miror on top of the tile. I also covered the other walls with a textured/paintable wallpaper I found at Lowe’s. I was even inspired to make wall art from an idea I saw on one of your Pinterest challenges. I’d show you pics, but am not too savvy with the computer.
One thing that I didn’t realize while doing the tiling is that whatever mastick(sp) you use with clear tile can alter the hue of the tile once its up. Mine presented a pale green shade, so I went with that when deciding my paint color. I’m really happy with how everything came out.
YoungHouseLove says
That’s awesome! Our glass tile is actually backed with an opaque film so you don’t see the thinset through it!
xo,
s
Wendy says
Same process to remove a tile in the floor? One of the tiles in my kitchen floor has a big chip and there are spare tiles in the basement left by the previous owner. Of course, the grout is a gross pink color that might be hard to match, but I would’ve never considered tackling this on my own without your help :)
YoungHouseLove says
I believe it would work- just be slow and steady and try not to chip other tiles around it! Hope it helps!
xo,
s
Angela R. says
Love the update! I have some minor surgery to do to our tile in our bathroom, so maybe I’ll tackle that now that I see it’s not super hard. I’m always afraid that something I think will take a couple hours will snowball into this 3 week project! :)
Also- I was watching the Nate Berkus show this AM and they had the one on where he makesover a brownstone for Gospel for Teens. I was watching the reveal and in the main performing room they got new rugs and they look VERY similar (maybe the same?) to the one you put in your bedroom. My husband looked at me kind of crazy when I was saying that I know somebody who has a rug like that….
YoungHouseLove says
No way! Someone else told us that he used the same rug for that makeover! Love it!
xo,
s
Jessie says
NICE JOB!!!
I am so inspired!!! (as always)
Wendy says
Also, I’m removing the mirror/light from my bathroom and replacing them. If I peek in the cracks between them, it looks like the same brownish papery stuff back there. I was wondering what it was but that’s exactly what it looks like. So to fix that (the new mirror/light are smaller), I assume I’ll need to skimcoat? Or something else?
YoungHouseLove says
Oh yes, sounds like drywall. I would skimcoat and sand it a bunch so it’s nice and smooth.
xo,
s
Lindsey @ arkadian belle woods says
I love the replacements you picked out! Clara seems to be a great tile tester too hahah! I love the picture of her checking out the ‘comfy’ factor of the tile lolz! Too cute! My hubby bought me the Dremel a few Christmas’ ago for my furniture re-finishing projects and I love it! Not only can I use for my furniture but hubs has also been able to use it for all types of demo projects around the house like our master bath tile too! I would say my only complaint with the Dremel is that we have had to replace it once. It just totally died. Luckily HD took it back no questions and we replaced it. Can’t wait to see the new tile!
YoungHouseLove says
Oh man, that stinks! But I’m glad they didn’t ask any questions and replaced it!
xo,
s
Marci says
You made my day…I’ve been cringing looking at the shells instead of trees for the past 2-1/2 years and had no idea that there was actually a way to do this….my husband and I aren’t much of risk takers but may just need to add this to my honey-do list….the one that never has anything crossed out but at least it can be added to the list now that its actually do-able!
Amanda says
Oh trust me I do a fair share of keeping those high fives alive. At work I give high fives all over the place like I have 10 hands. It’s crazy town I tell you. :)
YoungHouseLove says
Haha, I love it.
xo,
s
danielle says
I remember loving the fake bathrooms at home improvement stores also when I was a kid (ok maybe I still do…), I wonder what it is about them?
Kristen @ LoveK says
What a cool Dremel! I can’t wait to see the new tiles installed!
Emily says
We did some tile removal in a half bath so it was all on drywall paper. But we scraped it all so it was crowbars and screw drivers, no dremels. Covered it up with some wainscoting, it looks so fresh and bright now! (Wish we had taken before pics)
YoungHouseLove says
That sounds awesome! Congrats on such a big update!
xo,
s
ErinY says
Darn you Petersiks! Now I want to watch The Lion King!! :)
YoungHouseLove says
Haha, that video had the same effect on me.
xo,
s
tae says
i love that you do so many projects at once – it’s really fun to check in see all the different things you’ve got going on!
just pre-ordered the book – can’t wait to check out all the fun ideas.
YoungHouseLove says
Aw thanks Tae!
xo,
s
Amanda says
LOVE the Dremel! We got one when we were installing bamboo floors throughout our main level, and used it to “shorten” the trim around the doorways so we could slip the wood underneath. We did the same thing again when we put a tile floor in our half bath (it was yellow / grey linoleum before – so gross). It’s totally amazing and I *heart* it so much!!
Angie Lee says
Good work on the tile removal. I’m excited to see the change the new style brings. And no, high fives aren’t dead, I’m always asking hubby for one! Most of the time it’s because of a grown up joke between he & I and our little boys laugh along with us without actually getting the joke.
Christine says
You guys never cease to amaze! Our previous owners did not put a capstone tile at the top of the last row of tiles (that go half-way up the wall), so we are trying to figure out how to add one. I’m thinking if we purchased the tool you did, took out the last row of tile and added a capstone row instead, all may be well. I’ll wait for tomorrow’s update to see the finished project. Our Simba (who is absolutely and definitely Burger’s long-haired twin) is loving the soundtrack :-)
YoungHouseLove says
Haha, that’s hilarious! Hi to Simba from Burger!
xo,
s
Ana says
Hi, guys.
Totally off-topic question: What’s the plugin/widget you use for related content at the bottom of each post? I noticed that the last window is now promoted content from home design/real estate brands and realized it would be really helpful for my company to explore promoting our content on tech blogs that use the same plugin. Thanks in advance!
Ana
YoungHouseLove says
That’s called NRelate. Hope it helps!
xo,
s
Jill Palmer says
Oooo, just saw the (although temporary) cover to your book on Amazon! Most adorable! Congratulations! I know (from personal experience) that editing and proofing feels like walking through water and it only seems to go by slower as you near the end. Hang in there!
YoungHouseLove says
Aw thanks Jill! It’s crazy exciting but we can’t believe how many passes it takes to get things moving! I think we’re on our fifth read-through and we still have lots to do!
xo,
s
Sarah says
Nice job!
You can sing the Lion King “chant” with the words “Pink pajamas, penguins on the bottom.” It lines up perfectly and then you REALLY won’t get it out of your head. :)
YoungHouseLove says
Hahah, I love it.
xo,
s
Kelly says
Good project! I would have never thought about doing that. I have a funky accent tile in my bathroom too. But it’s not the tile itself I hate, but that it was grouted with red grout where everything else is a nice sand color. DO you think I can just grout over it with the sand color grout or do you think I need to invest in a Dremmel also? Thanks for the constant inspiration!
YoungHouseLove says
Oh yes, I would go to a tile shop and ask for a scraper tool that you can use to scrape out the old grout (or use a Dremel). Then regrout! It’ll look like a new room!
xo,
s
Chelsea Palcher says
A Dremel is one of the first things we bought when we started our apt rennovations. My fiance is obsessed with it. I think he makes projects up sometimes just to use it or try a new attachment!
Katie C says
i high-five like it’s my job! in fact, i had a hoodie made in college that said “hi-fives boost morale” on the back. because i like to high-five people when saying hi. i may have also instituted high-five fridays. so i am totally down for high-fives all day, any day.
YoungHouseLove says
Haha, I love it. You are a true high-five enthusiast.
xo,
s
Kim W Rily says
Sad. I really liked those tiles. I was hoping you wouldn’t get to that project for awhile. ;)
I suppose it *is* your house and all that. I want to send you a video of our 5 year old having fun with a screwdriver and hammer taking the tile off our shower. She really liked it after awhile and we made a game of getting them off in one piece.
Liz says
Sherry and John, I want to give you permission to take a day off from posting! How are you managing to do all of your projects AND post, AND respond to comments, AND take care of lil Clara? I am impressed, and also want to give you both a Xanax! haha.
YoungHouseLove says
Haha, thanks Liz! We just do this for fun. During the day we do blog/Clara stuff and most nights we’re DIYing to our heart’s content. Sometimes we see the fam or relax on the couch though, I promise!
xo,
s
Sherry says
after the contractors left us with a bare drywalled basement, there has been more than a few 6-hour painting marathons (difficult to squeeze in with 3 little kids). And as of last night we put the last stroke of paint on our 1400 sq/ft basement. You can bet there was a high five at the end. Our flooring arrives tomorrow and we have a break until we have to paint all the trim and 8 doors!
Your new tile is going to look great. Love you blog – it’s the first one I check :)
YoungHouseLove says
That’s so exciting! Congrats!
xo,
s
Michelle says
Yay! I’m so excited that you guys are doing this. I have some rather ugly tiles in my kitchen that I’ve hated since before I put an offer on my condo. I’ve toyed with the idea of doing exactly what you are, but well I was a little too timid to give it a go.
Now that you have very kindly been my project guinea pigs I may have to move my mini-kitchen revamp up my list of projects.
As a bonus, I was gifted a Dremel by my boyfriends parents for Christmas. Looks like I’m going to be putting it to use!
YoungHouseLove says
Nice! Good luck Michelle!
xo,
s
Kate says
My husband got a dremel-like tool when we first bought our house over 3 years ago…I think the intent was to shave off some drywall to replace some of the heat exchange covers in our older house. It was so funny. He wasn’t that excited about his purchase at first, but I was upstairs cleaning, and I heard him working downstairs through the air vent. After a few seconds and a few cuts, I heard him exclaim (through the airvent, to himself): “Oooh, this thing is neat!” and the continue on with his project.
I laughed out loud and bring it up anytime he uses the tool (which is pretty frequently!)
Looking forward to more progress with your projects!
YoungHouseLove says
Hahahahah, I love that. Totally something John would do.
xo,
s
Lynn @ SafeBeauty says
No we haven’t tackled anything tiley yet, but looking at that last shot in the bathroom I think that your bathroom may actually be the same small size as our master bathroom. I guess people were much slimmer in the 70’s? We also have been giving that Dremel the hawkeye nearly every time we go into HD. It will come home with me one day and I will love it forever. And you mentioned high fives…which I rock at least one like a champ every day. Michael says I need to calm it down because they have a “Todd”-esque feel to them. They snap, and that’s how you know it’s a good one right?
http://youtu.be/k_AzCm8Vass
My best, Lynn
YoungHouseLove says
Hahahaha, I love it.
xo,
s
Megan E. says
You were smart to get the Dremel tool to remove the grout. I replaced a few ugly fish tiles in my shower several months ago and just used one of those grout saws. Holy cow, it’s a lot of work.
http://megeletto.wordpress.com/2012/04/16/replacing-individual-tiles/
YoungHouseLove says
Wow- that’s amazing!
xo,
s
Nichole says
Can’t wait to see the glass tile transformation! I high-fived my husband yesterday after he finished mowing the lawn :) I sneeze terribly when I mow so he’s my hero! We also alternate between the fistbump-exploding hand and high fives. Yes, we’re super cool ;)
YoungHouseLove says
Haha, love the exploding fist-bump. Definitely the best kind.
xo,
s
Jasmine says
I’m loving the new glossy tiles you guys are using-much more John and Sherry-ish. Did you ever consider taking the top row of beige off as well? Maybe add another row of subway or a mosaic that has both the white and a beige tile included?
YoungHouseLove says
Never thought about that, but it’s always a possibility down the road!
xo,
s
Jill says
Well, since the shower floor gave way, we just used a sledge hammer to take down the tile on the walls and floor. A bit more aggressive, but faster. And just as messy.
Keep the inspiration coming!
YoungHouseLove says
That sounds like our idea of a good time! Haha. Good luck with everything Jill!
xo,
s
Brittney says
My husband and I are in the process of redoing our kitchen. We found that our walls were not drywall, but actually a mesh infused plaster – talk about messy. We purchased a dremel to help and cut through the wire mesh and plaster so we could pull out the walls in chunks instead of pieces – BUT the dremel seemed to overheat way too quickly. We’re talking 5 minutes of use and it was practically burning our skin.
Did you find the Dremel to get warm on you?
YoungHouseLove says
Ours didn’t, but were you using a Max? We had a Dremel Trio that seemed to overheat and not get things done as well. Hope it helps!
xo,
s