Well, thanks to the generous and wonderful folks at True Value, we now have a totally dry and completely functional basement to use for storage galore (read about how we prepped and waterproofed the former bug graveyard here and here). And thanks to a little road trip to Ikea this weekend, we came home armed with pretty much every item that we planned to snag in this basic mood board of sorts that we shared last week:
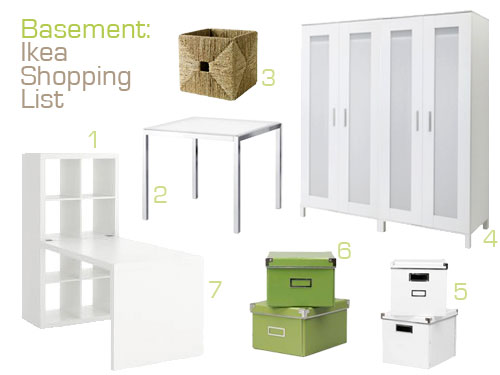
- Expedit shelf (included in the total Expedit Workstation) -$120
- Torsby table (already owned, so it’s free!)
- A woven basket or two – $17 each
- Two Aneboda wardrobes – $100 a pop
- A few white storage boxes – $12 for two
- And a few green storage boxes to keep things interesting – $12 for two
- Expedit desk (included in the Expedit Workstation) accounted for above
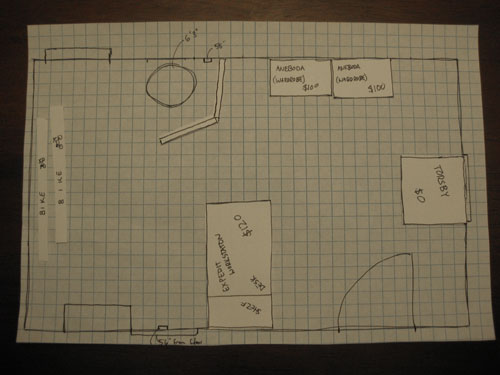
And the room is really coming together. Especially thanks to the floor plan we brainstormed ahead of time to see which items would work where (and which ones would provide the most function without breaking the bank):
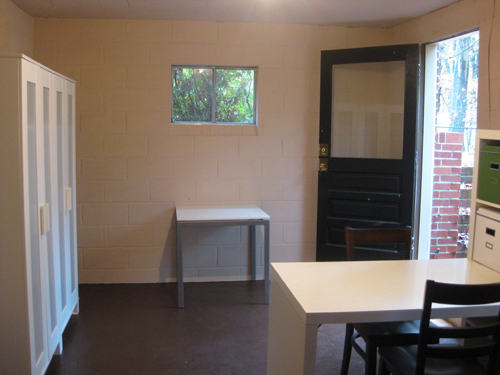
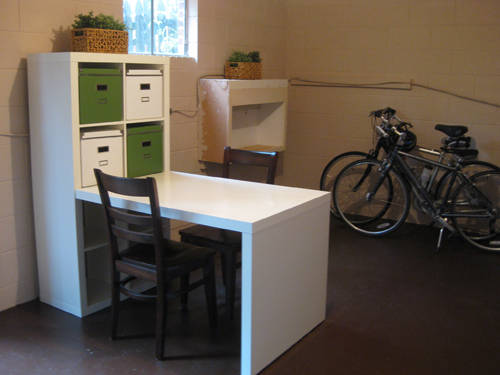
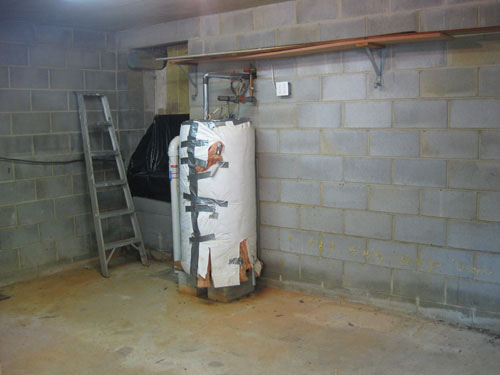
Of course we still have a lot more projects to take on (creating a new light fixture, rewrapping the water heater, building a screen to hide the ugly rewrapped water heater, dealing with the windows, DIYing a dehumidifier, etc). But here’s what the basement looks like now thanks to the addition of two Ikea Aneboda Wardrobes along with an Expedit Workstation and a few inexpensive accessories (like some faux plants for a bit of greenery and these storage boxes for even more concealed stashing space). Not to mention the Torsby table and a few extra wooden chairs that we already owned. We also brought down our bikes as planned, but have even more in store when it comes to sprucing up that back wall so stay tuned…
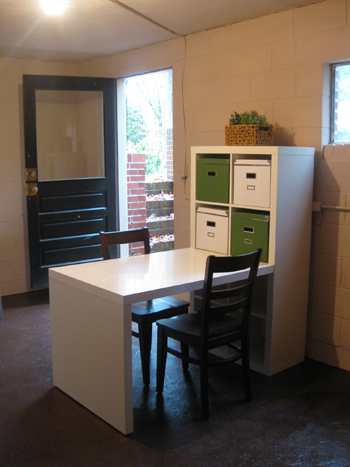
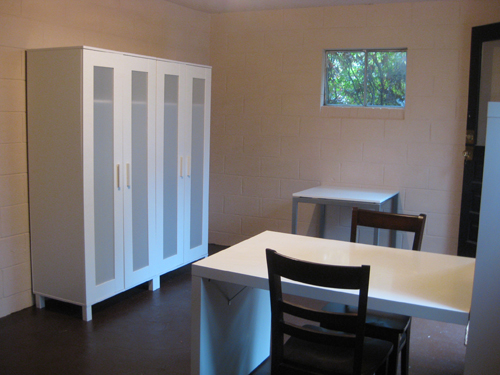
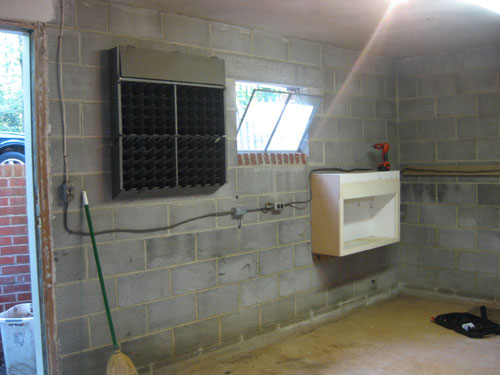
Oh and we still have to paint the built-in cabinet below, so don’t mind the dingy look of it now…
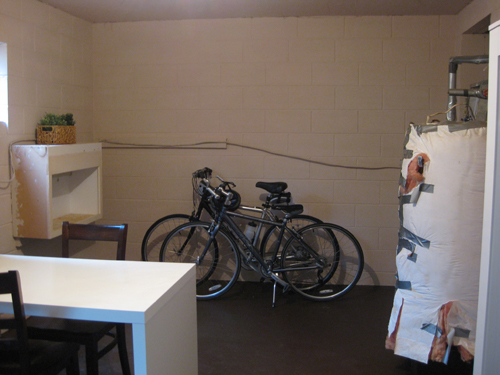
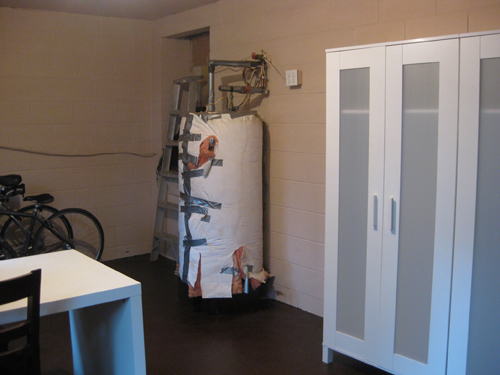
Not bad, eh? Just to refresh your memory, the room looked like this about a month ago:
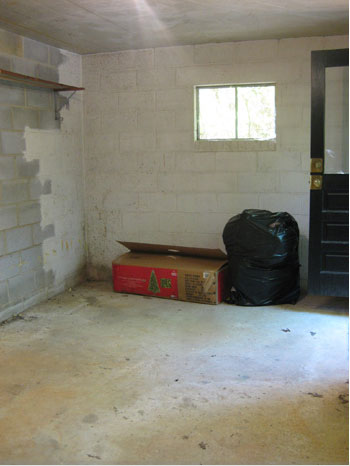
But thanks to around $350 worth of Ikea furniture (the Expedit Workstation even happened to be on sale!) and around $400 worth of prepping supplies (thanks again True Value!) we were able to take the basement from scary cinder block dungeon to a waterproofed room that’s furniture ready.
Oh and we would show you the insides of those wardrobes but we still have a lot of organizing to do (am I a total nerd for feeling a little bit giddy when I say that?). So next on the agenda is going back to True Value to snag lots of awesome sealed plastic storage bins to stack tons of seasonal decor, sporting equipment and other stuff that we’d rather hide behind closed doors. Then it’s on to lighting, art and hiding that wart of a water heater. Fun, fun, fun.
And speaking of house warts, do you guys have any ugly eyesores (fuse boxes? propane tanks? carpet stains? damaged hardwoods? odd trap doors? ugly outlets?) that you’ve successfully camouflaged? Tell us all about it.
Psst- Here’s how we hid our fuse box in the den, our exterior propane tank, and some pretty gross plugs and outlets above our washer and dryer. Fingers crossed we can make that water heater disappear too…

Kristy says
I think it looks fantastic. You should hang those bicycles on the wall they are leaned against or hang them from the ceiling..instant art!
Nicole Carter says
Very nice. Simple. Need those bike hooks on the walls so you can hang your bicycles…instant art…off the floor…win, win!
YoungHouseLove says
Nicole and Kristy- We actually have had major issues with the cinder block walls (they can’t support any weight, so hanging bikes is out of the question). We’re now on the lookout for a cool freestanding stand, like the one Lauren recommended to us a bunch of comments back. Stay tuned…
Cris- It has definitely crossed our mind and we have every intention of replacing our water heater with a tankless one when it’s no longer functional. We just have the hardest time sending it off to a landfill when it still works perfectly… but we’ve definitely considered that option. I guess we’ll just have to see where we end up!
Jackie W- Yup, in this post: https://www.younghouselove.com/2009/10/tackling-the-basement-chapter-two/
Kristen- You’re in luck! Ikea offers a range of drawers, bins, boxes and baskets that come totally pre-assembled (at least we know some of the bins and baskets do) so you can definitely check those out online (just google Expedit) to see what comes up) or in the store (where all the baskets are located). Hope it helps!
xo,
s
Tara says
YHL-
You have been nominated for the next blogger up for KREATIV blogger award. We hope to learn seven new things about you that we may not know:) Check out http://design2explore.blogspot.com/2009/11/kreativ-blogger-say-what.html as I nominated you as one of my fav’s. Feel Free to add on maybe seven new things we should know about you:)
kelly@TearingUpHouses says
look at all your extra room now! if only we had basements in florida…
as far as covering up eyesores, here is a “mean dog” sign that had to go buh-bye: http://tearinguphouses.blogspot.com/2009/08/mean-flowers.html
only happy furries where i live. :)
kelly
Amanda says
They make some cool bike stands that use suspension between the floor and ceiling, so you don’t have to put holes in anything. I don’t know where to get them though. My boyfriend made one for his apartment- he has a knack for that sort of thing.
Em says
Looks great guys!
In our last house we hid our water heater (which is located outdoors) by covering it in some bamboo fencing like this http://www.allgreen.com.au/images/750355.jpg as it is bendy we just wrapped it around the water heater and used wire to hold it in place, it fit in with the garden around it instead of having an unsightly water heater…
You could also create a similar look by using a bamboo screen such as these http://www.shanghaished.com.au/furniture/furnitureweb/bamboo3screen.jpg
Not sure if it fits with your plans, but I kind of envisage this room becoming a bridge between the inside and out seeing as you will have sporting equipment and greenery, so thought I would suggest.
xx
Miss T says
Wow it looks GREAT. You both must be so happy!
tammylee says
just curious. what is the shelf looking thing on the wall in front of your bikes? i noticed it in the before photos too so obviously is must be important for it to still be there. i was also wondering what was on the wall where your new desk is residing now. looks interesting. from the photos my husband said it looked like an old hotel key/mail holder. share with us please.
Jessica says
The basement looks great!!! So, how is it holding up in this Monsoon of a rain storm we are having right now???
Mandi says
It’s really coming along, good work!
Do you think it might be wise to cover the windows? I worry that all spruced up, with items stored (including easily pawned bikes) maybe things shouldn’t be so visible from the outside. This might be a good room for window film.
Dusa says
Is the space still spider-free?
Janis in Scotland says
Bicycle Rack – Aluminum Bike Racks – Tension Mounted
$19.99 – $129.00 from Stacks and Stacks.
http://www.stacksandstacks.com/garage-bike-bicycle-racks
Diana says
Hey There! Long time reader first time commenter. Your basement is looking GREAT! I’ve enjoyed watching this transformation. Also, I use your HOW TO section A TON so THANK YOU, THANK YOU, THANK YOU!
Diana
Katy Campbell says
I’m pretty sure that this is the nicest storage room I’ve ever seen! I think I would enjoy organizing and rummaging through memory boxes in a room like this!
Anya says
Oh, please do tell me if that freestanding bike rack actually works! i would it in my garage!!!!!!
Lisa A says
Looks great! Can’t wait to see what you do screen-wise to hide the H2O heater! The idea of bikes as art is brilliant. Bikes are soooo pretty!
Vonda says
WOW, looks great! Wish I could say same about my slow-moving bathroom reno.
I was wondering how the basement is holding up in what NBC12’s weather blog is calling a massive Nor’easter, possibly dervied from once huricane IDA?? Hope it’s holding up better than me! Starting to feel like a drowned rat!
http://www.nbc12.com/Global/link.asp?L=335177
YoungHouseLove says
Vonda & Jessica- We’re happy to report that the basement is bone dry even after days (and a record number of inches) of heavy rain! We definitely tackled the basement just in time because weather like this is leaving nearly every basement in our neighborhood soggy and gross! Whew.
Dusa- Yup, the basement is now 100% spider free! We sealed up any cracks that led to the crawl space under the house (where many of the critters were getting in) before we Dryloked so now there’s not a spider (or other creepy crawly guy) to be seen. Hurrah!
Mandi- Yup, we’re definitely planning obscure the windows and the door for more privacy and added security. Stay tuned…
Tammylee- The built-in shelf that we kept (on the wall near the bikes) was still in good condition and we knew it would be useful and clean looking with a crisp coat of white paint (coming soon) so we left it in place since it’ll provide even more storage space. As for the old metal shelf that used to be hanging near the door, many people who saw it guessed that it was an old time-card holder from a factory but the previous owner had used it to store nuts and bolts and other small pieces and parts. In the end we knew we could get a lot more function out of that wall so we removed it and Freecycled it. Hope it helps!
xo,
s
Abby says
ooh la la! It looks so good! I love the new basement! Isn’t it awesome to make a great room out of a space you never used before?
Kyley says
I love the “organizing” part! Please tell me you own a label maker – all obsessive organizers (my self included in that) need a label maker. Its my absolute favorite tool. I went label happy in my new houses’ basement once I caught site of the built in shelves and was able to bring all of my plastic totes down there. It was heaven.
Sharon says
Your BUTT UGLY water heater(I say that w/ affection as it’s twin brother lived here for many years) has already been mentioned however…..We needed more space, upgraded to a tankless and found a home for our perfectly working one w/ a person w/ little $$. It is GREAT, 2 teens, 2 adults, countless wash and dishes later it was a fantastic investment.
Love your blog, Sharon
YoungHouseLove says
Sharon- We have definitely considered upgrading to a tankless water heater. And it’s so good to hear that you love your so much!
Kyley- Can you believe that I actually don’t officially own a label maker? I love to make little homemade labels though, like these for example: https://www.younghouselove.com/2008/08/tag-youre-it/
xo,
s
Kyley says
wow I have to say I really thought you would of had a label maker! haha. Maybe its better…when I got mine as a gift from the husband I have to say I went a little label happy. I’m surprised I didn’t label him! you just might have to add one to your xmas list! :) can’t wait to see the basement when everything is done!
Sarah says
This turned out great! And your post was very inspiring on giving me ideas to finish our basement space… I was having a hard time finding the right kind of inspiration online, b/c our basement is not a huge space like the ones you see in the pictures, all done up luxiously! It’s more like yours, maybe a little more square feet, but you have given us a grand example of refinishing a smaller basement on a budget. THANK YOU!!!!
evilbunnie says
Hey! I love what you’ve done with the basement (I have my own issues with my icky basement, so I’ve been following with much anticipation), but are you going to do some conduit cover to corral that wire you’ve got running around the room? I know, picky picky, but it’s so very close to perfect, I can’t help myself. I can’t see from the pix, but if it’s not already an insulated cable, you can get those plastic conduit thingies from the big box store and at least make the wire behave. And if it is insulated cable, you can probably get fasteners to get it tight to the wall so it runs tight and straight. Just sayin’.
Good luck and thanks for all the inspiration!
YoungHouseLove says
Hey Evilbunnie,
Yup, we’re definitely not done down there, we just brought in the big furnishings but we have lots of details to attend to. The wires were stapled to the wall in sort of a wavy pattern so it might be hard to find something flexible enough to hide them but that’s the plan!
xo,
s
Belinda says
well.. it definitely looks better than it did before.. you have made a terrific transformation so far… It kinda looks tho like if you replaced the Torsby table with a couple chairs it could be a small town doctors office …
Chrissy says
After compulsively decorating/fixing/painting my first home only 4 weeks into moving in, let me tell you that I have a LOT more respect for the amount of work you guys (and everyone else you have featured as DIYers) have done. You show pretty pictures and amazing transformations, but I think it’s hard to really understand the amount of sweat and frustration that goes into these projects without actually having to do it.
That being said, how do you feel to have such an improvement over your old, unusable space? That Dryloking sounds like lesser couples would have divorced under such conditions! (I kid, I kid.)
Oh, and note on the tankless waterheater- I was gung ho about getting one in our new place, too, and mentioned it to our initial home inspector, and he surprised me by saying to save my money and for multiple reasons, the high price they are currently just don’t make up for it, especially if you just do the standard practice of keeping the temp low.
YoungHouseLove says
Hey Chrissy,
How interesting to hear that about tankless water heaters! It’s definitely something to think about and research a little further before we make a decision either way. And in the meantime we’re kind of excited to make our screen to hide the water heater so stay tuned. Oh and it’s true that showing the before, progress and after shots is just 1% of actually doing the job so we always love when readers truly understand the blood (sometimes), sweat (always), and tears (not usually) that go into our makeovers. And we’re nowhere close to done down here so stick around for lots more projects and potential divorces…
Ok, I was kidding about that last part. John’s actually a great little partner in crime.
xo,
s
jbhat says
It’s AMAZING! I love it, you guys. Please come to Seattle and work your magic on my gargage. I’ll fly you!
Tricia says
I can’t wait to see the finished project! I’ve been checking in everyday to see how the progress has been going. I, too, covet Ikea! I’m compiling my shopping list so I can go to the new Charlotte location next week. Now it is 45 minutes away instead of 2 hours!!! Thanks so much for all the neat ideas such as floor planning and how to weed out what does and does not fit the budget. And I’m seriously thinking twice about those Kassett boxes. As for how I hide the inevitable ugliness we all must face when it comes to storage, clutter, the hideous fuse box that stares us in the face, etc….here are some photos I thought I would share with you guys.
Conquering toy clutter:
http://www.flickr.com/photos/44022801@N04/4100920956/
http://www.flickr.com/photos/44022801@N04/4100919990/in/set-72157622671118533/
Covering the fuse box:
http://www.flickr.com/photos/44022801@N04/4100923318/
Hiding all the clutter in the pantry/ laundry room (Very similar to your laundry area cover-up!):
http://www.flickr.com/photos/44022801@N04/4100170047/
http://www.flickr.com/photos/44022801@N04/4100929222/?addedcomment=1#comment72157622671245003
Amanda says
I think you’re wise to keep the old water heater until it dies. It is less “green” and more wasteful to throw out something that works just to buy something new. Although when it does die, it might be smart to look at tankless options.
YoungHouseLove says
Thanks Amanda! That’s pretty much the plan, but we really look forward to a tankless option someday…
xo,
s
Kerry says
We’re doing our basement too… last step of a 4 year remodel process.
http://www.flickr.com/photos/seahills/sets/72157603881096769/detail/
AlaskanAndi says
I am so sad we don’t have an IKEA in Alaska… :-(
Kelsey Kleiman says
Hi. Thanks for your wonderful blog. I was wondering how your basement was holding up a year later. We have a similar such problem with moisture after heavy storms (but no mildew so far). From our research it seems quite difficult to remedy, something that just Dry Lock wouldn’t really cure for the long term. Were there other measure you took, like grading the earth by the source or redirecting drains?
Thanks.
Kelsey Kleiman
YoungHouseLove says
Our basement held up really well but we were lucky that our moisture issue was pretty simple (sweating cinder blocks that needed to be sealed) and not an actual drainage issue (which usually calls for the installation of french drains). Maybe try googling around for a french drain installation video on YouTube? Good luck!
xo,
s