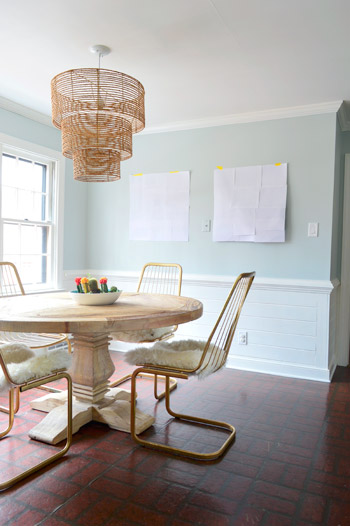
The other day I was working away in the office and Sherry breezed in and stole some paper from the printer. I didn’t think much of it… until a few minutes later when I walked into the kitchen to find this. Well, this and Sherry grinning at me and batting her eyelashes.
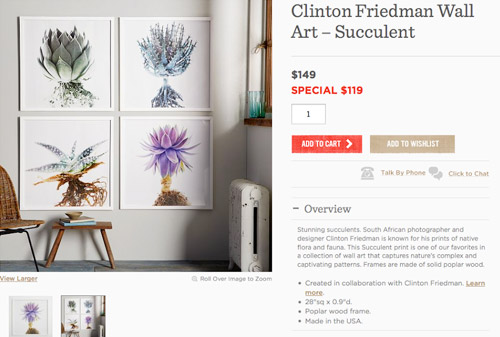
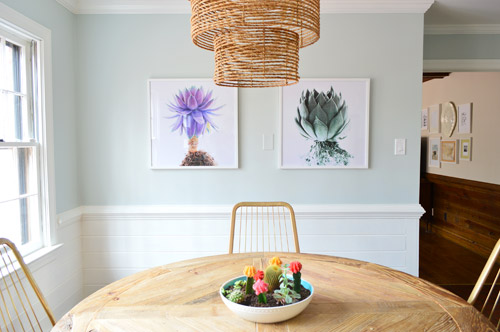
I soon learned that these large succulent photographs that she’d been eying for some time from West Elm had gone on sale (boo, but it looks like they’re back to full price now). It’s more than we typically spend on art, but they’re very large (almost 30″ wide and tall) and the price included the big glass frame – so Sherry took the 20% markdown as a sign from the succulent photography gods that two of these should come to live with us. I actually really liked them too, so I was easily convinced. We’ve been wanting to slowly amass more large-scale art over time (other than this yard sale painted canvas that Sherry DIYed and these bike prints I framed, we really don’t have much) so it’s nice to balance out some cheaper homemade stuff with some custom framed professional prints.
Fast forward a week or so, and that big empty wall in our kitchen is no longer empty.
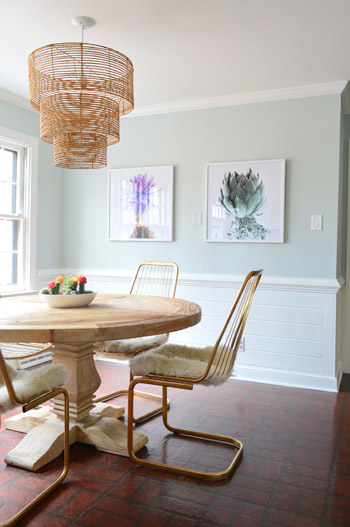
Here’s a much less glare-y view from the other side of our two new additions.
That’s the abridged version of the story. The complete version starts with a reminder that this is what the wall looked like to start with. As in, it had that big awesome non-working intercom in the way.

Although I had sort of grown to love this ugly non-functioning hunk of faux wood grain & dials… it was time to say goodbye. Luckily it only took a few loosened screws to detach it from the wall.

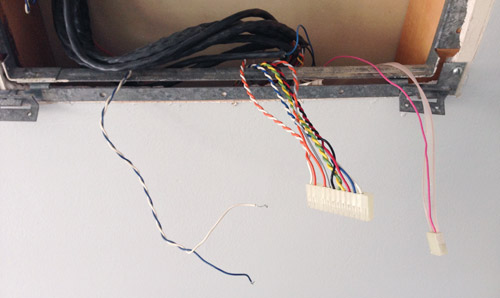
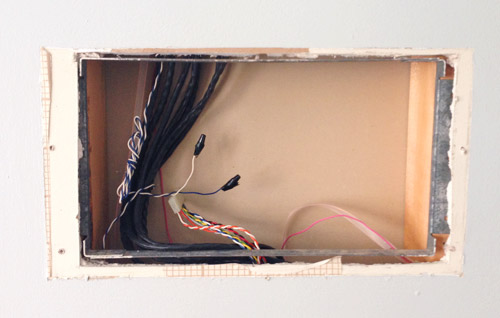
We hoped that we’d just find a tiny patchable hole with a couple of wires sticking out, but instead, we found this. For a few good seconds I was pretty certain it was a bomb and I’d be in trouble if I let this bus slow down.

But since it was not actually explosive (and since I’m most definitely not Academy Award winning actress Sandra Bullock) it was pretty easy to defuse, er, detach. With the power off, I was able to unhook the two power cords (blue and white) and the mess of other connectors that I believe weave through our house to the other rooms with intercoms (again, none of which really work).
Seeing as this wall is on the demolition list down the line (for when we eventually open the kitchen up to the living room), we opted for a temporary solution for now. Translation: we didn’t call in an electrician just yet. The intercom only shares a breaker with the light in our wet bar, which we never use, so we opted to cap and tape the intercom power wires, flip off that breaker, and call it a day. The next time I’m at the hardware store I’m going to look for a big flat metal plate that I can screw in to cover things up. Obviously it’s not a permanent solution, but it’ll do for now.
But the radio wasn’t our only eyesore. We also had a phone jack nearby that wasn’t in use. I did lots of googling and found a range of theories/instructions on how to disconnect one of these. The general consensus was (1) you don’t have to worry about getting zapped by a phone wire unless the phone is actively ringing or in use and (2) you usually can just cut the wires and stuff them back into the wall.
I was a little wary of both, but I was able to disconnect the four pairs of wires from the jack with nary a shock. Rather than leave them totally lose and exposed, I capped them with wire nuts just to be thorough. I capped the matching colored wires together after looking behind another already-capped phone jack in our living room and seeing that someone before me had done the same thing on that one.
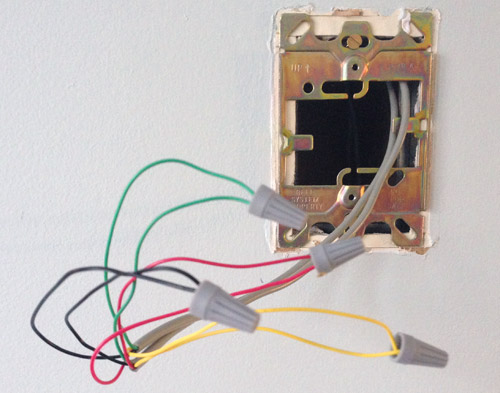
With those wires capped, I pushed them back into the box and tested the phone (still worked!). Then I stepped back to admire those two gaping holes. Gorgeous, no?
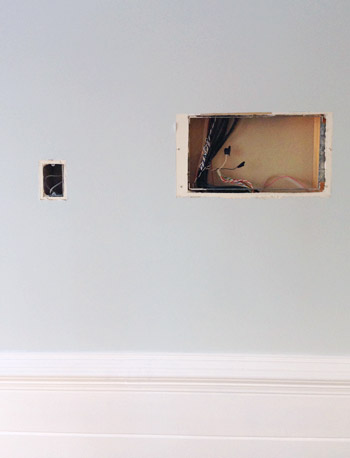
Well, they now look like this. Notice how I didn’t show any photos of drywall patching? It’s because we haven’t done any. Again, since this wall’s days are numbered we decided not to bother patching either hole (plus this leaves my temporary wiring fixes available for the electrician in the future if we want to get them handled by a pro). So for now, we just put a blank cover on the phone jack (and painted it to match the wall). And the big radio hole, well, it’s behind the green succulent. Sort of like hiding an old medicine cabinet hole behind a new mirror. But I’m hoping that big metal plate cover that I mentioned grabbing the next time we’re at Home Depot will make it a little more… temporarily legit?

I do have a bit of DIYer shame for not following through completely with those two holes, but at the same time I felt kind of silly paying for an electrician now (or carefully patching the drywall) just to tear it out later. So instead I’m just enjoying the new view.
Oh and from this shot you can see that we chose to center the art on the table and the chandelier, as opposed to centering it on the wall (we tried it both ways and it looked a little wonky when they didn’t line up with the table or the chandelier).
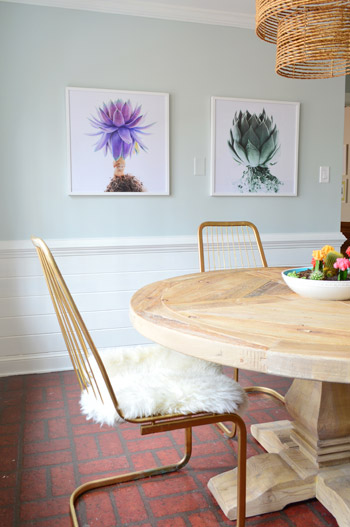
Can you guess which one is Clara’s favorite?
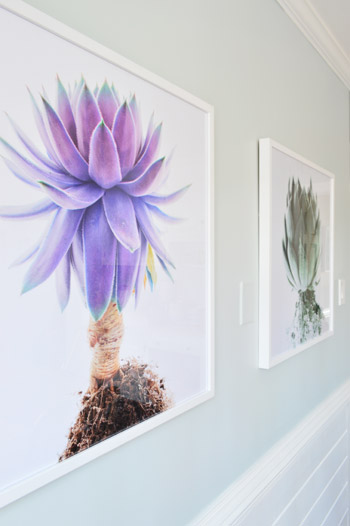
Yup, that purple one on the left.
We like that they add a little more color, but aren’t too crazy or busy (especially since we’re hoping to add some window treatments which might have more color and pattern). And since this wall won’t always be here, we’re certain they could work in a ton of other rooms in the future (like the dining room over a buffet, the office over a desk, etc).
I think I may have to send Sherry to a Succulents Anonymous meeting soon though. The photo below doesn’t even include the terrarium she just made.
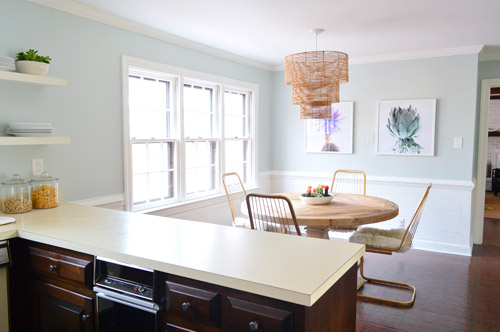
Man that last picture makes me want to do something about those counters right this second (well, those and that trash compactor). We just want to make a bit more progress in the nursery before we give those Ardex concrete tutorials a shot. And those floors. We’re coming for you, floors. Be afraid. Be very afraid.
Too bad we can’t just hide them behind a frame.

Sarah @ House Made of Marital Glue says
I love them! They pop really nicely with the wall color but also make it feel very serene! Just wondering where you might put them when the wall comes down. Seeing as you spent more than you usually do, I’m just wondering if you have a home for them when that place is no longer an option.
YoungHouseLove says
Oh yes, we mentioned that in the post but it’s easy to miss. We love that they’re flexible enough to go anywhere, so we picture them hanging in the dining room over a buffet or in the office over a desk or some cabinetry. Will keep you posted if they move someday!
xo
s
Amelia R. says
I love, love, love the prints!
A couple of things occurred to me while reading your post:
1) Perfect spot for a safe (behind the green succulent)!
2) Will the prints fade over time in that sunny location?
3) I always have trouble with my pictures shifting and then not hanging straight. How do you keep everything straight on your walls?
4) In Country Living this month, there’s a feature on a family in Montana who painted their plywood counter tops with chalkboard paint and waxed it to make it look like soapstone . . . maybe a quick fix for stage one of your kitchen reno?
YoungHouseLove says
Holy cow that sounds awesome about the counters. Never even heard of that! Will have to see if I can find it! As for the prints, we hope they won’t fade (we’ve never had sunny enough houses to make that happen to other prints we’ve owned for years) but will keep an eye on them and report back. And about pics not hanging straight, 3M command velcro is great for that – or that poster putty that kids use in college – just stick some back there and it will stay put!
xo
s
Lynne says
Not sure if anyone’s reading anymore (got around to reading late today!), but my advice for hanging things straight is to use two picture hooks. Use a level to put the hooks in, and space them nearly as far apart as the width of the frame. It’s much easier to keep picture on two hooks level, and the picture will also hang more flush against the wall. this only works the frame has a wire for hanging, of course.
YoungHouseLove says
Great tip Lynne!
xo
s
Meg says
Those are truly fabulous! I’m a huge succulent fanatic, too — and am hoping a certain Valentine will present me with some live ones this year . . .
Kathy says
I love them!! I have to admit I have a succulent obsession as well! Maybe we could form a group or something! Lol your house is really coming along! You guys are truly talented! Xo Kathy Stop by my new blog sometime http://www.thedailynest.com Since you have been my inspiration!!
YoungHouseLove says
Thanks Kathy!
xo
s
Gwen says
I bet those floors started quakin’ in their boots when they saw you messing around with those wires… :)
YoungHouseLove says
Oh yeah, they got all clammy and nervous. Haha!
xo
s
Sarah W. says
I keep forgetting that you’ve been in the new house for a while now, so every time there’s a little improvement I’m totally wowed! The kitchen is really shaping up.
I hear you about the counters though. Something about those laminate counters in an otherwise nice looking place just wears at your soul. We just put in an application for a beautiful new apartment and everything about it is wonderful except the counter tops. But we figured with 2 bedrooms, 2 full baths, 2 small patios, central air, a dishwasher, full size kitchen appliances (I can finally use that regular size cookie sheet that’s been sitting under the stove for 2.5 years!), and en suite laundry we can probably live with laminate counters and white appliances.
YoungHouseLove says
That’s so exciting Sarah! Good luck with everything!
xo
s
Michelle @ A Healthy Mrs says
I love these photos — so pretty! I also love that they’re just hiding the gaping hole — good call! :)
Mamaw says
Love, love, love the new art. Wish I had known they were on sale. Smart idea not to patch the wall. Work smarter, not harder.
Krissy says
I was confused because I thought you bought all four prints and was wondering where the other two were placed… but scrolled through the comments and figured it out. I also saw this cute succulent print that has nice greens and neutrals and would look cute in a certain little boy’s room: http://www.westelm.com/products/minted-for-west-elm-succulents-observation-d1574/?cm_src=AutoRel
YoungHouseLove says
So cute! I think John might have me committed if I get more succulent-related things though! Haha!
xo
s
Minnie says
Those look so good! I also have been on the lookout for large art, but am having the worst time finding a company that ships APO. I had a couple of posters from art.com that I was planning on framing :/
YoungHouseLove says
Anyone have tips for Minnie?
xo
s
Whitney Dupuis says
Oh my goodness I love them so much. I need to start investing in larger {read:nicer} pieces too.
Steph Nelson says
The green one looks like a artichoke a bit. I wouldn’t worry about the metal plate either. Why spend a couple of dollars on something you A) aren’t going to see and B) will be of no use when the wall comes out.
Emily @ Life on Food says
I love how adding some art on the walls can make such a difference. I hate how much it costs though. Glad you got a sale. We are slowly adding things over time. Now each one has a special story about how and why we got it.
Julie says
Hi! Just a bit if feedback regarding YHL.com useability – I check in on you via my phone once every few months, so I read a page and click Previous Page multiple times. With each click I have to zoom in to click the tiny Next button. But the Last button is huge, and I doubt people use it that often. Could you make the Next button the large one, or have them both be large? It would make navigating so much easier!
YoungHouseLove says
Thanks for the tip Julie! I’ll ask John if that’s something we can hard code! That bottom part is a plug-in so I’m not sure how editable it is, but we really appreciate the feedback!
xo
s
Meredith Jones says
Such a bright happy tranformation that kitchen of yours has made! Can’t wait to see the future down the lines plans for when you really make it wonderful!
I, along with Sherry, have a succulent obsession. How can you not! They don’t even DIE!! I’ve had some on our back patio all winter and last summer and they still look exactly like when I bought them at Home Depot in their tiny little containers, and I haven’t touched them for months! Gotta love it!
YoungHouseLove says
Wahoo! Go succulents, go succulents, go!
xo
s
Tanya says
Hi there!
I have 3 comments/suggestions:
1. Have you ever considered framing your own photographs? With the plethora of photos that you take I’m sure there are hidden art treasures everywhere! You can have them blown up and then frame them. Plus with your mad photoshop skillz I’m sure that you could add some really cool effects… I’ve seen this done on several design shows. :) And was just wondering if you’ve ever attempted it…
2. I’ve noticed in several of your posts when making a big purchase that you state something to the effect of “Normally we wouldn’t spend this much…” Why do you feel the need to justify your purchases? Don’t be ashamed of your success. I think that you can provide your readers with pricing information without a need to apologize. You deserve to have nice things just as much as the next person. :)
3. I noticed in one of your kitchen posts a drawerful of plastic zip lock baggies… From reading your blog, I also know that you try to be environmentally conscious. Have you ever thought about using reusable cloth baggies? They sell several super cute ones on Etsy. Or a potential craft idea?
Love your blog! :)
YoungHouseLove says
Thanks Tanya! We have a bunch of our own photos framed but we’ve never blown them up very large (other than things like our P monogram) but that would be fun! We’ll have to play around with that. As for the ziplock baggies, we also have reusable ones (various types like: grocery bags, produce bags, and even snack bags for Clara at school and wetbags for cloth diapers) but the disposable ones do come in handy for various DIY stuff (like for sealing paint brushes between uses, tossing screws or hinges into them and labeling with a marker and storing them that way, etc). And as for cost stuff, I think we’re just awkward when we talk about money in general. We were both raised really frugally and still consider ourselves to be penny pinchers, so when we do occasionally save up and splurge on things it still throws us off. Haha!
xo
s
Cheryl says
We have an intercom system that goes through our whole house as well, but ours does work and it is one of the few 80s things we love about our new house! We have been working with Ardex to cover the laminate counter in the laundry room and it is taking much longer than we thought. Partly because laundry seems to take precedence on the weekends and Florida humidity made each coat take a couple days to fully dry. You will probably finish before we do and I can’t wait to see!
YoungHouseLove says
Ooh that’s exciting! Hope it turns out awesome!
xo
s
Anna says
Are you planning a concrete counter for the kitchen? Look into it before you commit – I work at a place with a concrete counter that (2.5 years after being put in) is stained and scratched. It gets heavy use but still – I wouldn’t like that kind of wear at home. If it’s just a temporary fix it might not matter though.
YoungHouseLove says
Yes just a temporary fix. They sell a special kit to skim coat your existing cabinets and we have heard good things so we’re thinking of trying it out!
xo
s
Amy D says
When you posted about the Ardex it seemed like the perfect solution for our countertops. I’ve started work and am LOVING it! Can’t wait to see your results !
YoungHouseLove says
Wahoo!
xo
s
kimberly says
My husband and I used the Ardex concrete overlayment products and they worked fabulous! We are going on 9 months of living with our parsons styed breakfast bar made out of several sheets of plywood coated with Ardex and the patina just keeps getting better. We spent around $100 for two 10lb bags of ardex and sealer. Great deal! I wish I knew how to paste a picture here. Your kitchen is looking great!
YoungHouseLove says
That’s awesome to hear! Wow, nine months and still happy = a great update!
xo
s
Kat Black says
haha. she gotcha :)
M says
Hey – thumbs up for South Africa! That’s my home!
The internet makes the world such a small and connected place :)
YoungHouseLove says
My mom was just in South Africa last week! She said it was AMAZING! John and I would love to go someday.
xo
s
Barbara says
Cute! As for the counters, another idea is to tile with white subway tile. Check out everyday occasions. I think they did it for around $40.
YoungHouseLove says
Thanks Barbara! Off to check it out!
xo
s
Emily says
I saw these on sale too and was thiiiiiiis close to buying them. Not really in the budget at this moment but I. am. in. love. Seeing that you took the plunge, I’m wishing I did the same. Now, I’ll be stalking the West Elm website like a crazy person waiting for another sale!
YoungHouseLove says
Aw, I hope they have another one Emily!
xo
s
Lynn says
Too bad that wall is going to be demolished; I think the paint color looks great with the art! Where will the art go when there is no wall?
YoungHouseLove says
We mentioned that in the post but it’s easy to miss. We’re thinking they’d look great in the dining room hung over a buffet or in the office somewhere! Will keep you posted down the line (they’ll be in the kitchen for at least a year or two though).
xo
s
Elizabeth says
I know they are ugly, but trash compactors make an enormous difference in amount of trash you send off each week. I don’t know why they ever went out of style.
YoungHouseLove says
Ours has been broken since before we moved in, so we’ve never gotten to give it a spin! As for why they went out, maybe because people compost and recycle more?
xo
s
Elizabeth says
We had to ditch the trash compactor too! What will you replace it with? More cabinets? Ours was gross and coated in other peoples’ trash (our house was previously a rent house, and they apparently sucked at cleaning, ever). We ripped it out when we redid our kitchen hardware, and we replaced it with a 15″ wide wine fridge (!). We love the fridge AND keep it stocked, but unfortunately, the ones that fit that gap cost more than a normal-sized wine fridge. Installation was a breeze, though!
YoungHouseLove says
That’s awesome! We’re not sure if we’ll do anything with it for Phase 1, although even creating a usable cabinet there would be a big upgrade. For Phase 2 we’re not sure if we’ll even keep the peninsula configuration, so we’re playing that by ear for a while.
xo
s
Gwen says
Gorgeous prints, guys! Great purchase! They really do look awesome in your kitchen.
Can I make a suggestion, though? I’m a professional art consultant, and I’d like to recommend that you hang the two pieces closer together. I wouldn’t go more than 4 or 6 inches of space between them. (See how they’re hung really close together in the West Elm photo? Your wall is obviously bigger, so don’t go THAT close, but I think you can see what I mean.) When they’re hung really far apart as you have them here, the pieces tend to lack unity and look kinda lonely and small. Hanging them closer will unite them and they’ll appear as a larger unit, rather than two puny pieces.
General rule of thumb is to use 60in off the ground as the vertical center.
Anyway, just thought you could use a pro tip on this one. :)
Can’t wait to see where you’re headed with those floors! I love where the kitchen’s going with all these Phase 1 improvements. Keep up the great work!
YoungHouseLove says
Thanks Gwen! I completely agree, and would love to hang them closer. In order for them to stay centered on the table and cover that giant intercom hole, this is as close as we can get them for now, but if we ever patch that and paint it so it blends in I can’t wait to scooch them in more!
xo
s
My Crappy House says
No DIYer shame! I wouldn’t even bother to buy a cover. The art isn’t moving until you take the wall down, right? Why spend even a dollar more covering something that’s already covered?
YoungHouseLove says
Aw thanks!
xo
s
Addie says
I just finished my Ardex countertops, and I’m loving it! It’s not the super professional finish that I’d go for if money/time wasn’t an option, but it was completely diy-able and is a perfect “1st stage” upgrade. I researched via little green notebook and kara paslay, then ended up finding my own tricks along the way (as I’m sure you will do if you go that route!) I have a tiny galley kitchen and an 8 month old baby, so I did one side at a time – my hubby took out our stove/sink, and then put them back in once I was finished. I’d say go for it! It’s like a breath of fresh air when you’ve been staring at formica :)
YoungHouseLove says
Thanks so much Addie! Sounds awesome!
xo
s
sarolabelle says
Now I want to see how you organize your pantry! PLEASE do a post on that!
sarolabelle says
ok…somehow I posted that other one on the wrong blog post! GAH!
YoungHouseLove says
Haha, no worries! I’m building up momentum to tackle that. Someday…
xo
s
Melinda@Love Melinda says
Those are lovely! What a bright calming space! That intercom looks exactly like the one in my childhood home. :)
Erin says
Gotta love “patching” a hole in the wall with art- we covered a big mess in our kitchen with a framed poster to avoid spending money on a wall we will soon be renovating. Why yes indeed- there is such a thing as a load bearing poster!
bfish says
You’ve really done a great transformation of your kitchen and breakfast area — bringing it into the 21st century plus making it a lot more pleasant to work in, I’m sure. Keep on painting that out-of-date woodwork! The outside of your house is classic, traditional Richmond but (IMO anyway) you guys are on target to make the interior more distinctive and “you”.
Julia@Cuckoo4Design says
So so pretty! I want to steal the prints and chairs ;)
Whitney Novelli says
I like the trash compactor…it’s retro cool.
Ashley says
Where is the chandelier from? LOVE it
YoungHouseLove says
Thank Ashley! Joss & Main (of course it went on a deeper sale right after we ordered it, haha).
xo
s
Kaitlyn says
I’m totally with Clara, the purple one is gorgeous! I love how it looks with your wall colour!
tracy lynne says
We are in the process of doing the ARDEX counters as well we just haven’t started yet because like you we have to replace some appliances first, I told my husband am going to let you do yours first and see how you guys do it before we try to tackle ours…
ashley says
Hey guys! I apologize if this has been asked already (and I know it has), but what color are the walls in your kitchen? It’s EXACTLY what I’m looking for for my future kitchen that we’ll be moving into in 6 weeks (yay!). Love your blog!!!
YoungHouseLove says
Thanks Ashley! It’s Nelson Blue by Benjamin Moore.
xo
s
Holly says
I’ve been following your renos in this house since you moved in with a keen eye, as our house is sooooo similar to yours! Oak everywhere, carpet, and intercoms :) Does your intercom run your doorbell as well? Ours does and I am trying to figure out how to re-jig the doorbell so we can remove the main intercom panel that is right in our main hallway and very much an eyesore. Any ideas? Thanks!
YoungHouseLove says
Oh man, that sounds complicated! Our doorbell is separate but we also have an intercom box on the front porch. Anyone have tips for Holly?
xo
s
Annie says
Forgive me if someone else already pointed this out, but Wisteria is selling some cool succulent photos, too: http://www.wisteria.com/Succulent-Print-Pina-New/productinfo/T10976/
(And since they have pretty good sales, I wouldn’t pay full price.)
In any case, yours look great!
YoungHouseLove says
Thanks for the tip Annie!
xo
s
Peggy Golden says
Love the way you set the stage with the printer paper – great prints – liven up the space!
Mindy says
You should check out this super cute succulent watercolor print! It would look so cute in your kitchen! http://www.plaidpoppydesigns.com/prints/succulents-art-print
YoungHouseLove says
Beautiful! I LOVE IT! Thanks so much for sharing the link, Mindy.
xo
s
An says
You should check out these awesome succulent pillows on Etsy – http://www.etsy.com/listing/109783987/succulent-pillow-made-to-order?ref=shop_home_active_2!
YoungHouseLove says
SUPER COOL! I love it. Thanks for sharing the link An!
xo
s
Jelani Burton says
John,
I had to chuckle to myself a bit. That intercom looks like it was one of the first models to ever be introduced to the public. The update looks great! Almost like the photography better than the real thing because the colors are even more noticeable. Great idea!