Sometimes I go crazy and I demo stuff without really thinking too hard about what I’ll do after the demo dust clears. See, for some reason when I stopped and stared at all those crazy towel racks in our hall bathroom for the five hundredth time…
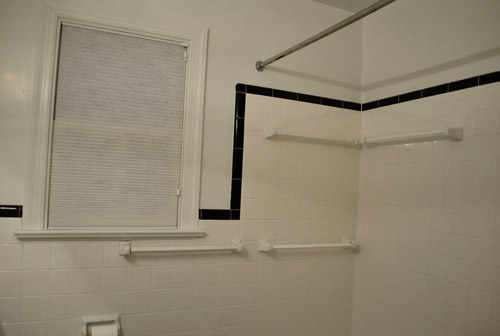
… I decided it was time to get the hammer and take a stand. Because who really needs that many towel bars? And who decided to put that one on the left so crazy off-centered below the window so it would protrude halfway out of the shower curtain? Especially when there’s room for a cute little hand towel ring on the un-tiled wall next to the sink near the doorway.
Can you tell that wonky half-under-the-window towel bar especially bugged me? Yeah I took it personally. So I took a minute to inspect the towel rods and decided that the ones in the shower weren’t that bad since they’d be hidden by a shower curtain 99.9% of the time (once we actually hung one). And I noticed that they all seemed to be adhered on top of the tile instead of inset in it (meaning if I could carefully chisel them off I might be able to save the tile under them for a completely seamless look). So I decided to say goodbye to that annoying off-centered bar under the window first. You know, since he was my least favorite towel bar in the history of the universe.
I very carefully chiseled it ever so softly with a flat head screwdriver and a hammer. Tap… tap…
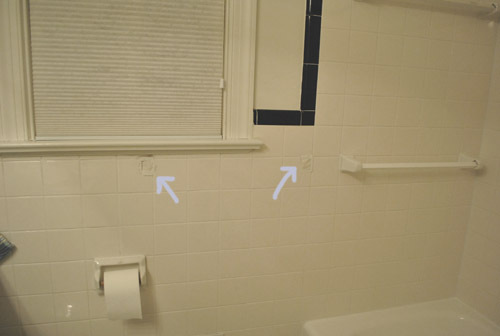
… crap. The bar holders came off pretty easily. But they weren’t stuck on top of the tile like I hoped. They were inset. Boo. So I was left with two highly visible boo-boos that looked a little something like this:
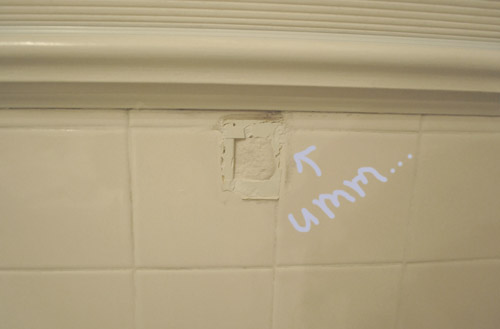
Cue the nausea. John didn’t even know what I was up to (surprise). I was banking on a “look what I did – doesn’t it look better?” reveal. You know, as opposed to an “oops I ruined the original 60’s tile that we definitely planned to work with” reveal.
But as I stood there picturing baked potatoes (an insane anti nausea method that I honed during 100 straight days of morning sickness while prego with Clara) I assured myself that we could probably semi easily hunt down two replacement tiles and just Dremmel out those ruined ones for a pretty flawless repair. But the longer I stared at my mistake, the more I realized there was a much easier fix. At least for one of the holes. Let’s rewind a little. Look closely at the window. Do you notice anything odd about it?

Why was there trim around the sides and the top, but not along the bottom? If we added some simple white wood trim down there it would probably look a heackova lot more balanced and it would cover one of my two glaringly obvious tile gaffes. We had also been meaning to hang the shower rod up near the ceiling with another one of our favorite super long 95″ waffle shower curtains, which would end up draping right in front of the other tile hole (yes, “tile hole” is a technical term) and completely obscuring it whether it was open or closed (since we push it towards the window when open, so it would still hide my dirty little tile secret in the open position as well as the closed one). Although it’s not a forever solution like adding trim, it’s definitely a will-do-until-we-find-a-matching-tile-later solution.
So I sheepishly padded down the hall wearing my best oops-I-went-crazy expression (humming “Oops I Did It Again” for effect) and requested some help adding “a tiny bit of trim and re-hanging the shower rod at ceiling height” so I could string up our new 95″ curtain (we ordered it from amazon.com a while back but hadn’t hung it yet). John was the man. He was pretty quiet (a sure sign that he wasn’t exactly ecstatic) but he didn’t give me the stink eye or anything. Instead he got to work fixing my mess while I stood in the background holding the baby and flattering him with stupidity like “you look great in that hat” and “nobody hangs trim like you, babe.” I managed to even get a little smirk with that last one. As for what John specifically did, first he removed the tiny piece of faux trim that looked sort of like shoe molding under the windowsill by prying it out with a flat head screwdriver (a mini crowbar would also work).
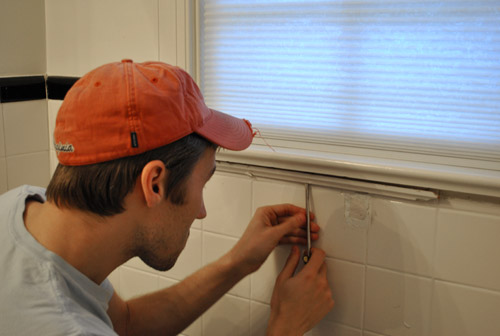
Then he cut a piece of trim that we already had in our scrap pile by looking at other windows in the house and mimicking the shape (straight down on each side with a small 45 degree diagonal bottom corner cut which he made using a miter box). He attached it with small finish nails which he hammered in at an angle towards the sill, using a small metal nail punch (which drives the nails in while keeping the trim from getting dented by the hammer).
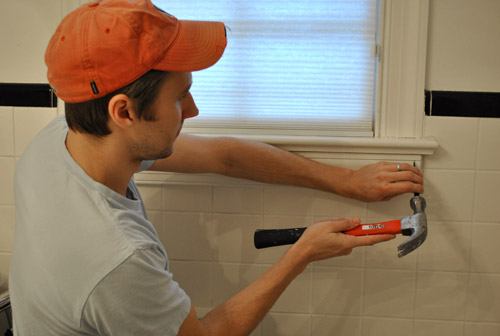
About twenty minutes and zero bucks later any evidence of my moment of madness was completely unidentifiable. And we were left with this (I even painted the new trim piece with leftover trim paint that I found in the basement thanks to the previous owners):
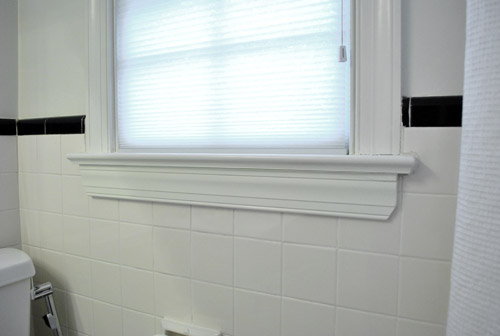
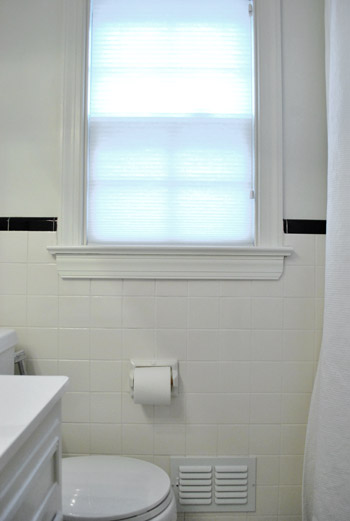
Oh yeah, and if you wonder why this next picture is so white, John took it. And he remembered to white balance first. See, sometimes when I’m going crazy and demoing something I forget to white balance before taking pics. I contend that this is an honest mistake. I mean in a state of demo mania, you can hardly be expected to remember how to use the complicated camera, can you? Anyway, the shower curtain and tile is pure white (along with the walls, the sink, the toilet, etc) so this shot’s coloring is the most true to life:
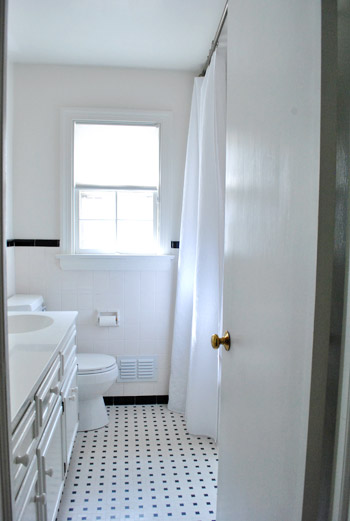
I know it seems like a stretch to act like my big tile “incident” was a good thing. And I might be in complete denial. But I think the window looks a lot better with that trim on the bottom, so that will definitely stay for life. And of course the whole “hide the other tile hole with a shower curtain” isn’t ideal, but once we hunt down a replacement tile it’ll be fixed for realsies. Best of all, our bathroom no longer has that crazy off centered towel bar that annoyed me from the hallway every single time I walked by. And I ask you, who the heck would want their hand towel grazing the toiler paper dispenser anyway?
I rest my case. Hooray crazy.
Psst- Wanna know what that silver nozzle next to the toilet tank is? Check this out.
Psssst- Clara is officially less than two months away from her first birthday. Crazytown. Which means we’re starting to think about how we’ll plan her cute little DIY b-day party. We’re spilling a few of our just-starting-out ideas (and sniffing around for not-your-first-birthday-rodeo advice) over on BabyCenter today, so feel free to drop in and sound off.

Nicole says
It looks great! Hooray for accidents that end up looking better than the original! (and for husbands that quietly fix things w/o rubbing it in)
Question about the shower curtain – is it actually waffle weave? I’ve read some reviews where people say that it is just printed (with dots and lines) to look like waffle weave from afar, as opposed to actually being weaved.
YoungHouseLove says
It’s a full waffle weave (you can see the threads, and there’s no printing). It’s from amazon.com sold by Target. Just search “95” shower curtain” or “extra long shower curtain” to hopefully find the same one we have. We’ve bought the same one twice (one for our master bath and one for the hall bath) and it’s great. Hope it helps!
xo,
s
Regina says
I feel your towel rack pain. We moved into a new place a few months ago and there are 5 towel racks in the hall bathroom. Three of them are oddly placed in the tub/shower. Luckily, they are mounted on hideous pink tiles, so I won’t be sad when I knock it all down.
Jennelle says
Very nice cover up with the trim! This post reminds me so much of my husband, who doesn’t “enjoy” DIY-ing like I do, but when he gets motivated, he gets to it. I recently had to “talk him down” while I was at work, and he was calling me at home to explain he was going to go ahead and sledge hammer our kitchen cabinets, while he was at installing the transition pieces from the flooring we just put down. We do plan to redo our kitchen eventually, but we aren’t even close.
beabee says
There are eight towel racks in the guest bathroom of the house we’re renting. It has always mystified me.
Snickrsnack Katie says
Good work!!!
Lauren B. says
Yes, the towel bars are crazy, but use them to your advantage! As Clara grows, her collection of bath toys will probably grow. We ended up with some boats, pitchers and some other “bigger” items. I got the small ‘s’ hooks from IKEA (there are two sizes) and the great thing is that they fit over our towel bars in the bath and they don’t rust or leave marks on the bars. Also, the toys don’t stink because they are sitting in a heap in the corner of the tub, but are hung and dry out nicely! Just a thought. :) Lauren B.
Jessica at Lavender and Lilies says
I think it looks great. We all have those DIY moments.
Kristin says
Looks really nice!
I think with the black tile border a lighter paint color will look better in this bathroom than the deep blue you used in the guest bath. So, good decision!
Regarding the white balance in the photos – isn’t it possible to white-balance in photoshop? I recently bought Adobe Lightroom (finally!) and there you can pick a neutral spot in the picture and lightroom will white-balance everything to this spot. When you’re photographing in Raw mode, there should be no difference to white-balancing in the camera, and you can easily do it afterwards, maybe even with the software the camera brings along.
Have fund demoing and photographing :) !
YoungHouseLove says
Yup, we could fix it all in photoshop! I just try to keep things real and not retouch pics too much if I can just toss something into the post that says “oops didn’t white balance.” But if it was dire to fix things after in photoshop (for a big reveal, for example) we definitely could. Hope it helps!
xo,
s
BarbaraB says
Genius. And it looks amazing. Simply.
Shelley says
This is why I love your blog. You make me not feel crazy. No one in my real world would understand the daily internal angst of an off-center, misplace towel bar!
Colleen says
That is HILARIOUS! I love that you did that. I dream of doing that, and we will soon but that goes along with a bigger project. Our previous owners painted the tile in our bathroom from pepto pink to white and we didn’t even notice before closing! Now the paint is peeling and revealing our dirty secret and we have BIG problems. Beware of tile paint!
Amanda says
This totally sounds like something I would do. Only replace “towel bar” with “kitchen ceiling.” Whoops. Still figuring out what to do with that one, but guaranteed it will look better when done than it did before, and we can thank my impulsive demo-ing for jump starting the project.
Melody says
I really like the trimmed towel-bar-less solution! Maybe it wasn’t planned that way, but it turned out great!
Home Decor News says
Nice work! I love when a mistake is turns into something wonderful :)
Kristen says
The window looks much better with the trim! John is so nice! :)
Chelsea says
LOL. I did the EXACT same thing, made the same assumptions to find that mine was actually a built in as well. Unfortunately for me, the window is more offset and the tile is a ‘burnt orange/apricot (gag) and the trim around the window is off-white.
I’m just trying to chill out and not look at it until we have a more permanent solution (maybe board and batten?) in the bathroom since that hole is the least bad of the whole bathroom.
Ashley says
that’s a hilarious fix for the window, but that trim REALLY does look tons better!!! LOVE it! And, I totally agree… who the heck in the world needs that many towel bars!!! That is nuts! Glad you guys are getting rid of those yucky things. :)
Melissa says
Great solution for an annoying problem.
karen says
I love trim…thick chunky trim makes my day.
Jen says
Looks so much better!
I was laughing while I read the post, I’ve so been there: “who does this? Why would you put that in such a stupid place?” for weeks, and then one night when I’m supposed to be doing something productive, “It’s Got. To. GO.”
Great fix.
Miranda says
Much better all around, I agree! And very creative. Way to make lemons into some awesomesauce lemonade.
carolinaheartstrings says
Wow does that make a difference. I love the way it looks now.
Sandra says
Brilliant save, Petersiks!
Just wanted to suggest that you can white balance your pictures in post using photoshop or lightroom. Just shoot in raw!
Melanie says
If you pick the right wall color, that little black tile trim will totally be a fun accent. I have a similar situation in my kitchen. The whole kitchen has the same square white tile wainscotting with the black border along the floor and as the top edge too. When I moved in, the walls were a pale, icey blue and the room just looked off (the cabinets are white too). I painted over the blue with Martha Stewart’s Bay Leaf and now the room looks great, and the black tile doesn’t stick out oddly at all.
Jannell says
Sherry, John,
I love you guys and every last bit of your house renovating adventures, but if I see you use a screw driver to pry off one more thing in your house I am going to personally mail you a bright shiny new pry bar myself!
But anyways, nice save on the tile hole. I’m waiting for the post that says, “John went for a run, so I decided to knock out that wall closing in the kitchen!”
YoungHouseLove says
We have one! Haha. We just prefer ol’ faithful Mr. Stanley Screwdriver. Hasn’t let us down yet. Unless you count those tile holes, but somehow I don’t think it was his fault. Haha.
xo,
s
Morgan G says
Haha! I love that train of thought – What the…? Why the…? How the…? Ah, well, here I go…
Kylee says
Looks great! I had to look at my bathroom window and it doesn’t have the bottom trim piece either. Must have just been how they did it in those old tiled bathrooms!
tracie says
Our house is roughly the same vintage, and the bottom of our window is trim-less as well. I’m pretty sure both of my grandparents’ houses were the same. It must’ve been the style!
Sherry, does your tile have subtle black flecks? You can google vintage speckle bathroom tile and find replacement tiles. I had to replace a few for my grandmother, and it was super easy to find. Now, pink tile for our bathroom? That’s a little harder, because there are fifteen thousand variations of pink used in bathrooms in the 50s/60s.
YoungHouseLove says
Ours doesn’t seem to have speckles, but we’ve seen a lot of similar looking stuff at the Habitat For Humanity ReStore. Fingers crossed it works…
xo,
s
Tash says
Much improved. What are your plans for the bathroom as far as paint etc.?
Where did you get those prints hanging over the toilet in your old bathroom?
YoungHouseLove says
We made that vintage subway sign art here. As for the paint plans for this bathroom, we know we want something fun on the walls since so much of the room is tempered by the white tile, white fixtures, white vanity, and white shower curtain (maybe a happy greeny-yellow?). Who knows where we’ll end up!
xo,
s
Sarah says
Hahaha, that is one of the silliest things I have ever seen! Isn’t it funny what you find when you buy a house? In one of our bathrooms, the door trim was super close to the switch cover and seemed to be kind of sticking out funny. When we took off the trim to repaint the bathroom, we realized that instead of cutting the switch plate, the previous owners just jammed the trim over the switch plate and filled it in with a heck ton of paint. So, we had to scrape that off and actually get the right size switch plate. Frustrating, but made for a funny story :)
bridget b says
We have something like that with the back door inside our house. instead of buying a smaller switch plate for the switch that operates the back porch light, somebody cut out a piece from the back of the trim so that the switch plate fits partially under it.
I guess it’s better than trying to disguise it with paint, but it looks funny up close.
Susanne says
Well, that worked out very well. Nicely done!
Colleen P. says
That towel bar would have made me crazy as well, and the window desperately needed to have that piece of trim put on! Yay to the previous owners for keeping the paint!
I actually have a “house book” given to me by the previous owners that has all the information about the appliances that were in the house, all repairs, etc., and even the paint swatches, and carpet and tile samples, with the names of the colors and the companies that made them. I have dutifully kept it up and when we sell, I’ll present it to the new owners-I can’t tell you how handy this has been to have!
Now, if you cannot find a tile to replace the ruined one, I do have one teeny suggestion-find as close as you can get to it, and then remove a tile from behind the toilet tank. Yes, you may have to remove the tank to do it, but you can Dremel out a tile from there, replace it with the close-but-not-quite tile, and put the matching one over the hole. No one will ever see it and if they do, they’ve got bigger problems than a simple tile is meant to handle.
YoungHouseLove says
That’s a genius idea! Love it.
xo,
s
Ames says
Oh my gosh, Colleen! You are a genius! I think this idea just saved us some heartache…..
samantha owens says
what a great idea!!! well, both ideas are great but the tile one is genius!
off to start working on my ‘house book’ for my future owners. i hope i can find all the random bits of information on appliances and paints :)
Colleen P. says
Oh gosh, I’m blushing here! LOL-glad I could throw an idea out there that might help! :D
Joy says
Together, you are a great team. Clever fix. Trim looks like it was always in place.
– Joy
Jennie says
Love this. We’ve had a lot of these moments at home :)
mribaro says
I understand the towel rack beneath the window because it’s right next to the tub and so it’s handy for taking a towel. Ok, it was off-center and that would visually bother me a bit too. However, what I don’t understand are the other three towel racks inside the tub area – wouldn’t towels get wet while one was taking a shower?
Good job on hiding the mess from de-racking :) and the window does look good!
YoungHouseLove says
Someone suggested that they’d come in handy to hang bathing suits up to dry (so they’d drip into the rub). Seems like it might be handy (although three of them is a bit much). I actually used two of them to air dry some faux sheepskins that I washed so that worked out kinda well, haha.
xo,
s
mribaro says
Oh, I see. We have installed a wall-mounted drying rack above our tub, for when we have soaking wet things that drip. It can take more things, but maybe the minimalist looking towel rack looks nicer.
mribaro says
Like this: http://www.lazyorganizer.com/blog/wp-content/uploads/2008/09/wallhungdryingrack.jpg
YoungHouseLove says
Love those!
xo,
s
Tricia Wilkerson says
First off, my husband would have killed me. Secondly, I’m so impressed. Is there anything that you two can’t fix or make pretty? Great job! As always, you are truly inspiring.
Kiran says
John did amazing with the trim! And why on earth would someone need all those towel bars??? Support perhaps?
Karla says
Wow! What a huge difference such a small change made!
Susan says
You guys seriously hit the jackpot of colored 60’s tile. There are so many BAD combos of that stuff out there and both of your bathrooms are cute and livable.
I would have never noticed the white balance thing if you hadn’t pointed it out. I don’t own a snazzy camera though, didn’t know it was possible.
Jo @ Jo In the Kitchen says
Nice save! That looks great!
Elizabeth Horn says
I can sooo relate to this. I get demo fever all the time! But that’s the way things get done, right?
Kate says
I was hoping you’d fix it in the post so I could see how you did it! :) We have similar bathroom floor tiles that are cracked in several spots that aren’t in good hide-it-with-a-rug spots.
Unrelated question, what is the height of your built in cabinets (the base part, not the shelving) in your dining room?
YoungHouseLove says
We’ll definitely share those details when we officially patch that one tile behind the curtain. As for our dining room built-ins, they’re 31″ tall. Hope it helps!
xo,
s
Heather Jo says
I love this post.
SouthsideShellyP says
Sherry Sherry Sherry Sherry Sherry!!!!! I so appreciate your authenticity. Looks much better with John’s handy-dandy trim. Everything you do inspires me to do the same. This weekend I’m painting my office in stripes (ala your bathroom) and I’m tap tap tapping out my ugly towel rods too. Did you say 95″ waffle shower curtain? Would you mind hooking me up with a link? Muchos gracias senorita.
YoungHouseLove says
Here ya go: http://www.amazon.com/Cotton-X-Long-Waffle-Shower-Curtain/dp/B000JK47CI/ref=sr_1_3?ie=UTF8&s=home-garden&qid=1300212626&sr=8-3
xo,
s
Sheryl J says
I know this may sound too “out there” but have you ever thought about painting the window trim black? Or would that make it too “black hole-ish”?
BTW – The room already looks amazing!
YoungHouseLove says
The funny thing is that our first house had a bathroom with the same exact tile and border (in much worse shape though, so we eventually replaced it) and I tried painting the trim black but hated it. Just felt too heavy. Perhaps a roman shade over the window with some black ribbon trim or a few black horizontal stripes will do the trick!
xo,
s
Anastasia says
Rarely does a DIY-post make me LOL. But this did. Why? Because yesterday I came home from work and spontaneously removed a towel bar that the previous tenant hung so close to the top of the toilet that a hand towel couldn’t hang w/out gazing the top. I started contemplating it in the morning while brushing my teeth and figured I’d do it this weekend but by evening I couldn’t resist just getting it down. Thankfully the bar was attached to the wall so I just have to fill the hole, sand and repaint. But your idea to add trim was spot on. The window looks much more balanced and complete. Kudos to you and your patient husband:)
Jessica says
What a great solution! I was already imagining the horror of trying to take off the damaged tile and replacing them with an exact match. I also love the idea of the high shower curtain. We do not like the tile in our shower and this is a great budget-friendly way of hiding it!
bridget b says
There you guys go reading my mind again. The added trim looks great, but how would you fix damage in the window sill itself?
I can’t tell what kind of mayhem I would create by totally removing the sill, but it has a large chunk that came off of the front edge. I thought about spackle, but the missing part would be hard to recreate and patch in.
Is that your hall bath? My first thought was that the previous owners must have had a lot of kids that needed to keep tabs on whose towel was whose.
YoungHouseLove says
Yup, it’s our hall bath. The previous owners of 25 years only had one kid, so maybe he had lots of friends over? Haha. As for the sill, you could take a picture to Home Depot/Lowe’s and see what they recommend (they might show you what to buy to replace your sill completely or suggest some wood putty which is easier to shape and sand and paint than putty). I’d definitely try wood putty before replacing the whole sill. Good luck!
xo,
s
Ashley says
Wow, that really does look better!
Kate says
This is the best 1 year old birthday inspiration…thought you might enjoy, if you hadn’t seen it already. I can see you doing a pic of all the kids at the party. If you wanted to go nuts, you could make the fabric banner from the photo fabrics. The full shoot is no longer up, but you can see some pics here:
http://www.stylemepretty.com/2009/09/08/pretty-in-pink/
http://www.stylemepretty.com/2009/09/08/pretty-in-pink-ii/
http://www.stylemepretty.com/2009/09/08/pretty-in-pink-iii/
YoungHouseLove says
Amazing. So sweet! Thanks for sharing the link! Love the water balloons!!!
xo,
s
jen@editbydesign says
Genius! Love the new trim — definitely a better long-term solution than just replacing the tile. Seems every project I start these days ends up taking longer/being more difficult than I’d imagined going in but the satisfaction is worth it. Usually. :-)