Alright folks, you know I have a love affair with fabric, so when I realized I had never attempted to make a roman shade (even a fixed one that’s just for looks) I knew I had to get on that. So here’s how I got my fake roman shade on.
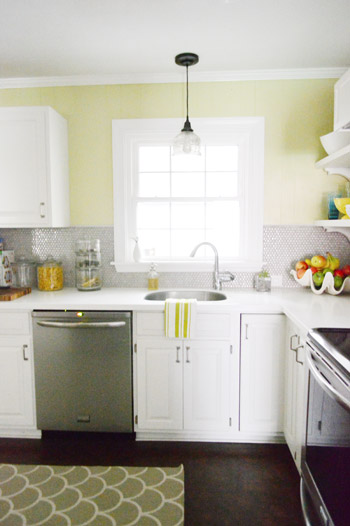
First of all, is this bare kitchen window begging for some fabric action, or what? It actually leads into the sunroom, so it didn’t need anything functional to draw/close, which is why I opted to go the faux shade route (actually all of the bamboo blinds in our first house remained open since I loved the light flooding in, so if you’re not a shade-drawer, a faux shade might work in any room for ya).
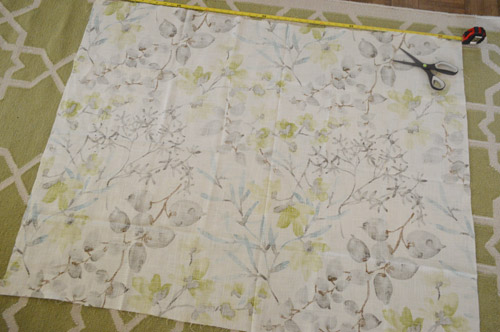
I didn’t follow any tutorial for this, I just sort of made it up as I went along, but here’s how it all went down. First I measured the window and realized that I wanted a finished shade that was about 47″ wide by x 18″ long, so I cut a rectangle of fabric that was 49″ wide (to account for an inch of hemming at the sides) and 30″ long (to account for the looping I was going to do with the fabric to make it look like a roman shade).
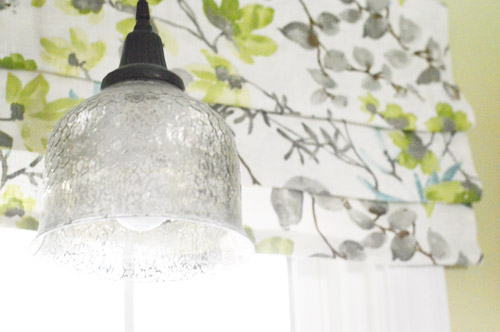
We used Gazebo Cloud by Braemore as our fabric (you might recognize it from here). We loved it so much, and it looked awesome in the kitchen, so we grabbed one more yard of it at U-Fab here in Richmond for $16 during a little store-expansion sale. Woot! Here’s an affiliate link to the same fabric on amazon for any non-locals.
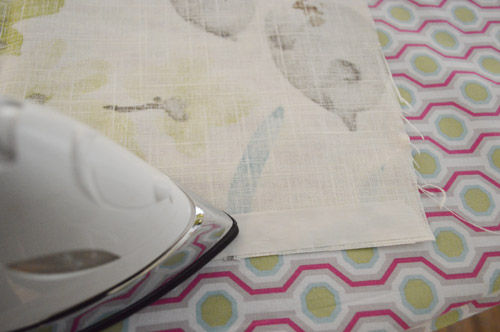
The first thing I did was hem all four sides of my 49″ x 30″ rectangle of fabric with no-sew iron on tape (I like heavy duty Heat N Bond, which I get for a few bucks at Michaels). Oh and there’s a little video tutorial on how to use no-sew tape here for anyone interested.
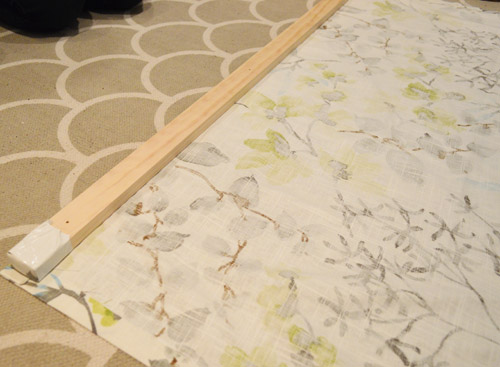
Then I cut a piece of 1 x 2″ scrap wood to the width of the fabric so we could hang the shade up (the finished width was 47″ wide). Although you could get them to cut you a piece of wood to the right size at Home Depot if you don’t want to whip out a saw yourself (I hummed the MacGruber theme song while sawing, BTW).
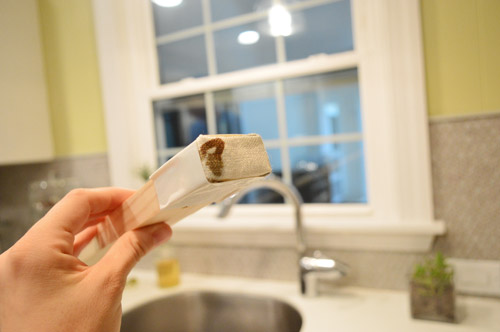
Next I wrapped scrap pieces of fabric around each end and secured them with white duct tape. That way once it was hung, you wouldn’t see raw wood from the sides.
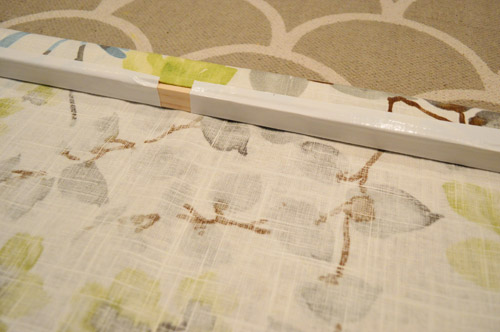
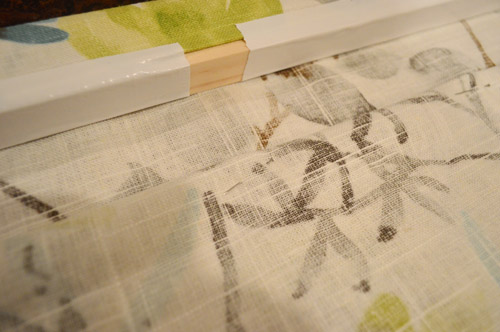
Then I rolled the fabric around the wood piece and secured it with more white tape (being sure the tape was on the back/bottom of the wood so it wouldn’t be seen from the front when the shade was hanging). See the flat 2″ part of the board in this photo (the part that’s facing up)? That will be the part of the board that is screwed into the wall to secure the shade (so the top and front will not have any white tape on them, it’s just on the back and the bottom of the board which won’t be seen).
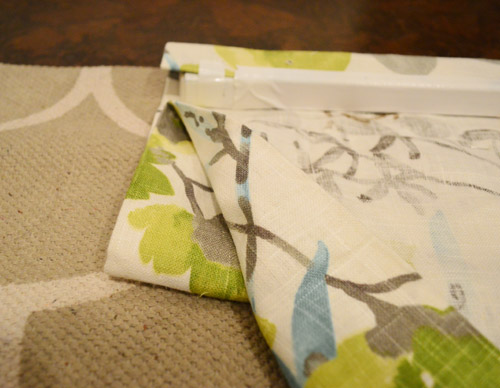
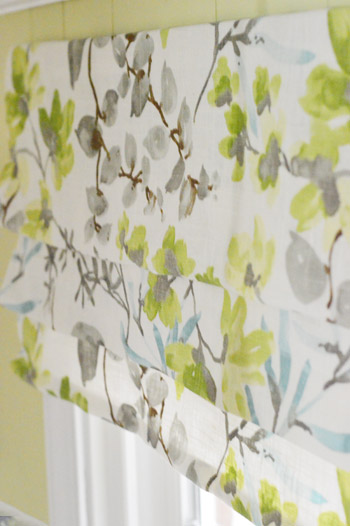
As for how I made the roman-shade-esque fabric loops, I just eyed things and tried to use a ruler where I could to keep things straight. Lining up the top of the shade with the top of our area rug in the kitchen also helped me try to keep things even (laying it down on the floor at an angle might have made it harder to eye things, so at least knowing it was straight on the floor and lined up with the rug gave me a nice frame of reference). As you can see from this picture, I made about a 5″ loop of fabric (which would show in the front of the shade) and then pinned that loop in place from the back of the shade. See how in this photo the fabric is folded back and comes to a point in the corner? That’s where the first pin went in. Then I followed that same line all the way across the back of the shade with pins, holding that loop in place along the entire front of the shade (and tried to keep the loop/pins at the same distance from the wood piece up top so it all looked even).
Here’s a shot where you can see two of my straight pins (see the one in the middle of the picture and the one on the right?). The key was to let them grab a lot of the fabric in the back (where they won’t be seen) but only grab a tiny bit of the fabric in the front since I didn’t want the pins to be super obvious.
I used rows of pins to make two folds about 5″ apart, along with pinning the bottom of the shade so it appeared to roll up/billow out as well. There definitely was some noodling when I turned the shade around and surveyed it from time to time (sometimes a row went up at one end so I repinned things to look straighter, etc). All in all the cutting and hemming process probably took about twenty minutes and the pinning/noodling/repinning process might have taken forty minutes or so. So it wasn’t a super long project, but I didn’t get all of pinning whipped out in ten minutes on the first try or anything. But with a little patience, I was able to get things looking a lot more lined up and then I could stop sweating so much. Haha.
Originally I had planned to pin each fold and later go back and “tack” each area where I pinned the fabric (tacking is basically doing a few manual stitches to hold things in place once you have pinned them and are sure that you like the look), but I worried that tacking might cause more puckering and the pins were holding very securely (and of course it was easier to call it done since everything felt nice and solid) so I did. Done ditty done ditty, done done done.
As for hanging it, we predrilled three holes in the wood piece and then hung it up with screws (nothing is drilled through the fabric to secure it to the wall, the fabric is pulled aside and the wood is just screwed into the wall directly and then the fabric in front can drape over it so it’s hidden).
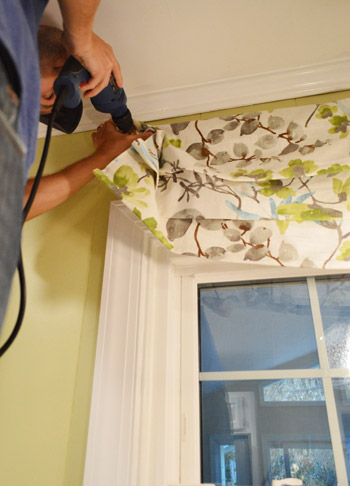
Maybe this shot explains it better. See how John is lifting the fabric up so he can drill right into the wood part to secure it to the wall? Then he let the fabric go and it fell back down in front of the wood piece so there aren’t any screws or wood that can be seen.
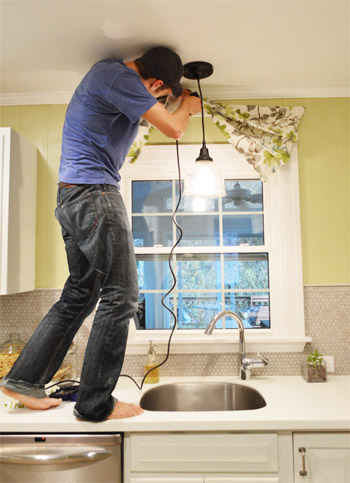
Like so:
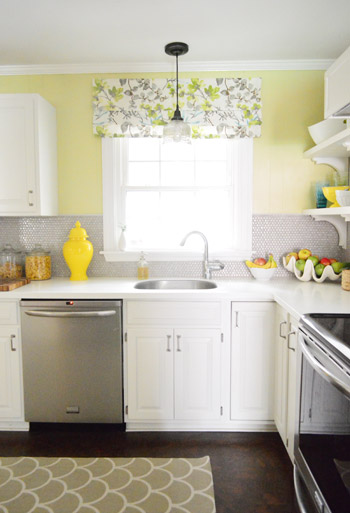
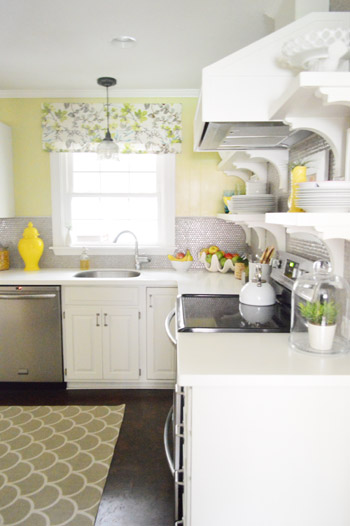
It definitely feels like it finishes that formerly naked window a little more, adds color and pattern, and even balances other things in the room like the range hood. The coolest thing about the fabric is that it ties the wall color into the gray tile, so it’s sort of like a bridge to connect the shiny penny tile and the gray rugs with the soft avocado walls.
Bam, detail shot. See how you don’t see any pickering or pins? I worried if I tacked things it might look more lumpy and bumpy. But if anyone out there has faux shaded a window and used another method, I’d love to hear what worked for you!
All in all, I definitely like how it makes the window feel taller, doesn’t block any light at all, but looks a lot more finished than the bare window did before. For about an hour of time and $16 worth of fabric, it was totally worth it!
What are you guys faking around the house these days? Any faux plants going on? Faux fruit? Faux shades? Faux cleanliness? That’s what I call it when we shove all of our clutter into baskets and closets so it looks like we’re not drowning in chaos. Haha. It’s all an illusion!
Psst- Wanna know where we got something in our house or what paint color we used? Just click on this button:


Megan @ Rappsody in Rooms says
That looks great! I’ve seen a faux roman shade made using tension rods, but it has to live in the window. My plan (before I host Christmas dinner) is to make roman shades using my old plastic (igly) blinds. We will see how it goes!
julie s says
love this fabric and have been hoping for a faux DIY roman shade from you guys – i have a few window on my to-do list.
one question…i noticed you mounted it higher than the actual window to increase the scale/size of the window…would you suggest adding lining to the back of the fabric so on the brightest days you cannot see the actual window location through the shade?
YoungHouseLove says
Sure that couldn’t hurt! Since ours isn’t an exterior window (that’s the sunroom) its not too bright.
xo,
s
Michele Daggar says
Woman do you ever sleep? I’ve done nothing today (day off ) but watch movies and goof around on Pinterest. How do you find the motivation? Seriously though, I spent 3 hours devouring your book last night. It’s the kick in the butt I need to get going on some projects.
Hope you guys enjoy Toronto. We’ve been there many times. It’s such a great city and easy to get around. Congrats on all the book success, you deserve it!
YoungHouseLove says
Aw thanks Michele! You’re so sweet. Our secret is that we’ll sleep next year. Haha. Or maybe that we’re cyborgs….
xo
s
Jen @ Migonis Home says
Looks amazing, Sherry, and I love how you are bringing in fabric from another part of the house…
Christina @ Homemade Ocean says
Oh how I love that hem tape! Seriously a life saver…if it weren’t for hem tape I would spend many a night crying over a sewing machine haha :)
Have fun on the rest of your crazy book tour! It was seriously so amazing to meet you in person, you all were so incredibly sweet and fun. No wonder you have so many fans.
YoungHouseLove says
Aw thanks Christina! You were so sweet!!
xo,
s
Olivia says
Definitely adds a warmth to the kitchen. I’m impressed that you figured it out without any instructions (because I never would have been able to wing it like that)!
Denise says
Love the Roman shade, it loooks great in your kitchen. Toronto is beautiful and you have to try to go up the CN Tower or try to go to the Eaton Centre.
I can’t wait until Thursday when you are here in Houston, we will definitely be going to meet the pair of you.
Koliti says
Hi! Many happy book tour wishes for you!
After your pic where you are ironing on the Heat N Bond, you might need a correction in the text…
“(the finished width was 27? wide)” – should it be 47″?
Love the mounting method with a length of wood and love wrapping the ends of the wood with fabric for a finished look – I want to use your method to hang a straight panel of fabric to cover the entire window behind my headboard.
YoungHouseLove says
Thanks Koliti! All fixed :)
xo
s
Jenn says
Your creativity astounds me. I love it! And that fabric is just perfect!
Marcie says
I made “faux” roman shade for a window I knew I wouldn’t actually use the shade. (Pictured here: http://sassyhappy.wordpress.com/2012/07/25/from-the-windoooows-to-the-walls/) I made it a happy medium between your faux shade and a real one. It has plastic loops on the back like a real shade would but I have the string permanently tied up and the fabric isn’t actually as long as the window if you let it down.
Love the idea of just pinning for a window that you can’t get right under like your sink. You sneaky kids….
YoungHouseLove says
Love that idea! Yours sounds great.
xo
s
Momcat says
Nice curtain and all, but you had me at the shot of John on the counter.
jeans + barefeet = sexy! WITH a power tool, no less! Rrrowwrr
(Seriously, I love your Roman shade. I have at least 2 windows in my house that need this treatment! I guess a trip to UFab is in my future!!)
YoungHouseLove says
I know right? That’s mah man.
xo
s
Jennifer says
Love that fabric! $16/yard! I need to stay away from that..you’ll see why when you read this post!
http://www.refreshandrepurpose.blogspot.com/2012/10/keepin-it-real-crooked.html
I thought it was going to be so simple, especially with sides already sewn for me…whomp whomp
YoungHouseLove says
Aw man!
xo,
s
Jillian {Her Split Ends} says
Soooo good! Love how it adds another layer of lovely to the already lovely kitchen. And so easy…DOing it!
Cheers
~ Jillian
http://www.hersplitends.com
Michelle | Letters from Boston says
New life goal: make curtains. And I say life goal, because Lord knows I won’t have the courage for at LEAST another few years :-) Thanks for making it look easy!! Maybe someday…
Angel says
Looks great! I recently did faux-ish roman shades in the bedroom. They are functional, but I cheated by using the existing mini blinds! :-)
http://chitowngirladventures.blogspot.com/2012/10/diy-roman-shades-from-mini-blinds.html?m=1
YoungHouseLove says
So smart!!
xo,
s
kcox says
Kind of weird, but has anyone told you you (Sherry) look a lot like a younger version of Gen. Petraeus’ mistress? Not to make light of the situation but every time I see a pic of her I think – wow that looks like Sherry from YHL in ~10 years.
YoungHouseLove says
That’s the first time I’ve heard that!
xo,
s
Victoria says
SO excited to come and see you guys tonight! Will be leaving my small town an hour away to get there early!
lesismore says
my husband and i just bought a 50s fixer a few weeks ago and we have an exterior door in our laundry room that leads to the very private backyard. the first thing i did when painting the room was tear the cheap plastic blinds off the window.
i knew i didn’t need anything that actually closed on the windo, but my sewing skills are pretty minimal so this is a great solution. yours look really lovely and really tie the room together. once we get our flooring and appliances in, i’ll hopefully have an idea about a color scheme.
i expect i’ll be looking at your blog mulitiple times a day for inspiration as we renovate this house from top to bottom. oh wait, i already look at your blog multiple times a day!
EngineerMom says
I love it! I second the rusting issue, but you definitely have some time to deal with the curtain before that becomes a problem. What about using some of the iron-on tape?
Also, can’t wait for you guys to come up to Seattle! I’ve never been to a book signing – can I buy the book there in the store, or do I need to bring one that I’ve ordered ahead?
YoungHouseLove says
Books will be available at every signing! Hope it helps :)
xo,
s
Maggie says
Love how easy this is! I did a “faux” (but functioning) roman shade a few years ago following Jenny Komenda’s tutorial with miniblinds. But I need something more like this (probably with blinds hiding behind) for our current kitchen. Looks easy enough!
Mallory says
Did anyone else read that last sentence in a Gob Bluth voice?
YoungHouseLove says
Haha!
xo,
s
Bethany says
You have my heart in your hands with that Hand, Hand, Fingers, Thumb reference. Love.
(Oh, and your faux blinds turned out pretty great, too. ;)
Krystle @ Color Transformed Family says
I love easy projects using stuff that’s already around the house. I think that should be my decorating motto!
Have fun on the book tour and your crazy schedule this week. Hopefully it won’t get to your immune system. I recently discovered that a teaspoon of honey mixed with a 1/4 teaspoon of cinnamon is great at fighting and preventing colds. They are anti-microbial and anti-bacterial. It helped me keep from getting sick the other week when my husband and daughter both came down with a cold.
YoungHouseLove says
That sounds delicious!
xo
s
Stacy says
Love your faux roman shade – looks great in the space. We recently replaced all of our ugly venetian blinds (throughout the entire house) with linen roman shades. Cost us about $2500, but they were professionally measured, installed and have a lifetime warranty so I’m not complaining.
Anja says
Very cute fabric! And you’re right, it is absolutely the right choice for this place =) Usually I’m not a big fan of avocado (or any vegetable colors, for that matter – ha ha!), but with the grey, it looks really fresh.
YoungHouseLove says
Thanks Anja!
xo
s
Annie says
I’ll be seeing you guys later tonight YAY!!!! My friends have bailed so I’ll be geeking out at you alone but whatevs, I can’t wait!
Also, I am so making these blinds.
YoungHouseLove says
Wahoo! We’ll geek out with you. You won’t be alone!
xo
s
Tanya says
Wonky = one of my favorite words EVER. Safe travels this week, sorry I missed you in Boston. Stupid storm!
Emily says
Is this your headboard fabric? If so, is it weird to see it in two different rooms, or do you not notice because they’re styled so differently?
YoungHouseLove says
It’s Gazebo Cloud by Braemore. We actually love that it’s in two rooms (in different applications) since it’s a subtle tie but nothing too matchy (like a million curtains in every room with the same pattern could be).
xo
s
Beth says
I have 4 windows that I am going to try this on! Hope to catch y’all at West Elm in Dallas! Are they selling books as well? They have 580 RSVP’s on Facebook so I am a little worried about the supply.
YoungHouseLove says
Yes, there will be tons of books available at each event!
xo
s
-alex says
I have seen your fabric popping up in so many places. It’s on an episode of Burn Notice in a hotel room (Season 5, episode 5?) In a magazine (Better Homes?) And I’m sure I’ve noticed on another show.
Is it weird that I’m obsessed with seeing your fabric in different settings? It’s like the “Where’s Waldo?” of the fabric world, but much more tasteful and not so stripey.
YoungHouseLove says
Hahahaha, so funny!
xo
s
Chrissann says
Great minds think alike…I actually made my own version of no-sew roman shades for your Fall pinterest challenge but then didn’t get to submit due to Sandy stealing our power for 12 days (not to mention Halloween…wop wop). Imagine my surprise and delight to see your own version posted today! :) If you want to take a peek at my woulda-coulda-shoulda pinterest roman shades, you can find them here http://ducksinarowevents.blogspot.com/2012/11/the-new-no-sew-pinkie-swear-roman-shades.html
YoungHouseLove says
Gorgeous! They look awesome!
xo
s
Carolyn says
Although I LOVE your blog, I sometimes cheat on it and look at other blogs. ;) I faked a roman shade using the tutorial from Little Green Notebook (http://littlegreennotebook.blogspot.com/2009/02/make-shades-out-of-mini-blinds.html), and it worked amazingly well. I dissected those cheap plastic blinds, removing all of the plastic pieces except for a few of them. I then glued them to a piece of fabric. The thing looks — and works — just like an expensive roman shade. Very fancy.
YoungHouseLove says
Jenny’s a genius! I love her blog.
xo
s
Steph says
You guys are just fabulous. Love the fabric. Brings the kitchen to life and makes it look so happy! I’m looking forward to grabbing your book and whipping up my first ever headboard for the bedroom. Good luck this week!
YoungHouseLove says
Thanks Steph!
xo
s
Katie says
So sad to miss your Canadian book tour stop! Being on the east coast though, the 20 or so hour drive is a bit too long for me! Would have loved to see you guys!
Unrelated to roman shades… but related to shadow boxes…
http://pinterest.com/pin/1055599883848114/
Came across this link and thought it seemed like something you guys would go for. Colorful, and includes a monogram and shadow box!
YoungHouseLove says
So cute! I love it.
xo
s
Terresa says
Love that shade. I make almost all my shades/curtains and it’s so satisfying when the end result is perfect like yours is. I needed a functioning roman shade recently and didn’t want to learn that myself, so I had it made. and its beautiful too. Yay for pretty shades! They complete a room!!
Heather S says
Thank you!!! I have been trying to come up with something cute to hang over our kitchen sink window, and this is absolutely perfect! And since I have NO sewing skills, I love the no-sew tape. You guys are amazing!
YoungHouseLove says
Aw, good luck Heather!
xo
s
Amanda says
I also used pins to make a faux shade for a window in my kitchen! The only difference is that I took 2 fabric placemats from Crate & Barrel, wrapped the top of the placemat around the curtain rod, and pinned them in place. Boom, done. :) Have fun in Toronto!
YoungHouseLove says
Super smart and easy!
xo
s
amanda@reno366 says
Looks great! I already tried a faux roman shade method via pinterest.
http://reno366.blogspot.com/2012/09/faux-no-sew-roman-blind.html
But I think I may re-do it using your method, I like how yours hangs above the window!
Lara says
Hand hand fingers thumb. One hand one hand drumming on a drum.
Dum ditty dum ditty dum dum dum.
Oh Sherry – you Mommy you ;P
YoungHouseLove says
Hahah!
xo
s
Paige says
OMG – that looks so awesome! I love it.
Meg says
It really does make you kitchen window look finished – I love it!
Safe travels you guys! thought if you this weekend when we put together our own Karlstad! You’re review after a year of having that sofa is what convinced us. We’re so happy with the look and price! Thanks for your continued great advise and honest opinions.
YoungHouseLove says
So glad!!
xo
s
Heather W. says
No slim shady references????? lol! Love the fabric in your kitchen! Looks great!
YoungHouseLove says
Sadly it wasn’t slim enough of a shade! Haha.
xo
s
Sheri says
I made some functional faux roman shades using Jenny’s tutorial on Little Green Notebook a while back – they look fantastic, you can still use them for privacy, and they solve the eyesore-mini-blinds-problem, all at once!
http://littlegreennotebook.blogspot.com/2009/02/make-shades-out-of-mini-blinds.html
YoungHouseLove says
Oh yeah I love that project of hers!
xo
s
Kelly says
Loved this! I have to say I’m disappointed, though, Sherry, especially since you’re all about the song lyric post titles– You passed up a perfectly good opportunity to make a Slim Shady/Eminem reference! (And we know how much you love him…)
YoungHouseLove says
Haha! I definitely thought about it, but it’s not really slim, so shady business seemed to make more sense…
xo
s
karen says
looks soooo good!!
I’m so nervous to meet you guys tonight!! Is clara joining?
YoungHouseLove says
Sadly she isn’t coming to any signings since we think it’s a little too overwhelming for her (and Burger) but they’ll be there in spirit! So excited to meet you!
xo
s
Wrenaria says
Lovely! Windows always look better with some fabric. And I very much love that fabric.
Skooks says
Were you channeling the book “Hand Hand Fingers Thumb” in this post? Or am I just totally immersed in kid-land that everything is relatable to kids’ books somehow?!
YoungHouseLove says
Haha, yes! Totally was.
xo
s
Lisa says
I am totally going to do this. About 9 years ago, after saving up for a looong time, we decorated our bedroom using an interior designer…I hated it from day one. Each window panel cost $800! Money I will never get back. We’re now getting new windows and I am totally going to do this instead of rehanging the panels. Maybe it will help make up for the gross spending (or at least make me feel better). :)
Ginny@ Goofy Monkeys says
I love it – it’s so pretty :) I was planning a similar treatment for our kitchen window as well, we’d probably put up some vinyl blinds also as the light can be pretty blinding sometimes, but the fabric would hide it quite nicely when it’s up.
I wondered why you opted for using tape rather than a staple gun to attach the fabric to the wood. Are you concerned about the tape not staying stuck over time?
YoungHouseLove says
That could have worked just as well, I just had it out for attaching the fabric around the corners, and since the wood piece is screwed into the wall in three spots, the fabric is sandwiched in there super tightly (so it can’t slip out even if the tape comes off). Hope it helps!
xo
s
Grace says
If this question has been asked already, please forgive the repeat, but there are 144 comments and I only have a couple of minutes on the computer. :) I was wondering what the back of the shade looks like? Is it presentable, or do the pins show?
Looks great from the front! :D
YoungHouseLove says
Good question! From the back you don’t see the pins since it’s hung in a way that most of the pins are actually in front of the wall (I hung it high and wide to make the window look larger) and not the window). Hope that makes sense!
xo
s
Grace says
Perfect sense – thanks!