Everyone loves an imaginative and awe-inspring kid’s room, am I right? Which is all the reason we were psyched to see this cheery redo from Amandelin. Check out her letter:
My son’s room was desperately in need of some redoing. Beyond the aesthetic problems (like the knotty wood paneling and bargain bin particle board furniture that my mother kept “gifting” us) the room is also 23 feet long and 9 feet wide. Three of the four walls are monopolized by windows and the fourth is broken up by double french doors. Needless to say it posed quite a challenge.
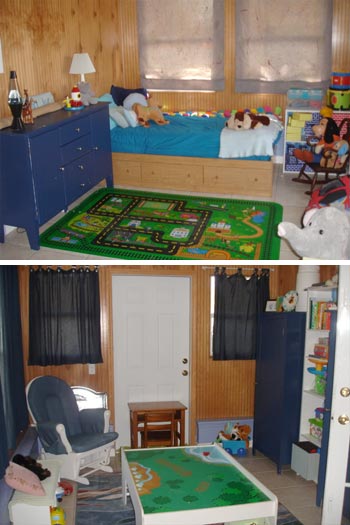
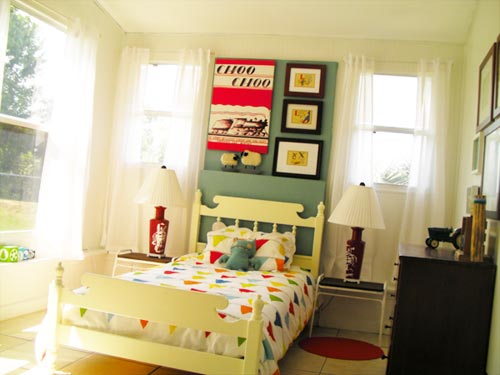
I painted all of the paneling white, replaced the mismatched denim curtains & “custom” 80’s paint-splattered roman shades with cheap white Ikea curtains. All of the furniture in the room, with the exception of the Expedit and the two Ikea toyboxes, is thrifted. I think the most expensive thing was the bed, at $19.99.
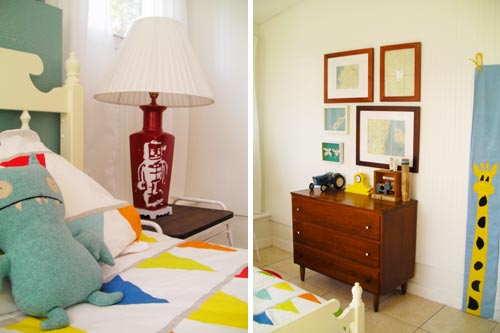
The sidetables were $5 for the pair; I painted them with white lacquer, used a jigsaw to cut a thick piece of wood to the curves on the top, and stained the wood. The lamps were $10 each at my local Habitat for Humanity REstore. I painted them out in red and hand-cut a robot stencil, using leftover table paint to get the graffiti effect.
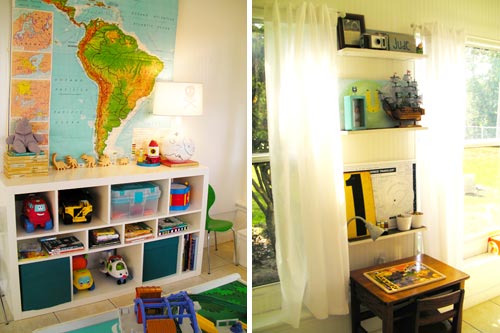
The lamp on his Expedit was originally one of a pair I had in my bedroom. Until he broke one. I hand-painted a treasure map on the base and used white contact paper to put a skull and crossbones on the inside of the shade, which is only visible when you turn the lamp on. Months and months of work and elbow grease and combing through thrift stores was totally worth it for my almost-four-year old to have a bright and functional room! – Amandelin
We can’t believe that’s the same room, Amandelin! It looks so cheery, and the fact that it was done so inexpensively and with so many hand details is just awesome. Your son must have so much fun in there. Kinda makes us wish we were four again. What about you guys? Do you have a favorite project or thrift store find in this makeover? So many great DIYs, so little time.

tasha roe says
spectacular!! love the colors and furniture! i am super into maps right now and the oversized one one on the wall made my heart skip a beat! congrats on a job well done!
Kelly says
Amedeline,
I am in awe over how you tackled all of the challenges of the original space! Even more impressive was how inexpensive the redo was. What a lucky little boy!
Darbi@APinch&ADash says
This room looks great, but I’m confused! I’m guessing that the headboard is now where that single white door was. But how do you get in that room? The 2 French doors? What did she use to cover those? I love how light and airy the room looks now! It’s amazing what a little paint can do.
Amandalin, come answer our questions!
Jen at Fresh Crush says
Great job! The best part is you’ve made such great choices, he’ll be able to keep his room like this for years to come. Love, love, love all the different colour choices on the walls and bedding and art. Did I say love? Love it!!
Nicole H says
This is a really fantastic makeover! I am blown away! I appreciate that she did it on a budget! To me that makes the whole process more rewarding, anyone can throw together a child’s room using a catalog, but to painstakingly hunt for the items via thrift stores, yard sales, craigslist, is what makes it a room that is special. 4 Stars to Amandelin, this is a room I would love to be in!!
Keep up the great work YHL, these kind of innovative and creative makeovers make me coming back (I guess it didn’t help that it was a kids room either, and who doesn’t love fun kids rooms!!)
Felicity says
[My thought process whilst looking at the pohotos] Yeah…Yeah…WOW!
This is F.A.N.T.A.S.T.I.C. I have a similar project on the board for an eight year old and have been putting it off but now am VERY inspired to hit the thrift shops and do a complete remodel. Thank you,
Felicity
Melissa says
Great job, it doesn’t even look like the same room.
Erika says
Wow! That looks fantastic – doesn’t even look like the same room!
Katie @ explanation required says
This room is seriously phenomenal and I love what you did with the lampshade!
Holly says
This doesn’t even begin to look like the same room! What an amazing transformation :)
Laurin says
Amazing. This is for those of us that can’t spend much at all on a room make-over… very inspiring- great job.
Pammy says
Wow the robot lamps and the treasure map lamp with the appearing skull are amazing and so creative! Love it!!
Bethany says
WOWWWWW! I have a tiny toddler room to make-over too… Inspiring!
patti says
wow! what a great room! i think any kid would love to hang out in there. great job!
Jen @ das Sushi says
I am SO impressed! I love the entire transformation, but the little details like the graffiti style robot stencils are just a-MAZ-ing. Way to go, Mom!! Lucky little guy you have.
Tiffany says
your son is soooooo lucky it is too cute!
XOXO,
http://outfitidentifier.com/
Annie says
I read YHL all the time and never comment! I just wanted to say I’m a huge fan of the blog :D
Nina says
I wish that was my room….and I’m 26!!
Amandelin says
Thanks everyone for your kind comments and John and Sherry for posting my makeover. I saw a couple of questions come up a few times, so I’d love to address them.
THE DOOR: I felt it completely unnecessary that my son have his own private entrance, and I desperately needed a flat surface to push the bed against, so what I did was have a piece of plywood cut to size to fit over the door. I nailed it to the doorframe. The four-inch ledge was still an issue, so I built a ledge about halfway up using 2x4s and then attached it to the plywood with L-brackets. I covered the front of that with another piece of plywood, then wallpapered the whole thing with paintable “ceiling tin” style wallpaper and custom-mixed the paint color from things I had on hand to coordinate with his school house map. This gave me a flush surface to position the bed against, as well as a place to hang art over his bed and put those charming sheep I found at a thrift store. The whole project took maybe 3 hours!
THE CHOO CHOO ART: Is actually passed down from a family member. My Aunt married Virginia Lee Burton’s son, and they had a handful of canvases made from her books’ cover art lying around. This one was in her garage, and she’s loaned it to us so that Jude can enjoy it while he’s in his train enthusiast phase.
Thank you again, everyone!!
Alicia (Atypical Type A) says
Holy moly, I can’t believe it’s the same room!
Quite sophisticated for a toddler’s room but still colourful, fun and imaginative.
Congrats on the stunning transformation (and the totally pro-looking shots).
Maya says
Wow – such a fantastic transformation! LOVE the treasure map lamp (what a cool idea!) and the big wall map and the whole vibe of the room. Great job!
LaTonya LaShawn says
I really enjoyed reading your blog. I
Carolyn says
Great job! looks like a totally different room. Loving the idea of using stencils on a lamp.
Erica says
WOW! It is so pulled together too. . . how did you do that?
Julie says
Love it! Could you tell us what paint colors you used? Room? Headboard? Bed? I love the combo. Thanks!
Steph says
This room is amazing! Such an amazing makeover – lucky boy! Like YHL, I cant even believe it’s the same room. This is such an inspiring make over to convince me that you really can change things for the better without lots of dollars!
Julie B says
Love, love, love this room. What an amazing transformation. Perfect space for a growing little one!
Ughsome says
ABSOLUTELY STUNNING. totally love the transformation. just wow.
Dana @ House*Tweaking says
Yay for kids’ rooms popping up on YHL! Amandelin…that’s quite some elbow grease you used! Way to go, Mom!
Heather S says
I am DYING over those robot lamps! So creative. The whole room looks amazing! Is the train table still in the room (and just not pictured?) We have ours in our living room and while we would never get rid of it (my son is train-crazy too), it’s not exactly a decorator’s dream piece of furniture.
Jennifer says
WOW!!!!!!!
These people have an AWESOME eye for decorating.
The rooms on this blog are always ‘nice’, but this one really takes it up a notch!
Well done!
Marie says
Unbelievable!! Wow!! I love the new room! What a lucky boy!
shanna says
I adore this! I have a son the same age and he (and I) would flip over this room! His room is on my list of things in the house to redecorate and I will definitely come back to your pix for inspiration! Well done!
Emily says
Amandalin,
Love the room!! Can you tell me the process you used to paint the beadboard? Did you sand it firt or just paint over it? I have knotty pine beadboard and would love to paint over it, but it has a varnish of some sort on it.
Thanks so much.
Laura says
SERIOUSLY it’s hard to believe that that is the same room. Amazing transformation– and I love the price tag on things! It is inspiring me to take a look at the stuff we have and see how we can update it with a little elbow grease instead of buying new.
Great job!
Meghan says
Superb – what a great job. :)
Anne says
Wow! So much fun, and very well done. I love the map, the colors, the overall lightening and brightening. What a lucky almost-4-year- old!
alison @ semi-fab lane says
it always amazes me to see what a coat of paint can do to some pine. also, that’s awesome that you were able to find everything on a budget-that’s where the real talent is and you did it well!
Jaimie says
I agree with all of the admiring comments — this is an incredible transformation and such a great space. It feels youthful and fun, but I can see a teenage boy still enjoying this space (with some small modifications) in years to come. Great inspiration for me as I prepare to tackle a “big boy” room in my own home!
JF says
WOW! The room looks amazing! It doesn’t even look the same space. Although a 9 foot wide room is not particulary big…I think having it 23ft long is great. If you think that is tiny…my 2yr old’s room is only 9×10.
Great job!
Jen says
I love this room – gave me so many good ideas for my 2 boys (ages 2 & 3). And I have to add that I love Amandelin son’s name – Jude – that is my 2 year old’s name.
Terri says
Wow! It’s hard to believe that this is the same room as in the “before” pictures. It’s a wonderful room for a young boy! I especially love the robot lamps… fun!
sarah b. says
WOW! What a fantastic update! It’s hard to believe it’s even the same room!
Amy K says
Fabulous!! Love the thrifted furniture – great great great job.
Christine Schwalm Design says
Never underestimate the power of white paint! Seriously, what a fantastic job you did. I think my favorites are the bed and the school map. And what’s great is that this room can age gracefully with him. Change out some bedding and accessories over time but the basics will last.
Megan says
I am so in LOVE with this room!! Great inspiration for my boys room that I’m dying to redo.
Ashley says
AMAZING!!!It looks so beautiful…clean lines, fun color (but not too much), ….it should be in a magazine! Great job!
Julie B. says
WOW! What a great transformation. You did a wonderful job. Thanks a bunch for sharing!
kelly says
wow. the redo is so grown up and cheerful. i love it!
http://www.kellyloves.wordpress.com
Christy says
Wow, it looks like it’s straight out of a Pottery Barn Kids catalog! KUDOS for doing such a fantastic job, especially on a budget! I love it!!