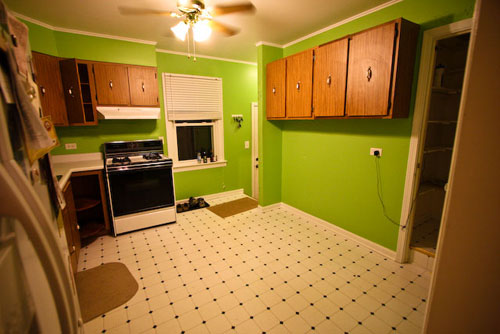
When Jennifer sent us her almost unrecognizable kitchen before and after pictures we had to share the goods. Here’s her letter:
I‘m so excited about my kitchen transformation that I had to send it your way since so much of it was inspired by YHL! Two of my favorite features in my new space (under cabinet spice shelf and sliding barn door) were inspired by this transformation that you guys featured on your blog a few months back. You can see my entire transformation with before/after pics here and the day by day process here. I’m so glad we were able to take the room from a neon green mess (yes, I painted it that color… it looked so much better in my head) to a serene and welcoming space that’s truly functional and easy on the eyes. My favorite things are the garden window in the kitchen where all of my herbs are flourishing instead of dying in the Illinois winter, and the spice shelf which was inspired by the kitchen you posted a few months ago! Anyway, thanks so much for helping me realize my dream kitchen, I don’t think I’d have 1/2 of the fun little features if it wasn’t for your blog and the amazing makeovers you share! – Jennifer
Here’s Jennifer’s bold green kitchen before:
And here’s her fresh and inviting space after the big makeover:

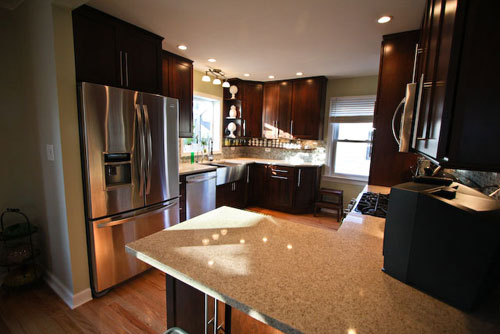
Pretty dramatic, huh? Here’s Jennifer’s list of sources:
- Cabinets: Bertch Cherry Wood, Brindle Stain
- Countertops: Quartz in Ivory Coast
- Appliances: Sears Kenmore Elite
- Hardwood Floors: Bruce Hardwood Floors
- Sink: Farmhouse Stainless Steel Undermount Kitchen Sink
- Faucet: Vigo Modern Pull-out Spiral Kitchen Mixer
- Instant Hot Water Faucet: Quick & Hot Water Tank and Chrome Faucet Combo
- Rug: Dash & Albert in Lighthouse Sprout/White Indoor/Outdoor
- Light Fixture: Bellamy Antique Pewter Semi-Flush Ceiling Light
Can you believe it’s the same room? We love that Jennifer wasn’t deterred by her initial lime green wall choice and still headed into the renovation with confidence and enthusiasm. So many people just get frozen with decision-making fear. And the fact that she took inspiration from other kitchens that she loved shows how easy it is to pinpoint your style and personalize your space to get “un-stuck” if that ever happens to you. Just flip through design mags or books at Barnes & Noble and google around for the perfect starting point! We also love that she trolled the web to find steals and deals on fixtures like the faucet that she snagged on Overstock. So thanks so much for sending the gorgeous photos our way Jennifer. We love everything from the ceiling-height cabinets and the mosaic backsplash to that built-in spice shelf and those gleaming silestone counters. Yum. What about you guys? Got any favorite parts?

dana says
Gorgeous!!!!!!!!!!!!!!!!!!!
Katie says
Is there an estimated price for the redo?
YoungHouseLove says
Hey Katie,
Jennifer actually dropped in to answer that question so feel free to scroll back through the comments to find her response!
xo,
s
Paula M. says
Holy cats!!! What a transformation!!! Absolutely amazing! Beee-yoooo-teee-ful! Great job!! :)
And you know, for that lovely a kitchen and the amount of work that the owners note, above, on that room, plus other rooms, 40K really does not sound bad at all!
Now I’m curious what part of the country the owners are in. I’m assuming it’s not the San Francisco Bay Area where I live, and where costs would probably be more. But I love the tip about pricing and buying things ONESELF. That’s something for me, as a relatively newbie condo owner, to keep in mind, if ever I bite the bullet and get some reno done. My bathroom in particular is in serious need of some help. for the time being, though, I’m holding tight to my pennies til the economy, job market and housing market improve. I’m still employed, but, having bought my place about a year before the Big Crash, I’m a little nervous.
Briony says
I love those cabinets. That’s what I want someday!
dizi izle says
Nice job! I like that you tore down the wall. I also like all your new windows. Nice blog, Jen, btw.
Jen Caputo says
Paula – I live just outside of Chicago in a Northwest Suburb.
Erin says
Gorgeous transformation! Love the new kitchen. However, let me play devils advocate here…I love your blog and part of that is because everything you do is budget friendly or rather budget realistic, and realistic for the average DIYer. Showing a $40K kitchen remodel is not all that exciting. Just shows that with enough money you can transform any room and really there is nothing too special about that. Now if you had told me that they did a lot of the work themselves and saved a ton that way I would be a lot more impressed. Still I do appreciate the design and particularly love the spice shelf.
YoungHouseLove says
Hey Erin,
If you look at the price explanation in Jen’s comment, the 40K was actually spent to redo three rooms, not just the kitchen. We also pride ourselves on bringing a range of projects, skill levels and budgets to the table here at YHL, so while we usually feature cheap and even free makeovers, we also love sharing inspirational and breathtaking upgrades like this- just to keep things interesting. With a record number of excited comments, we definitely think our readers have loved seeing this amazing transformation. And it’s also helpful to remember that just because someone spent a certain amount to achieve a specific look doesn’t mean that look can’t be mimicked on the cheap. For example, if this kitchen convinced someone who was thinking about restaining their cabinets in a dark rich tone (which can be DIYEd for less than $100 in one weekend) then we’re so glad to share the eye candy and help motivate people to go for it!
xo,
s
billy says
awesome…
Sandy says
Simply fabulous! Love everything about it!
candace says
!!!STUNNING!!! (Although, I am still in love with your kitchen.)
Kerrie says
Do you happen to know the tile they used for the back splash? It is gorgeous.
Thanks!
YoungHouseLove says
Hey Kerrie,
Scroll up for that info from Jen. She has stopped in a bunch with more details for everyone!
xo,
s
Jen says
Wow. I love the blend of woods, stone, and stainless steel. The spice shelf is genius… wonder if I can incorporate something similar when we remodel our kitchen. Thank you for sharing!
Cate says
How did they get rid of the popcorn ceiling? Did they scrape it or did they drywall over the top? In my dreams, our popcorn ceiling simply disappears, replaced by a lovely expanse of pristine plaster…
abbey says
Absolutely gorgeous! I love how much modern and contemporary it looks. And the new windows in the Living room are KILLER!!!!
lana @ make a house a home says
it is a week of kitchens! awesome transformation!
laura @ the shorehouse says
LOVE it. Question about the sink: I am especially in love with that but when I clicked through the link in this post, it took me to a listing for an undermount sink…but yours is clearly apron front? OR…is yours a faux-apron front? Either way I’d love to know…we’re looking for an apron front to add to an existing cabinet so a faux apron front may be even better (though I strongly suspect yours is the real deal. :-) Thanks in advance for your help, and congratulations on a wonderful reno project!
Lindsay says
Absolutely fantastic transformation!
Jen Caputo says
Cate – they scraped it off. It took them an entire day and they swore they would never do it again. They had every window in the house open and they said the bushes looked like it was snowing outside :) They even had to make runs to the hardware store to get better masks because the ones they were using wasn’t cutting it. They had to test an area to make sure it would scrape off easy enough because if it didn’t, the alternative was to redrywall the whole thing which would have cost a ton more.
Laura – That is the sink I bought. It’s an undermount and an apron front! The picture doesn’t show the front of it but trust me, it looks exactly like the one in my kitchen as that is the exact one I bought from Overstock.
Jen Caputo says
Oh! I thought I’d also mention… I waited for a mega sale on Overstock to buy the sink, faucet, and instant hot water faucet. There was a three day sale where everything was 15% off and then everything in the home improvement category was an extra 7% off. I wound up saving an extra few hundred dollars on those three items that way! I bought them 2 months before we even interviewed contractors because I didn’t think a sale that good would come along again anytime soon and I knew those were the items I wanted.
kathy says
@Cate – I had mine removed by a company that specializes in it. It was like your dream, I left for a day and came home to a clean painted ceiling (husband babysat the contractor). It was wonderful! Not messy, they knew exactly how to do it, taped everything off. And not too terribly expensive – best money I ever spent anyway! Check your yellow pages or servicemagic.com for a company that specializes in popcorn ceiling removal. Good Luck!
Kristin says
Wow, what a stunning transformation! I’m so glad this was posted, love reading about kitchen redo’s :) I can appreciatte all the time and effort that goes into such a huge project after taking on ours ourselves. Love reading your blog and love love your warm welcoming home. Thanks for sharing
Kristin
Whitney says
Kathy, would you mind telling how much your popcorn ceiling removal cost, and how large your house is? I want to look into it but I’m totally scared to find out how much it will cost!
Alejandragigi says
I love it! Good job!
Alejandra, from Chile
Eliana B. says
What an amazing transformation! Good for you guys.
Tracy Wright says
It’s amazing job, your kitchen looks awesome now.
bangchoy says
wow.. that all are great design…
i believe that must be expensive one…. :)
until today i still believe that great design must be follow with high price… right??
btw, that great article guys… i like it..
thanks
Crissa says
Sherry,
Do i have to take down my cabinets in order to prime and paint? Or can I leave them up and just paint them like that??? Thanks!
YoungHouseLove says
Just leave them right in place. Removing the doors and drawers should do it. Here’s a step by step tutorial for you: https://www.younghouselove.com/2008/11/how-to-paint-your-kitchen-cabinets/
xo,
s
Cate says
@Jen: Did they test the stuff for asbestos first? I don’t know when your home was built, but asbestos was sometimes used in the “popcorn” before 1978. That’s the thing that stops me from just getting out the spray bottle and the scraper! If I test it and it’s negative, I’ll have at it, but if it’s positive? Hmmm… not sure I want to open that can of worms.
@Kathy: that IS a dream come true! Like Whitney, I’m interested in a cost per sq. foot.
Michelle says
I’m due at the end of April and this task of finding the perfect crib has been daunting.I have gotten close to choosing one but all the ones that i love and want are way way over our budget. I can’t believe that you found one so beautiful for under $300. That has been our goal and it’s modern and sleek. Thank you for actually helping me in finding my dream crib. You’ll are amazing!!!! :)
Michelle says
Oops this was suppose to go in your baby crib post.
Chelsea says
Oh my goodness, what an amazing transformation! I just keep scrolling back and forth between the before and after – very inspiring.
Chelsea
Stacy says
What was wrong with the bright green? LOL! Love the new kitchen! It inspires me to work on my house!
Genie says
Cate-
Popcorn ceilings are not difficult to remove IF the ceiling has not been sealed with paint. Tape plastic sheets all over the room and walls, spray the ceiling with warm water then scrape! I used a drywall scraper and attached a broom handle on it. Be careful not to cut into the ceiling during the process. It took a few hours, but it was dyi. I then hired someone to texture the ceiling. It was actually kinda fun watching all that ugly popcorn drop onto the floor!
Melissa says
what color paint did she use? it looks like a grey-green- love it!
YoungHouseLove says
Hey Melissa,
We believe Jen dropped in with that info so feel free to scroll back through the comments to find out more (or follow the link in the post over to her blog for more details there). Hope it helps!
xo,
s