Jen’s desk makeover had us doing a double take. At first we didn’t believe it was the same piece! Here’s her letter:
I love your blog and get so much inspiration from it. I saw you recently featured a beautifully made-over dresser so I thought I’d send you my made-over desk. Who doesn’t love a before and after, right? I used primer and then just regular satin paint (for walls) from my local DIY store (called B&Q – I’m in England) in Antique White. Hope you enjoy the makeover as much as I do! You can check out more pics and details on my blog. Cheers! -Jen
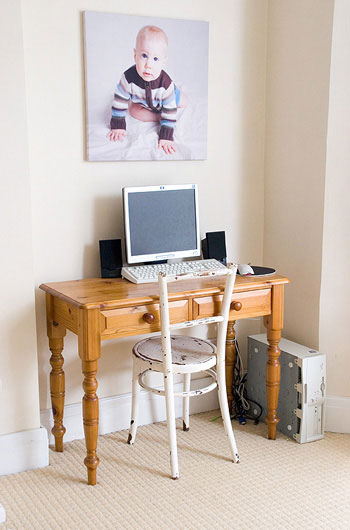
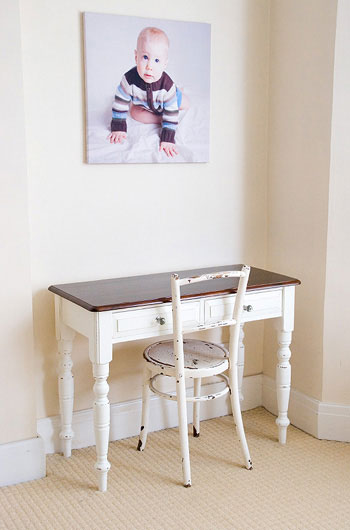
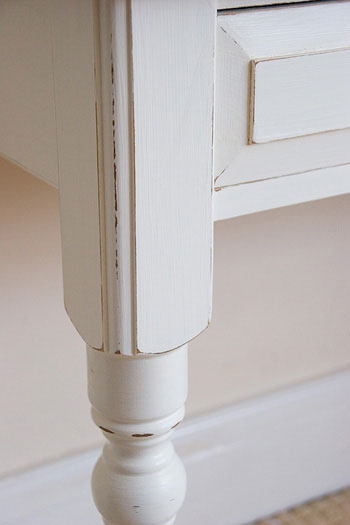
Jen’s lovely furniture fix-up proves that paint, sandpaper, stain, and new hardware can add up to a charmingly distressed piece that looks timeworn and lovely yet oh so current (thanks to the gleaming hardware and the rich stained top). Thanks so much for sending the pictures our way Jen! What do you guys think? Doesn’t this make you wanna whip out your paint brushes? Hooray for DIY furniture makeovers.

Katie says
YAY Jen! I love this makeover with all my heart :) Jen is such a sweet sweethearty sweetheart…glad to see her furniture makeover again!
City Chic - Jamie says
Love it! The dark stain goes well with the white, I am feeling like I should plan a weekend painting project. Thanks for the inspiration!
Catherine says
Amazing! I am actually getting ready to do the same thing to an old dresser. What kind of sanding technique did you use the get the “distressed” look? When you stained over it, did you stain the entire desk or just the areas that you sanded away?
(And how does veneer play into sanding?)
Thanks! Amazing work!
Emma says
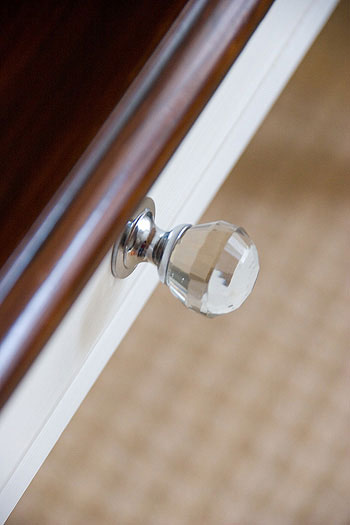
Love the new knobs!I just bought a curtain rod that has clear little balls exactly like that on the ends. Gives it such a funky/chic vibe.
Meredith says
That desk is really gorgeous. Looks like something you’d pay hundreds of dollars for at a chic furniture store!
While we’re talking about painting again, do you think I can get away with painting my faded plastic shutters? I was a bit dismayed to discover that they’re molded plastic and not wood, and they’re really faded maroon right now (would look nice if it wasn’t so faded), but I want to paint them dark grey. Do you think something like that spray primer you used would work? Or will outdoor paint just stick on its own?
In other news, I actually finally posted some before and during pictures, even though nothing’s nearly finished yet. It’s coming along…slowly…..
YoungHouseLove says
Hey Meredith,
We’ve heard that plastic shutters are not meant to be painted, but you probably have a fighting chance with some high quality oil-based spray primer and some great exterior paint (applied super thinly, either sprayed on or with a brush). It’s not necessarily a refinishing project that will last for decades, but it can tide you over until you have the moolah to replace them with wood ones. Hope it helps!
And great job with your before and during pics- can’t wait for the afters…
xo,
s
Jillian says
I love that desk! What a difference a coat of paint can make.
Kerry says
Awesome job! For you guys that have any pieces in need of a make over, I thought this was cool:
http://www.minwax.com/makeovercontest
Minwax will restore your furnature and fly you to the set of This Old House.
Pretty cool…
trish says
Just looking at your portfolio. Was wondering if you knew where Janis found that lovely painting above her fireplace?
Thanks,
Trish
YoungHouseLove says
Hey Trish,
Here’s the post all about Janis’ makeover. I believe she (or someone else) mentions where that painting is from in the comments:
https://www.younghouselove.com/2009/02/janis-design-dilemma-solved/
Hope it helps!
xo,
s
Sara says
Amazing! Does not look like the same piece! Really thinking about how that look would translate to our 55 year old knotty pine kitchen cabinets. hmmmm….
Meredith says
omg, I can’t wait for the after pics either, because that will mean I can stop feeling guilty every night that I don’t work on painting the trim etc.
I’ve had negative feedback from other people too about painting the plastic shutters…but new ones are so expensive, so I think I’ll go to the Sherwin Williams and get some advice from them, and then probably try it in hopes it will last for a year or two. The house has a big overhang in front, so they should get less harsh weather wear-and-tear than usual…since they’re on the north side of the house, it must have taken them years to get that faded! Maybe I’ll paint a patch on the back of one and see what I think…
JenM says
Thanks for featuring my desk – how exciting! To answer Catherine’s questions, I didn’t use any special technique for sanding – just went at it with a piece of sandpaper until the wood showed through. I just stained the top, once I’d painted the bottom. I was surprised at how dark and “not-orange” the wood looked when I sanded the legs and the wood showed through. No staining of those parts needed. I’d have a go at sanding painted veneer so long as you don’t go overboard and sand the veneer away.
Thanks again for showcasing my little desk :o)
YoungHouseLove says
Hey JenM,
Thanks so much for sending it our way! We’re so glad everyone else is digging your desk makeover as much as we are. In fact, today we picked up a piece of furniture to refinish because your makeover is so inspiring! Stay tuned…
xo,
s
Jenn D says
That looks awesome! I am thinking of doing this same exact thing to my kitchen table. Does anyone how to make the same effect on legs of a table that are already white? So there isn’t any color to sand too?
Baba says
Because hubby and I restored antique furniture for so many years it’s sometimes hard for me to look at a painted piece and say Yes! But this one does it for me. Fabulous makeover!
Sara says
To answer the question about painting shutters, I used Rustoleum spray paint to paint my vinyl shutters. That stuff sticks to everything. Ours were faded green and now they are a rich black. Here’s the before and after from my blog: http://delightfuldwelling.wordpress.com/2009/06/16/mission-accomplished/
It took 3 cans of paint to do 4 shutters. I used the universal Rustoleum. It’s new and it said it does work on vinyl.
Jen says
The hardware is my fave!
mary says
That is simply beautiful. I’m inspired!
yansy says
What an amazing transformation. I love the color and the knob is to die for.
SoBella Creations says
Wow what a great transformation!
Emily says
Just curious if you might know that type/color of stain used on the desk’s top?
Sophie says
I LOVE this desk makeover!
I’m from England too, and B&Q is seriously one of my favourite places in the world.
I’m so sad, I could just stand in the paint aisle and stare at all the colours, thinking about where I’d put them and what furniture would go with it… :|